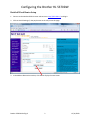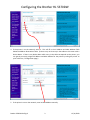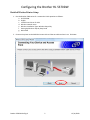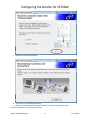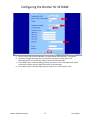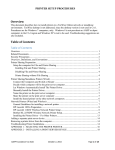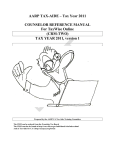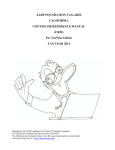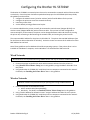
1
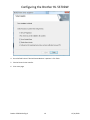
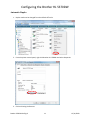
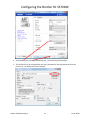
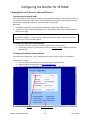
Configuring the Brother HL 5370DW The Brother HL 5370DW is a network printer that can be connected to a network with an Ethernet cable or wirelessly. Once the printer has been unpacked and setup per the HL‐5370DW Quick Setup Guide, this guideline can be used to: 1. configure the network router [wired or wireless] with a fixed IP address for the printer 2. configure the printer to access the network wirelessly 3. install the printer driver 4. set the default printing preference to Duplex It is recommended that the printer normally be connected to a wired router [Netgear RP‐614] or a wireless router [Netgear WGR‐614] with an Ethernet cable. If the printer has been configured to connect wirelessly to the network, the printer can be changed between cable and wireless by turning the printer off, connecting or disconnecting the network cable, and turning the printer back on. The recommended IP address for the printer is 192.168.1.53. The printer has two MAC addresses [one for the Ethernet cable and another for wireless]. A wireless router can reserve this IP address for either MAC address but not both. Note: These guidelines are for Windows XP and Vista operating systems. If the printer driver is to be installed on a Windows‐7 computer, use the Windows‐7 CD instead of the 5300 series CD. Wired Networks
Wired networks are required when using TaxWise Online and may be used for TaxWise Desktop.
1. Connect the printer to the RP‐614 router with a network cable and turn the printer on. 2. Using Detailed Wired Router Setup, later in this guideline, assign IP address 192.168.1.53 to this printer. 3. Using the Brother HL 5370DW CD, install the printer on computers connected to the network. For details, see Installing the Printer Driver later in this guideline. Wireless Networks
Wireless networks are permitted only for printing when using TaxWise Desktop. 1. Connect the printer to the WGR‐614 router a. with a network cable (Recommended) b. Wirelessly. For details, see Detailed Wireless Printer Setup later in this guideline 2. Using “Fixed IP Address for Network Printers” assign IP address 192.168.1.53 to this printer. 3. Using the Brother HL 5370DW CD, install the printer on computers connected to the network. For details, see Installing the Printer Driver later in this guideline. Brother 5370DW Config v2 1 12/11/2009 Configuring the Brother HL 5370DW Detailed Wired Router Setup
1. Connect to the NetGear RP‐614 router web server at http://192.168.1.1/ and log in. 2. Click on LAN IP Settings (in the purple area on the left) to see this page: 3. In the Address Reservation section, click Add to display the next screen. Brother 5370DW Config v2 2 12/11/2009 Configuring the Brother HL 5370DW 4. If the printer is on the network, select it. This will fill in the IP Address and MAC Address fields below the Address Reservation Table. (Printers may not show up in the table on this screen with a Device Name. If there is any doubt about which entry in the table corresponds to the printer, you can get the currently assigned IP Address and MAC Address for the printer by asking the printer to print a Self Test / Configuration page.) 5. If the printer is not on the network, enter its MAC Address manually. Brother 5370DW Config v2 3 12/11/2009 Configuring the Brother HL 5370DW Enter the IP address: Brother 5370DW: 192.168.1.53 Enter the printer type in Device Name Click when complete 6. Enter the desired IP Address manually. Enter the printer type in Device Name, then click Add. 7. Click the Apply button to save the updated Address Reservation table in the Router memory. (The router will need about 30 seconds to re‐initialize itself.) 8. Logout of the router. Brother 5370DW Config v2 4 12/11/2009 Configuring the Brother HL 5370DW Detailed Wireless Printer Setup
1. Run the Brother 5300 series CD. Answer the initial questions as follows: a. HL‐5370 DW b. English c. Install Printer Driver for USA d. Wireless network users e. Wireless Installation Type: Wireless Setup Only f. Setting Up Wireless: Step by Step install g. With cable 2. Connect the printer to the WGR‐614 router with an Ethernet cable and turn it on. Click Next. Brother 5370DW Config v2 5 12/11/2009 Configuring the Brother HL 5370DW 3. The wireless search utility should find the printer. Click Next.
4. The wireless network search will not find networks not broadcasting the SSID. Click Add. Brother 5370DW Config v2 6 12/11/2009 Configuring the Brother HL 5370DW 5. Then complete the following screens with SSID, Authentication Method, Encryption Mode and Network key (Passphrase).
6. Click Next and be patient while the wireless link is established. A Network Configuration page will print. Brother 5370DW Config v2 7 12/11/2009 Configuring the Brother HL 5370DW 7. Indicate the result and click Next.
8. The printer is now operating wirelessly.
9. Refer to “Fixed IP Address for Network Printers” to configure the wireless router.
Once the IP address is set, install printer drivers.
Brother 5370DW Config v2 8 12/11/2009 Configuring the Brother HL 5370DW Installing the Printer Driver
1. Run a driver appropriate for the operating system. Answer the initial questions as follows: a. HL‐5370 DW b. English c. Install Printer Driver for USA a. Network cable users or Wireless Network users i. Wireless Installation Type: Driver Install Only d. License Agreement: Yes e. Brother Peer‐to‐Peer Network Printer 2. When the Select Printer screen appears, click Specify your machine by address [Advanced Users] 3. Enter IP Address assigned by the router: 192.168.1.53, then click Next. Several windows may appear while the driver is being installed. Brother 5370DW Config v2 9 12/11/2009 Configuring the Brother HL 5370DW 4. Set as Default Printer if desired. Status Monitor is optional. Click Finish. 5. Exit the Printer Driver Installer. 6. Print a test page. Brother 5370DW Config v2 10 12/11/2009 Configuring the Brother HL 5370DW Automatic Duplex
1. Duplex mode can be changed from the default Off to On. 2. From the printer control panel, right click Brother HL‐5370DW and select Properties 3. Click on Printing Preferences Brother 5370DW Config v2 11 12/11/2009 Configuring the Brother HL 5370DW 4. Select Duplex, then click Apply followed by OK. This makes Duplex the default. 5. This preference can be changed when printing a document by selecting Properties from the Print menu. The default will not be changed. Brother 5370DW Config v2 12 12/11/2009 Configuring the Brother HL 5370DW Printer Resets 1.
2.
3.
4.
5.
Turn the printer off Make sure the front cover is closed Press and hold Go and turn the printer on When all LEDs light up and the Status LED turns off, release Go Press Go a. six times to reset all network settings b. eight times to reset all except network settings c. ten times to reset all factory settings Accessing the printer’s web server 1. Access the printer web server at http://192.168.1.53/ 2. Click on Printer Settings and use the default ‘user’ login and ‘access’ password 3. The Administrator default ‘admin’ login and ‘access’ password can access Printer Settings as well as Administrator Settings, Reset & Test and Network Configuration. Brother 5370DW Config v2 13 12/11/2009 Configuring the Brother HL 5370DW Changing between Ethernet Cable and Wireless
To determine the network mode
View status lights on back of printer. Steady green light below USB port means wireless is active. If the Ethernet connection is active, with a cable connected the green light on the Ethernet port will be on and the orange light will be on if the connection is high speed. Otherwise: 1. Press Go for 10 seconds. Release when the Network Configuration begins to print. 2. <Node Type> will be IEEE 802.22b/g (Active) if in the wireless mode, Ethernet 10/100Base‐TX (Active) if on cable Note: When changing the printer network mode between wired and wireless, the printer MAC address changes. To use the router’s Address Reservation feature, ensure the reserved IP address is for the correct MAC address. To change from Wireless to Network Cable 1. Turn the printer off, connect the network cable and turn the printer on. 2. If the printer remains in wireless mode, restore all factory settings to default [see Printer Resets above] To change from Network Cable to Wireless Set the wireless configuration. See “Detailed Wireless Printer Setup” earlier in this guideline. An alternative method: 1. Turn the printer on and connect to the network with a network cable 2. Log on to the printer web server at http://192.168.1.53/ 3. Click on Network Configuration and use the default ‘admin’ login and ‘access’ password 4. Click on the Wireless tab then on Configure Wireless Brother 5370DW Config v2 14 12/11/2009 Configuring the Brother HL 5370DW 5. Enter the SSID, Authentication Method, Encryption Mode and Passphrase. Click Submit. 6. A Network Configuration page will print which will indicate the <Node Type>: IEEE 802.22b/g (Active) if in the wireless mode, (Inactive) for Ethernet cable 7. If the <Node Type> is IEEE 802.22b/g (Inactive), the printer is still in the cable mode. Reset the network settings to factory default and start the process again. 8. If the <Node Type> is IEEE 802.22b/g (Active), the printer is in the wireless mode Brother 5370DW Config v2 15 12/11/2009