1
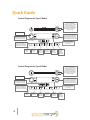
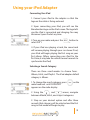
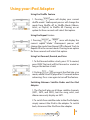
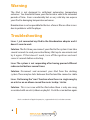
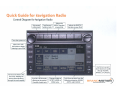
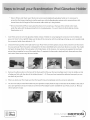
Ford / Lincoln / Mercury
Direct Connect
iPod Adapter
User Guide
Manual Contents
Control Diagram
Using Your iPod Adapter
3
Connecting Your iPod
3
Selecting a Search Mode
4
Navigating Through Albums, Artists,
and Playlists
4
Browsing Tracks
4
Seeing the Full Artist/Album/Song
Name
4
Changing What’s Displayed
5
Using the Shuffle Feature
5
Using the Repeat Feature
5
Using Fast Forward, Rewind, and Scan
5
Switching between iPod and Satellite
Radio
Troubleshooting
Warranty
Installation Instructions
1
Quick Guide
Control Diagram for Type A Radio
In CATEGORY mode, allows
you to select from the
following categories: ALBUM,
ARTIST, and PLAYLIST.
In normal mode, will advance
to the next ALBUM, ARTIST, or
PLAYLIST. Press and hold to
advance quickly.
Turns the system on.
Selecting CATEGORY allows
you to rotate through ARTIST,
ALBUM, and PLAYLIST with
the up and down arrows. Also
controls regular radio functions.
Puts iPod in SCAN mode,
allowing you to preview
10 seconds of each track.
Select SAT1 with this
button to begin listening
to your iPod.
Advances the iPod to the
next track. Holding the
button down advances
through the tracks rapidly.
Fast-reverses
within a
track.
Fast-reverses
within a
track.
Selects the
REPEAT
function on
your iPod.
Scrolls text
across the
display.
Selects the
SHUFFLE
function on
your iPod.
Changes
display to
ARTIST,
ALBUM, or
SONG name.
In CATEGORY mode, allows
you to select from the
following categories: ALBUM,
ARTIST, and PLAYLIST.
In normal mode, will advance
to the next ALBUM, ARTIST, or
PLAYLIST. Press and hold to
advance quickly.
Control Diagram for Type B Radio
Turns the system on.
Selecting CATEGORY allows
you to rotate through ARTIST,
ALBUM, and PLAYLIST with
the up and down arrows. Also
controls regular radio functions.
Puts iPod in SCAN mode,
allowing you to preview
10 seconds of each track.
Advances the iPod to the
next track. Holding the
button down advances
through the tracks rapidly.
Fast-reverses
within a
track.
2
Select SAT1 with this
button to begin listening
to your iPod.
COMPRESS
Fast-reverses
within a
track.
Selects the
REPEAT
function on
your iPod.
Scrolls text
across the
display.
Selects the
SHUFFLE
function on
your iPod.
Changes
display to
ARTIST,
ALBUM, or
SONG name.
Using your
UsingiPod
yourAdapter
iPod Adapter
Connecting Your iPod
1. Connect your iPod to the adapter so that the
logo on the cable is facing outward.
2. Upon connecting your iPod, you will see the
Brandmotion logo on the iPod screen. The logo tells
you the iPod is connected and charging. You may
disconnect your iPod at any time.
3. Turn on your radio and press the
select SAT1.
button to
4. If your iPod was playing a track, the same track
will resume playing through your car stereo. If not,
your iPod will begin playing the first song on your
first album. (When connecting your iPod for the
first time, it may take the vehicle several seconds to
synchronize the iPod)
Selecting a Search Category
There are three search modes to choose from:
Album, Artist, and Playlist. The iPod adapter default
category is Album.
1. To change the search category, press
radio head unit until CATEGORY
appears on the radio display.
on the
2. Using the UP and OWN arrows, navigate
between Album, Artist, and Playlist categories.
3. Stop on your desired option and after three
seconds that category will be selected and the first
song in that mode will begin to play.
3
Using your iPod Adapter
Navigating Through Albums, Artists, and Playlists.
1. Select your desired search mode. (See “Selecting
a Search Mode”)
2. Navigate through selections in that category
using the UPPPP and DOWN keys.
Browsing Tracks
1. Pressing SEEEK or SEEEK once will advance the
iPod one track up or one track down.
2. Press and hold SEEEK or SEEEK to navigate
through tracks more quickly.
Seeing the Full Artist/Album/Song Name
The radio display is limited to 12 characters, but
artist, album or song names longer than 12 characters will scroll across the display once. You can
scroll through the title again by pressing COMP on
a type A radio or FeFFF on a Type B Radio.
Changing What’s Displayed
The display will by default show the track name. To
change what information is displayed, press TeEXT
on a Type A or TEEE on a Type B Radio to rotate
through artist, album, or track.
4
Using your iPod Adapter
Using the Shuffle Feature
1. Pressing UFFL once will display your current
shuffle mode. Subsequent presses will change the
mode from Shuffle off to Shuffle Mode (Album,
Artist, or Playlist) to Shuffle All. Pausing on an
option for three seconds will select that option.
Using the Repeat Feature
1. Pressing REPEAT or RPT
once will display the
current repeat mode. Subsequent presses will
change the mode from Repeat Off to Repeat Track to
Repeat All in the current mode. Pausing on an option
for three seconds will select that option.
Using Fast Forward, Rewind, and Scan
1. To fast forward within a track, press FF. To rewind,
press REW. The track will fast forward or rewind as
long as the button is held.
2. Pushing SCA or SCA once puts the iPod into scan
mode, where a track is played for 10 seconds before
advancing. Press scan again to turn off the feature.
Switching Between Satellite Radio and the iPod
Adapter
1. The iPod will play on all three satellite channels
(SAT1, SAT2, and SAT3), but the song, artist, and
album name only display on SAT1.
2. To switch from satellite radio to the iPod Adapter,
simply connect the iPod to the adapter. To switch
back, disconnect the iPod from the adapter.
5
Warning
The iPod is not designed to withstand automotive temperature
extremes. You should not leave your iPod inside a vehicle for extended
periods of time. Even a moderately hot or very cold day can expose
your iPod to damaging temperature extremes.
Brandmotion is not responsible for the loss of music files or other issues
due to problems with the player.
Troubleshooting
Issue: I just connected my iPod to the Brandmotion adapter and it
doesn’t seem to work.
Solution: The first time you connect your iPod to the system it can take
several seconds to read your entire library. Wait up to one minute and
try it again. If that doesn’t work, turn off the ignition and wait
several seconds before restarting.
Issue: The system is not responding after having pressed different
radio control buttons several times.
Solution: Disconnect and reconnect your iPod from the docking
system. There may be static between the iPod and the connector cable.
Issue: Performing the “scan” function when there is a single song by
an artist or on an album caused the music to skip / stutter.
Solution: This is an issue with the iPod when there is only one song
associated with an artist, album or playlist. Push the scan button again.
iPod is a trademark of Apple Computer, Inc., registered in the U.S. and other countries.
6
Brandmotion Limited Warranty
Brandmotion LLC (“Brandmotion”) warrants its iPod Direct Connect Adapter System (“Product”)
against defects in material and workmanship under normal use and services for a period of 3
years or 36,000 miles if zero mileage at dealer with a certified installer. Post sale installation by
certified installer 12 months or 12,000 miles. Individual or non certified installation is 12
months from date of sale.
Brandmotion, at its option, will either repair, exchange or replace the Product during the
warranty period provided it is returned in accordance with the terms of this warranty. All
replaced parts or Product shall become the property of Brandmotion. Any repairs not covered
by this warranty will be charged at the cost of replaced parts plus the Brandmotion hourly labor
rate at that time.
This express limited warranty is extended by Brandmotion to the original end-user purchaser
only and is not assignable or transferable to any other party. All claims for damaged Products
must be made within fifteen (15) days from the date of occurrence resulting in the damage and
must be accompanied by the receipt for the damaged Product. This is the complete warranty
for Products manufactured by Brandmotion. [Brandmotion does not warrant for the installation, maintenance, or service of the Product.]
All costs of shipping the Product to Brandmotion for inspection and all risk of loss during transit
shall be borne solely by the original purchaser.
This warranty applies within the fifty (50) United States and the District of Columbia, and
Canada.
This warranty does not cover (a) defects or damage resulting from use of the Product in other
than its normal and customary manner; (b) defects or damage from misuse, accident or neglect;
(c) defects or damage from improper testing, operation, maintenance, installation, alteration,
modification or adjustment; (d) Product disassembled or repaired in such a manner as to
adversely affect performance or prevent adequate inspection and testing to verify any warranty
claim; (e) Product which has had the serial number removed or made illegible; (f ) freight costs
to repair location.
For your convenience, Brandmotion has established a telephone number for frequently asked
questions.
To locate an authorized service center or dealer nearest you, or for service assistance or resolution of a service problem, or for product information, please call:
1-877-276-6456
or contact us through www.brandmotion.com
7
Installation Instructions
Complete instructions to guide you through
the process of installing the Direct Connect
iPod Adapter in your Ford / Lincoln / Mercury
vehicle are available from our website:
http://www.brandmotion.com/ipod
or by calling Brandmotion Customer Support
at - 877-276-6456.
Most Ford / Lincoln / Mercury vehicles can be
equipped with the Brandmotion Direct
Connect iPod Adapter. However, a 2004 or
later, satellite-ready Ford factory radio is
required. New models introduced since 2004
should be compatible.
Edge
Expedition
Explorer
F-150
Five Hundred
Focus
Freestyle
Fusion
Mustang
Sport Trac
Super Duty
Check our website for the most up to date
compatibility list.
Note: Installing the adapter and wire harness
can be difficult for certain applications. Most
consumers will prefer to have an experienced
professional mechanic, dealer or 3rd party
aftermarket installer perform the installation
for them.
8
5000-IPOM01
Copyright 2007 Brandmotion, LLC.
Printed in China
Quick Guide for Navigation Radio
Control Diagram for Navigation Radio
Turns the system on.
Select SATl with
this button to begin
listenin to your iPod
Use the tune up and
down buttons to scroll
through ALBUMS,
ARTISTS, or PLAYLISTS.
Advances the iPod to the
next track. Holding the
button down advances
through the tracks rapidly.
Puts iPod in SCAN mode,
allowing you to preview
10 seconds of each track.
Changes display to
ARTIST, ALBUM, or
SONG name.
Push Genre to select from the
following categories: ALBUM,
ARTIST, and PLAYLIST.
BRANDMOTIONl
connected Ilfo-
./
Steps to Install your Brandmotion iPod Glovebox Holder
* Note to iPhone and iTouch users: We do not recommend installing the glovebox holder as it is necessary to
access the iPod screen interface to confirm each sync with the Brandmotion system and to answer phone calls.
Instead, leave the full length of iPod connector cable coiled up in the glovebox.
**We recommend that iPhone users place the phone in the small tray at the base of the vehicle center stack,
under the radio, with the plug coming from the closed glovebox. (You won't harm the iPod cable by closing
the glovebox on it.)
1.
Insert iPod connector wire into glovebox holder at base of holder. Do so by tipping the connector into the holder and
press it to "click" in for a tight fit. Make sure the face of the connector with the small logo is facing up, and is seated inside
the connector holder frame (photos A + B).
Choose the foam pad that is the right size for your iPod. There are three options and you'll only need the one that works
2.
for your particular iPod. One option is designed for the Nano (identified by the extra foam block to one side). The smaller
half pad is for larger iPods. The last option is for Video Nanos. In this instance, it is necessary to separate the two foam
pieces that are together for use of the regular Nano. To separate the foam pads, simply pull each foam pad away from
each other. Please remove any left-over residue.
c
A
3.
D
Remove the adhesive liner on the back of the foam pad that fits your iPod, and carefully insert it into the holdler so that
all edges are flush with the sides of the holder (photos C + D). Once you have inserted the adhesive foam pad, you can
test the fit of your iPod.
4.
5.
When you dock your iPod, make sure that iPod seats firmly and completely onto the connector (photo E).
You are now ready to install the holder into your glovebox. Simply hook the clips on the back of the holder to the side of
your open glovebox and you're ready to use the best iPod adapter system available for your Ford, Lincoln, or Mercury
vehicle (photo F). Enjoy!
E
[Ej]
Made for
~
iPod
F