1
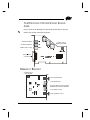
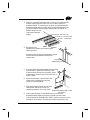
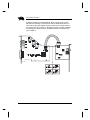
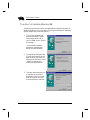
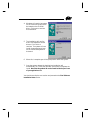
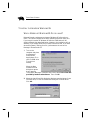
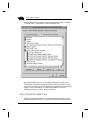
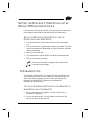
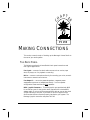
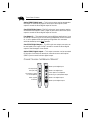
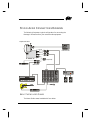
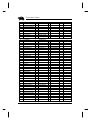
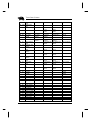
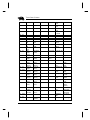
1
Turtle Beach
Montego II
Home Studio
2
TURTLE BEACH SYSTEMS
This documentation and the accompanying software are copyright © 1999
by Voyetra Turtle Beach, Inc. All rights reserved. No part of this publication may be reproduced in any form or for any purpose without prior
written authorization from Voyetra Turtle Beach, Inc.
Turtle Beach Systems, the Turtle Beach logo, Montego II Home Studio,
AudioStation, AudioView, MIDI Orchestrator, Digital Orchestrator Pro,
Voyetra, the Voyetra logo and the phrase “Multimedia Sound Specialists”
are all trademarks or registered trademarks of Voyetra Turtle Beach, Inc.
Microsoft and Windows are registered trademarks of Microsoft Corporation. DirectX is a trademark of Microsoft Corporation. Adobe and Acrobat
are registered trademarks of Adobe Systems Incorporated. Pentium is a
registered trademark of Intel Corporation.
All other trademarks are the properties of their respective companies and
are hereby acknowledged.
Use of this software is subject to the terms and conditions of the Voyetra
End-User Software License Agreement.
Voyetra Turtle Beach, Inc.
5 Odell Plaza
Yonkers, NY 10701-1406 USA
Sales and Information ............800-233-9377 (inside USA)
............914-966-0600 (outside USA)
Sales [email protected]
Information [email protected]
Fax ............914-966-1102
Website ............http://www.tbeach.com
Technical Support
Phone ............914-966-2150
Fax ............914-966-1093
Email [email protected]
3
TABLE OF CONTENTS
TABLE OF CONTENTS
3
WELCOME…
5
REMEMBER TO REGISTER!
OUR WEBSITE
6
6
THE MONTEGO II HOME STUDIO
7
RESOURCE USAGE
SYSTEM REQUIREMENTS
SIGNAL FLOW DIAGRAM
8
8
10
INSTALLING THE MONTEGO II HOME STUDIO
11
OVERVIEW OF THE STEPS
REMOVING THE OLD BOARD
INSTALLING THE BOARD
11
12
12
WINDOWS 95 & 98 INSTALLATION
17
BEFORE YOU INSTALL THE DRIVERS, NOTE…
17
SETTING THE MONTEGO II HOME STUDIO AS THE DEFAULT AUDIO AND MIDI
DEVICE
23
TESTING AND TROUBLESHOOTING
23
UNINSTALLING THE MONTEGO II HOME STUDIO
24
WINDOWS NT 4.0 INSTALL
27
BEFORE YOU INSTALL THE DRIVERS, NOTE …
27
INSTALLING THE MONTEGO II HOME STUDIO APPLICATIONS AND DRIVERS IN
WINDOWS NT 4.0
28
SETTING THE MONTEGO II HOME STUDIO AS THE DEFAULT MIDI AND AUDIO
DEVICE
29
TROUBLESHOOTING
29
UNINSTALLING THE MONTEGO II HOME STUDIO
30
MAKING CONNECTIONS
31
THE BACK PANEL
STUDIO AUDIO CONNECTIONS OVERVIEW
31
33
4
TURTLE BEACH SYSTEMS
USING THE MONTEGO II HOME STUDIO
37
GET STARTED WITH THE DIGITAL ORCHESTRATOR PRO VIDEO TUTORIALS
ABOUT THE HARDWARE
USING THE DLS INSTRUMENT DOWNLOAD FEATURE
CANCUN FX WAVETABLE DAUGHTER BOARD
WORKING WITH REAL-TIME EFFECTS
GRAPHIC EQ
S/PDIF DIGITAL I/O
INCLUDED SOFTWARE:
41
42
43
44
44
45
45
46
THE TBS MONTEGO II HOME STUDIO CONTROL PANEL
50
WINDOWS 95/98 TBS MONTEGO II HOME STUDIO CONTROL PANEL
WINDOWS NT TBS MONTEGO II HOME STUDIO CONTROL PANEL
51
54
TECHNICAL SUPPORT
56
CANCUN WAVETABLE SYNTHESIZER
58
INSTRUMENTS AND VARIATIONS
58
DRUM SET TABLE PART 1 (MIDI CHANNEL 10)
DRUM SET TABLE PART 2 (MIDI CHANNEL 10)
DRUM SET TABLE PART 3 (MIDI CHANNEL 10)
61
63
66
WARRANTY AND LICENSING INFORMATION
69
HARDWARE WARRANTY
VOYETRA END-USER LICENSE AGREEMENT
FCC DECLARATION OF CONFORMITY
DECLARATION OF CONFORMITY (EMC)
69
70
73
74
INDEX
75
PTE
A
H
R
C
5
ONE
WELCOME…
The Montego II Home Studio transforms your PC into a desktop digital
recording studio. It seamlessly integrates Voyetra’s award-winning
MIDI/digital audio sequencer, Digital Orchestrator Pro™ with a powerful
Montego II™ sound card. Built in enhancements such as 18 bit digital
audio recording, an S/PDIF digital I/O interface, a 64 voice Roland GS
compliant synthesizer, a 64 voice DLS compatible sampler, an external
MIDI interface, built in effects and more provide all the composing power
you need for professional grade recordings.
Record and edit both MIDI and digital audio tracks side by side in one
intuitive and easy to use environment. Built-in multi-track digital
recording lets you record vocals, guitars and other acoustic instruments
along side of your MIDI tracks. Add digital FX like reverb, delay, chorus,
flange, pitch shift and more. Create a lossless digital mixdown to DAT via
the S/PDIF digital interface.
Digital recording, digital synthesis, digital effects, digital mixdown… it all
adds up to a transparent, crystal clear recording. All in a single integrated
easy to use environment.
From the company that pioneered pro audio hardware for the PC
platform...Turtle Beach!
6
TURTLE BEACH SYSTEMS
REMEMBER TO REGISTER!
You can register by mail, fax, phone or on the Web — whichever is easiest
for you. Refer to the front of this manual or the Registration Card for
these addresses.
There are many benefits to registering your Montego II Home Studio. In
addition to the warranty, you also will receive:
Update Notifications — to keep you informed of software updates and
new Voyetra/Turtle Beach products.
Upgrade Plan — to provide you with discounts on our full-featured PC
sound products.
Technical Support — You must be a registered user to receive full
Technical Support. To help you install your soundcard and software,
prior to Registration, you will need your product ID. This number is
located on the CD cover of your software.
OUR WEBSITE
Be sure to visit the Turtle Beach website for the latest information on new
products, upgrades, technical support FAQ’s and to obtain the most recent
drivers. You will find us at www.tbeach.com.
Click the Turtle Beach website icon, in the TBS Montego II
Home Studio program group, for direct access to our website.
PTE
A
H
R
C
7
TWO
THE MONTEGO II HOME
STUDIO
The Montego has many significant features, including:
>97 dB Signal to Noise Ratio
18 bit audio converters
RCA and Optical Digital I/O
MIDI Synthesizer featuring Roland® GM/GS support
Up to 96 Hardware accelerated DirectSound streams
Full version of Voyetra’s Digital Orchestrator Pro sequencing software
MIDI and Digital Audio Editing Tools Included
10 Band Graphic EQ with Digital Display
128 Hardware Wavetable Voices
256 Software Synth Voices
8
TURTLE BEACH SYSTEMS
RESOURCE USAGE
The Montego II Home Studio, like all plug-in cards, requires certain
computer resources in order to operate. These resources are associated
with specific board functions.
In Windows 95 and 98, the resources are set automatically by the
Configuration Manager, but can be adjusted using the Windows
Device Manager.
In Windows NT, the resources are configured automatically.
THE REQUIRED RESOURCES ARE AS FOLLOWS:
Two IRQs
Several I/O address ranges
Two DMAs
SYSTEM REQUIREMENTS
Computer
Processor
RAM
Hard Drive
Operating System
CD-ROM Drive
IBM PC or compatible with one available PCI
slot and one available space at the back of
the computer chassis to install the breakout
bracket.
Pentium 75 MHz or higher (Pentium
200MMX Recommended)
16 MB (32MB in Windows NT)
approximately 12 MB free space for drivers
and applications;
Windows® 95, 98
Windows® NT 4.0
A CD-ROM drive is needed for the software
and driver installations
High-quality stereo sound system, powered speakers or headphones to
properly hear the Montego II Home Studio’s high-quality audio playback.
9
THE MONTEGO II HOME STUDIO SOUND
CARD
Here is a look at the Montego II Home Studio sound card, to help you
identify the various connectors and ports.
STEREO LINE INPUT
MICROPHONE INPUT
CONNECTOR TO
BREAKOUT BOARD
STEREO LINE OUTPUT
MIDI/JOYSTICK
CONNECTOR
BREAKOUT BRACKET
CONNECTOR TO
MAIN BOARD
OPTICAL S/PDIF INPUT
COAX S/PDIF INPUT
SECOND LINE OUT FOR OPTIONAL
HEADPHONES OR BACK SPEAKERS
COAX S/PDIF OUTPUT
OPTICAL S/PDIF OUTPUT
10
TURTLE BEACH SYSTEMS
SIGNAL FLOW DIAGRAM
PTE
A
H
R
C
11
TWO
INSTALLING THE
MONTEGO II HOME
STUDIO
It is time to install the Montego II Home Studio sound card. This chapter
takes you through the process step-by-step.
OVERVIEW OF THE STEPS
There is a specific sequence of steps that you need to take when installing
the Montego II Home Studio sound card.
12
TURTLE BEACH SYSTEMS
HERE IS AN OVERVIEW OF THE STEPS:
1. Remove old sound card and drivers (optional.)
2. Install the Montego II Home Studio sound card and breakout bracket
in the computer.
3. Attach the audio cable to the CD-ROM drive (optional.)
4. Install the Montego II Home Studio drivers and software.
5. Set the Montego II Home Studio to be the default audio device if
there is another audio device in your system.
PRODUCT ID NUMBER
To install the software, you will need the Product ID
number. This number is located on the CD case that came
with the software.
REMOVING THE OLD BOARD
If you have another sound card in your system that you are replacing with
the Montego II Home Studio, remove that sound card’s drivers from your
system, remove that sound card, then reboot the system to make certain
no errors occur and no old sound card drivers remain. For information on
removing the sound card and its drivers, refer to the appropriate
documentation.
INSTALLING THE BOARD
Here’s how to install the Montego II Home Studio sound card and
breakout bracket in your system.
1. Turn off your PC and any connected peripherals and unplug the
system.
2. Remove the mounting screws from your computer’s cover.
Remove the cover.
13
3. Select an unused PCI expansion slot for the card. It should be near
another empty expansion slot which you’ll need to install the
breakout bracket. The second slot can be of any type because the
breakout bracket doesn’t actually plug into the motherboard. Also,
you should position the Montego II Home Studio card as far as
possible away from the
video card and power
supply!
16-bit ISA slot – DO NOT USE!
8-bit ISA slot – DO NOT USE!
PCI slots – use this type!
YES!
4. Remove the two
selected
expansion slot covers by unscrewing their
securing screws.
Save the screws to secure the Montego II Home
Studio board and breakout bracket to the
chassis later.
Unscrew the
expansion slot covers
5. Align the card’s gold-striped edge connector with
the selected PCI expansion slot socket. With
a gentle back-and-forth rocking motion, press
the Montego II board firmly into the slot until it
snaps in place.
6. Secure the Montego II sound card to the
chassis with the expansion slot cover
screw you removed earlier.
7. Slide the breakout bracket into the other
selected slot and secure it with the
remaining expansion slot cover screw.
Gently press the Montego II card
into the slot
8. Connect the Montego II Home Studio sound card and the
breakout bracket together using the included connector cable.
One end should be attached to the S/PDIF Interface connector on the
Montego II sound board. The other end should be attached to the
14
TURTLE BEACH SYSTEMS
breakout bracket as illustrated below. When connecting the cable
between the Montego II Home Studio and the breakout bracket, be
sure that the pins are aligned correctly and that you’ve matched the
key (notch) with the connector. Misaligning these pins WILL damage
the Montego II Home Studio, the breakout bracket, and potentially
your computer.
15
INSTALLING THE CD-ROM AUDIO CABLE
The Montego II Home Studio comes with an audio connector cable — one
end is keyed (MPC-2), the other is not (Sony). All CD-ROM drives that
adhere to the MPC-2 (Multimedia PC) standard have an MPC-2 jack.
Connect the MPC-2 connector to your CD-ROM drive. Then attach the
Sony connector to the Montego II sound card.
MPC-2 Connector
(keyed)
Left
Ground
Ground
Sony Connector
Left
Ground
Right
Ground
Right
When connecting the CD-ROM audio cable, note that:
The audio cable should be plugged into the CD-ROM drive first; then
the other end of the interface should be plugged into the appropriate
connector on the Montego II Home Studio sound card. Make sure
that you are plugging the audio connector into the 4-pin header
labeled “CD IN.”
On the cable, “white” is “left” and “red” is “right.”
When connecting the cable to the Montego II Home Studio, the red
wire should be on the right (white should be closest to the slot cover.)
NOW YOU ARE READY TO INSTALL THE DRIVERS
Proceed to the chapter that applies to your system for instructions on
installing the drivers:
Windows 95 & 98 Installation
Windows NT 4.0 Installation
16
TURTLE BEACH SYSTEMS
C
17
R
PTE
A
H
THREE
WINDOWS 95 & 98
INSTALLATION
Now that the hardware is installed, it is time to configure the drivers.
The Plug and Play installation process uses your system’s BIOS and the
Plug and Play features of Windows 95 to allocate resources for the
Montego II Home Studio.
BEFORE YOU INSTALL THE DRIVERS, NOTE…
The Montego II Home Studio sound card and breakout bracket must
be installed in your system. If you have not already installed the
sound card in your PC, refer to the previous chapter for instructions.
IMPORTANT On the first boot up after physically installing the
Montego II Home Studio, place the Montego II Home Studio
Applications CD in your CD–ROM drive before Windows completes
boot up.
18
TURTLE BEACH SYSTEMS
TO INSTALL THE DRIVERS IN WINDOWS 98:
The following outlines the driver and applications installation process for
Windows 98 drivers. (If your system is running the Windows 95 operating
system, please skip to the next section.)
1. Turn on the computer and
place the Montego II Home
Studio Applications CD in
your CD-ROM drive if you did
not already.
The Add New Hardware
Wizard will automatically
detect the new hardware.
2. The following dialog box asks
if you’d like to search for the
best driver for your device or
display a list of drivers. Select
“Search for best drivers…”
and click the Next button.
3. The next dialog box asks you
to indicate the location of
the drivers. Click on the CDROM drive option and click
the Next button to continue.
19
4. Windows will search the system
for the correct driver which will
be located on the CD-ROM
drive. Click next to continue
the installation.
5. The installation will confirm
that it has located the correct
drivers. Click Finish to
continue. The system will now
install the appropriate drivers
for the various subsystems of
the board.
6. When this is complete you will be prompted to reboot the system.
7. Once the system reboots the Applications Installation will
automatically run. Follow the onscreen instructions to complete the
install. Note that the product ID can be found inside the jewel case
of your applications CD.
You should now skip the next section and proceed to the Final Software
Installation Notes section.
20
TURTLE BEACH SYSTEMS
TO INSTALL THE DRIVERS IN WINDOWS 95:
WHICH VERSION OF WINDOWS 95 DO YOU HAVE?
Microsoft issued a maintenance release of Windows 95 referred to as
OSR2. This version shipped as the stock operating system on many PCs.
If you have this version of Windows 95 then the installation will be
slightly different than described below. However, the installation will go
smoothly if you simply follow the on screen instructions and, in all cases
where the system is looking for a file, just browse to the root of the
Montego II Home Studio CD.
1. Turn on the
computer and place
the Montego II
Home Studio
Applications CD in
your CD-ROM drive
if you did not
already.
When the New
Hardware Found
dialog box reports
that it sees the
Turtle Beach Montego II Quadzilla sound card, select Driver from disk
provided by hardware manufacturer. Then click OK.
2. When the Install from Disk dialog box displays enter the letter of your
CD-ROM drive, or click on Browse and locate your CD-ROM drive.
Click OK.
21
At this point, the install program will check for Direct X 6 or
later. If Direct X is already on your system the installation will
proceed. If Direct X 6 or later is not installed the setup will
prompt you to install it. Simply browse to the DIRECTX folder
on the CD and follow the on-screen instructions. At the end of
the Direct X install you will be prompted to reboot. Press OK
and continue the installation. At the end of the applications install
you must reboot the system.
3. Windows then copies the
files from the CD. You
may be prompted to
insert your Microsoft
Windows 95 CD or floppies, as the core sound
components of the operating system may need to
be copied as well. These
include the audio codecs,
joystick drivers, the
Mixer and the Sound Recorder program.
The files are located in the WIN95 directory on your Windows 95 CDROM.
If you do not have your Microsoft Windows 95 installation CD or floppies available, you can choose Skip File for each of the Windows 95
Sound Options and install them later from the Windows 95 Control
Panel, although this is not recommended.
4. The drivers are now installed. The Installation will continue to install
the applications. Follow the on-screen instructions to complete the
install. Note that the product ID can be found inside the jewel case
of your applications CD.
5. At the end of the install you should reboot your system.
FINAL SOFTWARE INSTALLATION NOTES
At this point, the drivers should be installed and the Montego II Home
Studio sound card should be functional. After rebooting your system, the
22
TURTLE BEACH SYSTEMS
following devices should appear in the Device Manager: (Start > Settings
> Control Panel > System Icon > Device Manager Tab)
We recommend that you run the SoundCheck diagnostic located in the
TBS Montego II Home Studio program folder to test your system. To test
the system, you need to hook up headphones or speakers to the Montego’s
output. For more information on hooking up speakers, refer to the
“Making Connections” chapter later in this Guide.
ABOUT ONLINE DOCUMENTATION
The MIDI Orchestrator program included provides documentation in the
Adobe Acrobat format (PDF). If you do not have Acrobat installed you can
23
run the installation from the Montego II Home Studio CD Setup Menu.
(Run setup.exe on the CD then select Acrobat Installation.)
SETTING THE MONTEGO II HOME STUDIO AS THE
DEFAULT AUDIO AND MIDI DEVICE
If you have more than one sound card in your system you will need to set
the Montego II Home Studio as the default audio and MIDI device.
SETTING THE MONTEGO II HOME STUDIO TO BE THE
DEFAULT AUDIO AND MIDI DEVICE:
1. In the Windows 95 and 98 Control Panel double-click the Multimedia
icon.
2. Click on the Audio tab. Montego II Digital I/O Playback should be
chosen for Playback and Montego II Digital I/O Record should be
chosen for Recording.
3. Now click on the MIDI tab.
4. The Montego II Digital I/O MPU-401 MIDI should be selected.
5. Click on OK to save any changes.
TESTING AND TROUBLESHOOTING
If the Montego II Home Studio or your system is not working properly,
there is probably a resource conflict in your system. This means that two
or more devices in the system are using the same resources. Resource
conflicts are fairly typical and are a normal part of the PC hardware
installation process. These conflicts can be easily resolved.
There are several possible types of conflicts that users experience when
installing the Montego II Home Studio:
Input/Output Port Address Conflict
Interrupt (IRQ) Conflict
Troubleshooting your system involves checking the current settings for
each of these common conflicts and trying new settings for the resources
that conflict. Note that you may need to try a number of different resource
configurations before all of the peripherals work together in your PC.
24
TURTLE BEACH SYSTEMS
In the rare occasion that your system locks up after installing the board,
you should re-boot the system in safe mode and remove the drivers. (The
process is explained below) Then call Turtle Beach technical support at
914-966-2150 for help in diagnosing the problem.
TO BOOT IN SAFE MODE:
1. Restart the system again.
2. When you see the message “Starting Windows 95...” press the F8
key. If you have Windows 98 press F8 after the first beep.
3. Select Safe Mode from the menu.
SOUNDCHECK®
SoundCheck provides an easy way to find and fix audio problems in your
system. If you experience any problems installing the drivers, we
recommend you run this diagnostic utility to help you diagnose the
problem.
UNINSTALLING THE MONTEGO II HOME STUDIO
Uninstalling the Montego II Home Studio is a two step process. First the
applications must be removed, followed by the drivers. Before
Uninstalling be sure to close the Turtle Beach System Tray Launcher.
TO CLOSE THE TURTLE BEACH SYSTEM TRAY LAUNCHER:
1. Right-click on the Turtle Beach System Tray Launcher icon and
choose Close.
TO UNINSTALL THE APPLICATIONS AND DRIVERS:
1. From the Windows Control Panel double-click the System icon.
2. Click the Device Manager tab.
3. Double-click on Multi-function adapters.
25
4. Select TBS Montego Digital I/O Multifunction PCI Platform and click
Remove. A dialog will display asking confirmation, Click Ok.
5. From the Windows Control Panel double-click the Add/Remove
Programs icon.
6. Select Montego II Home Studio Applications from the list and click
the Add/Remove button..
7. Select Montego II Home Studio Drivers from the list and click the
Add/Remove button.
26
TURTLE BEACH SYSTEMS
C
27
R
H
APTE
FOUR
WINDOWS NT 4.0
INSTALL
BEFORE YOU INSTALL THE DRIVERS, NOTE …
Be sure your BIOS is in non Plug-and-Play mode. For instructions on
changing your BIOS, refer to your motherboard’s manual.
The sound card must be physically installed in your system. If you
have not already installed the sound card in your PC, refer to the
“Installing the Montego II Home Studio” chapter for instructions.
Be sure all other applications have been closed down. This is very
important.
28
TURTLE BEACH SYSTEMS
INSTALLING THE MONTEGO II HOME STUDIO
APPLICATIONS AND DRIVERS IN WINDOWS NT 4.0
To install the Montego II Home Studio in Window NT 4.0, you must install
the drivers first followed by the applications.
TO INSTALL THE MONTEGO II HOME STUDIO DRIVERS:
1. From the Windows NT Control Panel double-click the Multimedia
icon. (Start > Settings > Control Panel > Multimedia icon)
2. Click the Devices tab.
3. Click the Add button.
4. Select unlisted or updated driver. Click OK.
5. A dialog box appears and requests the path of the Montego II Home
Studio drivers to be installed. The drivers are located in the NT
directory of the Montego II Home Studio CD-ROM. Use the Browse
button to navigate to the D:\NT directory (where D: is the CD-ROM
drive letter) Click OK. Click OK on the next dialog also to accept the
path.
6. Select the Turtle Beach Montego II Digital I/O driver in the dialog
box. Click OK.
7. A Turtle Beach splash screen should now appear. Click the OK button.
8. Windows NT will display a dialog box confirming the drivers have
been added to your system. Click “Restart Now” to reboot the
system. After the system reboots, the Montego II Home Studio drivers
should be installed and working correctly.
TO INSTALL THE MONTEGO II HOME STUDIO APPLICATIONS:
To install the applications, run D:\SETUP.EXE (assuming D: is the letter of
you CD-ROM drive.) This will display a menu with different installation
options. Click on the Home Studio Applications Setup item. Follow the
on-screen instructions to install the applications.
29
SETTING THE MONTEGO II HOME STUDIO AS THE
DEFAULT MIDI AND AUDIO DEVICE
If you have more than one sound card in your system you will need to set
the Montego II Home Studio as the default MIDI and audio device.
SETTING THE MONTEGO II HOME STUDIO TO BE THE
DEFAULT AUDIO AND MIDI DEVICE:
1. From the Windows NT Control Panel double-click the Multimedia
icon.
2. Click on the Audio tab. TBS Montego II Digital I/O Playback should be
chosen for Playback and TBS Montego II Digital I/O Record should be
chosen for Recording.
3. Now click on the MIDI tab.
4. The TBS Montego II Digital I/O MPU-401 MIDI should be selected.
5. Click on OK to save any changes.
Note that you may need to be logged in as the Administrator
to make any system changes.
TROUBLESHOOTING
The Montego II Home Studio PCI is assigned an IRQ by the BIOS. If you
are having an IRQ conflict, you will need to go into your BIOS setup to
select which IRQ is assigned to the slot in which you installed your
Montego II Home Studio PCI. Please see your motherboard
manufacturer’s documentation.
TO CHECK THE RESOURCE SETTINGS FOR YOUR MONTEGO II
HOME STUDIO AND OTHER DEVICES:
1. Click on Start, then go to Programs -> Administrative Tools ->
Windows NT Diagnostics.
2. Click on the resources tab. This will display a list of some of the
devices and resources that they use.
30
TURTLE BEACH SYSTEMS
TO DISABLE OR ENABLE A DEVICE:
1. In the Windows NT Control Panel double-click on the Devices icon.
2. From here you can disable or enable individual devices. This can be
helpful when troubleshooting conflicting devices.
For more information regarding devices and resource settings please see
your Windows NT manual.
UNINSTALLING THE MONTEGO II HOME STUDIO
Uninstalling the Montego II Home Studio is a two step process. First the
applications must be removed, and then the drivers. Before Uninstalling
be sure to remove the Turtle Beach System Tray Launcher.
TO CLOSE THE TURTLE BEACH SYSTEM TRAY LAUNCHER:
1. Right-click on the Turtle Beach System Tray
Launcher icon and choose Close
TO UNINSTALL THE APPLICATIONS
1. From the Windows NT Control Panel double-click the Add/Remove
Programs icon.
2. Select TBS Montego II Home Studio Applications from the list and
click the Add/Remove button..
TO UNINSTALL THE DRIVERS
1. From the Windows NT Control Panel double-click the Multimedia
icon.
2. Click the Devices tab.
3. Select the TBS Montego II Digital I/O Audio driver and click the
Remove button.
PTE
A
H
R
C
31
FIVE
MAKING CONNECTIONS
This section covers the topic of hooking up the Montego II Home Studio to
the rest of your audio system.
THE BACK PANEL
The following outlines the Home Studio’s back panel connections and
their typical applications.
Line Input — connects line level audio sources such as a mixer, tape
deck, CD player, etc. for playback or recording.
Mic In— connects a microphone directly for recording your voice, acoustic
instrument or acoustic sound source.
Line Output 1 — connect to powered speakers, a separate power
amp/speaker system or to headphones directly. In a four speaker
configuration these would be the front speakers.
MIDI / Joystick Connector — The MIDI/Joystick port provides both MIDI
I/O as well as a port for the joystick when used with the included MIDI
adapter cable. If you’re not using external MIDI devices you can also hook
a joystick directly to this port. If you want to connect a joystick to the
sound card and drivers must be properly installed on your system. The
Montego’s joystick controller uses ports 201-201.
32
TURTLE BEACH SYSTEMS
Optical S/PDIF Digital Input — This input connector can be connected to
the output of a Minidisc® player or other source with optical S/PDIF
output to record the direct digital output of the unit.
Coax S/PDIF Digital Input —This RCA style coax input connector can be
connected to the output of a DAT player or other source with coax S/PDIF
output to record the direct digital output of the unit.
Line Output 2 — The second output has two different applications. It can
be used as a second line out for connecting headphones or other monitors.
Or, in a four speaker A3D quad gaming configuration this connector
would be hooked up to the back speakers.
Coax S/PDIF Digital Output — This RCA style coax output connector can
be connected to the input of a DAT recorder to record the direct digital
output of the Montego II Home Studio.
Optical S/PDIF Digital Output — This output connector can be connected
to the input of a Minidisc® recorder or some other source with optical
S/PDIF input to record its direct digital output.
CONNECTIONS ON THE BREAKOUT BRACKET
S/PDIF Optical Digital Input
Line Input (blue)
Mic Input (red)
Line Output 1 (green)
For Front Speakers
MIDI / Joystick
Connector
S/PDIF Coax Digital Input
Line Output 2 For Headphone
Monitoring or Quad Speaker Setups
S/PDIF Coax Digital Output
S/PDIF Optical Digital Output
33
STUDIO AUDIO CONNECTIONS OVERVIEW
The following illustrates a typical configuration for connecting the
Montego II Home Studio to your external audio equipment.
Digital I/O Bracket
Line In
DAT Recorder
Line Out
Joystick (Optional)
MIDI In/Out
ABOUT THE INCLUDED CABLES
The Home Studio comes bundled with four cables.
34
TURTLE BEACH SYSTEMS
1. A CD-Audio cable for connecting the CD-ROM audio output to the
CD-ROM input jack. (See the section on Installing the CD-ROM Audio
Cable)
2. A stereo 1/8” to dual RCA jacks cable for connecting to the line input.
This will provide standard RCA connections for running cables to
other audio sources.
3. A second stereo 1/8” to dual RCA jacks cable for connecting to the
line output. Again this provides standard RCA connectors for
connecting to a mixer or amplifier.
4. A MIDI connector – Connect this harness to the MIDI/Joystick port on
the Montego II sound board. This will provide a MIDI Input and a
MIDI Output as well as a thru connector for connecting a joystick.
RECOMMENDED ADDITIONAL EQUIPMENT CHECKLIST
MIDI keyboard/controller – For controlling the internal synthesizers.
Audio Mixer – Many manufacturers are now offering small high
quality mixers for under $300. A mixer will provide XLR inputs for
your microphones, equalization and easy level adjustments when
recording. A mixer is also helpful for mixing in other external
synthesizer sources when mixing down. Lastly, mixers usually have
headphone pre-amps for monitoring through headphones while
recording.
High Quality Microphone – A good quality mic is critical for a good
recording. Don’t even bother with a “computer microphone”. You can
purchase a good mic at a music store for around $100.
High Quality Monitoring System – Good quality powered monitors or
an amp/speaker system are also an integral part of a good recording
setup.
Headphones – When recording from a microphone you’ll need to use
headphones to monitor. The “closed ear” type are best for avoiding
feedback.
Mixdown Deck – After you’re done with your multitrack recording
you’ll want to mix it down to two track stereo for listening. There are
many options including; DAT, Minidisc and writable CD-ROM for
digital mixdown or a reel to reel or cassette deck for analog mixdown.
35
Cables & Adapters—You should map out which cables, connectors
and adapters you’ll need to connect all your gear. You’ll also save
yourself some headaches and money if you figure out where all your
gear is going to be set up ahead of time. Then determine how long
your cables need to be.
36
TURTLE BEACH SYSTEMS
C
37
R
PTE
A
H
SIX
USING THE MONTEGO II
HOME STUDIO
The Montego II Home Studio provides everything you need to turn your
PC into a complete desktop recording studio. With multi-track MIDI and
audio recording, digital effects, on-board synthesis and sampling, direct to
digital I/O, you’ve got all the tools to create professional sounding
recordings.
Now that you have the tools, what can you do with them? Well, to explain
every detail of the recording process is beyond the scope of this manual.
However we can offer a brief example of what can be done with the
Montego II Home Studio. This should help orient you to the recording
process and the capabilities of the system.
As you work with the Home Studio and get to understand it’s capabilities
you should also read up on recording and recording techniques. There are
many good books and web sites on the subject.
Also, learning recording techniques typically involves experimenting and
trying different things. Experimenting is a natural part of the creative
process and will help you hone your recording skills.
38
TURTLE BEACH SYSTEMS
AN EXAMPLE RECORDING SESSION
The following is a hypothetical step-by-step example of the process of
recording a typical pop style arrangement. Note that this is not intended
to be a tutorial, but rather an overview to illustrate how the features and
functions provided with the Montego II Home Studio work together in the
recording process.
DRUMS
First I’ll lay down the drums. This will give me a groove to play my other
tracks against. I’ll create this as a MIDI track and take advantage of one of
the 15 built in GS drum kits in the Cancun board.
Rather than play the part, I can load one of the 50 MIDI drum templates
included with the system. Then I’ll set the drum set to the big rock kit.
I’ll copy and paste the tracks on the end to make the part longer. Now I
have a complete drum track.
BASS
Next, I’ll put down a bass line. I’d like a real fat sounding electric bass
guitar so I’ll run the Bank Downloader application and download an
electric bass patch included in the instrument library.
I’ve got a MIDI keyboard connected to the Montego II so I’ll play the
patch from the keyboard and record it on a second track. Since I’m a lousy
keyboard player I can go back and fix the bad notes using the piano roll
window. This window displays all the notes in my track. Here I can add,
delete and change notes easily with the mouse.
PIANO
Now I’ll add a simple piano part. Again, I’m not a very good keyboard
player so this time I’ll slow the tempo down to a crawl and record the part
at the slower tempo. When I’m done I’ll crank the tempo back up.
After restoring the tempo I noticed that my rhythm playing was off a bit. I
can fix this by highlighting the track and applying the Quantize
Transform. This will clean up the rhythms by moving the notes onto the
divisions of the beat.
39
To fatten the part up a bit, I’ll make a separate copy of the entire track
and assign it to a different piano sound. Now I have two tracks playing the
same part on two different instruments. Lastly, I’ll pan them hard right
and left to get a nice stereo spread.
RHYTHM GUITAR
Synthesizers generally don’t replicate guitar sounds very well so I’ll
record the guitar part as a digital audio track. After recording the part I
notice that I played the last chorus section a bit sloppy. I’ll just delete that
section, copy the part from an earlier chorus section and paste it into the
last chorus.
Like the piano part, I can make a copy of this rhythm guitar track and
paste it into another track. Then apply a slight echo effect with the digital
delay transform to one track and a chorus effect to the other track. If I pan
the two tracks hard right and left I’ll get a nice stereo guitar effect.
LEAD VOCAL
Now that my rhythm tracks are done, I’ll lay down a lead vocal part.
Once I’ve finished recording the part I can smooth out the volume levels
with the Compressor/Limiter Transform in Digital Orchestrator. This will
smooth out the dynamics and allow me to boost the vocal gain in the final
mix.
Next, I’ll add a bit of digital delay for ambience, again using the Digital
Delay Transform.
BACKGROUND VOCALS
Adding a full sounding background part creates a very professional
sounding recording. Because layering and editing is so simple in Digital
Orchestrator creating this part is easy.
I’ll record one vocal part a fifth above the lead vocal for one chorus
section. Then I’ll do it again and merge the two tracks so I have two
unison vocal parts on one track.
Then I’ll do the same process with a different part—say a third above. I
now have four vocal parts of one chorus section.
40
TURTLE BEACH SYSTEMS
Now I’ll merge all of these tracks to one track. Then repeat the entire
process again.
Once I do that I have two tracks, each containing 4 vocal parts (total of 8).
I’ll pan them hard right and left to get a nice stereo spread, then copy and
paste the new background vocals into each chorus section in the song.
This renders a big sounding background vocal part with only a fraction of
the time spent, because I didn’t have to keep repeating the chorus part for
the whole song for 8 different tracks!
LEAD GUITAR
The song is nearly done. The lead guitar track is the last part needed.
Once I lay down the track I can add a flanging effect and a short delay,
once again using the digital delay transform.
MIXDOWN
Now that my song is pretty much complete, I’ll spend some time adjusting
the relative volume levels of each track and tweak the pan settings to get
a nice stereo image in my mix. Once this mix is complete I’ll want to
“mixdown” to a two-track stereo recording. The Home Studio provides a
number of mixdown options.
Export Wave Mixdown
The Export Wave feature in Digital Orchestrator Pro will create a digital
mixdown by merging all of the tracks in your composition. It takes into
account your volume and pan settings so your mix sounds just like the
multi-track playback.
If you had MIDI tracks in your composition you’ll need to record them as
digital tracks first so they can be included in the mixdown. This is easily
accomplished by setting up Digital Orchestrator to record two track
stereo, muting the existing digital tracks and recording the MIDI parts as
digital audio tracks.
Now that you have a WAV file mixdown you can create an audio CD with
a CD Recordable drive or convert the file to a web ready format and post
it on the internet.
41
Digital Output to DAT
The Montego II Home Studio includes a S/PDIF digital I/O port for
outputting a digital signal to external recorders. For example, this signal
can be recorded by a digital audio tape (DAT) deck or Sony Minidisc®
recorder.
Analog Mixdown
Of course, you can also connect the line output of the Montego II board to
the record input of an analog tape deck and record the mix via the analog
signal.
CONCLUSION
Hopefully the above recording session example will help orient as you
start to explore the powerful features of the Montego II Home Studio.
What follows is an overview of the package components and tips on how
to get the most out of the system.
GET STARTED WITH THE DIGITAL ORCHESTRATOR
PRO VIDEO TUTORIALS
After installing the Home Studio if you’d like to get started recording
right away it’s recommended that you view the Digital Orchestrator Pro
video tutorials. These tutorials provide step by step instructions for
recording and editing both digital audio and MIDI tracks. You’ll be
recording your own music in no time! These files are accessed from the
42
TURTLE BEACH SYSTEMS
Video Tutorial menu program in the Turtle Beach Montego Home
Studio/Digital Orchestrator Pro directory.
Once you’ve mastered the basics of recording MIDI and digital audio
tracks you can explore some of the more advanced capabilities of the
studio hardware. These features are discussed below. Although you won’t
need to be concerned with most of these features at the start, it’s a good
idea to read the following material to get familiar with the system and it’s
capabilities.
ABOUT THE HARDWARE
THE MONTEGO II SOUND CARD
The Montego II board is the heart of the system and represents the latest
in PCI audio technology. It offers crystal clear digital audio recording and
playback with sample rates up to 48kHz at 16 bit resolution. A hardware
sampler provides 64 hardware voices of synthesis. This synthesizer is DLS
compatible which means you can download new DLS compatible
instrument sounds into the synthesizer for an unlimited palette of sounds.
In addition to the sampler synth, an extra 64 voice daughter card
synthesizer has been provided for a total of 128 hardware synthesizer
voices on 32 MIDI channels. That’s a lot of composing power! This
synthesizer features Roland® GS compliant instrument patches including
285 different instrument sounds and 15 different drum kits!
ACCESSING THE TWO ON-BOARD SYNTHESIZERS
Each synthesizer has it’s own software driver to access the synth from
Digital Orchestrator Pro. You can set a track to be played by a particular
synthesizer by selecting it’s port in the port settings for that track. Here
are the port names as they would appear in Digital Orchestrator:
Turtle Beach Montego II Digital I/O MPU-401: The Cancun FX - Roland
GS compliant daughter synth
(This device is also assigned to the MIDI mapper device. Selecting the
MIDI Mapper will send to the daughter synth via the TBS Montego II
MPU-401 driver)
Turtle Beach Montego II Digital I/O MIDI: The Montego II DLS sampler
synth
43
Note that the daughter synth shares the MPU-401 output port with the
external MIDI device. If you would rather drive an external synthesizer
with this port you can simply mute the daughter synth in the mixer
application.
USING THE DLS INSTRUMENT DOWNLOAD
FEATURE
DLS is a powerful feature in the Montego Home Studio which lets you
download new instruments into the sampler synthesizer. A library
containing dozens of additional instruments has been included. In
addition, you can create your own DLS banks using any DLS editor. There
are two ways to download DLS banks into the Montego: via the Bank
Library application or via the Control Panel.
DOWNLOADING FROM THE MONTEGO II HOME STUDIO
BANK LIBRARY APPLICATION
The most convenient way to download banks is with the bank library
application. You can launch this program from the Montego Home Studio
program group. Select a bank from the library and press download. You
can audition the banks right there by playing a MIDI file, or launch Digital
Orchestrator Pro to audition from a MIDI keyboard.
DOWNLOADING INSTRUMENTS FROM THE CONTROL PANEL
DLS compatible instrument patches can be downloaded from the Montego
II Control Panel. From the Windows Start Menu select the Settings |
Control Panel. Then double-click the TBS Montego II Audio icon and
select the MIDI Tab.
Click on the Download button. This will display a File Open box where you
can select the file. Click OK and the file is downloaded. You should be able
to go to Digital Orchestrator Pro, select the TBS Montego II MPU-401
MIDI synthesizer as your port and audition the new sounds.
Note that the patch names will not reflect the names of the actual
patches. If you want to create a patch name template to match the bank,
you can do so by editing the Vseqptch.ini file in the Digital Orchestrator
Pro directory.
44
TURTLE BEACH SYSTEMS
CANCUN FX WAVETABLE DAUGHTER BOARD
The Cancun wavetable daughter board on the Montego II provides an
additional 64 hardware voices. This synthesizer also provides a Roland GS
compliant sound palette with over 128 General MIDI sounds with 225
variation sounds including sound effects and more than 200 drums
sounds in 15 drum sets + 1 SFX set.
To access all these sounds simply select the TBS Montego II Digital I/O
MPU-401 port on any track in Digital Orchestrator Pro and right click on
the patch column. Below lists all of the available instruments in the
daughterboard synthesizer.
The appendix at the back of this guide provides a complete listing of all
the instruments found in the Cancun synthesizer.
WORKING WITH REAL-TIME EFFECTS
Both synthesizers on the Montego II Home Studio provide real-time
effects. This means your synthesizer tracks can be enhanced with effects
such as Reverb, Chorus and more. The effects functionality on the two
synthesizers is slightly different:
MONTEGO II DLS SAMPLER EFFECTS
There are two effect processors on the Montego II synthesizer/sampler.
These effects are controlled from the Montego II Control Panel’s MIDI tab
(Start | Settings | Control Panel | TBS Montego II Audio | MIDI Tab). The
effects are global, which means that the effect and effect level are shared
between all instruments on 16 channels. The effect level can be controlled
via MIDI or from the control panel. There are a number of different effects
that can be selected. These include:
Delay
Room Reverb
Chamber Reverb
Hall Reverb
Chorus
Cabinet
Distortion
Wah-wah
Flanging
45
CANCUN DAUGHTERBOARD SYNTHESIZER EFFECTS
The Cancun daughterboard synthesizer includes two channels of effects.
These are channelized effects, meaning the effect level for each MIDI
channel can be adjusted individually. The default effects are reverb and
chorus however, effects can be changed via Sysex using Digital
Orchestrator Pro’s Sysex window.
See the demo sysex programs provided in the C:\Program Files\Turtle
Beach Montego II Home Studio\Digital Orchestrator Pro\Sysex\Cancun\FX
directory.
GRAPHIC EQ
A 10 band graphic EQ, located in the AudioStation application provides
tone control over the wave output and the sampler synth output of the
Montego Home Studio. A four band EQ is available for the Cancun
daughterboard synth via sysex.
See the demo sysex programs provided in the C:\Program Files\Turtle
Beach Montego II Home Studio\Digital Orchestrator
Pro\Sysex\Cancun\EQ_Surnd directory.
S/PDIF DIGITAL I/O
The S/PDIF digital I/O enables digital transfer of data to and from the PC
without signal degradation. For convenience, both the Coax and Optical
style connectors are provided for connecting to all sorts of digital devices
such as Sony Minidisc® or DAT.
The output sampling rate can be set to 32kHz, 44.1 or 48kHz. This is
done in the Montego II Home Studio Audio Control Panel applet in the
Digital Out tab.
It is possible to have both RCA and Optical inputs connected
to external devices simultaneously. However, since the input
source searches for a time clock with which to sync to, if
both devices are turned on, neither input will work. If you
would like to have both devices always plugged in, turn off
whichever unit you are not using at the time.
46
TURTLE BEACH SYSTEMS
The S/PDIF output feature and the second (quad) output are
mutually exclusive. When using the S/PDIF output port make
sure the Montego II Control Panel is NOT in Quad Speaker
Mode.
INCLUDED SOFTWARE:
DIGITAL ORCHESTRATOR PRO
Digital Orchestrator Pro is the software that harnesses the recording
power of the Montego Home Studio hardware. With unlimited tracks of
MIDI and digital audio, digital FX transforms, powerful editing features
and the ability to print your own sheet music, you've got everything you
need to produce music on your PC.
And it's easy to get started. On-screen video tutorials show you how to
master Digital Orchestrator Pro's intuitive interface. The Video Tutorial
menu is located in the Digital Orchestrator Pro program group. It’s
recommended that you watch these tutorials and try the examples
yourself to master Digital Orchestrator’s functionality.
In addition to the video tutorials a full 300+ page manual is available in
on-line Adobe Acrobat form and there’s comprehensive help available
from the Help menu in Digital Orchestrator Pro. Lastly, you can view on
line help in Digital Orchestrator Pro by moving the mouse over any
feature in the interface. The help text is displayed in the caption bar at
the top.
AUDIOSTATION 32
AudioStation® 32 integrates control of your multimedia files in one
convenient and useful location. AudioStation® 32 supports playback of
Redbook CD Audio, MIDI, WAV, DVD and Video Discs, and more. In
addition, AudioStation 32 is bundled with AudioView 32 and MIDI
Orchestrator 32, two feature-packed media editors.
AUDIOVIEW 32
AudioView 32 is a full featured digital audio recorder/editor which lets
you:
47
Edit WAV files using cut, paste, copy and continuously variable zoom.
Record files of virtually unlimited length directly to the hard drive.
Save and load internet ready compressed audio files.
Modify WAV files with sound effects: echo, reverse, fade, and more.
WAV file conversions include halve sample rate, stereo to mono and
more.
Embed WAV files by dragging icon into documents or load WAV files
by dragging file name into AudioView.
Open multiple instances to edit between several WAV files.
And much more…
MIDI ORCHESTRATOR 32
MIDI Orchestrator lets you re-orchestrate MIDI music with an intuitive
16-channel "audio mixer" style control panel. It provides a quick way to
adjust MIDI mix setting without the need for a full featured sequencer.
View MIDI data activity and change instruments, volumes,
transposition, tempo and other song settings in 16 MIDI channels.
Single out individual instruments while playing songs.
Lengthen and shorten MIDI songs by varying the tempo while
viewing the corresponding change in song time.
PC AUDIO MIXER
The PC Mixer application is the Home Studio’s main level control
application. It provides a convenient way to view all the available
hardware mixer functions at one time including level control, pan, mute
and record selection.
This application can be launched from the main program group or directly
from Digital Orchestrator Pro.
48
TURTLE BEACH SYSTEMS
For more information on using the mixer please see the PC Mixer on-line
help.
SYSTEM TRAY LAUNCHER
If you selected the option during the install the yellow speaker icon in the
system tray (bottom right) should have been replaced with a blue speaker
or Turtle Beach logo icon. Left clicking on this icon will display a master
volume slider for making quick global volume adjustments. Right clicking
on the icon will display a menu for launching the applications in the
Montego II Home Studio software suite.
A3D DEMOS
The Montego II board provides A3D positional audio support which
enables an amazing three dimensional audio experience using only two
speakers. This technology is demonstrated with the programs included in
the A3D demos folder.
A3D support is not available for NT. Demos won’t be
installed on NT systems.
MONTEGO II HOME STUDIO BANK DOWNLOADER & PATCH
LIBRARY
The Montego II’s Bank Downloader application provides a simple way to
download custom DLS instrument banks into the Montego II’s wavetable
synthesizer. A library of sounds has been provided to get you started. You
can also create your own sounds or get other sounds from third party
developers.
Be sure to click on the demo files at the bottom. These demos download
custom sound banks and play MIDI files which were orchestrated for
those sounds. These demos illustrate the incredible composing flexibility
that the Montego II’s DLS compatible sampler provides.
49
TURTLE BEACH SYSTEMS
PTE
A
H
R
C
50
SEVEN
THE TBS MONTEGO II
HOME STUDIO CONTROL
PANEL
The TBS Montego II Home Studio Control Panel allows you to configure
the features of your Montego II Home Studio. It lets you easily adjust
wavetable settings, A3D settings and offers access to the A3D demos. The
Montego II Home Studio Control Panel is slightly different in Windows
95/98 and Windows NT 4.0 so be sure to reference the proper section.
Note that A3D sound is currently only supported in Windows 95 and 98.
51
WINDOWS 95/98 TBS MONTEGO II HOME
STUDIO CONTROL PANEL
MIDI TAB
DESTINATION FOR DOS BOX MIDI OUT
This list box lets you select how MIDI is handled by programs running in
DOS boxes. There are two options.
Montego II Digital I/O MPU-401 - This setting sends MIDI data to an
external synthesizer/daughter card attached to the MIDI port.
Montego II Digital I/O MIDI - This setting sends MIDI data to the
internal Montego II Home Studio music synthesizer.
If you do not have an external synthesizer connected, select "Montego II
Home Studio Wavetable."
The following settings affect the Montego II’s sampler synth only. They
do not affect the CancunFX GS daughter synth.
WAVETABLE MODE
It sets the number of voices as well as the quality level of those voices.
These settings directly affect the amount of CPU utilization. It is
recommended that you work in 64 voice mode when doing MIDI
recording. You will likely experience MIDI note latency when working in
the other two modes which were intended for game playback only.
320 Voice, Pro Quality – The wavetable engine is optimized for 320
voices and premium quality. This mode has the highest CPU
utilization.
128 Voice, Game Quality – The wavetable engine is optimized for 128
voices with lower CPU utilization.
64 Voice, Pro Quality – The wavetable engine is optimized for 64
voices. (Recommended for MIDI recording)
52
TURTLE BEACH SYSTEMS
DOWNLOAD BUTTON
The Download button lets you select a different instrument sound bank to
be used by the Montego II Home Studio’s internal synthesizer. DLS Level
1 sound banks are supported as well as the Aureal ARL format.
WAVETABLE EFFECTS
The Montego II Home Studio offers advanced global effects. These
controls allow fine tuning of the effects.
Effects Checkbox – You can disable the effects with this checkbox.
When disabled, no effects are heard even if a program or MIDI file
requests them.
Effects Selection – The effect selection dropdown box allows you to
select from a number of effect algorithms including, Reverb, Delay,
Hall Reverb, Flange Distortion and more. Reverb and Chorus are the
default settings and are most useful for general MIDI playback.
Effects Sliders – These sliders increase the amount of the selected
effect over the levels set by a program or MIDI file. A zero setting
selects the same amount of chorus and reverb as set in the program
or MIDI file. Moving the sliders up increases the effects level until the
effect reaches its maximum possible level. If a program or MIDI file
sets the maximum possible reverb and chorus, the sliders have no
effect. These settings can be changed while a song is playing.
A3D SETTINGS TAB
OUTPUT MODE
The Montego II Home Studio is capable of optimizing it’s A3D Interactive
positional audio technology for 2-speaker, 4-speaker or headphone output.
This setting lets you select the target output. For optimum performance
change target output settings whenever you switch between speakers and
headphones. The different modes are:
Headphones: Use this selection if you are listening through headphones.
Monitor speakers: Use this selection if you are listening through speakers
placed close together.
53
Satellite speakers: Use this selection if you are listening through speakers
placed far apart. (Default setting)
Quad speakers: Use this selection if you are using the second line output
for monitoring or if you are listening through four speakers. For optimal
experience, place two speakers in front of you and two speakers behind
you.
The Montego II Home Studio ships in Stereo Satellite Speaker
mode. If you connect four speakers or anything else to the
second output (on the breakout bracket), be sure change to
Quad Speaker mode in the control panel.
The S/PDIF output feature and the second (quad) output are
mutually exclusive. When using the S/PDIF output port make
sure the control panel is NOT in Quad Speaker Mode.
3D AUDIO - TWO SPEAKERS VS. HEADPHONES
When using two speakers for 3-D audio, your left ear hears the sound
coming from the left speaker but also some of the sound coming from the
right speaker. The same holds true for you right ear, it also hears sounds
coming from the left speaker. This diminishes the 3-D effect.
To achieve the maximum 3D effect the use of headphones is
recommended. When using headphones the sound coming from the left
are only heard by your left ear just as the sounds coming from the right
are only the heard by your right ear. This results in a much more
immersive experience.
A3D SPLASH
By default, when an A3D enabled application starts up, the A3D logo
displays and a audio signature plays. You can deactivate the audio
signature and A3D logo at startup using these checkboxes. These settings
have no effect on the actual A3D sound.
54
TURTLE BEACH SYSTEMS
DISABLE DIRECTSOUND HARDWARE ACCELERATOR
Some games using DirectSound do not check the hardware resources
correctly. If no sound is audible, you can disable hardware acceleration of
DirectSound with this checkbox. Applications will then use the generic,
slower and lower-quality software DirectSound drivers supplied within
DirectX 5.0.
Disabling DirectSound hardware
acceleration disables all A3D functionality.
A3D DEMOS TAB
This tab offers quick access to the A3D demos. Double-click the icons in
this window to launch an A3D demo program.
DIGITAL OUTPUT TAB
The Digital Output tab provides output sample rate options. You can
choose to output a sample rate of 32kHz, 44.1 or 48kHz.
WINDOWS NT TBS MONTEGO II HOME STUDIO
CONTROL PANEL
MIDI TAB
The following settings affect the Montego II’s sampler synth only. They
do not affect the CancunFX GS daughter synth.
WAVETABLE MODE
Wavetable mode sets the number of voices as well as the quality level of
those voices. These settings directly affect the amount of CPU utilization.
320 Voice, Pro Quality – The wavetable engine is optimized for 320
voices and premium quality. This mode has the highest CPU
utilization.
128 Voice, Game Quality – The wavetable engine is optimized for 128
voices with lower CPU utilization.
55
64 Voice, Pro Quality – The wavetable engine is optimized for 64
voices. CPU utilization in 64-voice mode is significantly less than in
320-voice mode.
WAVETABLE EFFECTS
The Montego II Home Studio offers advanced global reverb and chorus
effects. These controls allow fine tuning of the chorus and reverb effects.
Effects Checkbox – You can disable the chorus and reverb effects
with this checkbox. When disabled, no effects are heard even if a
program or MIDI file requests them.
Effects Selection – The effect selection dropdown box allows you to
select from a number of effect algorithms including, Reverb, Delay,
Hall Reverb, Flange Distortion and more. Reverb and Chorus are the
default settings and are most useful for general MIDI playback.
Effects Sliders – These sliders increase the amount of effects, such as
chorus and reverb, over the levels set by a program or MIDI file. A
zero setting selects the same amount of chorus and reverb as set in
the program or MIDI file. Moving the sliders up increases the effects
level until the effect reaches its maximum possible level. If a program
or MIDI file sets the maximum possible reverb and chorus, the sliders
have no effect. These settings can be changed while a song is playing.
DIGITAL I/O TAB
The Digital Output tab provides output sample rate options. You can
choose to input or output a sample rate of 32kHz, 44.1 or 48kHz.
TURTLE BEACH SYSTEMS
PTE
A
H
R
C
56
EIGHT
TECHNICAL SUPPORT
This Getting Started Guide, the SoundCheck utilities and the various help
and PDF files should be all you need to get the Montego II Home Studio
sound card and the software applications working. However, if you need
support, here is how to contact us — Monday through Friday, 9am-5pm,
EST.
TO CONTACT TURTLE BEACH TECHNICAL SUPPORT:
Email: [email protected]
Internet: www.tbeach.com (Visit out FAQ section!)
Phone: 914.966.2150
Fax: 914.966.1093
You can receive a list of frequently asked questions both through the web
or by emailing [email protected].
57
IF YOU CALL:
You must be registered or have your product ID at hand.
If possible, use a telephone near your computer.
The technician might need to ask about the type of system you are
using and the additional hardware installed on the system — for
example, a synthesizer, CD-ROM drive or MIDI interface. Try to have
the manufacturers’ manuals for these peripherals at hand.
Be prepared to explain the problems you are having, what you were
doing when these problems occurred and any error messages you
have received.
58
TURTLE BEACH SYSTEMS
A
CANCUN WAVETABLE
SYNTHESIZER
INSTRUMENTS AND VARIATIONS
The tables below list all of the available instruments and sounds in the
CancunFX wavetable daughterboard synthesizer.
(all channels except 10)
To select variation : send CTRL 0, then PC
PC : Program change
C0 : controller 0 value (zero for General Midi capital sounds)
Sound name conventions :
w - pan type sound (low notes sent to left, high notes sent to right)
d - other velocity response
v - velocity split type sound
o - special release on sound
59
PC
GENERAL MIDI
C0
1st VAR
C0
3rd VAR
Piano 1w
C 2nd VAR
0
16 Piano 1d
1
2
3
4
5
(Grand) Piano 1
(Bright) Piano 2
(El. Grd) Piano 3
Honky-tonk Piano
El. Piano 1
8
8
Detuned EP 1
16 El. Piano 1v
24
60's El.
Piano
6
7
8
9
10
11
12
13
14
15
16
17
18
19
20
21
22
23
24
25
26
27
28
29
30
31
32
33
34
35
36
37
38
39
40
41
42
43
44
45
46
El. Piano 2
Harpsichord
Clavi
Celesta
Glockenspiel
Music Box
Vibraphone
Marimba
Xylophone
Tubular Bells
Dulcimer (Santur)
Drawbar Organ
Percussive Organ
Rock Organ
Church Organ
Reed Organ
Accordion (french)
Harmonica
Tango Accordion
Ac. Guitar (Nylon)
Ac. Guitar (Steel)
El. Guitar (jazz)
El. Guitar (clean)
El. Guitar (muted)
Overdriven Guitar
Distortion Guitar
Guitar harmonics
Acoustic Bass
HQ Finger Bass
HQ Picked Bass
Fretless Bass
Slap Bass 1
Slap Bass 2
Synth Bass 1
Synth Bass 2
Violin
Viola
Cello
Contrabass
Tremolo Strings
Pizzicato Strings
8
8
Detuned EP 2
Coupled Hps.
16 El. Piano 2v
24
Harpsi o
8
Church Bell
9
8
8
Det. Organ 1
Det. Organ 2
16 60's organ1
8
Ch. Organ 2
16 Ch. Organ 3
8
Acc. (Italian)
8
8
8
8
8
Ukulele
16 Nylon Gt. o
12-str. Guitar 16 Mandolin
Hawaiian Gt.
Chorus Gt.
Funk Gt.
16 Funk Gt. 2
8
8
Feedback Gt.
Gt. Feedback
8
8
Finger Bass
Picked Bass
1
8
8
Syn Bass 101
Synth. Bass 4
Slow Violin
Carillon
8 Synth. Bass 3
16 Rubber Bass
32* Organ 4
32* Organ 5
32* Nylon Gt. 2
60
47
48
49
50
51
52
53
54
55
56
57
58
59
60
61
62
63
64
65
66
67
68
69
70
71
72
73
74
75
76
77
78
79
80
81
82
83
84
85
86
87
88
89
90
91
92
93
94
95
TURTLE BEACH SYSTEMS
Orchestral Harp
Timpani
String Ensemble 1
String Ensemble 2
Synth Strings 1
Synth Strings 2
Choir Aahs
Voice Oohs
Synth Voice
Orchestra Hit
Trumpet
Trombone
Tuba
Muted Trumpet
French Horn
Brass Section
Synth Brass 1
Synth Brass 2
Soprano Sax
Alto Sax
Tenor Sax
Baritone Sax
Oboe
English Horn
Bassoon
Clarinet
Piccolo
Flute
Recorder
Pan Flute
Blown Bottle
Shakuhachi
Whistle
Ocarina
Lead 1 (square)
Lead 2 (sawtooth)
Lead 3 (calliope)
Lead 4 (chiff)
Lead 5 (charang)
Lead 6 (voice)
Lead 7 (fifths)
Lead8 (bass+lead)
Pad 1 (new age)
Pad 2 (warm)
Pad 3 (polysynth)
Pad 4 (choir)
Pad 5 (bowed)
Pad 6 (metallic)
Pad 7 (halo)
8
Orchestra
8
Syn Strings 3
32* Choir Aahs 2
8
Synth Voice2
1
Trombone 2
1
8
8
8
Fr. Horn
Brass 2
Syn Brass 3
Syn Brass 4
16 AnalogBrass1
16 AnalogBrass2
1
1
Square
Saw
8
8
8
Lead Voice2
8
Pad Choir2
Sine Wave
Doctor Solo
61
96
97
98
99
100
101
102
103
104
105
106
107
108
109
110
111
112
113
114
115
116
117
118
119
120
Pad 8 (sweep)
FX 1 (rain)
FX 2 (soundtrack)
FX 3 (crystal)
FX4 (atmosphere)
FX 5 (brightness)
FX 6 (goblins)
FX 7 (echoes)
FX 8 (sci-fi)
Sitar
Banjo
Shamisen
Koto
Kalimba
Bag pipe
Fiddle
Shanai
Tinkle Bell
Agogo
Steel Drums
Woodblock
Taiko Drum
Melodic Tom
Synth Drum
Reverse Cymbal
1
Syn Mallet
8
8
1
Brigthness2
Goblins2
Echo Bell
1
Sitar2
8
Taisho Koto
8
8
8
8
Castanets
Concert BD
Melo Tom 2
808 Tom
2
Echo Pan
9
Elec Perc 1
* This variation can also be obtained by sending
variation # 24.
DRUM SET TABLE
PART 1 (MIDI CHANNEL 10)
Prog 1 :
HQ STD SET1
27 - D#1
28 - E1
29 - F1
30 - F#1
31 - G1
32 - G#1
High Q
Slap
Scratch Push
Scratch Pull
Sticks
Square Click
Prog 2:
HQ STD SET2
Prog 9:
HQ ROOM SET
Prog 17 :
HQ POWER
SET
Prog 25 :
HQ ELEC. SET
62
TURTLE BEACH SYSTEMS
33 - A1
Metronome
Click
34 - A#1 Metronome
Bell
35 - B1
HQ STD1 Kick2 HQ STD2 Kick2 HQ Room
Kick2
36 - C2
HQ STD1 Kick1 HQ STD2 Kick1 HQ Room
Kick1
37 - C#2 Side Stick
38 - D2
HQ STD1
HQ STD2
HQ Room
Snare1
Snare1
Snare1
39 - D#2 Hand Clap
40 - E2
Snare Drum 2
HQ STD2
HQ Room
Snare2
Snare1
41 - F2
HQ Low Floor
HQ Power Low
Tom
Tom2
42 - F#2 Closed Hi Hat
[EXC1]
43 - G2
HQ High Floor
HQ Power Low
Tom
Tom1
44 - G#2 Pedal Hi-Hat
[EXC1]
45 - A2
HQ Low Tom
HQ Power Mid
Tom2
46 - A#2 Open Hi-Hat
[EXC1]
47 - B2
HQ Low-Mid
HQ Power Mid
Tom
Tom1
48 - C3
HQ Hi Mid
HQ Power Hi
Tom
Tom2
49 - C#3 Crash Cymbal
1
50 - D3
HQ High Tom
HQ Power Hi
Tom1
51 - D#3 Ride Cymbal 1
52 - E3
Chinese
Cymbal
53 - F3
Ride Bell
54 - F#3 Tambourine
55 - G3
Splash Cymbal
56 - G#3 Cowbell
57 - A3
Crash Cymbal
2
58 - A#3 Vibraslap
59 - B3
Ride Cymbal 2
60 - C4
Hi Bongo
61 - C#4 Low Bongo
62 - D4
Mute Hi Conga
63 - D#4 Open Hi Conga
64 - E4
Low Conga
65 - F4
High Timbale
66 - F#4 Low Timbale
67 - G4
High Agogo
68 - G#4 Low Agogo
69 - A4
Cabasa
HQ Power
Kick2
HQ Power
Kick1
HQ Elec Kick2
Gated Snare
Elec SD
HQ Power
Snare1
HQ Power Low
Tom2
HQ Elec Snare1
HQ Power Low
Tom1
Elec Low Tom1
HQ Power Mid
Tom2
Elec Mid Tom2
HQ Power Mid
Tom1
HQ Power Hi
Tom2
Elec Mid Tom1
HQ Power Hi
Tom1
Elec Hi Tom1
HQ Elec Kick1
Elec Low Tom2
Elec Hi Tom2
Reverse
Cymbal
63
70 - A#4 Maracas
71 - B4
Short
Whistle[EXC2]
72 - C5
Long
Whistle[EXC2]
73 - C#5 Short Guiro
[EXC3]
74 - D5
Long Guiro
[EXC3]
75 - D#5 Claves
76 - E5
Hi Wood Block
77 - F5
Low Wood
Block
78 - F#5 Mute Cuica
[EXC4]
79 - G5
Open Cuica
[EXC4]
80 - G#5 Mute Triangle
[EXC5]
81 - A5
Open
Triangle[EXC5]
82 - A#5 Shaker
83 - B5
Jingle Bell
84 - C6
Belltree
85 - C#6 Castanets
86 - D6
Mute Surdo
[EXC6]
87 - D#6 Open Surdo
[EXC6]
88 - E6
Blank - Same sound as "Standard Set"
[EXC] - Sounds with same EXC number are mutually
exclusive
DRUM SET TABLE
PART 2 (MIDI CHANNEL 10)
Prog26 :
HQ
TR808
SET
Prog 27:
HQ
DANCE
SET
Prog 33:
JAZZ SET
Prog 41 :
BRUSH
Prog 49 :
ORCHEST
RA
Prog 57 :
SFX SET
64
TURTLE BEACH SYSTEMS
27 - D#1
Closed Hi
Hat
Pedal HiHat
Open Hi
Hat
Ride
Cymbal
28 - E1
29 - F1
30 - F#1
31 - G1
32 - G#1
33 - A1
34 - A#1
35 - B1
36 - C2
37 - C#2
38 - D2
39 - D#2
40 - E2
41 - F2
42 - F#2
43 - G2
44 - G#2
45 - A2
46 - A#2
47 - B2
48 - C3
49 - C#3
50 - D3
HQ 909
BD
HQ 808
BD
808 Rim
shot
808
Snare
Drum
HQ Dance
Kick
HQ Elec
Kick2
HQ 909
Snare
808 Low
Tom2
808 CHH
[EXC1]
808 Low
Tom2
808 CHH
[EXC1]
808 Mid
Tom2
808 OHH
[EXC1]
808 Mid
Tom1
808 Hi
Tom2
HQ Dance
snare2
Elec Low
Tom2
808 CHH
[EXC1]
Elec Low
Tom1
808 CHH
[EXC1]
Elec Mid
Tom2
808 OHH
[EXC1]
Elec Mid
Tom1
Elec Hi
Tom2
808
Cymbal
808
HiTom1
Jazz BD2
Jazz BD1
Jazz BD1
Concert
BD 2
Concert
BD 1
*
*
*
*
*
*
*
*
*
*
HQ Dance
snare1
Elec Hi
Tom1
51 - D#3
52 - E3
Jazz BD2
*
Reverse
Cymbal
Brush Tap
Concert SD *
Brush Slap
Brush
Swirl
Castanets
High Q
Concert SD Slap
Timpani F
Timpani
F#
Timpani G
Timpani
G#
Timpani A
Timpani
A#
Timpani B
Timpani c
Timpani
c#
Timpani d
Timpani
d#
Timpani e
Scratch
Push
Scratch
Pull
Sticks
Square
Click
Metronom
e Click
Metronom
e Bell
Guitar
Slide
Gt Cut
Noise
(down)
Gt Cut
Noise (up)
Double
Bass Slap
Key Click
Laughing
65
53 - F3
54 - F#3
55 - G3
56 - G#3
Timpani f
Screaming
Punch
Heart Beat
Footsteps1
Concert
Cymbal2
Footsteps2
808
Cowbell
57 - A3
58 - A#3
59 - B3
Concert
Cymbal1
60 - C4
61 - C#4
62 - D4
63 - D#4
64 - E4
808 High
Conga
808 Mid
Conga
808 Low
Conga
65 - F4
66 - F#4
67 - G4
68 - G#4
69 - A4
70 - A#4
808
Maracas
71 - B4
72 - C5
73 - C#5
74 - D5
75 - D#5
Starship
Gun Shot
Machinegu
n
Lasergun
Explosion
808
Claves
76 - E5
77 - F5
78 - F#5
79 - G5
80 - G#5
81 - A5
82 - A#5
83 - B5
84 - C6
85 - C#6
86 - D6
87 - D#6
88 - E6
Applause
Door
Creaking
Door
Closing
Scratch
Wind
Chime
Car Engine
Start
Car
Breaking
Car Pass
Car Crash
Police
Siren
Train
Jet Takeoff
Helicopter
Applauses
Dog
Horse
Gallop
Birds
Rain
Thunder
Wind
Sea Shore
Stream
Bubble
*
*
*
*
66
TURTLE BEACH SYSTEMS
* - No sound
Blank - Same sound as "Standard Set"
[EXC] - Sounds with same EXC number are mutually
exclusive
DRUM SET TABLE
PART 3 (MIDI CHANNEL 10)
27 - D#1
28 - E1
29 - F1
30 - F#1
31 - G1
32 - G#1
33 - A1
34 - A#1
35 - B1
36 - C2
37 - C#2
38 - D2
39 - D#2
40 - E2
41 - F2
42 - F#2
43 - G2
44 - G#2
Prog 65 :
STANDARD
SET
High Q
Slap
Scratch Push
Scratch Pull
Sticks
Square Click
Metronome
Click
Metronome
Bell
Kick
drum2/Jazz
BD2
Kick
drum1/Jazz
BD1
Side Stick
Snare Drum
1
Hand Clap
Snare Drum
2
Low Floor
Tom
Closed Hi
Hat [EXC1]
High Floor
Tom
Pedal Hi-Hat
[EXC1]
Prog 73:
ROOM SET
Prog 81 :
POWER SET
Prog 89 :
Prog 90:
ELECTR. SET TR-808 SET
Power Kick
Elec BD
Gated Snare
Elec SD
808 Bass
Drum
808 Rim shot
808 Snare
Drum
Gated Snare
Room Low
Tom2
Room Low
Tom2
Elec Low
Tom2
Room Low
Tom1
Room Low
Tom1
Elec Low
Tom1
808 Low
Tom2
808 CHH
[EXC1]
808 Low
Tom2
808 CHH
[EXC1]
67
45 - A2
Low Tom
46 - A#2
Open Hi-Hat
[EXC1]
Low-Mid
Tom
Hi Mid Tom
47 - B2
48 - C3
49 - C#3
50 - D3
51 - D#3
52 - E3
53 - F3
54 - F#3
55 - G3
56 - G#3
57 - A3
58 - A#3
59 - B3
60 - C4
61 - C#4
62 - D4
63 - D#4
64 - E4
65 - F4
66 - F#4
67 - G4
68 - G#4
69 - A4
70 - A#4
71 - B4
72 - C5
73 - C#5
Crash
Cymbal 1
High Tom
Ride Cymbal
1
Chinese
Cymbal
Ride Bell
Tambourine
Splash
Cymbal
Cowbell
Crash
Cymbal 2
Vibraslap
Ride Cymbal
2
Hi Bongo
Low Bongo
Mute Hi
Conga
Open Hi
Conga
Low Conga
High Timbale
Low Timbale
High Agogo
Low Agogo
Cabasa
Maracas
Short
Whistle[EXC
2]
Long
Whistle[EXC
2]
Short Guiro
[EXC3]
Room Mid
Tom2
Room Mid
Tom2
Room Mid
Tom1
Room Hi
Tom2
Room Mid
Tom1
Room Hi
Tom2
Elec Mid
Tom2
808 Mid
Tom2
808 OHH
[EXC1]
Elec Mid
808 Mid
Tom1
Tom1
Elec Hi Tom2 808 Hi Tom2
808 Cymbal
Room Hi
Tom1
Room Hi
Tom1
Elec Hi Tom1 808 HiTom1
Reverse
Cymbal
808 Cowbell
808 High
Conga
808 Mid
Conga
808 Low
Conga
808 Maracas
68
74 - D5
75 - D#5
76 - E5
77 - F5
78 - F#5
79 - G5
80 - G#5
81 - A5
82 - A#5
83 - B5
84 - C6
85 - C#6
86 - D6
87 - D#6
88 - E6
TURTLE BEACH SYSTEMS
Long Guiro
[EXC3]
Claves
Hi Wood
Block
Low Wood
Block
Mute Cuica
[EXC4]
Open Cuica
[EXC4]
Mute
Triangle
[EXC5]
Open
Triangle[EXC
5]
Shaker
Jingle Bell
Belltree
Castanets
Mute Surdo
[EXC6]
Open Surdo
[EXC6]
808 Claves
69
B
WARRANTY AND
LICENSING INFORMATION
This Appendix includes the warranty for the Montego II Home Studio
sound card, the Voyetra End-User License Agreement for the software
suite in this package and the FCC and EMC Declarations of Conformity.
HARDWARE WARRANTY
Voyetra Turtle Beach, Inc. ("Voyetra") warrants to the original end-user
purchaser ("Purchaser") that the Turtle Beach Systems Montego II Home
Studio ("Product") will be free of defects in materials and workmanship for
a period of one (1) year from the date of purchase by Purchaser ("Warranty
Period").
Should a defect occur during the Warranty Period, the Purchaser must fax
a copy of the dated proof of purchase in order to obtain a Return
Merchandise Authorization ("RMA") from Voyetra. The Purchaser is
responsible for all costs incurred in returning the defective Product to and
from the authorized Voyetra service center, or to the repair facility located
70
TURTLE BEACH SYSTEMS
at Voyetra's corporate headquarters. The Product must be returned in a
static-proof bag, similar to the one included with the original packaging. A
copy of the dated proof of purchase must be included with the defective
Product and the RMA number must be clearly indicated on the outside of
the package. All packages sent without an RMA number will be Returned
to Sender.
In the event of a defect, Purchaser's sole and exclusive remedy and
Voyetra's sole liability is expressly limited to the correction of the defect
by adjustment, repair, or replacement of the Product at Voyetra's sole
option and expense.
This warranty does not cover, and Voyetra is not responsible for, damage
caused by misuse, neglect, fire, acts of God, or unauthorized modification
of the Product or damage resulting from the use of the Product with
hardware or software programs not provided or specifically recommended
by Voyetra.
Except as specifically provided herein, there are no other warranties,
expressed or implied, including, but not limited to, any implied warranties
or merchantability or fitness for a particular purpose and in no event shall
Voyetra be liable for indirect, incidental, consequential, or other damages,
including personal injury, lost profits and damages to property arising out
of any breach of this warranty or otherwise.
All software including operating systems or applications programs are
provided on an "As Is" basis without warranty. Some states do not allow
the exclusion or limitation of incidental or consequential damages, so the
above exclusion or limitation may not apply to you. This warranty gives
you specific legal rights and you may also have other rights which vary
from state to state.
VOYETRA END-USER LICENSE AGREEMENT
By installing this Software you acknowledge that you have read,
understood and agree to abide by the terms and conditions of this
Agreement. If you do not agree with the terms of this Agreement,
promptly contact the seller of this Software to arrange an appropriate
remedy.
SOFTWARE LICENSE: This is a legal agreement (Agreement) between
you (either an individual or an entity) and Voyetra Turtle Beach, Inc.
(Voyetra) that sets forth the license terms and conditions for using the
enclosed software (Software) and updates of the Software. In this
71
Agreement, the term “Use” means loading the Software into RAM, as well
as installing it onto a hard disk or other storage device.
The Software is owned by Voyetra and is protected under United States
copyright laws as well as international treaty provisions. You must treat
the Software as you would any other copyrighted material. Voyetra retains
title and ownership of the Software. The purchase price for the Software
grants you a non-exclusive license to use one copy of the Software on a
single computer. You may make copies of the Software solely for archival
purposes. You may not make copies of any written material accompanying
the Software. You may not allow third parties to use the Software by
time-sharing, networking or any other form of multi-user participation.
You may not rent, sell, lease, sub-license, time-share or lend the Software
to a third party or otherwise transfer this License without written
permission from Voyetra. You may not decompile, disassemble, reverseengineer or modify the Software.
This Agreement is effective until terminated by the destruction of the
Software — all of the CD-ROMs and/or diskettes — and documentation
provided in this package, together with all copies, tangible or intangible.
If you fail to comply with any of the terms and conditions of this
Agreement, this License will be terminated and you will be required to
immediately return to Voyetra the Software — CD-ROMs and/or diskettes
— and documentation provided in this package, together with all back-up
copies. The provisions of this Agreement which protect the proprietary
rights of Voyetra will continue in force after termination.
LIMITED LIABILITY: You assume responsibility for the selection of the
Software to achieve your intended results, and for the installation, use
and results obtained from the Software.
VOYETRA MAKES NO REPRESENTATIONS OR WARRANTIES WITH
REGARD TO THE SOFTWARE AND DOCUMENTATION, INCLUDING BUT
NOT LIMITED TO THE IMPLIED WARRANTIES OF MERCHANTABILITY
AND FITNESS FOR A PARTICULAR PURPOSE.
Voyetra shall not be liable for errors or omissions contained in the
Software or manuals, any interruption of service, loss of business or
anticipatory profits and/or for incidental or consequential damages in
connection with the furnishing, performance or use of these materials.
The Software and documentation are sold AS IS.
This Limited Warranty gives you specific legal rights and you may also
have other rights which vary from state to state. Some states do not allow
the limitation or exclusion of implied warranties or of consequential
damages, so the above limitations or exclusions may not apply to you. You
72
TURTLE BEACH SYSTEMS
agree that this is the complete and exclusive statement of the Agreement
between you and Voyetra which supersedes any proposal or prior
agreement, oral or written, and any other communications between us
regarding the subject matter of this Agreement. This Agreement shall be
construed, interpreted and governed by the laws of the State of New York,
except the federal laws which govern copyrights and registered trademarks. If any provision of this Agreement is found unenforceable, it will
not affect the validity of the balance of this Agreement, which shall
remain valid and enforceable according to its terms.
73
FCC DECLARATION OF CONFORMITY
PRODUCT NAME: Internal PCI Sound Card
Model Number: TBS-33750-01
FCC RULES: TESTED TO COMPLY WITH FCC PART 15, CLASS B
OPERATING ENVIRONMENT: FOR HOME OR OFFICE USE
FCC COMPLIANCE STATEMENT:
This device complies with part 15 of the FCC rules. Operation is subject to the
following conditions. (1) This device may not cause harmful interference and (2)This
device must accept any interference received including interference that may cause
undesired operation.
INFORMATION TO USER:
This equipment has been tested and found to comply with the limits for a Class B
digital device, pursuant to Part 15 of FCC rules. These limits are designed to provide
reasonable protection against harmful interference in a residential installation. This
equipment generates, uses, and can radiate radio frequency energy and, if not
installed and used in accordance with the instructions, may cause harmful interference
to radio communications. However, there is no guarantee that interference will not
occur in a particular installation. If this equipment does cause harmful interference to
radio or television reception, which can be determined by turning the equipment off
and on, the user is encouraged to try to correct the interference by one or more of the
following measures:
1. Reorient or relocate the receiving antenna.
2.
Increase the separation between the equipment and receiver.
3.
Connect the equipment into an outlet on a circuit different from that to
which the receiver is connected.
4.
Consult the dealer or an experienced radio TV technician for help.
CAUTION: Changes or modifications to this unit not expressly approved by the party
responsible for compliance could void the user’s authority to operate the equipment.
PARTY RESPONSIBLE FOR PRODUCT COMPLIANCE
Turtle Beach Systems
5 Odell Plaza
Yonkers, NY 10701
Tel: (914) 966 0600
Fax: (914) 966 1102
74
TURTLE BEACH SYSTEMS
DECLARATION OF CONFORMITY (EMC)
Manufacturers Name:
Manufacturers Address:
Turtle Beach Systems
5 Odell Plaza
Yonkers, NY 10701
Declares that this product:
Product Name:
Model Number(s):
Year of Manufacture:
Montego II Home Studio
TBS4003356-01
1999
Conforms to the following Product Specifications:
EMC:
EN55022 (CISPR:1993) CLASS B
ENN50082-1 (1992):IEC801-2 (1981)
ENN50082-1 (1992):IEC801-3 (1984)
ENN50082-1 (1992):IEC801-4 (1988)
Supplemental Information:
The product herewith complies with the requirement to the EMC
Directive 89/336/EEC.
Title: Executive Vice President
75
INDEX
warranty · 71
MPC-2 connector · 15
C
CD-Audio Connector · 9
CD-ROM audio cable
connecting · 15
H
P
port addresses, joystick · 35
Product ID Number · 12
R
headphones · 8
I
I/O addresses · 8
installing the sound card · 11
overview of the steps · 11
IRQs · 8
ISA slot · 13
J
joystick/external MIDI connector · 9
L
license agreement · 72
Line In · 9, 31
Line Out · 9, 31, 32
M
Mic · 9, 31
Montego sound card
features of · 7
installing · 11
RAM · 8
red wire · 15
registering your software · 6
resource usage · 8
S
S/PDIF · 9
software license agreement · 72
Sony connector · 15
speakers · 8
T
technical support · 6
contacting · 57
Turtle Beach, contacting · 2
U
Update notifications · 6
W
warranty · 71
76
TURTLE BEACH SYSTEMS
website · 2, 6
white wire · 15
Windows 3.x
installing the drivers · 27
resources · 8
Windows 95
common conflicts · 24
installing the drivers · 17, 20
resources · 8
Testing and Troubleshooting · 23
Windows NT 4.0
installing the drivers · 27


![第1回部会議事録 [PDFファイル/319KB]](http://vs1.manualzilla.com/store/data/006695322_2-3bbf378d5fd5f33d686fe76214343ad6-150x150.png)