1
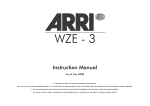
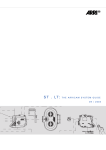
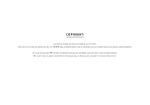
FEM-2
Instruction Manual
As of: 05/2003
ALL
THEY
MUST NOT BE COPIED (E.G. ON
IF
CD-ROM,
YOU ARE DOWNLOADING
WE
PDF-FILES
ARTWORK, PICTURES AND TEXTS ARE COVERED BY OUR COPYRIGHT.
DISKS OR INTERNET-SITES) OR USED IN THEIR ENTIRE FORM OR IN EXCERPTS WITHOUT OUR PREVIOUS WRITTEN AGREEMENT.
FROM OUR INTERNET HOMEPAGE FOR YOUR PERSONAL USE, MAKE SURE TO CHECK FOR UPDATED VERSIONS.
CANNOT TAKE ANY LIABILITY WHATSOEVER FOR DOWNLOADED FILES, AS TECHNICAL DATA ARE SUBJECT TO CHANGE WITHOUT NOTICE.
2
Contents
1. Contents .......................................................3
2. Safety Instructions and Legal Disclaimer ..5
2.1. Safety Instructions .........................................5
Warning Signs .............................................5
General Safety Instructions .............................5
Product Specifications....................................6
Explanation of the Symbols in the Manual........6
2.2 Disclaimer....................................................7
3. General Description .....................................9
Compatibility.........................................................9
Cameras....................................................10
Lens Control ...............................................10
Camera Remote Control ..............................10
Motion Control ...........................................10
Time Code .................................................10
The following devices can be used
with certain limitations .................................10
Use of the following equipment
is not permitted...........................................11
4. Setup ..........................................................13
Preparation ................................................13
4.1 Installing the FEM-2 on the camera................15
4.2 Installing the URM-1 radio receiver................17
Contents
1. Contents
5. Operating ...................................................19
5.1 Lens Data Display .......................................19
5.2 Radio system ..............................................21
To change the radio channel: .......................22
5.3 Remote Lens Control ....................................23
Lens Motors................................................23
ZMU-1, FIU-1 and CLM-1 Motors ..................25
ZMU-1, FIU-1 and CLM-2 Motors ..................26
WFU-1, WZU-1 and WHA-2 mit CLM-1 ........27
WFU-1, WZU-1 and WHA-2 mit CLM-2 ........28
Mixed Operation ........................................29
Wireless Control of Focus and Iris,Zoom
via ZMU-1 .................................................30
Zoom, Focus and Iris Wireless......................31
Zoom, Focus and Iris Wireless
via Two Separate Handheld Controls ............32
3
Contents
4
5.4
5.5
Camera remote control ................................33
WRC-1 via wireless remote control................34
WRC-1 with WHA-2 via cable .....................35
WRC-1 with WHA-1 ...................................36
RCU-1 .......................................................37
CCU-1.......................................................38
Time code ..................................................39
Operation..................................................39
Changing the batteries ................................39
6. Technical Data ............................................40
7. Additional Documentations ......................41
2.1. Safety Instructions
Please always follow these instructions to help
ensure against injury to yourself and damage
to the system or other objects.
This safety information is additional to the
product-specific operating instructions in
general and must be strictly observed for
safety reasons. They are no substitute to
settled down you own safety measures.
Warning Signs
Possible risk of injury or damage to equipment.
This symbol indicates the risk of electric shock
or fire danger that could result in injury or
equipment damage.
General Safety Instructions
Read and understand all safety and operating
instructions before you operate or install the
system.
Retain all safety and operating instructions for
future reference.
Disclaimer
2. Safety Instructions and Legal Disclaimer
Heed all warnings on the system and in the
safety and operating instructions before you
operate or install the system.
Follow all installation and operating instructions.
Do not use accessories or attachments not
recommended by ARRI, as they may cause
hazards and void the warranty.
Do not repair any part of the system. Repairs
must only be carried out by authorized ARRI
repair shops.
Do not remove any safety measure of the
system.
5
Disclaimer
Do not operate the system in high humidity
areas or expose it to water or moisture.
Do not place the system on an unstable cart,
stand, tripod, bracket, or table. The system
may fall, causing serious personal injury and
damage to the system or other objects.
Operate the system using only the type of power
source indicated in the manual. Unplug the power
cord by gripping the power plug, not the cord.
Never insert objects of any kind into the any part
of the system through openings, as the objects
may touch dangerous voltage points or short out
parts. This could cause fire or electrical shock.
Unplug the system from the power outlet before
opening any part of the system or before making
any changes on the systems, especially the
attaching or removing of cables.
Do not touch optical surfaces!
Do not use force!
6
Clean optical surfaces only with a lens brush
or a clean lens cloth! In cases of solid dirt
moisten a lens cloth with pure alcohol.
Do not use solvents in cleaning!
Do not remove any screws which are secured
with paint!
Any violation of this safety instructions or the non-observance
of personal care could cause serious injuries (including death)
and damages on the system or other objects.
Product Specifications
In the case of inquiries or when ordering parts, please
advise serial number and model.
Explanation of the Symbols in the Manual
Note:
Indicates important remarks and cross references.
photo indicates objects which are shown in the
photographs or drawings.
No part of this document may be copied or reproduced in
any form or by any means without prior written consent of
ARRI. ARRI assumes no responsibility for any errors that may
appear in this document. The information is subject to
change without notice. For actual design-in, refer to the
latest publications of ARRI data sheets or data books, etc.,
for the most up-to-date specifications. Not all products
and/or types are available in every country. Please check
with an ARRI sales representative for availability and
additional information.
for commercial use. Otherwise the customer has the
obligation to contact ARRI preceding the utilization.
While ARRI endeavors to enhance the quality, reliability and
safety of their products, customers agree and acknowledge
that the possibility of defects thereof cannot be eliminated
entirely. To minimize risks of damage to property or injury
(including death) to persons arising from defects in the
products, customers must incorporate sufficient safety
measures in their work with the system and have to heed
the statuted canonic use.
ARRI or its subsidiaries expressly excludes any liability,
warranty, demand or other obligation for any claim,
representation, or cause, or action, or whatsoever, express
or implied, whether in contract or tort, including negligence,
or incorporated in terms and conditions, whether by statue,
law or otherwise. In no event shall ARRI or its subsidiaries
be liable for or you have a remedy for recovery of any
special, direct, indirect, incidental, or consequential damages,
including but not limited to lost profits, lost savings, lost
revenues or economic loss of any kind or for any claim by
third party, downtime, good-will, damage to or replacement of equipment or property, any costs or recovering
The ARRI FEM-2 is only available for commercial customers.
The customer grants by utilization, that the ARRI FEM-2
or other components of the system are only deployed
ARRI or its subsidiaries does not assume any liability for
infringement of patents, copyrights or other intellectual
property rights of third parties by or arising from the use
of ARRI products or any other liability arising from the use
of such products. No license, express, implied or otherwise,
is granted under any patents, copyrights or other intellectual
property rights of ARRI or others.
Disclaimer
2.2 Disclaimer
7
Disclaimer
8
of any material or goods associated with the assembly
or use of our products, or any other damages or injury
of persons and so on or under any other legal theory.
In the case one or all of the forgoing clauses are not allowed
by applicable law, the fullest extent permissible clauses
by applicable law are validated.
ARRI is a registered trademark of Arnold & Richter Cine
Technik GmbH & Co Betriebs KG.
The FEM-2 is an expansion module for the ARRIFLEX 435
Advanced camera that provides the following functions:
• LDD (Lens Data Display) interface
• CCU interface (RS232)
• ACC interface
• Time code exposure
according to SMPTE RP136 (Barcode)
• Controls up to three CLM-2 motors
• Two LCS bus interfaces for CLM-1, WHA-2 and ZMU-1
• URM-1 (Universal Radio Module) compatible
Compatibility
To use the FEM-2 with the ARRIFLEX 435 Advanced
the following Versions of Software are necessary:
435 Advanced: SW 2.73 or higher
Firmware 2.65 or higher
WRC-1: V 1.08 or higher
LDD: 2.59 or higher.
The System
3. General Description
The FEM-2 must only be used on the ARRIFLEX
435 Advanced. The attempt to force the
module onto the ARRIFLEX 435 or 435 ES
results in damage to the equipment!
Use only accessories that are compatible
with the FEM-2! Accessories not included in
the compatibility list below must not be used
on the FEM-2!
Incompatible accessories or accessories not
approved by ARRI could damage the FEM-2,
the camera or the accessory itself.
9
The System
The FEM-2 is compatible with the following cameras
and accessories:
Cameras
ARRIFLEX 435 Advanced ......................................................... K0.59981.0
ARRIFLEX 435 Advanced Anamorphic ....................................... K0.59982.0
ARRIFLEX 435 Advanced 3perf................................................. K0.59983.0
Lens Control
URM-1 ................................................................................... K2.52048.0
RCU-1......................................................................................K2.47197.0
No fast ramping speeds, 0.1 fps not possible
WHA-1....................................................................................K2.52070.0
No fast ramping speeds, 0.1 fps not possible
ICU-1 ......................................................................................K2.47028.0
WHA-2.................................................................................. K2.54079.0
Might lead to exposure fluctuations
ZMU-2................................................................................... K2.52093.0
See nomogram in the ICU-1 instruction manual
CLM-1 ................................................................................... K2.41378.0
CCU............................... camera speeds below 1 fps can not be programmed
CLM-2 ................................................................................... K2.52036.0
LDD ....................................................................................... K2.54012.0
LDD-FP ................................................................................... K2.54163.0
Camera Remote Control
WRC-1 (on WHA-2 or WMU-1)................................................ K2.52087.0
ESU-1 .................................................................................... K2.46006.0
Motion Control
ARRIMOTION LCB-1 ............................................................... K2.52104.0
Time Code
SMPTE Time Code Module ....................................................... K2.47294.0
10
The following devices can be used
with certain limitations
Use of the following equipment is not permitted!
UC-C2 Run Cable .....................................................................K2.52076.0
LC-S1 Power Cable ...................................................................K4.46859.0
LC-S2 Power Cable ...................................................................K2.47146.0
The System
Use of the following equipment
is not permitted
LC-S3 Power Cable ...................................................................K2.47147.0
LC-A1 Battery Adapter Cable .....................................................K2.41385.0
LC-A2 Battery Adapter Cable .....................................................K2.41386.0
LC-A3 Battery Adapter Cable .....................................................K2.44022.0
LC-C1 Run Cable ......................................................................K2.41398.0
LC-C2 Run Cable .....................................................................K2.41399.0
FEM-1......................................................................................K4.52136.0
Replaced by FEM-2
11
12
Installation and Setup
Switch off the camera and disconnect all cables
from the camera and the FEM-2 before installing
the FEM-2 on the camera.
Switch off the camera and disconnect all
cables from the camera and the FEM-2 before
installing the URM-1 on the camera.
The installation of the FEM-2 and the URM-1 has
to be carried out on a static free workstation.
Preparation
• Verify the software version of the camera before
installation:
Software version 3.xx or higher is required to
operate the FEM-2 with the
ARRIFLEX 435 Advanced.
• A 3mm Allen key is required to install the FEM-2 on
the camera.
• A 2.5mm Allen key is required to install the URM-1
on the FEM-2.
Installation and Setup
4. Setup
13
Installation and Setup
guidings
fastening
flaps
fastening screw
14
Install the FEM-2 on the right side of the camera.
Installation must be carried out at an ESDsecured workstation.
To install the device:
• The camera should be fixed ideally on a pivoting
head to secure working.
• Turn the camera off and disconnect all cables.
• Remove the screw on the FEM-1 that is installed on
the right side of the camera
photo.
• Pull the FEM-1 backwards to remove it from the camera.
• Insert the two tabs at the front of the FEM-2 into the
guiding on the camera (or IVS)
photo.
• Press the FEM-2 into the connectors on the camera.
• Secure the FEM-2 using the screw supplied
(tightening torque< 0.5Nm)
Installation and Setup
4.1 Installing the FEM-2 on the camera
• Take the FEM-2 out of its packaging.
15
Installation and Setup
cover
two screws
M3x8 A2 DIN 912
16
• Untighten the two screws
cover.
photo and remove the
• Remove the two screws (DIN 912 M3*8) from the
holes in the cover.
• Apply the URM-1 to the FEM-2.
• Secure the URM-1 to the FEM-2 using the two screws
taken from the cover (tightening torque<0.3Nm).
Insert and tighten
screws here
Installation and Setup
4.2 Installing the URM-1 radio receiver
17
Operating
Lens motor status LED
LDD socket
CLM-2 plug-in module
Direction selection switch
Radio Status RDY-LED
Channel selection switch
LCS bus sockets
ACC socket
CCU LED
CCU socket
Battery compartment for time code clock
18
LDS-Status LED
for CLM-2 motors
URM-1 module
5.1 Lens Data Display
The LDS integrated into the FEM-2 is compatible with all
lenses equipped with ARRI LDS contacts.
The LDS status LED
photo indicates the status of the
LDS system as follows:
Color
Status
Green
LDS OK
Off
No LDS lens
Red
LDS transfer error
• The lens data display is connected to the LDD socket
photo on the top of the module. The following
cables should be used:
Operating
5. Operating
LDD
K4.55855.0
LDD cable 0.5m / 1.7 ft Spiral Cable
LDD-FP K2.54172.0
LDD-FP cable 0.6m /2ft Spiral Cable
Note:
For details of how to use the lens data displays, see the operating instructions provided
with the displays.
• The installation of the lens motors is described in
chapter 5.3.
Note:
For details of how to use and clean the lens
mount, see the operating instructions for the
ARRIFLEX 435 Advanced.
19
Operating
LDS status LED
Radio status RDY-LED
cannel selection
URM-1 module
20
Select an RF channel indicated for use in your
country before switching on the system.
Do not use RF channels that are not permitted
in your country.
Only use antennas supplied by ARRI.
Do not use directional antennas, omni-directional
antennas or boosters. The RF modem could be
damaged and conformance to standards
cannot be ensured.
A radio receiver URM-1
photo can be mounted on
the FEM-2. This permits the wireless communication of
positioning information for lenses and the camera
remote control.
Note:
The installation of the URM-1 is described in
chapter 4.2.
A channel selection switch
photo and a status LED
photo for the radio receiver are integrated on the
FEM-2.
• The channel selection switch is used to adjust the
correct radio channel for data transfer according to
the following table.
Note:
The applicable regional radio guidelines must
be observed.
Operating
5.2 Radio system
• You must set the same radio channel on the FEM-2
and the assigned handheld controls.
Channel
Use
0
Europe except France and Spain,
to be used in the USA, Canada, Mexico, New Zealand
1
Europe except France and Spain,
to be used in the USA, Canada, Mexico, New Zealand
2
Europe except Spain
3
USA, Canada, Mexico, New Zealand, France
4
Japan
5
Australia
6
Australia
7
Spain
8
Corresponds to switch setting 0
9
Radio device deactivated
21
Operating
To change the radio channel:
• With the camera off, set the channel and then turn
the camera on.
• Set the channel selection switch to 9 (deactivated)
and then turn it to the required channel within half
a second.
• Set the channel selection switch on the activated
camera to the new channel, the RF LED goes red.
Then turn the camera off and back on
after around 5 seconds.
The RDY LED of the radio system
the status of the radio as follows:
Color
Status
Off
wireless remote control deactivated (channel 9 selected)
or camera deactivated
or camera has no power
alternating
radio modem is being initialized.
red/green
Do not activate WMU-1 yet.
Green blinking
wireless remote control is ready, activate the WMU-1.
Green
wireless remote control OK
Red
channel selection switch has been changed.
Wireless remote control will continue to function
but the channel will be changed the next time it is
switched on.
-> Reset to the previously selected channel
if the change was unintentional, or turn module off
photo indicates
and on again to change channel.
Red blinking
hardware error in radio module.
If this error still occurs even after restarting the camera,
replace the radio module or send the FEM-2 and radio
module for service.
Red blinking rapidly Radio fault: another URM, LDB or FEM-2
are on the same channel. Select another channel.
22
Operating
5.3 Remote Lens Control
Lens Motors
LCS-bus sockets
Both CLM-1 and CLM-2 motors can be used with the FEM-2.
• The CLM-1 motors are connected to the LCS bus
sockets
photo.
• The CLM-2 motors should be connected to the zoom,
focus and iris sockets
photo on the CLM-2 plug-in
module.
Note:
CLM-1 motor function has priority over the
CLM-2 motor.
If a CLM-1 motor is set to the function zoom, focus or iris
and is connected to the FEM-2, the corresponding CLM-2
connection is deactivated.
Each CLM-2 motor connection has a direction switch
photo and a status LED
photo.
Status LEDs
direction switches
IRIS socket
FOCUS socket
ZOOM socket
23
Operating
• Use the direction switch to change the rotational
direction of the attached motor.
The status LED indicates the following:
The LC-M1, LC-M2, LC-Z1 and LC-Z2 cables are interchangeable and differ only in their appearance and length.
Color
Status
Off
no motor connected
Red
motor connected, but no handheld control found
Cable
Appearance
Green
motor OK
LC-M1
Spiral, 1m long outstretched
Green blinking
motor OK, but in an end stop
LC-M2
Straight, 0.15m long
Rot blinking
motor conflict: CLM-1 assigned to the same function
LC-Z1
Straight, 3.5m long
LC-Z2
Straight, 7m long
Red/green blinking calibrating
24
The following pages show some of the possible setups
with the LCS system. These are only samples and further
variations are of course possible.
CLM-1 Zoom
CLM-1 Focus
LC-F2
LC-M1
LC-M2
Operating
CLM-1 Iris
ZMU-1, FIU-1 and CLM-1 Motors
LC-M2
FIU Focus
LC-F1
FIU Iris
LC-Z1
ZMU
25
Operating
CLM-2 Iris
ZMU-1, FIU-1 and CLM-2 Motors
LC-F2
FIU Focus
LC-F1
FIU Iris
26
LC-Z1
ZMU
CLM-2 Focus
CLM-2 Zoom
WFU-1
WZU-1
WHA-2
LC-M1
CLM-1 Zoom
LC-M2
CLM-1 Focus
Operating
CLM-1 Iris
WFU-1, WZU-1 and WHA-2 mit CLM-1 Motors
LC-M2
LC-Z1
27
WFU-1
WZU-1
WHA-2
Operating
WFU-1, WZU-1 and WHA-2 mit CLM-2 Motors
LC-Z1
28
CLM-2 Iris
CLM-2 Focus
CLM-2 Zoom
Mixed Operation
LC-M1
CLM-1 Zoom
LC-M2
WHA-2
WFU-1
Operating
CLM-1 Focus
LC-Z1
CLM-2 Iris
LC-Z1
ZMU
29
Operating
CLM-1 Focus
Wireless Control of Focus and Iris,
Zoom via ZMU-1
CLM-1 Zoom
WMU-1
LC-M1
LC-M2
CLM-2 Iris
LC-Z1
ZMU
30
WFU-1
WMU-1
WZU-1
CLM-2 Iris
CLM-2 Focus
CLM-2 Zoom
Operating
Zoom, Focus and Iris Wireless
WFU-1
31
Operating
CLM-1 Iris
Zoom, Focus and Iris Wireless
via Two Separate Handheld Controls
LC-M1
WMU-1
32
WZU-1
WMU-1
WFU-1
CLM-1 Zoom
LC-M2
CLM-1 Focus
LC-M2
Note:
For details of how to use the RCU-1 and WRC-1,
please see the instruction manuals supplied
with these units.
For details of how to use RCU-1 and ESU-1,
please see the instruction manual for the
ARRIFLEX 435 Advanced.
The FEM-2 enables the camera to be remote controlled
by cable and via wireless remote control.
Only one control unit may be connected to the FEM-2 at
any time.
If the remote control is carried out wireless (WRC-1 with
WMU-1) or LCS (WRC-1 with WHA-2), the CCU LED
indicates that the CCU socket is not available.
Color
Status
Red
CCU socket not available
Green
CCU socket for CCU, RCU, LCC
Operating
5.4 Camera remote control
The following pages will show up some exaples for the
setup:
33
Operating
WRC-1 via wireless remote control
WRC-1 + WMU-1
34
Operating
WRC-1 with WHA-2 via cable
LC-M1
WRC-1 + WHA-2
35
Operating
WRC-1 with WHA-1
WC-W1
WRC-1 + WHA-2
36
KC39
Operating
RCU-1
RCU-1
37
Operating
CCU-1
KC24S
CCU-1
38
Check if the area for the time code (barcode)
exposure at the edge of the film is outside of
the image area defined by the used format mask.
If the selected format mask does not cover the
time code area, the time code will be exposed
into the image area.
Operation
Note:
Changing the batteries
The batteries for the time code clock are located under
a cover on the bottom of the FEM-2
photo.
• Use a coin to screw open the battery compartment.
Operating
5.5 Time code
The correct time code must be set after changing
the battery.
Time code operation is described in the instruction
manual for the ARRIFLEX 435 Advanced.
Battery type
Two batteries
Type
LR6
USA
AA
A, D, CH
Mignon
battery compartment
39
Technical Data
6. Technical Data
Operating temperature .............. -20°C to + 50°C
Operating voltage..................... As for the ARRIFLEX 435 Advanced
Protection type.......................... IP 42
LDD plug.................................. For ARRI LDD or LDD-FP or ARRIMOTION LCB
connection
LCS bus ................................... 5pol as per ARRI standard
Max 2.5 A on both sockets in total
Compatible with WHA-2, ZMU-1 and CLM-1
CLM-2 connectors ..................... 1 each for zoom, focus and iris
CLM-2 and CFM-1 compatible
Max 800mA each
TC........................................... SMPTE RP136
TC batteries.............................. 2 type AA
TC time code accuracy .............. 3ppm over operating temperature range
40
Instruction Manual for ARRIFLEX 435 Advanced.......................... K5.58231.0
Instruction Manual for the WRC-1 in German ............................. K5.43660.0
Instruction Manual for the WRC-1 in English ............................... K5.43668.0
Instruction Manual for the LCS in German .................................. K5.52422.0
Instruction Manual for the LCS in English .................................... K5.52423.0
Additional Documentations
7. Additional Documentations
41
technical data are subject to change without notice
© ARRI 2003
available languages:
Deutsch K5.60901.0
English K5.60902.0
ARNOLD & RICHTER CINE TECHNIK
Türkenstr. 89 • D-80799 München
Phone +49 – 089 – 38 09 – 0 • Fax +49 – 089 – 38 09 – 12 44
www.arri.com