1
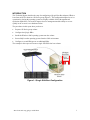
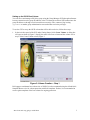
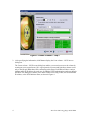
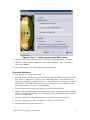
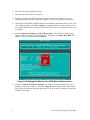
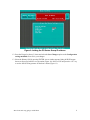
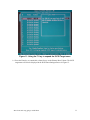
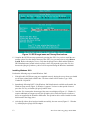
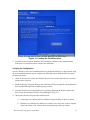
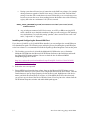
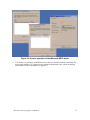
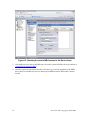
TECHNICAL REPORT PS SERIES DEPLOYMENT – BOOT FROM SAN USING QLOGIC ISCSI HOST BUS ADAPTERS ABSTRACT This Technical Report describes the procedure to boot a Windows operating systems from a PS Series SAN volume using QLogic iSCSI HBAs. TR1030 V2.0 Copyright © 2009 Dell Inc. All Rights Reserved. Dell™ EqualLogic™ is a trademark of Dell Inc. All trademarks and registered trademarks mentioned herein are the property of their respective owners. Possession, use, or copying of the documentation or the software described in this publication is authorized only under the license agreement specified herein. Dell, Inc. will not be held liable for technical or editorial errors or omissions contained herein. The information in this document is subject to change. June 2009 PREFACE Thank you for your interest in Dell™ EqualLogic™ PS Series storage products. We hope you will find the PS Series products intuitive and simple to configure and manage. PS Series arrays optimize resources by automating volume and network load balancing. Additionally, PS Series arrays offer all-inclusive array management software, host software, and free firmware updates. The following value-add features and products integrate with PS Series arrays and are available at no additional cost: Note: The highlighted text denotes the focus of this document. • PS Series Array Software o o • Group Manager GUI: Provides a graphical user interface for managing your array Group Manager CLI: Provides a command line interface for managing your array. Manual Transfer Utility (MTU): Runs on Windows and Linux host systems and enables secure transfer of large amounts of data to a replication partner site when configuring disaster tolerance. You use portable media to eliminate network congestion, minimize downtime, and quick-start replication. Host Software for Windows o o • Firmware – Installed on each array, this software allows you to manage your storage environment and provides capabilities such as volume snapshots, clones, and replicas to ensure data hosted on the arrays can be protected in the event of an error or disaster. Host Integration Tools Remote Setup Wizard (RSW): Initializes new PS Series arrays, configures host connections to PS Series SANs, and configures and manages multipathing. Multipath I/O Device Specific Module (MPIO DSM): Includes a connection awareness-module that understands PS Series network load balancing and facilitates host connections to PS Series volumes. VSS and VDS Provider Services: Allows 3rd party backup software vendors to perform off-host backups. Auto-Snapshot Manager/Microsoft Edition (ASM/ME): Provides point-in-time SAN protection of critical application data using PS Series snapshots, clones, and replicas of supported applications such as SQL Server, Exchange Server, Hyper-V, and NTFS file shares. SAN HeadQuarters (SANHQ): Provides centralized monitoring, historical performance trending, and event reporting for multiple PS Series groups. Host Software for VMware o Storage Adapter for Site Recovery Manager (SRM): Allows SRM to understand and recognize PS Series replication for full SRM integration. o Auto-Snapshot Manager/VMware Edition (ASM/VE): Integrates with VMware Virtual Center and PS Series snapshots to allow administrators to enable Smart Copy protection of Virtual Center folders, datastores, and virtual machines. o MPIO Plug-In for VMware ESX: Provides enhancements to existing VMware multipathing functionality. Current Customers Please Note: You may not be running the latest versions of the tools and software listed above. If you are under valid warranty or support agreements for your PS Series array, you are entitled to obtain the latest updates and new releases as they become available. To learn more about any of these products, contact your local sales representative or visit the Dell™ EqualLogic™ site at http://www.equallogic.com. To set up a Dell EqualLogic support account to download the latest available PS Series firmware and software kits visit: https://www.equallogic.com/secure/login.aspx?ReturnUrl=%2fsupport%2fDefault.aspx Boot From SAN using QLogic iSCSI HBAs i 2 Boot From SAN using QLogic iSCSI HBAs TABLE OF CONTENTS Preface .................................................................................................................................... i Revision Information ........................................................................................................... iv QLogic Revision Information .............................................................................................. iv Windows 2003 Revision Information .................................................................................. iv PS Series Software Revision Information ............................................................................ iv Introduction ............................................................................................................................1 Server and Group Requirements ............................................................................................2 Steps for Booting from the SAN ............................................................................................2 Setting up the iSCSI Boot Volume .................................................................................3 Prepare the Boot Server ..................................................................................................5 Configuring the QLogic HBA ........................................................................................6 Installing Windows 2003 ..............................................................................................12 Verifying the Configuration ..........................................................................................13 Installing and Configuring the Second HBA Port ........................................................14 For More Information ..........................................................................................................17 Technical Support and Customer Service ............................................................................17 Boot From SAN using QLogic iSCSI HBAs iii REVISION INFORMATION The following table describes the release history of this Technical Report. Report Date Document Revision 1.0 March 2007 Initial Release 2.0 June 2009 Updates with new Dell template QLOGIC REVISION INFORMATION The following table lists the revisions of the QLogic BIOS, Firmware, SANsurfer Manager, and the Windows Driver used in the preparation of this report. HBA Models BIOS Firmware Windows Driver QLA4050, QLA4050C, QLA4052C, QLA4060C, QLA4062 1.14 3.0.1.49 2.1.4.19 WINDOWS 2003 REVISION INFORMATION The following table reflects the service pack revision for the Windows Server 2003 operating system used to prepare this report. Vendor Model Software Revision Microsoft® Windows® Server & Storage Server 2003 SP1, SP2, R2, R2 SP2 PS SERIES SOFTWARE REVISION INFORMATION The following table reflects the revision information of Dell EqualLogic product software and firmware supported for this configuration. PS Series Firmware Host Integration Tools V3.2.8 or later HIT v3.0 or later 4 Boot From SAN using QLogic iSCSI HBAs INTRODUCTION This Technical Report describes the steps for configuring a QLogic Host Bus Adapter (HBA) to boot from an iSCSI volume in a PS Series group (Figure 1). This configuration improves server operations by placing the operating system on a highly available SAN with snapshot and replication capabilities. The result is improved server management and the ability to recover quickly in the event of server hardware failure. The procedures in this report show you how to: • Prepare a PS Series group volume. • Configure the QLogic HBA. • Install the Windows 2003 operating system onto the volume. • Successfully boot the operating system from the SAN environment. • Configure a second HBA port or an additional HBA. The example in this report will create a single 5GB PS Series boot volume. Figure 1: QLogic SAN Boot Configuration Boot From SAN using QLogic iSCSI HBAs 1 SERVER AND GROUP REQUIREMENTS This Technical Report assumes that the user has basic familiarity with PS Series group setup and management using the Group Manager Graphical User Interface (GUI). The user should also be comfortable with creating and connecting to group volumes and displaying connection status. The PS Series group must be previously configured with IP, subnet, and gateway addresses that will be accessible by the QLogic HBA once it is configured as described in this report. The procedures described in this report were conducted with a dual 2.4GHZ x86 server platform with 1GB of main memory. The QLogic QLA4052C iSCSI HBA was used and configured in the server. This configuration satisfied the QLogic SAN boot requirements. Also, the server BIOS was verified as up-to-date and able to support a SAN boot. Note: The server must have a 3.25” floppy disk drive and a bootable CD-ROM or DVD drive to be used for the <F6> driver load during the Windows 2003 installation. Network access between the PS Series group and the server will be provided through a Gigabit Ethernet network switch. Be sure to configure the switch according to guidelines provided in the Technical Report, Storage Array Network Performance Guidelines available on the EqualLogic Support website. The latest QLogic Windows SCSIport Miniport Driver files must be available and extracted to a 3.25” floppy disk. You can obtain this self-extracting kit from the QLogic website. A Windows Server 2003 CD and valid license key are required during the Windows installation portion of this report. STEPS FOR BOOTING FROM THE SAN The basic steps for booting from a PS Series group SAN are as follows: 1. Set up the iSCSI volume. Using the Group Manager GUI or CLI (the GUI is used in this report), create and prepare the volume that will be used as the SAN boot device. 2. Prepare the boot server. This step includes installing the HBA and loading the HBA driver and operating system disks. 3. Configure the HBA parameters. This step will be broken down into separate activities, which include enabling the HBA BIOS, providing the correct IP information for the iSCSI initiator, enabling the iSCSI boot capability of the HBA, setting the PS Series group IP address, and selecting the correct iSCSI target name for the operating system boot. 4. Install Windows 2003. During this step, the boot server is rebooted, allowing the Windows 2003 distribution CD or DVD to boot and begin the operating system load to the PS Series group boot volume. 5. Verify the configuration. After the Windows 2003 installation has finished and you have rebooted the server and completed final installation activities, you can install the QLogic SANsurfer Manager and complete final system checks. 2 Boot From SAN using QLogic iSCSI HBAs Setting up the iSCSI Boot Volume You can access and manage a PS Series group using the Group Manager GUI (through an Internet browser connection to the group IP address) or the CLI (through a telnet or SSH connection to the group IP address or through a serial connection to an array). Once connected, log in using grpadmin or another group administration account that has read-write privileges. To use the GUI to set up the iSCSI volume that will be the boot device, follow these steps: 1. In the Activities panel of the GUI under Getting Started, click Create Volume. A dialog box will open as shown in Figure 2. Specify the name of the boot volume and the volume size in step 2 of the Create Volume wizard, Figure 3. Figure 2: Volume Creation – Step 1 Dell suggests a minimum boot volume size of 20GB. It is also recommend using the default 100% Snapshot Reserve size for volume protection with SAN snapshots. Further, it is recommended to create regular snapshots of the boot volume for ongoing protection. Boot From SAN using QLogic iSCSI HBAs 3 Figure 3: Volume Creation – Step 2 2. After specifying the information, click Next to display the Create volume – iSCSI Access dialog box. The Create volume – iSCSI Access dialog box enables you to restrict access to the volume by creating an access control record. It is a good practice to protect and limit boot volume access only to the QLogic HBA that will be connecting to this target. Each HBA will have a unique initiator name for IP address for each port. In addition CHAP authentication can be set through the HBA. This dialog box enables you to limit volume access using CHAP, the iSCSI initiator IP address, or the iSCSI initiator name, as shown in Figure 4. 4 Boot From SAN using QLogic iSCSI HBAs Figure 4: Step 3 – Limiting access to the Boot volume 3. Select the desired access method and then click Next to display the summary dialog box. 4. Check the volume parameters displayed in the summary dialog box. If the information is correct, click Finish. The boot volume is now ready for the operating system installation. Prepare the Boot Server To set up the boot server, follow these steps: 1. As noted in Server and Group Requirements, the server should contain a bootable CD or DVD drive and a 3.5” floppy drive. Using the server’s BIOS setup utility, ensure that the CD or DVD drive is bootable, is configured as drive C:, and comes before the floppy drive and directattached IDE or SCSI disk drives in the boot order. It may be necessary to disable any other direct-attached disks on the server to accomplish this. 2. Follow the directions provided in the HBA users guide and install the HBA. 3. Obtain the QLogic Miniport driver kit from either the QLogic website or from the distribution CD that is included with the HBA. Follow the instructions provided with the kit to extract the files to a 3.5” floppy disk. 4. Insert the floppy disk created during the previous step into the server’s floppy drive. 5. Insert the Windows Server 2003 distribution disc into the server’s CD drive. 6. Shut down and turn off power to the server. Boot From SAN using QLogic iSCSI HBAs 5 Configuring the QLogic HBA At this time, the boot server has been prepared according to the instructions in Prepare the Boot Server and should be powered off with the QLogic driver floppy disk and the Windows Server 2003 distribution disc installed in their respective drives. Follow the steps below to set up the QLA405x HBA: 1. Turn on power to the server and be prepared to press <CTRL> + Q as soon as the QLogic Corporation banner is displayed (as shown in the example in Figure 5). Figure 5: Entering the QLogic Fast!UTIL Setup program A few seconds after you do this, the Fast!UTIL setup menu appears. 2. From the Fast!UTIL Options menu, select Configuration Settings. This opens the Configuration Settings menu. Select Host Adapter Settings to open the Host Adapter Settings screen shown in Figure 6. 6 Boot From SAN using QLogic iSCSI HBAs Figure 6: The Host Adapter Settings screen. 3. Verify that the QLA405x is loaded with the minimum revision of 1.09. 4. Enable the Spinup Delay. In some network configurations the iSCSI target may not be discovered at boot time; enabling the Spinup Delay setting eliminates this problem. 5. Enter the Initiator IP Address (Figure 7), the address assigned specifically to the QLogic HBA. Figure 7: Entering the IP address for the QLogic initiator Boot From SAN using QLogic iSCSI HBAs 7 6. Enter the subnet mask address (netmask). 7. Enter the gateway IP address (if required). 8. If desired, configure the CHAP user name and password (secret) at this time. For more information on using CHAP with PS Series groups, see the Group Administration manual. 9. Once the QLA405x BIOS is enabled and the network address information entered, press <Esc> twice. When prompted, select Save Changes to commit the changes. Expect a delay of five to ten seconds while the data is being saved. The Fast!UTIL option screen appears when the save is complete. 10. Select Configuration Settings, then iSCSI Boot Settings. The iSCSI Boot Settings menu appears, as shown in Figure 8. Use the Tab key to navigate to the Adapter Boot Mode field and press Enter. Set the Boot Mode to Manual. Figure 8: Enabling Boot Mode on the iSCSI Boot Settings screen. 11. Navigate to Primary Boot Device Settings. Press Enter to open the Primary Boot Device Settings screen shown in Figure 9. Select the Target IP option and press Enter. Enter the PS Series group IP Address in the popup that appears. You do not have to change the Target Port or Boot LUN settings. 8 Boot From SAN using QLogic iSCSI HBAs Figure 9: Adding the PS Series Group IP address 12. Press the Escape key three (3) times and select the Save Changes option on the Configuration settings modified screen. Save your changes. 13. Select the Primary field by pressing ENTER. A new window appears listing all iSCSI targets that were discovered after the save operation (Figure 10). Select a LUN and press the <F1> key to see the full iSCSI target name for the boot volume (Figure 11). Boot From SAN using QLogic iSCSI HBAs 9 Figure 10: Verifying that the Boot Volume has been Discovered and Connected 10 Boot From SAN using QLogic iSCSI HBAs Figure 11: Using the F1 key to expand the iSCSI Target name 14. Press the Enter key to commit this volume for use as the Primary Boot Volume. The iSCSI target name will now be displayed in the iSCSI Boot Settings menu as in Figure 12. Boot From SAN using QLogic iSCSI HBAs 11 Figure 12: iSCSI target name as Primary Boot volume 15. Complete the iSCSI boot setup operation by pressing the <ESC> key twice to recall the save settings option. Save the changes then press the <ESC> key one more time to select Reboot System. Before rebooting the server, verify that the QLogic Driver Disk and the Windows 2003 Distribution are located in their respective drives. Be prepared to press the <F6> key because the QLogic QLA40xx.sys driver will be required during the Windows installation. Installing Windows 2003 Perform the following steps to install Windows 2003: 1. If the QLA405x iSCSI boot setup was completed correctly, during the server reboot you should see the boot volume listed at POST time. The boot volume will be listed as Type - Disk, Vendor ID - EQLOGIC. 2. Immediately following POST, if the Windows 2003 distribution is available and bootable, the Windows Setup screen (Figure 12, Window 1) appears. You have a short period of time to press the <F6> key to load the QLogic QLA405x driver. 3. Once the <F6> interrupt has been trapped, the next screen displayed (Figure 12 – Window 2) requires additional user input to specify the QLA40xx driver. Enter the letter S to indicate a driver not supplied in the Windows distribution. The QLA40xx driver will be loaded from the disk located in the floppy drive. 4. After the QLA40xx driver has been loaded successfully, the next screen (Figure 13 – Window 3), will display the QLogic iSCSI Adapter. 12 Boot From SAN using QLogic iSCSI HBAs Figure 13: Loading the QLA40xx driver 5. From this point forward, the Windows 2003 installation continues in the standard manner. Follow the on-screen directions to complete the installation. Verifying the Configuration Once the Windows Server 2003 installation has been completed and the server has rebooted using the newly installed operating system, complete the following steps to finish the PS Series group SAN boot procedure. 1. Check for unexpected events in the Windows Event Viewer and check that the server reboots quickly and as expected. 2. Install the QLogic SANsurfer Manager provided on the CD that is supplied with the QLA405x kit or download the application from the QLogic website. 3. After the SANsurfer has been installed you can manage additional iSCSI data volumes that have been created using the PS Series Group Manager GUI or CLI. 4. Other post-SAN boot setup activities should include: a. Connecting a second boot path if available for high availability to the boot volume. b. With the server shutdown so that the boot volume is in a static state, create a snapshot of the boot volume. This will provide an original backup of the boot volume. Boot From SAN using QLogic iSCSI HBAs 13 c. During events that will cause loss of connection to the SAN boot volume, (for example during a firmware upgrade of the PS Series array), if the servers Disk TimeOutValue setting is less than 120 seconds then write errors followed by a server crash may occur. In order to prevent the server from crashing increase the default value of the following registry data value to a minimum of 120 (78 hex) seconds. HKEY_LOCAL_MACHINE\System\CurrentControlSet\Services\Disk\ TimeOutValue d. Any switch ports connected to PS Series arrays, or to NICs or HBAs carrying iSCSI traffic, should be set so that link transitions on that port will not trigger a full spanningtree recalculation. Cisco calls this setting "portfast"; other vendors use the terms "end node", "edge node" or "edge port". Installing and Configuring the Second HBA Port If you have a QLA4052 or (2) QLA4050 HBAs installed, you can configure the second HBA port for redundant boot paths. The following steps outline the process for adding the second HBA port to the boot volume. It’s recommended to install the EqualLogic Host Integration Tools at this point. 1. The first thing you need to do is install the Multipath I/O DSM on the server. Obtain the Multipath I/O DSM from the Microsoft iSCSI Initiator Software at the link below and install the updated iSCSI Initiator software. Be sure to check the box for Microsoft MPIO Multipathing Support for iSCSI. http://www.microsoft.com/downloads/details.aspx?FamilyID=12cb3c1a-15d6-4585-b385befd1319f825&DisplayLang=en 2. Reboot the server as requested. 3. Ensure MPIO has selected the boot volume. Open up the Microsoft iSCSI Initiator service located on the desktop of your system. Select Targets tab and locate the boot volume. Click the Details button to open up target properties. Select the Device tab, highlight one of the device names, and click the advanced tab as in Figure 14. If the MPIO driver has worked correctly you will see mpio in front of the Device Interface Name. If not Log On to the volume from the iSCSI Initiator Properties window and enable Multi-path support. 14 Boot From SAN using QLogic iSCSI HBAs Figure 14: Correct operation of the Microsoft MPIO driver 4. You will have to grant the second HBA access to the boot volume through the EqualLogic PS series group manager GUI. You do this by opening the Access tab of the volume and adding the IP address of the second HBA as in Figure 15. Boot From SAN using QLogic iSCSI HBAs 15 Figure 15: Granting the second HBA access to the Boot volume 5. After adding access to the second HBA port, reboot the system and follow the steps outlined in Configuring the QLA405x HBA. 6. Once the system reboots and the Windows OS comes up you will be prompted by the MPIO driver that it has installed new devices and needs an additional reboot. Reboot the system as needed. 16 Boot From SAN using QLogic iSCSI HBAs FOR MORE INFORMATION For detailed information about PS Series arrays, groups, and volumes see the following documentation: • Release Notes. Provides the latest information about PS Series storage arrays and groups. • QuickStart. Describes how to set up the hardware and start using a PS Series storage array. • Group Administration. Describes how to use the Group Manager GUI to manage a PS Series group. This manual provides comprehensive information about product concepts and procedures. • CLI Reference. Describes how to use the Group Manager command line interface to manage a group and individual arrays. • Hardware Maintenance. Provides information on maintaining the PS Series storage array hardware. The QuickStart and Hardware Maintenance manuals are printed and shipped with the PS Series array. They are also located on the documentation CD-ROM that is shipped with the array, along with the Group Administration and CLI Reference manuals and the Group Manager online help. The Host Integration Tools kit and documentation will be available on the support website (support.dell.com/EqualLogic) and on a CD-ROM that is shipped with the PS Series array. TECHNICAL SUPPORT AND CUSTOMER SERVICE Dell's support service is available to answer your questions about PS Series arrays. If you have an Express Service Code, have it ready when you call. The code helps Dell's automated-support telephone system direct your call more efficiently. Contacting Dell Dell provides several online and telephone-based support and service options. Availability varies by country and product, and some services may not be available in your area. For customers in the United States, call 800-945-3355. Note: If you do not have an Internet connection, you can find contact information on your purchase invoice, packing slip, bill, or Dell product catalog. To contact Dell for sales, technical support, or customer service issues: 1. Visit support.dell.com. 2. Verify your country or region in the Choose A Country/Region drop-down menu at the bottom of the window. 3. Click Contact Us on the left side of the window. 4. Select the appropriate service or support link based on your need. 5. Choose the method of contacting Dell that is convenient for you. Online Services You can learn about Dell products and services on the following websites: Boot From SAN using QLogic iSCSI HBAs 17 • www.dell.com/ • www.dell.com/ap/ (Asian/Pacific countries only) • www.dell.com/jp (Japan only) • www.euro.dell.com (Europe only) • www.dell.com/la (Latin American countries) • www.dell.ca (Canada only) You can access Dell Support through the following websites: • support.dell.com • support.dell.com/EqualLogic • support.jp.dell.com (Japan only) • support.euro.dell.com (Europe only) 18 Boot From SAN using QLogic iSCSI HBAs