1
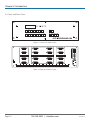
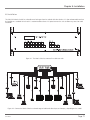
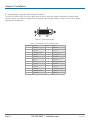
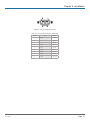
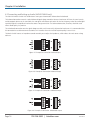
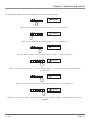
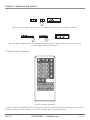
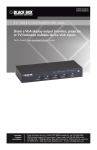
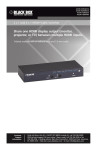
AVSW-DVI8x8 February 2010 MT1000A-85-R4 VSW-DVI8x8 8x8 DVI-D Matrix Switches A high-performance matrix switch BLACK BOX for multiple video and audio signals. ® Switch manually, from a remote control unit, or via a simple-to-use RS-232 connection and your computer. Customer Support Information Order toll-free in the U.S.: Call 877-877-BBOX (outside U.S. call 724-746-5500) FREE technical support 24 hours a day, 7 days a week: Call 724-746-5500 or fax 724-746-0746 Mailing address: Black Box Corporation, 1000 Park Drive, Lawrence, PA 15055-1018 Web site: www.blackbox.com • E-mail: [email protected] FCC and Industry Canada Statements Federal Communications Commission and Industry Canada Radio Frequency Interference Statements This equipment generates, uses, and can radiate radio-frequency energy, and if not installed and used properly, that is, in strict accordance with the manufacturer’s instructions, may cause interference to radio communication. It has been tested and found to comply with the limits for a Class A computing device in accordance with the specifications in Subpart B of Part 15 of FCC rules, which are designed to provide reasonable protection against such interference when the equipment is operated in a commercial environment. Operation of this equipment in a residential area is likely to cause interference, in which case the user at his own expense will be required to take whatever measures may be necessary to correct the interference. Changes or modifications not expressly approved by the party responsible for compliance could void the user’s authority to operate the equipment. This digital apparatus does not exceed the Class A limits for radio noise emission from digital apparatus set out in the Radio Interference Regulation of Industry Canada. Le présent appareil numérique n’émet pas de bruits radioélectriques dépassant les limites applicables aux appareils numériques de la classe A prescrites dans le Règlement sur le brouillage radioélectrique publié par Industrie Canada. We‘re here to help! If you have any questions about your application or our products, contact Black Box Tech Support at 724-746-5500 or go to blackbox.com and click on “Talk to Black Box.” You’ll be live with one of our technical experts in less than 30 seconds. Page 2 724-746-5500 | blackbox.com AVSW-DVI8x8 NOM Statement Instrucciones de Seguridad (Normas Oficiales Mexicanas Electrical Safety Statement) 1. Todas las instrucciones de seguridad y operación deberán ser leídas antes de que el aparato eléctrico sea operado. 2. Las instrucciones de seguridad y operación deberán ser guardadas para referencia futura. 3. Todas las advertencias en el aparato eléctrico y en sus instrucciones de operación deben ser respetadas. 4. Todas las instrucciones de operación y uso deben ser seguidas. 5. El aparato eléctrico no deberá ser usado cerca del agua—por ejemplo, cerca de la tina de baño, lavabo, sótano mojado o cerca de una alberca, etc. 6. El aparato eléctrico debe ser usado únicamente con carritos o pedestales que sean recomendados por el fabricante. 7. El aparato eléctrico debe ser montado a la pared o al techo sólo como sea recomendado por el fabricante. 8. Servicio—El usuario no debe intentar dar servicio al equipo eléctrico más allá a lo descrito en las instrucciones de operación. Todo otro servicio deberá ser referido a personal de servicio calificado. 9. El aparato eléctrico debe ser situado de tal manera que su posición no interfiera su uso. La colocación del aparato eléctrico sobre una cama, sofá, alfombra o superficie similar puede bloquea la ventilación, no se debe colocar en libreros o gabinetes que impidan el flujo de aire por los orificios de ventilación. 10. El equipo eléctrico deber ser situado fuera del alcance de fuentes de calor como radiadores, registros de calor, estufas u otros aparatos (incluyendo amplificadores) que producen calor. 11. El aparato eléctrico deberá ser connectado a una fuente de poder sólo del tipo descrito en el instructivo de operación, o como se indique en el aparato. 12. Precaución debe ser tomada de tal manera que la tierra fisica y la polarización del equipo no sea eliminada. 13. Los cables de la fuente de poder deben ser guiados de tal manera que no sean pisados ni pellizcados por objetos colocados sobre o contra ellos, poniendo particular atención a los contactos y receptáculos donde salen del aparato. 14. El equipo eléctrico debe ser limpiado únicamente de acuerdo a las recomendaciones del fabricante. 15. En caso de existir, una antena externa deberá ser localizada lejos de las lineas de energia. 16. El cable de corriente deberá ser desconectado del cuando el equipo no sea usado por un largo periodo de tiempo. 17. Cuidado debe ser tomado de tal manera que objectos liquidos no sean derramados sobre la cubierta u orificios de ventilación. 18. Servicio por personal calificado deberá ser provisto cuando: A: El cable de poder o el contacto ha sido dañado; u B: Objectos han caído o líquido ha sido derramado dentro del aparato; o C: El aparato ha sido expuesto a la lluvia; o D: El aparato parece no operar normalmente o muestra un cambio en su desempeño; o E: El aparato ha sido tirado o su cubierta ha sido dañada. AVSW-DVI8x8 Page 3 Trademarks Trademarks Used in this Manual Black Box and the Double Diamond logo are registered trademarks of BB Technologies, Inc. Windows and Windows XP are registered trademarks of Microsoft Corporation. Any other trademarks mentioned in this manual are acknowledged to be the property of the trademark owners. Page 4 724-746-5500 | blackbox.com AVSW-DVI8x8 Table of Contents Table of Contents 1.0 Specifications 2.0 Safety 3.0 ............................................................................................................................................................................... 6 . ................................................................................................................................................................................. 8 Introduction . ................................................................................................................................................................................. 9 3.1 About the 8X8 DVI-D Matrix Switch......................................................................................................................................... 9 3.2 What‘s Included........................................................................................................................................................................ 9 3.3 Front and Rear Views ..............................................................................................................................................................10 4.0 Installation . ................................................................................................................................................................................11 4.1 Connecting Using Input and Output Terminals.........................................................................................................................12 4.2 Connecting and Setting up Audio............................................................................................................................................14 5.0 Operation and Control........................................................................................................................................................................15 5.1 RS-232, LAN and Third-Party Control.......................................................................................................................................15 5.2 Front Control/Operation..........................................................................................................................................................15 5.3 Entering a Sequence of Commands on the Front Control Panel................................................................................................17 5.4 Remote Control Operation.......................................................................................................................................................18 5.5 Operation of the Application Software....................................................................................................................................19 5.6 Operating the Unit through the RS-232 Connection............................................................................................................... 20 6.0 Troubleshooting. ................................................................................................................................................................................21 6.1 Contacting Black Box...............................................................................................................................................................21 6.2 Shipping and Packaging...........................................................................................................................................................21 AVSW-DVI8x8 Page 5 Chapter 1: Specifications 1.0 Specifications Specifications — Video Bandwidth — 165 MHz, all digital Clock Jitter — < 0.15 Tbit Distance (Maximum) — Input: < 36 m, 1920 x 1200 @ 60 Hz; Output: < 7 m, 1920 x 1200 @ 60 Hz Error in DC Offset — 15 mV Fall Time — < 0.3T bit (20–80%) Gain — 0 dB Input EDID — Default EDID Transfer Delay (Maximum) — 5 nS (±1nS) Maximum/Minimum Level — TMDS 2.9 V / 3.3 V Resolution (Maximum) — 1920 x 1200 @ 60 Hz Resistance — Video input and output: 50 ohms Rise Time — < 0.3 Tbit (20–80%) Signal Strength — TMDS +/- 0.4Vpp Signal Type — DVI-D digital TMDS signal Switching Speed — 200 ns (maximum) Specifications — Audio (AVSW-DVI8X8 only) CMRR — >75 dB @ 20 Hz – 20 kHz Frequency — 20 Hz – 20 kHz Gain — 0 dB Gain Offset — ±0.1 dB Input Level (Maximum) — +19.5 dBu, balanced or unbalanced Noise — 0.03% @ 1 kHz rating voltage Output Level (Maximum) — +19.5 dBu, balanced or unbalanced Resistance — Input: >10 k ohms balanced or unbalanced Output: 50 ohms unbalanced, 100 ohms balanced S/N — >90 dB Signal Type — Stereo, balanced or unbalanced Stereo Separation — >80 dB @ 1 kHz Page 6 724-746-5500 | blackbox.com AVSW-DVI8x8 Chapter 1: Specifications Specifications — Control Baud Rate and Protocol — Baud rate: 9600; data bits: 8; stop bits: 1; parity bit: none Control Application — Switch 2.0 Serial Control Port — RS-232 Serial Control Poling Protocol — 2 = TX, 3 = RX, 5 = GND Speed — Full/half-duplex 10/100M Specifications — Physical Connectors — (16) DVI-D F; (1) DB9 F; 1 RJ-45, (16) 3.8-mm screw connectors MTBF — 30,000 hours Operating Environment — Temperature: -4 to +158° F (-20 to +70° C) Humidity: 10 to 90% Power — Input: 100 – 240 VAC, 50/60 Hz, IEC 320 Size — 5.3"H x 10.2"W x 16.9"D (13.4 x 26 x 43 cm) Weight — 9.3 lb. (4.2 kg) AVSW-DVI8x8 Page 7 Chapter 2: Safety 2.0 Safety To ensure user safety, please comply with the following items during the installation, maintenance, and operation of the 8X8 DVI-D Matrix Switch. 1) The Matrix Switch must be in stable position. Use only the power supply that comes with unit. Using an unauthorized power supply may damage the unit. 2) Do not place the Matrix Switch near hot or cold surfaces or sources. 3) To avoid damage from overheating, make sure there is good ventilation, which is necessary to radiate the heat when operating the Matrix Switch. 4) The Matrix Switch should be turned off when it is not in use. 5) Do not attempt to remove the cover from the unit; high-voltage components inside could cause electric shock. 6) Do not splash any liquids or chemicals on or near the equipment. 7) Make sure all the cables are in good working condition; do not use cut or damaged cables. NOTE: The operating instructions given in this user‘s manual can be used with other DVI Matrix Switch models from Black Box; however, for any maintenance information, consult the user‘s guide for those specific products. Page 8 724-746-5500 | blackbox.com AVSW-DVI8x8 Chapter 3: Introduction 3.0 Introduction 3.1 About the 8X8 DVI-D Matrix Switch The 8X8 DVI-D Matrix Switch is a high-performance professional computer and audio signal switch that can be used for cross switching multiple computer and audio signals. Independent DVI and balance/unbalance I/O terminals enable each component signal to transmit and switch separately; this design can maximize the performance of both image and audio signal. This Matrix Switch features flexible functionality and may be used in broadcast TV engineering, in multimedia meeting rooms, for big-screen display engineering, for television education, command control centers, or other fields. It provides a power-fail local protection function, LCD display, and A/V separate switching functions. It also has an adaptable compensation to extend the input distance to 70 feet. With the RS-232 interface, it can be used with a PC, a remote control system, or any other third-party control system devices. Two versions of the 8X8 DVI-D Matrix Switch are available: the AVSW-DVI8X8 Matrix Switch with full audio capabilities, and the VSW-DVI8X8 Matrix Switch without audio. 3.2 What‘s Included: • AVSW-DVI8X8 Matrix Switch with Audio or VSW-DVI8X8 Matrix Switch • CD with application software • Remote control unit • Power supply cable • RS-232 communication cable • This user‘s manual AVSW-DVI8x8 Page 9 Chapter 3: Introduction 3.3 Front and Rear Views: Figure 3-1. Front of the Matrix Switch Figure 3-2. Back of the Matrix Switch Page 10 724-746-5500 | blackbox.com AVSW-DVI8x8 Chapter 4: Installation 4.0 Installation The 8X8 DVI-D Matrix Switch has a durable metal casing and can be stacked with other devices. It is also rackmountable and can be installed on a standard 19 inch rack. It is recommended to leave a 1U space between the units to allow easy access for cable installation. Figure 4-1. The Matrix Switch as mounted in a cabinet or rack. Figure 4-2. Connect the Matrix Switch to a broad range of audio and video inputs and outputs, depending on the model. AVSW-DVI8x8 Page 11 Chapter 4: Installation 4.1 Connecting using Input and Output Terminals The 8X8 DVI-D Matrix Switch may receive signals from DVD players, computers, graphics workstations, and other digital non-HDCP signals. The switch can provide output to projectors, video recorders, displays, and other DVI non-HDCP displays, depending on the application. Figure 4-3. DVI-D dual-ink port. Table 4-1. Pinning for the DVI-D dual-link port. Pin Number Page 12 Function Pin Number Function 1 TMDS Data 13 TMDS Data 2 TMDS Data+ 14 +5V Power 3 TMDS Data/4 Shield 15 Ground (for +5V) 4 TMDS Data 16 Hot Plug Detect 5 TMDS Data 17 TMDS Data 0– 6 DDC Clock 18 TMDS Data 0+ 7 DDC Data 19 TMDS Data 0/5 Shield 8 No Connect 20 TMDS Data5– 9 TMDS Data1 21 TMDS Data5+ 10 TMDS Data1≠ 22 TMDS Data Clock Shield 11 TMDS Data1/3 Shield 23 TMDS Clock+ 12 TMDS Data3 24 TMDS Clock– 724-746-5500 | blackbox.com AVSW-DVI8x8 Chapter 4: Installation Figure 4-4. RS-232 DB9 connector. Table 4-2. Pinning for the RS-232 connector. Number AVSW-DVI8x8 Pin Function 1 Not used Not used 2 Tx Transmit 3 Rx Receive 4 Not used Not used 5 Ground Ground 6 Not used Not used 7 Not used Not used 8 Not used Not used 9 Not used Not used Page 13 Chapter 4: Installation 4.2 Connecting and Setting up Audio (AVSW-DVI8X8 only) The 8X8 DVI-D Matrix Switch with Audio features two types of connections: balanced and unbalanced. The balanced connection transmits a pair of balanced signals along two cables. Because interference will have the same intensity and the opposite phases on the two cables, the two signals will balance each other. For the low frequency end of the audio signal especially might be susceptible to interference across a long transmission. The balanced connection, therefore, should be used where sound quality is a premium. The unbalanced connection transmits signals along one cable, and is more easily subjected to interference. It is recommended that this connection be used for consumer electronics or in instances where the need for superior quality is not an issue. The Matrix Switch features an impedance control to enable you to adjust the impedance, which reduces the noise across a long cable run. Figure 4-5. Example of Connection: Balanced Input Figure 4-6. Example of Connection: Balanced Output Figure 4-7. Example of Connection: Unbalanced Input Figure 4-8. Example of Connection: Unbalanced Output Page 14 724-746-5500 | blackbox.com AVSW-DVI8x8 Chapter 5: Operation and Control 5.0 Operation and Control 5.1 RS-232, LAN, and Third-Party Control The unit can be controlled one of four ways: • Using controls on the front panel • With the Remote Control unit that is provided with the Matrix Switch • Using a PC and Black Box‘s software controller. • Using the RS-232 control systems. 5.2 Front Control/Operation LCD display: Real-time operations and status monitor Table 5-1. Controls for operation of the Matrix Switch using the front-panel buttons. Command Codes Functions 0, 1-9 Keypad: Keys to select I/O channels and save/recall preset commands AV AV synchronal button: To transfer video and audio signal synchronously by the Matrix Switch. Example: To transfer both the video and the audio signals from input channel 3 to output channel 6. Operation: Enter this sequence: “3”, “AV”, “6”, “END”, “ENTER”. VIDEO Video button: To transfer only video signals from input channel to output channel. Example: To transfer video signals from input channel 3 to output channel 10. Operation: Enter this sequence: “3”, “VIDEO”, “1”, “0”, “END”, “ENTER”. AUDIO Audio button: To transfer only audio signals from input channel to output channel. Example: To transfer audio signals from input channel 2 to output channel 6. Operation: Enter this sequence: “2”, “AUDIO”, “6”, “END”, “ENTER”. “/” Break button: To break different channels in a command Example: To transfer video and audio from input channel 1 to output channels 2, 3, 6 at the same time Operation: Enter this sequence: “1”, “AV”, “2”, “/”, “3”, “/”, “6”, “END”, “ENTER”. END Ending command button: Use when the command input has been finished. ENTER Execute Command: To perform a command after inputting it. All button: To transfer an input channel to all output channels or switch off all output channels. Example 1: To transfer video and audio signals from input channel 7 to all output channels. Operation: Enter this sequence: “7”, “ALL“. NOTE: Commands “END” and “ENTER” do not need to be used after this command. ALL Example 2: To transfer all input signals to the corresponding output channels. In other words, to switch to this status: 1->1, 2->2, 3->3, 4->4……8->8. Operation: enter this sequence: “ALL”, “1”. Example 3: To switch off all the output channels. Operation: Enter this sequence: “ALL”, “2”. SAVE Save button: To save the present operation to a preset command. Example: To save the present operation to the preset command 2. Operation: Enter this sequence: “SAVE”, “2”. NOTE: There are 11 preset commands ranging from 0 to 10. AVSW-DVI8x8 RECALL Recall button: To recall the preset command. Example: To recall the preset command 2. Operation: Enter this sequence: “RECALL”, “2”. CANCEL Cancel button: To return to the standby status without performing any commands. Example: To cancel the input instructions “1”, “AV”, “2”, “END”. Operation: Press the “CANCEL” button after the above inputs. Page 15 Chapter 5: Operation and Control Table 5-1, continued. Controls for Operation of the Matrix Switch using the Front Panel buttons. STATUS Inquiring status button: To inquire about the present status. Example 1: To inquire the status of output channel 7. Operation: Press buttons in the following order “7”, “STATUS”. Example 2: To inquire the status of all the output channels one by one. Operation: Press the “STATUS” button. UNDO Undo button: To resume to the previous status of the command. Group programming button: To define, recall and clear a group of output channels. Example 1: To group the output channels 1, 2, 3, 4, 5 under the Group 1. Operation: Enter this sequence: “1”, “Program”, “Program”, “1”, “2”, “3”, “4”,“5”. PROGRAM Example 2: To transfer signal from input channel 1 to Group 2. Operation: Enter this sequence: “1”, “Program”, “2”. Example 3: To clear the output channels under Group 1. Operation: Enter this sequence: “1”, “Program”, “0”. NOTE: Please clear the group to be set before grouping it. “<-- ” Backspace button: To erase the last input entry that was entered. THROUGH Through button: To transfer signals directly to the corresponding output channels. Example: To transfer signals from input channels 1, 2, 3 to their corresponding output channels. Operation: Enter this sequence: “1”, “/”, “2”, “/”, “3”, “THROUGH”. CLOSE Close button: To switch off the output channels. Example: To switch off the output channels 1, 2. Operation: Enter this sequence: “1”, “END”, “2”, “END”, “CLOSE”. Lock button: To lock buttons on the front control panel hold it for 3 seconds. LOCK DEMO Page 16 NOTE: When the control panel is locked, the Matrix Switch still can be controlled via the RS-232 port. You will need a password to unlock it. Demo button: To demonstrate the commands one by one every 3 seconds. The Switch can be controlled directly by entering the following command: “Input Channel” + “Switching Mode” + “Output Channel” + “END”+ “ENTER”. 724-746-5500 | blackbox.com AVSW-DVI8x8 Chapter 5: Operation and Control 5.3 Entering a Sequence of Commands on the Front Control Panel Figure 5-1. Press the button for input channel number “1“. The LCD displays: ”1”. Figure 5-2. Press the button for switching mode “AV“. The LCD displays “B”. Figure 5-3. Press the button for the first output channel, number “3“. The LCD displays ”3”. Figure 5-4. Press the ”Break” button: ”/”. The LCD displays a comma [”,“] to indicate a break between two channels in a command. Figure 5-5. Press the button for the second output channel, number “4“. The LCD displays “4“. Figure 5-6. Press the button “END“ to finish the command. The LCD displays a period [“.“] to indicate that the sequence is completed. AVSW-DVI8x8 Page 17 Chapter 5: Operation and Control Figure 5-7. Press the ”Enter” button to execute this sequence of commands. The LCD displays, ”Switch OK“. Figure 5-8. Display feedback on LCD: The video signal of output channel 4 is transferred from the input channel 3 and the audio signal is from the input channel 2. 5.4 Remote Control Operation Figure 5-9. Remote Control Unit The Matrix Switch can be controlled with the infrared remote control. The function buttons on the remote are the same as those on the front control panel, and the remote uses the same commands and the same input sequence. Page 18 724-746-5500 | blackbox.com AVSW-DVI8x8 Chapter 5: Operation and Control 5.5 Operation of the Application Software Video Matrix Switching Software is a compatible application that can be used with this series of Matrix Switches. Requirements to run the software: • Operating system: Windows® 98/2000/NT, Windows XP®, Windows 7 • Memory: at least 32 MB • Space in hard disk: at least 10 MB • CD-ROM • COM port When the Matrix Switch connects to the COM1 or COM2 of the computer with control software, users can control the switch with that computer. You can do so by using the application “Matrix Software“ on the supplied CD-ROM or you may use a third-party control software. You can also get the software by visiting the product page at www.blackbox.com or by contacting our FREE Tech Support. AVSW-DVI8x8 Page 19 Chapter 5: Operation and Control 5.6 Operating the Unit through the RS-232 Connection Table 5-2. Operating the Matrix Switch through an RS-232 Connection Command Types System Command Operation Command Page 20 Command Codes Functions /*Type; Acquires the model‘s information. /+xxxxxxxx; Rewrites the passwords; must be eight digits. /%Lock Locks the keyboard /%Unlock Unlocks the keyboard /:BellOff Turns off the buzzer. /:BellOn; Turns on the buzzer. /^Version Acquires the version of software [x1]All. Transfer signals from input channel [x1] to all output channels All#. Transfers all input signals to matching output channels. All$. Switches off all output channels [x1]#. Transfers signals from input channel [x1] to output [X1]*[X2]$ Transfers audio signals from input channel [x1] to output channel [x2]. [X1]*[X2]% Transfers video signals from input channel [x1] to output channel [x2]. [X1]*[X2]& Transfers video signals from input channel [x1] to output channel [x2]. [x1]$ Switches off output channel [x1]. [x1] V[x2] Transfers the video signals from input channel [x1] to output channel [x2]. [x1] V[x2],[x3],[x4] Transfers the video signals from input channel [x1] to output channels [x2], [x3] and [x4]. [x1] A[x2] Transfers the audio signals from input channel [x1] to output channel [x2]. [x1] A[x2],[x3],[x4] Transfers the audio signals from input channel [x1] to output channels [x2], [x3] and [x4]. [x1] B[x2] Transfers both video and audio signals from input channel [x1] to output channel [x2]. [x1] B[x2],[x3],[x4] Transfers both video and audio signals from input channel [x1] to output channels [x2], [x3] and [x4]. [x1]P[x2] Transfers signals from input channel [x1] to all output channels in group [x2]. [x1]PP[x2],[x3],[x4] Groups output channels [x2], [x3] and [x4] under group [x1]. S[x]. Acquires the output channels in group[x]. Status[x1]. Acquires the input channel to the output channel [x1]. Status. Acquires the input channel to the output channels one by one. Save[Y]. Saves the present operation to the preset command [Y].[Y] ranges from 0 to 9. Recall[Y]. Recalls the preset command [Y]. Clear[Y]. Clears the preset command [Y]. [X1]*[X2]! Transfers both video and audio signals from input channel [x1] to output channel [x2]. 724-746-5500 | blackbox.com AVSW-DVI8x8 Chapter 5: Troubleshooting 6.0 Troubleshooting 6.1 Contacting Black Box If you determine that your Matrix Switch is malfunctioning, do not attempt to alter or repair the unit. It contains no userserviceable parts. Contact Black Box Technical Support at 724-746-5500 or [email protected]. Before you do, make a record of the history of the problem. We will be able to provide more efficient and accurate assistance if you have a complete description, including: • the nature and duration of the problem • when the problem occurs • the components involved in the problem • any particular application that, when used, appears to create the problem or make it worse 6.2 Shipping and Packaging If you need to transport or ship your Matrix Switch: • Package it carefully. We recommend that you use the original container. • If you are returning the unit, make sure you include everything you received with it. • Before you ship for return or repair, contact Black Box to get a Return Authorization (RA) number. AVSW-DVI8x8 Page 21 Notes Page 22 724-746-5500 | blackbox.com AVSW-DVI8x8 Notes AVSW-DVI8x8 Page 23 © Copyright 2011. Black Box Corporation. All rights reserved. Printed in U.S.A. Black Box® and the Double Diamond logo are registered trademarks of BB Technologies, Inc. Any third-party trademarks appearing in this publication are acknowledged to be the property of their respective owners. AVSW-DVI8x8, rev. 1 FREE, live, 24/7 Tech Support is just 30 seconds away. 724-746-5500 | blackbox.com