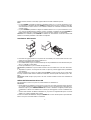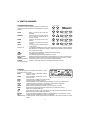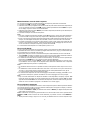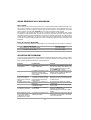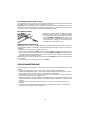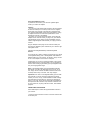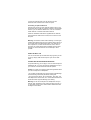
1
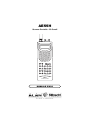
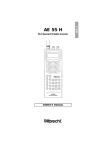
AE 55 H KURZANLEITUNG/ SHORT FORM MANUALS/ MANUALE D'USO Kurzanleitung AE 55 H Stromversorgung oder alternativ 6 Stück Batterien/Akkus Typ Mignon = AA einsetzen oder Netzteil 9 V DC (mindestens für 200 mA) einstecken. KFZ-Betrieb nur über Adapterkabel mit Spannungsreduzierung auf 9 V zulässig. Niemals 12 V direkt einspeisen! PGM so oft drücken, bis gewünschte Kanalnummer erscheint, Frequenz eingeben, mit E abspeichern. obere DC Buchse (POWER): Netz/KFZ-Betrieb 9 Volt DC (+ außen, innen) untere DC Buchse (Charge): Laden ca.14 Std, nur bei eingesetzten Akkus erlaubt! Vorsicht! Niemals herkömmliche Batterien laden! Ein/Aus/Lautstärke Rechter Drehknopf (Ein/Laut) Rauschsperre linker Drehknopf (Squelch). So einstellen, bis das Rauschen gerade verschwindet. Speichersuchlauf Suchlauf aller abgespeicherten Frequenzen. Startet immer automatisch mit dem Einschalten. Sonst SCAN drücken. Alle einprogrammierten Kanäle werden abgesucht. Bei Empfang auf einem Kanal stoppt Suchlauf. Weitersuchen SCAN drücken, oder warten, bis Signal verschwunden ist. Verzögerung vor Weitersuchen Auf gestopptem Kanal DELAY drücken (erscheint in Display) Manuelle Kanalwahl MANUAL, gewünschte Kanalnummer, MANUAL drücken. (bekannte) Frequenz einprogrammieren: PGM , gewünschte Kanalnummer, PGM, gewünschte Frequenz (mit Dezimalpunkt, z.B. 145.775 eintippen), mit E abspeichern. Frequenzbänder absuchen BAND so oft drücken, bis gewünschtes Frequenzband erscheint. 2 Sekunden später startet Suche (Achtung: Rauschsperre muß eingestellt sein!) Stoppt bei belegten Frequenzen. Zwischenspeichern einer interessanten Frequenz MON drücken Abspeichern von interessanten Frequenzen Solange Suchlauf gestoppt, E drücken. Es wird jeweils auf dem nächsten freien Kanal gespeichert. Suchlauf fortsetzen/unterbrechen Auf- oder Abwärts-Tasten drücken, bis Suchlauf startet (auch Umkehr der Suchrichtung ist mit diesen Tasten jederzeit möglich). Bei kurzem Antippen: Start/Stop bzw. kleine Schritte Monitorkanal abhören MANUAL, MON drücken. Monitorkanal abspeichern: Monitorkanal einstellen, PGM, MON, E eingeben. Die Speicherung erfolgt auf dem nächstem freien Kanal. Speicher löschen: Speicherplatz aufrufen (MANUAL, Nummer, MANUAL) PGM, Clear, E eingeben. Speicher ausblenden Speicher manuell aufrufen, L/OUT drücken. Ausgeblendeter Kanal wird im Display markiert und ist nur noch im Manual Mode aufrufbar. Ausblendung aufheben Gleiche Prozedur wiederholen. Markierung erlischt im Display. Löschen aller Einstellungen Mit spitzem Gegenstand in Loch neben POWER-Buchse verborgenen Resetschalter betätigen. Dabei CLEAR drücken. Mode d’emploi abrégé AE 55 H Alimentation en courant Installer 6 batteries d’accu, type Mignon AA ou brancher un bloc d’alimentation de 9 V CC (au moins pour 200 mA) sur le réseau. Le service en voiture n’est admissible qu’au moyen d’un câble d’adaptateur avec réduction de tension sur 9 V. Ne jamais brancher l’appareil directement sur 12 V! Douille CC supérieure (POWER): service sur le réseau/en voiture, 9 V (+ extérieur, - intérieur) Douille CC inférieure (Charge): temps de charge: environ 14 heures. Effectuer le procédé de charge seulement, si les accus sont installés dans l’appareil! Ne jamais charger des piles traditionnelles! Mise en/hors service/volume Bouton tournant droit (Mise en service / volume) Squelch Bouton tournant gauche (squelch). Régler le bouton de sorte que le bruit de fond soit justement éliminé. Balayage Balayage de toutes les fréquences mémorisées. Lors de chaque mise en service de l’appareil, le balayage commence automatiquement. Sinon appuyer sur SCAN. Tous les canaux programmés sont balayés. Le balayage s’arrête lors de la réception d’un canal. Continuer le balayage Appuyer sur SCAN ou attendre jusqu’à ce que le signal soit disparu. Délai du balayage Si le balayage s’arrête sur un canal, appuyer sur DELAY (indiqué sur l’afficheur). Sélection de canaux manuelle Appuyer sur MANUAL, le numéro de canal souhaité et de nouveau sur MANUAL. Programmer une fréquence connue ou alternativement Appuyer sur PGM, le numéro de canal souhaité et de nouveau sur PGM. Entrer la fré- quence souhaité (avec virgule décimale, entrer p.ex. 145.775). Mémoriser les données en appuyant sur E. Appuyer sur PGM jusqu’à ce que le numéro de canal souhaité soit indiqué. Entrer la fréquence et mémoriser les données en appuyant sur E. Balayer les bandes de fréquences Appuyer sur BAND jusqu’à ce que la bande de fréquences souhaitée soit indiquée. Après deux secondes le balayage commence (Attention: Le squelch doit être activé.) Le balayage s’arrête aux fréquences saisies. Mémorisation temporaire d’une fréquence intéressante Appuyer sur MON. Mémorisation des fréquences intéressantes Tant que le balayage serait arrêté, appuyer sur E. La fréquence est respectivement mémorisée sur le prochain canal libre. Continuer / interrompre le balayage Appuyer sur les touches UP/DOWN jusqu’à ce que le balayage commence (Grâce à ces touches, la direction de balayage peut toujours être changée.) En appuyant brièvement sur les touches, activation / arrêt du balayage ou balayage en petites intervalles. Ecoute du canal moniteur Appuyer sur MANUAL, MON. Mémorisation du canal moniteur Régler le canal moniteur, appuyer sur PGM, MON et E. La mémorisation s’effectue sur le prochain canal libre. Effacer l’adresse de mémoire Appeler l’adresse de mémoire à effacer (A cet effet, appuyer sur MANUAL, le numéro requis et de nouveau sur MANUAL). Appuyer sur PGM, Clear et E. Supprimer la mémoire Appeler manuellement la mémoire, appuyer sur L/OUT. Le canal supprimé est marqué sur l’afficheur et ne peut être appelé qu’en mode manuel. Annuler le marquage du canal Répéter le même procédé et la marquage sur l’afficheur disparaît. Instrucciones abreviadas AE 55 H Alimentación Insertar 6 pilas/baterias tipo mignon AA o conectar el alimentador 9 VDC (minimo 200 mA). Utilización en vehiculo únicamente mediante el cable adaptador con reducción de voltaje a 9 V. No conecte nunca 12 V directamente! Jack DC superior (Power) Red./utilización en vehiculo 9 VDC (+ ext., -int.). Jack DC inferior (Charge) Recargar aprox. 14 h, permitido solo con baterias recargables insertadas! EIN/AUS/LAUTSTÄRKE Botón giratorio derecho (ON, OFF, VOL.). frecuencia deseada (con punto decimal) y memorizar pulsando la tecla E. Alternativamente Pulsar la tecla PGM hasta que aparezca el canal deseado, introducir la frecuencia deseada y memorizar pulsando la tecla E. Barrido de bandas de frecuencia Pulsar la tecla BAND hasta que aparezca la banda de frecuencias deseada. 2 segundos después arranca el barrido automáticamente (ojo: el silenciador debe ser ajustado!). Se detiene el frecuencias ocopadas. Memorización temporal de una frecuencia Pulsar la tecla MON. Memorización de frecuencias Silenciador Mientras el barrido esté parado, pulse la tecla E. Se memorizará en el siguiente canal libre. Botón giratorio izquierdo (Squelch). Regular, hasta que el ruido de fondo justamente desaparezca. Detener el barrido/reiniciarlo Barrido de Memorias Barrido de todas las frecuencias memorizadas. Arranca siempre automáticamente con el encendido. Si no pulsar la tecla SCAN. Se hace el barrido de todos los canales memorizados. En caso de recepción en un canal, el barrido se detiene. Continuar Pulsar la tecla SCAN, o esperar que la señal desaparezca. Retardo antes de Continuar Sobre el canal de detención, pulsar la tecla DELAY (aparecerá en el display). Selección manual de canales Pulsar primero la tecla MANUAL, desqués introducir el canal deseado, y finalmente volver a pulsar la tecla MANUAL. Programar una Frecuencia Pulsar la tecla PGM, introducir el numero del canal deseado, pulsar de nuevo la tecla PGM, introducir la Pulsar las teclas UP/DOWN, hasta que el barrido se inicie (también se puede invertir el sentido de la búsqueda con estas teclas). Pulsando brevemente estas teclas: Start/Stop, y pequeños pasos. Escuchar el canal de observación Pulsar la tecla manual. Después pulsar la tecla MON. Memorizar el canal de observación Sintonizar el canal de observación, pulsar seguidamente las teclas PGM, MON y E. La memorización se hará en el siguiente canal libre. Liamar memoria deseada (Manual, número, Manual), y pulsar las teclas PGM, CLEAR y E. Marcar una Memoria Liamar la memoria manualmente, pulsar la tecla L/OUT. El canal marcado será señalado en el display y solo se podrá Ilamar a través del modo manual. Borrar el marcado Repetir el procedimiento anterior. El marcado desaparecerá del display. Borrar todos los ajustes Con un objeto puntiagudo, presione el interruptor de RESET que se encuentra oculto en el agujero al lado del Jack POWER. Mantener mientras tanto pulsada la tecla CLEAR. Verkorte handleiding AE 55 H Stroomverzorging Batterijen/accu´s 6 stuks type AA of een Netspanningsadapter 9 volt DC (minimaal 200 Ma.). Bij gebruik in de auto een spanningsadapter gebruiken die naar 9 volt is te reduceren. Nooit rechtstreeks op 12 volt aansluiten. opslaan. Frequentiebanden afzoeken Bovenste DC ingang BAND zovaak indrukken totdat het gewenste frequentiebereik verschijnt. Twee seconden later zal het zoeken worden gestart (Let op: De ruisonderdrukker moet zijn ingesteld). De scanner stopt bij een ontvangen signaal. (POWER) Netspannings/auto adapter (+ buitenkant, binnenkant) Tijdelijk opslaan van een gevonden frequentie MON drukken. Onderste DC ingang (CHARGE) Alleen gebruiken in combinatie met oplaadbare accu´s. Laadtijd ca. 14 uur. Let op ! Nooit gewone batterijen laden! Opslaan van gevonden frequentie´s Als de scanner is gestopt kunt U op de E toets drukken. De frequentie wordt op het eerstvolgende vrije geheugenkanaal geprogrammeerd. Ein/Aus/Laut Rechter draaiknop (Ein/Laut). In en uitschakelen en het regelen van het volume. Ruisonderdrukker Linker draaiknop (squelch). Zo instellen dat de ruis net verdwijnt. Zoeken voortzetten/onderbreken Op de UP of DOWN toets drukken tot het zoeken weer start (ook het omkeren van de zoekrichting is met deze toetsen in te stellen). Kort indrukken is start/stop en kleine stappen te nemen. Monitor kanaal beluisteren Geheugenkanalen scannen Het afzoeken van de ingeprogrammeerde kanalen. Start altÿd wanneer de scanner wordt ingeschakeld, anders kunt U op de SCAN toets drukken. Bij ontvangst van een kanaal zal de scanner het zoeken stoppen. Druk op MANUAL, en dan op MON. Monitor kanaal programmeren Monitor kanaal instellen, PGM, MON, E ingeven. Het opslaan gebeurt dan in het eerstvolgende vrije kanaal. Doorscannen Geheugenkanalen wissen Op SCAN drukken of wachten dat het signaal is verdwenen. Geheugenkanaal kiezen (MANUAl, kanaalnummer, MANUAL) PGM, Clear, E ingeven. Vertraging doorscannen Kanalen uitsluiten Bij ontvangst van een kanaal op DELAY drukken (verschijnt in het display). Geheugenkanaal met MANUAL kiezen, L/OUT drukken. Het uitgesloten kanaal wordt in het display gemarkeerd met L/O en is nu alleen maar in de MANUAL mode te bereiken. Handmatig kanalen kiezen MANUAL, gewenst kanaal, MANUAL drukken. Uitsluiting opheffen (bekende) Frequenties inprogrammeren PGM, gewenst kanaal, PGM, gewenste frequentie (met decimaalpunt b.v. 145.775 intikken) met E afsluiten/programmeren. Of PGM zovaak drukken totdat het gewenste kanaalnummer verschijnt, frequentie ingeven met E Zelfde procedure herhalen. L/O verdwijnt dan uit het display. Wissen van alle kanalen Met een puntig voorwerp de reset toets indrukken, welke is verborgen naast de POWER ingang. Hierbij moet U gelijktijdig de CLEAR toets ingedrukt houden. AE55H Scanner Portatile - 50 Canali SCAN MANUAL BAND MON 1 2 3 4 5 6 LIGHT 7 CLEAR PGM 8 9 DELAY L/OUT • E 0 AE55H 50 KANAL SCANNER MANUALE D’USO SOMMARIO CARATTERISTICHE PREPARAZIONE Alimentazione Installazione delle batterie Utilizzo dell’alimentazione di rete CA Utilizzo dell’alimentazione CC della batteria di un veicolo Ricarica delle batterie ricaricabili (o del pacco batterie) Collegamento dell’antenna Collegamento di un’antenna opzionale Utilizzo della clip da cintura Collegamento ad un auricolare o ad una cuffia Collegamento ad un altoparlante esterno 2 2 2 3 3 4 4 4 4 5 5 5 IL VOSTRO SCANNER Comandi della tastiera Il display Bande/Memoria monitor Bande di ricerca Memoria Monitor 6 6 6 7 7 7 OPERAZIONI PRINCIPALI Accensione dello scanner/Regolazione del volume e dello squelch Memorizzazione delle frequenze attive Memorizzazione manuale delle frequenze Ricerca nelle bande Ricerca Diretta Spostamento di una frequenza dalla memoria monitor ad un canale Monitor di una canale memorizzato Scansione dei canali Ascolto della memoria monitor Cancellazione di un canale 7 7 7 8 8 8 9 9 9 9 9 FUNZIONI AVANZATE Ritardo Esclusione di un canale dalla scansione Utilizzo della retroilluminazione Attivazione/disattivazione dei toni di tastiera Utilizzo del blocco della tastiera 10 10 10 10 10 10 GUIDA GENERALE ALLA SCANSIONE Falsi segnali Passi di scansione disponibili 11 11 11 SOLUZIONI DEI PROBLEMI Tabella dei problemi Reset/inizializzazione dello scanner 11 11 12 CURA E MANUTENZIONE 12 SPECIFICHE 13 CARATTERISTICHE Il vostro nuovo scanner portatile Albrecht AE55H vi dà la possibilità di ricevere oltre 27.000 interessanti frequenze, incluse quelle marine e radioamatoriali. Potete inserire le vostre 50 frequenze preferite in altrettanti canali (memorie) ed effettuare su di esse la scansione (ricerca automatica) cambiandone le impostazioni quando lo desiderate. Il vostro scanner ha la possibilità di effettuare la scansione di così tante frequenze perché è dotato di un microprocessore appositamente progettato - un minuscolo computer incorporato. Il vostro scanner possiede queste speciali caratteristiche: • Dieci bande di ricerca predefinite - potete ricercare trasmissioni all'interno di gamme di frequenze predefinite, in modo da trovare più velocemente le frequenze di maggior interesse. • 50 canali (memorie) - potete memorizzare sino a 50 frequenze preferite in modo da richiamarle facilmente ed effettuarne la scansione. • Rilevamento di frequenze doppie - vi avverte automaticamente se una frequenza è già stata memorizzata aiutandovi ad utilizzare la memoria dello scanner in modo più efficiente. • Memoria monitor - potete memorizzare temporaneamente una frequenza individuata durante una scansione in frequenza, e decidere successivamente se inserirla o meno in uno dei canali di memoria. • Esclusione dei canali (lockout) - permette di escludere dalla scansione determinati canali senza doverli cancellare. • Conservazione delle memorie – se si verifica un’interruzione di energia elettrica, le frequenze dei canali memorizzati e le impostazioni vengono conservate per circa un'ora. • Ritardo di scansione (due secondi) – quando termina una trasmissione, ritarda di due secondi il riavvio automatico della scansione in modo che possiate ascoltare eventuali risposte. • Blocco della tastiera – vi dà la possibilità di bloccare i tasti in modo da evitare comandi accidentali allo scanner durante il trasporto. • Antenna flessibile con connettore BNC - consente un’eccellente ricezione. Il connettore BNC permette di collegare e rimuovere facilmente l'antenna o altre antenne opzionali. • Display a cristalli liquidi - mostra in modo chiaro le varie impostazioni e rende facile variarle. • Varie possibilità di alimentazione - potete alimentare lo scanner con batterie interne (batterie a secco non ricaricabili, batterie ricaricabili o il pacco batteria ricaricabile opzionale) e con alimentazione esterna CA o CC (utilizzando adattatori opzionali). Il vostro scanner AE55H riceve le seguenti bande di frequenza: - 26-54 MHz - 68-88 MHz - 137-174 MHz - 380-512 MHz Per avere un elenco delle sottobande di frequenza nelle dieci bande di ricerca predefinite consultate il paragrafo "Bande di ricerca". PREPARAZIONE Alimentazione Potete alimentare il vostro scanner in quattro modi diversi: • Batterie interne (non fornite) da utilizzare con il portabatterie incluso • Pacco batteria ricaricabile (non fornito) • Alimentazione da rete CA (da utilizzare con un adattatore opzionale CA) • Alimentazione dalla batteria del veicolo (da utilizzare con un adattatore opzionale CC per presa accendisigari) Lo scanner è alimentato con sei batterie tipo AA (stilo). Per un utilizzo prolungato ed un migliore rendimento dello scanner, vi raccomandiamo di utilizzare batterie alcaline. Potete anche alimentare lo scanner utilizzando il pacco batteria ricaricabile opzionale o batterie al nichel-cadmio ricaricabili e ricaricarli ogni volta che si scaricano. Avvertenza: non utilizzate assieme batterie vecchie e nuove; oppure differenti tipi di batterie (ad esempio 2 batterie standard, alcaline o ricaricabili), oppure batterie ricaricabili di differenti capacità. Note: • La presa POWER vi permette di collegare un adattatore esterno CA o CC per far funzionare lo scanner. Collegando un adattatore alla presa POWER, le batterie interne vengono scollegate. Potete utilizzare l'alimentazione esterna anche se sono installate le batterie non ricaricabili o le batterie ricaricabili al nichel-cadmio. • La presa CHARGE vi permette di collegare un adattatore esterno CA o CC per far funzionare lo scanner e caricare simultaneamente le batterie. Quando connettete un adattatore alla presa CHARGE, le batterie interne rimangono collegate e vengono ricaricate quando collegate un caricabatterie. Attenzione: non utilizzate la presa CHARGE con batterie non ricaricabili! Se cercate di ricaricare delle batterie non ricaricabili potrebbero surriscaldarsi ed esplodere. Installazione delle batterie 1. Esercitate una leggera pressione sul coperchio del vano batteria posto sul fondo dello scanner e spingetelo nel senso indicato dalla direzione della freccia. 2. Estraete il portabatterie dal vano batterie. 3. Se installate batterie singole, inserite 6 batterie tipo AA nel portabatterie facendo attenzione alla polarità (+ e -) indicata su quest’ultimo. 4. Inserite il portabatterie o il pacco batterie nell’apposito vano. Avvertenza: Il portabatterie o il pacco batterie si inserisce nel vano batterie in un solo senso. Non forzartelo. 5. Ripristinate il coperchio in sede (prima di inserire il coperchio, premere leggermente il portabatterie verso l’interno). Quando le batterie sono scariche, sul display lampeggia BATT e ogni tre secondi circa lo scanner emette un bip. Sostituite subito tutte le 6 batterie non ricaricabili o ricaricate quelle ricaricabili (o il pacco batterie). Avvertenza: smaltite sempre al più presto e nel modo corretto le batterie vecchie. Non sotterratele né bruciatele. Utilizzo dell’alimentazione di rete CA Per alimentare lo scanner con la presa CA, dovete utilizzare un adattatore CA. Avvertenze: • Dovete utilizzare un adattatore CA che fornisca 9 volt e che sia in grado di erogare almeno 200 mA. Il suo contatto centrale deve essere collegato al negativo ed il suo connettore deve corrispondere perfettamente al tipo di presa POWER/CHARGE dello scanner. L’adattatore consigliato possiede queste caratteristiche. L’utilizzo di un adattatore non conforme può danneggiare lo scanner o l’adattatore stesso. • Quando avete terminato di utilizzare l’adattatore CA, per prima cosa toglietelo dalla presa di corrente elettrica CA. Quindi scollegatelo dallo scanner. Inserite il connettore dell’adattatore nella presa POWER dello scanner. Inserite quindi la spina dell’adattatore in una presa di corrente elettrica CA standard. 3 Utilizzo dell’alimentazione CC della batteria di un veicolo Per alimentare lo scanner dalla presa accendisigari del vostro veicolo, dovete utilizzare un adattatore CC. Avvertenze: • Dovete utilizzare un adattatore CC che fornisca 9 volt e che sia in grado di erogare almeno 200 mA. Il suo contatto centrale deve essere collegato al negativo ed il suo connettore deve corrispondere perfettamente al tipo di presa POWER/CHARGE dello scanner. L’adattatore consigliato possiede queste caratteristiche. L’utilizzo di un adattatore non conforme può danneggiare lo scanner o l’adattatore stesso. • Per proteggere il sistema elettrico del vostro veicolo, collegate sempre l'adattatore prima allo scanner e poi alla presa accendisigari del vostro veicolo. Scollegate sempre l'adattatore prima dalla presa accendisigari e poi dallo scanner. Inserite il connettore dell’adattatore nella presa POWER dello scanner. Inserite quindi la spina di alimentazione dell'adattatore nella presa accendisigari del vostro veicolo. Ricarica delle batterie ricaricabili (o del pacco batterie) Il vostro scanner possiede un circuito di carica incorporato che può caricare le batterie ricaricabili (o un pacco batterie ricaricabile) al nichel-cadmio mentre sono inserite nello scanner. Per caricarle, collegate semplicemente un adattatore CA o CC alla presa CHARGE dello scanner. Sono necessarie circa 14 -16 ore per ricaricare un pacco batterie (batterie ricaricabili) che sia completamente scarico. Potete utilizzare lo scanner mentre ricaricate il pacco batterie (o le batterie ricaricabili) ma il tempo di ricarica si allunga. Nota: La durata di un pacco batterie ricaricabile (o di batterie ricaricabili) è maggiore se lo / le lasciate scaricare completamente almeno una volta al mese. Per fare questo, utilizzate semplicemente lo scanner sino a che lampeggia BATT e viene emesso un bip ogni tre secondi. Procedete quindi alla ricarica. Importante! Quando le batterie ricaricabili (o il pacco batterie) hanno raggiunto il termine della loro vita, vanno riciclati o smaltiti correttamente. Per ottenere informazioni in merito, contattate le autorità competenti in materia di riciclaggio o smaltimento della vostra città. Collegamento dell’antenna Seguite questi punti per collegare al vostro scanner l’antenna flessibile di dotazione: 1. Allineate la scanalatura del connettore dell’antenna con la presa ANT dello scanner. 2. Spingete leggermente l’antenna verso la presa ANT e ruotate il connettore a baionetta BNC dell’antenna in senso orario sino a quando si blocca. Collegamento di un’antenna opzionale La presa ANT posizionata sulla parte superiore dello scanner consente di utilizzarlo con differenti antenne. Al posto dell'antenna di dotazione, potete collegarne una differente, come ad esempio un’antenna 4 esterna mobile o base. Seguite le istruzioni d'installazione fornite con l'antenna opzionale, portate il cavo d’antenna fino allo scanner e quindi collegatelo alla presa ANT. Avvertenza: Prestate estrema attenzione quando installate o disinstallate un’antenna base esterna. Se l'antenna dovesse cadere, allontanatevi immediatamente! Nel cadere potrebbe toccare cavi d’alta tensione. In tal caso, il contatto da parte di una persona con l'antenna stessa in contatto con pali, cavi o tiranti metallici può causare folgorazioni e la morte! In tali casi chiamate del personale specializzato per rimuovere l’antenna; non cercate assolutamente di farlo da soli. Utilizzo della clip da cintura Potete utilizzare la clip da cintura dello scanner per trasportare l’apparecchio a mani libere durante gli spostamenti. Basta semplicemente inserire la clip nella vostra cintura. Collegamento ad un auricolare o ad una cuffia Per un ascolto riservato, potete inserire un auricolare o una cuffia monofonica dotata di una spina da 3,5 mm nella presa PHONE posta sulla parte superiore dello scanner. Questo scollega l'altoparlante interno. Avvertenza: Per proteggere il vostro udito, seguite queste indicazioni quando utilizzate un auricolare o una cuffia: • Non ascoltate a livelli di volume troppo alti. Ascolti prolungati ad alti volumi possono far perdere l'udito in modo permanente. • Una volta impostato il volume, non alzatelo. Col tempo il vostro ascolto si adatta ai vari livelli di volume, perciò anche un livello che sembra confortevole può danneggiare il vostro udito. Attenzione: Non utilizzate un auricolare od una cuffia con il vostro scanner mentre guidate un veicolo o andate in bicicletta nel traffico. Potrebbe essere pericoloso ed inoltre in alcune località potrebbe essere illegale. Collegamento ad un altoparlante esterno In una zona rumorosa, un altoparlante esterno o un altoparlante amplificato possono rendere nettamente migliore l’ascolto. Inserite il jack da 3,5 mm del cavo dell'altoparlante nella presa PHONE del vostro scanner. 5 IL VOSTRO SCANNER Comandi della tastiera I tasti dello scanner potrebbero apparirvi complicati, ma queste informazioni vi aiuteranno a familiarizzare con le loro funzioni. SCAN MANUAL BAND MON 1 SCAN 2 3 attiva la scansione dei canali proLIGHT grammati. interrompe la scansione per permet4 5 6 tervi di digitare direttamente un numero di canale. 7 8 9 seleziona una banda di ricerca predefinita. CLEAR PGM DELAY L/OUT consente di accedere alla memoria 0 • E monitor. accende/spegne la retroilluminazione del display. consentono di effettuare la ricerca verso le frequenze superiori o inferiori partendo dalla frequenza che appare sul display, o selezionano la direzione quando effettuate la scansione dei canali. MANUAL BAND MON LICHT Tasti o CLEAR PGM Tasti numerici DELAY/. (ritardo/punto decimale) L/OUT/E (esclusione/inserimento) blocca/sblocca la tastiera per evitare inserimenti involontari. cancella le immissioni errate. vi permette di programmare le frequenze nei canali. utilizzate questi tasti per immettere i numeri relativi ad un canale o una frequenza. programma un ritardo di due secondi sul canale selezionato o inserisce il punto decimale (necessario per la programmazione delle frequenze). esclude i canali dalla scansione o immette la frequenza nei canali. Il display Sul display appaiono dei simboli che indicano le operazioni dello scanner in corso. MAN compare quando selezionate manualmente un canale. SCAN viene visualizzato quando fate la scansione dei canali. MON appare quando ascoltate la memoria monitor. BATT compare quando la batteria è scarica. L/O viene visualizzato quando selezionate manualmente un canale che avete escluso. SRCH compare durante la scansione di una banda o quella diretta in frequenza. / indica la direzione della ricerca o della scansione. DELAY appare quando programmate il ritardo di due secondi per un canale. PGM appare mentre state programmando le frequenze nei canali dello scanner. CH -d 000.000 Error dUPL (duplicato) indica che la tastiera è bloccata. appare dopo le cifre (da 1 a 50) che indicano su quale canale è sintonizzato lo scanner. appare durante la ricerca diretta in frequenza. le cifre sulla destra del display mostrano su quale frequenza è sintonizzato lo scanner. compare quando commettete un errore d'inserimento. compare quando cercate di memorizzare una frequenza che è già stata inserita in un altro canale. 6 Bande/Memoria monitor Bande di ricerca Il vostro scanner può sintonizzare oltre 27.000 frequenze diverse. Queste sono suddivise in bande di ricerca. Banda 0 1 2 3 4 5 6 7 8 9 Gamma di ricerca indicata sul display (MHz) 26-40 40-54 68-78 78-88 137-144 144-146 146-174 410-430 430-440 440-470 Descrizione VHF inferiore VHF inferiore e radioamatoriale dei 6m VHF inferiore VHF superiore VHF superiore Banda radioamatoriale dei 2m VHF superiore UHF Banda radioamatoriale dei 70 cm UHF Potete effettuare la ricerca in queste bande per trovare più velocemente frequenze attive (con trasmissioni in corso) da memorizzare nei canali dello scanner. Per esempio, se volete ascoltare i collegamenti tra radioamatori, dovrete effettuare la ricerca solamente nelle bande a loro dedicate (bande 1, 5 e 8). Nota: Le frequenze delle bande di ricerca dello scanner sono predefinite in fabbrica. Non potete cambiarle. Memoria Monitor Lo scanner possiede anche una memoria monitor che potete utilizzare per memorizzare temporaneamente una frequenza e decidere se salvarla definitivamente in un canale. Questa funzione è utile per memorizzare velocemente una frequenza attiva quando eseguite la scansione su tutta la banda usando la ricerca diretta. Consultate per questo il paragrafo “Ricerca diretta”(pag.8). OPERAZIONI PRINCIPALI Accensione dello scanner/Regolazione del volume e dello squelch Nota: Prima di accendere lo scanner accertatevi che l’antenna sia collegata. 1. Ruotate completamente la manopola SQUELCH in senso antiorario. 2. Ruotate la manopola EIN/LAUT (accensione/volume) in senso orario sino a che sentite uno scatto e poi un fruscio. 3. Ruotate la manopola SQUELCH in senso orario sino a quando non udite più il fruscio. Note: • Se lo scanner riceve dei segnali non desiderati, parziali o troppo deboli, girate la manopola SQUELCH in senso orario per diminuire la sensibilità dello scanner. Se volete ascoltare una stazione debole o lontana, girate la manopola dello SQUELCH in senso antiorario. • Se lo SQUELCH è regolato in modo che voi sentiate costantemente un fruscio, lo scanner non potrà effettuare la scansione correttamente • Se non avete memorizzato nessuna frequenza nei canali, lo scanner non effettua la scansione. Memorizzazione delle frequenze attive Potete memorizzare manualmente nei canali dello scanner le frequenze a voi già note. Potete anche memorizzare direttamente nei canali le frequenze trovate casualmente utilizzando la ricerca nelle bande. Potete anche memorizzare una frequenza nella memoria monitor e memorizzarla successivamente in un canale. Se non conoscete quali frequenze si possono ricevere nella vostra zona, seguite i paragrafi "Ricerca nelle bande" (pag.8) o “Ricerca diretta”(pag.8) per ricercare trasmissioni. 7 Memorizzazione manuale delle frequenze Se conoscete una frequenza e volete memorizzare una frequenza, potete farlo manualmente. 1. Premete il tasto PGM. Sul display compare PGM. 2. Utilizzate i tasti numerici per digitare il numero del canale nel quale volete memorizzare la frequenza (da 1 a 50), poi premete di nuovo il tasto PGM. Oppure, premete ripetutamente il tasto PGM sino a quando sul display compare il numero del canale desiderato. 3. Utilizzate i tasti numerici ed il tasto DELAY/. per inserire la frequenza (includendo il punto decimale) che volete memorizzare nel canale. 4. Premete il tasto E per memorizzare la frequenza. Note: • Se al punto 3 digitate una frequenza sbagliata, appare Error (errore), il numero del canale lampeggia, e lo scanner emette un bip per tre volte dopo la pressione di E. Ripetete semplicemente i punti 3 e 4. • Il vostro scanner approssima automaticamente la frequenza inserita sulla frequenza valida più vicina. Per esempio, se avete digitato la frequenza 145,4730 MHz, il vostro scanner l’accetta come 145,4625. • Se inserite una frequenza che è già stata memorizzata in un altro canale, appare dUPL (duplicato) ed il canale con la numerazione più bassa, contenente la frequenza doppia, lampeggia per circa tre secondi. Per memorizzare comunque la frequenza, premete nuovamente E. 5. Per memorizzare altre frequenze nei canali ripetete i punti da 2 a 4. Ricerca nelle bande Se non conoscete una frequenza da memorizzare, potete cercare le frequenze attive nelle bande di ricerca predefinite del vostro scanner (consultate il paragrafo “Bande di ricerca” pag.7), poi memorizzate quelle che avete trovato nei canali del vostro scanner. Seguite questi punti per ricercare e memorizzare le frequenze attive utilizzando la ricerca nelle bande. 1. Premete BAND. Compaiono sul display per circa due secondi il numero relativo alla banda selezionata l’ultima volta (“b” seguito dal numero della banda) e la gamma di frequenza. 2. Per selezionare una banda diversa, inserite il numero di banda (0 - 9) entro due secondi o premete ripetutamente il tasto BAND sino a che compare il numero di banda desiderato. Dopo circa due secondi, compare SRCH, il primo canale disponibile lampeggia e lo scanner comincia ad effettuare la ricerca rapida di una frequenza attiva nella banda selezionata verso le frequenze superiori (dalla frequenza più bassa a quella più alta). Note: • Per invertire la direzione di ricerca in qualsiasi momento, tenete premuto il tasto per circa un secondo. • Per effettuare la sintonia manuale nella banda verso l'alto o verso il basso ad un passo alla volta (5 o 12,5 KHz, a seconda della banda), premete brevemente più volte rispettivamente il tasto o . Lo scanner si ferma quando trova una frequenza attiva. 3. Per memorizzare la frequenza nel canale che lampeggia correntemente sul display, premete E. Lo scanner memorizza la frequenza, quindi il canale libero successivo lampeggia e la ricerca prosegue. Note: • Dopo che avete memorizzato una frequenza nell'ultimo canale disponibile, sul display compare --CH invece del numero del canale. Se cercate di memorizzare un canale quando compare –CH, sul display apparirà brevemente CH FULL. Per memorizzare altre frequenze, dovete cancellarne alcune già memorizzate nei canali. Consultate il paragrafo "Cancellazione di un canale" (pag.9). Ricerca diretta in frequenza Con questa funzione potete effettuare la ricerca verso le frequenze superiori o inferiori passando dalla fine di una banda all’inizio di quella successiva) partendo dalla frequenza che appare sul display e memorizzare una frequenza nella memoria monitor. 1. Premete i tasti MANUAL o PGM, poi utilizzate i tasti numerici e DELAY/. per digitare la frequenza nella quale volete che inizi la ricerca. Nota: Per iniziare da una frequenza già memorizzata in uno dei canali del vostro scanner, premete il tasto MANUAL o PGM, inserite il numero del canale desiderato, poi premete di nuovo il tasto MANUAL o PGM. 2. Tenete premuto il tasto o per circa un secondo per effettuare la ricerca verso le frequenze supe8 riori o inferiori partendo dalla frequenza selezionata. Quando lo scanner trova una frequenza attiva, la ricerca si arresta. 3. Per memorizzare la frequenza nella memoria monitor, premete semplicemente il tasto MON. Sul display appare MON. 4. Per continuare la ricerca, tenete premuto il tastoo per circa un secondo. Nota: Digitando la frequenza 174.0 (MHz) e premendo si può selezionare la banda 380-512 MHz (non disponibile con la selezione a bande). Spostamento di una frequenza dalla memoria monitor ad un canale 1. Premete il tasto MANUAL, digitate il numero del canale nel quale volete memorizzare la frequenza, poi premete il tasto PGM. Sul display compaiono PGM, il numero della frequenza (o 000.0000) e il numero del canale selezionato. 2. Premete il tasto MON. Sul display compaiono MON e la frequenza contenuta nella memoria monitor ed il numero del canale lampeggia. 3. Premete il tasto E. MON scompare, il numero del canale smette di lampeggiare e lo scanner memorizza la frequenza nel canale selezionato. Monitor di un canale memorizzato Potete continuamente controllare un determinato canale senza effettuare la scansione. Questo è utile se volete ascoltare, ad esempio, una trasmissione di emergenza su un canale e non volete perdere nessun particolare - anche se dovessero esserci dei periodi di silenzio - o se volete semplicemente controllare quel particolare canale. Seguite questi punti per selezionare manualmente un canale. 1. Premete il tasto MANUAL. 2. Inserire il numero del canale. 3. Premete nuovamente il tasto MANUAL. Scansione dei canali Per effettuare la scansione dei canali o per cominciare la scansione dopo aver monitorizzato un canale specifico, premete il tasto SCAN. Sul display compaiono SCAN e . Lo scanner comincia rapidamente ad effettuare la scansione verso l'alto sino a trovare una frequenza attiva. Se lo scanner trova un canale attivo, si arresta ed indica sul display il numero di quest’ultimo e la sua frequenza. Quando termina la trasmissione, ricomincia automaticamente ad effettuare la scansione. Note: • Dovete memorizzare le frequenze nei canali prima che lo scanner possa effettuarne scansione. • Per modificare la direzione di scansione premete i tasti o . • Lo scanner non effettua la scansione dei canali vuoti. Ascolto della memoria monitor Per ascoltare la frequenza memorizzata nella memoria monitor, premete il tasto MANUAL quindi il tasto MON. Sul display compaiono i simboli MAN e MON e la frequenza memorizzata nella memoria monitor. Cancellazione di un canale 1. Premete il tasto MANUAL. 2. Utilizzate i tasti numerici per digitare il numero del canale contenente la frequenza che volete cancellare, quindi premete il tasto PGM. Oppure, premete ripetutamente il tasto PGM fino a che compare il numero del canale desiderato. Sul display compare PGM. 3. Premete il tasto CLEAR. Lampeggia il numero della frequenza. 4. Premete il tasto L/OUT/E. Sul display appare L/O, il numero del canale lampeggia e la frequenza diventa 000.0000 per indicare che il canale è vuoto. 5. Per cancellare più frequenze ripetete i punti da 2 a 4. 9 FUNZIONI AVANZATE Ritardo Molte organizzazioni effettuano comunicazioni radio bidirezionali che possono avere una pausa di alcuni secondi tra una trasmissione e l’altra. Per evitare di perdere dei passaggi, potete programmare un ritardo di due secondi indipendente su ciascuno dei canali. In tal caso, quando lo scanner si ferma su un canale, sul display compare DELAY e lo scanner monitorizza il canale per ulteriori due secondi dopo il termine di ogni trasmissione prima di riprendere la scansione. Potete anche utilizzare il ritardo durante la ricerca sulle bande o diretta. Potete programmare il ritardo sui canali in due modi: • Se lo scanner sta effettuando la scansione e si ferma su un canale attivo, premete rapidamente il tasto DELAY prima che ricominci di nuovo la scansione. • Se il canale desiderato non è selezionato, selezionatelo manualmente, quindi premete il tasto DELAY. Per attivare invece il ritardo durante la ricerca sulle bande o diretta, attivate una di queste modalità e premete il tasto DELAY. Sul display compare DELAY e lo scanner aggiunge automaticamente un ritardo di due secondi a ciascuna trasmissione sulla quale si ferma. Esclusione di un canale dalla scansione Potete effettuare più velocemente la scansione dei canali memorizzati escludendo da quest’ultima quelli meno interessanti o che presentano una trasmissione continua che fa arrestare continuamente la scansione. Per escludere un canale selezionatelo, quindi premete il tasto L-OUT. Sul display compare L/O. Per includere nuovamente un canale selezionatelo manualmente, quindi premete il tasto L-OUT fino a quando scompare L/O. Note: • Potete sempre selezionare manualmente i canali esclusi. • Il vostro scanner esclude automaticamente i canali non programmati. Utilizzo della retroilluminazione Potete attivare la retroilluminazione se avete necessità di visualizzare il display mentre vi trovate in zone con scarsa illuminazione ambientale. Premete il tasto LICHT per accendere la luce del display per cinque secondi. Per spegnere la luce prima di questo tempo premete nuovamente il tasto LICHT. Attivazione/disattivazione dei toni di tastiera Ogni volta che premete un qualsiasi tasto dello scanner (ad eccezione dei tasti e LICHT), questo emette un tono di conferma. Seguite questi punti per disattivare o attivare il tono di conferma dei tasti. 1. Se lo scanner è acceso, spegnetelo ruotando la manopola EIN/LAUT in senso antiorario sino a che udite un clic. 2. Tenete premuti contemporaneamente i tasti 2 e E ed accendete lo scanner. 3. Dopo un secondo rilasciate tasti 2 e E. Utilizzo del blocco della tastiera Una volta programmato il vostro scanner, potete evitare comandi accidentali durante l’uso attivando il blocco dei tasti. Quando la tastiera è bloccata, gli unici comandi attivi sono LICHT, EIN/LAUT, e SQUELCH (lo scanner effettua regolarmente la scansione dei canali). Per attivare il blocco dei tasti, tenete premuto per circa tre secondi sino a che compare sul display il simbolo . Lo scanner emette tre bip (se sono attivi i toni di tastiera). Per disinserire il blocco dei tasti, premete per tre secondi sino a che scompare 10 sul display. GUIDA GENERALE ALLA SCANSIONE Falsi segnali Ogni scanner presenta dei falsi segnali. Questi sono creati casualmente dagli oscillatori interni dello scanner e possono interferire con le trasmissioni ricevute su alcune frequenze. Se programmate una di queste frequenze, su di esse sentirete un segnale senza alcuna informazione. Se l’interferenza non è forte, potete ruotare la manopola dello SQUELCH in senso orario per eliminare il falso segnale. Per localizzare i falsi segnali del vostro scanner, scollegate l'antenna ed allontanatela dallo scanner. Accertatevi che nelle vicinanze dello scanner non siano accesi apparecchi come PC, radio o televisioni. Utilizzate la funzione di ricerca ed effettuate la scansione di ogni banda di frequenza, da quella più bassa a quella più alta. Saltuariamente, la scansione si bloccherà come se avesse trovato un segnale, spesso senza audio. Si tratta di un falso segnale. Fate un elenco di tutti i falsi segnali del vostro scanner per vostro riferimento. Passi di scansione disponibili Le frequenze nelle varie bande sono selezionabili solo con determinati passi di scansione. Per esempio: Gamme di Frequenza 26-54, 68-88, 137-144 e 146-174 MHz 144-146 e 380-512 MHz Intervalli Specifici Passi da 5,0 KHz Passi da 12,5 KHz SOLUZIONI DEI PROBLEMI Se il vostro scanner non funziona come dovrebbe, le indicazioni riportate di seguito vi possono aiutare a risolvere eventuali problemi. Se lo scanner dovesse comunque continuare a non funzionare bene, riportatelo al vostro rivenditore di fiducia per eventuali riparazioni. Problema Lo scanner è completamente inattivo Possibili Cause L'adattatore CA o CC non è collegato correttamente Le batterie interne/il pacco batterie devono essere ricaricati, oppure sono esaurite le batterie non ricaricabili Lo scanner funziona in Un disturbo dall’alimentazione o modo non corretto o il una statica ha causato un’errata display fornisce indicazio- programmazione del microproni errate cessore interno Ricezione scarsa o nulla L'antenna non è connessa correttamente Le frequenze programmate sono quelle di falsi segnali Lo scanner è acceso, ma Lo SQUELCH non è regolato in non esegue la scansione modo corretto Nella modalità di scansio- Le frequenze programmate sono ne, lo scanner si blocca quelle di falsi segnali su frequenze che hanno trasmissioni poco chiare 11 Soluzioni Assicuratevi che l'adattatore sia ben collegato alla presa elettrica (rete elettrica CA o presa accendisigari del veicolo) ed alla presa POWER dello scanner. Ricaricate le batterie ricaricabili o il pacco batterie, oppure sostituite le batterie non ricaricabili con batterie nuove. Provate le procedure di Reset e/o di inizializzazione descritte in “Reset/inizializzazione dello scanner” Assicuratevi che l'antenna sia collegata correttamente Evitate le frequenze elencate nel paragrafo "Falsi segnali" Regolate lo SQUELCH come descritto nel paragrafo “Accensione dello scanner/Regolazione del volume e dello squelch” Evitate le frequenze programmate elencate nel paragrafo "Falsi segnali" o ascoltatele solo in modo manuale Reset/inizializzazione dello scanner Se il display dello scanner è bloccato, o non funziona correttamente dopo la connessione ad una presa di corrente, provate ad effettuare il reset o ad inizializzare lo scanner. Importante: Se lo scanner presentasse dei problemi, provate innanzitutto ad effettuare il reset. Se non funzionasse ancora potete inizializzarlo, tuttavia questo procedimento cancella tutte le frequenze memorizzate nello scanner e ripristina tutte le impostazioni predefinite in fabbrica. Reset dello Scanner 1. Spegnete lo scanner, quindi accendetelo nuovamente. 2. Inserite un oggetto sottile (es. una graffetta aperta) nel foro di reset che si trova sul fianco dello scanner (vicino alle prese POWER e CHARGE), quindi premete e rilasciate delicatamente il micropulsante di reset che si trova dentro il foro. Il display si cancella temporaneamente per tornare normale poco dopo. Inizializzazione dello Scanner Importante: Questa procedura cancella tutte le frequenze inserite nello scanner e ripristina le impostazioni predefinite in fabbrica. Inizializzate lo scanner solamente quando siete sicuri che non funziona correttamente. 1. Spegnete lo scanner, quindi accendetelo nuovamente 2. Mentre tenete premuto il tasto CLEAR, inserite un oggetto sottile (es. una graffetta aperta) nel foro di reset che si trova sul fianco dello scanner (vicino alle prese POWER e CHARGE). Quindi premete e rilasciate delicatamente il micropulsante di reset che si trova dentro il foro. Il display si cancella temporaneamente per tornare normale poco dopo. Nota: Dovete rilasciare il micropulsante di reset prima del tasto CLEAR. Altrimenti, la memoria potrebbe non cancellarsi. 3. Quando il display torna normale, rilasciate il tasto CLEAR. CURA E MANUTENZIONE I seguenti suggerimenti vi aiuteranno ad aver cura del vostro scanner in modo da utilizzarlo per anni senza problemi. • Cercate di non bagnare lo scanner, se dovesse accadere, asciugatelo immediatamente. • Utilizzate solamente batterie nuove e di tipo adatto. Sostituite sempre le batterie vecchie e scariche. Esse possono rilasciare sostanze chimiche che danneggiano i circuiti elettrici. • Maneggiate lo scanner con cura. Le cadute e gli urti possono danneggiare i circuiti ed i rivestimenti e possono causare malfunzionamenti dello scanner. • Utilizzate e riponete lo scanner in ambienti con temperature normali. Temperature eccessive possono abbreviare la durata dei dispositivi elettronici, danneggiare le batterie e deformare o sciogliere le parti in plastica. • Tenete lo scanner al riparo dalla polvere e dallo sporco che possono causare un’eccessiva usura delle parti. • Per pulire lo scanner utilizzate esclusivamente un panno leggermente inumidito, non utilizzate mai sostanze chimiche, solventi, abrasivi o detergenti. 12 SPECIFICHE Copertura di Frequenza 26-54 MHz 68-88 MHz 137-174 MHz 380-512 MHz 50 canali, più una memoria monitor Canali Operativi Sensibilità (20dB S/N): 26-54 MHz 68-88 MHz 137-174 MHz 380-512 MHz Selettività: +/-10kHz +/-18kHz Reiezione alle spurie: 26-54 MHz 68-88 MHz 137-174 MHz Velocità di Scansione Velocità di Ricerca Tempo di Ritardo Medie Frequenze (MF): prima seconda Reiezione MF: 10,7 MHz Sensibilità Squelch: Soglia Valore Massimo Impedenza Antenna Potenza d’uscita audio Altoparlante incorporato Alimentazione 0,7 µV 0,7 µV 0,7 µV 0,7 µV -6 dB -50 dB 50 dB a 41 MHz 50 dB a 78 MHz 50 dB a 154 MHz Fino a 25 canali/secondo Fino a 50 passi/secondo 2 secondi 10,7 MHz 455 KHz 70 dB a 154 MHz Inferiore a 0,5 µV 25 dB (S+N)/N 50 ohm 200 mW nominale (10% THD) 36 mm, tipo dinamico da 8 ohm 9 VCC, 6 batterie AA Adattatore CA/Adattatore CC (9V, 200 mA) 50 mA 171 x 59 x 40 mm (AxLxP) 240 g senza antenna e batterie Antenna Assorbimento (Squelch chiuso) Dimensioni Peso Accessori di serie Nell’impegno di migliorare costantemente la qualità dei propri prodotti, il costruttore si riserva la facoltà di variarne le caratteristiche senza preavviso. © 2003 ALAN Electronics GmbH 13 50-Channel Portable Scanner SCAN MANUAL BAND MON 1 2 3 4 5 6 LIGHT 7 CLEAR PGM 8 9 DELAY L/OUT • E 0 AE55H 50 KANAL SCANNER OWNER’S MANUAL PART 3 AE 55 H OWNER’S MANUAL AE55H 50-Channel Portable Scanner Your new Albrecht AE55H 50-Channel Portable Scanner gives you direct access to over 27,000 exciting frequencies, including police and fire departments, ambulance services, and amateur radio services. You can select up to 50 channels to scan, and you can change your selection at any time. The secret to your scanner’s ability to scan so many frequencies is its custom-designed microprocessor – a tiny, built-in computer. Your scanner has these special features: Ten Preprogrammed Search Bands – let you search for transmissions within preset frequency ranges, so you can find interesting frequencies more quickly. Fifty Channels – let you store up to 50 of your favorite frequencies for easy recall and scanning. Duplicate Frequency Check – automatically warns you if you try to store a frequency you’ve already stored, to help you use the scanner’s memory more efficiently. Monitor Memory – lets you temporarily save a frequency located during a direct search, so you can move it to channel storage later. Channel Lockout – keeps channels you select from being scanned. Memory Backup – keeps the channel frequencies stored in memory for about 1 hour during a power loss. Two-Second Scan Delay – delays scanning for 2 seconds before moving to another channel, so you can hear more replies. Key Lock – lets you lock the keys to help prevent accidentally changing the scanner’s programming. Flexible Antenna with BNC Connector – provides excellent reception. The BNC connector makes it easy to attach and remove the antenna or a variety of optional antennas. Liquid Crystal Display – clearly displays how the scanner is set and makes it easy to change those settings. Three Power Options – you can power the scanner from internal batteries (not supplied – including non-rechargeable batteries, rechargeable batteries, or a rechargeable scanner battery pack) or external AC or DC power (using optional adapters). Your AE55H scanner can receive the following frequency bands: 26-54 MHz 68-88 MHz 137-174 MHz 380-512 MHz For a list of the frequency ranges in the ten preprogrammed search bands, see “Search Bands”. PREPARATION POWER SOURCES You can power your scanner from any of four sources: · Internal batteries (not supplied) with the provided battery holder · A rechargeable scanner battery pack (not supplied) · Standard AC power (using an optional AC adapter) · Vehicle battery power (using an optional DC cigarette-lighter adapter) You can power your scanner from six AA batteries. For the longest operation and best performance, we recommend alkaline batteries. You can also power the scanner using a rechargeable scanner battery pack or rechargeable nickel-cadmium batteries, and recharge it as you use the scanner. Caution: Do not mix old and new batteries, different types of batteries (standard, alkaline, or rechargeable), or rechargeable batteries of different capacities. Notes: · The PWR jack lets you connect an external AC or DC adapter to operate the scanner. Connecting an adapter to PWR disconnects the internal batteries. You can use the PWR jack with either non-rechargeable or rechargeable nickel-cadmium batteries installed. · The CHG jack lets you connect an external AC or DC adapter to operate the scanner. The internal batteries remain connected when you connect an adapter to CHG, and get recharged when you connect a charger. Warning: Never use the CHG jack with non-rechargeable batteries! If you try to recharge non-rechargeable batteries, they could get very hot and explode. Battery Install 1. Press down on the battery compartment cover on the bottom of the scanner and slide the cover in the direction of the arrow to remove it. 2. Slide the battery holder out of the battery compartment. 3. If you are installing individual batteries, insert six AA batteries in the battery holder as indicated by the polarity symbols (+ and -) marked on the battery holder. 4. Slide the battery holder or battery pack into the compartment. Caution: The battery holder or battery pack fits only one way inside the battery compartment. Do not force it. 5. Replace the cover. When battery power is low, BATT flashes and the scanner beeps about every 3 seconds. Immediately replace all six nonrechargeable batteries or recharge the rechargeable batteries or battery pack. Caution: Always dispose of old batteries promptly and properly. Do not bury or burn them. Using Standard AC Power To power the scanner from AC power, you need an AC adapter. Cautions: · You must use an AC adapter that supplies 9 volts and delivers at least 200 milliamps. Its center tip must be set to negative, and its barrel plug must correctly fit the scanner’s PWR/CHG jack. The recommended adapter meets these specifications. Using an adapter that does not meet these specifications could damage the scanner or the adapter. · When you finish using the AC adapter, disconnect it from the AC outlet first. Then disconnect it from the scanner. Plug the adapter’s barrel plug into the scanner’s PWR jack. Then plug the adapter’s power module into a standard AC outlet. Using Vehicle Battery Power To power the scanner from your vehicle’s cigarette-lighter socket, you need a DC adapter. Cautions: · You must use a DC adapter that supplies 9 volts and delivers at least 200 milliamps. Its center tip must be set to negative, and its plug must correctly fit the scanner’s PWR/CHG jack. The recommended adapter meets these specifications. Using an adapter that does not meet these specifications could damage the scanner or the adapter. · To protect your vehicle’s electrical system, always plug the adapter into the scanner before you plug it into your vehicle’s cigarette-lighter socket. Always unplug the adapter from the vehicle’s cigarette-lighter socket before you unplug it from the scanner. Plug the adapter’s barrel plug into the scanner’s PWR jack. Then plug the adapter’s power module into your vehicle’s cigarette-lighter socket. Charging a Rechargeable Battery Pack/Rechargeable Batteries Your scanner has a built-in charging circuit that lets you charge a rechargeable battery pack or rechargeable nickel-cadmium batteries while it is in the scanner. To charge it, simply connect an AC or DC adapter to the scanner’s CHG jack. It takes about 14-16 hours to recharge a battery pack (rechargeable batteries) that is fully discharged. You can operate the scanner while recharging the battery pack (rechargeable batteries), but charging takes longer. Note: A rechargeable battery pack (rechargeable batteries) lasts longer if you let it fully discharge once a month. To do this, simply use the scanner until BATT flashes and the scanner beeps about every 3 seconds. Then fully charge it. Important! At the end of a rechargeable battery pack or batteries useful life, it must be recycled or disposed of properly. Contact your local, county, or state hazardous waste management authorities for information on recycling or disposal programs in your area. Some options that might be available are: municipal curb-side collection, drop-off boxes a retailers such as your local store, recycling collection centers, and mailback programs. CONNECTING THE ANTENNA Follow these steps to attach the supplied flexible antenna to your scanner. 1. Align the slots around the scanner’s connector with the tabs on the ANT jack. 2. Press the antenna down over the jack and turn the antenna’s base clockwise until it locks into place. Connecting an Optional Antenna The ANT jack on the top of the scanner makes it easy to use the scanner with a variety of antennas. Instead of the supplied antenna, you can attach a different one, such as an external mobile antenna or outdoor base station antenna. Follow the installation instructions supplied with the antenna, route the antenna cable to the scanner, then connect it to the ANT jack. Warning: Use extreme caution when installing or removing an outdoor base station antenna. If the antenna starts to fall, let it go! It could contact overhead power lines, if the antenna touches a power line, contact with the antenna, mast, cable or guy wires can cause electrocution and death! Call the power company to remove the antenna. Do not attempt to do so yourself. USING THE BELT CLIP You can use the belt clip for hands-free carrying when you are on the go. Simply slide the belt clip over your belt or waistband. CONNECTING AN EARPHONE/HEADPHONES For private listening, you can plug a mono or stereo earphone/ headphone with a 3.5 mm plug into the PHONE jack on top of your scanner. This disconnects the internal speaker. Caution: To protect your hearing, follow these guidelines when you use an earphone or headphones: · Do not listen at extremely high volume levels. Extended highvolume listening can lead to permanent hearing loss. · Once you set the volume, do not increase it. Over time, your ears adapt to the volume level, so a volume level that does not cause discomfort might still damage your hearing. Warning: Do not use an earphone or headphones with your scanner when operating a motor vehicle or riding a bicycle, in or near traffic. Doing so can create a traffic hazard and could be illegal in some areas. CONNECTING AN EXTENSION SPEAKER In a noisy area, an extension speaker or an amplified speaker might provide more comfortable listening. We recommend to use an active speaker (like they are sold for portable music players) Plug the speaker cable’s 3.5 mm plug into your scanner’s PHONE jack. YOUR SCANNER A LOOK AT THE KEYPAD Your scanner’s keys might seem confusing at first but this information should help you understand each key’s function. SCAN – scans through the programmed channels. MANUAL – stops scanning to let you directly enter a channel number. BAND – selects a preprogrammed search band. MON – accesses the monitor memory. LICHT – turns on/off the display’s backlight Up or Down keys - searches down or up from the currently displayed frequency, or selects the direction when you scan channels. (key symbol) – locks/unlocks the keypad to prevent accidental entries. CLEAR – clears an incorrect entry. PGM – lets you program frequencies into channels. Number Keys – use these keys to enter the numbers for a channel or frequency. DLY/. (delay/decimal point) – programs a 2-second delay for the selected channel, or enters a decimal point (necessary when programming frequencies). L-OUT/E (lockout/enter) – locks out channels so they will not be scanned, or enters frequencies into channels. A LOOK AT THE DISPLAY The display has indicators that show the scanner’s current operation. MAN – appears when you manually select a channel. SCAN – appears when you scan channels. MON – appears when you listen to the monitor memory. BATT – appears when battery power is low. L/O – appears when you manually select a channel you locked out. SRCH – appears during a band or direct frequency search. Up or Down-symbols - indicates the search or scan direction. DELAY – appears when you program a 2-seconds delay for a channel. PGM – appears while you program frequencies into the scanner’s channels. (key symbol) – appears when you lock the keypad. ch – appears after the digits (1-50) that show which channel the scanner is tuned to. -d – appears during a direct frequency search. 000.000 – the digits on the right of the display show which frequency the scanner is tuned to. Error – appears when you make an entry error. dUPL (duplicate) – appears when you try to store a frequency that is already stored in another channel. UNDERSTANDING BANDS/MONITOR MEMORY Search Bands Your scanner can tune over 27,000 different frequencies. Many of these frequencies are grouped within permanent memory locations called search bands. Band 0 1 Displayed Search Range (MHz) 26-40 40-54 2 3 4 5 6 7 8 9 68-78 78-88 137-144 144-146 146-174 410-430 430-440 440-470 Description VHF Lo VHF-Lo and 6 m Amateur Radio VHF-Lo VHF-Hi VHF-Hi 2-Meter Amateur Radio VHF-Hi UHF 70-cm Amateur Radio UHF You can search these bands to quickly find active frequencies you might want to store into the scanner’s channels. For example, if you wanted to search for transmissions between amateur radio operators, you could search only the search bands where you are most likely to hear the transmissions (Bands 5, and 8). Note: The frequencies in the scanner’s search bands are preset. You cannot change them. Monitor Memory The scanner also has a monitor memory that you can use to temporarily store a frequency while you decide whether to save it into a channel. This is handy for quickly storing an active frequency when you are searching through an entire band using direct search. See “Direct Search”. OPERATION TURNING ON THE SCANNER/SETTING VOLUME AND SQUELCH Note: Make sure the scanner’s antenna is connected before you turn it on. 1. Turn SQUELCH fully counterclockwise. 2. Turn VOLUME clockwise until it clicks and you hear a hissing sound. 3. Turn SQUELCH clockwise until the hissing sound stops. Notes: · If the scanner picks up unwanted, partial, or very weak transmissions, turn SQUELCH clockwise to decrease the scanner’s sensitivity to these signals. If you want to listen to a weak or distant station, turn SQUELCH counterclockwise. · If SQUELCH is adjusted so you always hear a hissing sound, the scanner does not scan properly. · If you have not stored frequencies into any channels, the scanner does not scan. STORING ACTIVE FREQUENCIES You can manually store frequencies you already know into the scanner’s channels. You can also store frequencies you found using band search directly into channels. You can also store a frequency into a monitor memory then store it into a channel. If you do not have a reference to frequencies in your area, follow the steps in “Band Search” or “Direct Search” to search for transmissions. Manually Storing Frequencies If you know a frequency you want to store, you can store it manually. 1. Press PGM. PGM appears. 2. Use the number keys to enter the channel number where you want to store the frequency (1-50), then press PGM again. Or, repeatedly press PGM until the desired channel number appears. 3. Use the number keys and DLY/. to enter the frequency (including the decimal point) you want to store into that channel. 4. Press E to store the frequency. Notes: · If you entered an invalid frequency in Step 3, Error appears, the channel number flashes, and the scanner beeps three times after you press E. Simply repeat Steps 3 and 4. · Your scanner automatically rounds the entered frequency down to the nearest valid frequency. For example, if you enter a frequency of 151.4730, your scanner accepts it as 151.4700. · If you entered a frequency that is already stored in another channel, dUPL (duplicate) and the lowest-numbered channel containing the duplicate frequency flash for about 3 seconds. To store the frequency anyway, press E again. 5. Repeat Steps 2-4 to store more frequencies into channels. Band Search If you do not know of a frequency to store, you can search your scanner’s preprogrammed search bands (see “Search Bands”) for active frequencies, then store any that you find into your scanner’s channels. Follow these steps to search for and store active frequencies using band search. 1. Press BAND. The last selected band number (B followed by the band number) and the frequency search range appear for about 2 seconds. 2. To select a different band within 2 seconds, enter the band’s number (0-9) or repeatedly press BAND until the desired band number appears. After about 2 seconds, SRCH Up appears, the next available channel flashes, and the scanner begins searching rapidly upward in that band (from lowest to highest frequency) for an active frequency. Notes: · To reverse the search direction at any time, hold down the Down key for about 1 second. · To search the band upward or downward in small increments (in steps or 5 of 12.5 kHz, depending on the band), repeatedly press and release Up or Down. The scanner stops when it finds an active frequency. 3. To store the displayed frequency in the channel currently flashing on the display, press E. The scanner stores the frequency, then the next available channel flashes and continue the search. Notes: · After you store a frequency into the last available channel, -ch appears instead of a channel number. If you try to store a channel while --ch appears, Ch FULL appears briefly. In order to store more frequencies, you must clear some channels. See “Clearing a Channel”. Direct Search You can search up or down from the currently displayed frequency and store the frequency into the monitor memory. 1. Press MANUAL or PGM, then use the number keys and DLY/. to enter the frequency where you want to start the search. Note: To start from a frequency already stored in one of your scanner’s channels, press MANUAL or PGM, enter the desired channel number, then press MANUAL or PGM again. 2. Hold down Up or Down for about 1 second to search up or down from the selected frequency. When the scanner finds an active frequency, it stops searching. 3. To store the frequency in the monitor memory, simply press MON. MON appears on the display. 4. To continue the search, hold down Up or Down for about 1 second. MOVING A FREQUENCY FROM THE MONITOR MEMORY TO A CHANNEL 1. Press MANUAL, enter the channel number where you want to store the frequency, then press PGM. PGM, the frequency number or 000.0000, and the selected channel number appear. 2. Press MON. MON and the frequency appear and the channel number flashes. 3. Press E. MON disappears, the channel number stops flashing, and the scanner stores the frequency in the selected channel. MONITORING A STORED CHANNEL You can continuously monitor a specific channel without scanning. This is useful if you hear an emergency broadcast on a channel and do not want to miss any details – even though there might be periods of silence – or if you simply want to monitor that channel. Follow these steps to manually select a channel. 1. Press MANUAL. 2. Enter the channel number. 3. Press MANUAL again. SCANNING THE CHANNELS To begin scanning channels or to start scanning again after monitoring a specific channel, press SCAN. SCAN and Up-symbol appear, and the scanner begins to rapidly scan upward until it finds an active frequency. If the scanner finds an active frequency, it stops and displays that channel and frequency number, then it automatically begins scanning again when the transmission ends on that frequency. Notes: . You must store frequencies into channels before the scanner can scan them. . To change the scanning direction, press Up or Down. . The scanner does not scan empty channels. LISTENING TO THE MONITOR MEMORY To listen to the frequency stored in the monitor memory, press MANUAL then MON. MAN, MON and the frequency stored in the monitor memory appear. CLEARING A CHANNEL 1. Press MANUAL. 2. Use the number keys to enter the channel number containing the frequency you want to delete, then press PGM. Or, repeatedly press PGM until the desired channel number appears. PGM appears. 3. Press CLEAR. The frequency number flashes. 4. Press L-OUT. L/O (lockout – see “Locking Out a Channel”) appears, the channel number flashes, and the frequency number changes to 000.0000 to indicate the frequency is cleared. 5. To delete more frequencies, repeat Steps 2-4. SPECIAL FEATURES DELAY Many agencies use a two-way radio system that might have a pause of several seconds between a query and a reply. To avoid missing a reply, you can program a 2-seocnd delay into any of your scanner’s channels. Then, when the scanner stops on the channel, DELAY appears and the scanner continues to monitor the channel for 2 seconds after the transmission stops before it resumes scanning. You can program a 2-second delay in any of these ways: · If the scanner is scanning and stops on an active channel, quickly press DLY before it starts to scan again. · If the desired channel is not selected, manually select the channel then press DLY. · If the scanner is searching, press DLY during the search. DELAY appears and the scanner automatically adds a 2second delay to every transmission it stops on. LOCKING OUT A CHANNEL You can scan existing channels faster by locking out a channel that has a continuous transmission. To lock out a channel, select the channel then press L-OUT. L/O appears. To remove the lockout from a channel, manually select the channel then press L-OUT until L/O disappears. Notes: . You can still manually select locked-out channels. . Your scanner automatically locks out empty channels. USING THE DISPLAY BACKLIGHT You can turn on the display’s backlight for easy viewing in dimly-lit areas. Press LICHT to turn on the display light for 5 seconds. To turn off the light before it automatically turns off, press LICHT again. TURNING THE KEY TONE ON AND OFF Each time you press any of the scanner’s keys (except (key symbol) and LICHT), the scanner sounds a tone. Follow these steps to turn the scanner’s key tone off or back on. 1. If the scanner is on, turn VOLUME counterclockwise until it clicks to turn it off. 2. While you hold down the 2 and E keys, turn on the scanner. 3. After 1 second, release 2 and E. USING THE KEYLOCK Once you program your scanner, you can protect it from accidental program changes by turning on the keylock feature. When the keypad is locked, the only controls that operate are LICHT, VOLUME, and SQUELCH (and the scanner continues to scan channels). To turn on the keylock, hold down (key symbol) for about 3 seconds until (key symbol) appears. The scanner beeps three times (if the key tone is turned on). To turn it off, hold (key symbol) for about 3 seconds until (key symbol) disappears. GENERAL GUIDE TO SCANNING BIRDIE FREQUENCIES Every scanner has birdie frequencies. Birdies are signals created inside the scanner’s receiver. These operating frequencies might interfere with broadcasts on the same frequencies. If you program one of these frequencies, you hear only noise on that frequency. If the interference is not severe, you might be able to turn SQUELCH clockwise to cut out the birdie. To find the birdies in your scanner, being by disconnecting the antenna and moving it away from the scanner. Make sure that no other nearby radio or TV sets are turned on near the scanner. Use the search function and scan every frequency range from its lowest frequency to the highest. Occasionally, the searching will stop as if it had found a signal, often without any sound. That is a birdie. Make a list of all the birdies in your scanner for future reference. SPECIFIED INTERVALS Frequencies in different bands are accessible only at specific intervals. For example: Frequency Range 26-54, 68-88, 137-144 and 146-174 MHz 144-146 and 380-512 MHz Specified Interval 5.0 kHz steps 12.5 kHz steps TROUBLESHOOTING If your scanner is not working as it should, these suggestions might help you eliminate the problem. If the scanner still does not operate properly, take it to your local store for assistance. Problem Possible Causes Remedies ------------------------------------------------------------------------------------------------------------------------The scanner The AC or DC adapter is not Be sure the adapter is plugged into does not work properly connected. a working AC outlet or cigaretteat all. lighter socket, and is fully inserted into the scanner’s PWR jack. ------------------------------------------------------------------------------------------------The internal batteries/battery Charge the rechargeable batteries pack needs to be recharged, or or battery pack, or replace nonthe non-rechargeable batteries rechargeable batteries with fresh are dead. batteries. ------------------------------------------------------------------------------------------------------------------------Poor or no Improperly connected antenna. Be sure the antenna is properly reception. connected. ------------------------------------------------------------------------------------------------Programmed frequencies are the Avoid programming frequencies same as birdie frequencies. listed under “Birdie Frequencies” ------------------------------------------------------------------------------------------------------------------------Scanner is on, SQUELCH is not correctly Adjust SQUELCH clockwise (see but does not adjusted. “Turning On the Scanner/Setting scan Volume and Squelch”. ------------------------------------------------------------------------------------------------------------------------In the scan Programmed frequencies are the Avoid programming frequencies mode, the same as birdie frequencies. listed under “Birdie Frequencies” scanner locks or only listen to them manually on frequencies that have an unclear transmission. RESETITNG/INITIALIZING THE SCANNER If the scanner’s display locks up or does not work properly after you connect a power source, you might need to reset or initialize it. Important: If you have problems, first try to reset the scanner. If that does not work, you can initialize the scanner, however, initializing clears all frequencies you stored in the scanner’s memory and initialilzes the scanner to its default settings. Resetting the Scanner 1. Turn off the scanner, then turn it on again. 2. Insert a pointed object, such as a straightened paper clip, into the reset hole on the side of the scanner. Then gently press and release the reset button inside the opening. The display goes blank, then information reappears. Initializing the Scanner Important: This procedure clears all frequencies you stored in the scanner’s memory and initializes the scanner to its default settings. Initialize the scanner only when you are sure the scanner is not working properly. 1. Turn off the scanner, then turn it on again. 2. While holding down CLEAR, insert a pointed object, such as a straightened paper clip, into the reset hole on the side of the scanner. Then gently press and release the reset button inside the opening. The display goes blank, then information reappears. Note: You must release the reset button before you release CLEAR. Otherwise, the memory might not clear. 3. When the display reappears, release CLEAR. CARE AND MAINTENANCE The following suggestions will help you care for your scanner so you can enjoy it for years. Keep the scanner dry. If it gets wet, wipe it dry immediately. Use only fresh batteries of the required size and type. Always remove old and weak batteries. They can leak chemicals that destroy electronic circuits. Handle the scanner gently and carefully. Dropping it can damage circuit boards and cases and can cause the scanner to work improperly. Use and store the scanner only in normal temperature environments. Temperature extremes can shorten the life of electronic devices, damage batteries, and distort or melt plastic parts. Keep the scanner away from dust and dirt, which can cause premature wear of parts. Wipe the scanner with a damp cloth occasionally to keep it looking new. Do not use harsh chemicals, cleaning solvents, or strong detergents to clean the scanner. SPECIFICATIONS Frequency Coverage 26-54 MHz 68-88 MHz 137-174 MHz 380-512 MHz Channels of Operation Sensitivity (20dB S/N): 26-54 MHz 68-88 MHz 137-174 MHz 380-512 MHz 50 Channels and 1 Monitor Memory 0.7 0.7 0.7 0.7 uV uV uV uV Selectivity: +/-10kHz +/-18kHz -6 dB -50 dB Spurious Rejection: 26-54 MHz 68-88 MHz 137-174 MHz Scanning Rate Search Rate Delay Time 50 dB at 41 MHz 50 dB at 78 MHz 50 dB at 154 MHz Up to 25 channels/second Up to 50 steps/second 2 seconds Intermediate Frequencies (IF): 1st 2nd IF Rejection: 10.7 MHz 10.7 MHz 455 kHz 70 dB at 154 MHz Squelch Sensitivity: Threshold Tight Antenna Impedance Audio Output Power Built-in Speaker Power Requirements Current Drain (Squelched) Dimensions Weight Supplied Accessory © 2003 ALAN Electronics GmbH Less than 0.5 uV (S+N)/N 25 dB 50 ohms 200 mW Nominal (10% THD) 36 mm, 8-ohm Dynamic Type 9 V DC, 6 AA batteries AC adapter/DC adapter (9V, 200 mA) 50 mA 171 (H) x 59 (W) x 40 (D) mm 240 g without antenna and batteries Antenna