1
OWNER'S MANUAL
10
Ventilation
Slots and openings in the cabinet arc provided
Ior ventilation and Io ensure reliable operation (fl the
producl and Io protecl il horn ovefl_eadng, and Ihese
openhlgs must not be blocked or covered The openings
shoukl never be blocked by placing II_ep_oduc[ on a bed.
sol,l, rug. or otl_er similar surlace This product should not
be placed in a built-in installation such as a bookcase or rack
unless proper venlilalion is provided or Ihe manulaclurel's
instructions have been adhered to.
11
Power Soulves This producl should be operated only h'om
Ihe lype oi pox_er somve indicated on the marking label I1
you are noI sure ol the lype ol po_ er supply Io your home.
consllh your product dealer ol local power company. For
products intended to operate hx)n] battery power, or other
SOtll_2es,relbr to tile operating instl'ilctiolls
Grounding or Pohu'iza6on
This pro&_cl may be equipped
with a polarized ahernaling current line phig (a plug having
one bklde wider than the other). This plug will lit into the
powel oullet only olle way This is a sal_?ty lb lture. H you
aw unable Io inserl Ihe plug lully into the oullel, try
revmsing Ihe plug If Ihe plug should still Jail Io fiL contact
yot_r electrician to replace your obsolete outlet D,) not
deft?at the salety purpose of the polarized plug
CAUTION
RISKOF ELECTRICSHOCK
DO NOTOPEN
CAUTION:
ELECTRIC
TO REDUCE THE RISK OF
SHOCK, DO NOT REMOVE
COVER (OR BACK). NO USER-SERVICEABLE
PARTS INSIDE. REFER SERVICING TO
QUALIFIED SERVICE PERSONNEL.
Explanation
The lighming
equilateral
of Graphical Symbols
flash with
tTiangle,
p]csence
arlowhe
is hltended
of uninsulated
[he ploducffs
magnitude
KI synl bok within
to
deft you
"dangerous
cm losm'e
an
to tile
vohagc"
12
within
[hal may be of sufficient
to ¢onstimle
i rik
of eJ¢ctiic
shock to
pel golly;
The
exclamation
is hltended
point
within
an equilamr
to tJel_ you Io lhc t)re_en
opel ating
and maintenance
d tIiangle
e of hnpol_ant
(sel_ icing)
instructions
hi
13
the liter lture accomp ln) ing the appliance
1
5,
3
Read
hlsmlcdons
be
Relain
Insmlctions
shoukl
be
Heed
read
Follow
5
Cleaning
7
Waler
on
lll;llltl_lcltIl'ei"
alld
moislure
example,
near
hlundr\
¸¸ Hlh
lile
ill a wcl
in _he
use
the
insu'uctions
wall
outlet
or aer(isoi
ilttachlllel)[S
ii/ll
i'ecoilllllellded
i/azai'ds,
may
callse
ll(ll use
this
producl
lub,
wash
baseTilel_t;
bowh
_;tlrges
before
cleaners
cleaners
near
kitchen
Do
tripod,
i_ol place
brackeL
causing
serious
injury
damage
to the
producl.
bl'ackeL
or table
wilh
product¸
the
lol]ow
the
D/Otlllthlg
a swhl_l]lil_
producl
oi_ tin tll_slable
to a chikl
Use
Any
alld
cart
QtHck
Mops,
cause
_he pl-odtlct
wilh
by
Ihe
of the
iilslrucdons,
reclll]lll]ended
c()l]][_il_ilti_)il
eKcessi',e
and
fol-ce,
carl
may
or adult,
only
mounting
l/lal_Lllaclurer's
producl
seriot_s
moved
ulles, ei_ Stll-I_aces
combh_alk)ii
Object and Liquid Eimy
Nexer push ot_jecls ol any kind
into _his i?_x_dtlctIhrough openings as they may loud]
dangerous vohage poin[s or short-out parts thai could restl][
in a fire or eledric shock¸ Ne_er spill liquid ol¸any kind on
tl_e plx)duct
18
Servicing
or sold
should
sho[lJd
use
with
i!
care¸
as
may
En
openiIlg
Do i]ol altempl Io service this producl yourself
OF ren_oving
coveFs
may
ex]?ose
yOU
to
dangerous vohage or otller hazards¸ Reler all servicing _o
qualified service personnel
_o
19
Caution-i
i'esuh
17
tripod,
the i_anul_acttll'er
be
Over]o idillg
Do not overload
v_all oullels, exlension
cords, Of in(egra]
c(invel]iel_Ce
receplac]es
as Ihis can
in a risk of fi_e or eleclric shock.
carl,
f_dl,
stand,
product
16
or
poll]_
mallttlacHlreL
alia
by
sl]_ltl](I
ai_d
and
a carl
Power Lines An oulside amenna syslem should not be
localed in Ihe vicinity o1 overhead powm lines o_ olher
electric light or powel ci_vuit_, or where it can hdl into snch
power lines or cil'cuit _, When installing an outside antelma
systelm exlreme care shoukl be laken to keep h'onl l(mching
such power lines o_ circuits as conlad wilh them migh_ be
latak
waler
sink.
or near
The
l'ecommel_ded
accessory
A prodtlcl
Ihis
or tahle.
1B
by
like
Accessories
stand,
from
and
_o.
and
as [i/ey
Do
a I_l_l/
inslrucdons
14
be adhered
product
use
operating
the producl
operating
i1,;e liquid
Do llot
producl
and
warnings
fills
llot
and
rel_rence
shoulcl
hlstructions
is operated¸
safely
All
Unplug
nllachl]leilts
9
All
Do
product
luture
instruclions
6
lor
for
Inslructions
cleal_ing
tile
the
The
retained
operating
salel) and operating
the
before
Warnings
4
8
All
shoukl
PowerCord Prolecdon
Po_er supply cords should be
routed so that fl_eyare not likely to he walked on or pinched
by i_ems placed upon or against them, paying pardcul u"
attentiol_ to cords at plugs, convenience receptacles, md the
Ix)in( where II/ey exil lbom (he product.
Lighming
For added protection R)r fl_is product during a
lightning stoml, or when it is lelt unattended md uuused lot
long periods of lime. mlplug il h'om the wall outlet and
disconnect the anlenna o_ cable syslem. This will p_evenl
d image to the pwduct chle to lighming md po_erdi.e
Damage Requiring Service
Unplug this product from file
wall outlet and =_l_l¸ servicing _oqualified service personnel
under the R)llowing condilions:
al
b)
When the power-supply cord or plug is damaged,
If liqukl has been spilled, or objecls have 11dlen into the
c)
producL
If _he producl has been exposed to rain or wa_e_
dl
II die product
does
nol operate
normall}
b) followhlg
24
Ou(door
tbc operabng
instructions
Adjust only dlosc controls
tb31 are covered bv Ihe operaling
hlslrtlctions
as an
improper
adjustment
of other con(rols may result in
damage
and will (/llel/ le(ltlile
qualified
lechniclan
exlensive
to restore
wolk
the producl
bv a
Io h_ normal
If die product
wav
f)
has been dropped
When
IIle product
exbibils
Replacement
Parts
a disdnct
21
Salary
electrodes,
in perfof
When
replacemenl
parts
Collduc[ors,
to gl_luIldil_g
lbr tbe grounding
eleclrode
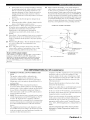
OF ANTENNA
GROUNDING
paris
as the original part¸ Unauthorized
may resuh in fire, eleclric shock, or other
Check
Upon completion
condition¸
Wall or Ceiling
to a wall
or
whh i_gard to proper grounding
of the
structure,
grounding
o[ the lead-in wil_
and requi_men(s
EXAMPLE
are requh'ed,
has used I'ephlceil_elll
Ill" have tbe same
olany
service
or repairs
to
dlis producL ask tbc scrvice lecbnician
to perfornl sallxy
checks (o determine
Iha( die product is in proper operahng
22
anlenna
a need lor Sel_ice,
t e sure Ihe service lechnicial3
specilied ]_) the I_llllll:_lctlllel"
charac(crisdcs
substitubons
hazards¸
change
If an outside
t(i all al_tenl)a discbaE'ge unit, size ()J__loundill_
Ioc_lti{)ll of al_teRl_a discharge
Ullit, col_llecth)ll
in any
and
i1%lnce - this indicales
20
or damaged
Grounding
provides inlbrmalion
mast and supportblg
opel'a[h)ll,
el
Anlenna
cable system is connected to the product, be sui_ the antem_a
or cable system i_ _rotlnded
so as t(i plovide some
protection
agahlst vohage su_es and bulb-up static cha_es
Article 810 of Ihe Nadonal Elechical
Code, ANSI/NFPA
7().
Mounling
or ceiling
The unil should
oldy
a_ recommended
j
_J
j
be mounled
_2227_72;Z721
.....
by the
illallll I ac( u get
23
Heat
The
sourceg
product
such
producls
should
be
as r ldiators,
(blcludhlg
situated
heat
away
registers,
amplifiers)
Ihal
fronl
stoves,
produce
hea_
or other
heat.
Note to CATV system
installer:
This rcn]b_der is pix)vided to call the CATV system installer's
attention
(o Ardcle 820-40 ol Ihe NFF Ibat provides
guidelines
Jot proper grounding
and, in particular,
specifies
Ihat tile cable ground sball be connect_'d
[_>the grounding
system ol (he btdldblg, as close Io (lie point of cable enlry as
pmcdcah
NEC
FCC INFORMATION
1
IMPORTANT
NOTICE:
DO NOT
MODIFY
THIS
producl
This ploduct. _hen installed is indicated
in d_e
inslluclions
contained
in this manual, meets FCC
Yamaba
Modifications
may void yore
not expressly
audlority,
gran(ed
approved
by
by the FCC.
accessories
When
(o
use this prodnct
this product
could
product
use only
higb qualily
Utilize
void your
FCC authorization
to
in the USA
This producl
with the requirements
lot Class "B"
digital
requirements
provides
listed in FCC Regulations,
dex ices
Compliance
a re lsonable
equipment
generales/uses
in Ihe usels I]lallllal,
OlX radon
ladio
and _lsed according
may cause
of other electronic
to be Ihe soulve
of inted_rence,
which
measures:
either
this product
or the device
that
is beblg
by the interl_rence
power
outlets
or _se)
that are on different
ci_vuits
or install
b_ the case of radio or TV
the antenna¸ II¸ the antenna
the lead-in
branch
(ch'cuit
AC line liher/s
interlerence,
relocate/reorient
lead-in is 300 ohm ribbon lead,
Io coaxial
type cable¸
and l%und (o comply
Part 15
with these
level ol ;isStll'aRcg that
devices.
nol inslalled
bi_aker
change
bas been tesled
your use ol this product in a residential
environment
_ill
no( resuh in harmlul
interl)rence
with other electronic
This
I_)llowing
af_cted
to
Cable/s stlpplied with tbis product MUST
all inslallNion
inslmc6ons
Faihne to
I iIhlw il_structions
NOTE:
connecting
andh_r anodler
shielded cables
be _lsed Follow
3
is Ibund
Relocate
IMPORTANT:
with FCC reguhltions
does not guar intee that
will nol occur in all inslallations
[f this
can be determined
by lurning the unit "OFF" and "ON".
please Iry to eliminate
the problem by using one of the
use the prodllcl
2
(for US customers)
Compliance
inted_rence
UNIT!
requirement_
NATIO_IALEU=CrRICA_ COOE
fi'equencies
and. if
Io tile h_struclions
interhq'ence
harmlu]
h)und
to the
If these corrective
i]leastlres
do 11o[ prod Lice satisl_lctory
results, please contact the local i_tailer authorized
to
dist6bute
tbls lype of product. If you can not locale the
appropriale
retailer,
Corp, US.A
90620.
Tile above
6660
please
contact
Orangedlorpe
statements
distributed
by Yamaha
s_4bsidiaries
apply
ONLY
Corporation
Yamaha
Ave,
Elechonics
Buena
to _ose
Park,
CA
products
of America
or its
levices
Caution-ii
En
1
2
Tu assure
tl/_" finest perl_)rnlance,
carefully¸
Keep
Inslall
Ibis souncl system
place
away
please
i{ in a sal_ place
dusL moisture,
and/or
sunlighL
cool,
heal sources,
cold¸ Allow
30 cm on the lop, 20 cm on the left and right,
Ihe back of Ibis unil
3
Locale
or
4
this unil a'_ay
Iltli]gJ()[ii]_l
S Io
hul]]i_lin_
humidity
lie.
condensalion
a room
inside
shock,
fire, damage
Avoid
installing
this unit, which
coi_polleIff_,
as
discoloration
they
(i.e
o_ects
to this unit, andk>r personal
candlesh
wi{h ]iqukl
n]ay cause electrical
Ihis uniL
Do not cover
in order
d_is uni{ rises,
and]or
personal
_li_l/()l"
silock
iniul_
Io Ihe user andk>r damage
ml_lecloth,
heal raclialion
il may cause
fi_,
Io
curtain,
IJ¸li_e temperature
dam_e
tilis unit Lipside-down
causing
until all conneclions
dan]age
vohage
Use a clean,
specified
of this unit with a voltage
prevenl
damage
OUI_OO[
ai_[ei]l_as
durh_g
a lighming
14 Do not al{empt
Yamaha
service
cabinel
should
dlan specified
keep
]:[ol31
persomlel
Ibis
and may
iniury
Yamaha
i_suhing
_l wa]a
when
oF
[11_
Lli]i_
The
periods
ol ¸ time
plug IYom the wall
ai]d whel_
the AC power
easily¸
17 Be sure to wad tile '<Troubleshooting"
bel_re
En
qua]ilied
is needed¸
l_r any reasons.
the AC power
conch_ding
FOR CANADIAN CUSTOMERS
To prevent electric shock, match wide bhlde of plug 1o
wide slot and flllly insert.
This Class B digital apparatus complies with Canadian
ICES-003.
section
POUR LES CONSOMMATEURS CANADIENS
Pour ,Sviter les chocs _51eclriques,introduire [a lame ht
plus large de la fiche darts la borne cormspondante de
la prise et pousser jusqu' au Ikmd.
Cet appareil num_rique de la classe B est confonne ,_
la norme NMB-003 du Canada.
flora use
cord and
ou[l_[
any service
Io use this unit l_r long
), disconnect
This unit is not disconnected fiom the AC power
somce as long as it is connected to the wall outleh even
if this unit itself is turned off by @STANDBY/ON
This state is called the standby mode. In this state, this
unit is designed to consume a very small quantity of
power.
IMPORTANT
IJ_e po_er
or fix this ul_it. Contacl
Ibis unil near the AC ouliel
Caution-iii
Using
slorm
to modily
never be opened
erwrs
be used,
other d/an specified¸
discol_i_ec{ed
plug can be reached
operating
this mighl
is dangel_us
I_>rany damage
by ligh{ning,
not planning
(i,e vacation
oulleL
solvenls:
dry clod1
Io Ibis unit. ai]dk_r personal
will nol be held responsible
WARNING
TO REDUCE THE RISK OF FIRE OR ELECTRIC
SHOCK. DO NOT EXPOSE THIS UNIT TO RAIN
OR MOISTURE.
cords¸
fi'onl Ille wall outleL
on this uni{ must
vohage
cause fire, damage
16 Inslall
and/or
cable
this unit with chemical
{he linish
unil _ ith a higher
15 When
knobs
Ihe power
ti_e phJg; do not pull tile col_L
11 Do not clean
12 Only
on switci_es,
disconnecling
grasp
It may overheaL
damage¸
Do not use _lrce
heat sucil as
Io this uniL
in]uiT
opera_
10 When
13 _
or
comple{e
D//not
possibly
9
dripping
as they may la]l and liquid
Do not plug in Ibis unh Io a wail outlel
al_
8
il_iury
daillage
tills unit with a newspaper,
inside
240 V AC. 50160 Hz
cause heal h1_ loss
as li/ey may cause fire,
in them,
nol to obstruct
plugging
21 Excessive sound pressui_ flora earphones and headphones can
may l_ll] <into
Io liquid
Cause
BEFORE
oi¸ this Lmit
burning
containers
7
may
on the surl_ce
Voltages are I I 0 120/220
on the J_ar panel of this uilit
an eiec{rical
objec{
damage
elc
from
_ilh
Io preven{
persona]
i_eign
SEI.ECTOR
20 Tile batteries silall not be exposed to excessive
sunshine, fire or like¸
On li_e top of this unit, do nol place:
othel"
6
must be set _ir your local main voltage
into the AC wall outleL
molors,
to set dlis
the AC pilwer plug
lAsia and General models onlyl
and 20 cm on
may cause
I/) this uniL arid/or
this unit whe_
SELECTOR
Ti_e VOI.TAGE
appliances,
Ibis unil andk_r Ihis unit may be exposed
splaslling.
19 VOI,TAGE
SOLli_ds
whh a hunlidifier)
pi'L=s_@STANDBY/ON
space of al least
Do n/>l expose this unit to sudderl lemperalure
changes
cold I/! hot, and do i]ol locale this ui]]t in a environmenl
high
5
IYonl olher electrical
avoid
dry, clean
vibration.
ventilation
Ibis mill
unit in the standby mode, and disconnect
ii_m the wail outlet.
rel_l_nce
in a well venlilaled,
fi'om direct
18 B_qor_" moving
read dds manual
i_]¸ lulure
on common
Ihat this unit is laulty
Please record the serial lnlmber of this unit in the space
below.
MODEL:
Serial No.:
The serial number is located on the rear of the unit.
Retain this Owner's Manual in a saiL. place for fllture
reference.
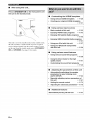
Features ...................................................................
Getting started ........................................................
Quick start guide ....................................................
Preparation: Check the items .....................................
Step ]: Set up your speakers ......................................
Step 2: Compeer your DVD player and other
componellls
............................................................
2
3
4
4
5
6
Step 3: PJess SCENE l button ...................................
7
What do you wanlto do wdh this unit? ..................... S
Connections
.............................................................
Rum panel ..................................................................
Placing speakers .......................................................
Connecting spe ikm s ................................................
Inlorma(ion on jacks and cable plugs ......................
Inlomla(ion on HDMI TM ..........................................
Audio and video signal I]o_ ....................................
Connecting video components .................................
Connecting other conlpol_ents .................................
Connecting audio components .................................
Connecting a Yamaha iPod IM universal dock or
Bluetoofl9 x_adapter .............................................
Using (lie VIDEO AUX jacks on the h'ont panel ...
Connecting II/e FM and AM anlemms .....................
Connecting the power cable .....................................
Setting the speaker impedance .................................
Turning on and off the power .................................
Front panel displa_ ..................................................
Optimizing the speaker setting
for your listening room ....................................
Using AUTO SETUP ..............................................
9
9
l0
I1
]3
14
14
15
16
18
19
19
20
20
21
21
22
XM Satellite Radio tning ......................................
Connecting the XM MinbTuner Dock ....................
Actiwlting XM S itellite Rldio ................................
Basic XM Satellite Radio operations .......................
Setting XM Satellite Radio p_eset channels ............
Displaying tbe XM Satellile Radio inlonnafion
SIRIUS Satellite Radio TM tuning .........................
Connecting 0/e SP'iusConneclrX_ tuner ....................
Activating SIRIUS Satellile Radio TM subscriplion..
Bisic SIRIUS S ltellite Radio c'_ operations ............
Setting the SIRIUS Satellite Radio r?'_preset
channels ...............................................................
Setting the Parental Lock .........................................
Displaying the SIRIIJS Satellite Rt_dior_*
h_lk_]lnalion ..........................................................
Using iPod IM..........................................................
Controlling iPod _ ...................................................
Using Bluetooth TM components ............................
Pairing the Bluelooth r?'_ad _plcrand your Bhletooth
component ...........................................................
Pklyback ol the Bluetooth I_ component .................
Recording ...............................................................
46
46
47
47
49
50
51
51
52
52
SET MENU ............................................................
Using SET MENU ...................................................
1 SOUND MENU ....................................................
2 INPUT MENU ......................................................
3 OPTION MENU ...................................................
Renlote control features ........................................
Controlling this unit. a TV. el other conlponents....
Setting remotu control codes ...................................
Advanced setup ......................................................
61
62
63
68
70
73
73
75
76
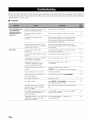
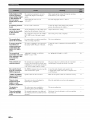
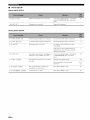
Troubleslmoling
.....................................................
Glossary ..................................................................
Specifications
.........................................................
Index .......................................................................
78
88
90
91
54
54
56
57
57
59
59
59
60
24
24
Selecting the SCENE templates ...........................
28
Selecting Ihe desiJed SCENE lempla(e .................... 28
Crealing your original SCENE (emplates ................ 31
Using rcmo(e conlrol on Ihe SCENE lcamre ........... 32
Playback ................................................................
33
Basic operations .......................................................
33
Selecting audiu input jacks
(AUDIO SELF£'T) ..............................................
34
Selecting tbe MULTI CH INPUT component ......... 34
Displaying the current status el this unit ou a vkk'o
monilor ...............................................................
35
Using yonr headphonc-s ............................................
35
Muling die audio oulpul ...........................................
35
Playing video sotnces in the-hckground of an audio
somce ...................................................................
36
Dispk@ng the input source inlbm_ _tion................. 36
Using the sleep timer ..............................................
37
Sound field programs ...........................................
38
Sound lield progranl descriptions ............................ 38
tTsing audio features .............................................
41
E@_ying high qnalily sum_d.................................... 41
At!lusting tbe tonal qualily ....................................... 41
At!lusting the speaker k-w,l......................................
41
Selecting Ihe nigbt listening mode ........................... 42
FI_UAM tuning ......................................................
43
Automatic tuning .....................................................
43
Mmud tuning ..........................................................
43
Automatic preset tuning ...........................................
44
Manual preset tuning ...............................................
44
Selecting preset stations ...........................................
45
Exchanging prese( station ........................................ 45
(at the end of this
manual)
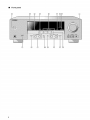
Front panel ................................................................
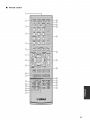
Remote control .......................................................
List of remote control codes .................................
About this manual
• .'¥cindicates a tip lol your opel ation
• Some operalion
_an be pelfolmed
b3
l]ollt
palld
name
or tile
differ
Oll@S Oll tile
betx,,een
re*mote
the front
panu]
using
colltrol
i
ii
iii
eithel tile button oil tile
Ill
ase
and Ihe renlor_
tile
buttoll
_ontrol,
Ihe
butlon name oll [he remote control
is given in palcntheqes
• This lnan ual is printed p_k)l to plodu
tion Design
and specifications
are
sobjecl
to challg@
ill part
as i l_SLlJl
of i Illpl'OVe
l_]@tll S. elC
Ill case
of difference between Ihe nl mull and ploduet, tile product has
priority
• '_)SPEAKERS" oJ-(4)DVD" (examplciindicatesthenameof tile
p_lls
oll
tile
flOlR
sheet or tile pages
pallel
el
file
retook,
coll[lOl
R¢I_I
R_ tile
a_la
at the end of this in _lloal lor tile llllorlllation
bed
abet1 [
each position of the parts
• The ',5'm bol "r
" with
page
nunlber(s)
Jndk ales
tile _ori_'spondJng
refcreme page()
1 En
|
Built-in
5-channel
power
Radio tuners
amplifier
Minimunl RMS ot_tput po_'r
t_
FM/AM
[USA
and Cana k_modelsl
( 1 kHz, ()0<_ THD, 8 -Q)
105 With
!_
XM Sat_'llite
and Home
ti.
[Other models]
(1 kHz, 09% THD, 6 f2)
105WA'h
SCENE
select
!_
function
Yam_dla
sulrotllld
!_
technology
Compressed
Mush' Enh_m_er
Dolh} Digital decod_'r
N_'tHal Surrou_d
(U.SA
Virtual
•
lot the" creation
ol muhl-
%ouild
Dolby Pro gogic/Dolby
DTS clecode_
Pro Logic
t_
II clecod_'r
I_
t_
!_
decoder
CINIgMA
mnhlg
capability
(using
XM Mini-Tuner
sold separately)
Satellite Radio TM tuning capabildy
tuner_ sold separately)
(using
SIRIUS
Multimedia Interface)
HDMI interlace
lor st m [a_d, _'nll_m_ed o_ high-delRlition
video/includes
10g0p _ideo signal U"msmisslonl
as well as
inulti-ch_mne] digital m_clio
ti,
TM
t_
t_
0
ti.
ti,
rlD
DOCK termilml to connect a Y_lmah i iPod lmiversal dock
(such as YDS_I(), sold separately)
or Bluetooth
adapter
(such as YBA_I()_ sold separately)
Other features
!_
mode
md C'm_ada models _mly)
CINEMA
I)SP
SILENT
Dock,
DOCK terminal
Decoders and DSP circuits
ch_lnilel
SIRIUS
Connecl
capability
Ridio
HDMI (High-Definition
P_es_'t SCENE t_'nlph_tes Ik_r_rious situ;=tions
SCENE tern phlte customizing capability
PJopri,'tar}
tuning
YPAO (Yamaha Parametric
Room
autom_ltic speaker setup
192 k Hz/24 bit D/A converter
Acoustic
Optimizer)
h_r
DIRECT
mode lk>r high quality sound JOl'a]l soulces
6 additional
input i_cks Ik_r discr_'te multi-channel
input
OSD (on-screen
display) menus that allow you to optimize
this unit to suit your individual audiovisual
system
Coluponenl
vid_x_ inpllt/output
capability
(3 COMPONENT
VIDEO INs md 1 MONITOR
OUT}
Optical and co _xial digital audio signal iacks
Sleep timer
Cinema and music night listening
modes
iPod conu'olling
capabilily
Remote collll'ol %_ith preset i'_'lllOte contl'/>l codes
_dlti
DIGITAL
Manuiac_urd
und_'r lh'ense
"Dolb_",
'Pro
Logic",
of Ddby
l.ahorlto_ies
flora Dolb}
and the do_lble_D
"DTS" and "'DTS
DTS, Inc
gabor_(ories
Digital
Stm'otmd"
XHF'{
TM
Tile XM name _md r_'la_'d
Satellite Radio Inc.
aetlr{ll
is a tradem
_rk ol
Ai_ph',
h_c,
regi
reded
in the" US
and
Ot NL=I"C(Itln{i-i_'s
Bluetooth
Bluetooth
XMMini-Tun r
Iogos m'e r_'gist_'rd
tlademarks
of XM
hy Yamaha
tr ldemark
in accoE_lance
of the Bluetooth
witl_ a license
SIG lnd is
agreement¸
' HI)MI", the "HDMI" k_go and "High-DeI]nition Multhnedia
Interiace" a_e trademarks o_ registered trademarks of HDM]
Licensing LLC
En
Stll._)tllld
by Neural
Audio
TM
II{ll_le alld rel_lted Iogos _ll'e tl-ademarks
owned
Corporalh>n,
SIRIUS
TM
is a registered
H-"IITll
2
of
TM
"iPod"
used
trademarks
s} n3I_oI a_c' trademarks
SILENT
CINEMA
"SILF.NTCINEMA" is a tradema=k
of YAMAHA
CORPORATION
iPod
are registered
SATE_IT_
©2006
RADIO
SIRIUS
Satellite
Ralio
the SIRIUS dog logo, channel
SIRIUS Sal_'llite Radio Inc
Inc, "SIRIUS",
_ Sirius Connect",
_mmes and Iogos are trademarks
ol
•
•
Supplied accessories
Check that you received all of tile t_)llowing parts.
J
Installing batteries in the remote control
3
Remote control
J Batteries (2) (AAA, R03, UM-4)
{3 Optimizer microphone
AM loop antenna
Indoor FM antenna
•
VOLTAGE SELECTOR
(Asia and General models only)
Caution
The VOLTAGE SELECTOR
on the rear panel of this
unit nmst be set tkar your local voltage BEFORE
plugging
hnproper
the power cable into the AC wall outlet.
setting of the VOLTAGE SELECTOR
may
cause damage
hazard.
to this unit and create a potential
1
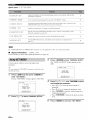
Take of! the battery compartment
2
Rotate
the VOLTAGE
countel_lockwise
straight
Voltages
to the correct
clockwise
positkm
Insert thetwo
or
using a
are ;is tk)llows:
......................
220/230-240
V AC, 50/60
Hz
V AC, 50/60
Hz
3
l 10/120/220/230-240
supplied batteries
(AAA, R03, UM-4) according to the polarity
markings (+ and -) on the inside of the
battery compartment.
slot screwdriver.
Asia model ...................
General model
--
SELECTOR
cover.
fire
Snap the battery compartment
cover back
into place.
VOLTAGE -SELECTOR
• Change
ull of the ballelles
o[ ¸ ihe
i_l_lOle
conllol
• Do
nol
use
all
• Do
nol
use
differenl
nlanganese
these
old
ballely
alld
lypes
batteries)
difi_l_nt
il you
nolice
Ihat
Ihe opelalk)n
range
decreases
a lleW
together¸
types
ol_e together.
of balteries
(such
Read
ol ¸ batteries
the
nlay
as alkaline
packaging
i/ave
the
and
careluily
same
as
shape
and
CO]OL
• II ¸ the
batteries
have
leaked,
dispose
Iouching
Ihe
leaked
malelial
clothing+
etc
Clean
Ihe
inslaliing
• Do
nol
new
n]intl[eS,
the
compartmenl
batteries
contix)l
of the
h_serl
with
in accordance
ink)
Avoid
contacl
thoroughly
batleries
house
your
ba{teries
ba[[el-ies
memo_
ilew
general
with
is without
oF if exha_ls[ed
contm_ts
is c]eared_
away
correctly
• If ti_e remote
ballery
immediately.
il come
wi{h
beR)re
batteries¸
throw
of them
ol tilenl
or Jelling
_)r
rel/lail_
may
alld
local
up
dispose
more
than
2
ill the i-en_o[e
be clea_d
set
wasle;
_gulations
When
ll/e
remo{e
conHx)].
the
memory
control
oode
We Want You Listening
Yamaha and the Elecuonic
For A Lifetime
Industlies Association's
Cmlsumer
Electronics Group want you to get the most out of your
equipment by playing it at a safe level One that lets the sotmd
come tl_aough loud and clear without annoying blaring or
distortim_ and, most importantly, without affecting your
sensitive llearing
Since hearing dalnage from loud sotmds is oftml
tmdetectable
tmtil
itistoolate,
"_maha andthe
Electronic
hldustlies
Association's
Co_Isumel
¸
Electronics
Group leconmte_Id
you toavoid
plolonged exposule ftonl excessive vohune levels
_
__
|
tds_
3
En
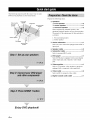
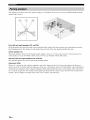
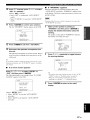
The tk)llowing steps describe the easiest way lo enjoy
DVD movie playback in your home theater.
Prepare
Video
monitor
Front right
speaker
Front left
speaker
Subwoofer
Surround right
speaker
Center speaker
the l_)llowing items.
Speakers
Front speaker ..................................... x 2
_1 Center speaker ................................... x 1
Surround speaker .............................. x 2
Select magneticall) shielded speaker. The
minimum required speakers are two lront speakers.
The priority of the requirement of other speakers is
as li)llows:
1. Two surround speakers
2. Center speaker
DVD player
Surround left
speaker
[..I Active subwoofer
...................................
x 1
Select an active subwoofer equipped with an RCA
input jack.
Speaker cable .........................................
.J Subwoofer cable .....................................
Select ;tmonaural RCA cable.
x 5
x 1
L._IDVD player ..............................................
x 1
Select DVD player equiplx_d with coaxial digital
audio outlmt jack and composite video output
jack.
Video monitor ..........................................
x 1
Select u TV monitor, video monitor or pr(_jector
equipped with a composite video input jack.
[.l Video cable .............................................
x 2
Select an RCA composite video cable.
[.l Digital coaxial audio cable .................... x 1
Enjoy DVD playback!
4
En
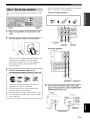
qr/_,'tFsl ,'rNIJrr_t;
Be sure to connect
the left channel
(R), "+" (red) and "-" (black)
Place your speakers
unit.
in the room
and connect
(L), right channel
properly.
Front and center speakers
them to this
/
1
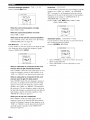
Place your speakers and subwoofer in the
room.
2
Connect speaker cables to each speaker,
To%%r/=
,aar
1' =\
TO the front
right speaker
TO the front
left speaker
Surround speakers
\
Cables are colored or shaped differently, perhaps wilh
a stripe, groove or ridge. Connect the striped
(grooved, etc.} cane to the "+" (red) terminals of
your speaker. Connect the plain cable to the ""
(black) terminals.
3
Connect each speaker cable to the
corresponding
speaker terminal of this unit,
®
5)
g
To the surround
right speaker
To the surround
left speaker
Make sure lhat this unit and the subwoot)r are
unplugged fl'onl the AC wall outlets.
"2 Twist the exposed wires of the speaker cables
4
Connect the subwoofer cable to the input
jack of the subwoofer and the SUBWOOFER
OUTPUT jack of this unit.
together to prevent sho_l circuits.
_? Do not let the bare speaker wires touch each other.
"a Do not let the bare speaker wires louch any metal
Subwoofer
AV
receiver
pro] of this unit.
,
,
I
=
o
t
i
.,
|
s• t
SUBWOOFER
OUTPUT jack
Inpu
Subwoofer
cable
5
En
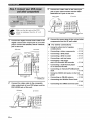
3
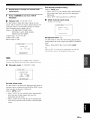
Connect the video cable to the video input
jack of your video monitor and the VIDEO
MONITOR OUT jack of this unit.
AV
Video monitor
Make sulv that this unit and the DVD
player are unplugged
outlets.
fi'om the AC wall
]
Video input
jack
DVD player
•
•
DVD DIGITAL INPUT
COAXIAL jack
MONITOR
jack
OUT
For further
connections
Using the other kind of speaker
combinations
,
P. 11
•
Connecting
a video components
_
P. 15
•
Connecting
a DVD player
,
P. 16
•
Connecting
a DVD recorder
_
P. 17
•
Connecting
a set-top boxes
_
P. 17
•
Connecting a CD player
and a CD recorder/MD recorder
_
P. 18
Connecting a multi-format
or an external decoder
_
P. 18
an Yamaha iPod/Bluetooth
_
P. 19
•
Digital coaxial audio
cable
VIDEO
Connect the power plug of this unit and other
components into the AC wall outlet,
AV receiver
Digital coaxial
audio output jack
J
Video cable
4
Connect the digital coaxial audio cable to the
digital coaxial audio output jack of your DVD
player and the DVD DIGITAL INPUT COAXIAL
jack of this unit.
receiver
player
•
Connecting
dock
•
Using the VIDEO AUX jacks on the front
panel
_ P. 19
•
Connecting
•
Connecting the XM Mini-Tuner Dock
•
Connecting the SIRIUS Connect tuner
c
an FM/AM antenna
_
P. 20
P. 46
2
Connect
the video cable to the composite
video output jack of your DVD player and the
DVD VIDEO jack of this unit.
DVD player
AV receiver
C
oopo,it° iOeo
output
6
En
jack
Video
cable
_
DVD VIDEO jack
p. 51
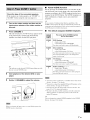
you
unit
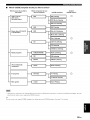
Check the type of the connected speakers.
If the speakers are 6 ohm speakers, set "SP IIVlP." to
"6_._MIN" before using this unit (see page 21).
1
Turn on the video monitor and then set the
input source selector of the video monitor to
this unit.
2
Press @SCENE
This unit is turned on. "DVD Viewing" appears in fl_e
front panel display, and this unit automatically
optimize own status R_rthe DVD playback.
recall
your
program
according
assigned
to the
built
l_vorite
inpul
to the SCENE
SCENE
combinations
button.
of input
If you connect
SCENE
a Yamaha
control
compol_enl
signals,
Ihe DVD
player
The
Default
SCENE
button
product
Rel)r
activate
Io the insiruclk!n
_be
mmud
ol
DVI)
Iiekl program:
you _anl
Disc Listening
inpu( source:
STRAIGHT
Io enjoy
DVD
n3t]_l_'
IOOH1.
_o[
[his
TV Viewing
q
inpu_ soulce:
SCENE
4
field
a DVD
phlyback
DVD
fl_e connecled
sound
of the desired
are
field
inlk_rnlafion.
DVD Viewing
inpu[ soulce:
SCENE
3
Start playback
templates
sound
that has cap _bility of the
sound fiekl proglam:
3
field
been
The name of the SCENE
template
and its description
SCENE
2
up while
has
The default assigned SCENE templates
For when
lighls
SCENE
and
on this
sound
that
ibis unil can automatically
ik/r furlher
sound
bu_on
and
template
sources
and starl playback
SCENE
1
The indic ltor on the selected SCENE
fl_is unit is in {he SCENE mode
can turn
source
programs.
•
1,
and
5cb Stereo
phlyer as fl_e background
DTV/CBI_
program:
STRAIGHT
Radio Listening
_2,"3, :4
inpm somce: TUNER
sound lield program:
5ch Enhancer
from Ih_' FM radio s_ Ilion
DVD on your
player,
4
Rotate @VOLUME
to adjust the volume.
*1 You musl connecl
advance¸
See page
a cable
TV or a salellile
"2 You need _o connect
II_e supplied
FM and AM anlennas
unit in advance¸ See page 20 _r de_ails
*3 Yotl mLISl ItHle in[(i Ihe desire_l radio sta[ioll
pages
@
43 Io 45 l_)r luning
*4 To achieve
You
buttons
Wben }ou change Ihe inpul source
SCENE nlode is deactivated¸
ol sound
field program,
can
See
page
28
reception,
or adjust
change fl_e assigned
for
il_ advance¸
_o _his
See
inik)rmation
_lle be_t possible
AM loop ant_lna,
indoor FM an_nna
umer to this uni{ in
17 l_)r del_lils
the position
SCENE
orien_ fl_e connected
o_¸ file end of the
tern I lale
I'( r Ihe
SCENE
de_ails
|
fl_e
7
En
•
After
using this unit...
Press @STANDBY/ON
on the front panel to set
this unit to the standby mode.
•
Customizing
the SCENE
templates
•
Using various SCENE templates
•
Creating your original SCENE templates
_
P. 28
P. 31
•
\
This unit is set to the standby
this unit consumes
mode.
a small amount
In the standby
mode,
of power in order
to
receive infrared signals from tile remote control. T_) turn
on this unit from the standby mode, press @STANDBY/
ON (or @POWER).
Using various
input sources
•
Basic controls of this unit
_
P, 33
•
Enjoying FM/AM radio programs
_
P. 43
•
Enjoying XM Satellite Radio programs
_
P, 46
•
Enjoying SIRIUS Satellite Radio programs
_ P, 51
•
Using your iPod with this unit.
*_ P. 57
•
Using your Bluetooth components
with this unit.
_
P, 59
_
P. 38
_
P. 41
See page 21 lk)r details.
•
•
•
•
•
Using various
sound
features
Using various sound field programs
Using the direct mode for the high
quality sound
Customizing
Adjusting
the sound field programs
_, P. 40
the parameters
of this unit
•
Automatically optimizing the speaker
parameters for your listening room
(AUTO SETUP)
_
•
Manually adjusting various parameters of
this unit
*_ P. 61
•
Setting the remote control
•
Adjusting the advanced parameters_
•
En
P. 73
P, 76
Additional features
Automatically turning off this unit
8
_
P. 24
*,_ P.37
i)
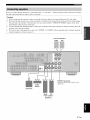
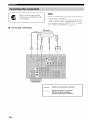
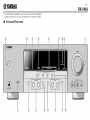
<@@@@@@@
I
(U.S.A. model)
@
HDMIjacks
14
@
DIGITALINPUT
@
COMPONENT
@
XM jack
@
SIRIUS
jack
(U.S.A.
and Canada
jacks
VIDEO
(U.S.A.
13
jacks
13
and Canada
models
only)
46
51
models only)
@
DOCK terminal
I_)
@
Speaker
I1
@
VOLTAGE SELECTOR
(Asia and General models
terminals
3
only)
@
AUDIO
jacks
13
@
VIDEO
jacks
13
@
MULTI
CH INPUTjacks
Is
SUBWOOFER
ANTENNA
OUTPUT
terminals
jack
II
20
|
9 En
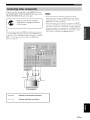
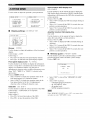
The speaker layout below shows
channel audio sources.
Front
left and right
the speaker
speakers
setting
we recommend.
You can use it to enjoy CINEMA
DSP and multi-
(FL and FR)
Tile l]'ont speakers are used for tile m_dn source sound plus effect sounds. Place these speakers at an equal distance
ideal listening posilion. The distance
Center
speaker
speaker,
Surround
The
is lbr the center channel
you can do without
left and
surround
right
speakers
Subwoofer
_lre
not so critical,
lO En
for
(dialog, _,ocals, etc.).
however,
are obtained
If t_)l"some reason
it is not practical
to use _
with the full system.
(SL and SR)
et_ect
with a built-in
not only for ivinforcing
of the LFE (low-fi'equency
speakers.
speakers
used
sounds
it. Besl results,
and
surround
sounds.
(SW)
The use of _ subwooler
effective
from the
should be lhe same.
(C)
The center speaker
center
of each speaker from each side (if the video monitor
because
Turn il slightly
effect)
channel
low bass sounds
toward
mnplifier,
such as the Yam_h_ Active
bass lhequencies
included
from any or all ch_mnels,
in Dolby
are not highly
Digital
directional.
the center of the room to reduce
Servo Processing
Subwooler
System,
but also for high fidelity sound
and DTS sources.
But it is better
wall reflections.
The position
is
reproduction
of the subwoot)r
to place the subwoofer
near the lhont
is
Be state to connect
this unit cannot
the left channel
reproduce
(L), right channel
the input sources
(R), '+" (red) and _-" (black)
properly.
[f the connections
me l_mlty_
accurately.
Caution
Belkwe connecting
the speakers,
Do not let the bare speaker
this unit and/or
panel display
the speakers.
If the speaker
fl:om the AC wall outlet.
any metal part of this unit. This could damage
wires me short-circuited,
"CHECK
SP WIRES"
appears
in the front
shielded
speakers.
If this type of swaker
still creates
intert)rence
with the monitor,
place
the
away from the monitor.
If you are to use 6 ohm speakers,
speaker
plug is disconnected
when you turn on this unit.
Use the nlagnetically
speakers
make sure that the AC power
wires touch each other or let them touch
impedance
setting,
be sure to set "SP IMP." to "6_Q MIN"
beft_re using this unit. For details
about the
see page 21.
Surround speakers
Right
Left
Cen_r
speaker
Subwoofer
Right
Front
Left
speakers
(FRONT
A)
|
11 En
•
Before connecting
terminal
to the SPEAKERS
A speaker cord is actuall3, a pair of insulated cables
running side by side. Cables are coh)red or shaped
dilt)mntly, perhaps with a stripe, groove or ridges.
Connect the striped (grooved. etc.) cable to the "+" (red)
terminals of this unit and your speaker. Connect the plain
cable to lhe "" (black) terminals.
Remove approximately 10 mm (3/8") of insulation
from the end of each speaker cable and then
twist the bare wires of the cable together to
prevent short circuits.
Connecting
to the SPEAKER
terminals
nooat,vo,-,
;,:#,,,,vo<+,
1
Loosen the knob.
2
Insert the bare end of the speaker wire into
the hole on the terminal.
3
Tighten the knob to secure the wire.
Connecting the banana plug
(except Europe, Russia, Korea, and Asia models)
The banana plug is a single-pole electrical connector
widely used to terminate speaker cables. First, tighten the
knob and then insert the banana plug connector into the
end of the corresponding terminah
Banana plug
12 En
Connect
one of the type of the audio jack(s)
lind/or vide() jack(s)
that your input components
Audio jacks and cable plugs
AUDIO
DIGITAL AUDIO
©
®
/'vVhile)
(P.ed)
COA_AL
@@@
are equipped
Video jacks and cable plugs
VIDEO
COMPONENT VIDEO
PR
PB
Y
@
@@@
DIGITAL AUDIO
OPTICAL
D
(Yellow}
(Orange}
t 1` t
with.
(P.cd)
1'
1`
lBlue)
(Green)
1'1`1'
I
Left and right
analog audio
cable plugs
•
Audio jacks
This
unit
has
depends
three
on the
Coaxial
digital audio
cable plug
tyws
of
availability
audio
Optical
digital
audio cable
plug
jacks.
of audio
jacks
Component
video cable
plug
plugs
•
Video jacks
This unit has two types of video j ucks. Connection
ConnecTion
on your
Composite
video cable
other
depends on the availability, of input jacks on your video
comporlents.
monitol\
AUDIO jacks
For conventional analog audio signals transmitted via left
and right analog audio cables. Connect red plugs to lhe
right jacks and white plugs to the left jacks.
VIDEO jacks
DIGITAL
AUDIO
COAXIAL
For digital audio signals
audio cables.
DIGITAL
AUDIO
transmitted
OPTICAL
For digital audio signals
audio cables.
jacks
via coaxial
digital
jacks
transmitted
For
conventional
audio
analog
signals
AUDIO
digital
signals
Video
signal flow
for MONITOR
to input PCM,
Dolby
and anak)g
inpul al Ihe digital
OUT (REC)jacks
signals
jacks
Digital
independently
are nol otllpul
and
with digital
rill
Output
(MONITOR OUT)
Input
iacks
transmitted
OUT
via optical digibd
DTS bkstreams
Optical input jacks Ire compatible
signals with up to 96 kHz of sampling h'equency.
• This unil handles
vide()
COMPONENT VIDEO jacks
For component signals, separated into the luminance (Y)
and chrominance (PB, Pr) video signals transmitted on
separate wires of component video cables.
COMPONENT
• You can use the digital
composite
composite _ideo cables.
V,OEO
V,
OEO
PR PB Y
@@@
@
PR PB Y
-@@@
@
Thus
al the
The DSI)
sign 11is nol ouq_ul
II Ihe DVR OUT
(RECI jacks
|
13 En
[l,2,1111f.g_t_f#le_
•
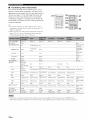
HDMI compatibility with this unit
Audio
signal
Audio
types
signal
2oh. 32-192
u"
Bitstream
t
kHz,
CD,
bit
DVD-Audio,
etc
DVD-Audio,
etc
DVD-Video,
etc
6oh. 32-192 kHz,
16/2(}/24 bit
Dolby
HDMI
components
16/20/24
Mtflti-ch Line
PCM
Digital,
DTS
•
HDMI Version 1.2a (High-Definition Multimedia
lntertace Specificalion Version 1.2a) licensed by
HDMI Licensing, LLC.
HDCP (High-bandwidth Digital Content Protection
System) licensed by Digital Contenl Prolectiom
LLC.
• Wheu CPPM copy-protected DVI) audio is pblyed back, video
and audio signals may not be output depending/m the type of
the DVD player.
• This ulfit is not compatible with HDCPdncompatible HDMI or
DVI conlponents
• You can check II_epotenlial problenl about [13eHI)MI
{unnecfion (see page 36).
•
?
I)VD-Vkleo,
This unit's HDMI interlace is based on file lbllowing
standards:
•
HDMI jack and cable plug
Compatible
HDMI
formats
2oh ISnea= PCM
•
Audio signal flow
HDMI cable
• We recommend
using an HI)MI cable shorter
I_el) with the HDMI logo prinled on it.
• Use a conversion
cable
this unit to other
(HDMI
jack
<_ DVI-D
than 5 meier
jackl
[//connecl
DVI components
• Audio signals inpul al input jlcks other than fl3eHDMI IN DVI)
or HDM] IN DTV/CBL jack o] fllis uni[ cannot be digitally
output a_ the HDMI OUT jack
• I1you turn oH tile power of the video monitor connected to the
HDMI OUT jack via a DVI connectiou. _his unit may lafl t//
establish the com_ection to the compouenL
Video signal flow
Output
Input
Output
HDMI
AUDIO
oo's ;0'sOO@
---_
Digital output
......
D- Analog
VIDEO
output
--_• 2 channel
as well as multi-channel
DTS signals
CBL
input at the HDMI
jack can be output
"SUPP()RT
• Audio
AUDIO
14 En
signals
AUDIO"
at file HDMI
is set to "Other"
input It the HDMI
oulpul jacks.
PCM,
IN DVD
I)olby
Digital
or HDMI
OUT jack
and
IN DTV/
only when
(see page 67),
IN jacks are not output
at the
116
• I)o not disconnect or connect the cable or turn off the power of
_he HDMI conlponents connected to the HDMI OUT jack of
[his unh while dam is being [ransl_ned, Doing so may dismpl
playback ol cause noise
•
Input
plug
@
Through
• 000
,,I*,]llll'4_f_le
Connect
your TV (or projector)
the COMPONENT
VIDEO
VIDEO
MONITOR
to the HDMI
MONITOR
OUT jack,
OUT jacks,
or tile
OUT jack of this unit.
• Some
video monilors
connection
connected
fail to recognizc
Io this ilnit vi_l a DVI
the HDMI
audio/video
signals
Make sure that this unit and other
components
arc unplugged
AC wall outlets.
HDM]
t_om tile
indicator
• When
l
HDM[
/!n m//ther
HDMI
of this unit
MENU"
signals
to play back HI)MI
conlponent
Use the "SUPPORT
to select
audio
connected
tile component
AUDIO"
signals
ol_ this trait or
to the HDMI
p irameter
h'regularly
your TV
monitor
or projector
via HDM[
connectkln,
OSDaredoes
nol sl_mdbv
appear¸ mode¸
In such Incase_,
c/innect
being input ifdiethcy
in the
IIlis case
Ihe the
TV m¢/llitol ¸ ol¸ pl (_jeclol ¸ \ia compone111, or video collilec_h!ll
• Connect
You can choose
flashe_
you conncct
video
II/e inpul source
IN I)TV/CBL
nlonhor
iack
connected
components
to display
_o the HI)M]
Io the HDMI
_he video
IN DVD
images
or
on _he
OUT jack,
OUT iack
in SOUND
Io play back HDMI
mldio
(see page 67)
HDMI
i
_id nero
'
Video in
TV (or projector)
indicates
recommended
indicates
alternative
connections
connections
I
|
15
En
rl.i*,]alal.g_l_l¢t.
Make sure that this unit and other
components are unplugged flom the
AC wall outlets.
• Be sule 1o make Ihe same lype ol v]dc'o CO[lilecljol)s
made Ior y<mr TV (see page 15)
• To make
a digilal
connection
del lult component
assigned
the correspimding
IN" il_ "INPLJT
•
setting
to i componel_t
to DIGITAL
Ik_r "OPTICAL
ASSIGNMENT"
od/er
INPUT
681
DVD player
out
_F.j
indicates recommended connections
indicates
alternative
connections
(One for the video connection,
and one for the audio connection)
16 En
thin
jack.
the
select
IN" or "COAXIAL
(see page
Connecting a DVD player
HDMI
as {hose
•
Connecting a DVD recorder, PVR or VCR
DVD recorder,
PVR or VCR
Connecting a set-top box
Satellite
receiver
receiver, cable TV
or HDTV decoder
HDMI ou_
=
indicates recommended
connections
indicates alternative
connections
(One for the video connection,
and one for the audio
connection)
17 En
|
Connect file audio components as tPllows.
•
Connecting a CD player and a CD
recorder/MD recorder
• When
you connect
connection,
yotlr CD player
priority
selecl
connection
component
assigned
_he corl_sponding
to a component
to each
setting
that
this
unit
and
other
fl'om
1
J
the
and digital
other
DIGITAL
in "INPUT
sure
input a_ the DIGITAL
--
INPUT jack¸
• To make a digi[al
del_ult
via analog
is given to the signal
Make
components
are unplugged
AC wall outlets.
indicates
recommended
indicates
alternative
connections
d_an d_e
INDUT
jack,
connections
ASSIGNMENT"
(see page 68)
( )plJcal
Audioou[
CD recorder or
MD recorder
otll I
CD player
•
Connecting
a multi-format
player or an external decoder
This unit is equipped with 6 additional input jacks (FRONT L/R. SURROUND L/R, ('ENTER and SUBWOOFER) for
discrete multi-channel input from a multi-format player, external decoder or sound processor. Connect the output jacks
on your multi-tk_rmat player or external decoder to the MULTI CH INPUT jacks. Be sure to match the left and right
output jacks to the left and right input jacks lor the front and surround channels.
• When
you
select
the componenl
turns off the digital
• This
unit does
you connecl
sound
connected
field processor,
not J_direcl
signals
a 5 1_channel
speaker
to Ille MULTI
inpul al Ihe MULTI
syslem
CH INPUT
and you cannot
bel_re
rising
selecl
sound
CH INPUT
jacks as II_e inpul somce
jacks to accommodate
this I_ature
° I ...."i
=
o=
_=
o
&
o
Multi4ormat
player/
External decoder
18En
(see page 34). Ihis unit automalically
field programs¸
e,
o=
l_r nlissing
speakers.
We reconmlend
tlla_
Use the VIDEO
game console
AUX jacks on the ti'ont panel to connect
or a video camera
a
to this unit.
Caution
I_
J
colnpoilenls
are unplugged [hOlll the
AC wall outlets.
Make sure that this unil and other
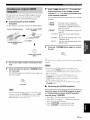
This unit is equipped
with the DOCK
panel that allows you to connect
dock (such as YDS-10,
terminal
a Yamaha
sold separately)
adapter
(such as YBA-10,
Yamaha
iPod universal
dock or Bluetooth
componenls
before
the volmne
making
of this unil and other
connections.
|
on the rear
iPod universal
or Bluetooth
sold separately).
Be sure to turn down
Connect
adapter
• To reproduce
"V-AUX"
• When
a
to the
DOCK lerminal on the rear panel of this unit using ils
dedicated cable.
the source
signals
input at these iacks,
select
as II_e input source
audio
signals
}ack and die DOCK
ol Ihe inpul signal
I. DOCK
are input al the AUD[O
terminal
on the real" panel
jacks.
PORTABLE
die priority
order
is as lk)lhms:
2 PORTABLE
3 AUDIO
mini plug
Yamaha iPod universal dock
or Bluetooth adapter
Audio
oulpul
Game console or
video camera
Portable audio
player
|
19 En
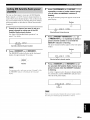
rlD2.1111l_g_f_llt,
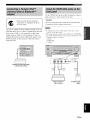
Connecting
the wire of the AM loop antenna
Open the lever
Both
FM
unit.
Connect
and
tenninals.
AM
indoor
each
In general,
sufficient
signal
antennas
antenna
these
are supplied
with
correctly
to the designated
antennas
should
Insert
Close the lever
this
provide
strength.
4"
See right lot conne_:tion
an[ennm
hfl _rmalion
of tile supplied
AM loop
Tile wire of the AM loop
and you can connecl
lerminal.
• The
AM
loop
anlenna
should
be plac;'d
• The
AM
k/op
anlenna
should
airways
outdoor
•
AM
A properly
_han
an
iiis[_lll
anlenna
indoor
de_ller
Outdoor
outdoor
one
{11_outdoor
g{iR1;lha
is connected
installed
If you
an[t?nl_l
or Sel vice
AM
away
Io dlis
anlenna
this
poor
the
(Jt?lllel ¸ abotl[
uniL
even
Assembling
does
not have any polarhy
end oi ¸Ihe wire
Io AM or GND
the supplied AM loop antenna
il: all
unlL
provides
experience
C(iTl£tll[
fl'om
be connecled,
antenna
eilher
clearer
reception
reception
_'_/'_.._
quality,
n_ll_S[
;l[l[h(iriz(?d
Oil[door
_liitel_ilas
h
_3_'t_
antenna
U_e _5to10nl(161o33
fl/vin_l-co_ered
wire
ex[ellded
Otl/dools [rol_l I
willdow
AM loop
antenna
(supplied)
Indoor FM
antenna
(supplied)
The lypes
depending
ol Ihe supplied
AM loop antenna
Once all connections
;_re complete,
into the A.C wall outlet.
I
I
I
I
I
is diflulent
on fl_e models¸
plug the power
(U.S.A.
(U.S.A. model)
Ground
(GND
terminal)
F(_I i_aximul/i
saJety
antemla
Ienninal
(';ND
gl'otln d is a met_ll
and millimum
lc_ a good
strike driven
JIIIL.IJel'ell_ e_ c(_nl_ecl
earth
into moisl
gromld
A good
the
eal_h
earth
Power cable
20 En
model)
cable
•
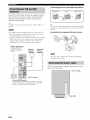
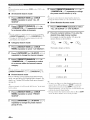
Caution
[f you are to use 6 ohm spe_kers, set "SP IMP." to
"6___MIN" as follows BEFORE using INs unit.
Turning on this unit
Press @STANDBY/ON
on this unit.
(or @POWER)
to turn
F,
1
Press @STANDBY/ON
on the front panel to
set this unit to the standby mode.
Refer to the right colmnn for details.
When
belOl'e
•
2
Press and hold @TONE
CONTROL
then press @STANDBYION
unit,
),ou
(his
turn
on
uni(
tin
dlis
mill
Ihere
repl,>duce
will
be a 4 (o 5 se_'ond
dela 5
gourd
Set this unit to the standby mode
and
to turn on this
This unit turns on, ;rodfl_ead'_mced setup menu
appears in lhe front panel display.
Press @STANDBY/ON
this unit to the standby
(or @STANDBY)
to set
mode,
In the standby mode. this unit consumes a small mnount of
power in order to receive
conlrol.
infimed
signals
from the remote
While holding
TO_%CO"TROL down
3
Press @PROGRAM
IMP.",
<_/_> to select "SP
"SP IMP." mM the current speaker impedance setting
("8f_ MIN") appear in the fi'ont panel display.
4
Press @STRAIGHT
"6_ _.MIN",
5
Press @STANDBYION
repeatedly to select
to save the new
setting and turn off this unit.
The selting
5ou
made
is rellecled
nexl lime you turn on d/is uniL
|
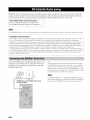
21 En
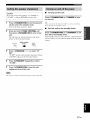
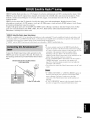
rlD2=qafa{.g_llt.
The XM and SIRIUS
SIRIUS
indicalor
indica(o_
ligh(s
is only
up only
when
applicable
'XM"
to Ihe U.S.A.
or 'SIRIUS"
k. DVR-
and Canada
is selecled
models
and the cursor
on Ihe leli of the XM indicalor
o]
as (he input source
DTV/CBL IpDVD
DOCK_NHARCER_-
I_MD/CD-R I_CD
NER
YPAO
L.
YPAO OR¥
,
VIRTUA_I AUTOTUNED
$TERE0,_
IMUTE LJLIdB
_LD__
E..........
|||||
|||||
|||||
|||||
|||||
|||||
|||||
|||||
|||||
|||||
|||||
|||||
|||||
|||||
|||||
|||||
|||||
|||||
|||||
|||||
|||||
|||||
||||
|||||
|||||
|||||
|||||
|||||
|||||
|||||
|||||
|||||
|||||
|||||
|||||
|||||
|||||
|||||
|||||
|||||
|||||
|||||
|||||
|||||
|||||
|||||
|||||
B
...............................
_
HDMI
Lights
indicator
input at the HDMI
@
@
up when the signal
DOCK
Lights
of the selected
IN jacks
indicator
iPod universal
connected
your iPod in a Yamaha
dock (such as YDS-10,
to the DOCK
page 19) and V-AUX
Ymnaha Bluetooth
Bluetooth
is in the paring
adaptor
component
adaptor
and the Bluetooth
(see page 59).
up while
the connected
is connected
Yamaha
m the Bluetooth
or SIRIUS
pages
43 lo 56).
Bluetooth
component
(see
Satellite
Radio tuning
mode
(see
@ MUTE indicator and VOLUME level indicator
• The MUTEindicator flashes while the MUTE function
•
@
is on (see page 35).
Indicates the current volumelevel.
PCM indicator
up when this unit is reproducing
Modulation)
the Bluetooth
indicators
up when this unit is in the FM. AM, XM Satellite
Radio
Lights
(see page 59) or the
is searching
Tuner
Lights
unit (see
as the input source.
(such as YBA-l 0, sold separately)
component
sold separately)
terminal orthis
is selected
Flashes while the connected
adaptor
is
(see page 14).
up when you station
Lights
input source
|||
digital
PCM
(Pulse Code
audio signals.
@ Decoder indicators
The respective indicator lights up when any of the
decoders of this unit timcfion.
page 19).
@ ENHANCER indicator
Lights up when the Compressed Music Enhancer mode is
selected (see page 38).
@ Input source indicators
The corresponding cursor lights up to show lhe currenlly
selected input source.
Z _ YPAO
Lights
indicator
up when you run "AUTO SETUP"
speaker
settings
any modifications
22 En
set in "AUTO
SETUP"
(see page 24).
illld when the
are used without
@ Headphone indicator
Lights up when headphones are connected (see page 35).
@ SP A B indicators
Light up according to the set of thontspeakers actiwtted
(see page 33).
SP A: The FRONT A speakers are activated.
SP B: The FRONT B speakers are activated.
,'I*,]afal_i_ftle
@
CINEMA
Lights
DSP indicator
up when you select
field program
VIRTUAL
Lights
a CINEMA
DSP sound
(see page 39).
•
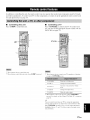
Using the remote control
The remote control trnnsmits u directional infl'mxxlray.
Be sure to aim the remote control directly al the remote
control sensor on this unit during operation.
indicator
up when Virtual
CINEMA
DSP is active (see
page 39).
SILENT
CINEMA
indicator
Lights
up when headphones
sound
field program
are connected
is selected
and u
(see page 39).
Approximately
6 m (20 ft)
d_ Multi-information display
Shows tile name of tile curren_ sound field progrmn and
other intimnation when adjusting or changing settings.
@ SLEEP indicator
Lights up while the sleep timer is on (see page 37).
@ Input channel and speaker indicators
_LtI
9
h]dicalol
Infrared
Outputs
infrared
conlponent
_2
I
c
e indicl{ol3
channel
componenls
digital input signah
• Light up or flash according
speakers
signals.
Aim this window
at the
operate.
set
the remote
col_[fo]
codes
ior
other
conlponents,
see
page 75.
indicators
• Indicate the channel
control
you want to
4;:
To
Input
window
of the current
to the settings
when this unit is in the automatic
procedure
(see page 24) or the speaker
procedure
in the "SP LEVEL"
of the
setup
level setting
(see page 65).
• Do not spill water or other
•
DO
I_o[
drop
• Do not leave
ol conditions:
[he
rePilo[e
liquids
on the rcmo_e
control
con[l'ol
or store the _mote
places
of high
humidity,
places
of high
[empera[Llle.
such
places
of exll'eillely
control
in the l_lllo_ing
types
as near a ba_h
such as ilear a heater
or s[ove
low temperaltll'eS
dus_y places
I
23 En
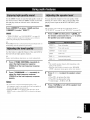
This unit elnploys
troublesome
the YPAO ('_.unaha
listening-based
optimizer microphone
environment.
speaker
collects
Parametric
setup
Room Acoustic
and achieves
mid this unit analyzes
highly
the sound
during
that it is normal
the "AUTO
• To achieve the best results,
possible while die "AUTO
(here
is
(oo
mtlch
I_)r loud test tones
SETUP"
_ll]lblellt
technology
sound
your speakers
2
• Be advised
Optimizer)
accurate
which lets you avoid
adjustments
produce
automatically.
The supplied
in your actual listening
Connect the supplied optimizer microphone
to the OPTIMIZER MIC jack on the front
panel,
to be output
pr_cedt_=_
make sure the room is a_ quiet as
SETUP"
procedu_
is in p_g_ss
IJ ¸
ii()ise,
(he
re_ld(s
may
i1(1(
be
satisl_ctory
_u
can run "AUTO
in the OSD
OSD
SETUP"
using the system
or in the fl_nt panel
illustrations
to explain
display
the "AUTO
This
menu
manual
SETUP"
that appears
uses the
ZL
procedure¸
Optimizer
microphone
.................. I_
1
Make sure of the following
check points.
The
tollowing
displa),
appears
in the OSD.
RUTO SETUP
Befl)re starting the automatic etup, check the lk)lh_'aing
check points,
Speakers are connected
appropriately.
..l
SETUP .......
÷ 5TARt
Headphones
are disconnected
from this unit.
This unit and the video nlonitor are turned on.
_UTO
PPoce_sing
o£ all
i_en
[4J/[_J_Selec_
{_1 This unit is selected
the video monitor.
{..l
The connected
volmne
as the video input source
subwooli_r
is turned
of
on and the
3
level is set 1o about half way (or slightly
less).
The crossover frequency controls of the
connected subwooli_r is set to the maxinmm.
Place the optimizer microphone at your
normal listening position on a flat level
surface with the microphone heading
upward,
Optimizer microphone
VOLUME
J
Controls
CRC_SOV£R
_
_
t
HIGH¢IjT
of a subwoofer
(example)
FRONT A speakers are selected as the fi'ont
speaker system (see page 33).
The room is suftSciently quiet.
It is recommended
{l_at you use 1 tripod (etc) to affix the
optimizer
microphone
al the same height as your ears would
when
allached
you are seated
screw ol a tripod
1o the I_ipod (_qc),
24 En
in your
listening
(elc)
posilion,
be
You can use Ihe
I1! fix Ihe oplimizer
microphone
Make
sure that
"SETUP"
and the pointer
is set to "AUTO"
is pointing
at "START".
4£
You um also s{'le{'l [he folha_ h3g setup med3ods. In [his
case. press @_
to select "SETUP", press @<:1 / 1> to
selecl d_e one o[ {he Ik)llo'Mng choices and {hen selecl
'START"
Choices:
AUTO,
RELOAD,
• Selecl "AUTO"
UNDO,
to automatically
settings
settings.
• Select "UNDO"
and override
the previous
to start the setup
procedure.
This unil starts the auto setup procedure. Loud test
tones are output from each speaker during the auto
setup procedure. Once all items are set, the result
display appears in the OSD.
• During
operation
the auto setup
l?_x)cedt_re, do not peril)tin
to undo
• We recommend
Ihe auto selup
getting
out of [i_e Jx_om while 1his unit is in
procedul_?
settings.
'RELOAD" or "UNDO" is available only _q/en 5ou have
l?revi_msly run "AUTO SETUP" and confirn_ed the result_
Press @V to select "START" and then press
@ENTER to start the setup procedure.
The t_)llowing message appears in the OSD.
NOTICE
tones
ape
Please
keep _uiet
or" leaue
Ehe r'oor,i.
PPess
]1 takes approxima[ely
the au[o
3 minu{es
selup procedure.
the last "AUTO SETUP"
to the initial factory
Loud test
OL_tPUE,
any
on this uniL
I_r this unit to complete
settings and restore tl_e previous setlings.
• Select "DEFAULT" to reset the "AUTO SETUP"
parameters
Press @ENTER
DEFAULT
run the entire
"AUTO SETUP" procedure.
• Select "RELOAD" to reload the last "AUTO
SETUP"
6
This unit pedi_rms
Speaker
the R_llowing checks:
wiring/volume
Checks
which speakers
polarity
of each speaker.
level
biiRiHG.,[_EUEL
are connected
Also checks
and the
and adjusts
the
volume level of each speaker.
Speaker distance
[::,i!!;[i:ii{{::E
Checks the distance of each speaker lhom the
listening position and adjusts the timing of each
channel.
Speaker size
'!!;iZE
Checks the frequency re ponse of each speaker and
sets the appropriate low-frequency crossover tZ_reach
channeh
[ENTER]
Before proceeding next operation
Once )ou perform the next operation, this unit starts lhe
automatic setup procedure. For more accurate
measurements, keep quiet and move to the wall where
speakers are not around. We recommend that you leave
the listening room during the automatic setup
brocedllre.
|
25 En
The
display
changes
as tollows.
7
%EFJ _:2!JR........................................................
Press @L_ and
setup
results
@ENTER
to display
the
in detail.
g4UTO
SETUP.......
÷ START
8
Aut c,h_tic
Rioters
n9
o_ al item
Press @<q / _> repeatedly
the setup
[ENTERJ: Stare
._
t
result
to toggle
between
displays,
Results of the speaker
connection and wiring
RUTO SETrlR
Results of the speaker
distance from the
listening position
D4ITIb?LIZ INS
÷ [d!RING/LEUEL
[:,IETAREE
SIZE
UR!T!NG -[±]!E:it
Results of the speaker
size
1
g4ClT
0 SETUP
RESULT
SP :
S,2,8.1
bIST: ....
o_/o
Jr
LUL :
-_ _dB
÷ :_EET
E_RCEL
,_
Results of the speaker
output level
............................
The
results
displayed
Number
under
"RESULT"
of speakers
are as lollows.
II you arc not satislied
adjust each parameter,
:!;F:'
with die resuhs
run "MANUAL
or _ant to malmaliy
SETUP"
(see
page 61)
Displays the number o1 speakers connected to this unit in
the R_llowing order:
Front/B ack/Subwooti_r
The
Speaker
distance
[;q !!;T
Displays
the speaker
distance
longer
fiom the listening
in lhe R)llowing
order:
Closest
distance/Farthest
speaker
Speaker
Displays
level
speaker
procedme,
• If a J=error
details,
appears
speaker
occurs
during
level
dtlring
SETUP"
procedure.
messages
appears
Press @ENTER
de[ ending
restlhs
ma)
be
on Ihe
_peaker_
to return to the result
3/2/8.1
3=2 3.5h
-2/+2dB
ERNEEL
[ENTER J: Detai i
the "AUTO
SETUP"
appeals"
potential
'WARNING"
(see page 27)
problems
are output
procedtlrc,
and an error screen
scleen
o_g?;!_
gg%!L];
...................................
+ RESULT
SP
:
[:'I ST:
LULi
>SET
the lesfing
in step 4, no test tones
is canceled
see 'II an error
ol ¸ yoor
in lhe '"DISTANCE"
dislance
order:
output
fi'om step 4
Ibis unil delecls
26 En
level in the following
level/Highest
'REI.OAD"
setup procednre
• When
oulput
ERROR"
JeslaH
select{'J
displayed
Ihe ac{oal
display,
output
• If"E-9:[NTERNAL
• If you
9
distance
Ihan
characlerislic_
position
L.iJ[
the speaker
Lowest
speaker
distances
appears
the
For
on page 27
during
and the numheJ
Ihe
'AUTO
ol warning
qTlltTr/_dtaT![tLla4_,z_._YJg_l/ril_
10
Press @V and then press @<:1 / L> to select
"SET" or "CANCEL".
Choices: SET, CANCEL
• Select 'SET" to confirm tile 'AUTO SETUP"
results.
• Select "CANCEL" to cancel the "AUTO SETUP"
results.
The top "SET MENU" display appearsin the OSD.
t[|q,.-
=
•
If"WARNING"
appears
When this unit detects potential problems during the
"AUTO SETUP" procedure. "WARNING' appears in the
result display. Check tile warning messages to correct your
speaker settings.
_,Varllhlgs
"AUTO
11 Press@ENTERto confirmyourselection.
t,_A.omml_-a,_la*
1
SET HENU
differ
SETUP"
h'OI]I
errors
il] (ha( warllhlgs
do nol callcel
Ihe
prucedure
Make sure the pointer is pointing at
"WARNING" and then press @ENTER
to
display the detailed information about the
warning.
Tile number on the right of "WARNING" indicates
tile [ltlmbel of warning messages.
TOP HENU
÷ -RUTO SETUP
=H_qHU_L SETUP
- SIGH_qL IHFO
[ENTER]:Enter
_qLITOSETUP
12
Press _ MENU
13
Disconnect the optimizer microphone from
this unit.
÷ bl_RHIHG,:2 >
RESULT
SP
:
3¸¸2¸/0
, _, _. _1,i
LULi
-2/+2dB
>SET
CFIblCEL
[_] ,IT] :UP "Doi,ir_
[ ENTEP,J _Det_ ii
to exit from "SET MENU".
The optinfizer microl3hone is sensitive to heat. Keep it
away' from direct sunlight and do not place it on top
of this unit.
2
Press @<_ / _ repeatedly to toggle between
the warning displays.
rJRRH[HG
II yoo change
speakers,
speaker
posilions,
or die layoul
ol your
bI-I:OUTOF PHRSE
Reuer_e ch3nne_
FL
--CEHTER
5L
---
listening environment, run "AUTOSETUP" again Io r,'calibrale
yore system
•
If an error screen appears
[4 J,[}]_SeleI:t
[ENTER]:RetuPn
Press @_ / V / <3 / L> to select "RETRY" or
"EXIT" and then press @ENTER.
The lk)llowing display is ;in example where "E-8:USER
CANCEL" appears in the OSD.
a_
• For details IIx/ut each _arning message, see the "AUTO
SETUP" section in "Tioubleshooting" on page 84
• When the corresponding warning message is not
applicable to a speaker. " " is displayed instead
ERROR
÷ E-8:USER
Cg4HC:EL
Can't detect
sigr1_! at H!C
hRETRY
3
Press @ENTER
to return to the result
display.
EXIT
[EHTER]:EnLer
Choices: RETRY, EXIT
Select "RETRY" to retry the "AUTO SETUP"
procedure.
Select "EX[T" to exit fl'om the "AUTO SETUP*'
procedure.
I
27 En
This unit is equipped with 17 preset SCENE templates lor
various situations of using this unit. As the initial t)lctory
setting, tile l_>llowing SCENE templates are assigned to
each SCENE button:
2
Press @INPUT <_ / _- (or press @AMP and
then press @ <_/_-) to select the desired
template,
SCENE 1: DVDViewing
SCENE 2: Disc Listening
SCENE 3: TVViewing
SCENE 4: Radio Listening
Front panel
If you want to use other SCENE templates, you can select
the desired SCENE templates from the SCENE template
librmy and assign tile templates to the selected SCENE
buttons on the fl'ont panel and the remote control.
Select
the desired
template
or
Q
SCENE
)
Remote
control
'%jj_
I=%=tl
I= _. t
!1
==._
I:!="M
_'_• =:,':_
I
I
!'t
"
=:.'M,!
Assignthe
SCENE
SCENE
template
(Image)
templatetothe
SCENE button
library
3
Press the @SCENE
(or @SCENE)
button
again to confirm the selection.
The selected SCENE template is assigned to the
buttolL
s.AK_
%
Press and hold the desired @SCENE (or
@SCENE) button for 3 seconds•
The indicator on the selected SCENE button on the
front panel starts It) flash, _mdlhe name of lhe
currently assigned SCENE template appears in the
fl'ont panel display.
3 seconds
Front panel
3 seconds
!
Flashes
28 En
Remote
control
or
Remote
Front panel
Once
Ihe desiJed
corresponding
SCENE
SCENE
sowce ol tlae SCENE
l)J delails
(emplates
bllllolls,
lemphlte
are assigned
control
to (lie
you may need 1_)sel tl_e inpul
on Ihe Jemote
conlrol.
See page 32
Which SCENE template would you like to select?
Which
source do you like to
play back?
Video
Which component
do you
like for playback?
DVD
sources
SCENE
Default
SCENE buttons
templates
DVD Viewing
(DVD video,
Recorded video)
DVD Movie Viewing
DVD Live Viewing
Music discs (CD, SACD
or DVD-Audio)
DVR
DVR Viewing
DVD
Disc Hi-fi Listening
Music
Disc Listening
Disc Listening
CD
CD Hi-fi Listening
CD Listening
CD Music
Radio
Listening
Listening
Radio programs
XM
TUNER
SIRIUS
iPod or Bluetooth
component
XM Listening
(FM/AM)
_
Dock
Listening
Listening
DOCK
TV programs
Video
SIRIUS
TV Viewing
_
DTV/CBL
H
TV Sp°rts
_
V-AUX'
_
Game
]
]
]
]
]
]
]
]
]
]
]
]
I
I
I
Viewing
I
games
When iPod is coTin¢c[ed Io [he Yamaha iPod tmiveJsal dock or a Bluelooth
plays back _he audio sources input _1_the DOCK lerminal,
component
Playing
is con netted
I
to d_e Bkleloolh
adapler,
Ihis unh
a_
Y_I can crea_e your
original
SCENE
tenlpla_es
by editing
[he preset
SCENE
_nlplates
See p_lge 31 l_r delail_
|
29 En
•
Preset SCENE templates descriptions
The
illustrations
of the
SCENE template
DVD
SCENE
button
Input
in the
source
Playback
indicate
the assigned
SCENE
mode
buttons
in the default
DVD
MOVIE
Movie Dramatic
Live
Viewing
DVD
MUSIC
Pop/Rock
Select Ibis SCENE tempb.e
video on your DVD playeJ
wt_en you enjoy Ihe musi
DVR
MOVIE
Movie Dramatic
Selecq fllis SCENE templale
_our digilal video rucolder
wllen you play bmk
DIRECT
Viewing
Hi-fi
Listening
DVD
MUSIC
DiSC
DVD
DISC
Listening
Hi-fi
CD
Listening
MUSIC
XM
Listening
Listening
Listening
SIRIUS Listening
Dock Listening
STEREO
2ch Stereo
setting.
Features
VJewJRg
DVR
CD
table
Movie
DVD
CD
tbllowhtg
Selec_ this SCENE
your DVI) player
template
when you play back nlovies on
live
movies on
Selec_ fllis SCENE template when you enjoy tile high fidelily
sotmd of tile music discs on youl DVI) player.
Sele*'l Ibis SCENE
tenlplale
when you play bmk
nlusic di_s
on yore DVD pklyel
CD
DIRECT
Selecl Ibis SCENE templale when you enioy the high fidelity
sound ol the music discs on yotn C[) player
CD
STEREO
5oh Stereo
Selecl I]]is SCENE ten]pklle wilen you play back music discs
on your CD player as file backgEound muic
CD
STEREO
2oh Stereo
Select this SCENE templam
on your (I) player
XM
SIRIUS
DOCK
when you play back music somce
MUSIC ENHANCER
5oh Enhancer
Selec_ Ibis SCENE
Radio proglanls
MUSIC
5ch
Selec_ I]lJs SCENE templale
Radio proglanls
when you enjoy SIRIUS Salelble
Seiecl
when
ENHANCER
Enhancer
MUSIC ENHANCER
5ch Enhancer
I]]is SCENE
otll ¸ iPod
g hl_ fflolb
staliOlled
compoilelll
tenlplate
ten]plale
when you enjoy XM Satellite
in a Yalllaha
you
iP(xl
]lla[ is c(llllle_qed
play
back
ti[livelsal
music
dock
(m
ol ¸
Io file Bh[e[oolb
adapler
!!
!i_i
i!iiil
iiii!i
_ii!_i!i
¸ii!iii!i
_iii!_i
_i!il
i!iill
!i_!i_iil
_i_iiiii
iiiii
iii_iil
_ili!il
i!i!il
_!i!_i
i_i!il
i_!i!_i
i_i!il
i_!i!i
i_i!il
i_!i!i
i_i!il
i_!i!i
i_
_ii
_i_
i ,_,_+_i_+_+_,_,,_
+i
it,
i,++!
!+!
+!
+!
+++++_
++!
++!
+++++++++
++
++
++
TV Sports Viewing
DTV/CBL
ENTERTAINMENT
TV Sports
Game Playing
30 En
V-AUX
ENTERTAINMENT
Game
Select this SCENE
templale
wllen you enjoy sporls programs
template
when you play video games
on yore TV
Selecl Ibis SCENE
t=dt'_ill_i,
3
Press @AMP
llii'v'_r_l_l._lg:aTri_t
._
and then @/\ / V to select the
desired parameter of the SCENE template
and then @<_ / _> to select the desired value
You can create
your original
SCENE
You can refer to the preset
button.
templates
to create
SCENE
the original
templates
SCENE
tot each
of the selected parameter.
You can adjust the Ik_llowiIIg parameters t_r a SCENE
template:
17 SCENE
templates.
•
Customizing the preset SCENE
templates
Use this t)ature to customize the pleset SCENE lemplates.
Select
a SCENE
template
Create
the original
template
• INPUT:
• MODE:
SCENE
• NIGHT:
SYSTEM:
SCENEtemplate library
The input source component
The active sound field programs.
STRAIGHT or DIRECT mode (see
pages 39 and 41)
The nighl listening mode setting (see
page 42)
Keeps the cunent night listening
mode.
CINEMA:
Sets the night listening mode to the
C[NEMA mode.
MUSIC:
Sets the night listening mode to the
MUSIC mode.
I
(Image)
4
Assign
Press the @SCENE
the edit,
button again to confirm
to the SCENE
button
a_
An asterisk
]
Turn on the video monitor connected to this
mark (*) appears
by die name
of die original
SCENE
tempi _te
unit.
2
Press and hold the desired @SCENE
for 3 seconds,
button
The SCENE template customizing screen appears on
the video monitor.
• Once the desired SCENE templates are _ssigned to die
corJesponding @SCENE bultons, you muy need to sel Ihe
input sonrce ol Ihe SCENE lemplale on the remote conlrol
page 32 I2yrdetails
• You can create a customized SCENE _empla_e lor each
See
(g_SCENE button, and if you cleave another customized
SCENE lemplale, this unit overwriles the old customized
SCENE templale wilh the new one
• The newly crealed lemplale is only av dlable iol the assigned
@SCENE button.
3 seconds
•
When the SCENE templale you want to customi/_ is not
assigned to any of the @SCENE buttous, press @AMP
and then press (fi_<:_/ t>- repeatedly to recall the desir_'d
SCENE temphm, on tht" menu screen
Renaming the SCENE templates
Select the name of the SCENE template at step 3
of "Customizing
the preset SCENE templates"
and then press @ENTER,
•
•
•
•
Press@/\ / V to select the desired character:
Press @<:1 / C> to place " "(underscore) under the
space or the desired character.
Press @RETURN to cancel the new name.
Press @)ENTER to confirm the new name.
31 en
|
•
Controlling the input source
components in the SCENE mode
Youcan opel'ale both this unit mid the input source
component
by using the remote control. You]nust set the
appropriate remote control code 12)reach input source in
advance (see page 75).
1
2
Press the desired @SCENE
remote control,
button on the
to control the input source component of the
selected SCENE template.
--
SCENE
These bLlllons coiltl'o] tile ]n])l]l SOtll'ce conlpollelll
fol" de{ails of the JuIlcti(>ll (>]_each bu{ioll
32 En
Setting input source of the customized
SCENE template
on the remote control
If you customize tile input source of the selected SCENE
template, you must set the input source of the SCENE
template on the remote control to operate the input source
component correcdy.
Press and hold the _SCENE
button and the
desired input selector button (@) for 3 seconds.
Press the desired buttons in the * area below
....
•
bunons
See page 74
P=essthe @SCENE buttonagai. {ooperaie the input source
component
Caution
5
Extreme caution shouM be exercised when you play
back CDs encoded in DTS. If you play back a CD
desired output level.
encoded in DTS on a DTSqncompatible
CD player,
you will only hear some unwanted
noise that may
damage your speakers.
supports CDs encoded
Check whether your CD player
in DTS. Also, check the sound
output level of your CD player
CD encoded in DTS.
1
before
Rotate @VOLUME
(or press
_VOLUME
+/-) to adjust the volume to the
6
you play back a
Press @PROGRAM
<_/_> repeatedly (or
press @AMP and then @ PROG <_ / _>
repeatedly) to select the desired sound field
program.
The name of the selected sonnd fieM progranl appears
in the lront panel display.
See page 38 for details about sound field programs.
Turn on the video monitor connected to this
unit,
IF{U=..-+.Li:::= L-q'*-:::H
q -:::+
!.- £ L.-,
k
2
Currently
Press@SPEAKERS
repeatedly to select the
front speakers you want to use,
selected
surroundfield program
The respective speaker indicators lights up in the
t?ont panel display.
• Choose a sound field program based on your listening
3
Press @INPUT
pre_2?lR?l_CQ
<_/_> repeatedly (or press
one of the input selector buttons (@)) to
select the desired input source,
The name of the cunel]tl_ selected input source
appears in the front panel display t_r a Ii:w seconds.
Available
input sources
l
I_O[
113eB?ly
• Whe n you select
the last sound
o1_
[he
name
of
the
pl'ogralll
an inpu[ SOreR:e, this uni[ automatically
field
program
used with
the corl_spondhlg
selects
input
SOtll'Ce
• Sound
field
connecled
programs
cannot
to Ihe MULTI
be selected
CH INPUT
when
jacks
the componen[
is selected
as [lle
inpu[ source/see page 34).
• When PCM signals wid/a sampling l?eqLlency higher than 48
kHz are input, this trait is automatically
set tothe _'STRAIGHT*'
mode (see page 39)
• To display in_>rnlationabout the currently selected input sou=re
in tl_eOSD. see page 36 I_>rde[ails
/.....................................
1
,
i,i'{r"
IL
U
i ,=
LJL,_-_
,
•
T
Currently
selected
A quick guide to contents
input
source
See
When
you want
to...
page
Start playback on the selected component or
select a broadcast station.
• Ret_r to the operating instructions for the source
component.
• See page 43 l_r details about FM/AM tnning
instructions.
• See page 46 for details about XM Satellite Radio
tuning instructions.
• See page 51 t_r details about SIRIUS Satellite
Radio tuning instructions.
Enloy high qualily sound
41
Adjusl the Ional qtmlit_ Oi Ihe h'ont speakers
41
Adlusl Ihe paranlelets
40
ol sound IieM ploglams
Lnjov the sources vd_h a _idc d_narnic range a_ nigh_
42
Use headpimnes
35
Sek'ct a decodc_
Aulomati_ally
Io pla_ back sotnces
_ith
se{ Ihis unil 1o the slandby
39
m{xle
_7
|
33 En
r_'frptrm;-
This
unit
tleature
crones
(audio
with
input
jacks
when
more
same
input
source.
a variety
jack
than
of input
select)
one
jacks.
to switch
input
jack
Use this
between
is assigned
input
to as the
Use this feature
to selecl
MULTI CH INPUT
setting
the audio
• You can adiust
tile deiauh
using "AUDIO
SELECT"
audio
input jack
input jack
in 'OPTION
select
_o "AUTO"
selecl
Ill Ihis unil by
MENU"/see
SELECT
connected
to the
18) as the input
<_ / _ repeatedly (or press
@AMP and then @MULTI
MULTI CH.
CH IN) to select
"MULTI CH" appears in the tront p;mel display.
plge 71 }
Use
Press @AUDIO
(see page
source.
Press @INPUT
• We recommend
in mosI cases.
the component
jacks
(or press @AMP
and
"MLILTI
parameters
CH
SET"
l(!r MULTI
menu
CH
in
'INPUT
INPUT
(Ree
MENU"
paoe
to set
the
69)
then @AUDIO SEL) repeatedly to select the
desired audio input jack select setting.
Available
Tile input signals
input sources
processing.
die nigh_ listening
il_ptl[ SOUl_2e
T
Currently
selected
audio input lack select setting
'..utomatic lily sekcts hlpul signals in th_
Iolh_wing order: /l ) HDMI/2)
Digital
signals 131 Analog sign_lls
}-][)['] .."-
Selecls
only HDMI
signals
When
HDMI
sigllals are [iol hlpuI, i1o soulld is Olltpul
CL-Ii:i::'{.-"L-I[:"["
Selects only digilai signals When no
signals are inpul, no sotmd is outpul
i:[i,]i:[[..i])iTi
Selecls
only analog
signals
II no zlnalog
signals are inpul, no sound is outpul
This ]_aturc is not avail lble when no digital inl?Ut]lcks
(OPTICAL, COAXIAL and HDMI) are assigned¸ In addition,
HDMI i_ not available as an audio inpu_ jack _elect setting when
die HDM[ IN DVD and HDMI IN DTV/CBL jacks al_ no_ u_ed.
Use "INPUT ASSIGNMENT" in "INPUT MENU" Io reassign
tile respective inpu_ jack (see p_ge 68)
34 En
ire amplified
Thcr_/re,
and outptlt
you cannot
mode.
etc
while
activale
MULTI
directly
sound
will/out
sound
field programs.
CH i_ selected
_ls dlc
_r_mP.g#
You can display the operating infommtion of this trait on a
video monitor.
1
Connect a pair of headphones with a stereo
analog audio cable plug to the PHONES jack on
the front panel.
Turn on the video monitor connected to this
unit,
2
Press _ DISPLAY.
The current status screen appears in the OSD.
STRTUS
UOLi-4OdB
DUD Houie
Uieuing
HOUIE
Mouie Spaciou_
INPUT:
DUD
R,SEL:
HbHI
NI_HT:CINEHR
_HID>
[DISPL_V]!ST_TOS
OFF
a_
xl_)tl can se]ec[ [he am()ul][ o] time t[la[ [hi = till-l-eli[ Slillus 1£
displayed
"OPTION
in file OSD
MENU"
by using the "OSD-AMP"
parameIer
in
(see page 70)
The OSD signal is not output a_ the DVR VIDEO OUT jacks and
will nol be recorded¸
When
you select
is autonlatically
• When
a sound
yon connect
speaker
field plogmm,
activated
headphones,
Digital
no signals
and DTS atldio
lel!t and right headphone
Press _)MUTE
_)MUTE
mode
a=> outpu_ at the
again to resume
i'e tlllle the radio
• You can adiust
al_ nlixed
d(_
n Io _he
the audio output,
@VOLUME
_l-press _:_VOLUME
+/-
I(,
output
the nluting
parameleJ
in "SOUND
• The MUTE
indicalor
level by using
MENU"
flashes
Otllptl{ iS muted
when
signals
channels.
to mute the audio output. Press
• You can also romle
display
CINEMA
_erminals
• All Dolby
atld]o
SILENT
(see page 39 )
the audio
in Ille lronl panel
and disappe
output
the "MUTE
TYPE"
(see page 66).
display
when
the
u's Irol]J tile l)'ont panel
is resumed.
|
35 En
r_,,q,
Fm;1¸
You can combine a video image from a video source with
sound from an audio source. For example, you can enjoy
listening to classical music while viewing beautiful
scenery from the video source on the video monitor.
Press the input selector buttons (@) control to
select a video source and then an audio source,
Audio
sources
Video
sources
• You can also select <'MULTICH" as die audio source (see
page 34) Pwss @AMP and tllen press @MULTI CH IN,
• Set_lle<'BGV"par;unewr inthe =MULTICH SET" menl] to the"
lesired setting t//select the"delault hackground _ideo input
somceor theMUI.TI CH INPUT sources!seepage69)
....
appears
h_tormat h/l_
•
Video
when this unit cannot
F)pe ol lll_ source _icko signals md lhe
_kleo signals ()Llll)tll II Ihe HDMI OUT
jack
Press @AMP
and then _MENU,
The lop +'SET MENU" display appears in the OSD.
the col'respolidiiig
information
H[?H ."-- S _ i'-_'-_i:_i..
You can display the R)rnlat.sampling fl'equency, channel,
bit rate and flag data of the current input signal.
display
H[:,Vi
..'_{-_c]3[-:
ol this tlllil
Ilestlhilionol theHDMIsignalshllXltol
oulpul
Will,
II Ihu HI)MI
H[:,N.."_{-7[;f:-:Og:
(Only whenerror
[Eliot message
is detected)
eiro_ and message"
IN/(
lacks
)UI
l_n HDMI
soulces
ol Ihis
ol
colmecledHDMIdevices See "'HDMI
l_>l"details
SET HENU
TOP HEHU
÷ -_tUT0 SE'iUP
< FIg4FIL]_qL
SETUP
- S!GNRL IHF0
[EN_ER]:Enter
Press @V repeatedly to select "SIGNAL
INFO" and then press @ENTER.
The audio intbrmalion about the input source appears
in the OSD.
....
appears when this unit cannot display
hlh>lmalion,
HDMI error and message
L?l:;t.._J.t..;l:; i.lt._7.l_
The numl)er ol Ihe connecled HDMI
COIllpoflelllS
Press @<_ / _> to toggle between the audio
and video information displays.
4
Press _MENU
MENU".
36 En
again to exit from "SET
IS O\el
Ihu
limil
Hi.?L:i-"i.........
:.=_.r_.L._:HD(t ) aulhenlicalion
lailed
OUT
OF
_[_[[]_-_;
=
"]'hc: coIIIl_'Ch=J
with
3
the correspondhlg
Ih¢
IllOllilor
i{<;ohilion
ol
is Ilol
coinpalible
the. illpUl
_ideo
signal
Use this fealure
standby
mode
to automalically
after a certain
set this unit to the
amount
of time.
Press @AMP and then press _SLEEP
repeatedly to set the amount of time.
Each time you D_ss _SLEEP,
the thont panel display
changes as shown below.
The SLEEP indicator flashes while you are switching the
amount of time fi)r the sleep timer. Once the sleep timer is
set, the SLEEP indicator lights up in the lhont panel
display, and the display returns to the selected sound field
program.
• To cancel
@gLt=t=P
tile sleep thner,
Jepeatedly
press @AMP
until "SLEEP
and then press
OFF"
appears
in the l)'ont
panel display
• The sleep timer setdng can also be canceled by pressing
@STANDBY/ON
standby
(or @STANDBY
I to set this trait to the
mode
I
37 En
This trail is equipped with a variety of precise digital
decoders thai allow you to enjoy multi-channel playback
ti'onl ahnost any stereo or multi-channel sound source.
• When
you select
the lasl sound
an inpul soma:e,
field program
this unh
used
automatically
selecls
with _he corresponding
input
SOUICe
Press @ PROGRAM
then press ._PROG
<1 / _- (or press @AMP
<1/_> repeatedly),
and
• Sound
fiekl pin,grams
connected
The name of the selected sound field program appears in
the fi'ont panel display.
i_p_ll source
• When
cannot
to tile MULTI
PCM
be selected
CH INPUT
when
the component
jack_ is selected
as the
frequency
than 48
(see page 34)
signals
kHz a=_ input,
with a sampling
this unit is autonlatica]ly
higher
set to the "STRAIGHT"
mode (see page 39)
Choose
a sound
not merely
CINEMA
concert¸
DSP
The
processing
sound
0n [he vivldlless
illsllllll_el_t8
MUSIC
field progranl
on the name
This
progranl
field reproduces
of vocals
based on your
of the program
pi_sems
all image
Ihe spaciousness
oll the slage
alld
lislening
prel_rence.
itselJ
of pop,
of a massive
rock,
ol jazz
pavilion
with
solo illstr th/lell ts alld the bea[s
live
an enlphasis
of l'hyt hill
CINEMA DSP processing This sound fieki is suitable for cl lssic ai=dorchestr d music The
progranl uses dala collected ill a large concerl hall in Munich You can enjoy delicale and
H.---i]. _
beatltilu]
leverbera[iOll
alld
a i_l_!]eslic
almogphere
•_'._iZZ
CINEMA DSP processing The sound lield is suitable _r jazz and fusion music¸ I! uses data
collected m a thmous jazz club in New York¸ You can enjoy clear reverberalion
{!i.Effg_?
CINEMA DSP processing You can enjoy dynamic and thrilling sound effecls as you play
games¸ The program lets you leel the depth and three-dimensional surrounding sounds oil he
field where you are playing, and offers cinemaqike surroundhlg sound e fl_cls for Ihe scenes
of
I_lOVleS
ENTERTAINMENT
MOVIE
STEREO
T[.J '!!i[:"O i-"_.'Z.
CINEMA DSP plocessing. You can enjoy sports re]ays bloadca t in sleleo and _adety shows
wilh a 1i_¢ soulld el_vil'()l_lnelll Fol sport l'ela'¢s the voices of coffll]]enl ffor_;al_d
all iloullCel'S conic cJe lily l1"o1_1
t[l_ C_I1[_r; the cheers and atl3losphere
ill IJl¢ sl/adiu nl spl'e ld
around within i conliortable iange, and you can It-el like is if you me in tile stadimn
HOL._7.@ '.:_i
F:'._iC. - OLi'Z.
CINEMA DSP processing The sound lield is suitable lo_ movies with an emph Isis on
DxtaculaJ _lund elle Is. and is a peffccl lh with I wide screen The progr m_ ieproduces a
wide dyn lmic i allg_ l]om 13lillimtlnl sound ellects Io p(g_el fuI sounds
, ,._...._i,..."_ _.-=P_"--=r==
bi,-,_
._===._=
:=÷
-.._...i="
C'INEMA DSP pro c'ssing This somld field is also suitable fol movies widl m emphasis on
three-dilllensJolla] sound elIects Ii lesllaJlls rev¢lberalJoll 1o all ll_od_r lle exIellt, but
l_,ploduces SOtllld ellects and backgl ound i_ltlSiCill a sol(, gl l'ee_dh_lellsioll i] mallller wll]l
¢hli_} _lld ¢e11_¢Iorienlation of _OiC_Sts pl_o_s
"2.C.i'- ':_I_..=_:=D.=_:=O
Dowmni×es mulfi-d_ mnel sources to 2 ct_annel ot phys back 2-ch mnel somces a they me
....
_)C._-i '2_i_._=_"_=()
(_'INEMA DSP processing Usii=g ltlis progl lm incle lses ltle listening posilio== rmge This is
a sound IieJ(l suitable for background music at parties
Selec_ these pmg_ m_s t()play b_ck _ompression _itif _cl (such _s _he MP3 fom_al) in
2-cjlalllle] or 5-c]lalllld steleo This ploglanl ¢llh IllCeSgotll ]J lelling exI',eliellce by
"2.C._- En}-i._ii-iC..=:-=D
_:._ .- i r-...
..u_.r
i:.r ir_.........
i.::ir i_...'_-=
r•
MUSIC
ENHANCER
leg_ll_l'a_illg
The
sound
[]eld
attila] concel'l
direction¸
38 En
prograHis
hall
music
o1: this
Llni[
\el/ue,
movie
_lre
retie
ilions
thealer
etc
o]
l'eil]-V_or]d
Thus
_[l_
l]liS_illg
acouslic
VOtl may llolice
h_l'll]Ollics
envh'ollHlellls
varialion,;
in
I
col3]pl'_sSiOll
n]lde
allJlacl
]'l'/)l_l
ill Ihe slrellglh
precise
I]le[iSlllelllel_tS
of Ihe ref]ecliolls
conlil/_
laken
ill
the
Irol_l each
•
Enjoying
standard
2-channel
decoders
sources
using the
•
Signals input from 2-cfiannel sources can also be played
back on multi-channels.
Press @AMP
repeatedly
and then
to select
press
@SUR.
You can select fi'om the I_)llowing decoders
the type of source
DECODE
a decoder,
you are playing
on
depending
and your personal
preference.
F'V'O k.O_i+Z
[)olb_ Pro L(!gic processing lor in5
sources
Dolby
F'Li i Ho_-_.:-:.e
movie
PIx) Ix)gic II processing
sources
Using sound field programs
surround speakers
(Virtual CINEMA DSP)
Virtual CINEMA DSP allows you to m_ioy the CINEMA
DSP programs without surround speakers by creating
virtual speakers.
If you set "SUR. L/R SP" m "NONE" (see page 64),
Virlual CINEMA DSP is automatically activated
whenever you select a CINEMA DSP program
(see page 38).
Virtual
CINEMA
"SUR,
cases:
L/R SP" is set Io "NONE"
R!r
l)olb_ Pro Logic II plocessing lot
mtt_ic
F'L][ ."--G.=.Fi?
Dolby Pro Logic [I processing for
game
_'{.=_:,i._i-'.i_i
i _!-i__i'"=
SOIl I'CeS
SOUrCeS
Neural Surround processing for any
solll_2es
DSP will nol be aclivaled
when
'5ch
when
headphones
•
[:'[..i[ i Ni_{:E-J.G
without
Sterc(P'
Enjoying
even when
(see page 64) in the hallowing
(see page 38) is selected.
are connected
to the PHONES
multi-channel
sources
jack
and
sound field programs with headphones
(SILENT CINEMA)
SILENT CINEMA allows you to enjoy nmlfi-channel
music or nlovie sound, including Dolby Digital and DTS
sources, through ordinary headphones. SILENT CINEMA
is automatically activated whenever you connecl
headphones to tfie PHONES jack while listening to
CINEMA DSP sound field progrmns (except for 5ch
Stereo) (see page 38). When activate& the SILENT
CINEMA indicator lights up in the fiont panel display.
•
When
Enjoying unprocessed input sources
(Straight decoding mode)
tfiis refit is in tfie "STRAIGHT"
mulfi-channel
sources
appropriate
channels
processing.
2-channel
are decoded
without
mode,
straight
any additional
stmeo sources
into the
effect
al_ ouqmt
from only
tfie fi'ont left and right speakers.
Press @STRAIGHT
press @STRAIGHT)
(or press @AMP and then
to select "STRAIGHT",
To deacti_ ate tfie "STRA[GHT" mode, press
@STRAIGHT (or press @AMP and then
@STRAIGHT) again so that "STRAIGHT" disappears
from the fi'ont panel display.
I
39 En
L.'*_llYJ_l[dtD_.'_l*J,#iI/_.a_ljit
•
Editing sound fields parameters
You can enjoy good quality sound with tfie tuctory detS.lult
paranleters. Although you do not have to change the inilJal
settings, you can change some of the parmneters to better
suit the input source or your listenfi_g room.
hlitial
sellings
aw indicaled
While listening to a source, press @AMP
and then press _PARAMETER.
Press @A / _7to select the desired parameter
you want to change.
3
Press (83<_ / c> to change the parameter
value.
parameler
Movie Spacious and Movie Dramatic:
Function:
Choices:
For2ch
2
each
For Pop/Rock, Hall, Jazz, Game, TV Sports,
DSP level
1
ill bold under
[)SF' L.[!JJE[
Adjusts tfie effect level.
MIN, MID, MAX
Enhancerand
Effect level EFFECT
Function:
Choices:
5ch Enhancer:
[..L_ILiE[
Adjusts the effect level.
LOW, HiGH
For Pro Logic II Music:
Panorama
Function:
You caimol change pm anleter wllues _hen "MEMORY GUARD"
in "OPTION MENU" is sel Io <'ON" (see page 701
Choices:
Dimension
Function:
Pg_-_O_?g_g
Sends stereo signals to the surro/ind
speakers as well as the front speakers fi)r
a wraparound effect.
OFF, ON
Di HEN'.:_..
i 0N
Gradually adjusts the sound field either
towards the fiont or towards the rear.
Control range:-3 flowards the rear) to +3 (towards the
fi'ont), initial setting is STD/standard).
Center width CT i,ii[,[H
Function:
Adjusts the center image fi'om all three
Dent speakers to varying degrees. A
larger value adjusts lhe center finage
towards the front lett and right speakers.
Control range: 0 (center channel sound is output only
fi'om center speaker} to 7 (center channel
sound is output only from fiont lefi and
right speakers)+ initial setting is 3.
40 En
Use the DIRECT mode to enjoy the high quality sounds of
the selected source. When llle DIRECT mode is activated,
You can adjusl the output
this unit plays back the selected
playing
source
with the least
listening
to a music
sources
level of each speaker
source. This is also possible
while
when
input at the MULTI CH INPUT.jacks.
circuitry.
Press @DIRECT (or press @AMP
_DIRECT)
to select "DIRECT".
and then
This operalion
will oserride
the lesel ac!jusmlents
"AUTO SETUP"
(see page 24 ¸)and "SP I.EVEL"
1
• "TONE
settings
CONTROL"
(except
and 'SOUND
l_)r speaker
• The lmnt panel
display
MENU"
level settings)
automatic
Press @AMP
nlade in
(see page 65)
and then press @LEVEL
on
the remote control and then @A / V to select
the speaker you want to adjust.
(see page 63)
are not elI_.ctive
dly dims
_.,4;:
While
DIRECT
mode is activated,
illOlllenl lri]y _hen
all operath)n
Ille front panel
display
turns
on
is pelhumed.
Use this l)ature to adjust the balance of bass and treble l_r
the ti'ont left and right speaker channels.
.,F,
_t)_Speaker
and
headphone
adjuslmenls
are slored
increase
or decrease
Ihe
sulrouild
• TONE
DIRECT
sound
speakers
CONTROL
mede.
d_e higl>hequency
Io an ex[J_me
nlay
is not
or when
level,
Front
F'R0i'H"
_?
FJonl right speaker
lell speaker
i]_:
El t'{"["[!i...'-7.:
Cemer
'2[;
h ]F"[_'.
S tlb_ (/(/l:ei-
'2[;]J[_'.= i..
Stlrr(lulld
lell spelker
'2[;U[_'., _-'
Surf(rand
right speaker
• The avaihlble
speaker
LEVEL"
2
3
o_ fl_e
_he tonal
quality
speakm
channels
selling ol Ihe speakers.
• When the xideo monitor
Press @PROGRAM
<_ / _> repeatedly to
adjust the high-frequency response
(TREBLE) or the low-frequency response
(BASS).
lowq_quency
i
independenlly
Press @TONE CONTROL repeatedly to
select the high4requency response
(TREBLE) or the low-frequency response
(BASS).
• 11 you
F'R0i'H"
ol ¸
adjustment
Press @<
level.
differ
depending
on die
is turned on. the "SPEAKER
menu
appears
in the xideo
monilor
/ > to adjust the speaker output
•
Press
@)_-_ to increase
•
Press
@<:a
•
Control
to decrease
range:
-It)
the value.
the value.
dB to +10
dB
Press @LEVEL to turn off the speaker level
adjustment
display,
i_(ll 133alch.
eflk_ctive
MULTI
when
CH
_his
is selected
unit
is in _he
as the
inpu_
sotil_2e
|
41 En
The night listening
listenability
modes
are designed
at lower volumes
to improve
or at night.
Press @AMP and then _NIGHT
to select "NIGHT:CINEMA"
or
"NIGHT:M USIC",
Choices:
NIGHT:CINEMA,
NIGHT:MUSIC,
• Select "NIGHT:CINEMA"
reduce
the dynamic
make dialog easier
• Select
• Select
to preserve
"OFF"
OFF
when watching
range
films to
of flhn soundlracks
and
to hear at lower volumes.
"NIGHT:MUSIC"
sources
repeatedly
when listening
ease-ofqistening
to music
IZ)r all sounds.
if you do not want to use this fealure.
--'4':
When a night li tening mode is selected, tile NIGHT
indicalor lights up in Ihe h'onl panel display
Press @<:1 / _ to adjust the effect level while
"NIGHT:CINEMA"
or "NIGHT:MUSIC"
is
displayed in the front panel display.
[:::.'F "F _:_L... t.._,
Choices:
• Select
• Select
• Select
L.J...%L _' H.LL.
._
MIN, MID, MAX
"MIN" for minimum compression.
"MID" t_r standard conlpression.
"MAX" tbr maximmn compression.
"NIGHT:CINEMA" and "NIGHT:MUSIC" a@lsmlems me
stored
• You cannot
hldependently.
rise the night listening
when
II/e DIRECT
mode
when
the componen_
jacks
is selected
when
headphones
{ht?
42 En
connec_d
inpU[ SOUrCe
are connected
modes
alld
in Ihe ibllowlng
to _he MULTI
as _he inpu_ somve
• The night listening
Oil
mode_
cases:
(see page 41 ) is selecled
CH INPUT
!_ee page 34)
to the PHONES
jack¸
may vary in ellk?ctiveness
',_lI3oufld
SOtl[Id
'_ellillgs
you
depending
tlSe
There are 2 tuning methods:
there
is no interference.
the automatic
aulomafic
If the signal
and manual
preset
and manual.
Automatic
fi'om the station
lulling fealllres
2
3
Press @INPUT <_/c> repeatedly so that
"TUNER" is displayed in the front panel
display,
Press @BAND
(FM or AM).
to select the reception band
Press @TUNING
AUTO/MAN'L
is effective
when station
signals
are strong
and
You can also use
R) store tip to 40 stal]ons.
Automatic tuning is eft)clive when station signals are
strong and there is no interl)rence.
1
tuning
you want to select is weak. tune into it manually.
If the signal
received
l¥om the stalkm
you want to select is
weak. tune into it manually.
tuning into an FM station aulomafically
tuner _/_monaural reception _o inc_ase the signal
Manually
1
switches the
quality¸
Press @INPUT <_/_> repeatedly so that
"TUNER" is displayed in the front panel
display,
so that the
AUTO indicator lights up in the front panel
display,
Lightsup
2
Press @BAND
to select the reception band
(FM or AM).
3
Press @TUNING
AUTOiMAN'L
so that the
AUTO indicator disappears from the front
panel display,
No colon (:)
Ifa colon (:) appears in the front panel display,
automatic riming is not possible. Press
@PRESETfl'UNING
to turn the colon (:) off.
Press @PRESETiTUNINGiCH
Lights
4
Press @PRESET/TUNING/CH
<_/c> to
tune into the desired station manually,
--'4_
up
!
"" '::a
If a colon (:) appears in the front panel display,
manual tuning is not possible. Press
@PRESET/TUNING to turn tbe colon (:} off.
<_ / D once
to begin automatic tuning.
When this unit ix tuned into a station, the TUNE[)
indicator lights up and the fl'equency of the received
station is shown in the front panel display.
"" i:71'I
Nocolon (:)
HoH
dO_
n {he bLItnlll
t(i COIltillt[e
Sealching
....
|
43 En
You can use lhe automatic preset tuning feature 1o store
FM stations with strong signals up to 40 (AI to E8:8
preset station numbers in each of the 5 preset station
groups) of those stations in order. You can then recall any
preset station easily by selecting the preset station number.
You can also store up to 40 stations (AI to E8:8 presel
station nnnlbers in each of the 5 preset station groups)
manually.
1
Tune into a station automatically or manually,
See page 43 t_r bming instructions.
1
Press @INPUT
"TUNER"
display.
2
<:1/_> repeatedly so that
is displayed in the front panel
2
Press @BAND
to select "FM" as the
3
reception band.
3
Press @MEMORY.
The MEMORY indicator flashes in the ti"ont panel
display lk_rapproximately 30 seconds.
Press and hold @MEMORY
seconds,
Press @AIBIClDIE
and
@PRESET/TUNING/CH
<_ / c> repeatedly
to select a preset station group (A1 to E8)
while the MEMORY indicator is flashing.
Check that the colon (:) appears in the front panel
display.
for more than 3
The preet station number as well as the MEMORY
and AUTO indicators flashes. Atler approxinmtely 5
seconds, autonlatic presetting starts fronl the cur_nt
frequency and proceeds toward the higher
frequencies.
Flashes
I[
Flashes
I
Preset station
group and
number
LI
Colon
(:)
Flashes
4
Press @MEMORY
When automatic preset tuning is completed, the fl'ont
panel display shows the frequency of the last preset
station.
while the MEMORY
indicator is flashing.
The station hand and t_eqnency appear in the front
panel display with the preset station group and
number you have selected.
You can select the preset station group and tile preset station
number where the first received station _i11be stored by presshlg
@AIBICIDIE andIhen@PRESET/TUNING/OH <:1/L>,
•
Any
stoJed
c]e_lred
_ta[ion
• Only
slalion
,_,hell
and
existing
a ne_
under
a preset
s[a{io[i
uilder
stadon
numbeJ
{he s_lllle
The displayed
is
station
has been stored
as A1.
preset
n tllll gelFM
stations
automatically
want
dala
yoLI sn)re
by
to store
slo=_
with
sufficient
automatic
is weak
i_ as described
signal
preset
in signal
strength,
in "Manual
strength
tuning¸
are
lithe
tune
prese_
stored
station
into
uming"
you
•
it manually
on
this
Any
cleared
page¸
slalioll
• The
stored
dala
y{itl qn)re
exisdng
under
11 ii_?w slaliol_
a prese_
tlllder
Ihe
sladon
numbe_
q_lme
preset
n[]mb_?l ¸,
reception
_he station
44 En
station
whe[i
mode
frequency¸
(stereo
or monaural/
is sto=_d
akmg
with
is
! _/fl'.Ti_/b_lHIla
You call tune into any desired
the preset
stored.
station
group
station
and number
simply
under
by selecting
You Call exchange
which it was
the assignlllelitS
with each other. The example
procedure
to exchange
of two preset
below describes
preset station
"El"
stations
tile
with "A5".
,F,
When
perfolmhlg
@TUNER
I/
Ihis
st lecl
operation
"TUNER"
with
Ihe
as file
remole
inpul
conlroL
1
press
source
Select preset station "El" using @AJB/C/D/E
and @PRESET/TUNINGtCH
<1 / c>.
See "Selecting preset stations" on this page.
Press @AiBiC/D/E
(or @A-E/CAT. <1 / _>)
repeatedly to select the desired preset
station group (A to E),
The pl_set stalion group letler appears in tile t*ont
panel display and changes each time you press the
button.
2
Flashes
Press @PRESETiTUNINGiCH
<1 / _- (or
@PRESET/CH/_
/ V) to select the desired
preset station number (1 to 8),
The pisser station group and rlumber appear in tile
fl'ont panel display along with the station band and
ti'equency.
F
F
%,, ']
.=, ==
_ !:7!'d
_:::;_:::;
_.,_ _.,._ _1 _:5
.,."
!'d!.}*,_
i _i _ ,_,,,
Press and hold @PRESET/TUNING
for
more than 3 seconds,
"El" and the MEMORY indicator flash in the ti"ont
panel display.
•
o
!22 "_ , !:2"i"{
_2__2_
<_
i"{ t..! -.=
/
Flashes
1
3
Select preset station "A5" using @AiBiCiD/E
and @PRESET/TUNING/CH
<1 / t>,
"A5" and the MEMORY indicator l]ash in the t¥ont
panel display.
You
by
cm
])l'essin_
selecl
Ihe
Ihe desired
i1uilleric
preset
bu[toil'_
sl ilion
on
number
file remole
(l
Io 8) direcfl
3
coillro]
Flashes
•
4
M_
o-
Press @PRESET/TUNING
again.
"EXCHANGE El-A5" appears in the front panel
display and the assignments of the two preset stations
are exchanged.
I
45 S_
XM Radio ofl)rs an extraordinary variety of commercial=flee music, plus the best in premier sports, news, talk radio,
stand-up comedy, children's and entertainment programming. XM is broadcast in superior digital audio quality fl'om
coast to coast. From rock to reggae_ from classical to hip hop, XM has something R)r every music tim.
XM Satellite Radio online information
For U.S. customers: http://www.xmradio.com/
For Canadian customers: ht*p://www.xmradio.ca/
The XM Satellite
Radio
service
is only availiNe
in the 48 contiguous
United
States
(not available
in Alaska
and Hawaii)
and Canada
XM READY legal disclaimer
XM monthl 3 service
service
sub crip6on
It is prohibited
(eclmok_gy
or
sold separately.
to cop_, decompile,
oft_are
incorporated
in receivers
md ta×es, inch_ding a one=time lc6v.ldon
explicH
langm_ge
m" indicated
with an XL
residems I and I =877=GET=XMSR
advertising-stlpported
to ¢Cuslomer
in the 48 contiguous
property
channels,
Agr_,emun[
United
Mini-Tunel
Channel
visit lilkeup xmradio
ul _x_w xlnradio
States and Canada
reverse
compalibh'
tee m.ly apply
and Home
engineer,
Rudio
is ,ivailable
H/r XM
corn (US residents)
Satellite
sold separuteiy)
Sys(em
(Cana
to receive
awlilablu
[nslallufion
cosls
XM
an)
and othuJ ices
Chann_qs with H'equent
b) calling
commelciab
xnmidio
ise make
to change
radio receivers
or xmladio,ca
and www
(each
or otheJ_
tll_iect
For a hill listing ol file XM
XM
requi_ed
manipulate
lee and programnling
corn (US residents)
©2008
Dock
hack,
with _he XM Sa(ellit_"
All
blocking
(Canadian residents/.
a'*aiJabJe
ol thuir respective
XM
disassemble,
1-800-XM-RADIO
(US
h'_'_"channels and
Iian re idents)
ca (Canadian
Radio [nc. All Jlghls Jesmved
Subscriptions
residents).
All//thur
Only
std_ject
awfiluble
trade,larks
are the
ma nets
Connect XM Mini-Tuner and XM Mini-Tuner Dock (sold
separately) to the XM jack on the rear panel of this unit.
For details, see the operating instructions provided with
XM Mini-Tuner Dock.
To ensure
optimal
reception
Ihe XM Mini-Tuner
lacing
mount
Dock
ol the XM Satellite
must be placed
Radio
signals,
al or near a sontherly
window _ith no obstacles
in Ihe palh to Ihe sky You can
it indoors or outdoors.
Use the "XM RAD[O SET" screen
in the video monitor/see
level and adjust
page 72} to check
the orientatiol_
the antenna
reception
oi the antenna
If "CHECK ANTENNA" or "CHECK XM TUNER" appears in
the lront panel display, the connection m_d setting of the antenna,
Home Dock, or XM Mini-Tuner nlay not correct (see page 821
46 En
h_lR_-iF'dlltt_l_T;llTlllmm
Once you have installed tile XM Mini-Tuner Dock,
inserted the XM Mini-Tuner, connected the XM
Mini-Tnner Dock to your XM Ready _ home audio
system, and installed the antenna, you are ready to
subscribe and begin receiving XM programming. There
are three places m lind your eight character XM Radio ID:
on the XM Mini-Tnner, on the XM Mini-Tuner package,
and on XM Channel 0. Record the Radio [D in the
Mlowing eight squares lbr ret_rence.
1
Press @INPUT < / > repeatedly (or press
@XM) to select "XM" as the input source,
The cursor on the left of the XM indicator lights up in
the front panel display and the XM Satellite Radio
information (such as channel nljinber, channel name,
category, artist name, or song title) tot the currently
selected ch_mnel appears in lhe tYontpanel display.
[]DDDDDDD
The XM Radio [I) does
Activale
your
http://_w
not use Ihe letters
XM Satellile
xmradio
corn/or
Radio
service
call
1-8()0-XM
Lights
T',
"O". "S" or 'F'
in the LJS
online
Ma_CH
periods
system
normally
takes
I0 to 15 minutes,
you nlay ileed to keep your
on M" up to an hour. When
but during
XM Ready
home
you can access
you
select
lutomafically
peak busy
"XM"
i_'calls
as the input soulve,
the previously
this unit
selected
cMnnel
the full cMnnel
at www
Lislener
or call XM's
When
audio
audio system you Ire done For
in Canada. visit XM on the Web
xmradio.ca
_ _
RAI)[O
lineup on your XM Ready home
Inole Mormation
or Io subscribe
I 877-GET-XMSR
CD _
al
(1 400-967
23461. You will need a ma_ior credit card. XM will
selJd a signal horn the satellites to activate the lull channd
lineup.
Activation
BV_ V_uX DW_CeLDVD M_¢_
up
• The XM Satellite
AUDIO
CaJe al
•
/ 1-877438-9677)
OUT
II: a S(al
panel
tis
message
display
Radio
signals
or
all
erl_)r
be output
Nessage
or in the OSD.
appeals
see the "XM
section in "Troublesilooling"
remedies
2
cannot
at the
(REC/jacks¸
ill the
Satellite
l_
ii1 (
RadkP'
on page 78 lbr appropriale
Search for a channel by using one of the XM
Satellite Radio search modes.
•
To select
"All
•
To select
Search
•
a channel
To select
• You can use the Neural
surroul_d sound content
nlulfi<hannds
t?om
(see
the preset
on page
channel
nljmber,
on page
see
list.
see
48.
'Category
48.
mode"
the desired
the channel
all cl:_annel
on page
by category,
on page
Search
the
mode"
a channel
To select
mode"
t?om
Search
mode"
"Preset
•
a channel
Channel
see
channels,
see
48.
directly
"Direct
by entering
Number
Access
48.
Sun'ound
decoder to enjoy the XM HD
ill:the XM Satellite
Radio broadcasts
in
page 39).
• You can set the XM Satellite
Radk!
preset
channels
(see
page 49)
• You can disl?lay
pand
display
the XM Salellile
or in the OSD/see
Radio
inM'mallon
in the i)'ont
page 501
|
47 En
Belore
illpUI
perlomling/>peradons,
pless
(_XM
Io elect
"XM"
as die
3
SO[II'CL"
•
All Channel
1
Press _SEARCH
MODE (or _SRCH
MODE) repeatedly to select "ALL CR
SEARCH".
Y,mcan also select the pres_'l channel numberdirecdy by
pr_'sshlgthe numeric buttons (l to 81on file rcinolc coml'ol.
•
Direct
Press _PRESET/TUNING/CH
<3/E> (or
@PRESET/CH
A / V) repeatedly to search
for a channel within all channels,
1
Press @SRCH MODE repeatedly to select
"ALL CH SEARCH" or "CAT SEARCH",
2
Search
mode
Press _PRESET/TUNING/CH
<3/_- (or
@PRESET/CH
A / V) repeatedly to change
the preset channel number (1 to 8),
2
• You can search
Ibi i channel
quickly
by pressing
and holdh_g
QPRESETfTUNING/CH <:::/ L> (or @PRESET/CH A / _i
• To displa} the XM Radio ID nunlber disphiyed hi Iheh'onl
panel display,
selecl
d/annel
mode
Press the numeric buttons (@) to enter the
desired three-digit channel number,
For example, to enter the number 123, press the
nu]lleric
bullons
as shown
below.
%
Category
1
Press _SEARCH
MODE
MODE)
to select "CAT SEARCH",
repeatedly
Access
"0"
•
2
Search
Number
mode
(or @SRCH
The display changes as lk)llows.
Press@CATEGORY
(or A-E/CAT. <3/
repeatedly to change the channel category.
3
!
Press(_PRESET/TUNING/CH
<3/_> (or
_PRESET/CH
A / V) repeatedly to search
for a channel within the selected channel
category,
:t_'_
You call search I_)r a chnnllel quickly
b) pressilig
#
and holdh3g
@PRESET/TUNING/CH <l / _> ior _PRESET/CH A / _1
•
Preset
Search
mode
Prior to selecting a preset channel in the Preset Search
mode, you must preset XM Satellite Radio channels. For
details, see +'Setting XM Satellite Radio preset channels"
on page 49.
--'4':
Allpivse_channels (A1 Io Eg/recalls "001 Preview" by the initial
I lctory setting.
':'.X !"!.':'7.2 .:i'
• Toenter a one digit or two-digh channel number, press Ihe
nunleric buuoiis !_)/and then press _}ENT _oconfirm the
input immber. Instead ol pressing _ENT _orune imo the
channel immedia[ely,y<mcan wail a le',_seconds until Ibis unit
conihlns
1
Press QSEARCH
MODE (or @SRCH
MODE) repeatedly to select "PRESET
SEARCH",
2
Press @CATEGORY (or @A-E/CAT. <3/ >)
repeatedly to change the preset channel
group (A to El.
48 En
the entered
channel
nunlbev
• Pr_'ssinga button other d/an the mmleric buttons/_) or _ ENT
cancels the Direct Number Access mode procedure
3
Press @CATEGORY
You can use lhis l_:ature to store up to 40 XM Satel[ite
Radio d_annels (AI to ES: 8 preset channel numbers in
each of the 5 preset channel groups). You can then recall
any preset channel easily by selecting the preset channel
group and number as described in "Preset Search mode"
on page 48.
[
_-"..... f:_A ":!'
Selected
See "Basic XM Satellite Radio operations" on
page 47 lot details.
Currently
3 XHU
selected
channel
< / c>)
Flashes
Search for a channel you want to set as a
preset channel by using one of the XM
Satellite Radio search modes.
1
(or ®A-E/CAT.
repeatedly to select a preset channel group
(A to E) while the MEMORY indicator is
flashing.
The preset channel grou 1)letter appears in tile tYont
panel display.
4
]
number
preset channel
':.:'bJ J
group
Press _PRESET/TUNING/CH
<:I/_> (or
@PRESET/CH
A / V) repeatedly to select a
preset channel number (1 to 8) while the
MEMORY indicator is flashing,
The preset channel nnmber appem's in tile front panel
display.
Flashes
Press (_)MEMORY (or _ MEMORY).
The MEMORY indicator flashes in the front panel
display for approxinlately :;0 seconds.
%
i
'.2 h{ _ I
j'
Selected
.... MEMORY.....
/
f:;_ ,4 ":t
p'- _;al
preset
channel
number
i
Flashes
5
Press (_)MEMORY (or @MEMORY)
to set
the selected XM Satellite Radio channel as a
preset channel while the MEMORY indicator
is flashing.
._. colon C) appears next to the preset channel number
for confirmation, and the MEMORY indicator turns
off in the t_'ont panel display.
/u must pl _eed to md c,r=y out steps 3 d_l'ough5 _ hile
the MEMORY indicat_r is Ilashing ilkIhe {ront panel
display
........ !l_':J
Colon
Ollce
yOU Se[ a 11_2Wj)l'esel
_he same
p['ese[
Challile{
"T ....
¢',,
"_ J
(:)
challne{,
gFotlp
and
(he/me
previous{_
IltlNlber
is de_ll'_d,
stored
in
|
49 En
• The h'onl panel
char icters
Salellile
You can display the XM Satellite Radio information (such
as channel number, channel name, category, artist name,
or song title) lk)rthe currently selected ch_mnel in the fiont
panel display or in the OSD.
Radio
continuous
using
display
al once.
SCROLL"
pamm_qer
Radio
be recognized
II a StatL1S messes{" o[ Jill error
display
or in the OSD,
"Tioubleshooting"
•
appears in th,"hont pan,'l
message
see the "XM
Satellite
on page 82 I_)r lppropriate
R ldio"
section
in
Displaying the XM Satellite Radio
information in the front panel display
Press @INFO
(or @INFO)
repeatedly
to toggle
between the following XM Satellite Radio
inlormation display modes,
Channel
in "'OPTION
inlk)rnlation
Ihe signals.
•
in a
charac[ers
contains
at once by
MENU"
(see
a character
that
will be
wilh a space
conlrol
"NO
press @ENTER
inl_!rmafion,
while it is being disphlyed,
agdn to I'cle lse the held inl2/mlafion
• When Ihe antenna ol the XM Mini-Tuner
remedies
tile XM
display
by this unit, Ihe characler
• To hold the Ctll rcl)l XM Raido
the remote
Io display
m illl]er or by 14 alph mumeric
the 'FL
displayed
up I_) 14 alphanumeric
in the Iront panel
inlomlafion
page 7{)),
• It the XM Satellite
cmnol
can indicale
You can sel whefller
SIGNAL"
appears
on
Press @ ENTER
I)ock
cannol
in the fi'ont panel
receive
display.
Displaying the XM Satellite Radio
information in the OSD
Press _DISPLAY,
The tollowing screen is displayed in the OSD.
number/name
[41
[51
Channel
Artist
category
name/song
[1] Search mode (see page 48)
title
[2] Channel category
When the channel number / name is displayed:
[3] Song title
[4] Channel number/name
[5] Artist name
!. %="r -..= .1
¢ '__ _ %.=
;'4':
When the channel category is displayed:
• To turn oll the OSD,
_DISPLAY
press
_gam
• XM stems messages
also appem" in the OSD
• You can seh'_ the anlount ol time tile XM Satellile
inJ_)lmalion
is displayed
' OSI)-SOIJR('E"
in flw OSI)
parameter
Radio
by using file
in "OPTION
MENU"
(see
page 701
• To hold the XM S ltellite
on the remote
When the artist name/song
title is displayed:
The HOLD
control
indicalor
you are holding
flashes
50 En
i ¢"4_::.
i
::ah.a
/
i " i ¢'_
press (8_ENTER
hll_yrnlation,
it is being
displayed
in _he l_'om panel
the XM inlorn]afion,
change Ihe XM Satellite
inh)rmadon
i "¢"_
Radio
while
Radio
channel
Press
in file OSD
disphly
while
@ ENTER
again
to release
the held
or
SIRIUS
Satellile
SIRIUS
has more than 65 original
authentic country
commercial-l)'ee.
SIRIUS
Radio provides
over 130 channels
music
and real bluegrass
also has more than 55 channels
you get up to 16 NFL games
are broadcast
during
great
their respecti'_e
with great sports
intk_rmation,
entertainment
hits to R&B,
of world-class
sports,
and 100% commercial-free
oldies
and classical
music.
masterpieces.
Only
From
rock and many more. Best of all, it's all 100%
news and entertainment.
a week, up to 40 NBA games
Included
as part of your
a week and up to 40 NHL games
a week. (Games
seasons.)
news from ESPN,
news and entertainnlent,
of exclusive
ti'om today's
to cool jazz, hot latin, reggae,
subscription,
Coupled
channels,
the SIRIUS
like NPR, CNBC,
sports ollering
Fox News,
is unrivaled.
Radio Disney
And don't
and E! Entertainnlent
forget a host of other
Radio.
For more
visit http://www.sirius.com/.
SIRIUS Satellite Radio legal disclaimer
SIRIUS is a_ail_dMe in the US I_!="
subscribers _ith addresses in the coillin_'ntui US
and is a_ailuble in Canada loJ subscribers _id/
a Canadian ;_ddress To get SIRIUS Satellite R_dio. _lsubscliption and coHlp_lible tuner and antenna are required (solcl separately)
Vish sh'hlsx'_ml lol d_e most complete and up-t_ date channel lhleup and inlomlation+
+'SIRIUS" and the SIRIUS dog logo and I_qat_=dmarks a_e t='_d_'m_ks oI SIRIIIS Satellite R_di_>Inc
• To ensure
optimal
Jeceplion
signals+ the antenna
of tJ_e S[RIUS
o1: the SiriusConnect
it or near a wilidox_ will/i1o
Connect
the SiriusConnect
SIRIUS
jack on the rear panel of this unit. For details,
the operating
tuner+
instructions
tuner (sold separately)
provided
to the
with the SiriusConnect
see
orientation
ol the antenna
depending
on the area.
Radio
be placed
in tile path to the sky The
ltH" Hie best =_'ception dilI_'l's
Rel_r to the instruction
manuals
supplied with the SiritlsConnect
tuner I_l" the installatk>n
_ll_lentla Woll can ll]otlllt h illdools or outdoors.
• Use the _ANTENNA
SiriusConnect tuner and the antenna
(sold separately)
obstacles
Salellile
tuner must
_SIRIUS
[NFO"
Inli>rmalion"
screen
page 56) to check Ihe antenna
olientation
ol the _ll_[elll_l.
• Yt>u will need to conl_ect
hlftH+mation
in the l)'t_nt panel
in the video
_eceplion
<>_the
level and at[just
the SiriusConnect
o_
monitor/see
Ihe
tuner to the AC _vall
outlet
• II 'CHECK
SR TUNER"
the Ront panel
tuner or antenna
collnection
disphly,
or ANTENNA
the conl_ection
is incorrect
ERROR"
In such c_ses,
of the ShltlsColll_ect
_i>pears
in
of the SiriusConnect
check
the
tul_er and the al_lelll_a (see
page 83)
To the AC wall outlet
• II +N( IT SUPPORTED"
appears
in II_e lronl panel
trod does not support
the connected
SiriusConnecl
display+
this
tune_
|
51
En
kq/.*tl#_."_,*_h":21tlflFlL*h'qqlfl]_llt_tJtte_
BeRate using the SIRIUS
activate
your SIRIUS
activate
file subscription,
uniquely
assigned
Satel[ite
Satellite
l)ature,
you need to
Radio subscription.
you need the Sirius ID
to the SiriusConnect
To
1
which is
tune_: Sirius ID is
12-digit munber and it appears on tbe package of the
SiriusConnect
tuner, on the label of the SiriusConnect
tuner and when you lune into the SIRIUS
Channel "0" (see below).
Satellite
•
Displaying the Sirius ID of your
SiriusConnect tuner
1
Press _SIRIUS.
2
Press _O
Sirius
and then
_ENT
to display
ID of your SiriusConnect
the 12-digit
Lights up
"[ OA
'_000Sirius IDxxxxxxxxxxxx"
indicates
Radio
Press @INPUT
< / _> (or press _SIRIUS)
to select "SIRIUS" as the input source,
The cursor on the left of the SIRIUS indicator lights
up in the l?ont panel display and the SIRIUS Satellite
Radio inlormation (such as channel numbel: channel
name, category, artist name_ or song tille) R_rthe
currently selected channel appears in the thont panel
display.
,:'ZT!:'3T!
_C"
LL,..,..
the
When you select "SIRIUS" as Ihe input source, this unit
amomalically recalls the previously selected channel.
tuner,
("xxxxxxxxxxxx"
Sirius ID of your SiriusConnect
tuner) appears in the front panel display.
• The SIRIUS
--'4':
T,) scroll Ihe message again, press @INFO
AUDIO
(or @INFO)
• When
S Itellile Radio
OUT
signals
you have not activated
can only
cannol
be output
at tile
(REC)jacks¸
select
your
subscription
yet, you
_'184" or "/)00"
Write the Sirius ID below.
2
ID:
SIRIUS Satellite Radio online information
Contact I_)ractivation
URL: https//activate.siriusradio.com/
Phone: 1-888-539-SIR[US (1-888-539-7474)
Search
for a channel
SIRIUS
Satellite
• To select
a clmnnel
"All Channel
• 'It) select
Search
a channel
• To select
"Preset
• To select
mode"
list, see
mode _on page 53.
by category,
see "Category
from the preset
mode"
the desired
the channel
modes.
on page 53.
a channel
Search
one of the
search
from the all channel
Search
mode"
by using
Radio
number,
channels,
see
on page 53.
channel
directly
see "Direct
by entering
Number
Access
on page 53.
--'4':
• You can set the SIRIUS Satellite Radio preset channel
(see page 54}
• Y,m can display Ihe SIRIUS Satellile Radio inhrmlation
Ille h'onl panel display or in Ihe OSI) (see page 56)
52 En
in
•
Bel_3re perlk)rming
_SIRIUS
Ihe following
operations,
•
All Channel Search mode
1
Press @SEARCH
pless
MODE (or _SRCH
1
MODE) repeatedly to select "ALL CH
SEARCH".
2
ioi a channel
@PRESET/TUNING/OH
1o_ @PRESET/CH
(plickly
by pressing
and holding
2
3
<_ / t_
Press @SEARCH
or ll_'xt c re'gory
Press@CATEGORY([email protected]/CAT.
<31r:>)
Press@PRESET/TUNING/CH
<_/_> (or
@PRESET/CH
A / V) repeatedly to change
0_r @A-E/CAT.
b?_
<_ / E> I
"_ixl can also
•
Category
1
Press @SEARCH
MODE (or _SRCH
MODE) repeatedly to select "CAT SEARCH".
2
MODE (or OSRCH
the preset channel number (1 to 8).
to tl/_"previous
plessing @CATEGORY
mode
repeatedly to change the preset channel
group (A to El.
A /_71
• You can skip channels
Search
MODE) repeatedly to select "PRESET
SEARCH",
Press@PRESET/TUNING/CH
<1/1> (or
@PRESET/CH
A / V) repeatedly to search
for a channel within all channels.
• Yoll cm sealch
Preset
Prior to selecting n pl_set channel in the Preset Seurch
mode, you must preset S[RIUS channels. For details, see
"Setting the SIRIUS Satellite Radio TM preset channels" on
page 54.
Search
mode
pressing
select
the preset
Ihe numelic
channel
buttons
number
directly
by
(1 to 8) (_)1
•
Direct Number Access mode
1
Press _SRCH
MODE on the remote control
repeatedly to select "ALL CH SEARCH" or
"CAT SEARCH",
Press@CATEGORY([email protected].<_I_>)
repeatedly to change the channel category.
3
Press@PRESET/TUNING/CH
<lit:>
(or
@PRESET/CH
A / V) repeatedly to search
for a channel within the selected channel
category.
"Am can search
fi)r a channel
quickly
@PRESET/TUNING/CH
<_/c>
This
_hen
by presshlg
md hokling
(or @PRESET/CH
2
Press the numeric buttons (_D) to enter the
desired three-digit channel number,
For example,
mode ol Ca[egoQ
Search
malJunction
ol this unh):
Ihe channel
dae channel
mode
tl/is unit is All Channel
in tile lollowing
54)
to the channel
press
the
%*%
Search
(il is not
Ille SIRIUS
fi'ont panel
• To enler
numeric
is locked (see page
is out ol service
you do not subscribe
cases
123,
A/V)
• To display
uni_ skips the channels
the nmnher
to enter
numeric buttons (v_)) as shown below.
{_ENT
• Instead
display,
a one-digit
buttons
Radio
select
ID (SID) number
channel
or Iwo-digil
channel
(@) on the remote
to confirm
the input
of pr_-ssing @ENT
a breton
cancels
the Direct
• If the selecled
fi'ont panel
number
cancel
Nmnber
by usilig
press the
and then press
number
Access
is locke&
Enler
ill the
Io tune inn) tile channel
other than the numeric
channel
display.
number,
control
immediately,
you can _ait a I_w seconds
[he eRler_.'d chaRilel i1umber
• Pressing
displayed
"0"
the numeric
buttons
mode
"PIN:
the Ik)ur_digit
buttolis
until Ihis unit confirms
(@/or
{_}ENT
plocedur,"
" appears
Pmenlal
in tile
Lock code
1@) or pl'cs_ @ENT
Io
|
53 En
_*'I/.'tl#/."_*_F'atlftTZ.'h'Ta/t'it.g_ll_ljltml
Before
perforllllrl_
Ihe
I:ollowirl_
opel'atiOllS,
press
4
_SIRIUS
Press @PRESETITUNINGICH
<_ / _>
(or @PRESETICH
k IV) repeatedly to select
a preset channel number (1 to 8) while the
MEMORY indicator is flashing.
The preset channel nunlber appears in the thontpanel
display.
You can use this leature to store up to 40 SIRIUS Satellite
Radio channels (AI to E8:8 preset channel numbers in
each of the 5 preset channel groups). You can then recall
any preset channel easily by selecting the preset channel
group and number as described in "Preset Search mode"
on page 53.
Search for a channel you want to set as a
preset channel by using one of the SIRIUS
Satellite Radio search modes.
See "Basic SIRIUS Satellite Radio
page 52 for details.
Currently
s_
channel
TM
Flashes
I
-m0_-
Currently
5
operations" on
selected
preset
channel
number
Press @MEMORY
(or @MEMORY)
to set
the selected SIRIUS Satellite Radio channel
as a preset channel while the MEMORY
indicator is flashing.
A colon C) appears next to the preset channel nmnher
for conflmmtion, and the MEMORY indicator turns
offin the lront panel display.
number
Colon (:)
Press @MEMORY
(or @MEMORY).
The MEMORY indicator flashes in the fl'ont panel
display l_r approximately 30 seconds.
Once
Ihe
MEMORY
you
same
sel it ne'_
preset
pl'esel
cha_llel
channel,
grl/[lp
alld
the
one
iltltl_ber
pl'evlousJ_
stoled
in
is cleared.
Flashes
You can use the Pm_ntal
SIRIUS
automatically
skips the h)cked channels
You must proceed to anl car D out steps 3 through 5 _hile
_he MEMORY indicator is tlashhlg in the front panel
display.
in the All Channel
Press @CATEGORY
(or @PRESET/CH
(or @A-E/CAT.
<1 / _>)
Lock l_ature
to the desired
Satellite
Search
and you search a channel
@PRESET/TUNING/CH
to limit the access
channels.
This unit
when this unit is
mode or Category
A / V).
repeatedly to select a preset channel group
(A to E) while the MEMORY indicator is
flashing.
•
The preset channel group letter appears in the front
panel display.
(PIN) and select the channels to be locked.
Flashes
Setting the code number and the locked
channels
Use this l_ature to set the Parental Lock code mm_ber
1
Press @AMP on the remote control and then
press _MENU
to display.
2
Press (8);7 to select "MANUAL
then press @ENTER.
I
Currently
54 En
selected
preset channel
group
Search mode
by pressing
<_ / _>
SETUP" and
3
Press @V repeatedly to select "OPTION
MENU" and then press @ENTER,
In Ihe SIRIUS
oulpuls
4
is locked
Press @A / V repeatedly to select "G)SIRIUS
SET" and then press @ENTER.
The tbllowing menu screen appears.
OPT!ON
name
10
HENU
G>SIRIUS
+ PRRENTRL
Satellile
the sound
Only
Radio
channel
el Ihe selected
the lirst eighl
are displayed
Press @ENTER
channel.
channel
characlers
lisl screen,
this unit
even il'lhe channel
el each
channel
in Ihe lisl
to lock the selected
Check nlark appears bet_re the selected channel.
SET
--'4"
LOCK
When you select the locked channel and press @ENTER,
Ihis mill unlocks Ihe selected channel
11
Repeat steps 9 and 10 to lock the channels
you want,
12
Press @ RETURN repeatedly to exit from the
"PARENTAL LOCK" screen.
Press @ ENTER.
"NEW PIN:O000" appe:us.
13
II a Sh'iusConnect
Ax ailable"
tuner is not connecled
Io d_is uniL "Nol
If you lorge{ or w_lll[ it) change
If the Parental
instead
then proceed
Lock code
o[ "NEW
number
PIN:0000"
is ah'eady
Relcr
seL "'PIN:
-'
_o step 8 and
the operations
Enter the desired 4-digit code number by
using the numeric buttons (@).
_.,&
Press @ RETURN
without
7
setting
to return
the previous
menu
level
H_e code immber
Press @ENTER
lock code
ilunlber,
•
Tuning into the locked channels
You can tune inlo the locked channels b> the Direct
number access mode or preset chan]lel mode. Whe]l you
time into the locked channel, lk)llowing message appears
in the t}ont panel display. Enter the code number you set
for the Parental Lock l_ature by using the nmneric buttons
(@) or press @ENT to cancel the tuning.
appears.
L.#
1
] :..=
.L i "1 :: ..................
Enter the 4-digit code number you set at step
6 above to unlock the protection.
When the code nunlber ix correcL "OK" and then the
SIRIUS Satellite Radio channel list appears.
g
Ihe Parenlal
use 'SSR PIN" in "ADVANCE[) SETUP" {olesel die Pmenhl
Lock code ilumber
to confirm the code number.
"OK" appears and then "PIN:"
8
to exit from the setup menu.
.,F,
appears
--'4':
appears
Press @MENU
This unit is tuned into the last channel you select in
the "E_RENTAL LOCK" screen. If the channel is
k eked, his u lit is u led rote 184 SIR[US Weather
& Emergency" or "000 Sirius lDxxxxxxxxxxxx"
("xxxxxxxxxxxx" indicates the Sirius ID of your
SiriusConnect luner/.
Press @<
If IIle enlered
code numbeJ
fi'ont panel display
selected channel¸
is incorrect,
"Wrong"
appears
in the
and _his uni_ is luned hllo the previously
/ c> repeatedly to select the
desired channel category and then press
@A / V repeatedly to select the channel you
want to lock.
|
55
En
_'ql;tl#t.."t_*_iggltlilFll;h'7_l.qI_,lll_lJllml
Before perfornllrl_
@SIRIUS
Ihe I:oJIowirl_ opel'a[iOllS,
press
• The h'onl panel
display
clmr _cters al once.
Saleliile
Radio
can indicale
up Io 14 alphanumeric
You can se_ whefl_er Io displa 3 the SIRIUS
iniomlafion
in the Iront panel
conIil_UOtl>, m inl]er Or by 14 aJph mumeric
using
the 'FL
SCROLL"
page 7()1
• IJ ti_e SIRIUS
You can display
(such as channel
name, composer
selected channel
the SIRIUS Satellite Radio int_._rmation
mNnber, channel name, category, artist
nmne. or song title) lot the currently
in the front panel display or in the OSD.
Ihal cannol
displayed
IJa
SI _[[lS
disphl_
[]legg(lgL
= or
in 'Troublesi_ooting"
•
message
{In error
or in the OSD,
appe lrs ill Ihe
see the "SIRIUS
S ltellile
on page 83 Ior lppropriale
h'onl
Radhl"
S _teliite Radio
be _ecognized
@ENTER
conlains
(see
_ character
by this unit, Ihe characler
will be
SIRIUS
Salellite
Radio
inh_ marion,
press
p(ln_?]
secliim
remedies
Press @INFO (or @DISPLAY).
The t_llowing screen is displayed in the OSD.
_
repeatedly to toggle
between the following SIRIUS Satellite Radio
information display modes.
Channel
inl_rmation
MENU"
Displaying the SIRIUS Satellite Radio
information in the OSD
_ i_-; '[.n+:c,p_8 I:<h>_'_
[11---°°
(or @INFO)
in "OPTION
_ bile it is being di played
Displaying the SIRIUS Satellite Radio
information in the front panel display
Press @INFO
in a
a[ once by
wilh a space
• Tu hold II_e cun'enl
•
param_ger
display
charac[ers
[51
gl............._,'_
T.,._...,'_
[
[21- --- J¢:F'c'P
[al---2
'_........
[41'_--.,.
r, ._
[6]
I
#J_'&F:,x
R,{.'.-3 ' F:!-:F_,
I [71
{.c,
. i[y_di .".g
s_
,:.,.-F_
number/name
!
L:H i [:.i:iUi<'.'d J.['ii- U
Channel
eg
[1] Search mode (see page 52)
[2] Channel category
)HOF
[3] Song title
category
!
[4] Composer name
[5] Antenna reception level
Artist
name
/ Song
[6] Channel number/name
title
t
[7] Artist name
• To mrnou the OSD press @DISPLAY _gaiu
Composer
• SIRIUS status
• You can select
name
!
inJ_)m]alion
messages
also appear in [l_e OSD
the lnlounl of lime the S[RIUS Satellde
is displa_ed
reception level
D-=ff' :-"i_:UL:.:= J._L--'-U
Sound
field
cg)......,,
the inl:ormation
indicator
you u'e holding
Sa{ellite
Radio
illlbrmation,
i{ is being displayed
lhlshes
the SIRIUS
screen.
'HOLD"
in the h'on( panel
inlormation
to
-i-:b_HHgl
appears
T h_FFi"
press
in {l_e OSI)
While
disphl}
this
in the
appears
while
P=ess @ENTER
lgain or chal_ge the SIRILJS Salelliie Rldio
_he held inlorm ilion When in inlorn_aliol=
!
56 En
while
• The HOLD
_.,,,_,,,__:,
program
Back
@ENTER
unil is holding
OSI)
t
MENU"/see
page 70)
• To hold the SIRIUS
Channel number/Antenna
Radio
by using the
p u'ameter in "OPTION
' OSI)_SOURCE"
FIHrE:HHFi
.--":NFO •, ':'.__ "'__:_'"
in Ihe OSI)
channel Io release
is ulia_ail lble,
Once you have stationed your iPod in a Yamaha iPod universal dock (such as YDS=I0, sold separately) connected to the
DOCK terminal of this unit (see page 19), you can enjoy playback of your iPod using the supplied remote controh You
can also use the Compressed Music Enhancer mode oi tills unit to improve the sound quality of the compression mtifacts
(such as the MP3 formal} stored on your iPod (see page 19).
• Only
iPod (Click
• Some
l_atures
• D_r a complete
and Wheel),
list ill status
_'Troubleshoo6ng"
your
• Once
the connection
• Only
iPod is stationed
Ilghls
Ihe analog
analog
AUDIO
messages
on the model
that appear
hl a Yamaha
between
your
up in _he flont
audio
or the sol,ware
in the l¥ont panel
_Pod universal
dock.
display
version
of your
and in the OSD,
this unh begins
iPod and this unil is complete,
panel
iPod
see file "iPod"
secdon
in
lacks
_r
is automatically
signal
_qPod connecled"
_Ja]_sl]]issi/_n
appears
wi_h your
iPod
in _he front panel
display
and _he DOCK
display
and video signals
Ol JT tRECi
• Your iPod baltery
lerminal
depending
on page 85
• Once
indicator
iPod nano, and iPod mhli ire supported.
may not be conlpahble
of your
iPod are input a_ the DOCK
ternlinaL
and _he analog
audio
signals
can be outpu_ at _he
recording,
charged
when
your
iPod is stationed
ill a Yanlaha
iPod Lmiversal dock
connected
to the DOCK
of this unit as long a_ this unit is Ire'ned on,
You can control your iPod when 'W-AUX" is selected as the input source. The operations of your iPod can be clone wilh
the aid of the OSD of this unit/menu browse mode) or without it (simple remote mode).
•
Remote control operation
Before
p_rfl)rmiJ_g
the lolk_ing
operations,
•
Hess
@V-AUX/DOCK
ENTER
Subsequenl
menu
Menu down
/-4
Previous
12>
Subsequent
<a<4
Searcil backward
r:>g>
Semch lorwmd
remote
You can pertL)rm the basic operations of your iPod (play,
stop, skip, etc.) using the supplied l_mote control without
the aid of the OSD of this unit.
• Operations
_7
iPod in the simple
• You can viex_ the photos
(some models only)
Menu up
0_
Controlling
mode
or video
carl be also done
clips stored
on your
iPod
with Ille controls
on youl
iPod,
menu
II_lgl]U
(Press and hold_
(Press and hold)
Skip backwal*J
12:42:q
Skip 1_1x_al (1
00
Pause (Menu
Play/Pause
h=owse nlodel
(Simple
remote
mode)
12>
Play (Menu browse mode)
Play/Pause (Simple 1emote mode}
MENU
Plevious
DISPLAY
Display
menu
|
57 En
•
Controlling
mode
iPod in the menu
Shuffle
browse
You can ped_)rm the advanced operations of your iPod
using the supplied remote control when you connect this
unit and a monitor using the VIDEO connection. You can
browse the songs stored on your iPod in the OSD. Furlher_
you can dlange o1"adjust settings tbr your iPod to suit
your personal preferences.
• The name of the song being played also appems in die h'on{
paneldisplay accoJding 11/the"FL SCROLL" parameler in
"OPTION MENU" (see page 701
• You can select the anlotmt oi time tile iPod menu md play
inR)rmationis displayed in tile OSD bE using tile
"OSI)-SOURCE" in "OPTIONMENU'*(see page 70)
• Operations
cannot
• The Yamaha
• There
panel
be done
logo appears
al_ some characters
display
replaced
underscores
• The "Settings"
Press
paranle{ers
can be changed
@ENTER
repeatedly
parame_r
settings
browse
the photos
1
or video
remote
clips stored
Press @V-AUX/DOCK
_DISPLAY.
or ac[ius{ed
to toggle
or video
Use {he simple
the photos
in the l¥ont
characters
Use this feature
random order:
to set this unit to play songs
or albnms
Choices: ()It, Songs, Albmns
• Select "Oft" to deactivate this l)ature.
•
Select "Songs"
order.
•
Select "Albums"
random order.
to set this unit to play songs
in nmdom
to set this unit to play albums
in
-"4_
When "Shuffle" is set to a setting other than "O1"1
'. "Z7_"appears
in {hetop right corner while songs or albums are being shuffled
Repeat
[?.._:=F._:=._t
Use this l)ature to set this unit to repeat one song or a
sequence of songs.
Choices: Off, One. All
• Select "OFF' to deactivate this l)ature.
• Select "One" to set this unit to repeat one song.
• Selecl "All" to set this unit to repeat a sequence of
songs.
alx?
between
clips stolid
mode
only
in
{lie
on your
_/>enjoy
on your
When "Repeal"is sel Io a se_tingother than "Off"."@" or "c_,"
appears ill the {opright corner xd_ileone song or a sequence Of
songs are being repemed
•
The function
display
iPod
and then
The li)llov, ing display appears ill tile ()SD.
of the play information
[11
_
_--
[71
[2]
l_
I
[3]
M._de-to-or
g4rti:t:
>
Songs
GeriPe_
iPod
C:oFiPozer
_
ToP
[41
,--
--
[51- "[_
def.
II
B',:,._d I:..o .i,r,J i._
i I ..................
Settingz
[01,_,--0=51
-7=44_[t0]
[f]
Playback status
[2]
Track number/total
playback of the selected song.
Choices: Playlists (playlists), Artists (artists), Albums
(albums), Songs (songs), Genres (genres),
[3]
Artist name
[4]
Song title
Composers (composers), Settings (settings)
Playlists > Songs
Artists > Albums > Songs
Albums > Songs
Songs
Genres > Artists > Albums > Songs
Conlposers > Albunls > Songs
Settings > Shuttle, Repeat
[5]
Progress bar
[6]
Elapsed
[7]
Shuffle
[8]
I_ (playback), II (pausing), _+(search
forward) and _ (search backward)
[9]
Name of the album
Press @/\ / _7 / <] / _ to navigate the iPod
menu and then press @ENTER to begin
En
tracks
time
and repeat icons
[10] Remaining time
58
in
--"
"Settings"
watching
Those
iPod.
ol¸ your iPod.
be displayed
ol ¸ _his unh
• You cannot
iPod in {lie OSD
on your
window
tha_ cannot
or in the OSD
with
the OSD
with d_e controls
in the display
'-";h:_:f£ l __
[gl
You clm connect
a Yamaha
enjoy the music contents
Bluetooth
this unit and the Bluetooth
Bluetooth
component
adapter
(such as YBA-10,
stored in your Bluetooth
component.
component
sold sepmately)
(sud]
to tile DOCK
as a portable
nmsic
You need to perlk)rm "pairing" the connected
_erminal
must be pertbrmed
component
when using a Bluetooth
with the Bluek)oth
adapter
connected
panel
wiring
adapter
and your
between
conlponent
for Bhletooth
adapter
is not connected
of this uniL "No BT adapter"
to the DOCK
appears
ill {he front
di play
to this
unit lk_r the first time or if the pairing data has been
deleted. "Pairing" refers to the operation of _gistering
Bluetooth
Bluetooth
of this unit and
without
in ad',ance.
If the Bhletoolh
Pairing
terminal
player)
4
Check that the Bluetooth component detects
the Bluetooth adapter.
If the Bluetooth component detects the Bluetooth
adapter, "Y BA- Ill YAMAHA" (example) appears in
the Bluetooth device list.
5
Select the Bluetooth adapter in the Bluetooth
device list and then enter the pass key
"0000" on the Bluetooth component.
When the pairing procedure is successful,
"Completed" appears in the lrotlt panel display.
a
communications.
_.,;-_
• You only need the pairing opem0on Jbr the J]rs{ 6me that yogi
use the Bluetooth componen{ _ ith the Bluetooth adaptm,
• Pairing Jequires opera6ons on this unit and on {he olher
componem widl which BJuetooth communicalions are to be
esmhlished II necessary, r_qk:rto the other componenVs
operating
illstrllcthlHs
There are two pairing mefllods: pairing by using "START
PAIRING" in "SET MENU" and quick pairing.
•
Pairing by using "SET MENU"
Use this ti_atnre to perlorm pairing with the video monitor.
Select "START PAIRING" in "INPUT MENU". See
page 71 tk)r details.
•
The g*_maha Bhleioolh
adapter
Bluen>oth
When
with
a ninth componen{
pairing
cleared.
Quick pairing
components.
data
can be paiJed
pairing
and the pairing
ter the least recently
wilh lip {o eight
is conducted
data
used other
successhdly
is registered,
component
{he
is
To ensm'e seculity, a tim_"limit oi 8 minutes is set lor the
pah'ing operation You m'e recomnl_q_ded to Jeud and Ikflly
understand all {he insn-uclions belore starting
1
1
Press @INPUT
<I / [> repeatedly
@V.AUXiDOCK)
to select
(or press
"V-AUX"
as the
Press @INPUT
<:1/_> repeatedly (or press
@V-AUXtDOCK)
input source,
to select "V-AUX" as the
input source,
2
Turn on the Bluetooth
component
you want
Start
playback
When
the connected
Bluetooth
to pair with.
DOCK
3
Press and hold @BAND
seconds
Once
to start
the Blnetooth
"Searching..."
Bluetooth
indicator
adapter
flashes
Bluetooth
component,
indicator
appears
• Wh_'n you pn'ss @ENTER,
Seill'che
staffs pairing,
R)r a moment.
is in the pairing
detects
the
and the
in the fl'ont panel display.
and
conllee[
[o
the connected Bluetooth ]dapter
thL = hlst
COllhL=ctl=d
B]llgtOOth
componen_ It'th_" Biu_'_ooth adapter cannot find file Bluetooth
componenL 'Not Ikmnd" lppears in the h'ont panel disphly
• To disconnecl the Bh]etooth adapler fl'om the Bhletooth
componenL press @RETURN,
While the
mode,
adapter
"BT connected"
component.
for 3
pairing.
appears
adapter
(or @BAND)
of your Bluetooth
DOCK
in the front panel display.
g4::
To cancel the p,ddng, press @BAND
(or @BAND)
again
59 En
|
Recording
adjustmenls
instructions
lot those
• When
Ihis unil is set to the standby
• TONE CONTROL
not aflkzcl _corded
• The source
• The SIRIUS
• I)igital
source
• A given
• Once
Radio
component
audio
• Check
lilws
Do I test
signals
is nol oulput
slgnals
recording
fl'om tbe recording
laws
beli_re
cannot
bet_een
speaker
components.
iacks
of this uni_ cannot
OUT
at the AUDIO
are not output
Refer
to tile operating
channel
terminal
in you r cotmtry
au aclual
can be output
to this unh.
fl'om other
to record
Io this uniL
field programs
{see page 38) do
be re_orded
(REC)¸jacks¸
OUT (REC)
on _he same OUT (REC)
connected
(see page 41 ) and the sound
at die analog
signals,
componenl
other componenls
levels
only digilal
Ihe sound
start
iacks
be output
INPUT
to pJ_vide
a recording
3ou
record
settings,
be Ot_tpu_ at the AUI)IO
inpm al the DOCK
off:. this uIlit may distort
the copyright
you cannot
CH INPUT
cannot
is connecled
you have connecled
turn_
signals
input at the DIGITAL
input source
• The analog
mode,
to the MULTI
Radio
Satellite
signals
are perlimned
(see page 41 ) and VOLUME
material
connected
• The XM Satellile
your
and other operations
components.
jacks.
AUDIO
you cannot
record
OUT
{REC)¸jacks
l_r _cording
ThereR_re,
if
tile source¸
at the analog
AUDIO
keep _he component
turned
OUT (REC)jacks
on while
l_r recording¸
using tl/is uniL If the componem
is
components.
Irom CDs, radio,
etc
RecoE_Jing
ol ¸ copyrighted
malerial
may infl'inge copyright
recording.
If you play back a vide() source that uses scrambled or encoded signals to prevent it fiom being dubbed, the picture
itself nlay he disturbed due to those signals.
1
Turn on all the connected components.
3
Start playback on the selected source
component or select a broadcast station,
2
Press @INPUT
<3 / D repeatedly (or press
one of the input selector buttons (@)) to
select the source component you want to
record from.
60 En
4
Start recording on the recording component.
You can use the following parameters in "SET MENU" to adjust a variety of system settings and cuskm]ize the way this
unit operates. Change the initial settings (indicated in bold under each paran]eter) to reflect the needs of your listening
environmenl.
•
Auto setup
i:iij[L-i SETUP
Use this t_alure to automatically adjust speaker and system parameters {see page 24).
•
Manual setup
M..qHUi?LSETLiP
Use this feature to manually adjust speaker and system parameters.
Sound menu
;;. SOU_--%_
MEHij
'_:'_)'-:_Pi_'i:iK[[."-T-:_[-*'dT
Se ec s
crossoxer
e s ze eac
speake,
e sj eake s
iw e ] e c} Sigl]al
lr_qu_ ncy, md Ihe Iocalion of {he fl'ont sD'ak_ rs connected
OtllptH,
filial Ihe
Io {he FRONT B
63
[el 113i11_11S
S::,SPLEi...
ir-:i
Adiusts
Ihe oulpul lexel ol each speaker
65
U .:Q:,i-' L?.-'.b { b_[{L.:}:2
Adiusls
Ihe dela)
65
[? ::'q:ENTER
\diusIs
II1_.!IOIlal quali[y ol Ihe cenlel
_(liu_ls
lh_. OLHpUlkxel ol tll_ IFE
_7-EO
_ .:%i-" b. L_KUb.L
r- ::,[:+'..'t-4i:i
Mi C r-:_M_:T
u..m,.,,.
L u
:d.) :-i}._r1[
..,_.
L-:,i::i
f
lime ol each speaker
speaker
channel
66
lot Dolb> Digihll ol DTS signals
66
_,diu Is lh_.!(lyllal]]ic rang_ ol D/!lby DigiHI ol DTS signals
AdBisls Ihe muling
le_,el, audio ilela_, maximum
Selec[s whelheJ Io pla) back HDMI audio signals
coml>onenl connecled [o Ihe HDMl I)UT jack
_olume
66
level inll hlilial _olulne
on Ihis unil or oil anothel
HDMI
level.
66
67
I
61 En
Option menu ]_ L-IF'TiL-IHHEHU
,-,. r'. r ,"r-,_ ,",;, :'r"'r"
i-i : L=£ Z=i-L.i-_Y Z=i2i
Adiusls fl3e bl'ighlness ol fl3e fi'ont panel displa_
illl iHl)alioiI i_ ilispla} cd.
i!:) HEH0i?
'_ (!iUi:ii?.[)
LockssoundfieldDogiamparamulersaiidolher"SlTMENLt"seUiiigs
'.:-;[!Z.i!%:T
C)iYiU[:@3
[:_) F'i)i?.i)H=
r-.r-,=
:.r--r.
Pail file connected Yamaha Blueloolh
BltKIOOfll CompOIl_ Ill (S_e plge 59)
F )_:==[=iiZ_H[)_ ()
Displays
'_:iE T
(!i) !!;i [?. i U_!- !!;E'[
•
RADIO
70
so/ices comlccted IoHle
71
IniHalizes liw pa]anleleLs ola gloup ol sound field programs
="" ="="'"=" ="" " ' ' ' "-'=" =
The "XM
f13_XM and iPod
70
De_ignll_s fl_edelaul_audioinpuliack
sek'c_scUhlg lot Ihcinpul
DIGI]AL
INPUT iacks _qwn you uun on Ihe pi/_uJ o[ 1his unil.
i H I[
==r-T:.,,-,_-_
and f13__a_ in whidl
Ih_ _un_nl
i_q_lion
Svls Ihe S]PdUS Palenlal
page 54
SET" and "SIRIUS
Signal information
SET"
paranlelers
adapluJ (such as YBA
le_d ol tl3e XM Satellite
Lock code numt/er
are onl b applicable
7J
lO. sold sepal;/el_
I with I
71
P.adio signals
72
aiid Ih_. ch iniivl h_ck conl]gurathm
to Ihe L!SA
and Canad
_see
72
i models,
!!:U!iHi:t..i?4FO
Use this feature to check audio signal intL_rnlation (see page 36).
3
Press @ENTER
Use the renlote control to access and at[just each
parameter.
;'4"
SETUP".
•NRHURL SETUP
You can change
reproducing
1
to enter "MANUAL
The 'qVIANUAL SETUP" display appears in the
OSD.
the "SET
MENU"
parameters
while
this unit is
÷ i SOLIN[:,HENU
2 IHPUT HEHU
3 OPTION MENU
sound.
Press @AMP and then press _MENU
enter "SET MENU".
to
[ ENTEP,J_E_ter ¸
The top "SET MENU" display appears in the OSD.
4
SET HENU
Press@kl_l<ll_.
and change
TOP HEHLI
and @ENTER
• Press @A / _ to select
÷ -_UTO SETUP
- H_HURL SETUP
- SI_NRL INFO
• Press@<l/c>
• Press @ENTER
confirm
Press @A / V to select"MANUAL
TOP
+
HENU
-RUTO SETUP
-H_NURL SETUP
=S!GHRL
DIFO
[ &J/UgJ; LP, Do[ r{
...... A!_2]!!!-92:2!]...........
62 En
menu
or
SETUP",
to change
the parameter
to enter the selecled
value.
menu or to
the paralneter.
• Press @RETURN
level.
5
SET HENU
the desired
parameter.
{ ENTER_: Entep
2
to select
the parameter.
to return
to the previous
menu
Press @*3MENU to exit from "SET MENU".
_/J
Use this menu to manually
compensate
LCD
acljust any speaker
lk_r video signal processing
monitors
setlings
or
delays when using
_laL5
Woot)r section of a speaker is 16 cm (6.5 in) or larger:
large
Woot)r section of a speaker is smaller than 16 cm
(6.5 in): small
or projectors.
Front speakers
5_-&iN_ -=V
Choices: SMALL, LARGE
i
SOUND HENU
i "2
i SOUND NENU
÷ R>SF'ERKER
SE]"
B)_P LEUEL
C>SPb!_]'RNCE
b)CEHTER6EO
@IRNURL SETUP
E>LFELEUEL
2 "2
÷ F?D'_'NR_'IIC
RRNGE
6>RU[:,IO_ET
H>HD_'II_E]"
@1kNURL
i SOONDHEHU
R>SPERKER5E7
FROHT 5P
SETUP
•
Speaker settings
#;,SFi.::i:iKER Sc7
Use this feature to manually adjust any speaker settings.
FRONT B speaker setting
FRONT E'
Use this t)ature to select the location of the front speakers
connected to the FRONT B terminals.
Choices: FRONT, ZONE B
R>SPERKER
FROHT
i
Select "FRONT"
SOUND
........ _,J_BL&_25kgc_g
.......
When the front speakers
Select "LARGE" (large).
are large
When the front speakers
Select "SMALL" (small).
are small
SET
When 'LFE/BASS OI JT" is sel Io "FRONT" (see page 64), you
can select only 'LARGE" in "FRONT SP" Ii' the value of
"FRONT SP" is sm to a se_ting other than "LARGE" in advance,
this unit amomatically ch rages the value to "LARGE"
B,.,.FROHT
HENU
to turn on or off SPEAKERS
when the speakers connected
terminals al_ set in the main
to the FRONT
zone.
A and B
Center
speaker
Choices:
NONE
on all the SlYeakers including
i SOUNDHENU
the subwooti_r
the main zone are muted
and this unit outputs
the FRONT
only.
• 11 you connecl
B terminals
headphones
sound is oulpul
terminals
when
• II¸ a DSP progranl
"ZONE
Io the PHONES
is selected
when
(see page 39)
"FRONT
enters
R)SPERKER SET
CENTER5P
in
sound at
ol this unh, the
from both headphones
and _he FRONT
"FRONT
B" is se_ to "ZONE B"
R", II/is uni_ automahcally
DSP mode
iack
B
B" is se_ to
the Virtual
:!;P
LRG
B
Select "ZONE B" if the speakers connected to the
FRONT B terminals are set in another zone. [f
SPEAKERS
A is turned off and SPEAKERS
B is
turned
CEHTER
SML
CINEMA
!IO!IE >St'IL LR6
When the center speaker is large
Select "LRG" (large).
When the center speaker is small
Select "SML" (small).
When
you do not use the center
Select
NONE
directed
(none).
speaker
The ce ter cha reel s g als are
to the fion_ leR and right speakers.
|
63 En
Surround left/right speakers
Choices: NONE, SML LRG
Crossover
L-;UR° L.."R 5;P
Use this t)ature to select tile crossoxer l?equency of all tile
speakers set to "SML" (or "SMALL") in "SPEAKER
SET" (see page 63). All frequencies below the selected
frequency will be sent to the subwoot)r or fi'ont speakers
depending on the setting of "LFE/BASS OUT" in
"SPEAKER SET" (see page 63).
Choices: 40Hz, 60Hz, 80Hz, 90Hz. 100Hz, 110Hz,
120Hz, 160Hz. 200Hz
i SOUND MENU
£>SPE_KER SET
SUR_ L_R SP
NONE >SML
CROSSOUEi;!
LRG
L 5D!JUE£
r%U!J
.................................
When the surround speakers
Select "LRG" darge).
are large
When the surround speakers
Select"SML"(small).
are small
When
FREO-=-80Hz
you do not use the surround
Select "NONE '_ (none).
CINEMA
DSP mode
LFE Bass out
R>SPERKER
SET
CROSSOOER
speakers
This unit is set to the Virtual
phase
L-;LiBi.,.iO.L}FER
PHg':L:--:
Use this t_ature to switch tile phase of your subwoot_r if
bass sounds are lacking or unclear.
Choices: NORMAL, REVERSE
(see page 39).
LFE/£gL-;S
Subwoofer
,"]U[
Use this f_:atureto select the speakers that output the LFE
(low-frequency effect) and the low-t_equency signals.
Choices: SWFR_ FRNT, BOTH
i SOUND MENU
R>SPERKER
SET
SUBNOOFER PH£SE
i SOUND MENU
R>SPERKER
SET
LFE, BRSS OUT
>NORMRL
•
SUFR
When
a subwoofer
and you want
is connected
to get natural
Select "SWFR" (subwoot_r).
as the low-frequency
signals
"SML"
(or "SMALL")
When
a subwoofer
•
FRNv >BORN
bass
are directed
is connected
Select "BOTH"
(hoth).
sigmds
set to "SML"
the subwoofer.
righl speakers
"FRONT
When
SP" setting
of
of other
are directed
to
of the front
to the front left and
regardless
of the
(see page 63).
you do not use a subwoofer
tkequency
(front). The LFE signals,
signals
and right speakers
the low-
of the li'ont let? and right channels,
and the low-thequency
"SML" (or "SMALL")
64 En
signals
signals
arc directed
unit
Tile LFE
signals
(or "SMALL")
and the subwoofer
Select "FRNT"
setting
The low-thequency
fi:om the subwoofer.
Tile low-theqnency
left and right channels
to this
sound
as well as the low-frequency
speakers
as well
set to
to the subwooti_r.
to get rich bass
are output
unit
sound
The LFE signals
of other speakers
and you want
any source
to this
signals of other speakers set to
are all directed to the thont left
regardless
(see page 63).
of the "FRONT
SP"
REUERSE
Select "NORMAL" if you do not want to reverse the
phase of your subwoof_r.
Select "REVERSE" to reverse the phase of your
subwoote_
_/J
•
Speaker
Use this feature
level
EOSF:' LL:?..iEi
to manually
adjust
Speaker
•
the output
level of each
speaker.
range: -10
Control
step: 1 dB
Initial setting:
to +10 dB
Ideally, each speaker
must be applied
B>SPLEUEL
should
position.
most home situations.
SOUND
r_EHU
[
_2
SOUND HEHU
B>SP LEUEL
- .........
÷SUR_L_I
5UR. R
II
7 FR, L_I
FR,R_I
CHTR_I
adjust the distance
of each
to lhe respective
channeh
and the delay applied
main listening
0 dB
C;,SF:' [:,i!!;[i:iHCF
Use this fi:ature to manually
speaker
Control
distance
_laL5
be the same distance
However,
Thus,
a certain
amount
to the sotmd flom each speaker
sounds
time.
will arrive at the listening
Unit
UHiT
lkonl the
this is not possible
position
in
of delay
so that all
at the same
2 2
÷
SUFR_I
N
@
FR =[
Fronl left speakel
F'R =[4:
Fwn[ dghl speakeJ
Choices:
(_:i.[r[_:
(emel speaker
Initial setting:
[U.S.A. and Canada
':::i,ii:" [;'
Sub_\ oolcE
'2[;ij[?.
_[
Smround leH slxaker
'2[;ij[?., [?.
SuEround lighl spe ik_i
meters
[Other models]:
•
•
Control
speaker
channels
diller
depending/m
the seuing
of
ti:el (tt)
(m)
Initial
distances
range: 0.30 to 24.00 m ( 1.0 to 80.0 R)
Control
Ihe speakers¸
models]:
meters
Select "meters" to adjust speaker distances in meters.
Select "leer" to adjust speaker distances in leer.
Speaker
The available
(m), feet (It)
step: 0. l 0 m 10.5 t_)
setting:
FRONT
L/FRONT
CENTER:
SUR. L/SUR.
_!
R/SWFR:
3.00 m ( 10.0 ft)
2.60 In (8.5 ft)
_
R: 2.40 m (8.0 R)
_
_i_:Si_@,_
¸¸
F'F-:I])_]T J
Fwnl lell speakel
F'RI:I_]T
From rigN speaker
R
i][:[.:}1TE _-:
Cenlel speak_ r
'2[;h.iF_-I
Stlb_ O(>l)l
'!!;UR=
• _
[.
Surround
lell slxaker
'!!;Jj[_:= [?
Sun'ound
_igh[ speake_
Tl_e avaihtble
speaker
ch mnels
differ depel_ding
•
_
on d_e se_dng
of
_he speakers¸
|
65
En
•
Center speaker equalizer [:)CEHTC:Rriu:!
to acliusttile builtqn 5-fi'equency band
Use this t_ature
(1 (lOHz, 300Hz,
equalizer
I kHz. 3kHz and IOkHz) graphic
[i)r the center channel
the center speaker
matches
can make adjustments
selected
so that the tonal
Dynamic
quality
of
You
range
headphones.
decoding
This setting
Dolby
Digital
I
SOUND HENU
[_ ] "[_] ! Up "[)o14n
[41 '[i_1! AdSust
OdB
OdB
OdB
_dB
OdB
Speaker '_-;
P Ei::.:'{(
ER
Adjusts lhe speaker compression.
Headphone
H[::,'--i[::,F'H
0 Hr
Adiusts
the headphone
Choices:
MIN, STD,
compression.
Ti-:!!;T
Use this feature to make adjustments lor 'CENTER
while listening to a test tone.
GEQ"
Choices: OFF, ON
Select "OFF" to stop test tones and output the currenlly
selecled source component.
Select "ON" to output test tones lhom the center and
front left speakers.
Low-frequency effect level E)[..FE [..EUEi
Use this t_ature to adjust the output
frequency effi_ct) channel according
•
Select "MIN"
certain scenes.
signal contains
if you regularly
listen at low
volume levels.
•
Select "STD"
•
Select "MAX"
amount
{standard)
tk)r general
(maximum) to
of dynanlic
use.
preserve
the
greatest
range.
•
Audio settings
G::,_LiCqO 2;[!:[
Use this t)ature to at@st the overall audio settings of this
unit.
level of the LFE (low'to the capacity of
This setting is effective
the LFE channeh
range: -20
MAX
(minimum)
i SOUNbHENU
your subwooti_r or headphones.
The LFE channel carries
low-frequency
special effecls which are only added to
G>AUD 0 gET
÷ HLITE TYPE---FULL
A. DELA?......
_r,is
_IA:_:UOL,---+I6dB
I _41
T, {)OL,, -, - OFF
when the input
to 0 dB
[4J, [_J_ Select
I dB
i SOUNDMENU
E>LFE LEUEL
÷ SPEAKER......
OdB
HEAbPHOHE--=-OdB
Mute type
Mi.iTE T'?P.I:
Use this feature to adjust how much the mute fimclion
reduces the output volmne/see
Choices: FULL,-2(tdB
Select "FULL"
1o completely
•
output.
Select "-20dB"
to reduce
Speaker :!;PEEKER
Audio
Adjusts the speaker LFE leveh
Use this t_ature
delay
using certain
Control
range:
( ontrol step:
Depending on the sellings ol "LFE/BASS OUT"/see page 64h
some signals nla> not be ouqml a_tile SUBWOOFER OUTPUT
iack.
mute all the audio
the current
volmne
by 20 dB.
i:i= [)[.::Lb]'-,'
to delay the sound output
it with the video
Headphone HF_ [>F'{-:.-'O
N_
Adjusts the headphone LFE leveh
page 35).
•
[_ J/['q J_ UP, Do[ h
66 En
is efti_ctive only when this unit is
and DTS signals.
F>D'_NRH C RRNGE
[4J, [_J_ AdJ_4st
( ontrol step:
range
or
÷ SPEAKER ......
HRE
HEADPHONE, -, - MAX
D?EENTER_E_4
TEST >OFF ON
÷ i00Hz ---I1=-300Hz , - ,}_, ikHz - - 41=
-3kHz , - -II"- l OkHz -, -I1'- "
Control
of dynanfic
to your speakers
1o the currently
or a lest tone.
i SOUNDHENU
•
the amount
to be applied
Control range: -6.0 to +6.0 dB
Control step: 0.5 dB
Initial setting: 0 dB
Test tone
F)[;,'?HgH,,'_-C Ri:_N_!-_!
Use this t)ature to select
compression
that of the front speakers.
whi]e ]istening
source component
•
image.
LCD monitors
0 to 160 ms
I ms
and synchronize
This may be necessary
or projectors.
when
_/J
Maximum
volume
!_;_;:-:;UOLo
•
Use this t_ature to set the muxinmm
feature
volume level. This
is usefld to avoid the unexpected
the volume
nmge becomes
H)H[:,H.."_5_;7
Use this feature to select the component to play back
HDMI audio signals.
loud sound by
mistake. For example, the original volume
to -80 dB. However. when "MAX VOL."
HDMI set
range is +16 dB
is set to -5 dB,
-5 dB 1o -80 dB.
H>HDHI
Control
range:
+16 dB,
Control
step: 5 dB
_laLh
+10 dB to -30 dB
SET
SUPPORT RUDIOi
1 500_4D HENU
_ENTER]!Retur
The "MAX
VOL,"
selling
Forexample,
VOL,"
is set to
selling
lakes priority
over Ihe "[nitial
il'INITVOL"issetto
30 dB, the voltlille
20dB
Volmne"
red'MAX
Icsel is autonlaticllly
Support audio
Use
audio
Initial
Use
INs
volume
this
unit
.."_-T=(q_-.."[..=
feature
to set the volume
is turned
on.
Choices:
Control
iH
Of[.
step:
The "MAX
MUTE,
-8(1
level
dB to +16
when
the power
of
selling
this fe_ture
signals
connected
unit.
to select
on this
whether
unit
to the HDMI
to play
or on another
OUT
jack
hack
HDMI
on the rear
HDMI
component
panel
of this
dB
1 dB
VOL"
S='_LiCiO
set to
you turn olk the I?m_er ol {l/is unit next time
30 dB when
n
lakes priori D oveJ
the "[NIT.VOL
E,=._ ...i i.4 __--:7
F.¢-=
....-T= =. =
Plays back HI)MI audio signals on Ihis unil The
HDM[ audio signals inpul al Ihe HDM[ input
jacks of this unit _u_ not output to Ihe HDM[
conlponenl con necled Io Ihe HDM[ OUT jack on
the _ll ¸ panel of this unit¸
()i3h_:=F
Pla2s hick HDMI
audio signals on anolhel
HDM[
jack¸
connecle<l to tile HDM[
"
selling,
• This unit IJ msmils
c_mlponent
audio
and video signals
input
O[ !T
at die HDMI
inpu[jacks
Io tile HI)M] oul iack only when this unit is turned
on even ii ¸_'SUPPORT
AUDIO"
is set [o "O_her",
• Available audio/video
signals depend on Ihe specification
of _hc
cOilllCCtt_ vidco illol_i[or Rel_?l" t(> the instltlCtiOl_ maRtlaJ of
cach
collnc42tcd
Colllpon_n[
|
67 En
For HDMI
Use this menu to reassign
decoder
mode or rename
the input jacks,
select
jacks
1 and
2
the
the input source.
Choices:
(1) DVD, DTV/CBL,
V-AUX,
DVR
(2) DVD, DTV/CBL V-AUX,DVR
- MRHURLSETUP
2 IHPUT MEHU
÷ R>INPUT RSSISNMENT
B)!HPUT REHAME
C)VOLUMETRIM
[:,)[:,ECO[:,ERMO[:,E
E)MULT_ [:H SET
R) IHPLIT RSSIGHMEHT
HDM! IN
+ [IN1]=_DVD
( br)D
>
IN2_-•-DTV/CBL
( bTr,I"CBL >
ENTER): Entep
•
Input assignment
i:i) 1 HPUT _SS i 6NHE)-4T
Use this t_ature to assign the input jacks according to the
component to be used ff the initial settings of this unit do
not correspond to your needs. Change the R)llowing
parameters to reassign the respective jacks and eft_ctively
connect more components.
Once the input jacks are reassigned, you can select the
corresponding component by using @INPUT <1 / C> (or
the input selector buttons (@)).
For COAXIAL
('hoices:
INPUT
jack
(1) CD. MD/CD-R,
INPUT
2 !PJPVYrJQ!LL
..................................
B>!NF'HTRENRME
hub
-> DUE:,
[_]'[_]:Position
1
DVD, DTV/CBL,
V=AUX, DVR
2
•
Input rename
B)iHPUT RE#-#_HE
Use this feature to change the name of the input source
that appears in the OSD and in the front panel display.
1
Press one of the input selector buttons (@)
or {$MULTI
CH IN to select the input
source you want to change the name of•
MENU
A) IHPLIT ASS!SHMEHT
CORXIRL
IN
÷ ( _ ;......
_aD/CD _
DUD
DUD
TUNER
)
or.....
For OPTICAL INPUT jacks 2 and 3
OPT._:CgL .."_-H
(2)
0PT]:C.:qL IH (S)
2
Choices: (2) CD, MD/CD-R, DVD, DTWCBL,
V=AUX, DVR
(3) CD, MD/CD-R, DVD, DTV/CBL,
V-AUX, DVR
3
2
!NPUT
HENU
R>INPU
RbaI aNHENT
OPTICRL
IH
÷ <2; ......
[:,T[b CBL
<DTU* CBL >
'3, .....
[:D
C[:,
>
Press @AMP and then press @ <1 / L> on the
remote control to place the .... (underscore)
under the space or the character you want to
edit,
Press @_ / V to select the character you
want to use and then press @ <1 / _- to move
to the next space•
• You can use tlp to 8 ch iracters
• Press
@_7 Io change
or press @A
_o go in the reverse
A to Z, a space,
*,
_l_)ll
C[IIIII()[
68
En
Se]ecI
a
speci]_c
ilem
lllOl'e
Ihall
ollce
, +, e[c)
l_)r elch
the characler
0 to 9, a space,
input
in die l_)llowing
orde_
order:
a to z, a space,
symbols
(#,
_/J
4
Repeat steps 1 through 3 to rename each
input source.
5
Press @ENTER
RENAME".
•
Volume
trim
toexit from "INPUT
C)IjOLLJHE !-Ri_
Use this fealure to a_ust the output v_ume of each
source. This is useful if you want to balance the level of
ead_ input source to avoid sudden changes in volmne
when switching between input sources.
Choices: CD, MD/CD-R, TUNER_ DVD,
DTV/CBL V-AUX, DVR, DOCK,
MULTI CH. XM, SIR[US
Control range: -6.0 to +6.0 dB
Control step: 1.0 dB
Initial setting: 0.0 dB
2 INPUT HENU
_laL5
DTS decoder prioritize setting
Choices: AUTO, DTS
• Select "AUTO"if you want this unit to automatically
detect input signal types and select the appropriate
input mode.
• Select "DTS" when you play back a DTS-CD.
•
Multi channel input setup
E[)MiJLi .! L:F 'z,_-d.i
2 DIFIUT >IEHU
E>MULTI CH SET
BGU.........
LOST
[4]'[_]!Seiect
Background Video
E!:GU
Use this t_ature to select the video source played in the
background of the sources inpul at the MULTI CH INPUT
jacks.
Choices: DVD. DTV/CBL V-AUX. DVR, LAST
C>HOLUHETRIH
DUD
B,_JB
......
0. OdB
Selec[
Se]ec[ed
_'LAST"
to set
video
SOtll'Ce
[his
uni[
[o atltOma[icaJ[y
as the background
vkleo
select
[h£ = last
SOtll_2{ =
[RETURN_:Exit
5%u cm only adjusl dke value lot DOCK
sladoned
in the Yamaha Universal
Dock
•
_hen 3our iPod is
connecled
to this uniL
Decoder mode [?)[;,EZ:O[;,EIR
NOD[!
2
INPUT
HENU
[:O[:'ECO[:'ER HOE:'E
C[:.....
bLeD
DTU, CBL
....
....
_4LITO
AUTO
_qLITO
Decoder select mode
Use this feature to designate the delimit decoder mode R)r
the input sources connected to the DIGITAL INPUT jacks
when you turn on the power of this unit.
Choices: AUTO, LAST
Select "AUTO" if you want this unit to automatically
detect the type of input signals and select the
appropriate decoder mode.
Select "LAST" if you want this unit to automatically
select the lasl decoder mode used the connected input
source.
|
69 En
Source feature OSD display time
O::5[)-2;OURI2:...E:
Use this menu lo adjust llle optional
-NAHUAL SETUP
30PTIOH
•
system
paramelers.
-NAHUAL SETUP
HEHLI
i 2
3 OPT!OH HEHLI
÷ R>b!SF'LA',_ SET
B>HEHOR_?
GLI_qRb
C)RU[!I 0 SELECT
[:'>PRR_qM,!H!
E>BLUETOOTHSET
÷ F>}]H R;qb!O SET
_z _IRIU_
_
_ >ET
_
[ ENTER]_Enter ¸
[ ENTER]_Enter ¸
Display settings
3 OPTION
2,2
i:i:_[::,.."_-!!;F'[...."-:i'-,'
SET
HENU
F4)D[ SPLR _' SET
÷
D!HMER .........
@
FL SCROLL- - - EOHT
OSD SHIFT ......
0
OS[:'-SOUREE- - - 30s
OS[:'-_HP ......
392
Dimmer
[_i_MER
Use this fealure
to a_[itlst the brighlness
of the front pro/el
Use this I%ature to set the amount of time to display the
XM Satellite Radio inlk3rmatiom SIRIUS Satellite Radio
inR_rmation or iPod menu in tl_e OSD after you psi-form a
certain ol}eration.
Choices: ON, 10s, 30s
• Select "ON" to display tl_e OSD unceasingly during an
operation.
• Select "Ills" to turn off the OSD Ill seconds after you
perfi_rm a certain operation.
• Select "30s" to turn off the OSD :;0 seconds after you
perform a certain operation.
Amplifier function
055[)--.i:iH
P
OSD display
time
Use this feature to set the amounl of lime to display the
status after you l)erform a certain operalion.
Choices: ON, los, 30S
• Selecl "ON" to display the OSD conslantly during an
operation.
• Select "Ills" to turn off the OSD Ill seconds alter you
pedbrm a certain operation.
• Select "3: (s) " to turn off the OSD 30 seconds after you
perform a certain operation.
display.
Control
range: -4 to 0
Control
step:
l
Press @ <1 to make the front panel display
dimmer.
Press @C> It) make the fi'onl panel display
brighter.
Front
panel
display
scroll
FL SCRL]L[
Use this lltature to set whether
to display
(such as a song title or a channel
display
in a continuous
alpha]lumeric
when"XM",
Select 'ONCE"
the operation
in a continuous
to display
aP,er scrolling,
the openltion
range: -5 (downward)
step:
Initial selling:
all characters
to adjust the vertical
Control
•
status in lhe
once.
posilion
Select "OFF"
to turn off the "MEMORY
GUARD"
feature.
of the OSD.
•
Select "ON"to
protect:
-
sound field progrmn parameters
all "SET MENU" items
-
all speaker
-
SCENE
levels
template
parameters
to +5 (upward)
1
When
0
Press @ <:I to lower
'MEMORY
and adjusl
the position
Press @C> to raise the position
En
status in the
manner.
0:!;[_ '.:SHiF]
Control
70
all characters once
selected as the
pane c sp _y by the lirsl 14 alphanmneric
Use this feature
B>MEMOR
'_ GURRD
N]FF
ON
or by the first 14
atter scrolling
DOCK
i
to display
fl'ont panel display
OSD shift
{ 30PTXOH _IENU
ONCE
Select "CONT'
characters
g
the information
nmne) in the £ront panel
[_]_[b]:Select
input source.
Choices: CONT.
flo
manner
characlers
SIRIUS
•
Memory guard £;,HE_<OR9 E...lJi:iR[;,
Use this feature to pre_ enl accidental changes to DSP
progrmn parameter values and other system settings.
Choices: OFF, ON
of the OSD.
of the OSD.
GUARD"
any o_her "SET
is set _o 'ON".
MENU"
ilems
you cannol
selecl
•
Audio
select
Use this featnre
select
setting
C;,_tC-i0
to designate
Bluetooth setting E )BLUErOOTH SET
SEL.ECT
the default
tbr the input sources
audio input jack
when you turn on the
3 OPT!ONMENU
power of this unit.
Choices: AUTO, LAST
E>BLUETOOTH
SET
STRRT PRIRING
3 OPTION
MENU
C>#JDI0
>AUTO
SELECT
[ ENTER ] ! Enter
UqST
Use this feature
Bluetooth
[4]=[hi:Select
t()
start pairing
adapter
your Bluelooth
component.
refer to _Pairing
Select "AUTO"
if you want this unit to automatically
detect the type of input signals
appropriate
and select
To ensure
select the last input mode used R_r the connected
source (see page 34).
initialization
O?PFiRi:iH= iNi
__ #EZ!#E r!E#!!............................
X40
1
Check
IFII
/ES
that
3
setdngs
once you
reverl
initialize
Io the pnwious
Ihe sound lield
conlponent
separately
initialize
individual
sound
program s
• You cannot
"MEMORY
inid dize any sound lield pix_gram
GUARD"
is set to "ON"
the Bluetooth
(example)
Select
the Bluetooth
adapter
list and then
enter
"0000"
on the Bluetooth
this unit completes
completed"
appears
1 the
detects
adapter,
in the
in the Bluetooth
the
pass
key
component.
the pairing
successfully
appears.
To cancel the pairing, press @RETURN
'START PAIRING"
parameters
a)pears
component
device
Once
paramelel
plogram
• You cannot
the Bluetooth
YAMAHA"
device list.
starting.
starts searching
Se rch n_...
If the Bluetooth
to read
before
pairing.
adapter
adapter,
"Pairing
auh!malically
to start
Bluetooth
the Bluetooth
"YBA-IO
Bluetooth
Select "NO" to cancel file parameter initialization and
retl_rn to the previous menu screen.
Select "YES" and press @ENTER to set all the sound
field parameters to the initial lactory settings.
all the instructions
Bhetootl
conpone/s.
video monitor.
2
is set R_r
You are recomn_ended
Press @ENTER
The connected
[4J,'[FJ_
Select
[ ENTER ] ! Return
• YOU cann()l
and your
a time linlit of 8 minutes
operation.
and IMly understand
input
Use this [_ature to set all the parmneters of the sound field
programs to the initial factory settings.
Choices: NO. YES
D>P_4R_¢I,
adapter
TM
on page 59.
security,
the pairing
if you want this unit to automatically
Parameter
with
For details about the pairing,
the Bluetooth
component"
Ymnaha
sold separately)
the
input mode.
Select "LAST"
•
Bluetooth
the connected
(such as YBA-10.
Io exil from
fiekl
4
groups
Press @RETURN
PAIRING".
when
• 11 Ihe connected
components,
• 11 a Bhle[ooth
TM
Blueloolh
to exit from "START
Bluetooth
adapter
"No_ l_mnd"
appears¸
adapter
Adapter"
camlot
is not connected
find
my Bhletoodl
[o tilts uniL "No
appears¸
|
71 En
XM Radio setting F>_.::H
i_:_L_'u_:_:i
(U.S.A. and Canada models only)
3 OPTION
F)XH
HENU
R£[:'_O
SET
:@1RNTENNR,-,95_
[ENTER_Retu_'r_
XM Radio antenna
:-::Hi:iNFEHN_
Use this feature to check the cun_nt reception level of the
XM Satellite Radio signals. For the best reception, orient
XM Mini-Tuner so that a value of 60% or more is
displayed here.
Display status: NONE, 0 to 100%
'NONE"
is displayed
iiXM
tllis unit. [n _his case, check
Mini-Tuner
Dock
Ihe amemla
connections
is nol connected
to
(see
page 46¸1¸
•
SIRIUS
Satellite
Radio setting
(U.S.A. and Canada
Use this l_atm'e to set the code
desired SIRIUS Satellite Radio
the Parenta] Lock" on page 54
3 OPTION
models only)
number t_r locking the
channels. Rel_r to "Setting
R)r details.
HENU
a >IRIU_
÷ PRRE_4TRL
SET
LOCK
SIRIUS Satellite Radio parental lock
Pq F:E2-4T;-%LOCK
Use this feature to set the code number for locking the
]
desired SIRIUS
S_tellite Radi( I cha reels. Rel_:rt )' Setti isI*
the Parental Lock" on page 54 t_r details.
72 En
[11addition
to controlling
and other malmfacmrers.
for each input source
this unil, the relnote
To control
control
can also operate
your TV or other components,
components
made by Yamaha
remote
control
code
(see page 75).
•
Controlling this unit
Press @AMP to control this unit.
AMP --
other audiovisual
you must set up the appropriate
•
Controlling a TV
Press@DTV/CBL to control yourTV. To control your
TV,you must set the appropriate remote control code fi}r
DTV/CBL (see page 75).
_;!i;i;!
"2 -
' J These buuons dways conU'ol {his unil,
*2 These but[ons control fills t_ni[ only when @AMP
is pressed¸
J These buuons dways conlrol yore" TV regardless of whelher
you press @DTV/CBL
or nol
TV POWER
Turns on ol off {he powm.
_/CH
Changes
1he channel
IIICI_2aS_S
OI ¸ {]t_cre_l_2s
_/
+_
VIIL +_
number¸
I]IC
TV INPUT
Changes
TV MUTE
Mules Ihe audio outpul
"2 These
N_ttons control
pressed¸
_)r
VO[UIll_
level¸
tile hlpul sou]ce
your TV only
detai Is, see [he "Digital
when
@DTV/CBL
TV/Cable
is
TV" cohmm
on
page 74
--'4;:
Y/!tl call con{Iol
lemole
control
more
than one TV by setting
the appropriate
code lor any hlput SOllrCe selectol
thal_ @D'I'V/OBL
highlighted
above(;l
selector btl[ toll
In such
and
a case,
2) when
you call control
buttons
other
the buttons
you press the input
source
73 En
|
•
Controlling other components
Press one of the input selector buttons (@) or A to C
buttons to control other coml×ments. You must set the
appropriate remote control code l_)reach input source in
advance (see page 75). The ff_llowing table shows tile
function of each conlrol button used to control other
[2_
H71
_ ....
components assigned to each input selector button. Be
advised that some buttolls may not correctly
operate the
[4F
[5>
000_
selected component.
H81
[?EIZIIN_B
-"4k
• The remote
conlrol
conlponents
has 13 modes
so that the remote
(inpul areasl
contlx)l
C_ll_
to colmol
up [O ] 3
opera[e
H91
difl _'mnt component_
• Whell
you
pr_'s_; olle of the optional
buttons
(A to CL you can control
without
changing
[1]
tile input source
control
area
component
of this unit
Powel * 1
AV POWER
Po'a el * l
Power '12
Power * l
Power ,i I
Power * l
Title
[21 TITLE
[31
component
thedesimd
Band
PRESET/CH
Up
VCR channel up
Presel up ( 1-8)/
Tuning up
Up
VCR channel
PRESETICHV
Down
Preset down
( 1-8}/Tuning
Down
do'a
I1
dowi
1
Presel
A-E/CAT
<1
Left
(A-E)
A-E/CAT [2>
Righl
Righl
Preset up
A-El
ENTER
Enter
Enler
Hokl
[4]
RETURN
Return
Relurn
Memory
[5]
REC
Disc skip
(player)
Rec (recorder/
Rec
Rec *2
[2>
Play
Play
PDy _2
<1<I
Selrch
backw lid
Searchblckwtrd
Selrch lorwald
Patlge
lID
j
dowll
Left
Disc skip
Rec
PDy
PDy
Plly
Seuchbackwu'd
*2
SeaJcbbackwlrd
Seucbbackwlrd
Searcbbackward
Se ilcb Iolward
Search Iot_'a rd
,i2
Selrcb forward
Se u'ch fol_ald
Sealcb forw lid
Pallse
Pause *2
Pause
Pause
PtUSe
Skip backv,'ard
Skip backw lid
Skip backw u'd
Audio progr un
do'an
Skip lorwtrd
Skip forwlrd
Skip for'aard
Audio program
up
St()[)
Slop
Numeric buttons
Numeric bullons
I_
Skip backward
Skip b ickw u'd
Skip b tckuald
*2
!2:q2M
Skip lorward
Skip lolwaJd
Skip folwlrd
_2
Information
Stop
Slop
St()[) *2
Slop
[0]
1-9,0,+10
Numeric butlons
Numeric buttons
Numeric buttons
Numeric
[7]
MENU
Menu
[8]
DISPLAY
Display
Display
Display
Display
Dispia?,
Displ ty
Displ ty
[9]
ENT
Title/hldex
Enter
Enler
Cb tpielTTime
hldex
bldex
Enlel
TI
s t
_2 These
74 En
tt
bretons
s
te
_t
OlX tale
Menu
al only
_our
buttons
DVI)
when
the odginal
recorder
only
remole
when
Search mode
control
}ou
Presel stllions
ll-s/
set
supplied
d_e ippropriale
x_itl/
the
remo_e
conlponenl
control
Ires a POWER
code
lot
DVR
button
(see
page
75)
You can control
other components
by setting
While pressing and holding one of the input
selector buttons (@) on the remote control to
the
select the input area you want to set up,
press @AV POWER for more than 3
seconds.
appropriate
]'emote control codes. For a complete list of
available remote control codes, ret)r to "List of remote
conlrol
codes"
at the end of this manual.
[_
Remote control code default settings
xM
_lRlUS
©©
MD/C_.R
P,e s,o,
DVR
CD
CD
YAMAHA
5013
MD/€'D R
CD_R
YAMAHA
5001
TUNER
TUNER
YAMAHA
5007
DVI)
DVD
YAMAHA
2000
DTV/C'BL
V-AUX
TUNER
YAMAHA
5(H I
DVR
DVR
YAMAHA
2(M 1
XM
TUNER
YAMAHA
5009
SIRIUS
TUNER
YAMAHA
5017
TUNER
YAMAHA
5012
A
oow °
TUNER
©
©
While holding
2
[_
©
seconds
down
Press the numeric buttons (0 to 9) (_)) to
enter the four-digit remote control code for
the component to be used.
When the setting succeeds, "Rem_teSetup OK"
appears; however, when it does not, "RemoleSetup
NG" appems in the ti"ont panel display.
• II the" lii_lnLl_ct[lrer
of you r component
has more than one cod_'.
try each o_ diem tmtil you find the con'ect/me
B
TUNER
YAMAHA
5009
• II you do not press any buttons
setup
C
TUNER
YAMAHA
Y/m may rlOl be abk- to opel'ale
5r2unaha remo(e
IJy setting
control
anotheJ
yotll- Yamaha
code is pJesel
Yamaha
remole
5017
corn pol_enl
as listed above
conlJol
process
is canceled.
within
30 seconds
II this happel=s,
repeat
in step 2, the
the setup
procedme
even i J"a
In this case.
code
|
75 En
This unil has additiona] menus that are displayed in the
front panel display. The advanced setup nlenu offers
additional operations to adjust and customize the way this
unit operates. Change the initial settings (indicated in bold
under each parameter) to reflect the needs of your
listening environment.
•
Speaker impedance
!!;P i_F:'=
(U.S.A. and Canada models
only)
Use this feature to set lhe speaker impedance of this unit
so that it matches that of your speakers.
Choices: 8D MIN, 6D MIN
• Select "8-Q MIN" 1o set lhe speaker impedance to 8 ft.
• Select "6Q MIN" to set the speaker impedance to 6 _2.
• Only_)STANDBY/ON(_)PROGRAM </L>,and
_STRAIGHT are ell_ctive while you a=>Llsingthe advanc_.d
FIont (A ol B)
getup menu
• No othel operaUons
ldv
Hlced
setup
call be made
_hile
you are tlsing the
8D MIN
mol_U
The impedance
of each
speake] rnus{ be 8 -Q o]
higher
Ccnte]
• The advanced setup menu isonly available in die h'ont pmel
SuiTouild
display
Floi]t
1
Press QSTANDBY/ON
{A ol B)
to set this unit to the
Thein_pedanceofeach
6D_MIN
standby mode.
(2"nlel
speakel
must be 6 -Q o]
higher
SLII 10UnJ
2
Press and hold QTONE
CONTROL
then press @STANDBY/ON
unit.
and
to turn on this
This unit turns on. and the adwmced setup menu
appears in the fYonlp_mel display.
3
Press _)PROGRAM
<I/D
to select the
parameter you want to adjust,
The name of the selected parameter appears in lhe
fl'ont panel display.
4
Press @STRAIGHT
Press QSTANDBY/ON
mdt
76 En
you
made
are
rellected
Satellite Radio Parental Lock I_ature to the initial factory
setting.
Choices: RESET. CANCEL
• Select "RESET" to set the code number to the initial
•
factory setting.
Selecl "CANCEL" 1o set lhe code number to lhe initia]
fl_ctory setting.
Even
to confirm your
selection and set this unit to the standby
mode,
The seltil_gs
SIRIUS Satellite
Radio Parental
Lock
code number reset
!!;'.:_RF:'._:E
Use this I_ature to set the code number IE_rthe SIRIUS
repeatedly to change
the selected parameter setting,
5
•
nex[
time
you
ttn'n
on this
il you sel 'SSR
[he locked channels
Lock code mu_aber
PIN"
1o 'RESET".
The initial
is "0000"
lactory
[l/is unh does
setling
not u nlock
ol¸lhe Parenlal
•
Tuner frequency step TLi
(Asia and General models only)
Use this t_atureto set the tuner l_equency step according
to the frequencyspacing in your area.
Choices: AM 10/FM100, AMg/FMS0
Select "AM 1(!/FM1(!0" for North, Cen{raland South
America.
Select "AM9/FM50" lk)rall other areas.
•
Initializing
iHiT=
Use this t_a{llre to reset all the lmrameters
of this unit to
the initial lactory settings (see page 87).
Choices: OANOEL
RESET
Select "CANCEL"
unit.
not m reset any parameters
Select "RESET"
• This setting
completely
hlchlding
the "SET
advanced
selup
• The initial
Ihis unil
to reset the parameters
of this unit.
resets all the p irameters
MENU"
paJameters.
nlenu paranlelm
i_lctory setdngs
of this
However,
of this unit
die
s will nol be initialized
me aclivated
next tinle you Iurn on
I
77 En
Rellzr to the table below when this unit does 11o1fimction properly. If the problem you are experiencing is not listed below
or if the instruction below does not help, turn off this unit, disconnect the power cable, and contact the nearest authorized
Yamaha dealer or service center.
•
General
This unit fails to turn
on or enters
the
standby
mode soon
after the power is
turned on.
The pox_ er cable is nol connecled
plug is nol comple[ely
Jllsell_l
Tile speaker impedance
inc°_l_cL
The pro_ecfion
or tile
sel{ing is
ci_vui{Jy I_as been
aCl Jval_d
C onnecl
Sel file speaker impedance
Io ma[ch
yore ¸ speakers
Make sure Illal all speaker wiJ_ conneclions
on dlis
Lil]i_ and
oll all Sl_akel'_; a£_ -,eCUI_ a[id
llla[
_lle wile
I_/I¸ each coilllcclioll d(_s 1lot [ouch allylhiilg o[]_el ¸
llltlll
No sound.
Ihe power cable firmly.
jl _, I_Sp_clive
Sel fllis unil _o Ille slandby nl_le, disconnecl
power cable, piug i_ back in after 30 seconds
use il normally¸
Incorlec[
Connecl
illpLll OI¸ oulpu_ cable
No applopria_e
t_2en
Sel
llle
Audio inplll jack selec_ Ilas
ltle cables properly¸
cab]cs
may
11
collneclJoil
Tills unil has becll e×posed Io a s{rong
ex[ernal eieclric shock (such as lighlning
oi¸ slrong slalic electlicily)
COIHleCliOll_.
2I
I_[_ de
Sel an appropdale
If file problenl
[lle
and li_en
persists,
i 3_ 18
[_2cliv_
Audio inpm ¸jack selec_
34
Audio inpuLjack seJect is sel _o _HDMF'.
_COAX/OprF ' Or _'ANALOG'"
£e_ Audio inpuLjack
Audi/! i[Ipl_ jack select is sel to
"%NALOG'" while playing a source
encoded in Doiby Digilal or DTS
Se_ Audio inpu_ jack select Io "AUTO"
"_COAX/OPT"
No appropriale
selected
Selec_ an appropriale inpul source wi_h
_INPUT
<l/C> (ol ¸ file inpu_ _elec_/_l¸ I_u_!=lslO}/
33
_pt2ake_ coilllecii/!l_s a£e _1ol_2cu re
_t2C UI't2 I]]e
I l
Tile l_on_ speakers _o be used Ilave nol
been selecled properly
Selecl
_]le
]_1_[1
V(!IUII_C
inpul somce
iS IUl lied
has i_een
dowI1
]]le sound is nlu_d
select Io _AUTO"
_Jle
or
34
COIIIleC[JOIIS
d_e I_onl speakers
lip
34
wifll QSPEAKERS.
33
voIun_e
Press _}MUTE
or _VOLUME
+/- Io resume audio
35
ou_pul and filen a_]jusl file volume
Signals fills uni_ cannol reproduce are
t_2Jllg Jnpu[ _'oil] a SOUrCe com]_oIl_llL
S_Ici_as a CD ROM
Play a source whose signals can be wpl_d LICC_Iby 1his
t[llii
Tile HDMI componenls
connected _o Ihis
uni_ do no_ supporl file HDCP copy
plX)lecii/!l_ SlaIlda£_ls.
Conn_cl HDMI conlponenls
copy p_x)[ec[ion slandard_
-SUPPO[_F
Set "SUPPORT
AUDIO"
is set [o _t)_i_eJ ¸'' and
_HDM I" audio signals are nol i_ing
piayed back on _i/is ul_i_
78 En
_IANUAL
AUDIO"
S I_[UP ".
Ihal supporl
_o _RX V463"
_he HDCP
14
in
67
rligri,'TFJtqigil';l_la
The sound
goes off.
suddenly
Ttle pmlection
cilcuill
y Ilas beea
t_cc_lusc of a s]loll cifctiil,
e[c
Check Ibal tile impedance
activaled
selling is c<n rcct
wires a_ nol touching
()[lICE ¸ all(I
ttllil
21
Check Ibal the speaker
Ibcll
Iulll
Ibis
back
oll
The sleep Iimm ¸ has turned olt ¸Ibis uniL
Turn on this uniL and pkly Ihe source again¸
The sound is muled
P1_ss _MUTE
or _VOLUME
each
+/- to resume
audio
35
output¸
Sound
is heard from
the speaker
on one
side only.
Only the center
speaker outputs
substantial
sound,
Illc/>l reel cable connections¸
Comlect IIle cables prop_ly
the cables may be del_ctive
Incol recl sdtings
At!just the "SP LEVEL"
in "SP LEVEL".
Wben piffling a monaural source wilh a
CINEMA DSP p_ogram, tl_e source signal
is diJected _o Ihe cenlel channel and tile
h'olI[
and
StlllOuIld
speakers
ouq_ul
II'lhe problem
persisl_,
_etlings
11 - 1g
41
This is nol mallkmclion.
eflccl
soullds
NO sound
is heard
from the center
"CENTLR SP" in "SPEAKER
Io "NONE".
SET'
is sel
Set ' CEN FER SP" to "SMI."
o= "LRG"
63
speaker.
Some sound rich
SOUIIdS
No sound
is heard
from the surround
hoIII
[JIc
ploglanls
CCillel
do not outpul
"Fly anothel
sound field proglam
38
S[}eakCl
"SUI,L L/R SP" m "SPEAKER
sel _o "NONE"
SET" i_
Set _ SLIF: IJR SP" to 'SML" ol "LI_:(-I"
64
qhis unil is in Hie " S'I [_.AI(']HT" mode
PJe_s _STRAIGHT
39
and a monaulal
back
disapwm's
speakers.
No sound from the
center, surround
sotlrce is being played
"FRON_I B" in 'SPEAKER
"ZONE B"
SEmi" is sol to
so that "STRAIGHT"
honl Ille lionl panH display
Set _ FRONT
B" m "FRONT _'
63
speakers when the
FRONT B speakers
are activated.
No sound
is heard
from the subwoofer,
"Lt [/BASS
OIYI" in "SPEAKEP.
SLT'
is set to "t P.N F" _tlen a Dolby I)igiml
Sel "LFE/BASS
OU-V" to "SWFR"
o_ _B( )TH'"
64
Set "KFE/BASS
OUF'
ol 'BOTH"
64
or
DTS signal is being pklyed
"I [ E/BASS OUT" in "SPEAKER
SET"
is sel to "SWFR" _n 'FP.NF" when a
2 channel
']be source
soulce
is being played
does nol COIllaiJl
low flvqtlency
to "SWFR"
'Ibis is Ilol mallklnclioll
bass signals
|
79 En
Dolby Digital or DTS
sources cannot be
Tile cOllllCC Icd COlllpollen
played. (Dolby Digital
or DTS indicator in
signals
the front panel
display does not light
Audio inpu[ j_ck sdecl
- kNALOG"
oulpul
Dolby
Digital
[ is IlO[ _e[ [o
oi DTS
digilal
is sel Io
Make
all approprial_
iiisil ucliol_s
setting
Ik>llox_ ing
Ihe Ol',el ati ng
i'tl£ youi ¸ compol]_ill
ScI Audio mpu[ i_ck sdecl
Io "AU-IO"
_4
up.)
A humming
heard,
sound
is
In_onect
able
_onneclion_.
Lonne t file audi_, cables Ihmiy II die pwblem
per_lsl_, Hie _ _bk's rn_y I_' d_.i_ctiw.
The volume
level
cannot be increased,
or the sound is
distorted.
You ale al[elll p[iilg {tl s_'l [h_=VOILIIII_level
high_'r tllan file maximum _ohlme lewq
Adlusl "MAX VOL*' sellill_
The _ ompon_'nl conne_led Io the AUDIO
OUT (REC) jacks ol tl/is unil is lulncd
of£
Ttun on Ih_"pox_ <.l ol Ih_"component
The sound
effect
cannot be recorded.
It is not posq bk' [o lecord file <,ound ctl_ct
_ilh a le_ol'ding conlponenl
This is nol mall un_ lion
A source
cannot
be
recorded by an
analog component
connected to the
The somcv component is not connected Io
fl_" analog AUDIO IN lacks of fl_is unil
L'onnec I the" source componenl
IN j:_cks
"MEMORY
Set "MEMORY
AUDIO
jacks.
67
to Ih_' an;dog AUDIO
14, 18
OUT (REC)
The sound
field
parameters
and some
other settings
of this
unit cannot be
MENU"
GUARD"
in "OPTION
GUARD"
to "ott"
70
is sel Io "'ON".
changed.
This unit does not
operate
properly,
The inlemal mi_mcompulc_
has been
hozcn by m_ ex a'u]al ek'cuic shock (sud_
;_s lightning ol excessive slalic electlici_y }
Ill by a po_er supply _ilh I//_ _//llage
I)is_onnecl
IIw po_'l caN_. horn Ih_"A( _all outlet
_md then plug it in again al_vr aboul 3(I seconds
No sound is heard
from the connected
HDMI component.
The HDMI component does hill ac_cpl flit
mul[i chann_q audio signals
Conw.rl tile multi ci_;mnel audio sigllal_ Io file
2 d_annd audio sign_ds al the souice compom, nl such
_s a DVD player
"CHECK
SP WIRES"
appears in the front
panel display.
Speak_'l cahk's arc sholl ci_ uiled.
Make su=e all sp_'ake= cables
There is noise
interference
from
digital or radio
frequency
equipment.
This unit is Ioo close to Hie digilal oi
high hequency eqtupment
Move thi _,unil fllithel a_ay
The picture
disturbed,
The video soulcv uses _cl lmbk'd ol
encoded signals t_, pw_*nl dubbing
This in not nlalhm_lion
Tile inlcm_d a'mpemlure is too I_igh _md
d_e ow.d=ea pwtecliou
ci_ uil_y Ms been
_ dvaled
Wait _l_otlt I hour l_l II_is unil to _ool do_n
mm it b_ck on
is
This unit suddenly
enters the standby
mode.
80
En
aw conne
led oueclly
flora such uquipmunl
and Ihcn
II
ri_ri,'IFJ_iTi'/;jm
•
Tuner
FM stereo
noisy.
reception
is
The" _ haJacl_Jiisli_
t_roadcasl_
whell
s ol
II_e Ir all Slllill_r
Ihc _111
_fllla
IM
SICl_JO
Ch_ck
Ihc
_£ll{el]ll_l
2O
collfle_'[ioils
may c_luse [hi _, i)i(>hlem
is Ioo
lal ¸ away
Or
illl_uI 1_ pOOl¸¸
r W using a high quality
alllellfla
directional
FM
Use Ihe manual luning melllod
FM
There
is distortion,
and
clear reception cannot
be obtained even with a
Adiust the anl_nna position
mulli palh inlerl_rence
Io eliminale
The signul is Ioo v, elk
Us_' a high qtmlil> diEectional
good FM antenna.
The desired
station
cannot be tuned into
with the automatic
tuning
Use Ihe manual
FM anwnn;_
lunin_ inelh_d
43
method.
Previously preset
stations
can no longer
be tuned into.
This unit has t_'en disconnected
long perh>d
The desired
station
cannot
be tuned into
with the automatic
The _ignal is weak or Ihe anl_nna
conneclions are Ioosc.
tuning
AM
l'herc is mulli padl inlel [k.runce
43
lk>ra
Set presel stations
Tighten {he AM loop antenna conneclions
and olicnl il R>J¸ Ihe be_,l reccplion
US_'
method.
Ih_? nl[Hlll[ll
[[Iklillgttlethod
There are continuous
crackling and hissing
noises,
Noiso call lesult llolll li_]lt tlitl g,
I]tan escenl lamps, molo= s. Ihe_moslats
and ethel elech'ical equipmenl
Use an outdo?or _111
t_:lllla alld a ground wire
This will help somewhal, bul il is dirlicull Io
eliminate all noise
There are buzzing
whining noises.
A TV _et is being used nearby
Move
and
44
43
this unil away h<>m tile "rv set.
|
81 En
I'lri'i'_ ;'i_iTilTJ
•
i t mi
XM Satellite Radio
If an operation takes longer than usual or an error occurs, one of the following messages may appear in the front panel
display. In this case, read the cause and R)llow lhe correslxmding remedies.
{..i{-{>._.._}:_.
?:_q
i U['i[:.}_'.
The XM Mini I'tmel is nol inslllled in Ihe
XM Mini "['unel Dock oi Ihe XM
Mill] [tillEr Dock is IIo_ connected Io {his
Conlh m {lie XM Mini Tunel is hill) sealed in the
dock and check 1he XM Mini Tuner Dock cable is
connecled [o Ibis ullil.
46
Tile XIVIanlelli? I is llol COllllecled kl li_e
XM Mini Ttmel Dock ol Ihe XM anknna
Check (ilal lile XM anlelllla iS secul'el_ conllecled Itl
Ihe XM Mini Tuner l)_vk ind check Ihe amenn I
46
cable Ilas t_'colne damaged,
cable 1oi damage.
cable is damaged
L_:{-{ U_{_i..i T{-{
You ma 3 lie allempling
Io Kme Ill an XM
challll_ 1 Ihal is blocked ol Ih;l[ }ou c_lnn(l_
lecei_e wfih _oul XM subscLiplRm
pack ig_
Consull lile lalesl cllannd guide al
h{{p://\_ \_ w xnll I(Jio 12onl/(US lesillenlsl and
h(qx//www xmradio ca/(Canadian
residenls) l/!l II_e
CUIlell{ ]iSI Ol ch IllneJ>, For hll_)ll/la[ion Ol1lec_ivhlg
lilts channel _]si( hllp://www xnlladio corn/[US
resid_ n[s[ and hllp:/iwwwxlllladioca/(Canadian
lesidenls) oi conlacl XM Salellile Radio al
I 800 967 2346 (US resklenls) and I 877 GET
XMSR (Clnadian
lesidenls)
NO
The XM Mini Tunel is nob eceix hl_1he.
XM salelli_e signal Son_e_iling nlay be
blockin_ tile XM anlenna's view of tile
saleililes ol¸ Ihe _ll_leil_la is ilol proper]} ¸¸
aimed¸
Cl_eck k/I anlen na obsh uclions and leposilion file
XM anlenna Io gel belier signal recep0on ! Ise Ihe
"XM P.AI)IO SET' screen in the vk[eo monitor _
check Ihe aille_l na receplio_l level _ee i_lslr tlcliolls
supplied witll Ihe XM Mini Tuner and Dock for
unfl
..i-_c._...r... i-_4 ? _.i _ "4i-_
......,: :, =:._
':::TffgH_2_i
alllenna
The XM
plogral/i
salei_ile
occm ¸in
Ui-_ i-{i.i_
L_i-{ {.i_{_i..i_7__ L.i__:i.__
ill l ol lllal]
The XM channel }OU selected
eur_enl ly N oadcasting.
Check
The selected cllannel
is Ilol
is not available
illoni[oJ"
back
[o
eileck
a{ a [flel
Ihe
lim_]
aillellna
J_2cep[ion
ill [h_ mean
I_vel
{bile.
gOec{
a nollleJ" c[l_ln ilel
The
XM's signal Iol an exlellded
No allisl naille ol song li(le is a_ailable
li_is seleclion
video
Ior
Consult Ille latest channel guide at
h(tp://www xnlradio corn/(1 !S residenls) and
ilt_p:/Iwwwxnlradioca/!Canadian
residents [ lk/i¸ lile
CUrlell[
liSI
o_challl_eis
Fol ¸ cases
ola
ile\\
XM
Mini Tuner or a XM Mini TtllleJ ¸ tilat ilas nol i_ceived
XM's signal lk!ran ex{ended period, allow Ihe XM
Mini Tuner I_/receive Ihe XM salelliie signal iol ¸ at
least 5 minules anti tllen _Jy Io selecl lile cllannei
again¸
No aclion lequireJ
47
46.72
oll.
Tllis message stl/!tllll disappcal in a ii:w seconds in
good signal conditions¸ If you see tills message often,
reposilion Iile XM anlenna _o gel belter signal
i_ception
Use tile "XM RADIO SET" screen in tile
nol received
period
82 En
{ion
Mini I'lulel is acquhing audio ol
in_)rl/la0ol_ fl (1_1_the am
signal. This message can also
weak XM signal conditions¸ Note
Iha[
lllis
unil
May
IIot
J_2spond [o sOlll¢?
ope_alions wi_ile tills message is
clisplayed
ehalinel lllay Imve been reassigned Io a
dil_crunl cl_annel numbel T/lis nlessage
may occur ini(ially wilh a nc\'_ XM
Mini Tuner ol a XM Mini limer thai has
..........
ills{alia
P.eplace Ihe XM anlenlm il Ille
72
!!;U[!;
[.*-P[?i:_TE[?
_Ihe subscriplk/ll
.."Hi..i:q
L [[[3
The
HOt.
1"he opel
_.._
_. ].._:2:_][ e
selecled
Ilion
hll_umation
channel
)ou
is cuJlenfl)
nlad_
is updated.
oul
ol
Sdecl
anolher
channel
52
is nol a_aihbk
-m
|
83 En
IIff'_rl_t=J'_lillll'Jtllt
E-4 ; HOi'!!;'r'
Tunl
off
noisy
condilio[lels
optimizer
_ leclric
Ol ¸ i]lo,ve
equipmenl
[ht3m
away
like
[]om
air
[he
micl opholle
_[--_, ="H{) _ _ _._:
The optimizer miclophone was unplugged
during [he "AUTO SETUP" procedule
Connect Ihe supplied oplimizei micJophone
to OPTIMIZER
MIC ¸jack _ll the front
panel
24
c---'
The optm_izer
Check the microphone
24
; i'[0
'-:ii t_'_{_24{..
microphone
does not detect
setting¸
It3_,l I(ll]eS
Check [hc spt2akel ¸¢ollnec[iol]s
plac_!l]lell[
_[--;'-;; U'j[Tr}IR i._?g'{_"_C_[i
The 'AUTO SI TUP" procedure
Callcelled due lo user aclivily
_!--9 ; i _'{'['[!i_:_'{.."-:[[.._!R_I_0_I_
An inlernal
84 sn
error occuned
was
and
10, II,
24
Run "AUTO
SETUP"
again
24
P.un "AUTO
SETUP"
again¸
24
rZi/_,'It:'J_igigiJ_la
ReadBisl the sl>eak_'r installalion so Ihat all
speakers al_ sel in Iocalions with similar
ColldiliOllS
Check (he speaker conncclions
Use _peakcrs
• II the "ERROR"
• If a warning
ol "WARN[NG"
message
• If all el'rOl" illeSsa_e
•
screens
"'W_ 1", %V-2".
_E-_Y'/iccttrs
appears,
or "W_3"
lepealed]y_
cl_eck the cause
appears,
please
corrections
col_lacl
ol d_e problenl,
are made,
a qttalified
of sinliklr qualily
Ihen run "AUTO
SETUP"
again
but they may not be optinlaL
Vanlaha
service
center¸
iPod
]R _ase oJ a trail missioR
(see
error
'&ilhotK a sulltls message
appeal'illg
ill the lront
panel
md
ill the OSD
check
[he coRneclioll
Io '_our iPod
page 19)
This uni[ is in Ihe middle of _ecognizing
(he coilllec[ioll wilh yotlr iPod
This uni[ is in Ihe nliddle of acquin ng
s(lil_ IisIs floll] youl ¸ iPod
,-. ........
a
..........
i..ur ir ii:u_. L• _!g'}" Ur
There is a problem wifil Ihe signal palh
II olll yotll ¸ iPod [{iIbis iIili[
WuIn
O(T
(his
TI} reselling
Ui7k i7Oi=JKi -. P Z+(J
- F'O ('1 70Kii"i@ C.+_.(?CJ
3he iP<xl being used is nol suppotled
this uniL
"L._Z_i--__ ._
illd
reCOlllleCl
)our
Onl'_ iPod (Click
Ill{? Yalllah
i iPod
19
(el minal ol Ibis trail
iPod
and Wheeh
iPod nano+ and iPod
ll_iIli are suppor_.!d
Youl iPod is prollerl.\ slalioned in a
Yamaha iPod universal dock (YDS 10,
sokl sepalalely)
connecled
[_fll_illal
tll]il,
o[ ¸ [Ills
_x2I_e_n your iP_l
U i_i_iL7i1_
b}
Illlil
uni_el sal dock (o Ihe DOCK
alia
(o [he DOCK
[ho
COl]R_2C[iOI1
a_l_l _l_isu_li_ i_
iP/_ uni_er_ll dock/YDS
10, s_l_
S_l_a_a_el_ c/_n_lecIed _o _l_e D_C_K
d_ck !Y_S 10, s_l_ sep_l_'_ely) c_nnec_
D_CIK le_l_i n_l _!f Illi_ uni_
This _mi_ c_m_l_i_li_k__back _l_ so_l_s
Check I1_ _he songs c_r_lll_
¢u_r_!_lI1_,_s_lr_!d _1_1voli_" iPo_k
_1_'_!
_l_t_lbl_,
Store
some
o(hel
pkl)
abl{?
mtlsic
_i__h_
|
_s_o_ed on y_!_" iPo_
(lies
oil
)Otlf
iPod.
85
En
\
The
Bluel/!_qh
_lclapler
and file Bluel//ofl_
c//nlpi_nenlisinthenliddleoieg_ll)li_hing
_]]_ cOIIlleC[j_HL
L_IOFF:"I i_=_.i_u2i
The I)aring i', compleled
_...:_'"_-"_,....-:.'-"
Li.-:.=._'-'"j
The I)_l'i=lg i_ c_nceled
_!;_- (i.C_-ii.'i_G_._?_:._
The conIleclion
\
\
\
belween file Y_lmaha
Bluet/_/!lh _ld_lp[_r (s_Icll _s YBA ](I, _old
sep_lralely) and file Bluel/!oth c//nlPonen[
i_ e_,[_lblished
[_ :._ G OFii-i:_=C._.:_=('j
Tile Bluel///!_ll compone_l i_ discolmec_ed
fi'_] Ih_ Y_lnl_l]_i B]U_loolh _td_l])l_t_(SUch
_lsYBA I0. _old _eparalely)
_'qO i!;]- ilid.EiF'_._=F"
The Bluel/*ofll Iihpl_l
_l_e DOCK
86 En
lernlin_l]
is nol c//nnecled
Ill
C_mnecl 113eYin3ah_l Bluelo/llh
YBA
\
\
id_lptel (such ;is
10. s/)ld sell_l_llel,, I I/! file DOCK
leinlinaL
\
\
\
\
19
TQ,
Si'llill_
Ll>,ill_
g\k_ll
•
i_ [h_
]ell]ole
Coll_lOl
c_)ll'cclly
Set.
there
(ILl 110{
i espol]d
_o
al'c
[he
Some
i'elllOIC
codc
alIOI]lCI"
"Lisl
Ill
code
lenl_lle
[OJ IhC
c//ll{rol
Same
codes"
75
I]]alILI[_ICILIICI
al
{he
end
_11_ {his
is
l]lt)_lcIs
thai
COnll'OI
Resetting the system
Use lhis feature to reset all the parameters ot this unit to
the
1
initial
factory
settings.
• This procedure
completely
resets all the parameters
including
the "SET MENU" parameters¸
However.
Press @STANDBY/ON
on the front panel to
2
Press and hold @TONE
CONTROL
then press @STANDBY/ON
unit.
advanced
setup
menu paramelers
• The initial lactol_
Ibis uniL
set this unit to the standby mode.
and
to turn on this
setth]gs
ill this trait
the
will not be initialized
ale activated
next time you ttlrn on
a_
To cancel
the initializ
any changes,
'CANCEL"
_tion procedure
press @STRAIGHT
at my time without
repeatedly
mlking
to select
and then press @STANDBY/ON
The ud_anced setup menu appears in the front panel
display.
3
Press @PROGRAM
4
Press @STRAIGHT
repeatedly to select
"RESET".
Select "CANCEL" to cancel the initialization
<3 / _:>to select "INIT.".
procedme without making any changes.
5
Press @STANDBY/ON
to confirm your
selection and set this unit to the standby
mode.
|
87 E_
•
CINEMA DSP
Since the Dolby
originally
•
Surround
designed
and DTS systems
for use in movie
were
theaters,
their effect
is best felt in a theater ha_ing many speakers designed
acoustic ett_ct_. Since home conditions,
sudl as room
size, wall materiah
differ so widely,
the sound
of speakers,
it is inevitable
CINEMA
tield technology
to combine
experience
of a movie
own hon/e.
and so on, can
of actually
DSP uses Yanmha
and DTS systems
in
measured
original
Dolby Pro Logic,
to provide
decode
for
that there are difl)rences
heard. Based on a wealth
data. Yamaha
Digital
number
sound
Dolby
vast nmnbers
•
Composite
video signal
With tile comllosite video signal systmm the video signal
is composed of throe basic elements of a video picture:
color, brightness and synchronization data. A composite
video jack on a video component transmits these three
elements combined.
Dolby Digital
Dolby
Digilal
surround
sound system
that gives
you completely
independent
multi-channel
audio. With 3
fl'ont channels (front L/R and center), and 2 surround
stereo
channels.
channels.
Dolby Digital
With
an additional
provides
channel
5 hall-range
especially
audio
lk_r bass
eflEcts, called LFE (Low Frequency
Effect), the system
has a total of 5. I-channels (LFE is counted as 0.1
channel).
By using 2-channel
speakers,
more accurate
surround
sound environnlent
stereo
moving
for the surround
sound
eftEcts and
are possible
than with Dolby
Surronnd.
The wide dynamic
range
minimum
volume
by the 5 fifll-range
and the plvcise
sound
environment
configuration
88
sound orientation
processing
excitement
En
reproduced
provide
and iealism.
from nlaxinlum
generated
listeners
to
channels
using digital
with unpl_cedented
With INs unit, any sound
lhoil/monaural
up to a 5.1-channel
can be tYeely selected
for your enjoynlent.
1 center
leB and right channels
channel
for conventional
instead
of
Pro Logic
technology.
Thetv are three modes available: "Music
mode" tBr music sources. "Movie nlode" l_r nlovie
•
and "Game
Dolby
mode"
uses a 4-channel
realistic
(monaural),
eft)cts
within
(stereo),
signal
processing
volmne
system
eft_cts:
a center channel
frequency
for dialog
for special
channel
2 l¥ont
sound
reproduces
range. Dolby Surround
ix
all video tapes and laser discs.
and in many TV and cable
decoder
recording
sonnd
channel
The surround
a narrow
widely used with nearly
Pro Logic
analog
and dynamic
and a surround
(monaural).
sound
t_)r game sources.
Surround
left and right channels
broadcasts
as well. The Dolby
built into this unit employs
system
on each channel
a digital
that automatically
stabilizes
to enhance
sound
moving
the
efl)cts
and directionality.
•
DTS Digital Surround
DTS digital
surround
soundtracks
of movies
track,
WaS developed
thealers
around
the world.
system
home
theater
sound
and natural
gaining
popularity
the analog
spatial representation
5.l-channel
sound
in movie
DTS. Inc. has developed
so that you can
in your home. This system
distortion4ree
to replace
with a 5.1 =channel digital
and is now rapidly
surround
is a digital
sources.
5-channel
wifll 2 t?'ont lelt and right channels.
Dolby Surround
•
Component
video signal
With tile comllonent video signal system, the video signal
is separated into the Y signal l()r the hmlinance and the Pt_
and PR signals for the chromimmce. Color can be
reproduced more ti6thfldly with this system because each
of these signals is independent. The component signal is
also called the "color diftErence signal" because the
luminance signal is subtracted thorn the color signal. A
monitor with component input jacks is required in order m
output component signals.
a discrete
and 2 surround
only 1 surround
used to
Surround
channel,
sources
room of your
enables
technique
Dolby
playback
to reproduce
•
II
of existing
This new technology
the audiovisual
theater in the listening
Dolby Pro Logic
Dolhy Pro Logic II is an inlproved
enjoy lhe
a
depth of
of DTS digital
produces
practically
sound (technically,
left, right
and center channels, 2 surround dlannels, plus an LFE 0.1
channel as a subwootl:l; tk_r a total of 5.1=channels).
•
HDMI
•
HDMI (Higll-Definifion Mukimedia Interface) is the first
induslry-supported, uncompressed, all-digital audio/video
interface. Providing an interface between any source (such
as a set-top box or AV receiver) and an audio/video
monitor/such as a digital television), HDMI supports
standard, enhanced or high-definilion video as well as
mulfi-channel digital audio using a single cable. HDMI
transmits all ATSC HDTV standards and supports
8=channel digital audio, with bandwidth to spare to
accommodate future enhancements and requirements.
When used in combination with HDCP (High-bandwidth
Digital Content Protection), HDMI provides a secure
audio/video inlertace that meets the security requirements
of content providers and system operators. For filrther
intk)rmafion on HDML visit the HDMI website at
"http://www.hdmi.org/'.
•
LFEO.1
channel
This channel reproduces low-trequenc3, signals. The
frequency range of this channel is from 20 Hz to 120 Hz.
Tfiis channel is counted as 0.1 because it only enR)rces a
low-frequency range compared to the fidl-range
reproduced by the other 5 channels in Dolby Digital or
DTS 5.1 -channel systems.
•
Neural Surround
Nenral Surround _v lvpresents the latest advancement in
surround technology and has been adopted by XM
Satellite Radio fi_rdigital radio broadcast of surround
recordings and live events ill surround sound. Neural
Surround _'_employs psychoacoustic frequency domain
processing which allows delivery of a morn detailed sound
stage with superior channel separation and localization of
audio elements.
Sampling frequency
and number of
quantized
bits
When digitizing an analog audio signal, the nunlber of
times tfie signal is sampled per second is called the
sampling fi'equency, while the degree of fineness when
converting the sound ]evel into a numeric value is cal]ed
tfie nmnber of quanfized bits. The range of rates that can
be played back is determined based on the sampling rate,
while the d} namic range representing the sound level
difference is determined by the number of quantized bits.
Ill principle, the higher the sampling fi;equency, the wider
lhe range of frequencies lfiat can be played back, and the
higher the number of quantized bits, the more finely the
sound level can be reproduced.
•
SILENT CINEMA
Yamaha has developed a natural, realistic sound effect
DSP algoritfim tk)rheadphones. Parameters fi)r
headphones have been set tBl"each sound field so that
accurate representations of all the sound field programs
can be enjoyed on headphones.
•
Virtual
CINEMA
DSP
Yamaha has developed a Virtual CINEMA DSP algorithm
that allows you to enjoy DSP sound field sun'ound eft_cts
even without any surround speakers by using virtual
surround speakers. It is even possible to enjoy Virtual
CINEMA DSP using a minimal two-speaker system that
does not include a center speaker.
•
PCM (Linear PCM)
Linear PCM is a signa] tbrmat under which an analog
audio signal is digitized, recorded and transmitted without
using any compression. This is used as a method of
recording CDs and DVD audio. The PCM system uses a
technique t_r sampling tfie size of the analog signal per
very small unit of time. Standing tk)r"Pulse Code
Modulation", the ana]og signal is encoded as pulses and
then modulated fi)r recording.
|
89 En
AUDIO SECTION
• Signal I,evcl
Composilc
Component
* Minimum RMS Output Powel lk)= hont, CenwJ, Smround
[USA
anti Canada modelsl
I kHz, 0 9_ THD, 8 f-_ ...................................................
IOIher models I
I kHz, 0 90 THI), 6 _ ...................................................
• Maximum Powel for FronL Cenlcr. St.round
(JEITA)
I kHz, 10%THD.
0 f! .......................................................
* Dynamic
IUSA
([HK
[Olher
(IHF,
* Fivquency
(D. ell
Response
Io Fionl IdR
]HD
............................
• Signal [o Noise Ratio .................................................
105w
• Maxhnum
130w
• Fl_quency Response (MONITOR
OUT)
Component Signal ...................................
90/I I0113(gl50
w
I(}0/1 I(gl25
* DynamicHeadroonl
[USA
and Canadamodelsl
8 t2 .....................................................................................
Input Signal
EHcct On. I kHz, 05%
105w
....................
w
0.27 dB
2 0 V or nlorc
I0 Hz Io 100 kHz.
• "FolM HalmolliC DiSIOl'[iol]
IUNA
and Canada modelsl
(1 kHz, 45 W, Fronl [JR, 8 £2 ) .............................
IOther nlodelsl
(1 kHz, 50 W, Fronl [JR, 6 £2 ) .............................
3 dB
006<_ ol less
()06G
ol less
Flon[ L/R ................................................................
* Channel Separation ( I kH//10 kHz)
(D. ell (5 1 kC.2shorlcd) Io Fronl [JR
...................................................................
150 !_V ol less
60 dB/45 dB ol mole
• "Ibne Control (Flonl IdR)
BASS Boosl/Cul ....................................................
TREBLE Boosl/Cul
..............................................
÷10 dB/100 Hz
+10 dB/20 kHz
• Headphone
400 mV_70
()uqxlghnpedance
..............
• Inptlt SensiIivi_y/Inpu_ hnpedance
CD. etc ..................................................................
MUUFI CH INPUT •..............................................
60 MHz.
28 !W (202
• Signal to Noise Ralio (IHF)
Mono/Slereo
.............................................................
3dB
Inpm (unbalanced)
dBD
73 dB/70 dB
• Harrnonk f)isto_lion (I kHz)
Mono/Suq'co
................................................................
0.5_,_/0 5<_
.....................................................
75 £2
AM SECTION
• Tuning Range
[U S.A. and Canada models[ .............................. 530 _o 1710 kHz
[Asia and General modclsl ................. 530/531 m 171(I/1611 kHz
[Olher m_xlelsl .................................................... 531 lo101I kHz
200 mV/47
200 mV/47
• Po_ci Supply
[Europe and Russia modelsl ..............................
[USA
and Canada rnoddM .............................
[Aus[lalia model} ...............................................
k_
k_
• Filler Characteristics
(_(1/60/8_90/100/I
I0/I 20/I 60_00 Hz)
HRE
(FRONT SP, CENTER SP, SUR L/R SP:
SMAIA YSML) ............................................................
12 dB/ocl
LRF (Stlbw<)o_r]
.........................................................
24 dB/oct
SECTION
* Video Signal ]_pe (Gray bach
I U.SA, Canala, Korea and GeneralmodHs] .................... NTSC
IOthcr modclsl .......................................................................
B\I.
230 V AC, 5() Hz
120 %'AC, _) Hz
240 V ,4<, 50 Hz
[Korearnodell
.......................................
220 %'AC, (_0Hz
[China model] ....................................................
220 V A(', 5(} Hz
[Asia model[ .........................................
220 240 V AC, 50/60 Hz
[Genelal model] ......................
I IO 120/220 240 V AC. 50/60 Hz
(_OIl'_tffl]p_io;]
[LISA
and Canada modelsl .................................
240 \V/320 VA
[€k'nc111 model] ..................................................................
2(_0 W
[( )d3m m_.h'lsl ....................................................................
240 W
• Slandby Pox_e_ ('onsumplion
90 En
5 Hzlo
• 50 dB Quieting Sensilivity (IHt
100% rood)
Mono .................................................................
• po\_,cl
• Oulput Level/Oulpul
Impedance
AUDIO OUT (RE(?) ............................................
200 mV/l 2 k_
SUBWO()FI'3 _. ()U'IPUT
•..........................................
4 V/I 2 k_
VIDEO
15 Vp p or nlore
GENERAL
Noise (IHF A Nelwork)
Jack Raled
50 dB or more
Input I,evel ...........................................
• Tuning Range
[USA
and Canada modelsl .......................... 875_o 1079 MHz
[Asia and General modclsl ....... 875/8750
Io 108 0/I 0800 MHz
[od3m m_xh'lsl ............................................
8750 [(310800 MHz
• An[enna
• Signal Io Noise Ralio (IHF A Nelwork)
CD (200 nlV ) Io Flonl I,/R. Effect Off .................. 98 dB m mole
CD (250 InV} Io Front L/R, EffEct Oil . ................ 100 dB or nlole
• Residual
I Vp p175_
Vp p/75 D_ (P_/P_)
FM SECTION
Power
and Canada modelsl
8/6/4/2 _) ...........................................
models I
6/4/2 f!) ....................................................
• Maxhnum
CD. etc
.................................................................
...................
I Vp p/75 .Q (Y), 07
.................................................
08 W
• Maxhnum Pov, e= L'onsunlplion [Asia and (]eneml models onlyl
5d3, 1()r/_ TH D ....................................................................
440 W
• AC Oullels
[Austr ilia model] ........................................
I (100 W nmxhnum)
[IT,S A, Canada and China m{xlelsl
2 (]bla1100
W maxin]um)
[()d3e_ m{xlelsl ......................................
2 (Tola150 W maxhnurn)
• Dimensions
• Weighl
(W x H x D) ..................................
435 x 151 x 352 mm
( 17 1/8'" x 5 15/16" x 13 7/8")
..............................................................
' Specificallons
me sul_ject _o change
85
wilhoul
kg (18 Ibs 12 oz)
notice
•
Symbols
XM tunhlg
SOlll_d poelltl
.......... 65
•
C)VOLUME
TRIM, IJlpuI menu
CALL SIRIUS. SIRIUS Satellite
......... 69
Radio
D)CENTER
C)SP
- - -.
<XM>
slaltlS message
...............
82
DISTANCE,
slalus
•
Numerics
I SOUND
Canceled,
MENU.
2 INPUT
message
Manual
MENU,
setup
Muntml
........ 61
setup
..........
61
CAT
..................................
Troubleshoo_i
SEARCH,
Category
ng
..................
86
XM tuning
.................
53
Search
mode,
2oh Sleleo_
3 OPTION
Sound JieJd progrum
......... 38
MENU
...............................
70
CD player, Connection
CD recorder, Connection
3 OPTION
MENU,
CENTER
Manual
setup
....... 62
5el= S_c_eo, Sound IMd program
•
......... 38
A
A)I)[SPLAY
SET. Oplion
A)INPUT
nlenu
......... 70
ASSIGNMENT,
Input menu
SET, Sound
A DEI.AY.
Audio
ACQUIRING,
stares
settings
SIRIUS
message
Aclivating
XM Satellite
Raclio
settings
speaker,
Cel_er
width,
Speaker
Sound
COAXIAL
............
47
COAXIAL
...........
53
XM mnhlg
mode,
IN/l),
Iilptll assignment
INPUT
Input
.......................
•.....................
..............................
INPUT
Con]pleted,
FRuetooth
AM
43
Connect
70
message
............................................
Connect
MIC!,
............................................
flmction
Display
ANTENNA
Radio
OSI)
display
thne,
settings ................................
ERROR,
SIRIUS Salellite
status
message
.......................
Connecting
lerminals
,86
..............
iPod controlling
status
message
.................
13
CD player
•........................
CD recorder
.....................
18
18
Audio jacks ..........................................
AUDIO SELECT
.................................
13
34
Connection,
Connectk)n.
DVI)
I)VI)
16
17
Audio
select.
..................
71
Connection.
exle_'nal
Audio
setlings.
................
Connection.
FM antenna
14
24
Connection.
HDMI
Connectk_n.
MD i_corder
AUTO
84
Connection,
Connection,
Midti-_rmat
Po_er cable
44
Connection,
PVR
43
SETUP.
Automatic
FM/AM
Amomadc
•
Enx>r message
preset
............
tuning,
miring
.................................
tuning.
FM/AM
tuning
.
B
B)INPUT
RENAME,
Input
B)MEMORY
GUARD.
mellu
....... 68
Background
Video,
Mil]li channel
BGV,
Muhi
inpul selup
channel
Blueloolll
selling,
BT connected,
Bluelooth
•
70
65
status
................
input setup
Option
menu
70
....................................................
DSP LEVEL.
S<mnd field parameter
DSP level,
Sound
....................
fiekl parameter
40
40
DTS decoder
prioritize
set6ng_
Decodm mode .................................
69
18
DVD
DVD
16
17
20
Dynamic
playeJ connec6on
.......................
Jecorder conneclion
....................
rinse,
Sound
menll
..............
66
LEVEL.
Sound
meno
..............
66
14
.....................
IS
player
......... Ig
......................
20
E
E)LFE
E)MULT[
CH SET. Input
menu
..........
69
Au[o setu ) en'or message
E-2:NO
SURR SP.
................
84
19
Video
components
...........
k)fL
iPod universal
...........
SET.
..............................
SP.
71.72
anlo settl ) error
E-4:NOISY.
message
................
84
73
other c oliipol_el] ts.
control
.................................
Aulo
E-6:NO
selu } el'tel
MIC.
message
................
84
74
Auto
E-7:NO
selll } errol
SIGNAL.
message
................
84
Auto setu ) error message
E-8:USER
CANCEL.
................
84
Auk) setu ) error message
E-9:INTERNAL
ERROR,
................
g4
................
84
a TV
Coi_trollhlg
Remote
dock
RAI)IO
..................................
Controlling
...........
7I
CROSSOVER,
this uniL Remote
original
SCENE
Speaker
Speaker
CT WIDTH.
Curren_
..................................
•
15
Conlle*21
Cleating
slams
Sound
dispkly
control
templates
seltings
sel{ings
fiekl
¸,.73
¸¸,¸¸31
..........
.................
parameter
...........................
(_
64
¸.¸..4(¸)
35
Auto
71
85
Connection.
Controlling
C)AUDIO SELECT, Opdon nlenu .
.,,
............
Option meno
E-1 :NO FRONT
69
C
age
menu
17
17
69
86
stzfftls rues
Option
86
Connection,
set-t_)p boxes ....................
C<)IlJlec_i_)_l. VCR .................................
..........
.................
iPod controlling
Displ _y settings,
................
E)XM
Cix_ssover,
message
......................
nlessage
17
Yamaha
Option menu ....................................
B)SPEAKER
LEVEL, Sound mel_u
,20
...............................
slalus
25
22
Connection,
Connection,
66
Blueloolh
Disconnected,
DISTANCE.
Amo selup ......................
DOCK indicator ..................................
34
menu
53
.......................................
12
iuput }acks selection
Sound
XM tuning
Disconnected,
26
25
Audio
Audio signal flow .................................
AUTO SETUP
.....................................
mode,
48
........... 18
...............
Access
XM tuning .......................................
Uh'ecl rluirlbel iccess mode,
g4
Audio
decoder
70
41
26
AM anlenna
menu
70
Number
settings
DIST. Auk) setup result .......................
DISTANCE
.........................................
Connection,
Oplion
.................
Display
settings
....................
...............................................
50
Connection.
player •.....................
i_corder
..................
Display
40
..... 40
DIST
66
36
.......................................
....................
field parameler
13
85
delay, Audio seltings .................
inl2mllation ................................
connection
parameter
Sound
13
..
Displaying
file XM Satellite Radio
inlormation
......................................
Audio
Audio
j]cks
Direct
lield
jacks
jacks
13
to Ihe FRONT A
...........................................
components
Dimmer.
DIRECT
68
message
components.
..................
]8
......................
status
VIDE{-)¸jacks
Atllo seltlp error
83
...........
en'or,
iacks
68
Audio
AUDIO
C,mnection
COMPONENT
,68
assignmenL
assignnlenl
COAXIAL
tuning
DIMMER.
83
Radio
hkput menu .................
mode. Decoder mode
.......... 63
83
23
stares message
DSP indicator
DIGITAL
Soond
Radio
CINEMA
69
69
69
mode.
select
Dimension.
status
66
Decoder
Decoder
66
tuning
....
71
22
63
,4()
..........
melm
D)PARAM
INI. Option menu ............
Decoder il=dicators
...............................
OPTICAL
settings
XM
menu
Inpm
COAXIAL
field parameter
ANTENNA,
Sound
MODE.
AUDIO
Center speaker eqtmlizer,
Sound menu .....................................
Center
GEQ.
D)DECODER
DIGITAL
AUDIO
DIMENSION.
.............
XM tuning ..................................
48. 53
AM antenna connection
.......................
20
Amplifier
1g
Ig
66
..................................
ALL CH SEARCH,
All Channel
Search
.........................
.....................
82
......... 63
...................
Satellite
¸¸,¸¸¸48
message
............................................
CHECK
SR TUNER,
SIRIUS Satellite
menu
68
XM tunh_g
SP. Speaker
CHECK
.......................................
A)SPEAKER
83
D
Eil)cl
sell1 } elrol
level.
Sound
message
field
pmameler
40
91 En
|
l_
ENHANCER
indicator
....................... 22
Exchange. Preset station.
FM/AM tuning ................................. 45
External decoder conneclion ................ 18
•
J
•
Jazz, Sound field program ....................38
•
L
LFE/BASS OUT. Speaker setlings ... 64
LFE/Bass ore. Speaker seldngs ............ 64
LOADING.
F
F)DYNAMIC RANGE.
Som]d menu .....................................
•
66
F)XM RADIO SET .............................. 72
FYWUPDATING, SIRIUS Satellite Radio
status message .................................
Factory presets, Advanced setup .........
FL SCROLl,. Display settings .............
FM antenna ..........................................
FM antenna connection ........................
83
77
70
20
20
FM luning ............................................
FRONT B speaker setting.
Speaker settings ...............................
FRONT B, Speaker settings .................
Front panel displ _y ...............................
Frout panel display scroll,
Display setlings ...............................
FRONT SP, Speaker settings ...............
Fronl speakm s. Speaker settings ..........
43
63
63
22
XM tuning status message ............... 82
Lo lding ..
iPod controlling status message . .85
Lowqrequency ell_ct lexel,
Sound menu ..................................... 66
LV[ .......................................................
26
LVL, Amo setup resuh ......................... 26
•
M
Manual preset aming,
FM/AM tuning ................................. 44
MANUAL SETUP, SET MENU ......... 61
70
63
63
Manual setup. SET MENU .................. 61
Manual tuning. FM/AM tuning ............ 43
MAX VOL. Audio selllngs ................. 67
Maximum vohm]e. Audio smtings ...67
MD recorder, Connection .................... 18
G IAUDIO SET, Sound menu .............. 66
Men]ory guard, Option menu ............... 70
Menu browse mode, iPod controlling 58
Movie Dramalic,
•
G
G)SIRIUS SET .................................... 72
G)SIRIUS SET. Ophon menu ............. 72
Games, Sound field pwgram ............... 38
•
H
H) HI)MI SET, Sound menu ...............
Hall. Sound field program ...................
HDMI indicator, ...................................
HDMI see Sound menu .......................
HDMI, Connechon ..............................
67
38
22
67
14
HEADPHONE. Dynamic range .......... 66
Headphone. Dynamic range ................. 66
HEADPHONE.
Lo_-frcquency eflbct level ..............
Headphone,
Lowq:mquency efl_ct level ..............
Headphones ..........................................
Headphones [ndicalor ..........................
•
66
66
35
22
I
Sound i'iekl program ........................ 38
Movie Spacious.
Sound i'iekl program ........................ 38
MULTI CH INPUT componenl
selection ...........................................
34
Muhi channel inptu setup,
Input menu .......................................
Muhi-channel source
whh headphones .............................. 39
Mtddqormal player connection ........... 18
Muhidnl_)rma6on dispbly .................... 23
Music Enh. 2oh.
74
74
P
PANORAMA.
Sound field parameler ..................... 40
Panorama, Sound field paramewr ....... 40
Pa_ametel inkialization.
Optk)n menu ....................................
PARENTAL LOCK,
71
SIRIUS Satellite Radio se_ting ........ 72
PCM indic _tor .....................................
22
PHONES jack ......................................
Play informa6on display,
iPod colin'oiling ...............................
Phlying video somces
in the backglxmnd ............................
PLII Game ...........................................
PLII Movie ..........................................
PLII Music ...........................................
35
58
36
39
39
39
P_ese_ channel setting,
XM lunJng ................................. 49, 54
Plese_ SCENE templales ..................... 30
Preset Sealvh mode,
MUTE TYPE, Audio settings .............. 66
Muting ..................................................
35
XM tulfing .................................
PRESET SEARCH,
48. 53
XM tuning .......................................
Presel SlaliODexchange,
FM/AM tuning ................................
Prese_ sta6on selection.
53
XM tuning slams message ............... 82
Not Available, SIRIUS Satellite Radio
FM/AM tuning ................................
PRESET. Adwmced setup ...................
Pro Logic .............................................
Pure hi-fi sotmd ...................................
PVR connection ...................................
45
77
39
41
17
stares message ..................................
NOT SUPPORTED. SIRIUS Satellite
•
Neurd Sm'wlmd ...................................
92 En
68
24
24
24
24
62
70
70
70
70
Sound lield program ........................ 38
MUTE ..................................................
35
MUTE indicator ................................... 22
INI.VOL, Audio settings .................... 67
hdtial volume, Audio seuh3gs .............. 67
Input assignmenh input menu .............. 68
Input channel and sl?eaker indicators ... 23
Input chmmel indicators ....................... 23
Input menu, Manual setup ................... 61
Input rename. Input menu .................... 68
Input soulx:e indicators ......................... 22
Input soulve inRmnation display ......... 36
INVALID. SIRIUS Satellite Radio
85
85
57
•
82
68
68
Pop/Rock. Sound field pwgram .......... 38
Power cable. Conneclion ..................... 20
•
83
XM tuning status message ..............
OPTICAL IN (2). Input assignment
OPTICAL IN (33. hlput assignment
OPTICAL INPUT assignment,
Inpul assignment .............................
OPTIMIZER MIC iack, Amo selup ...
Optimizer microphone .........................
Optimizer microphone. Amo setup ....
Optimizing speaker selhng ..................
Option menu, Manual setup ................
OSD SHIFT. Display settings .............
OSD shift, Display smtings .................
OSD-AMP. Display settings ...............
OSD-SOURCE, Display sellings ........
Olher components controlling
by lemole conlrol ............................
Olher componems controllP_g,
Remole conlrol ................................
........................ 38
Sound field pwgram
MusicEnh 5ch,
Inhared window. Remote control ........ 23
slalus message .................................
iPod connected, iPod conlwlling stares
message ............................................
iPod conm>l, Status message ...............
iPod using ............................................
69
O
OFF AIR.
N
39
Nigbt listening mode ............................ 42
No BT Adapten
Blueloolh stalus message ................. 86
NO SIGNAL,
45
83
Radio status message ....................... 83
Number <)i"speakers ............................. 26
Number <)i"speakers,
Auto selup resuh .............................. 26
R
Remote control codes
...........................
iii
Remote control, Troubleshoot big ........
Rename, SCENE template ..................
Repeat ..................................................
Repeat, iPod contwlling ......................
Resetting d_e system ............................
87
31
58
58
87
'i[q-?,ll
•
S
SCENE ...................................................
7
SCENE template selection ................... 28
Searching ....
Bluelooth status message ................. 86
Selection, Audio input jacks ................ 34
Selection,
MULTI CH INPUT componen(
Selection, Preset station.
. 34
FM/AM liming ................................. 45
Selection, SCENE template ................. 28
SET MENU ..........................................
61
Setting rein/ire control codes ................ 75
Setting SCENE template input slmrce.
Remote control ................................ _2
Set4op box connec(ion ........................
Shullle. iPod conm_lling ......................
SILENT C[NEMA ...............................
SILENT CINEMA indicalor ................
Shnple mnlote mode,
iPod controlling ...............................
SIRIUS Satellite Radio ........................
17
58
39
23
57
83
SIRIUS Satellite Radio par_'ntal lock 72
SIRIUS Satellite Radio Parental Lock,
Advanced selup ................................
SIRIUS S itellile Radio se(ting ............
SIRIUS Satellile Radio setting,
Option metal ....................................
SIRIUS Satellilc Radio tuning .............
SiriusConnes:t tuner ..............................
SIZE .....................................................
76
72
SIZE. Auto settlp ..................................
SLEEP indicator .................................
25
23
Sleep limer ...........................................
Sound lield programs
wilh headphones ..............................
Sound menu. Manual setup ..................
Soulve Icaturc OSD dispkly time,
Display setfiJ_gs ................................
SP .........................................................
SPA B indicators .................................
37
72
51
51
25
39
61
70
26
22
SP IMP. Advanced setup .................... 76
SP. Aulo setup result ............................ 26
Speaker dislance ............................ 25, 26
Speaker dislance, Auto setup ............... 25
Speaker dislance, Auto setup resuh ... 26
Speaker distance. Sound melm ............ 65
Speaker distances, Speaker distance .. 65
Speaker impedance setting ................... 21
Speaker impedance. Adwmced setup ..76
Speaker level ........................................
26
Speaker level ac[iuslmen[ ..................... 41
Speaker level, Auto setup resuh .......... 26
Speaker level, Sound menu .................. 65
Speaker settings. Sound menu ............. 63
Speaker size .........................................
25
Speaker size. Auto setup ...................... 25
Speaker _ iring ..................................... 25
Speaker _iring. Auto setup .................. 25
Speaker _iring/vohune level,
Auto selup ........................................
25
SPEAKER. Dynamic range ................. 66
Speaker, Dynamic range ...................... 66
SPEAKER.
W-2:DISTANCE
Lo_ lrequency effect level .............. 66
Speaker. Lo_ lrequency effect level 66
Specilicadons ....................................... 90
SSR PIN. Advanced setup .................... 76
STRAIGHT ..........................................
39
Amo setup erroJ message ................ 85
W-3:LEVEL ERROR.
ERROR,
Amo setup erroJ mess_ge ................ 85
WIRING/LEVEl .................................
25
WIRING/LEVEL,
Auto setup ............. 25
Straight .................................................
39
SUB UPDATED. SIRIUS SatellHe Radio
•
slatus message ..................................
SUBWOOFER PHASE.
XM ANTENNA ..................................
XM ANTENNA,
72
XM Radio setting ............................
XM Mini-Tuner Dock .........................
XM Rldio antelma ...............................
XM Radio an(enna,
72
46
72
XM Radio setting ............................
XM Radio setting ................................
XM Radio setting. Opdon menu .........
XM Satellite Radio ..............................
72
72
72
82
83
Speaker settings ............................... 64
Subwooler phase, Speakm sellings ...(-_
SUPPORT AUDIO, HDMI set ............ 67
Support audio. HDMI set ..................... 67
SUR L/R SP, Speaker settings ............ (,4
Surround lelgright speakers.
Speaker settings ............................... 1,4
•
T
Test tone, Cemer speaker _'qllMizer ..66
TEST. Center speaker equaliz_r .......... 66
Tonal qu llity aqjuslment ...................... 41
Tix)ubleshooting ................................... 78
TU. Adwmced setup ............................. 77
Tuner/FM/AM),Troubleshoodng
..81
Tuner frequency step,
Advanced setup ................................ 77
Tuner indicator_ ................................... 22
Turning off the power ......................... 21
Turning <inthe power .......................... 21
TV Sports, Sound field plogram .......... 38
•
X
XM Satellite Radio tuning ................... 46
XM Satellite R _dio, Status message
82
•
Y
Yamaha iPod universal dock.
Connection ......................................
Yamaha Palanletric Roonl Acoustic
19
Opdmizer ........................................
YPAO ..................................................
24
24
YPAO (Yamaha P u'ametric Room
Acoustic Optimizer) ........................
YPAO indicalor ..................................
24
22
U
Un ible to play, iP//d controlling
status message ..................................
UNIT. Speaker distance .......................
Unik Speaker distm_ce ..........................
Unknown iPod, iPod controlling
stalus message ..................................
Unplug HP!.
AuIo selup error message .................
UPDATING, SIRIUS Satellite Radio
status message ..................................
UPDATING.
85
65
65
85
84
83
XM tuning status mess _ge ............... 82
•
V
VCR connection
...................................
17
VIDEO AUX i lcks, Front panel .......... 19
Vkieo conlponents. Connection ........... 15
Video hll\yrnlation ................................ 36
VIDEO jacks ........................................ 13
Vide<}jacks ...........................................
13
Vide<) signal flow ................................. 14
Video som-ces in the background ......... 36
Vhlual CINEMA DSP ......................... 39
VIRTUAL inclicator ............................ 23
VOLTAGE SELECTOR ........................ 3
VOLUME level indicator .................... 22
Volume Trim, Input menu .................... 69
"@SPEAKERS"
or "@DVD"
indicates
tile nanle ol the parts
•
panel or the remote control
aIlached
sheet oi ¸ Ule pages
inallua] _)r the illR_m]a[]oll
W
W- l :OUT OF PHASE.
Atl{o setup err/ir message ................. 85
1"_o
sition
of the parts¸
(example)
on the front
Refer to the
al the end iff this
abolH each
1|
93 En
•
Front panel
•
Remote control
®
ii
List of remote control
codes
MBO
2078
Blu-ray player
Medkm
2072
Samsung
Mi
2072
Yokd
2078
2073
Zeni01
2038,
2137
Micromedi
CD player
Yanl
lha
romaxx
5000,
5013
_
_Sunaha
2000,
2(X) l, 2003,
Microsoft
2030,
2101
Mind
Mierosta_
2072
MJ{snbish]
2035
DVD Recorder
MJTuda
2075
Apex
2024
CD Recorder
Muslek
2(178
JVC
2070
Yamaha
Naiko
2077
LG
2071
Onkyo
O Jall
2073,
2075
Panasonic
2020,
P&B
2075
Pacilic
2074
Panasonic
2030.
2040,
2057,
5001
DVD
Acoustic
Solutions
2078
2100
2135
2(M7, 2073
Philips
2065,
2067
2046,
Sony
2022,
2005,
2006,
2007,
2090
Toshiba
2068
2122,
2130,
2131,
Pioneer
Proline
2036.
2077
2082
Yamaha
2023
2132
Yukai
2069
2096
RCA
2031,
Brandl
2073,
Broksonic
2060
Bust]
2075.
Cenuex
Classic
2085
2042,
2050,
2051
206 I. 2062,
2064
DVD/LD
Pioneer
2036
2076
Reoc
2074
2077
Ro_,xlst ar
2075,
JVC
1017,
2078
Rowa
2077
LG
1071,2087
Clatlonic
2075
Slba
2085
Panasonic
Coby
2078
S lbaki
2074
C-Tcch
2074
S mlsung
2032,
CybelHome
2025,
2079,
Daewoo
2092,
2098
Dans
2096
2086
Toshiba
2004,
Touch
2132
2132
1025
Voodoo
2132
2113
RCA
1022,
Sansui
2074
Samsung
1021,2041,
2104
Sanyo
2095
Shaql
1023,
2106
1073,
2043,
Sony
1019,
2107
1(174, 2039.
Toslfi ba
1024,
2108
1075,
Zcn0h
1026.2(M7
2(_1,
2104,
2078
Labs
2074
2074.
2086
Shaql
2034,
2043,
2094
2078
Silva
2093,2106
2076
D-Vision
2096
Singer
2074
DVX
2074
Skymasmr
2074.
Eltl
2096
Skyworfll
2076
Euroiine
2096
SM Electronic
2074,
2078
Sony
2028,
2083.
2029,
2107
Soundnllsmr
2074
Soundn]ax
2074
ABS
2132
2078
2(_5
Philips
Sciendlic
2077,
2116,
2133
ScanMagk:
2074
2132
Systems
UltimateTV
SEG
Sphere
2132
Tagar
Viewsonic
1020,
2088
Global
2132
Systemax
2105
2091
2058
2059,
I072,
2040.
2042
Yamah
2044,
2039.
ZT Group
2121.2122.
2125,
Toshib
i
201 ]
2132
2136
iPod
501 I
LD player
Yamaha
P masonic
2067
Pionee)
2114
MD
S m_sung
2115
Yamaha
Toshiba
2068
Yamaha
Grundig
H&B
2077.2(198
2075
Standmzl
StaJ Cluster
2074
2074
Alienware
2132
TUNER
CyberPower
2132
Yamaha
Haaz
2074
Starmedia
2075
Dell
2132
HE
2078
Supervision
2074,
2078
DIRECTV
2123,
Hitachi
2032,
Sylvania
2052,
2058
2128,
2129.
2133
5002,
5003.5(X)4
5005,
5006
5007,
5008.5C09.
5010,
5012,
5014.
5015,
5016,
5017,
0206.
5018
Synn
2074
DISH
2078
TC&I
2072
2072
Tcac
2074
Dishplo
Ed]ostar
2126
2126.
Acer
(_)93
hmdio
2134
Tec
2076
Expressvu
2126
Acme
0207
JDB
2078
Tcchldcs
2030
Galeway
2132
Acura
0208
JVC
2033.2(r15.
Technika
2096
GOI
2126
ADA
0955
Hewletl
PackatKI 2132
ADC
0906
Admiral
(1058,
0205,
0210,
0211
0207
Innov
ElectJonics
idon
2053,
NetwoJk
2002
TAPE DECK
DVR
2075,
Home
2126.2127
2073,
2099
Technosonic
2096
Kenwood
2030,
2097
Tevion
2072,
2074
Hit lchi
Kingavon
2075
Thomson
2085,
2109
How aid Compulers
2127
2008
TV
Koda
2075
Tokai
2076
2132
Adyson
0200.
Lawson
2074
Toshiba
2026,
2044,
2048,
HTS
2126
Agasid
0200
Lento
2075
2056,
2073,
2108,
LG
2084.
2111
Hughes
Hun]Ix
2123,
2123
Agazi
AGB
0206
0204
Liletec
2072
Un0ed
2078
Hush
2132
Aiko
0127,
Limit
2074
Voxson
2078
iBUYPOWER
2132
LogicLab
2074
Whailed
2074
JVC
2126.
Luxor
2077
X]ogic
2074
Linksys
2132
2077
Media
2087
Magnavox
2(137, 2073,
Magnum
2072
iii
2075
lie
Yakmno
Yalnad
_
2077
Cenler
2132
HD DVD
YSunnh _
DVD-DVR
2078
t
Goodmans
2(172
2132
2123,2130,2131
Scotl
2052.
Solutions2074
10
2010
2119,2120
Stack 9
Tivo
DVD/VCR
2078.
Bhm
Sony
Stack
Red Star
Funai
Global
2129,
2026,
Bminwave
DK Digital
Duff
2124,
2133
2081,
2075
2076
2116,
2014
2073,
Provision
2074
R(A
2013.
2019,
2078
2075,
2129
2009,
Axion
Diamond
2012,
Proscan
Sonic
2(M9
Denver
PioneeJ
2018
2027,
2078
2103
2066.
RCA
Apex
Awa
2102,
2121,2123,
2128
2110
Philips
2030,
2117,
2105,
2086
Denon
2017,
2118,2119.2120
2078.
2089
2016,
2120
Shtrp
2076
2075
2015,
RephyTV
Alba
2080.
2132
Panasonie
2021
Akum
DEC
ire
Pioneer
2096
Daylek
2132
Northg
2054,
Akai
li
Media
2019.
2063
2055.
2112
2132
Nivcus
Philips
Aiwa
2078.
2132
PC
2132
2128
()2(X), 0207,
0208
2127
Aiwa
0028,
0237
0139,
0229,
Akai
Akiba
Akura
Alaron
Alba
ALBIRAL
AllstaJ
Amplitision
Amsiiad
Amu'on
Anam
Anam Nltional
Anglo
Anilecl_
Ansonic
AOC
Apex
Air enCiel
Arcam
Arcanl Deltt
Arislona
ASA
AsbeT_
Astra
Asuka
A0antic
Atod
Audio_mic
0059, 0065.0127.
0129.0130,0200,
0204. 0208, 0209,
0213,0217,0218,
0255
0209, 0218
0206, 0209. 0218
0200
0200. 0207, 0208,
0209, 0217, 0218
0212
0213
0207
0204, 0206, 0208,
0209, 0218
0062
(1208
0062
0208
0206, 0208
0203, 0208
0060, 0B61
0118, 0122. 0132
0216
0200
Cascade
Cathay
CCE
Celebrily
Cenmdon
Cen/my
CGE
Cimline
Citizen
0207
0213,
(1205,
0213
0208
0200.
0209.
0200,
0217
0208
Craig
Crosley
Crown
0217
0211
0208
0213.0217
0127
0059
0213,0217
0205
0214, 0215
0208. 0218
0060, 0(X)I,
0064
City
0208
CI irivox
0212, 0217
CI itronic
0206, 0207,
0209, 0213.
0218
CMS
02(_J
Colortyme
0060. 0061
Concerto
0060, ()(K,I
Concorde
0208
Condor
02(X), 0207,
Contec
028B. 0207.
Contec/Cony
0062
Continental Ediscm
0216
Cosmel
0208
CS Electronics
0206, 0207,
0218
0207. 0213.
CTC
Curiis Ma01es
CXC
0207, 0208, 0209,
0213.0216,0217,
0218
0207
0062
0205, 0206, 0207
0200
0216
Cyberuon
D tewoo
Bang & Olofxen 0205
Basic Line
0208. 0209, 0213,
0218
Bastide
0207
Baur
0217
Beko
0228
Belcor
0060
Bell & Ho_e8
0058.0004
Dantax
Day(ton
De Graaf
Decca
Benq
Beon
Beslar
Binalone
Black Star
Blaupunkt
Blue Sky'
Bondstec
0081
0213, 0217
0213
0207
0214
0255
(1209, 0218
0214
Dixi
DTS
Dual
DuaETec
Dumout
Bools
BradB)rd
BrandI
Brionvega
Britannia
Brockwood
Broksonic
Bmns
BSR
BTC
Bush
0207
0062
0216, 0226
0205,0213.0217
0200, 0207
0060
0138
0205
0215
0209, 0218
0177. 0208, 02(0,
0210, 0213, 0215,
0216,0217,0218,
0230. 0237
Dy nalron
Elbe
0060, (14161
0206
AudioTon
Audiovox
Aulovox
Awa
Baird
Candle
Capsonic
Dainicl_i
Dansai
Desmet
Dianlond
Dimensit
0062
0205.
0062.
0208,
02(X).
0214,
0214
0057,
0964,
0062
0214,
0063,
0213,
0207,
0218
0062,
0208,
0214.
0060.
C()61
Hisawa
0209.0218
Erws
0213,
0217
Hitachi
0806,
(K)I4, 0015,
ESA
0080
0016,
(_142, 0060,
Etron
0208
006 I, 0095,
0105,
Eu ro-Feel
0206
0127,
0156,
0179,
Euroline
0217
0180,
(Y2(#,
02(17,
Euroman
02(X)
0210.
(_11,
0215,
Euromam]
0206,
0207.
0213
0216.
(_51
Europhon
0200.
0204,
0207,
0213,
0215
0213
0208
0313. 0217
0215.0216
0208, 0215
0127, 0205.
Hygashi
0200,
0207
Fidelity
Fiulandia
0200.
0210
0207.
0210
Hyper
0200,
0214,
0207,
0215
0208,
Fiulux
0204,
0205,
0207,
Hypson
0206,
0207,
0213.
0200.
0206,
0213.0215,
0217
0200.
0207.
0208,
0213.
0214
Fisher
0064,
0127,
0128,
0205, 0207,
0213.0218
0215
Flint
I(eS
[MA
02(X), 0218
0062
0200,
0215.
0207.
Imperial
0211,
0215
0213,
hldiana
0213,
02-17
hllinhy
0063
hlgelen
0211
0205.
0217
Fortress
0205
Fiontech
02(X), 0208,
0310,
021 I. (_14
FujBsu
Funai
0127.
0213,
0208
[nno
0201,
0204,
0207,
0208,
0209,
0213,
0217,
0218
Hit
0127
0033,
0034,
0035,
hlnovation
0206,
0208
0036,
8B37,
0062.
[nteJ buy
0208,
0214
[nteffu
0205,
0211.
Gatex_ ay
0094
GBC
0208,
GE
0057.1_)60.
0214,
[ngm sol
0088,
0062
0209,
0218
0024,
Fu tui_'lech
Geloso
ICE
0023,
0025,
0206
GEC
0217
0207.02()8,
nk
0313.
0214,0216.0217
0215,
0132.
0147
0204,
0207,
0213,
0217
0208,
0210,
General
Technic
0208
Gencxx
I
02(19.0211.
Intenlalional
02(X)
0218
Interviskm
0206,
0207,
0218
006 I,
hladio
0201,
0208,
0299,
0213.
0217,
0218
Isukai
0209,
0218
ITC
0207,
0215
ITS
0200,
0209,
0213.
0211
021 I.
0215
0218
0213,
[TT
0129,
0208.
ITV
JBL
0208,
0063
0217
(X160, 0061
GibralteJ
0218
0060
GoldHand
(12(_)
JC Pelmey
0057,
GoldStar
0060.
(K)61.0127,
JCB
0(159
0128.
(_()0,
0201.
Jensen
0060.0B61
0307.
(_()8,
0210.
JV(
0017.
(_.)I 8.0019,
0213,
0214,
0215,
0108,
0136,
0153,
0178,
0190,
0213,
0200,
0207,
0208.
0209.
0218
0217
Goodm
0171,
0201,02(g,
0306.
0208,
0317.
(1240
GPM
0209,
0218
Gmelz
021 l
Gmnad
ms
t
0213.
0207,
(1917
0210.
Gmndin
0208,
0209.
0217
0213, 0217
0203, 0204, 0212.
0218
Elbe-Sharp
0204
Elcit
0204. 0205
ELECTRO TECH
0208
Electrob md
0059
Electrohome
0059.0B50. 0061
Elin
02(X). 02(17. 0213,
0217
Elite
02(D, 0213, 0218
Elman
0215
Elll
0200. 0208
Grmldig
0128,
0130,
0222.
0236,
0255
Emerson
0060, (_161,0062,
0064. 0128, 0205
0207
0226
0204,
0213.
Dur lbJand
Dux
0218
0200.
0212.0217.
02(X)
0217
0060. 0B61,0208
0210
02(N, 0207, 0313,
0217
0213, 0217
02(X)
0057
0209,
Huanyu
Fcrguson
Fonnenti-Phoenix
(X)60, 0061,
0065
0213
HosilaJ
0208
Formenli
0215
0128,
0217
02(_),
Hornyphon
Fcm_er
Fil stline
0209, 0218
0060, (_161,0120,
0127. 0155, (1193,
0200, 0207, 0208,
0213, 0218. 0238
()2(X), 0209, 0218
028B, 0206, 0213,
0217
0208.
0208
0207,
0207,
0060,
0207
0126
0217
Envision
0318
Kaisui
Kanlos_mic
0207
Kanlp
0200,
0207
Kap_h
Kal_ her
0211
0207.
(_08,
0212,
0060,
0061,
0217
Kawasho
0059,
0200
Gru npy
0062
Halilax
028B. 0206.
Hallmark
0060.
Hampton
(12(_), (_2(17
Hanseatic
0203,
(_2()7, 0208,
0213,
0215,
0207
0061
Kendo
0128,
Kennedy
0315
Kenwood
0060,
Kingsley
02(X). 0207
Klos
0210
8B61
Novabeanl
0217
0062
Hant aJex
02(£!. 0208
Kneissel
0203
Harvard
0062
KoJster
0213
HCM
0206,
Konkt
02(79.0218
0218
Koq_el
0213,
Hifi vox
0216
Kolling
0205
Higashi
02(X)
Ko_oda
0208
Hinari
0208,
KTV
0062.
Kyoto
02(X), 0212
0207,
0209,
0317.0218
0208,
0313,
0217
0127,
0207
iv
Lenco
0208
Lenoir
0207.
NEC
Lesl
0214
Leyco
0206,
0213,
0217
LG
0016,
0038,
0039,
0127,
0128,
0158,
0163,
0166,
0188,
0200,
0208
Neckeml
0205,0207,0210,
(1()20, 0021,
0022.
0(_,9,
0060,
0064.
0217,
0250
0127,
0128,
0200,
Planu'on
0206,
0213
0203,
0207,
0215
Pohlloid
0075
SBR
0209,
0213.
Nesco
0214
NET-TV
0082,0101
Poppy
Portland
02(18
(X)60. 0061
SCHAUB
0164.
0189.
New Tcch
0208,0213
PrandonPPrince
0204.
Schneider
0201,0207,
New World
0209,
0218
PJccision
0207
0208,
0210,
0213,
Nicamagic
0200.
0207
Prima
0208.
0214,
0215,
0217
Nikkd
0200,
0206.
0207.
Prolex
0208
Scotc!_
(1061
0209,
0218
0213,
0217.
Profi-T]onic
0213
Scotl
8060,
0061,
(_)62
Proline
0213
Sears
(_.)57, 0060.
0061.
Pro_an
0057
Prosonic
0200,
0207,
0217
Pro(call
0206.
0207,
0_08,
0214,
0215.
0208
Nikko
(X)61
0255
Sanyo
0157.
LORENTZ
0211
0210
0_07,
0215,0216,0217,
0211
0218
0064
0128,
0203.
Nobliko
0200,
0204.
0223.
0227
Nogafllalic
0216
0205,
0213,
0217
Nokh
0129,
0211
0213,
SE[
(_04
Nordmende
0205,
0211,0213,
0217
SEbSinudyne
Lumt
0210,
0217
0210,
0213,
0217
0207
0217
0063,
0058
re'on
0216.
0217
Logik
Lure
0195.
0213,
0206,0208,0218
Opla
0194,
021 I, 0213,
NEI
Lilelec
Loewe
0182,
0127
0096,
0217,
0217
0206.
e
0060.
0061,
0213,
Liesenk
Lile
Loe_
mn
(1(126, 0053.
SEG
0200,
0206,
0214,
(1215, 0217
0207,
(_04,
0205,
0216
Ploton
(1060, 0061
Seleco
0210,
021 I, 0215
0211
Nordvision
0217
Plovision
0217
Sencora
0208
Oceanic
Olexia
0211
(1()_
Pulsu
(X)60
Sentm
0218
Pye
0213.
Serino
0200
Shtrp
(1()09, 0010,
C<)I 1.
0060,
0061,
0066.
Lux Mty
Luxman
0213
0060.
Luxor
0201.0207.0210
ONCEAS
0207
Pymi
0208
LX[
0057,
Onwa
(X)62, 0218
Quasar
0152.
0214
Orbit
0213
QuelJe
0201.
0206.
02-07,
0070,
0087,
0111,
Orion
0126,
0204,
(_2()8,
0214,
0215.
0143,
0145,
0167.
0213,
0217,
0235
0213,
0217
0061
006 I, 0063,
0064
Magnadyne
0204,
0205,
0214,
0215,
(_ 17
Magnafon
02(10.
0204.
0207
Orline
0218
Radialvl
Magmwox
0060,
0061,
0063,
Orso'_ e
02(M
Radio
Shack
Osaki
0127.
0206,
Radio
ShackPRealistic
0209,
0218
0102,0103,0150
Magnum
0206,
Majestic
0058
Mandor
0206
Mallesttl
0206.
0208
0207.
0213.
0217
Marantz
0207,
0210.0213,
Medialor
0213.
0217
Medion
0206.
0208
Megatron
Melecllolfic
Mivar
Montgomery
Mu0i System
Mu00ech
Singer
(1149
Simldyne
Realistic
0147,
(1064
Revox
0213,
0217
Skantic
0211
Rex
0206,
0210,
Sohvox
0211
0205
Sonoko
0206,
0208.
Pananl
0200,
t
0217
0206,
0207.
0110,
0114,
0137.
R-Line
0213.0217
0141,0151,
0162,
Roadstal
(_2()6, 0208,
021 I, 0213,
0165,0186,0204,
Robotron
0218,
02(15
Rowa
0216.
(X)61. 0064,
Parle
Cinen]t
0211,
0244,
0246,
0254
0200,
0203,
0245.
(_07,
0212,0215
P uhe Malvoni
0212.
Sonolor
0211
Sontee
0213.0217
Sony
(X)41,0059,
0067,
0085,
0086,
0174.
0200
0196,
0199,
0208.
RTF
02(15
0219,
0234
Saba
0204.
0209,
0218
0205.
Pausa
0208
saccs
0212
0208
Pcrdio
0200
S lisho
026vl, 0206,
0206.
0208
Pl]ilco
0060.
0061.
(1()63,
0128,
0205,
02-14,
Philips
0061.
(X)40. 0060,
0063,
0104,
0112,
0113.
0072,
(1115,
0116.
0125,
0205,
0213
0124,
0130,
0150,
0200,
020 I, 0202.
0175,
0184,
02(13.
0204.
Ward
0(161, 0128,
Pl_ilips
0210,
0215,
Mmphy
0200.
NAD
0061
N louis
0210
Salora
0214,
Phoenix
San]bel _.
0204
S_mpo
0060,
0101
& Vision
Soundesign
(X)60, 006 I. 0062
Soundwave
0213,0217
SSS
8060,
SlandaJzl
0207, 0208,
0213.0218
Stallighl
St ul0e
0217
(X)62
Slenway
(_18
Stern
0210,
(X)83.
0062
0209.
(gl0,
0211
0031,
S unkai
0208,
0218
0187,
0032,
0044,
0045,
S unwot_J
0208,
0213
02(15, 0207,
(1213,
0046.
0047.
0060,
Superla
0200,
0204,
0215,
0217,
0220.
0061,0065,
0068,
SupeJTech
0200
0221,
0232,
0233.
0069,
0071,
0079,
SupH
0208
0252,
0253
0087,
0127,
0128,
SupTen]e
0059
0130,
0144,
0160,
Susmnu
0209
0161,0170,
0176,
Sutton
0_08
0183,
0200,
Sydney
0_00,
0207
0201,0206,
0207,
Sylvania
0060,
0061,
C<)63.
0208,
0213,
0217,
0080,
0134,
0142,
0239,
0241,
0242,
0148
Magnavox
0124
0200.
0205.
(_13,
0200.
0205,
0213,
0217
0207
0(161,
Sound
(X)29, 0030,
Samsung
0217
Phonola
0201,0204,
021 I. 0215
08d, 8, 0060,
0207
0207.
0208
0215
0207
0211.
0216
0216
0061
Philharmonic
0209,
0237
0206.
0204
0211
0213,0217
0060.
0217
V
0207
0208
Panasonic
0208.
0208.
0135.
0207
02C<), (_()7,
0207,
(1133,
Palladium
0128,
0215,
0200
0091,
0217
0127,
0215
0205,
Silva
02C£J, (_207, 0208,
0217
0062,
0214.
(_04,
0217
(X)61.
0200.
0200
(_05,
0060,
0061
0060,
(X)58
0057,
0058
MTC
0213
Signature
RCA
0200
0006,0015,0016.
0255
Sien'a
0217,
Rhapsody
0213
Siemens
0215
0216,
0214
0247.
0249
0205.
0213
(1097.
MSsubishi
0212
Radio(one
0074,
Mhloka
0204,
Sicalel
0213,
0073,
0205
t
0205,
0203.
0208
Mhlelw
0217
0204.
RFT
Metz
Microstar
0213.
RadimnarclJi
(X)60
Si u'em
0207,
0218
0063,
Melnptds
ixx
Radiola
Shogun
0204,
Pael
0208
Microm
0(?64
C<)06. 0007,
0058.
MGA
0062,
0061,
OIlo Versand
0217
Memorex
0060,
0218
0255
0204,
0057,
0209,
0_ 13, 0217
Malsui
0248,
Osmne
0090,
02(X), 0213,
026v¢,, 0224,
()()(M
Oso
0215,
Mark
0218
0201
(X)61,0063.
0205
0168,0169,0198.
Osio
0060,
Marelli
0207,
0217
0185,
0243
Pilol
0060
Pioneer
(X)l 2. 0013,
0060,
Smdm
0200,
0207
0061,
0(_)8,
0109.
Smsui
0123,
0126,
0117,
0128,
0181.
0213
Symphonic
(X)62. 0080
Sysline
0217
Sy_ong
0200
0207
Tandy
0127,0207.0200.
weltblick
0213.0217
Alba
0211.
0218
Weslon
0215
American
Tashik{>
0200,
0207.
Tamng
0127,02-{)4,0207,
0210
0237
White
Weslinghouse
Yamall
1
High
H}44. 1050
GoldHand
1050
1(1{)4
Goldst
1000.
1(142
0200,0207,0217
Anitec!l
1050
00{g1, 0001,0002-,
ASA
1045,
1046
0t_)3.00(14,
Asha
100_.
1014
Asuka
I(142. 1045.
0217,
TCM
0206,
0208
Teac
0127
Tec
0207,0208.0214.
Yamishi
0218
0215
Yoko
02{X), 0206,
0207,
Audio
0208,
0209,
0213,
Audiovox
10(H
021%
0218
Baird
1042,
0060,
Techwood
0060.
0061
Teknika
0058,
006(h
0061,
0005,
0061
Goodmans
1046,
unics1000
1043,
1042,
1045,
1050,
I(147
I {)05
Gmetz
I{143, 1047
Granada
1046,
1(147.
1{149
Gmndin
I042.
1045,
I050
Gl_ndig
1046.
1050,
1062
Han_ea0¢
1045,
1046
HarE'y Davkl_:>n
Hannan/Ka_lon
1005
If_}0
Harwood
1006
HCM
1050
0062
Yorx
02(Y-). ()218
Basic
0216
Zanussi
0210
Baur
1046
Telecor
0218
Zeuifll
0058,
0060,
0100,
Eeaumalk
l{g)2,
Tele_nken
0065,
0105,
0119.
0121.
Bell & Howell
l{g)l
Telegazi
Telelech
0218
Elaupunkt
I046,
1048
Headqua_er
I(DI
Eroksonic
Bush
1012,
1(M4.
1013
1050,
Hinari
I(}44,
Hisawa
I(}44
Hitachi
1{XI7, 1010,
1039,
I(_2,
11)49
1046,
Telelon
0208,
0207
Televideon
0200
Tensai
0208,
0216
0154
0214,
0217
TV[[}VD
0209,
0213,
(1218
Tesmet
0213
Tevioll
0206,
0208
Texet
0200,
(H07
Thol/Isoll
0191,
0192,
Aiwa
0139,
2055
Ctlix
10{H
Apex
0132,
2(/49
Cradle
1002,
Broksonic
0138,
2(g}0
Culon
EgM
1014
1066
1003
105(I
1043,
Bush
0230.2112
CCE
HI06
JVD
0136,
CGE
H}42. 1043
Panasoldc
0137,0254,2054,
Cin0ine
1044,
1050
Hypson
1044,
2110
CitiTen
1002,
1003
hnperia]
1042
0133,0135,2050,
Coloilyme
10(1{)
2051
Colt
10(X_
hlno Hit
Innovation
1046, 1050
I{}44. 1048
Craig
100_.
Instant
I{)(}4
0207,
0213,0216,0226
1044.1050
Gmdiente
Teleavia
0213,
Line
1042.
1069
1050
Dyn
1003.
I045
Amstmd
0213,
u
RCA
2053
Thorn
(1212,
0217
TMK
0060,
(1{)61
Sylvania
0134,
2052
Tokai
0213
Thomson
0226.
2109
Tokyo
Toshiba
0200,0207
Toshiba
0131,0231,
2048,
2111
Cro'a n
Curtis
M _Ihes
Cyber
ex
Hughes
1003.
1006,
Network
Replay
Syslems
101(I
1050
1014
Inte_uy
1045
1050
Inter_nk
Intel_ ision
I046,
1042
1047
hTadio
1045,
1050
ITT
1043,
1047
ITV
I045
JC Penney
I{K)0, 1001,
0027,
0043,
0053,
10(X), 1002,
10(}4,
0054.
0064,
0078,
0089.
0090,
0E)6,
TV/DVD/VCR
0E)7,
0127,
0131,
Pm]asonic
0141.
1(140. 2057
0140,
0146,
0159,
San]sung
0241,
1070,
2113
0197,
0225.
023 I.
Si]alp
0143,
1028,
2059
Dansai
1050
1041. 2058
Dmta×
1044
JCL
1003, 10{}4, 1006
I (1(}4
DBX
10(10
Jensen
1007
De Graaf
Dec*a
1046, 1049
1(2'42, 1043,
JVC
1000,
1001,
1007,
1011,
1017,
1036,
Denon
1010
Dimensia
1009
Kaisui
1050
Dual
1(143. 1046
Karcher
1(146
Dumont
1(142. 1046.
Kendo
1{}44
Kenwood
1000.
1001,
1007,
1009
0237
Sylvania
0142,
Towada
0211,0215
Toshiba
0140,1029,2056
Tl2_l]slec
Tfidenl
0200
0204
TVfVC_
Tfistar
0218
Aiwa
0237,
Triumph
Uher
0204
Bush
0237.
1t_b6
0211,
0213
Daewoo
0155,
0238,
Ultravox
0200,
0205.
0214,
0215
0207.
1{_6
1038,
1067
Daewoo
1002.
1014
1005,
1038,
I061.
I067
1046
I (_3
1047,
GE
0147,
1030
Goodmans
0240,
1(_9
Dynalech
1005
Grundig
0236,
1062
Elect rohome
1003
KLH
I01 I, 1043
1006
HiH_hi
0156.1039
Electrop[lonic
1003
Kodak
1{KI3. 1004
JVC
0153,
I(E6
Elta
1050
Korpel
105(I
Magnavox
0150,
1033
Enlelson
I(203. 1004,
Legco
1050
OIion
0235.
1065
LG
1003,
0214.0215,0217
Panasonic
0151.
l(H4
Vexa
0208,
Philips
0150.
0232,
Victor
0213
1033,
1062.
VIDEOLOGID
0200
Qutsu
0152,
Videologique
0200,
RCA
0149,
0218
Ro Klstar
0237,
1(}66
0214
0213
g _msung
0144,
1068
0239,
Sharp
0145,
1028
Sony
0234,
1(_4
Fonnenti/Phoenix
United
0217
Univel
sul]_
0127,
0128.
0129.
0201.0206,0213,
0214.
Univox
0212
Vestel
0210,
Videosal
VideoSystem
Videotech
Vidlech
nic
0215,
0211,
0217
0213,
0217
0207,
0209,
0200
Fcrguson
1043
Lil6tec
1044,
1063
Fidelity
1042
1055
Fiulandia
1046,
1{147, I(M9
Lloyd's
12_ewe
10{}5
I048
1032
Fiulux
I{)42,
E143,
1046.
12_ew e Opta
I {)45, 1046
1049,
12_gik
Luxor
1006,
I(}47
LXI
1003
M Elecll_mic
1042
Magnasonic
1047
Magnavox
1004,
1046
Magnin
1{}03. 1014
Fuii
1004
Manesth
l {}50
Fujitsu
1042
Marantz
1000.
Funai
1005,
Galaxy
Garrard
1042
1005
Maria
I{146, 1051
1003
Matsui
I{}44. 1045
GBC
1050
Matsushila
I{)(}4
GE
1002,
1004,
Medialor
1046
1014,
1030
Medion
I044,
MEI
1004
0077,
0092,
Sylvania
0148,
1031
0009.
0172,
0173
Tatting
0237.
11k56
Visiola
0200,
0207
0146.
0237.
Vision
0213
Vortec
0213,
Voxsol_
0205.02-10,
0213
0212
WaJ_ls
0057.
0058,
0061,
0063
Nat soil
0213,
0217,
0218
Watt
0200,
0207.
0212.
Wcga
0154.
1037
V{_:_
0207,
0215
0205
1029,
021 I,
Waltham
Radio
1027,
0060,
Admiral
1008,
Advenmra
1005
Aiwa
1005,
1013
FIRST
LINE
1044,
1050
1045,
Fisher
1001,
1047
Flint
1044
1{N2, 1043,
1(2,44. 1066
GEC
1046
Akai
1007.
1(143
Geloso
1050
Akibl
Akma
1050
I(M3,
1050
General Technic
Go Video
1044,
1014
I(}45,
1071
I(147, 1049
1066
Zenith
1042,
0233,
0076,
(_ 17
1013
1050
0061
I
1005,
Elzuko
0060,
Toshib
1049
I012,
10{_,
1042
1000,
1048
1050
1018,
1001,
I033
10{14,
1048
1048
vi
Memorex
1001,
1002,
1003,
Pathe
1004,
1005,
1008,
Penney
Mai_oni
1043
1010,
]014
Samsung
1013,
1(114.
1042.
Pentax
1010,
1049
1045,
1047
Pe_lio
1042
Memphis
1(_0
Phiico
1004,
105]
Metz
1048
Philips
1004,
1025,
I033,
MGA
]014
1046.
1056,
1(_7,
1059.
1/)62,
1063
MGN
Technology
1/)02,
1014
Micromax×
1/)44,
1048
Micl_star
1044,
1048
Migl_s
Mhloha
Mitsubishi
1011,
Montgomery
Philips
Magnavox
l(X)2,
1014,
1021,
1027,
1052,
1068,
TCM
1(144, 1048
Tcac
l (105, 1007
Sansui
1007,
1011.
Sanyo
Lorenz
Teknik
1050
1003
10] I, 1046
Scott
1012
Prinz
1042
Sears
1(_)1,
Profex
Profl_onic
1050
1014
SEG
1047
Tcnsai
I(142, 1045,
1042,
1044,
I045_
Tevion
1044,
1048
1046,
1050
Thomson
I043.
1058
Tllom
1043,
1047
TMK
10(12, 1014
1010
1050
Tokai
TonsaJ
1045,
1050
1050
Tosllib
1013,
1024,
1029,
I(N3,
I046,
1066,
1003,
1014
1003.
1(K)4, 1/)1)8
Proline
I042
SE1-Sinudyne
I046
MTC
1(_2,
1014
Proscan
1(_9
Seleco
I043
Mt_hitech
1002,
1005.
1(K)6.
Prosonic
1044
Senl_J_
I(150
1042,
1046,
1050
Protec
1006
Sharp
1008,
1023,
Pye
1046,
1053,
1/)73
1047,
Murphy
1042
Nationa_
1048
Qua_er
1001
Shin_m
l(X)6,
NEC
1(X)0, 1001,
1007,
Qua_z
1001,
1/)47
Sl_ivaki
1045
1011,
1043.
105]
Quasar
1(104,
1035
Sh_un
1002,
Neckennam_
1043,
1046
Quelle
1042,
1046.
Siemens
1045,
NEI
1046
Radio
Shack
Nesco
1050
Radio
Sh ack/Realistic
Silva
1045
Nikko
l(X)3
1001,
1/)(/2, 1003,
Singer
1004.
Noblex
1(102, 1014
1/)04,
1005.
Sinudyne
Nokia
1043,
No_lmende
1043
Oceanic
1042.
Okano
1044
Olympus
Optimus
Orion
1012,
Otto
1(175
1028,
1050
Totevision
10(_,
Towad
1050
_
Towika
1050
Uher
I(M5
1014
Unitech
1002,
1014
1047
UniveJsum
Vector Resealdl
1042,
] ()(_)
1045.
Video
I(K)0
I(K)8
ConceNs
1046
Videou
1044,
] 048
I(146
Videosonic
100_,
1014
Wards
1002,
1003,
l()(;q,
1(_)5,
1006,
1008.
1010,
1014
1/)(/6
Sonlec
1045
Radix
1003
Sony
1016,
1019,
I055_
Randex
10(_
1060.
1064,
1074
RCA
1002.
1004_ 10(g),
STS
I(K)4.
1010
I(K)4
1010,
1014.
Sunkai
1044
1(_)3, 1008
1022,
1032
Sunstar
1042
1001,
1002,
1003,
Suntmnic
I042
XR- 1000
1C<)4, 1005.
l 0(X)
1004,
1005_ 1008
Sunwood
1050
Yam _ha
I0(K), 1001.
1007
Sylvania
I(_4,
YamJshi
1050
1050
1042,
Versand
I
1046
1043
1013.
1044.
1042
Osaki
1(_14.
Radiola
Realistic
1065
Orson
1014,
1(142, 1043,
Motorola
1047
1050
I(143
Pioneer
1(_8
1005
Tcnosal
Pilol
2000
10(M,
Telefunken
1010
Signatm_
1048
I()(B,
I (146
]002,
1043.
1004,
1047
1042
1003
_
1043
Schneider
1/)56
Technics
Teleavia
1(_I.
SBR
1047
1013.
1043
104b
1008
1066
1(108
Phonola
Wa_
1042,
1070
Schaub
1046
1007,
1046,
Sanky
1/)18
1042.
Tamng
1045.
1050
1046
Rex
I043
RFT
1046
Roadstar
1045,
Palladium
1043,
1045.
1050
Saba
1043
Panasonic
1(K)4, 1020,
1034,
Saisho
1044,
1040,
1/)54,
Salora
1047
1048,
1050,
1015.
1066
1050
Weltblick
White
1045
Westinghou;e
1013
1005_ 103L
1041
Yokan
Symphonic
I(_5
Yoko
I(M5,
1050
Taisho
1044
Zenith
1013,
1026,
Tandy
l(X)l
Tasl_iko
1(_3,
1037
1/)42
1072
OYAMAHA
© 2008
YAMAHA
ELECTRONICS
CORPORATION,
USA 6660 ORANGETNORPE
AVE, BUENA
PARK, CALIE
yAMAHA
YAMAHA
YAMAHA
CANADA MUSIC LTO_ 135 M_LNER AVE. SCARBOROUGH_ ONTARIO M_ S 3R£ CANADA
ELECTRONIK
EUROPA 6_m.b.H. SIEMENSSTR_ 22_34 25462 RELUNGEN BEI HAMBURG
GERMANY
ELECTRONIOIJE
FRANCE $.A_ RUE AMBROISE Cf_OIZAT BP70 CROISSY-BEALtBOURG
77372 MARN_&A-VALLEE
¥AMANA
YAMAHA
yAMAHA
ELECTRONICS
(UK) LTD. YAMAHA HOUSff_ 200 RICKMANgWORTH
ROAD WATFORD_ NERTS WDI 8 7GO, ENGLAND
SCANDINAVIA
A.B. J A WETTERG_ENS
GATA 1_ 8OX 30083, 400 43 VASTRA FROLUNDA
SWEDEN
NU$1¢ AU$_FtAUA
_T¥, LTD. 17-33 MARKET ST,_ SOUTH M_LBOURNE
3205 V_. AUSTRALIA
YAMAHA CORP_TION
All rights reserved.
90320. U&A.
CEDEXOZ
FRANC_
YAMAHA CORPORATION
Printedin
China
,c
WN25670
OYAMAHA
The circled
ges hombres
•
numbers
RX-V463
and alphabets
correspond
el lettJes dans un cercle
Front panel/Face
®
to those
con'espondenl
Manual.
avant
®
®
in tile Owner's
h ceux du mode d'emploi.
©
®
@
©
®
@ ®
®
@
@®
®
©
@
•
Remote
control/Boitier
de t_lecommande
®
@
YAMAHA CORPORATION
Pdntedin China c
WN26190