1
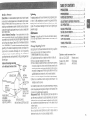
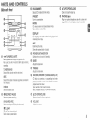
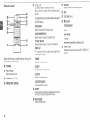
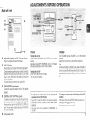
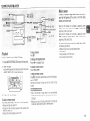
For your convenience,recoid the modzl numberand Serial
number(youwill find themon the rearof your set) in the space
providedb&w. Pleasereferto them when you contzct youi
Aiwa dealerin caseof difficulty.
Forassistanceand
(UnitedStatesand i3.w-b Rco)
ELECTRIC SHOCK,
so WT SEMO”E COVEP (OR BACK).
NO LSE%SERVICEABLE
PARTS INSIDE.
REFER SEWICiNG 53 CU&FiED
S3ViCE
?ERSOMNEL.”
leciric shock 07 irijq.
be iollavetl
in the ii;sta!l2iioii.
thesesafetyhsiructioils should
ure ai:C XX\jiGl~~ tile unit.
- Co not use attaci~me% sci recommended
TVthe
unitmantifacturer
asthey:lar result:ntheriskof Ire: EieCtii’:
si;ock
ii? injuryto persons.
W&r ml U&&m3 - 30 r!ci use:llis unit nearwaiei - for
example,nearabat& v!ashbowl.
k’ichsnsink,or laur@iuL. in
a wetbasement,
or neara swimm;ngpool,and!lie like.
Heat- 30 notusetnis unitnearscuiccsof heat,includingil~~tlnQ
:ven!s,sbves,or orherapp;~wces
thatger;e:ate
heai.if al.%shcul3
;‘ct bepiacedin temperatures
lessihsn5”: j4i’Fi or greaterihari
~~~as~~e~~s
tearntingswlace ?laceihe uniton a itat,evenMace.
&~~lssories - Do noi placethis urii!on an tinstabiccart.stand,
tripod.bracket.cr table Theunit mayial!, causir!gse:iousinjury
to a ci~lo or a11adult,a;id seriousdamageto ihe appliance.Use
oil’y witha cart.siand,tripod.aracket,or Me recornmerided
by
the manufacturer,
or scld wit+ the unit. Any mouniingof the
ap$i~ncesho~;d
f&wt~e m;iluf~c:ur& ins:ru;tiws.andshould
usea mountingaccessoryrecommended
bythemawiacturer.
Po~tabk car%- AII agpl:arce and carI
combination
si?ouidbemovedwiincare.Qcick
s!ops.excessive
force,anduneven
surfaces
may
causethe appliancea-;d cartcombinationto
overturn.
Ya&Eaf$on The unii shckl:! Se siiuaieCwlih adequatespas?
aroundii so ihatproperhealvzntila;ionLsassured.A;lovui 0 c.‘;
clearance
EroTthe rearand:hs tcp of t::i: unit.aiid 5 cmfro:: tb
eachside.
Slots and openingsill the cabinetand rhe backor bot:omare
providedforveniilaiion.ai.d13ensarere,iabie3Deration
of theiuili:
an<tc ;‘o?ec:it irsm cve:hsating.theseo$:ings must X! bi:
blockedor covered.The opesingsshouldceverbe blockedt?y
placingthe mt on a bed.sofa.r@ or crhersiMlar scrtece.?Ris
unitshouldnotbeplacedma W-in instal’a:ion
suchese bockcase
unlessproDi3ventilationis provided.
Objm’: asd Liqdd &try Neverpushobjectsof anyk!nd:ntc
rh’s cni-:thro-ghthe ce’linstsrolcastheymayto%? dangerccs
voliaqeoointsor short-ciisiiitpartstzarcouldresultin a fire Cr
elect& shock.Neverso111
liquidof anykindon theunit.
Pww Sowces - Thisun;rshouldbeo;ieratedcniyfromtheWe
oi powersourceindicatedontne7iarkingIaM. If ycu 2%no:suie
of thetypeof powersupplyio yourhorse,consultyo::: a@iai!ce
des!eror Iccaldowercompany.
Tocperaieuniton batterypower.C’
etherswrces.referto t!Ieoperainginstructions.
Gaooirarlirrg
or Polarization-Thisunitisprovidedwitha polarized
alternatino-current
line alum(a ~1%havinqonebladewiderthan
the otherf Tliis piug w/l/ fit :riio the p&r outletonly onewaji.
Thisis a safetyfeature.if youareunabletoinserttneplugfuliy into
theoutlet,try reversingize plug. If the p!ugshouidsiiil iall to fir.
contactyourelectriciaiito replace
yourobsoleteoutlet.DonorMeat
ihesafetypurooseof thepolarizedplug.
Pwer-Cord ~~~~e~~~~~
- Powe;-supply
cordsshouldberouied
so Far tneyare not likeiyto be walkedon or pinchedby iiems
placeduponor againstthem,payingparticularattentionto cordsat
p!ugs, convenience
Weptacles.andthepaid wheretheyexitfrom
theproduct.
~~~~~~~~~~~
- Do net cverioadwail outlets,extensioncords.
integralcocvenience
receptacles
asthis car!restlItin a :isk of iire
or eleciricshock.
Power lines An outsideantennasystemshouldnot be located
in thevicinityof overhead
powerlinesor otherelectriclightorpower
circu’ts.orwhereit canfall intosuchpowerlinesorcircuits.Winea
mstallingaii outsideantennasysiem.exirtimecareshouidbetaken
to jeepfromtouchingsuchpowerlinesor ci:cuirsascontactw!rh
themmightbeiatal.
&Mnor &%nna Grounclirrg^ If an outsideantennaor cable
systemis connected
to tie unit,besuretheaniernaorcablesystem
isqrnunded
soasto providesomeprotection
againstvoltagesurges
an; built-upstaticcharges.Section610oi [heNationalElectrical
Code.ANSIINFPG
No.70.orovidesinfcrmaiion
withregard:o proper
groundiiicof tne mastandsupaornngsxxure. grxnding 3f the
icad-in wire to an anrepnadischargeunit, size of aroundinc;
conductors.lacarionof antenna--discharge
unit, connectic:,ir,
gxmding electrodes,
andrequirementsfcrthe
g:oundingeleclmk
Seeinefigure
ELECTRODE
SYSTEM
@ECAR:250PART
W)
NEC-NKKXAL
ELFCTRICAL
CODE
Fara&d prorectioii
fortiils unitrerei;ierd!irinGa I’giirninCstrirrr
3r Wei it is IeRunaitendzd
andzcsed for longperiodsof time,
unplugit fromti;ewall outleianddisconnectiheantennaiurcabi:
system,Thiswill prevenrdar:‘ageto :he unit due,o Ightninga!?d
poweriinesurges.
iplug ihis unitfromine uall out;eibe&e cleaniar;
Do zot useliquid cleanersor aerosolcleaners.txe a damp19th
for cieaninG.
Unpl;ij tnis unitfromthewallout;etandreferce*!!icing:o qualif~el
swics ?erscnnelunder[heioliowingconditiors.
ti Whenihe ooblercordor [;iugis damaged.
2j If liquidhasbeenspilled,or objectsh$jeial.en~ctothe unit.
3j Ii theunii hasbee: exposedto rein0; waie:
4) if IheJnit doesnot opeiatenormalljibi followingIheopciarina
instructionsAdjustoniytnosecontrclsthalarecohjered
bythe
cr;e:alingir:siiucficnsasirproperadjustment
or orlher
Wiiti:s
mayresult;n damageandwill of% *equirecxtersive‘&Jork
bya
qual:iiedtechnicianto resrflretne &it to inoimaloperation.
5) lfrlie MI hasDee;droppedor ihecab;%:?asbeenoamagcd.
5) \&er: ihE~$1exi;ibirsa c:siinc;cixge in pe%rmanx - his
iildicaks a needfor sxvice.
Doi!otatte;-ptto servicath,st!iiit yo~seliasose:ing3’ removing
coversrnzj exposeyouto danzero&yoliagecr olderhazards.
peter
all servicingb qualif;edserviceperscnne:.
&plasement Pa&- - Whererepiacemen;
parisarereqxed, 3t:
surerheservicerechnicianlias used:eoiaci;menh
pairsspec:i;?~
bythema::‘acWercr Izvingt!:esamecha;acteristics
asI’-?oiginal
part,Unauihorized
substitutrons
mayies~~lli? iii?. electricshock
or oihe;hazards.
$afety CLs;ek- Uponihecomplerionof anyser:vice
c: re;!alrstc
'
^I "q
is
this ~u?rt,
ask rhe servicete;hmcianto perfix” sa,et?
d!~
L:
dereWe tnatihe..xt ISin p:operopeiailngccnd!ric:.
&io Jnif CX-LEM~Q
SpeakersSX-LEMX
8
&nc:e ,on::oi
‘f\A an;enrlL
Sps&r 1~6s
,A&1
apciyne
3
3 Connectthe wpplieci antennas.
connectioix
aremode.
Connectthe FM antennato ihe FM 75 a terminalsanc
the AM antenr:ato the AM LOOPjack.
Detachthe battervcomoartmentlid at ?herear of the remote
conirol and insert two R6 (size AA) batteriesvdithcorrect
polarity
1 Come12the speakercords to the speakes.
Sonnecithe coppercoresic the+ ter;ninalsandthe silver
cords to the - teimlrais.
2 Connect the speakers to ihe main unit.
Connectthe right speakerto the SPEAKERSR terminals
SPEAKERSL terminals. The copper
and the left to
cords go to the t&rminals.
4 Connect the AC power cord to an AC outlet.
The clock will flash on the display.
For settingtineclock, s&epage8.
affectedby magnetismnearthe speakers
nnas away from metallic objects: electrical
and cords.
nfl8: Extendfully in aT-shape.If receptionis poor,
an optional outdoor anienna to the FM 75 R
terminals.Besureto connectthe shield braidof the antenna
e A terminal.
~~~~~~~: Rotateto find bestreceotion.
*Replace the batterieswith n&woneswhen the operational
b distancebeiweenthe remotecontra!andmainunit becomes
shorter.
*Remove the batteriesif the unit is not going to be usedfor
an extendedperiod of time.
@Theremotecontrolmaynot operateif it is usedunderintense
sunlight or il its line of sight is obstructed.
E
SelectsEC0 modeand dimmer mcde.
T
Tunein a oresetstation
CD: selectsrandomand repeatplaybackmode.
Taoe.selectsa reversemode.
CD: displays the track number being piayed and
remainingtime of play.
T
Determinesthe mode
Storesthe receivedsiation to oraset
Starisplaybackand changesthe playbacxside.
41~0 used to enter G-second blank spaces during
recordino.
cts t!~efcnction of zxiernalecjuipmeniconnectedtc
AUX IN jacks.
CD: skips to z previous or a succeedingtrack when
pressed, searchesF.track in fast forward or revers:
playbackwhenheld down.
Tape:rewindsor fast frxwardsthe ta3e.
23&o: manualiytiines uo c; town withi tineband.
Adjusis the volume.
CD atndTape:stops piayback.
Radio:clearsa ;iresetstariori.
Opensor closesthe tapetray.
jack
Plus in an ootional headphonesset with a stereo miri
plus (03.5 mm, i!b il1,). Speakeroutput is canceled.
track of tiiE specifiednumber.
Radic: iunes in the station with the specified preset
number.
SS and TREBLEselling mode.
SelectsprogrammedCD playoackmode.
Selectsrandomor repeatCD playbackmode.
e weenstereoor ilWl~Ui3l Fivl reception.
s the track number being played and
Selectstimer seiting mode.
Selectssleep-timersettingmode.
Hold downwhenpressinga numberedbuitonto change
its function to that printedabovethe number.
E
Selectsa reversemode.
Switches!he activeiunction amongTAPE,TUKER.AUX
and CD.
~~~~~~~
&@uniton
Press POWR ~STAND~Y~O~~(POWERon the remote
control).
Alternativeiy,pressTAPE,TUNER/BAND,
AUXor CD.Playback
will start automaticallyif a disc or tape is loaded.
Connectexternalequipmentusingan optionalconnecting
cablewith RCAphono piugs (red p!ug to R jack, white
plug io i jack). Referalso tc the operai;nginstructions
for your equipment.
To switchfunctionto externalinput, pressAUX.
Rwniwg the unit t3f
PressPOWER&STANDBYiONagain.
The tinii goes into srandby.
Turn VOLUME (press VOLUME (+/-j on the remote
controij.
Adjusifrom 0 (minimum)to 49 and MAX (maximum).
E/2:
Volume level setting is retailledduring Dower-offstandby.Ii
the unit is turned oif vdiththe volumeset to 36 or higher,ii is
automaticailyturneddownto 35 the nexttimethe unit is turned
03.
speakers.
) jack
toutfhrou~hthis jack.
Usean opticalcableto connectdigitai audioequipment.
Removethe dust capfrom the DIGITALOUT(OPTiCALj
jack. Thenconnec!an opticalcaoleplug to the DIGiTAL
CU’(OPTICAL! jack.
Press AUX to select the Euncilonof exrernaiequipmeci
Hold
press POWE?while the poweris 3n
bypower~~~s~~~~~~a~
powereconomizing
modeis off : 14W
Whenpowereconomizing
modeis onor auto: 0.7W
WE%pmdsrzYxHm&ingmodeIs setto ““ON”%
“FGTB””
5 V$hen
powershutsoff,ali indications
oftnedisplaywindow
includingthec;ockareturnedoff.
@When
powerturnson by !imerrecording(pageIT), the
displaywindowbrightnessis setto “OIMMER 3”, ali
buttonlampsgo off.
*The displaywindowbrightensonlywhentheunit is being
operated.
Whentheunithasnotbeenoperated
forBseconds,
the brightness
switchesio the levelchosenby the “D&l
MODE” setting. (I; the brightness is set to
“DIM - OFF”.thebrightness
doesnotchange.)
WE% power ~~~~~~~~~~~
mode k3z!ito “‘AUTD”’
I
In additionto theabove:
*Ii thetapeandCDarestoppedandthereis 110audioinput
“DiM MODE” is displayed.
fromanyconnectedexternalequipmentfor IO minutes,
powershutsoff.(Whenlistening
totheradio,Ihowever.
power 2 Within 8 seconds, press SET.
doesnoishutoffautomatically.)
Thecurrentlyselectedbrightness
is displayed
3 Within 8 seconds, press
I Press ECO/DlMMERwhile the unit is turned on.
to select
“ECO WIODE”is displayed.
the desired brightness.
2 Within 8 seconds, press SET.
4 Within 8 seconds, press SET.
Thesurrentpowereconomizing
modestatusis displayed.
If powereconomizing
modeis off : “ECD OFH”
:f powereconomizing
modeis auie: “EC0 RUTQ”
Ii powereconomizing
modeis on : “EUI ON”
to select
3 Within 8 seconds, press
the desired power economizingmode.
4 Within 8 seconds, press SET.
Hoiddown SHIFTandpressCLOCKon the %?mote
GORlrOl.
Whentheunitis tune6 off,youcanaisopressSET.
to set the time.
Press
Eachpresschanges
thetimein l-minutesteps.
Holdingthesebuttonsdownwil
varytnetime
in?G-min!ite
.rnits.
5 cotpressedwiihin8 seconds.
setting
!f
3 canceled.
Press SET.
Thetimedisplaystopsflashingaindtheciocl;startsfrom
00 seconds.
Todiqiay theme whiletile pwderis 013
HolddownSHIFTandpressCLOCKontheremotecontra!.
Thetimewill bedisplayed
for 8 seconds.
Es switch fa the 24-hour $~~~~~~~
Displaythetimeandpress within8 seco~lds.
Witheachpress.the clockalternates
between12- and24
hourstandardtime.
I-@:
Inthe12-hourstandard,
“Wp/i12:00”indicates
midnightand
“PM12:OO”noon.
If me elm%dkplay flashes when the unit is furned
of
Therehasbeena powerinterruption.
Resettheclock.
all tbtiefiricksin random
all thetracks
or
thetrack beingplayed.YffuCUR
se/ecfrandomundrepeafall
ployat thesametime.
order. In repeat ploy mode it ploys repeatedly
I
Press MODE (hold down SHIFT and press
RANDOM/REPEAT on the remote control)
repeatedly to select one of the following nodes:
“G 1”: Repeat1 playback
“G”: Repeatall playback
“RRI\IDOW: Randomplayback
G”: Random/Repeat
all playback
“RAM
to start play.
2 Press
-CD OPEN/CLOSE to open the disc
compartment.
Placea disc with the iabel side up. Then close :he disc
compartmentby pressmg&CD OPEN/CLOSE.
-ra cancel ~~~~~~/~~~e~~ p8ay
PressNiODE(hold downSHIFTandpressRANDGWREPEAT
on the remote control) repeatedly until “FIRNDOM”,
“$ 1” or “6” disappears.
Direct selection of the tracks with the numberedbilttons
cancelsrandomplay mode.
fast ~~~~a~~or revewe)
Releaseat the desiredpoint.
Ta select 8 treekwith the remote control (
Pressthe numberedbuttonsto selecta track.
- Toselectthe 25th track, press+iO. +I0 and 5.
- To selectthe 1Ith track, presstlo and I.
-&Jchange Bhedlsphy in playback mode
PressDISPLAY(hold downSHlFTalidpressDWLAY on the
remotecontrol) dliring play.
The displaychangesin the iollowing order:
1 Tracknumbe;beirg playedar;delapsedp!a$ng tine
c 2 Remainingtime of a disc
@Remaining
time of play cannotbedisplayeddciiflg random
play or programmedplay.
%I repeat 8 se:lscted 8$il of fraeks
Firs! select the tracks with programmned Jlay isse
“Progiamned play” on page10).
Thenselectrepeatplayback.
m
78 ch
repeatedlyin stop mode. The track
Press
numberand programnumberare displayedin succession.
Hold ckw SHIFT and press PROGRAM on the
remote control in stop mode.
“PHIGM” flashes011the display.
Press fhe numbered buttons cn the remote
control to program a track.
-To selectthe 25th track, presstl0, +I0 and 5.
-To selectthe 11th track, pressi-70 and 1.
Theselectedtrack number!ights up on the disp!ay.
Repeat step 2 to program other tracks.
Theiota! numberof seiectedtracksandtotal playingti;ne
will be displajied.
to start play.
Press
The track number for the curreni track hashes on the
display.
e Duringprogrammedplay,you cannotselecta trackwiih ihe
numberedbuttons. “CZI’? SE” is displayedwhenyou
try to selecta track
a if the total playingtime of the programexceeds99 minutes
and59 seconds,or if a trackwith a tracknumberexceeding
30 is programmed, the playing iime is displayed as
I/- _:_ - /,
~You cannot program more than 30 tracks. “FkiLb” is
displayed
To clear the progmm
Press in stopmode,“PAGM” disappearsfromthe display
TD add $rackz:to %e ~~~~~a~
Repeatstep 2 beforestartingplayback.The tracksare added
to the end of the program.
@Donoi placemore than one disc.
0 Do not tilt the unit with a disc loaded.
a Theunit maynot play CD-R/fRW
discs recordedon personal
computersor ceriain kinds of CD-R!RWrecorders.
*Do not aitzch adhesive labe! io either side oi
CD-RIRWdiscs, as doing so maycausemalfunction.
* Do noi loadan unrecordedCD-RIRWdisc.Thedisc maybe
damaged.
e Do not use irregular-shapedCDs.
f
Select the band.
2 Press PRESET (
) repeatedly.
With each press,the station with the succeedingpreset
numberis tuned in.
You can tune in the desired preset station directly by
pressingthe numberedbuttonson the remotecontrol.
- To selectpresetnumber?I, presst10 and 1.
- To selectpresetnumber15, press+I0 and 5
To clear a pwiet statson
1 Tunein the station by presettuning.
2 Piess , then pressSETwithin 8 seconds.
Presetstation numbersin the bandwhich are hiqherthan
the clearednumberdecreaseby one
ND repeatedly to select a band
The unit switcheslo the radio from any other functior
and alternatesbetweenFM and AM.
repeatedly to tune in a station
whena station is tuned in.
“STEREO” is dispiayedfor ffv! stereoreception.
a~~~~a~~~a~~~
(B&o sea&)
ion.
T;j stop the searchmanually,press
r Auto sear& may not stop at stationswith weaksignals
I
Tune in the desired station.
2 Press SET to store the station.
Tihepreset ;iumber, beginriing from “1” flashes on the
display.
3 3epeat steps 1 and 2 ‘0 preset other stations.
The next station will not be stored if a tcial of 32 preset
stationshavealreadybeenstored
(“FULL” is dispiayed.)
*The unit canstorea maximumof 20 stationsfor eachbane.
l+pdyjer,‘;h$ it can &y s\gre5 total y 32 preseig;::p\s.
ali poweris interruptedfor morethanapproximaiel]y
12 hours,
ali setbngsWed in memoryafterpurchaseneedto bereset.
----
ToSwimto
_--
.-
-
receptloR
PressMODE(hold down
T and pressTUNE3MODEon
the remotecosi:ol) SOthat “MOW is dispiayed.
%acanal, pressMDDE(holddownSHiFTandpressit!NEii
DIODEon the remotecontrol) again.
z-&x
W/her?FM stereo receptionis poor, switching to monaura!
ieducesnoise.
Thedefaultsettinoof the AM tuning intervalis 10 kHz/step.If
you use this oni?% an areawherethe frequencyallocation
systemis 9 kfiz/step, changethe tuning iniervai.
Hold downTUNER/BAND
and oressPOWER.
Tip:
Whenthe AM tuning interval is cnanged,a!l presetstations
are cleared.
TurnBASS.
The basslevercan be adjustedfrom “-5” to”+5”.
Thetreble level can be adjustedfrom “-5” to”+!?
e If the soundbecomesdistortedwith the BASSeffect,cancel
the effect.
Press SOUNDrepeatedlyso that “TWE” is displayed,and
to adjusi the level.
QIf the sound becomesdistorted with the TREBLEeffect.
cancelthe effect.
the -4 indiiatcr 31 the displ
to move tc the next track, or
itq of the torrent track.
ihe P indicator on ine c;ispl
to move to ihe next track, 0’
beginningoi the currectrreck.
The searchfxction may not be able :o detecttracks ulder
tlie Mowing cofiditions:
e Blanksof lessthen ii secondsbetweentracks
a %oisytrack:
TAPE CIPENKLOSEla open the tag tray.
insert the tape.
the exposedthe side facingforward,zncipress
OFENKLOSEto close the tapetrsy.
hs~rt with
4@select a &?Y%kS%
mde
PressMilODt(REVMI?DE3!: the rsmcie :~i:cl) iep%id$
83To play one side oniy,select Z.
*To play from the side facing L;$varcto the oppssite side
once:on!y.Select3
*To play boiil sides repeatedly,seiec!(3
resemg rnWl easiiy
Press
OPEFUCLOSEto o&legthe tape tray.
inseri the retarding “.ape.
!nsertwith the exposedside facingforward and the side
to be :ecorded oii first facing upvwc. Press
&TAPE CFENiCLCSEto closethe tapehey
Press FL!iICTlCii\i on the remote control to select
the TAPE function.
Press iiiiODE (REV MOE an the remote controt)
to select the reverse mode.
To :ecordon one site oniy. selectz.
To recordon both sides, select3.
Press FUNCTION on the remote controi to select
?he source to be recorded.
Preoare the source
To recordCD, ioad a disc.
TOrecorda radio brcadcast,tune in the desiredstation.
.Tarecordfrom connectedexternalequioment,pressAL%
and preparethe equipment.
Whenrecordinga CD, CD playbackstarts automatically.
When recording input from connected equipmer?t.
manLaiiystaii piaybackof the source.
*Volume or tone adjustment(s)does no; affectrecording.
Whenthe taoe reachesits end,the recordingstops,
pe to be recorded, load the disc. and piess
SYNCHROREC.Regardlessoftne itnction currentlyselected,
CD play and taperecordingstari simultaneously,
*In CD step mode taperecordingstartsfrom the beginning
of 32 track.
When CD playback stops, tape recording slops
simultaneously.
*In CD playbackmode,the only currenttrack is recorded.
Wnen irie current rraclkplaybackf
stcos. io srop CD playback.press
AUSE.Pressagainto resume.
33 record a seleetad saQof tracks from a G
Programthe desiredtracks(see“Programmedplay”)andthen
pressSYNCH30REC.
33 &a@ rrmrdbg with fh@remote cosltrol
Press RECMODErepeaiedlyto dispiay “SYNC REC” or
“FEr
SYPJC REC: recordingCD
WC: recordingradio CD or connectedexternalequipment
F?EC/REC
PAUSEto start recording.
Whenselected“REZ:“, press RECiREC
PAUSEagainio
start recording.
TA,PEiRECMUTE during recording or in
I Press
recordingpausemode
“REC METE” hashes on the display for 4 secows (a
biank space is added)and il’rerlrhe unit erters reocrdina
/RECPAUSEto resumerecording
To mm3 a tagss
1 Insertthe tape. Setthe tapeto tha desiredpoint if needed.
2 press AUX
If optionalequipmentis connectedto theAlJXIN jacks,turn
it off.
Prepare
a tapethatis longerthantheCDlength.
N~hen
recordinga wholeCD,Al EditRecord;ngtakestirelength
of yourtapeb~toaccountandrearrangesthe recordingorderof
the trucksif necessary,so that no track is cutshort at the end
of the side.
(A/:ArtificialIritelligence)
*Recordingcannotstartfroma pointhalfwayin thetape
*Ai EditRecording
cannotbeusedwithdiscscontaining
more
than30 tracks.
1 Inseti the recording tape.
2 Press FUNCTIONon the remote controi to select
the CD function,
and load the disc.
3 Hold down SHIFTand press CD EDIT/CHECKon
the remote control in stop mode.
“Al EDIT”and“Al c--00” aredisplayed.
4 Press the numbered buttons on the remote
control to enter ihe length of the recordingtape.
10to 99 minutescanbespecified.
- Fora 60.mirniite
tapepress6 ai?d0.
In a fewseconds:the unit determines
the iracksis be
iecordedfor eachside.
leftforsideA appears
onthedisplay.
n a;sobeused‘.ospeciiy“iapelei?gth.
RECTOsiati recorriioy.
Whenyoustartrecordingwiththe remoteco?irol,press
R.ECMODErepeaiedly
to dis:j!ay“SYNC:KEC”, then
press RECiREC
PAUSE
Theiapeis rewoundto the begiilrinGof thesidefacig;
upward.“REC MUTE” flashesonthedisplayandthe
leadsegmen:is playedthroiigli for 70 secoiids,and
recordingstarts.
Whenreccrdingon :Be side facira tipward!sida Ai
fiiiishes,recording011iheoppositeside(sideB)starts.
As you program the CD trucks to record, FrogrammedEdi;
lecording displaysthe remainingrecordingtime for eachside
of the tape, so you con easilyselect a set of desiredtmcks
Iwithinthe lengthof yourtape.
@Recording
cannotstartfroma pointhalfwayin thetape.
@Youcannotprogrammoreihan30tracks.
5 Youcannotprogramatrackwitha i:aclcczmberlargerthan
30.
Press SYNCHRORECto start recording.
Whenyoustartrecordingwiththe remotecontrol,press
RECMODErepeatedly
to display“SYNC: WC”, then
Thetapeis rewoundto the beginningof thesidefacing
apward,“REII WTE” flasheson thedisplayandtine
leadsegmentis playedthroughfo: 10 seco~ids,
and
recordingstarts.
‘&‘henrecording02 t?e side facingLipward(side A)
finishes,recordingontheoopositeside(side3) siarts
1 Insert the recording tape.
2 Press FUNCTIONon the remote control to select
the CDfunction, and load the dLx.
3 Hold down SHIFT and press CD EDIT/CHECK
twice on the remote ccnfrol in stop mode.
“PRGMEDIT”and“W&M C-483” aredisp!ayed.
8 Press We numbered buttons on the remote
control to enter the length of the recording tape.
10 to 99 minutescanbespecified.
- Fora SO-minute
lapepress6 andC.
@
can alsobeusedio speciiytapelerjgth.
5 Press the numbered b~ittorx on the remote
CGntroitG selectthe first track to 5e recordedon
side A.
-Toselectme25thtrack,press~13,t10 a~?d
5.
-ToselecttneI >thtrack,gress+I0 and1.
6 Repeatstep 5 to select ihe resi 3f ihe tracks 4or
side A.
v cfsitefi,isdisplay$,j
‘~/oL.
Yte remaininrecotiinglimp
canlotseiecra rrzckwitha longerplayingtim.e.
7 Hold down SHIFTand press CD EDIT/CHECKon
the remote control to switch to side 6 and select
thpL)..
Wks
, side.
u for the
Press
Recording
andCDplayback
stopsimultar;eol;siy.
Pi3d-E& ihe program
1 Before recording. hoid down SHIFT znd press
CDEDIT/CHECK
ontheremotecoctrolto selectsideA or
B.
2 Press
repeatedly.
TherrackPuxberafid
isplayedin sxcessIon.
progra
-&.Ichangethe program of each side
HolddownSHIFTand?ressCDEDiT
controlto selectsideCorB,a?dpress
for theselectedside.ihei?,selecttrac
-- __....
“..”.-..
““~
__...------
--1
..^__.^
Eireak
oii theplastic
tabofthecassette
tapewithascrexdrjver
or otheroointedtool.
To recordon the tapeagain,coverthe tab openingswith
adhesive
tape,(OntypeIt tapes,rakecarenot :o coverthe
type/I tapedetection
siot.)
cormi.
“SLEEP” is displayed.
1
l-bid down SHIFTandpressTIMERon the remoie
cootrol repeatedly so that “6” tights up and
“8 PLW Is displayed.
repeatedlyto set the steep
2 Withjn 8 seconds, press SET.
timer diiration.
Wth eachpress,thetimerdurationchangesin 5-minute s
to set the Wrier-ontime, and
stepsbetween
5 to 240minutes.if thereis nobuttoninout
for8 secoiids,
thecurrentsettingis entered
automatically.
Eachpresschanges
thetimein l-minutesteps.
Theunitturnsoffaftertheselected
time.
I-folding
thesebuttonsdownwillvarythetimein IO-minute
units.
To checkw remaining time unw %x4unit turn%OR
Wd downSiilFi andpressSLEEPon the remotecontrol.
to selectthesource.and press
4
Theremaining
time/s displayed
for 8 seconds.
To cancel $hesleep timer
HoiddownSIWI’ andpressSLEEPon the remotecontrol
repeztedly
sothat“SLEEQaFF”is displayed.
@Fortimerplayof a CD.seleci “CD”.
@Fortimerp!ayof a tape,select“TAPE”.
@Fortimerplayoi a radiobroadcast,
select“TUNER”.
Yeuwill selectthebandlaterin step7.
@Fortimerplayof theequipment
connected
to theAU
INjacks,select“AN.
8 Insert the recording tape and then turn the unit
to set the timer-activated
SET.
Witheachpress,thetimer-activated
durationchangesin
5-minutestepsbetween
5 to 240minutes.
to adjustthe volumetoriimer
Press
playback,and press SE%
Thevolumelevelcanbeadjustedfrom0 to 35.
7 Preparethe source.
ToolavCD,loada disc.
Toalava taoe,insertthetape.
Toolavtfneradio,selectthebandandtunein thedesired
station.
Toulavexternal
eauinmeni
connected
to theAUXINiacks.
setanexternal
timerfortheequipment
sothatitsplayback
beginsat thesametime.
8 Press POWER6STkNDBY/Of\ (XXMR) to turn
the unit oil.
“0” remainsonthedisplayto indicatethetimerstandby
mode(whenECGmodeis deactivated).
Attimer-ontime.theunitturnsonandpiaystheselected
sol;rce.Afterihe specifiedtimer-activated
duration,ife
unitturnsoffagain.
*Timerplayback
will not beginunlesstheunitis turnedoff
firs!.
e Ccnnected
equipment
cannotbeiumeconoroffbytfiebull:in rimerofthis iunii.Useanexternaltimer.
Off.
Hold down SHIFTand pressTlhliERon the remote
control repeatedlyso that”@ REC”li@htsup and
“0 KC” is displayed.
Within 8 seconds, press SET.
Press
to setthetiner-on time, and
“0 SEC”remainson the displayto indicatethe timer
standbymode(whenEC0modeis deactivated).
Attimer-ontime,theunitturnsonandrecordstheselected
source.Afterthe specifiedtimer-activated
duration,the
unit:urnsoffagain.
* Connected
equipment
cannotbeturnedonoroffbythebuiitir timeroi this unit.Useanexternaltime:
To checkthe timer scmng
HolddownSHIFTandpressTIME4on the remotecontrol
Eachpresschanges
thetimein l-minutesteps.
repeaiedfy
sothat“0 PFWY”or “0 WC” appears
ontne
Holding!hesebuftonsdownwillvarytheiime
inTO-rnrnute display
UfiiiS
The timer-on
time,thesourceandthe time;-activated
duration
are
displayed
for
8
seconds.
to
select
the
SOUTCE,
and
cress
?ress
SET.
Ta &an&3 the timer setting
5 Fortimerrecording
ofaradiobroadcas!.
seieci“TJNER Resettheiimeragain.
Youwill selectthebandlaterin step7.
r Fortimerrecordingof iheequipment
connected
to the
HoiddownSHIFTandpressTIMERon the remotecontroi
AU):INjacks,select“AUX”.
repeatediy until “0 OFF” is displayed. “0” or
to set the timer-activated “0 9EC”disappears
Press
or
fromthedisplay.
SET.
duratt
en p
Tip:
Witheachmess;thetime-adivateddureiionchanges+I Yourtimersettingis reiainedevenif the i~meiis cancelec.
S-minutestepsbetween
5 to 240minutes.
Nexltimethetimeris activated,
yooChnchange
yourorevioos
to adjUst’i~eV3;Ilmeforfilfier settin@or simplyusethesamesettingagain
Press
recording, and press SET.
ThevolumelevelcanSeadjustedfrom0 IO35.
pK%
Preparethe source.
Torecordtheradio,selectthesandandtuneintnedesired
st&on.
.B recordexienaleouioment
connected
ic ihe AUX?<
~FJJ&setan externaltimerfor theequipment
SCtnati:s
piayba;;c
beginsatthesameWe.
lL!sea SC?and dry cloth if the ~~nit%riaies are extiemely
dir$ use a sofi cicih lightly moistenedwith miid deteiger?
solution.Do not usestrongsoivenissuchasalcchcl. benzene
Oi thinner.
Dirty iape headscausesound deterioraticn.After every 1C
!mrs af use, c&m t’le tap heads with a head cleaning
cassette.Referto the instruciionsof the cleailing sass~tte.
To d%magnstiz~ tlas tiape Aeads
,ise a demagnetizingcassetteafter every 20 to 30 hours of
i~se.Referto the instruciiocsof the demagnetizingcassetie.
Whena CD becomesdirty, wipe it f:om the centerout with a
cleaninacloth Afterplayinga CD, store it in its case.DO not
keepit ;n hot or humid places.
Care of taoes
Storetapes’in their casesdier use. DCnot leavetapes neai
magnets,motors,ielevisioi7sets.or anySOUiCBof magnetism.
De not exposetaoesto direct sunlight, or leavethem in a car
parkedin direc! sunlight.
@Arethe speakersand AC powe:cord connectedproperly?
“me unit shagtofk sudd%wly
* Fossiblya shortcircuit in the speakerte~minais.
Disconnenl
the AC powercord from the AC cutlet and reconnectthe
speakercordscoriectiy.
Moisturemayform on the CD pickup lens wheii:
‘j
s The trnii is moved‘ram a cold spot to a warmSDOt
*The heatirlgsystemhas just beenturned on
*The unit is used ir, a very humid room
*The unit is cooled Dyan air conditioner
\WnenTunis
unit has condensation?
inside, it may inoifunction
normaliy.Should tllis occur. leavethe unit ior a few hours.
tien try io operateagain.
*Reselthe unii. (See“Resettingthe unit” on ihis page.)
Bam8;a&5
rec%@iean
a Checkantennaconnection,Adjust ;he antennato find the
best reception.
‘Move the unit and antenna away from other electric
appliancesand cords.
Poor tape sound
0 Checkior oiriy Lieads.Cleanthem if needed
annot record
is the erasurepreventiontab of the iape broker off? If so,
coverihe detectionslot with adhesivetape
*Is the disc correctlyioaded?
a Is the disc dirty?
“Is the lens affected by condensation? If se. wait
approximatelyone hour and iry again.
an unusualcondition occurs in the display window or the
cassettedeck,resetthe unit asfoilows:
i PressPOWERto turn off the power.
If the powercannotbe turnedOH,disconnectthe AC power
cord, then p it in again.
2 Hold down and press POWER,
Everythingstored in memoryafterpurchaseis cleared.
FMtuningrange
F!vlusablesencitiviiy(IHF)
FMantennaterminal
AMliining range
AM usablesensitivity
AMantenna
87.5MHzto 108MHz
73.2dBf
75 ohms(unbalanced)
530 kHi to 1710kttz (10 kHzstep)
531kHrto 1602ktiz (9 kHzstepj
350uV/m
Loopantenna
L
Powerrequirements
120VAC, 60 Hz
Powerconsumption
60W
Powerconsumption
in standbymode
WithEC0modeonor AUTO,0.7W
Wi:hEC0modeofi: 14W
Crmensions
(Wx H x D’j 191.5x 249.0x 389.0mm
(7 ‘ic x 9 I/; x 15 $I3in.)
WeiQhi
5.3 kg (11 ibs 12 oi)
Speakers
system
Poweroutput
Totalharmonicdistortion
input
outputs
28 W .I.28 W (40 HZ^ 20 kHi, THD
lessthan1%
, 6 ohmsi
35 W + 35 W (I kriz,iHD 10 c/o,6
ohms)
0.15“0 (17.5W IkHz,6 ohms,DIN
AUDlGj
AUXiN: 700mV
SPEAKERS:
6 ohmsor more
PHONES:
32 ohmsor more
DIGITAL
OUT(CPTICALj
jack
Trackformat
Preouency
response
I&cordingsys$rn
Heads
4 tracks.2 charinefssterec
50 Kz- 15000liz
ACSias
fiecrdingrplaybackx I, erasex 1
Laser
D/Aconvener
Signal-to-noise
ratio
Harmonicdistortion
\,f$oyf
andfiutter
Ssmicontlucicrlaser(k = 780nm)
I bit dual
88 38 (1 kHz,0 dE)
Unmeasurabie
il kH:.0 dB)
Usmeasurab!f
Speakerunits
impedance
Dimensions
(Wx H x 0)
Weight
2 way. bass reflex (magnetic
shielded)
Wooier:120mm(4 ‘is in.) cone
Tweeier:
25 mm(1 in.) dome
6 ohms
155 X250X27i3~liil
(!j ‘1, X 10 X 8 5/s IT.)
2.4 kg (5 IDS6 CL)
Specificationsal-idexternalappearancearesubjectto change
without notice.
6:
h
Checkcopyrightlaws relevantto recordingsfrom discs, radio
or tape1%ihe countrywherethe unit is to be used.
TE
Thisequipmenthasbeentestedandfoundto complywiththe
limitsfor a ClassB digitaldevice.pursuanlto Pert15 of the
FCCRules.Theselimits aredesignedto providereasonabie
prelection against harmful interferencein a residan;ia!
instaliation.
Thisequipment
generates,
uses;aridcanradiateradiofrequency
energyand,il r?otinstalledandusedin accordance
with the
insiructions. may cause harmful interferencetc radio
communications. However,ihere is no guaranieethar
interference
will not cccur in a particularinsta’lation.If this
equipment
doescauseharmfulinterference
to radioort&vision
reception,whichcanbedetermined
by lurningiheequipment
off and on, the user is encouragedto try to correct ;he
interference
by oneor moreof thefoliowingmeasures:
- Reorientor relocatethe receivingantenna.
Increase
theseparation
between
theequipment
andreceiver.
Connect
theequipment
intoanoutletcn circu;rdifferentfrorn
thatto whichthe receiveris connected.
- Consultthedealeror anexperienced
radio/TVtechnicianfor
heip.
fviodificationsor adjustmentsto this produci, vghichare
rot expresslyapprovedby the manufacturer,
mayvoid the
user’sright or auihori$ to overatethis product.
off this sticker and
here it to the reverse side of
WARRANTY .PERI5D$
During the applicable LABOR warraniy period, AIWA will pay iabor and
service charges for the repair of defects or, at its option, will replace a
defective product with a new or remanufactured equivalent product.
During the applicable PARTS warranty period, AIWA wiii supply at no
charge new or rebuilt replaczment parts in exchange for defective parts.
However, after the LABOR warranty period, all labor and service
charges are your responsibiiity. Replacement parts are warranted for
th? remainder of the oriqinai PARTS warranty period.
The ILABOH and PARTS warranty periods for your product are liSi?C
rB&e commaBLce with the purchaw dab.
below All warrareg
WA
LAB@
VCRITV2l”and below
1 year
yp&”
1 year
Homo Audio/TV abov?* 21”
CRT
2 <ears
2 yews
yfH0 PERFORMS AWAS v!!ARRANTY?
AlWA’s warranty obligations must be performed by an AIWA Authorized
Service Center. For the name of the AIWA Authorized Service Center
nearest to you call toll free l-800-289-2492 (I-800-BUY-AIWA).
To obtain warranty performance, you must :ake the product, or deliver
the product freight prepaid. to an AIWA Authorized Service Center. If
shipped, the product must be packaged so that it is protected from
possibie shipping damag?. You must pick tip the product when warranty
perfo:mance is completed or, if you choose, and the produci was
received by the Service Center during the !ABOR warranty period, the
repaired product will be returned 10 you freight prspaid. You must
present to the Service Gemer, or include wrth your shipment. a dealer’s
bili of sale. or other original evidence, showing the dat? and place of
purchase and describtng the product purchased. Be sure to include
i your return address and daytim? telsphon? number where you zn be
reached should the need arise.
&&Ax.M.E WAWRAMTY FBOESNOT C%%ER
This warranty does nor cover (1) products purchased outside of Me
U.S.A., Puerto Rico or the U.S. Virgin Islands: (2) product set-up,
adjustment of controis, r?pair of antenna systems outside the unir; (3:
removal or reinstallation, batteries, carrying case, AC adapters and otner
accessories packaged witn the product; (4) defects occxrina after
purchase due to rep% or service other tnan by art #WA ku;horized
Servic? Center. product modification, accident, misuse, abuse, or
negltgence; o: (5) reception problems caxed by signal conditions, or
cable or antenna systems outsi@ the unit. This warranty INil)not appiy
if rhe serial number of the unit has been allared or removed.
R;PRlR OR REPLACEXNT AS PROVIDEC IN THIS WARRAXTY :S
THE PURCHASERS EXCLirSIVE WARRANTY REMEDY. iMPLiEC
‘WARRANTIES, INCLUDING THE WARRANTIES OF
MERCHANTABILITY AND OF FITNESS FOR A PARilCtiLAR
PCIRPOSE, SHALL NOT EXTEND BEYOND THE GUflATION 07 THE
APPLICABLE PARTS ‘WARRANTY PERl3D. IN NO EVENT SHALL
AIWA BE LIABLE FOR INCIDENTAL OR CONSEQUENTZAL
DAMAGES IN CONNECTION WITH THIS PRODUCT. Some stares do
not allow iimitations on how iong an ;mp;ied warranty lasts or the
excIusron or :in~~tattonof incidental or conseqJentiei damages. so the
above limitations or exclcsior may no apply to your. This wsrrant~ gives
you specific legal rights, and you may aiso have orher rights which may
vary from stat? to stat?.
PRODUCT REGI§TwTKm
Although r,ot reqoiredrranty
coverage, we ui-ge you to ret&R :he
t attached Product Reg!%radon Card. The Product Registration Card will
provide us with valuable marketing data and will enable A&VA to contact
If you should it ever be required.
IF YOU RIEED FE&p.: Your AIWA Authorized Service Center shou!d
answer all of your werraniy questions, or write to the AIWA Product
/ Services Department, AiWA America, Inc., 800 Corporate Drive,
I Mahwah. New Jersev 07430-2048.
Please .-~
corresponchce
t send product
or other
So this address.
87-B50-053-01
980024/VD-9
Printed In Malaysia