1
another free manual from www.searstractormanuals.com
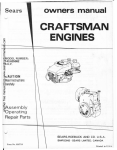
Sears
owner's
manual
MODEL NO. 143.726182
Se.-
~/D4D
CRAFTSMAN ~
CAUTION:
Read RULES for
Safe OPERATION
and INSTRUCTIONS
Carefully
ENGINE
• Operating
• Maintenance
• Repair Parts
Sold by SEARS, ROEBUCK AND CO., Chicago, IL. 60684 U.S.A.
and SIMPSONS - SEARS LIMITED, Toronto, Ontario, Canada.
Printed in U.S.A.
2-1-82
181-383-11
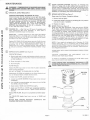
SPARK PLUG
AIR CLEANER
OIL FILL PLUG AND DIPSTICK--
MODEL AND SERIAL NUMBERS HERE
COOLING FINS
-)
\\-
another free manual from www.searstractormanuals.com
STARTER HANDLE
LEVERS AND LINKAGE
MUFFLER
Figure 1
THIS SYMBOL POINTS OUT IMPORTANT SAFETY INSTRUCTIONS WHICH IF NOT FOLLOWED COULDA
ENDANGER THE PERSONAL SAFETY AND/OR PROPERTY OF YOURSELF AND OTHERS. READ AND
FOLLOW ALL INSTRUCTIONS IN THIS MANUAL AND ANY PROVIDED WITH THE EQUIPMENT ON WHICH
THIS ENGINE IS USED BEFORE ATTEMPTING TO OPERATE YOUR CRAFTSMAN ENGINE .
A
THE FOLLOWING SYMBOLS MAY APPEAR ON YOUR ENGINE:
~
FAST
. . . . . SLOW
@STOP
OIL & FUEL RECOMMENDATIONS
To start and operate your Craftsman engine, you will need the
following:
A CLEAN, HIGH QUALITY, DETERGENT OIL.
Be sure original container is marked with engine service
classification "SC," "SO," "SE" OR "SF."
m
FULL
OFF
CHOKE
PRE-START INSTRUCTIONS
G)
®
DO NOT USE SAE10W40 OIL.
Read all instructions provided with the equipment on which this
engine is used.
FILL OIL SUMP WITH OIL. See preceding "OIL & FUEL
RECOMMENDATIONS," Item CD for correct oil and Figure 1 for
oil fill locations.
POSITION EQUIPMENT SO ENGINE IS LEVEL.
Remove OIL FILL PLUG and DIPSTICK and place it on a clean
surface.
Fill oil sump, slowly, to "full" mark on DIPSTICK. DO NOT
OVERFILL. OIL FILL PLUG must be seated fully and tightened
and locked securely into oil fill hole when checking oil level.
FOR SUMMER (ABOVE J20F) USE SAE 30 OIL.
ISAE 10W30 is an acceptable substitute.)
FOR WINTER (BELOW J20Fl USE SAE 5W20 or 5W30 OIL.
(SAE 10W is an acceptable substitute.)
Oil level should be checked frequently during initial engine
break-in period. OIL FILL PLUG must be seated fully and
tightened and locked securely into oil fill hole when engine is
running.
Oil Sump capacity is approximately 19 ounces (1-1/8 pints).
®
1...1
A FRESH, CLEAN, UNLEADED AUTOMOTIVE
GASOLINE. (Leaded " Regular" grade gasoline is an acceptable substitute).
FILL FUEL TANK with gasoline as specified in the preceding
"OIL & FUEL RECOMMENDATIONS," Item(!).
DO NOT USE GASOHOL.
Never use "stale" gasoline left over from last season or stored
for long periods.
NOTE: Use clean oil and fuel and store in approved, clean, covered
containers. Use clean fill funnels.
IMPORTANT
KEEP THIS MANUAL HANDY AT ALL TIMES FOR FUTURE
REFERENCE. READ IT CAREFULLY AND FAMILIARIZE
YOURSELF WITH THE OPERATING AND MAINTENANCE AND
SAFETY INSTRUCTIONS. THIS MANUAL ALSO CONTAINS A
COMPLETE PARTS LISTING.
NEVER MIX OIL WITH GASOLINE
~ NEVER FlU. FUEL TANK fNDOORS. NEVER FILL FUEL
. . TANK WHEN ENGINE IS RUNNING OR WHILE ENGINE JS
HOT.
~ NEVER FILL FUEl TANK COMPL£T£LY. FILL TANK
. . WITHJN 1/4 TO 1/2 INCH OF TOP OF TANK TO PROVIOE
SPACE FOR FUEL EXPANSION. WIPE ANY FUEL
SPILLAGE FROM ENGINE AND EQUIPMENT BEFORE
STARTING ENGINE.
Page 1
181-383-11
PRE-START INSTRUCTIONS
®
®
tcontinuedl
CHECK THE FOLLOWING before attempting to start your
engine:
NOTE - Warm engine may start without choking.
A. Move remote control on equipment to FAST.
A. BE ;WRE EOUIPMENT~:iS. .iN: : Ne·urt~ALi G~AR WITH
.¢(QTCHIS.s, BELtS} CHAINS, · ere:, blS!NGAGEO,
{fOLLOW EOUif:iM£Nt · MANUFACTURER'S IN·
"
B. START ENGINE
STRUCTIONS.} THIS SHOULD PLACE .ANV SAFETY
SWITCHES IN SAfE STARTING POSITION.
1. Grasp STARTER HANDLE (see Figure 2) and pull rope
out, slowly, until it pulls harder due to engine compression. Let rope rewind slowly.
B. Be sure SPARK PLUG WIRE is attached to SPARK PLUG.
(see Figure 1)
2. Pull rope with a rapid continuous full arm stroke. Let rope
rewind SLOWLY. Don't let STARTER HANDLE snap
back against starter.
3. Repeat preceding Instructions 1 and 2 until engine starts.
C. Be sure any ignition switch on engine or equipment is in ON,
RUN or START position.
If engine falters, move equipment control to CHOKE untill
engine runs smoothly and then to FAST.
D. Be sure FUEL FILL CAP air vent is open.
another free manual from www.searstractormanuals.com
WARM ENGINE START (Engine still warm from recent
running).
NOTE: If engine fails to start after a reasonable number
of starting attempts, follow preceding " CD COLD
ENGINE START" instructions.
STARTING INSTRUCTIONS
h NEVER . RUN ENGlNE lNDOORS OR IN ENCLOSED,
. . POOf\tYVEN'f'ILATED AREAS. ENGINE EXHAUST CONTAINS CARBON MONOXIDE, AN ODORl.ESS AND
DEADLY GAS.
. ..
h KEEP HANDS, FEET, HAIR AND LOOSE CLOTHING
. . AWAY FROM ANY MOV!NG PARTS ON .ENGINE AND
EQUIPMENT.
TO STOP ENGINE
G)
®
h
h WARNING - TEMPERATURE OF MUFFlER AND NEAR. . BY AREAS MAY EXCEED 1SOOF (OO'Cl. AVOID THESE
..
G)
..
AREAs.
..
.
h
COLD ENGINE START (Engine has not been run recently).
A. Move remote control on equipment to CHOKE (see equipment manufacturers instructions).
B. START ENGINE
1. Grasp STARTER HANDLE (see Figure 2) and pull rope
out, slowly, until it pulls harder due to engine compression. Let rope rewind slowly.
h
..
2. Pull rope with a rapid continuous full arm stroke. Let rope
rewind SLOWLY. Don't let STARTER HANDLE snap
back against starter.
Move remote control on equipment or any ignition stop switch
on engine to STOP or OFF position (see equipment manufacturer's instructions).
AFTER ENGINE IS STOPPED:
A. DISCONNECT SPARK PLUG WIRE FROM SPARK
PLUG AND PLACE IT WHERE IT CAN NOT CONTACT
SPARK PLUG.
.·
B. TURN IGNITION SWITCH KEY If SO EQUIPPED. TO
''OFF" POSITION AND REMOVE KEY FROM SWITCH.
THIS WILL REDUCE THE POSSIBILITY OF
UNAUTHORIZED STARTING OF ENGINE WHILE
EQUIPMENTfS NOT IN USE.
C. NEVER STORE ENGINE WJTH FUEL IN TANK IN~
DOORS OR IN ENClOSED, POORLY VENTILATED
ENCLOSURES, WHERE ~UEL fUMES MAY REACH AN
OPEN FLAME, SPARK OR PILOT LIGHT AS ONA
FURNACE, WATER HEATER. CLOTHES DRYeR, ETC.
3. Repeat preceding Instructions 1 and 2 until engine fires
and when engine starts, move equipment control to
FAST position.
If engine falters, move equipment control to CHOKE untill
engine runs smoothly and then to FAST.
NOTE: If engine fires, but fails to start, move equipment
control to FAST and repeat preceding Instructions 1 and
2 until engine starts.
If engine fires, but fails to start again, repeat preceding Instructions 1, 2 and 3 until engine starts.
Figure 2
Page2
181-383-11
MAINTENANCE
G)
CLEAN COOLING SYSTEM frequently, by removing any
build-up of grass, dirt or other debris from the cylinder and
cylinder head COOLING FINS, AIR INTAKE SCREEN and carburetor governor LEVERS AND LINKAGE. This will help insure
adequate cooling and correct engine speed and will reduce the
possibility of overheating and mechanical damage.
CHECK OIL LEVEL REGULARLY.
another free manual from www.searstractormanuals.com
POSITION EQUIPMENT SO ENGINE IS LEVEL.
Check level every five (5) operating hours or each time equipment is used. Always clean area around OIL FILL PLUG (see
Figure 1) before removing plug, to avoid contaminating oil with
dirt, grass clippings, etc. Add oil as necessary. DO NOT RUN
ENGINE UNLESS PROPER OIL LEVEL IS MAINTAINED.
LEVEL MUST BE BETWEEN "FULL" AND "ADD" MARK ON
DIPSTICK. See Instructions ® and ® in preceding "PRESTART INSTRUCTIONS" (Page 1).
®
®
Clean every 4 to 8 hours. Proceed as follows:
1. Remove and tap lightly.
2. Knead with hands to remove any remaining dirt. Air pressure
may also be used, if available.
®
CHANGE OIL - after first two (2) hours of operation and
every twenty-five (25) hours thereafter, or more often if
operated in extremely dusty or dirty areas.
DRAIN OIL - Position equipment so that engine OIL DRAIN
PLUG (see Figure 1l is lowest point on engine. Remove OIL
DRAIN PLUG and OIL FILL PLUG (while engine is still warm)
and allow oil to drain completely.
®
INTAKE AIR FILTER (see Figure 1)
3. Replace on engine.
SPARK PLUG (see Figure 1)
Clean and reset gap periodically. Clean area around SPARK
PLUG base, prior to removal, to prevent dirt from entering
engine. Replace SPARK PLUG if electrodes are pitted or burned
or if porcelain is cracked. Clean SPARK PLUG by carefully
scraping electrodes (do not wire brush or sand blast). Be sure
entire SPARK PLUG is clean and free of foreign material. Check
electrodes gap with wire feeler gauge and reset gap to .030 if
necessary. If replacing SPARK PLUG, use Champion J-8 or
J-17LM or equivalent (see note below) and tighten to 15 foot
pounds or if lacking torque wrench tighten firmly.
Replace OIL DRAIN PLUG and tighten securely. Refill oil sump
with new oil of proper viscosity and service classification per
preceding "OIL & FUEL RECOMMENDATIONS" (Page 1).
Replace OIL FILL PLUG and tighten securely. See Instructions
®and@ in preceding "PRE-START INSTRUCTIONS" (Page
1).
NOTE: If your engine is equipped with a Champion RJ-17LM
resistor spark plug, it is in compliance with the Radio Noise
Limitations Order (Radio Frequency Interference) issued by the
Ministry of Communications of the Canadian Telecommunications Regulations Branch.
SERVICE AIR CLEANER (see Figure 3)
COMPLIANCE WITH RADIO INTERFERENCE REGULATIONS
CERTIFIED.
PRE-FILTER (Cloth):
CERTIFIE CONFORME AU REGLEMENT
BROUILLAGE RADIO ELECTRIQUE.
A. Remove and wash in water and detergent solution every ten
( 10) operating hours or more often if used in extremely dusty
or dirty conditions.
B. Rinse thoroughly in clear water.
To remain in compliance, a Champion RJ-17LM resistor
plug must be used for any replacement.
(j)
C. Dry thoroughly.
A
FILTER (Paper):
SUR
LE
spar~
.
oo~c;t< ENQit!l~ A.NP. EO.Ol~MEN1:' ~eo~~Nn.v FOA
J.:Oc:)~e NU.T~t BQLTSiATfAP.ftMEf!T~~ ~'fC.~• AND t(E~f
THESE lTgM~ "f*QHT:E~HUik ., ).
.·······.··············<•·······················. . •.·
.
' ...•..
Replace FILTER once a year or more often if used in extremely
dusty or dirty conditions.
DO NOT ATTEMPT TO CLEAN OR OIL FILTER.
PRE-FILTER
(CLOTH)
Replacement FILTERS are available at any Sears Roebuck and
Co. (or Simpsons-Sears Limited) Service Center.
To install new FILTER, proceed as follows:
A. Loosen two COVER SCREWS (These need not be removed
completely).
B. Turn COVER counterclockwise and remove it and FILTER
from BASE. Discard FILTER .
C. Clean inside of BASE and COVER thoroughly.
D. Insert new FILTER into COVER and reassemble COVER to
BASE as it was before removal. Tighten COVER SCREWS
securely.
Replace PRE-FILTER. Be sure it is completely dry before replacing.
Pull PRE-FILTER elastic band over one ear of BASE and
COVER.
NEVER RUN ENGINE WITHOUT
CLEANER INSTALLED ON ENGINE.
COMPLETE
AIR
~
COVER
.i i I JJ .· /SCREWS I~
FILTER
(PAPER)-------
~
~
BASE
Figure 3
Page 3
181-383-11
ADJUSTMENTS
STORAGE
NEVER STORE ENGINE WITH FUEL ~N TANK INDOORS
OR IN ENCL.OS£0, POORLY VENTilATED ENCLOSURES.
WHERE FUEL FUMES M A Y REACH AN OPEN FlAM£,
DO NOT MAKE UNNECESSARY ADJUSTMENTS. FACTORY SETTINGS ARE SATISFACTORY FOR MOST APPLICATIONS AND
CONDITIONS. IF ADJUSTMENTS ARE NEEDED, PROCEED AS
FOLLOWS:
_J)
If engine is to be un-used for 30 days or more, prepare as follows:
A. HIGH SPEED ADJUST NEEDLE is pre-set at the factory.
(1-1/2 turns open) Re-adjustment should not be necessary.
B. Close IDLE ADJUST NEEDLE by turning clockwise. Close
finger tight only. Forcing may cause damage.
C. Open IDLE ADJUST NEEDLE by turning 1-1/4 turns
counterclockwise.
another free manual from www.searstractormanuals.com
·.~~~~~?a$i~i$~&:~~~~~~~::i~; flJA.NA.CE~··~i~~
CARBURETOR ADJUSTMENTS (see Figure 4)
G)
A
A. Run engine until FUEL TANK is empty and engine stops due
to lack of fuel.
D. Start engine. Follow preceding STARTING INSTRUCTIONS. Run engine a few minutes to warm it up.
B. Disconnect FUEL LINE at CARBURETOR or FUEL TANK.
Be very careful not to damage FUEL LINE, Fittings or FUEL
TANK.
Drain any remaining fuel from System
E. With engine running at IDLE speed, adjust IDLE ADJUST
NEEDLE 1/8 turn at a time, clockwise and counterclockwise,
until engine runs smoothly.
®
Remove all gasoline from CARBURETOR and FUEL TANK to
prevent gum deposits from forming on these parts and causing
possible malfunction of engine.
Allow several seconds between each adjustment for engine
to adapt to new setting.
®
NEVER TAMPER WfTH £NGJNE GOVERNOR WHICH lS
FACTORY SET FOR PROPER ENGINE SPEED. OVERSPEEDING ENGINE ABOVE FACTORY HIGH SPEED
SETTING CAN BE DANGEROUS.
®
FOR ANY MAJOR ADJUSTMENTS OR REPAIRS, CONTACT
YOUR NEAREST SEARS ROEBUCK AND CO. (OR
SIMPSONS-SEARS LIMITED) SERVICE CENTER.
h AVOID SPRAY . FROM $PARK PlUG HOLE WHEN
. . CRANKING ENGINE OVER' SLOWtY;
If oil has not been changed recently, this may be a good time to
do it. See "CHANGE OIL" instructions in "MAINTENANCE"
section.
Remove SPARK PLUG and pour one (1) ounce (0,029 Liter) of
engine oil into spark plug hole. Crank engine over, slowly,
several times.
Replace SPARK PLUG.
Clean engine by removing any clippings, dirt, or chaff from exterior of engine.
GENERAL
Just as your automobile needs professional mechanical maintenance
from time to time, so does your Craftsman engine. Replacement of
the spark plug and ignition points is made necessary by NORMAL use.
Professional Air-Cooled Engine Service is as close as your nearest
Sears Roebuck and Co. (or Simpsons-Sears Limited) Service Center.
A yearly check-up or tune-up by Sears is a good idea to avoid
breakdowns or delay ... do it at the end of the season, then you're
ready for the next. We even prepare it for storage for you.
CARBURETOR
HIGH SPEEO ADJUST NEEDLE
Figure 4
Page 4
181-383-11
another free manual from www.searstractormanuals.com
""''
\
Page 5
181-383-11
TROUBLESHOOTING
another free manual from www.searstractormanuals.com
THE FOLLOWING MAY HELP AVOID A DELAY IN YOUR WORK OR SAVE THE
EXPENSE OF A SERVICE CALL.
\
l
l
ENGINE FAILS TO START OR STARTS WITH DIFFICULTY
CAUSE
REMEDY
Controls not in start position.
Move ENGINE CONTROL or equipment control to "HI" or START position.
See "STARTING INSTRUCTIONS" in this manual.
Spark plug wire disconnected from spark plug.
Connect spark plug wire to spark plug.
Spark plug fouled.
Remove spark plug and clean. See "SPARK PLUG" instructions in
"MAINTENANCE" section in this manual.
Spark plug porcelain cracked.
Replace spark plug.
Insufficient fuel.
Fill fuel tank per "PRE-START INSTRUCTIONS".
Water or dirt in fuel.
Drain fuel tank and re-fill with clean, fresh gasoline. See "PRE-START
INSTRUCTIONS" in this manual.
Improper carburetor adjustment.
Adjust carburetor (if applicable). See "ADJUSTMENTS" section in this
manual.
Fuel fill cap air vent hole obstructed.
Open air vent hole in top of fuel fill cap.
ENGINE LACKS POWER
CAUSE
REMEDY
Dirty air cleaner.
Replace or clean air cleaner per "SERVICE AIR
"MAINTENANCE" section in this manual.
Improper carburetor adjustment.
Adjust carburetor (if applicable). See "ADJUSTMENTS" section in this
manual.
Lack of lubrication.
Fill oil sump to proper level. See "PRE-START INSTRUCTIONS" section in
this manual.
CLEANER"
in
ENGINE MISSES UNDER LOAD
CAUSE
REMEDY
Spark plug fouled.
Remove spark plug and clean. See "SPARK PLUG" instructions in
"MAINTENANCE" section in this manual.
Spark plug porcelain cracked.
Replace spark plug.
Improper spark plug gap.
Regap spark plug electrodes. See "MAINTENANCE" section in this manual.
Improper carburetor adjustment.
Adjust carburetor (if applicable) . See "ADJUSTMENTS" section in this
manual.
Page 6
181-383-11
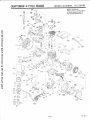
CRAFTSMAN 4-CYCLE ENGINE
MODEL NUMBER: 143.726182
BASIC ENGINE
another free manual from www.searstractormanuals.com
Refer to Parts List for product
on which engine is used for
any Unlisted Engine Parts.
~~18
78 - -~
,J
3
158
...._
I
''
Page 7
I
181-383-11
CRAFTSMAN 4-CYCLE ENGINE
\
'-)
.•
~
I
Ref.
Part
No .
No.
1
2
3
4
5
5
6
another free manual from www.searstractormanuals.com
6
~
7
8
9
11
32586B
27652
27642
32630
32783
32784
27878A
27880A
27882
27881
32581
34889
12
13
14
34517
14
34518
14
29783
27884
34519
14A
32592B
14A
32593B
14A
32594B
15
15
15
32595
32596
32597
16
27888
17
32591C
18
19
21
660662B
34242
32115
22
23
34034
31303B
24
28427
34011A
25
26
*30684
27
31546
28
650488
30
31
32
33
34
35
33876
650489
*32631
30938A
30939A
650697A
37
33636
37
34251
Canada
38
*27896
39
40
28423
41
42
28424
28425
43
27793
650128
44
45
*27915
27627
46
30195A
48
30196
MODEL NUMBER: 143.726182
Ref.
Part
Part Name
No.
No.
Cylinder Assy. (Incl. Nos. 2, 3 & 4)
Pin, Dowel
Plug, Sq. hd. pipe (oil drain)
Seal, Oil
Valve, Intake (Std.) (Incl. No. 9)
Valve, Intake (1/32" oversize) (Incl.
No.9)
Valve, Exhaust (Std.) (Incl. No. 9)
Valve, Exhaust (1/32" oversize)
(Incl. No.9)
Cap, Upper valve spring
Spring, Valve
Cap, Lower valve spring
Crankshaft Assy. (Incl. Nos. 12 &
13)
Pin, Groove
Gear, Crankshaft
Piston, Pin & Ring Assy. (Incl. Nos.
14A, 15 & 16) (Std.)
Piston, Pin & Ring Assy. (Incl. Nos.
14A, 15 & 16) (.010 oversize)
Piston, Pin & Ring Assy. (Incl. Nos.
14A, 15 & 16) (.020 oversize)
Piston & Pin Assy. (Incl. No. 16)
(Std.)
Piston & Pin Assy. (Incl. No. 16)
(.010 oversize)
Piston & Pin Assy. (Incl. No. 16)
(.020 oversize)
Ring Set, Piston (Std.)
Ring Set, Piston (.010 oversize)
Ring Set, Piston (.020 oversize)
Ring, Piston pin retaining
Rod Assy., Connecting (Incl. Nos.
18 & 19)
Screw, Connecting rod
Dipper, Oil
Camshaft (Mech. Compression
Release)
Lifter, Valve
Cover, Cylinder (Incl. Nos. 24, 27 &
106)
Seal, Oil
Dipstick, Oil (Incl. No. 73)
Gasket, Cylinder cover
Bushing, Crankshaft
Screw, Hex hd. Sems, 1/4-20 x
1-1/4
Gasket, Stator
Screw, Hex hd . Sems, 1/4-20 x 5/8
Gasket, Cylinder head
Head, Cylinder
Cover, Cylinder head
Screw, Hex flange hd. , 5/16-18 x
2-1/2
Plug, Spark (Champion J-8 or
equivalent) Except for Canada
Resistor Spark Plug (Canadian
Regu lations re quire RJ-17LM
resistor spark plug)
Gasket, Valve spring cover
Body Assy, Breather
Element, Breather
Cover, Valve spring
Clip, Conduit
Screw, Fil. hd. Sems, 10-24 x 1/2
Tube, Breather
Gasket, Intake
Flange, Carburetor (Incl. Nos. 76 &
49
50
52
53
650152
54
650548
55
56
57
63
30826
30824
64
65
29536
650561
66
34374
29747A
32158D
650815
8116
33590
33893A
*31688
29752
69
70
71
72
73
74
75
76
78
80
29642
29826
29216
32326A
30699C
26460
6505n
81
82
83
84
85
87
88
89
90
91
92
97
101
650521
102
32862
103
104
106
107
30590A
30820
*27272
29918
30205
31691
30727
31715
650494
30700
30936
29574
29633
32332
31845
30591
29193
108
109
30588A
113
118
120
121
124
128
30688
30962
650128
30622
29716
33110A
129
130
131
32589
133
650493
137
650163
31431
650542
31757
28942
138
144
145
151
153
154
155
156
80)
31843A
28763
31902
32203
32204
31667
Part Name
Screw, Fil. hd. Sems, 8-32 x 3/8
Ring, Retaining
Screw, Hex washer hd., 10-32 x 3/4
Lock Nut, Hex "Keps" 10-32
Screw, Hex washer hd., 8-32 x 5/16
Governor Lever Assy.
Spring, Extension
Link, Governor-to-throttle
Rod Assy., Governor (Incl. Nos. 91
&92)
Baffle, Blower housing
Screw, Hex washer hd. Durlok,
1/4-20 X 5/8
Decal, Instruction
Screw, Hex hd. Sems, 5/16-24 x 3/4
Housing, Blower
Washer, Belleville
Nut, Crankshaft
"0" Ring
Tube, Oil filler
Gasket, Carburetor
Nut & Lockwasher Assy., 1/4-28
Clamp, Fuel line
Screw, Flat hd. Sems, 1/4-28 x
1-1/8
Washer, Flat
Baffle, Heat
Gasket, Air cleaner
Lockwasher No. 8 E.T.
Bracket, Governor adjusting
Bracket, Air cleaner
Screw, Fil. hd. Sems, 10-32 x 1-1/8
Element, Air cleaner
Body Assy., Air cleaner
Screw, Fit. hd. Sems, 6-40 x 5/16
Yoke, Governor
Flange, Air cleaner
Elbow, 90°
Nut, Conduit
Muffler
Nipple, Exhaust pipe
Shaft, Mechanical governor
Gear Assy., Governor (Incl. No. 81)
Ring, Retaining
Spool, Governor
Screw, Hex hd. Sems, 1/4-20 x 112
Line, Fuel
Screw, Fit. hd. Sems, 10-24 x 1/2
Extension, Blower housing
Screw, Pan hd. Sems, 1/4-28 x 7/16
Control Assy., Remote Speed (Incl.
No. 56)
Key, Flywheel
Bracket, Governor gear
Screw, Hex washer hd. shakeproof, 10-32 x 19/32
Screw, Hex hd. Sems, 1/4-20 x
1-3/4
Screw, Fil. hd. Sems, 10-32 x 7/8
Elbow, Air cleaner
Screw, Hex hd. 5/16-18 x 3/4
Base, Engine mounting
Screw, Hex washer hd. Sems,
10-32 X 3/8
Wire, Ground
Air cleaner, Starter
Bracker, Starter air cleaner
Spring, Pre-cleaner bag
*Indicates Parts Included in
Gasket Set, Ref No. 169.
Screw, Fit. hd., 5/16-18 x 3/4
Page 8
181-383-11
CRAFTSMAN 4-CYCLE ENGINE
another free manual from www.searstractormanuals.com
Ref.
No.
Par t
No.
157
158
31668
730512
163
164
166
32125
590417
611038
MODEL NUMBER: 143.726182
Ref.
No.
Part Name
Bag, Pre-cleaner
Kit, Pre-cleaner (Incl. Nos. 156 &
157)
Cup, Starter
Screen, Starter c up
Magneto (The complete magneto
is not available as an assembly. The
magneto number is shown for
reference purposes only. Order
component parts individually as
shown in parts list.)
167
168
169
Part
No.
631454
590420
33239
181 -383-11
Part Name
Carburetor (Incl. No. 75)
Starter Assy. , Rewind
Gasket Set (Incl. items marked *)
Owners Manual
* Indicates Parts Included in
Gasket Set, Ref No. 169
MAGNETO NO. 611038
' I ht> romplt>tt• m.•..:n• 1o 1..., not
a\ .ul<.th!. '" .tn , ........ mhh
Tht• m.t~lwto numlwr ' '
... huv. n feu rt·f1·rt nn· purpu-.t..,
unh ()nit r 'ompcmt nt part ...
md1\ utu.t11\ 11.. ..hn¥. n 10
-------'
Ref.
No.
10
11
12
13
14
15
611038
611037
30661
610947
30647A
610386
33356
610408
29181
610593
30560A
30564
30548B
30545
30561B
16
17
19
30549
31311
610967
1
2
3
5
6
7
8
9
Page 9
Part
No.
Part Name
M agneto
Flywheel
Spring, Breaker box dust cover
Cover, Dust
Contact A ssembly, Breaker
Washer, Terminal
Tab, Ground term inal
Nut, Terminal
Sc rew & Washer, Breaker
Screw, Condenser
Coil Assy. (Inc l. No. 121
Wire, Lead
Condenser
Core & Plate
Stator Assy. (I ncl. Nos. 2 thru
11, 13, 14, 16, 17 & 19)
Felt, Cam wiper
Clip, Coil locking
Gasket, Dust cover
181-383-11
CARBURATOR NO. 631454
Ref.
No.
,....
/
...-'1I
I
(
I
15
14- @ -1
I
another free manual from www.searstractormanuals.com
...I
~--16
--.._____/'
I
21
-~-l
~
-0.
23 30 _coil - 22
SA - ~
A
0/
Part
No.
631464
31834
1
2
631767
3
631036
650606
4
630766
5
5A 630738
660417
6
7
31842
63JJ157A
8
31837
9
10 "630748
11 "631027
12 "631021
13
14
15
16
18
21
22
631022
632019
"631024
631867
631183
27110
"31839
23
24
"630740
"631078
"631028
632164
631184
631971
630739
31840
25
26
27
29
30
31
Part Name
Carburetor
Shaft & Lever Assy., Throttle
Spring, Throttle return
Shutter, Throttle
Screw, Rd. hd., 4-40 x 3/16
Spring, Idle regulating screw
Spring, Main Adjustment screw
Screw, Idle regulating
Shaft & Lever Assy., Choke
Spring, Choke return
Shutter, Choke
Plug, Welc h
Plug, Welch
Inlet Needle, Seat & Clip Assy.
(Incl. No. 13)
Clip, Inlet needle
Float, Carburetor
Shaft, Float
Bowl, Float
Washer, Felt
Gasket, Bowl-to-body
Adjustment Screw Assy. , Main
(Incl. Nos. 5A, 21, 23 & 301
"0" Ring, Adjustment screw
Screw, Idle adjustment
Gasket, Bowl-to-body
Fitting, Fuel inlet
Washer, Flat
Seal, Dust
Washer, Flat
Repair Kit (Incl. items marked "I
REWIND STARTER NO. 590420
(0)-a
,'¥~
--...
10\RJ
r ~
~~ ;
'
:~
1:
"
I·
9-~
t
I
I
~)7
~
9
~~
~~
Ref.
No.
1
2
3
4
5
6
7
8
-6
9
10
11
f(-5
~
3-~ ~4
Part
No.
Part Name
590420 Starter, Rewind
590409A Screw, Retainer
590410 Retainer, R.H.
590411 Spring, Brake
590148 Dog, Starter
590412 Spring, R.H. dog
590413A Pulley
590414 Spring & Keeper Assy.
590536 Housing Assy., Starter (Incl. No.
1)
590451A Rope, Starter
590387 Handle Assy., Starter
590459 Pin , Centering
..-----....._
2-~
1-~
11-m
Page 10
181-383-11
•
- - -
- - --
- - -- -- - -- - -
How to ORDER Repair Parts
another free manual from www.searstractormanuals.com
Sears
owner's
manual
The Model Number will be found stamped into the blower
housing (See Figure 1). Always mention the Model Number
w hen requesting service or repair parts for your Craftsman
Engine.
All parts listed herein may be ordered from any SEARS,
ROEBUCK AND CO. or SIMPSON S- SEARS LIMITED
retail or catalog store. If the parts you need are not stocked
locally, you r order will be electronically t ransmitted to a Sears
Repair Parts Distribution Center for expedited handling.
WHEN ORDERING REPAIR PARTS, ALWAYS GIVE THE
FOLLOWING INFORMATION AS SHOWN IN THIS LIST.
1.
The PART NUMBER
2.
The PART DESCRIPTION
3.
The MODEL NUMBER
4.
The NAME OF ITEM-ENGINE
MODEL NO. 143.726182
"Your Sears merchandise has added value when you consider
that Sears has service units nationwide staffed with Sears
trained technicians . . . professional technicians specifically
trained on Sears products, having the parts, tools and equipment to insu re that we meet our pledge to you .... we service
what we sel l."
Sold by SEARS, ROEBUCK AND CO., Chicago, IL. 60684 U.S.A.
and SIMPSONS - SEARS LIMITED, Toronto, Ontario, Canada.
181-383-11