1
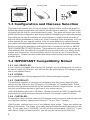
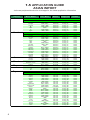
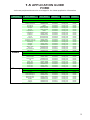
TOP VIEW
Instruction Manual
PXDX-KD
PXDX-KI
PROFESSIONAL INSTALLATION
STRONGLY ADVISED
Peripheral Electronics®,
a division of AAMP of America™
13160 56th Court Clearwater, Florida 33760
866-788-4237 in the US or 727-572-9255 ext.262 for international calls
[email protected]
©2006 AAMP™ of Florida, Inc.
rm07.25.05
Table of Contents
CHAPTER 1-Getting Started
Pages
1.1 Introduction
1
1.2 Precautions
1
1.3 Configuration & Harnesses
2
1.4 Compatibility Notes
2-3
1.5 Application Guide
4-9
1.6 Programming the Audio2car
10
CHAPTER 2-General Installation
2.1 Installation Location
11
2.2 Pre-Installation Checklist
11
2.3 Wiring Connections
11-12
2.4 Installation at Changer Location
12-13
2.4 Installation at Radio
13
CHAPTER 3 -Operation
3.1 Operation
14
3.2 Troubleshooting
15
3.3 Warranty
16
3.4 Warning
16
3.5 FCC Statement
16
Chapter 1- Getting Started
1.1 Introduction
Thank you for purchasing Peripheral Electronics’® Audio2car interface. The
Audio2car is designed to provide endless hours of listening pleasure through most
vehicles’ factory radios. To ensure that your Mobile Device performs correctly in
your car or truck, we recommend that you read this entire manual before attempting
installation of the Audio2car interface.
The Audio2car interface will allow you to connect your Mobile Device to a factory
radio that has the ability to control a CD changer. The Audio2car is designed to be
used with all iPods, mp3 players, portable DVD players, video game systems and
any other portable device with traditional audio outputs.
1.2 Precautions
(Important, Please Read)
PREVENTING DAMAGE TO YOUR VEHICLE OR MOBILE DEVICE.
To eliminate the risk of an electrical short, we recommend disconnecting the car
battery in most vehicles, except in the following situations:
• Vehicles equipped with on-board navigation should not have the car’s battery
disconnected. Doing so may cause loss of memory settings. These settings
would then have to be reprogrammed by an authorized car dealer for a fee to be paid by the vehicle’s owner. For these vehicles, we recommend extreme
caution when handling exposed 12V power or ground wires/connectors.
•Vehicles that incorporate a security-code protecting the radio. If the car’s battery or the radio’s power plugs are disconnected, the radio will not operate without re-entering the security-code. If you have access to the security-code, feel
comfortable disconnecting the battery and the radio’s power connectors. Other wise, do not disconnect the battery and exercise extreme caution while handling exposed 12V power or ground wires/connectors.
PROPER MOUNTING LOCATION
Securely install the interface in a location free from; heat, humidity, moving parts or
direct sunlight. Beware of hot-air flow from your vehicle’s climate control system.
We recommend securing the interface to a suitable location, free of sharp metal
edges, using; double sided tape, Velcro or wire ties.
1
Audio2car interface
Docking cable
Vehicle specific harness
1.3 Configuration and Harness Selection
This section will instruct you on how to properly identify and/or confirm the proper interface dip-switch configuration and vehicle specific harness selection. On the following pages you will find our vehicle application guide. This guide will inform you of the
proper dip-switch configuration and vehicle specific harness for your particular vehicle.
Depending on the type of audio2car kit you purchased, it might include a bundle of
different vehicle harnesses or none at all. If the kit contains many harnesses, only one
will be needed for your specific vehicle. If the kit came without any vehicle harness,
your authorized Peripheral® dealer will have the harness for you to purchase separately.
Before consulting the application guide please take a moment to review our IMPORTANT COMPATIBILITY NOTES below. These notes will inform you of any issues or
circumstances that can affect the compatibility of our product with your factory audio
system and accessories. Some situations result in the loss of use of some factory
audio players. Please read and understand these notes before proceeding to the application guide.
1.4 IMPORTANT Compatibility Notes!
1.4.1 ALL VEHICLES-
If your vehicle is equipped with a factory CD changer, you must disconnect it in order to
be able to install the interface. You will lose the use of the factory CD changer to gain
use of your Mobile Device.
1.4.2 ACURA-
Not compatible with vehicles equipped with a factory Navigation system.
1.4.3 CHEVROLET-
The Audio2car interface is currently not compatible with any factory external audio
source such as: XM tuner, Any CD player or Cd changer, or Cassette player. These
devices must be disconnected during the installation and will longer function. You will
lose the use of these devices to gain use of your mobile device.
1995-1999 Radios with built in CD player (Except Corvette) are NOT compatible with
the Audio2car interface because they do not have CD changer control functions.
1.4.4 CHRYSLER-
To determine if your vehicles radio has CD changer control functions, and will work with
the iPod2car interface, check preset button #”1” for the “Disc ^” symbol.
1999 Chrysler vehicles have one of two different style radios. These two radios use
different harnesses. The shape of the radio face will determine which harness you will
use. If your radio face is SQUARE, you will use the harness part# PXHCH1. If your
radio face is OVAL (rounded corners), you will use the harness part# PXHCH2.
2
1.4.5 DODGE- See Chrysler 1.4.4
1.4.6 EAGLE- See Chrysler 1.4.4
1.4.7 FORD-
The Audio2car is not compatible with factory radios with built-in 6-disc CD changers.
1.4.8 GMC- See Chevrolet 1.4.3
1.4.9 HONDA-
Starting in 2003 Honda introduced a new series of radios that use different software
that is currently incompatible with the Audio2car. In 2005 all Honda radios use this
software- making them incompatible.
1.4.10 HUMMER- See Chevrolet 1.4.3
1.4.11 JEEP- See Chrysler 1.4.4
1.4.12 LINCOLN-
The Audio2car is not compatible with factory radios with built-in 6-disc CD changers.
1.4.13 MERCURY-
The Audio2car is not compatible with factory radios with built-in 6-disc CD changers.
1.4.14 OLDSMOBILE-
The Audio2car is not compatible with factory radios with built-in 6-disc CD changers.
1.4.15 PLYMOUTH- See Chrysler 1.4.4
1.4.16 PONTIAC-
The Audio2car is not compatible with factory radios with built-in 6-disc CD changers.
1.4.17 TOYOTA-
2003-2005 Toyota vehicles have radios that appear to be the same but use different
harnesses. Unfortunately, because the radios have the same outward appearance, the
only way to determine which harness to use is to remove the radio and visually confirm
the connector on the back of the radio. If the harness part# PXHTY1 harness does
not fit into the connector on your radio, you will also need the harness part# PXHTY2
adapter harness that will adapt the PXHTY1 to fit the newer style radio connectors.
1.4.18 VOLKSWAGEN-
We recommend using the PXHVW2 harness on single DIN (2” tall) style radios to
install the Audio2car behind the radio. For double-DIN style radios use the PXHVW3
harness.
When installing in either a single DIN style radio (2” tall) or a double DIN (4” tall) style
radio, the factory CD changer cable may be connected. Disconnect the factory CD
changer cable and replace it with the PXHVW3 cable.
3
1.5 APPLICATION GUIDE
ASIAN IMPORT
visit www.peripheralelectronics.com/apps for the latest application information
Manufacturer
/ Fabricant
Model / Modèle
Acura
Year / Année
Harness
Configuration
Interface
Location
NOTE: NOT Compatible with Vehicles Equipped with Navigation
Nota¬: Non Compatible Avec Les Véhicules Dotés De La Fonction Navigation
Honda
CL
Integra
Legend
RL
RSX
TL
Vigor
1996-2002
1992-2001
1992-1995
1996-2002
2002
1999-2002
1992-1994
PXHCH2
PXHCH2
PXHCH2
PXHCH2
PXHCH2
PXHCH1
PXHCH2
Config
Config
Config
Config
Config
Config
Config
#1
#1
#1
#1
#1
#1
#1
Radio
Radio
Radio
Radio
Radio
Radio
Radio
NOTE: NOT Compatible with Vehicles Equipped with Built-in 6 Disc Changer
Nota¬: Non Compatible Avec Les Véhicules Dotés D’Un Changeur De 6¬CD Intégré
Isuzu
Mazda
Nissan
Scion
Toyota
Accord
Accord
Civic
Civic
CRV
CRV
Del Sol
Element
Insight
Odyssey
Odyssey
Passport
Prelude
Prelude
S2000
Amigo
Rodeo
Trooper
B-Series Truck
B-Series Truck
Tribute
Quest
tC
xA
xB
PXHCH2
PXHHD1
PXHCH2
PXHHD1
PXHCH2
PXHHD1
PXHHD1
PXHHD1
PXHHD1
PXHCH2
PXHHD1
PXHHD1
PXHCH2
PXHHD1
PXHHD1
PXHTY1
PXHTY1
PXHTY1
PHXFD2
PHXFD3
PHXFD3
PXHFD3
PXHTY3
PXHTY3
PXHTY3
Config
Config
Config
Config
Config
Config
Config
Config
Config
Config
Config
Config
Config
Config
Config
Config
Config
Config
Config
Config
Config
Config
Config
Config
Config
#1
#1
#1
#1
#1
#1
#1
#1
#1
#1
#1
#1
#1
#1
#1
#9
#9
#9
#4
#4
#4
#4
#9
#9
#9
NOTE: Matrix NOT Compatible when Equipped with Built-in 6 Disc Changer
Radio
Radio
Radio
Radio
Radio
Radio
Radio
Radio
Radio
Radio
Radio
Radio
Radio
Radio
Radio
Radio
Radio
Radio
Radio
Radio
Radio
Radio
Radio
Radio
Radio
Nota¬: Non Compatible Avec Les Véhicules Dotés D’Un Changeur De 6¬CD Intégré
4-Runner
Avalon
Camry
Solara
Celica
Corolla
Echo
Highlander
Landcruiser
Matrix
Matrix
MR2
Prius
RAV4
Sequioa
Sienna
Solara
Supra
T100
Tacoma
Tercel
Tundra
Yaris
4
1992-1997
1998-2002
1992-1997
1998-2004
1997
1998-2004
1993-1997
2002
2001-2004
1995-1997
1998-2004
1998-2002
1992-1997
1998-2001
2000-2003
1998-2000
1998-2002
1998-2002
1997
1998-2001
2001-2002
1999-2002
2003-2005
2003-2005
2003-2005
1998-2005
1998-2005
1998-2005
1999-2003
1998-2005
1998-2005
2000-2005
2001-2004
1998-2005
2003-2004
2005
2000-2005
2001-2005
1998-2005
2001-2005
1998-2005
2004-2005
1998
1998
1998-2005
1998
2000-2005
2007
PXHTY3
PXHTY3
PXHTY3
PXHTY3
PXHTY3
PXHTY3
PXHTY3
PXHTY3
PXHTY3
PXHGM3
PXHTY3
PXHTY3
PXHTY3
PXHTY3
PXHTY3
PXHTY3
PXHTY3
PXHTY3
PXHTY3
PXHTY3
PXHTY3
PXHTY3
PXHTY3
Config
Config
Config
Config
Config
Config
Config
Config
Config
Config
Config
Config
Config
Config
Config
Config
Config
Config
Config
Config
Config
Config
Config
#9
#9
#9
#9
#9
#9
#9
#9
#9
#9
#9
#9
#9
#9
#9
#9
#9
#9
#9
#9
#9
#9
#9
Radio
Radio
Radio
Radio
Radio
Radio
Radio
Radio
Radio
Radio
Radio
Radio
Radio
Radio
Radio
Radio
Radio
Radio
Radio
Radio
Radio
Radio
Radio
1.5 APPLICATION GUIDE
FORD
visit www.peripheralelectronics.com/apps for the latest application information
Manufacturer
/ Fabricant
Model / Modèle
Ford
Year / Année
Harness
Configuration
Interface
Location
NOTE: Not Compatible with In-dash 6 Disc CD Changer
Nota¬: Non Compatible Avec Un Changeur De 6¬CD Intégré Au Tableau De Bord
Lincoln
Crown Victoria
Crown Victoria
Econoline
Econoline
Escape
Escort
Expedition
Expedition
Explorer
Explorer
Focus
Freestar
F-series Pick Up
F-series Pick Up
Mustang
Ranger
Ranger
Sport Trac
Taurus
Thunderbird
Windstar
1995-1997
1998-2003
1997
1998-2004
2001-2004
1997-2003
1997
1998-2003
1995-1997
1998-2004
2000-2003
2004-2005
1995-1997
1998-2003
2001-2003
1995-1997
1998-2004
2000-2004
1996-2005
2000-2004
1999-2003
PXHFD2
PXHFD3
PXHFD2
PXHFD3
PXHFD3
PXHFD2
PXHFD2
PXHFD3
PXHFD2
PXHFD3
PXHFD4
PXHFD3
PXHFD2
PXHFD3
PXHFD3
PXHFD2
PXHFD3
PXHFD3
PXHFD1
PXHFD3
PXHFD3
Config
Config
Config
Config
Config
Config
Config
Config
Config
Config
Config
Config
Config
Config
Config
Config
Config
Config
Config
Config
Config
#4
#4
#4
#4
#4
#4
#4
#4
#4
#4
#5
#4
#4
#4
#4
#4
#4
#4
#4
#4
#4
Radio
Radio
Radio
Radio
Radio
Radio
Radio
Radio
Radio
Radio
Radio
Radio
Radio
Radio
Radio
Radio
Radio
Radio
Radio
Radio
Radio
NOTE: Not Compatible with In-dash 6 Disc CD Changer
Nota¬: Non Compatible Avec Un Changeur De 6¬CD Intégré Au Tableau De Bord
Mercury
Avaitor
Continental
Continental
LS
Mark VIII
Navigator
Navigator
Town Car
Town Car
2002-2003
1995-1997
1998-2004
2000-2003
1995-1998
1997-1998
1999-2003
1995-1997
1998-2003
PXHFD3
PXHFD2
PXHFD3
PXHFD3
PXHFD2
PXHFD2
PXHFD3
PXHFD2
PXHFD3
Config
Config
Config
Config
Config
Config
Config
Config
Config
#4
#4
#4
#4
#4
#4
#4
#4
#4
Radio
Radio
Radio
Radio
Radio
Radio
Radio
Radio
Radio
NOTE: Not Compatible with In-dash 6 Disc CD Changer
Nota¬: Non Compatible Avec Un Changeur De 6¬CD Intégré Au Tableau De Bord
Cougar
Grand Marquis
Grand Marquis
Mountaineer
Mountaineer
Sable
Tracer
Villager
1999-2003
1995-1997
1998-2003
1995-1997
1998-2004
1996-2005
1995-2004
1999-2002
PXHFD4
PXHFD2
PXHFD3
PXHFD2
PXHFD3
PXHFD1
PXHFD1
PXHFD3
Config
Config
Config
Config
Config
Config
Config
Config
#5
#4
#4
#4
#4
#4
#4
#4
Radio
Radio
Radio
Radio
Radio
Radio
Radio
Radio
5
1.5 APPLICATION GUIDE
CHRYSLER
visit www.peripheralelectronics.com/apps for the latest application information
Manufacturer
/ Fabricant
Chrysler
Model / Modèle
Year / Année
Harness
NOTE: ONLY Works in Vehicles with Radio with “DISC
Configuration
Interface
Location
^ ” Printed on Preset Button # 1
Nota¬: Ne Fonctionne Que Dans Les Véhicules Où «¬Disc ^¬» Est Imprimé Sur Le Bouton De Préréglage No¬1 De La Radio
Dodge
300M
300M
Cirrus
Cirrus
Concorde
Concorde
Concorde
Le Baron
LHS
LHS
New Yorker
Prowler
Prowler
PT Cruiser
PT Cruiser
Sebring
Sebring
Sebring
Town & Country
Town & Country
Town & Country
1999-2001
2002-2003
1995-1999
2000
1995-1999
1999-2001
2002-2004
1995
1995-1999
1999-2001
1995-1997
2001
2002
2001
2002-2005
1995-1999
1999-2001
2002-2006
1995-1999
1999-2001
2002-2004
PXHCH1
Config #1
PXHCH3
Config #3
PXHCH1
Config #1
PXHCH2
Config #3
PXHCH1
Config #1
PXHCH2
Config #3
PXHCH3
Config #3
PXHCH1
Config #1
PXHCH1
Config #1
PXHCH2
Config #3
PXHCH1
Config #1
PXHCH2
Config #3
PXHCH3
Config #3
PXHCH2
Config #3
PXHCH3
Config #3
PXHCH1
Config #1
PXHCH2
Config #3
PXHCH3
Config #3
PXHCH1
Config #1
PXHCH2
Config #3
PXHCH3
Config #3
NOTE: ONLY Works in Vehicles with Radio with “DISC ^ ” Printed on Preset Button # 1
Radio
Radio
Radio
Radio
Radio
Radio
Radio
Radio
Radio
Radio
Radio
Radio
Radio
Radio
Radio
Radio
Radio
Radio
Radio
Radio
Radio
Nota¬: Ne Fonctionne Que Dans Les Véhicules Où «¬Disc ^¬» Est Imprimé Sur Le Bouton De Préréglage No¬1 De La Radio
Eagle
Avenger
Avenger
Caravan
Caravan
Caravan
Dakota
Dakota
Dakota
Durango
Durango
Durango
Intrepid
Intrepid
Intrepid
Neon
Neon
Neon
Ram Pickup
Ram Pickup
Ram Pickup
Sprinter
Stratus
Spirit
Van (Fullsize)
Van (Fullsize)
Van (Fullsize)
Viper
Viper
Viper
1995-1999
2000
1995-1999
1999-2001
2002-2004
1995-1999
1999-2001
2002-2005
1998-1999
1999-2001
2002-2004
1995-1999
1999-2001
2002-2004
1995-1999
1999-2001
2002-2004
1995-1999
1999-2001
2002-2004
2004
2002-2004
1995
1995-1999
1999-2001
2002-2004
1995-1999
1999-2001
2002-2004
PXHCH1
Config #1
PXHCH2
Config #3
PXHCH1
Config #1
PXHCH2
Config #3
PXHCH3
Config #3
PXHCH1
Config #1
PXHCH2
Config #3
PXHCH3
Config #3
PXHCH1
Config #1
PXHCH2
Config #3
PXHCH3
Config #3
PXHCH1
Config #1
PXHCH2
Config #3
PXHCH3
Config #3
PXHCH1
Config #1
PXHCH2
Config #3
PXHCH3
Config #3
PXHCH1
Config #1
PXHCH2
Config #3
PXHCH3
Config #3
PXHCH3
Config #3
PXHCH3
Config #3
PXHCH1
Config #1
PXHCH1
Config #1
PXHCH2
Config #3
PXHCH3
Config #3
PXHCH1
Config #1
PXHCH2
Config #3
PXHCH3
Config #3
NOTE: ONLY Works in Vehicles with Radio with “DISC ^ ” Printed on Preset Button # 1
Radio
Radio
Radio
Radio
Radio
Radio
Radio
Radio
Radio
Radio
Radio
Radio
Radio
Radio
Radio
Radio
Radio
Radio
Radio
Radio
Radio
Radio
Radio
Radio
Radio
Radio
Radio
Radio
Radio
Nota¬: Ne Fonctionne Que Dans Les Véhicules Où «¬Disc ^¬» Est Imprimé Sur Le Bouton De Préréglage No¬1 De La Radio
Jeep
Summit
Vision
1995-1996
1995-1997
PXHCH1
Config #1
PXHCH1
Config #1
NOTE: ONLY Works in Vehicles with Radio with “DISC ^ ” Printed on Preset Button # 1
Radio
Radio
Nota¬: Ne Fonctionne Que Dans Les Véhicules Où «¬Disc ^¬» Est Imprimé Sur Le Bouton De Préréglage No¬1 De La Radio
6
Plymouth
Cherokee
Cherokee
Grand Cherokee
Grand Cherokee
Grand Cherokee
Liberty
Wrangler
Wrangler
Wrangler
1995-2001
1995-2001
1995-1999
1999-2001
2002-2004
2002-2004
1995-1999
1999-2001
2002-2004
PXHCH1
Config #1
PXHCH2
Config #3
PXHCH1
Config #1
PXHCH2
Config #3
PXHCH3
Config #3
PXHCH3
Config #3
PXHCH1
Config #1
PXHCH2
Config #3
PXHCH3
Config #3
NOTE: ONLY Works in Vehicles with Radio with “DISC ^ ” Printed on Preset Button # 1
Radio
Radio
Radio
Radio
Radio
Radio
Radio
Radio
Radio
Stratus
Spirit
Van (Fullsize)
Van (Fullsize)
Van (Fullsize)
Viper
Viper
Viper
2002-2004
1995
1995-1999
1999-2001
2002-2004
1995-1999
1999-2001
2002-2004
PXHCH3
Config #3
Radio
PXHCH1
Config #1
Radio
PXHCH1
Config #1
Radio
PXHCH2
Config #3
Radio
PXHCH3
Config #3
Radio
PXHCH1
Config #1
Radio
PXHCH2
Config #3
Radio
PXHCH3
Config #3
Radio
visit
www.peripheralelectronics.com/apps
for with
the“DISC
latest
application
information
NOTE: ONLY Works in Vehicles with Radio
^ ” Printed
on Preset Button
#1
Eagle
1.5 APPLICATION GUIDE
CHRYSLER CONT.
Nota¬: Ne Fonctionne Que Dans Les Véhicules Où «¬Disc ^¬» Est Imprimé Sur Le Bouton De Préréglage No¬1 De La Radio
Manufacturer
/ Fabricant
Chrysler
Jeep
Interface
PXHCH1
Config #1
Radio
Harness
Configuration
Location
PXHCH1
Config #1
Radio
NOTE: ONLY Works in Vehicles with Radio with ““DISC
DISC ^^ ”” Printed
Printed on
on Preset
Preset Button
Button ## 11
Summit
Model
/ Modèle
Vision
1995-1996
Year
/ Année
1995-1997
Nota¬: Ne Fonctionne Que Dans Les Véhicules Où «¬Disc ^¬» Est Imprimé Sur Le Bouton De Préréglage No¬1 De La Radio
Plymouth
Dodge
300M
1999-2001
Cherokee
1995-2001
PXHCH1
Config #1
Radio
300M
2002-2003
PXHCH3
Cherokee
1995-2001
PXHCH2
Config #3
Radio
Cirrus
Grand
Cherokee
1995-1999
PXHCH1
Config #1
Radio
Cirrus
2000
Grand
Cherokee
1999-2001
PXHCH2
Config #3
Radio
Concorde
1995-1999
PXHCH1
#1
Grand
Cherokee
2002-2004
PXHCH3
Config #3
Radio
Concorde
1999-2001
PXHCH2
Liberty
2002-2004
PXHCH3
Config #3
Radio
Concorde
2002-2004
PXHCH3
#3
Wrangler
1995-1999
PXHCH1
Config #1
Radio
Le Baron
1995
PXHCH1
#1
Wrangler
1999-2001
PXHCH2
Config #3
Radio
LHS
1995-1999
PXHCH1
#1
Wrangler
2002-2004
PXHCH3
Config #3
Radio
LHSNOTE: ONLY Works in 1999-2001
PXHCH2
Config
#3
Radio
Vehicles with Radio with “DISC ^ ” Printed on Preset Button # 1
New Yorker
1995-1997
PXHCH1
Config #1
Radio
Nota¬: Ne Fonctionne Que Dans Les Véhicules Où «¬Disc ^¬» Est Imprimé Sur Le Bouton De Préréglage No¬1 De La Radio
Prowler
2001
PXHCH2
Config #3
Radio
Acclaim
1995
PXHCH1
Config
#1
Radio
Prowler
2002
PXHCH3
Config #3
Radio
1996-1999
PXHCH1
Config
Radio
PTBreeze
Cruiser
2001
PXHCH2
Config #1
#3
Radio
2000
PXHCH2
Config
Radio
PTBreeze
Cruiser
2002-2005
PXHCH3
Config #3
#3
Radio
Neon
1995-1999
PXHCH1
Config
Radio
Sebring
1995-1999
PXHCH1
Config #1
#1
Radio
Neon
1999-2001
PXHCH2
Config
#3
Radio
Sebring
1999-2001
PXHCH2
Config #3
Radio
Neon
2002-2004
PXHCH3
Config
Radio
Sebring
2002-2006
PXHCH3
Config #3
#3
Radio
Prowler
1997-1999
PXHCH1
Config
Radio
Town
& Country
1995-1999
PXHCH1
Config #1
#1
Radio
Prowler
1999-2000
PXHCH2
Config
Radio
Town
& Country
1999-2001
PXHCH2
Config #3
#3
Radio
Voyager
1995-1999
PXHCH1
Config
Radio
Town
& Country
2002-2004
PXHCH3
Config #1
#3
Radio
Voyager
1999-2000
PXHCH2
Config
#3
Radio
NOTE: ONLY Works in Vehicles with Radio with “DISC ^ ” Printed on Preset Button # 1
Nota¬: Ne Fonctionne Que Dans Les Véhicules Où «¬Disc ^¬» Est Imprimé Sur Le Bouton De Préréglage No¬1 De La Radio
Avenger
1995-1999
PXHCH1
Config #1
Radio
Avenger
2000
PXHCH2
Config #3
Radio
Caravan
1995-1999
PXHCH1
Config #1
Radio
Caravan
1999-2001
PXHCH2
Config #3
Radio
Caravan
2002-2004
PXHCH3
Config #3
Radio
Dakota
1995-1999
PXHCH1
Config #1
Radio
Dakota
1999-2001
PXHCH2
Config #3
Radio
Dakota
2002-2005
PXHCH3
Config #3
Radio
Durango
1998-1999
PXHCH1
Config #1
Radio
Durango
1999-2001
PXHCH2
Config #3
Radio
Interface
Durango
2002-2004
PXHCH3
Config #3
Radio
Model
/ Modèle
Year
/ Année
Harness
Configuration
Location
Intrepid
1995-1999
PXHCH1
Config #1
Radio
Intrepid
1999-2001
PXHCH2
#3
Radio
A4
1998-2004
PXHAD1
Config #2
Trunk
Intrepid
2002-2004
PXHCH3
#3
Radio
A6
1998-2002
PXHAD1
Config #2
Trunk
Neon
1995-1999
PXHCH1
#1
Radio
A8
1998-2002
PXHAD1
Config #2
Trunk
Neon
1999-2001
PXHCH2
#3
Radio
All-Road
2001-2004
PXHAD1
Config #2
Trunk
Neon
2002-2004
PXHCH3
#3
Radio
Cabriolet
1998
PXHAD1
Config #2
Trunk
RamRS6
Pickup
1995-1999
PXHCH1
#1
Radio
2000-2003
PXHAD1
Config #2
Trunk
RamS4
Pickup
1999-2001
PXHCH2
#3
Radio
2000-2004
PXHAD1
Config #2
Trunk
RamS6
Pickup
2002-2004
PXHCH3
#3
Radio
2002-2003
PXHAD1
Config #2
Trunk
Sprinter
2004
PXHCH3
#3
Radio
S8
2001-2002
PXHAD1
Config #2
Trunk
Stratus
2002-2004
PXHCH3
#3
Radio
TT
2000-2004
PXHAD1
Config #2
Trunk
Spirit
1995
PXHCH1
#1
S-Type
2000-2002
PXHFD4
Config #4
Radio
Van (Fullsize)
1995-1999
PXHCH1
Config #1
Radio
Beetle
1998-2005
PXHVW2
Config #2
Radio
2006
Van (Fullsize)
1999-2001
PXHCH2
Config #3
Radio
Cabrio
1998-2004
PXHVW2
Config #2
Radio
Van (Fullsize)
2002-2004
PXHCH3
Config #3
Radio
Eurovan
1999-2004
PXHVW2
Config #2
Radio
Viper
1995-1999
PXHCH1
Config #1
Radio
Golf
1998-2005
PXHVW2
Config #2
Radio
2006
Viper
1999-2001
PXHCH2
Config #3
Radio
GTI
1998-2005
PXHVW2
Config #2
Radio
2006
Viper
2002-2004
PXHCH3
Config #3
Radio
2006
Jetta
1998-2005
PXHVW2
Config #2
Radio
NOTE: ONLY Works in Vehicles with Radio with “DISC ^ ” Printed on Preset Button # 1
Passat
1998-2003
PXHVW2
Config #2
Radio
Nota¬:Passat
Ne Fonctionne Que Dans Les2004-2005
Véhicules2006
Où «¬Disc ^¬» EstPXHVW3
Imprimé Sur Le Bouton
De Préréglage
Radio
Config
#2 No¬1 De La
Radio
Phaeton
2004-2005
PXHVW3
Config
Radio
2006
Summit
1995-1996
PXHCH1
Config #2
#1
Radio
Toureg
2004-2005
PXHVW3
Config
Radio
2006
Vision
1995-1997
PXHCH1
Config #2
#1
Radio
EURO-IMPORT
Manufacturer
/ Fabricant
Audi
Jaguar
Volkswagen
Eagle
Jeep
NOTE: ONLY Works in Vehicles with Radio with “DISC
^ ” Printed on Preset Button # 1
Nota¬: Ne Fonctionne Que Dans Les Véhicules Où «¬Disc ^¬» Est Imprimé Sur Le Bouton De Préréglage No¬1 De La Radio
Plymouth
Cherokee
Cherokee
Grand Cherokee
Grand Cherokee
Grand Cherokee
Liberty
Wrangler
Wrangler
Wrangler
1995-2001
1995-2001
1995-1999
1999-2001
2002-2004
2002-2004
1995-1999
1999-2001
2002-2004
PXHCH1
Config #1
PXHCH2
Config #3
PXHCH1
Config #1
PXHCH2
Config #3
PXHCH3
Config #3
PXHCH3
Config #3
PXHCH1
Config #1
PXHCH2
Config #3
PXHCH3
Config #3
NOTE: ONLY Works in Vehicles with Radio with “DISC ^ ” Printed on Preset Button # 1
Radio
Radio
Radio
Radio
Radio
Radio
Radio
Radio
Radio
7
1.5 APPLICATION GUIDE
GM VEHICLES
visit www.peripheralelectronics.com/apps for the latest application information
Manufacturer
/ Fabricant
Model / Modèle
Buick
Year / Année
Harness
Configuration
Interface
Location
NOTE: 1995-1999 NOT Compatible with In-dash CD Player
Nota¬: Non Compatible Avec Le Lecteur De CD Intégré Au Tableau De Bord Des Modèles 1995-1999
LeSabre
Rainier
Rendezvous
Cadillac
1999-2002
2005
2003-2005
PXHGM3
PXHGM3
PXHGM3
Config #7
Config #7 or #8
Config #7 or #8
Radio
Radio
Radio
NOTE: 2003-2005 MUST Disable Factory External A/V Source Devices
NOTA : Les appareils source audiovisuels externes installés en usine dans les modèles 2003-2005 DOIVENT être désactivés.
NOTE: 1996-1999 NOT Compatible with In-dash CD Player
Nota¬: Non Compatible Avec Le Lecteur De CD Intégré Au Tableau De Bord Des Modèles 1996-1999
Deville
El Dorado
Escalade
Escalade
Seville
Chevrolet
1995-2000
1995-2002
1999-2002
2003-2006
1995-2005
PXHGM2
PXHGM2
PXHGM1
PXHGM3
PXHGM2
Config #6
Config #6
Config #6
Config #7 or #8
Config #6
Trunk
Trunk
Radio
Radio
Radio
NOTE: 2003-2005 MUST Disable Factory External A/V Source Devices
NOTA : Les appareils source audiovisuels externes installés en usine dans les modèles 2003-2005 DOIVENT être désactivés.
NOTE: 1996-1999 NOT Compatible with In-dash CD Player
Nota¬: Non Compatible Avec Le Lecteur De CD Intégré Au Tableau De Bord Des Modèles 1996-1999
Astro Van
Avalanche
Avalanche
Blazer
Camaro
Cavalier
Cavalier
Colorado
Corvette
Impala
Impala
Lumina
Malibu
Monte Carlo
Monte Carlo
Silverado
Silverado
Suburban
Suburban
Tahoe
Tahoe
Trailblazer
Venture
Venture
GMC
1996-2005
2002
2003-2006
1998-2002
1997-2002
1996-1999
2003-2005
2005
1997-2004
1995-1999
2000-2005
1996-1999
1997-2000
1995-1999
2000-2005
1996-2002
2003-2006
1995-2002
2003-2006
1995-2002
2003-2006
2004-2006
1997-1999
2004-2005
PXHGM1
PXHGM1
PXHGM3
PXHGM1
PXHGM1
PXHGM1
PXHGM3
PXHGM3
PXHGM2
PXHGM1
PXHGM3
PXHGM1
PXHGM1
PXHGM1
PXHGM3
PXHGM1
PXHGM3
PXHGM1
PXHGM3
PXHGM1
PXHGM3
PXHGM3
PXHGM1
PXHGM3
Config #6
Config #6
Config #7 or #8
Config #6
Config #6
Config #6
Config #7
Config #7
Config #6
Config #6
Config #7
Config #6
Config #6
Config #6
Config #7
Config #6
Config #7
Config #6
Config #7
Config #6
Config #7
Config #7 or #8
Config #6
Config #7 or #8
Radio
Radio
Radio
Radio
Radio
Radio
Radio
Radio
Trunk
Radio
Radio
Radio
Radio
Radio
Radio
Radio
Radio
Radio
Radio
Radio
Radio
Radio
Radio
Radio
NOTE: 2003-2005 MUST Disable Factory External A/V Source Devices
NOTA : Les appareils source audiovisuels externes installés en usine dans les modèles 2003-2005 DOIVENT être désactivés.
NOTE: 1996-1999 NOT Compatible with In-dash CD Player
Nota¬: Non Compatible Avec Le Lecteur De CD Intégré Au Tableau De Bord Des Modèles 1996-1999
8
Hummer
Oldsmobile
Envoy
Envoy
Denali
Denali
Jimmy
Sonama
Safari
Savana
Sierra
Sierra
Suburban
Suburban
Yukon/XL
Yukon/XL
H2
1999-2001
2004-2006
1995-2002
2003-2006
1998-2002
1998-2002
1996-2005
1999-2000
1995-2002
2003-2006
1995-2002
2003-2006
1995-2002
2003-2006
2003-2006
PXHGM1
PXHGM3
PXHGM1
PXHGM3
PXHGM1
PXHGM1
PXHGM1
PXHGM1
PXHGM1
PXHGM3
PXHGM1
PXHGM3
PXHGM1
PXHGM3
PXHGM3
Config #6
Config #7 or #8
Config #6
Config #7
Config #6
Config #6
Config #6
Config #6
Config #6
Config #7
Config #6
Config #7
Config #6
Config #7
Config #7 or #8
Radio
Radio
Radio
Radio
Radio
Radio
Radio
Radio
Radio
Radio
Radio
Radio
Radio
Radio
Radio
NOTE: 1995-2001 NOT Compatible with Built-in CD Player
Nota¬: Non Compatible Avec Le Lecteur De CD Intégré Au Tableau De Bord Des Modèles 1995-2001
NOTE: 2004-2005 MUST Disable Factory External A/V Source Devices
NOTA : Les appareils source audiovisuels externes installés en usine dans les modèles 2004-2005 DOIVENT être désactivés.
Envoy
2004-2006
PXHGM3
Config #7 or #8
Radio
Denali
1995-2002
PXHGM1
Config #6
Radio
Denali
2003-2006
PXHGM3
Config #7
Radio
Jimmy
1998-2002
PXHGM1
Config #6
Radio
Sonama
1998-2002
PXHGM1
Config #6
Radio
Safari
1996-2005
PXHGM1
Config #6
Radio
Savana
1999-2000
PXHGM1
Config #6
Radio
Sierra
1995-2002
PXHGM1
Config #6
Radio
visit www.peripheralelectronics.com/apps
for thePXHGM3
latest application
information
Sierra
2003-2006
Config #7
Radio
Suburban
1995-2002
PXHGM1
Config #6
Radio
Suburban
2003-2006
PXHGM3
Config #7
Radio
Manufacturer
Interface
Yukon/XL
1995-2002
PXHGM1
Config #6
Radio
Model
/ Modèle
Year
/ Année
Harness
Configuration
/ Fabricant
Location
Yukon/XL
2003-2006
PXHGM3
Config #7
Radio
H2
2003-2006
PXHGM3
Radio
NOTE:
1995-1999 NOT Compatible
with In-dash CDConfig
Player #7 or #8
Hummer
Buick
1.5 APPLICATION GUIDE
GM VEHICLES CONT.
Oldsmobile
NOTE:
NOT
with
Built-inDe
CDBord
Player
Nota¬: Non Compatible
Avec1995-2001
Le Lecteur
De Compatible
CD Intégré Au
Tableau
Des Modèles 1995-1999
Nota¬: Non Compatible 1999-2002
Avec Le Lecteur De CD Intégré
Au Tableau De Bord Config
Des Modèles
LeSabre
PXHGM3
#71995-2001
Rainier
2005
PXHGM3
Config #7 or #8
NOTE: 2004-2005 MUST Disable Factory External A/V Source Devices
Rendezvous
2003-2005
PXHGM3
Config #7 or #8
Cadillac
Radio
Radio
Radio
NOTA : Les appareils sourceNOTE:
audiovisuels
externes
installésFactory
en usine
dans les
modèles
2003-2005
MUST Disable
External
A/V
Source2004-2005
Devices DOIVENT être désactivés.
Achieva
1996-1998
PXHGM3
Config #7
Radio
Alero
1999-2000
PXHGM2
Config #6
Trunk
NOTE:
1996-1999 NOT Compatible
with In-dash CD Player
Alero
2003-2004
PXHGM3
Config #8
Radio
Aurora
PXHGM2
#61996-1999 Trunk
Nota¬: Non Compatible 1995-1999
Avec Le Lecteur De CD Intégré
Au Tableau De Bord Config
Des Modèles
Aurora
2001-2004
PXHGM2
Config #6
Trunk
Deville
1995-2000
PXHGM2
Config
Trunk
Bravada
1997-2001
PXHGM1
Config #6
#6
Radio
ElBravada
Dorado
1995-2002
PXHGM2
Config
Trunk
2004
PXHGM3
Config
#7 #6
or #8
Radio
Escalade
1999-2002
PXHGM1
Config
Radio
Cutlas
1997-1999
PXHGM2
Config #6
#6
Trunk
Escalade
2003-2006
PXHGM3
Config
#7 #6
or #8
Radio
Cutla
Supreme
1995-1997
PXHGM2
Config
Trunk
Seville
1995-2005
PXHGM2
Config
Radio
Eighty-Eight
1996-1999
PXHGM2
Config #6
#6
Trunk
NOTE: 2003-2005
MUST Disable Factory
External A/V SourceConfig
Devices #6
Intrigue
1998-2001
PXHGM2
Trunk
LSS
1996-1999
PXHGM2
Trunk
NOTA : Les
appareils source audiovisuels
externes installés en usine
dans les modèles Config
2003-2005 #6
DOIVENT être désactivés.
Regency
1997-1998
PXHGM3
Config #6
Trunk
NOTE: 1996-1999 NOT Compatible with In-dash CD Player
Silhoette
1996-1999
PXHGM1
Config #6
Radio
Silhoette
PXHGM3
Config
#7 or1996-1999
#8
Radio
Nota¬: Non Compatible Avec2004
Le Lecteur De CD Intégré
Au Tableau De Bord
Des Modèles
NOTA : Les appareils source audiovisuels externes installés en usine dans les modèles 2003-2005 DOIVENT être désactivés.
Chevrolet
Pontiac
Saturn
GMC
NOTE:
1996-2001 NOT Compatible
with Built-in CD Player
Astro Van
1996-2005
PXHGM1
Config #6
Radio
Avalanche
PXHGM1
#61996-2001 Radio
Nota¬: Non Compatible Avec2002
Le Lecteur De CD Intégré
Au Tableau De Bord Config
Des Modèles
Avalanche
2003-2006
PXHGM3
Config #7 or #8
Radio
NOTE: 2004-2005 MUST Disable Factory External A/V Source Devices
Blazer
1998-2002
PXHGM1
Config #6
Radio
NOTA Camaro
: Les appareils source audiovisuels
externes installés en usine
dans les modèles Config
2004-2005#6
DOIVENT être désactivés.
1997-2002
PXHGM1
Radio
Cavalier
1996-1999
PXHGM1
Config
Radio
Aztec
2003-2005
PXHGM3
Config
#7 #6
or #8
Radio
Cavalier
2003-2005
PXHGM3
Config
#7
Radio
Bonneville
1996-1999
PXHGM2
Config #6
Trunk
Colorado
2005
PXHGM3
Config
#7
Radio
Bonneville
2000-2005
PXHGM1
Config #6
Radio
Corvette
1997-2004
PXHGM2
Config
Trunk
Firebird
1996-2002
PXHGM1
Config #6
#6
Radio
Impala
1995-1999
PXHGM1
Config
Radio
Grand
AM
1996-2000
PXHGM1
Config #6
#6
Radio
Impala
2000-2005
PXHGM3
Config
Radio
Grand
AM
2003-2005
PXHGM3
Config
#7 #7
or #8
Radio
Lumina
1996-1999
PXHGM1
Config
#6
Radio
Montana
1999-2000
PXHGM1
Config #6
Radio
Malibu
1997-2000
PXHGM1
Config
Radio
Montana
2004-2005
PXHGM3
Config
#7 #6
or #8
Radio
Monte
Carlo
1995-1999
PXHGM1
Config
Radio
Sunfire
1996-1999
PXHGM1
Config #6
#6
Radio
Monte
Carlo
2000-2005
PXHGM3
Config
Radio
Sunfire
2003-2005
PXHGM3
Config #7
#7
Radio
Silverado
1996-2002
PXHGM1
Config
#6
Radio
Trans Am
1996-2002
PXHGM1
Config #6
Radio
Silverado
2003-2006
PXHGM3
Config
#7
Radio
TransSport
1996-1998
PXHGM1
Config #6
Radio
Suburban
1995-2002
PXHGM1
Config
Radio
Vibe
2004-2005
PXHGM3
Config
#7 #6
or #8
Radio
Suburban
2003-2006
PXHGM3
Config
Radio
SC1
1995-1999
PXHGM1
Config #7
#6
Radio
Tahoe
1995-2002
PXHGM1
Config
Radio
SC2
1995-1999
PXHGM1
Config #6
#6
Radio
Tahoe
2003-2006
PXHGM3
Config
Radio
SL
1995-1999
PXHGM1
Config #7
#6
Radio
Trailblazer
2004-2006
PXHGM3
Config
#7
or
#8
Radio
SL1
1995-1999
PXHGM1
Config #6
Radio
Venture
1997-1999
PXHGM1
Config
Radio
SL2
1995-1999
PXHGM1
Config #6
#6
Radio
Venture
2004-2005
PXHGM3
Config
#7 #6
or #8
Radio
SW1
1995-1999
PXHGM1
Config
Radio
NOTE: 2003-2005
MUST Disable Factory
External A/V SourceConfig
Devices #6
SW2
1995-1999
PXHGM1
Radio
NOTA : Les appareils source audiovisuels externes installés en usine dans les modèles 2003-2005 DOIVENT être désactivés.
NOTE: 1996-1999 NOT Compatible with In-dash CD Player
Nota¬: Non Compatible Avec Le Lecteur De CD Intégré Au Tableau De Bord Des Modèles 1996-1999
Hummer
Oldsmobile
Envoy
Envoy
Denali
Denali
Jimmy
Sonama
Safari
Savana
Sierra
Sierra
Suburban
Suburban
Yukon/XL
Yukon/XL
H2
1999-2001
2004-2006
1995-2002
2003-2006
1998-2002
1998-2002
1996-2005
1999-2000
1995-2002
2003-2006
1995-2002
2003-2006
1995-2002
2003-2006
2003-2006
PXHGM1
PXHGM3
PXHGM1
PXHGM3
PXHGM1
PXHGM1
PXHGM1
PXHGM1
PXHGM1
PXHGM3
PXHGM1
PXHGM3
PXHGM1
PXHGM3
PXHGM3
Config #6
Config #7 or #8
Config #6
Config #7
Config #6
Config #6
Config #6
Config #6
Config #6
Config #7
Config #6
Config #7
Config #6
Config #7
Config #7 or #8
Radio
Radio
Radio
Radio
Radio
Radio
Radio
Radio
Radio
Radio
Radio
Radio
Radio
Radio
Radio
NOTE: 1995-2001 NOT Compatible with Built-in CD Player
Nota¬: Non Compatible Avec Le Lecteur De CD Intégré Au Tableau De Bord Des Modèles 1995-2001
NOTE: 2004-2005 MUST Disable Factory External A/V Source Devices
NOTA : Les appareils source audiovisuels externes installés en usine dans les modèles 2004-2005 DOIVENT être désactivés.
9
1.6 Programming the Audio2car
Now that you have identified the correct harness and dip-switch configuration using the application guide, it is now time to program the interface.
To program the interface, set the dip-switches located on the side of the interface
(see Fig.1 below) to the congfiguration listed for your vehicle in the Application
guide. Switches are in their default setting of “off” in the up position and are turned
“on” when switched down. Refer to the chart on the bottom of this page.
This programs the Audio2car to the vehicle it is being installed in. The dip-switches
MUST be set before the interface is plugged into the vehicle. Otherwise the
Audio2car will not work correctly.
Dip Switch Configuration Chart
1
2
3
4
5
6
7
8
Config. #1
ON
off
off
ON
off
off
off
off
Config. #2
ON
off
off
off
off
off
off
off
Config. #3
off
off
off
ON
off
off
off
off
Config. #4
off
ON
off
off
off
off
off
off
Config. #5
ON
ON
off
off
off
off
off
off
Config. #6
off
off
ON
off
off
off
off
off
Config. #7
ON
off
ON
off
off
off
off
off
Config. #8
off
ON
ON
off
off
off
off
off
Config. #9
ON
ON
off
ON
off
off
off
off
DIN CONNECTOR / DIP SWITCH VIEW
Fig.1 Side view of Interface with dip switches
1 2 3 4 5 6 7 8
ON
DIP
10
Chapter 2- General Installation
2.1 Installation Location
Most installations will require you to remove the factory radio in order to plug in the vehicle
specific harness. Some vehicles may require you to connect the interface to a factory prerun CD changer cable. The location of these CD changer cables will vary by vehicle. Some
common locations of these cables are in the trunk, behind the glove box, and in or under a
center console. ( see Fig.2 below)
Common Connection Locations
Mobile Device
Audio2car
interface
Vehicle Specific Harness
Refer to Application Guide
for correct harness
Fig. 2
2.2 Pre-Installation Checklist
At this time and before beginning the installation:
• You should have your radio’s security code.(when applicable, see section 1.2)
• The dip-switches on the interface should have been set with the proper configuration.
(see section 1.3)
• You should have in your possession the correct harness for your vehicle. (see sec. 1.3)
• You have determined your installation location. (see section 2.1)
If any of these steps has not been taken, STOP. Only when ALL of these steps have been
taken should you proceed with the rest of the installation.
2.3 Wiring Connections
Some vehicle specific harnesses require wiring connections that involve splicing of wires. If
you are not confident in making these connections to your radio’s wiring harness, we recommend you seek professional installation. You can visit www.peripheralelectronics.com and
click on the dealer link at the top of the page to find an authorized professional installer.
Make these connections only after verifying the proper circuit on your radio harness with a
11
voltmeter. With the key OFF and the negative test lead of the voltmeter firmly touching a
bare metal chassis part of your car, begin probing the wires in the main radio harness with
the positive test lead. The constant 12V+ circuit should read a continuous 12 volts or higher.
Once you’ve identified the constant 12V+ circuit, strip back about 1/8” of the insulation. Now
take the positive test lead and insert it into the wire stranding so that you can now probe for a
suitable ground location in the dash cavity using the negative test lead. Bare chassis metal
is the recommended ground spot. The voltmeter will read a constant 12 volts or higher when
you have found a good ground point. Attach the BLACK ground wire to this spot with either
an existing bolt or screw or use a metal piercing screw. You also have the option of splicing
into the ground wire in the main radio harness. Probe the remaining wires with the negative
test lead until you again find a circuit that reads a constant 12 volts on the voltmeter. When
you’ve found a circuit that reads constant 12 volts, turn the dash light dimmer control to make
sure you have not probed the illumination dimmer circuit. If the circuit continues to read a
constant 12 volts or higher regardless of the dimmer position, you have found the ground
wire. If not, continue testing until you do. Some vehicles do not have a ground wire in their
main radio harness and instead ground through their mounting brackets to the dash. In these
cases, you will have to ground the black wire to the bare metal chassis inside the dash . Once
the ground wire is connected, please finish your wiring connections by splicing in the external
YELLOW wire from the vehicle specific harness.
Vehicle Specific Harnesses that require wiring connections:
PXHFD1 – connect the Yellow wire to constant 12V+ & connect the Black wire to ground.
PXHFD2 – connect the Yellow wire to constant 12V+ & connect the Black wire to ground.
PXHFD3 – connect the Yellow wire to constant 12V+ & connect the Black wire to ground.
PXHGM3 – connect the Yellow wire to constant 12V+ & connect the Black wire to ground.
PXHVW2 – connect both the Black and Black/White wires to ground.
2.4 Installation at the CD Changer Location
In this section you will learn how to install the Audio2car in the factory CD changer location. If your
vehicle is equipped with a factory CD changer you will need to disconnect it from the factory pre-run
harness in order to connect the Audio2car interface. If your vehicle is not equipped with a factory
CD changer, you will need to locate the factory pre-run harness. This may involve the removal of
the; center console, glove box, or carpeted side panels in the trunk. Please consult your vehicle’s
dealership or a local car audio professional for instruction or assistance with locating the factory CD
changer connection if necessary.
1. Connect your vehicle specific Harness to the factory pre-run CD changer harness in the vehicle.
2. Make any necessary wiring connections on your vehicle specific harness. Please see section 2.3
for details on making these wiring connections.
3. Now that the interface is connected to the radio, you will need to test the operation of the interface before permanently running the RCA cables or 3.5mm headphone cable or re-assembling the
dash. First, connect the white Mobile Device cable to the Mobile Device. The Mobile Device should
indicate that it is being charged. Turn on the factory radio and press the button that would activate
the factory CD changer to select the Mobile Device. It may take up to three minutes for the interface
to initialize to the radio (this only happens the very first time you select the Mobile Device). Once
the Mobile Device has been selected, press Play on the Mobile Device. You should be able to hear
the music on your Mobile Device through your factory radio. With the operation of the interface
confirmed, you may continue with the installation. If you experience difficulties in operation, please
see our troubleshooting chart in section 3.2.
4. Decide on a convenient location to mount your Mobile Device.
5. Run the black docking cable from the interface to the desired mounting location. Use caution to
not cut, pinch, or crimp the cable during this step. Avoid moving parts, vehicle wiring harnesses and
areas of excessive heat when routing the cable.
12
Continued on next page
6. Secure the interface in the vehicle using; double sided tape, Velcro or wire ties. Make sure to
check for proper clearance and avoid moving parts. Take into account the size of the interface and
the wire harness and do not force the interface and harness into a space that is too tight, damage
to the harness may result.
7. Now that the interface is secured and the docking cable has been run, you are ready to enjoy
your Mobile Device in your vehicle!
2.5 Installation at the Radio
In this section you will learn how to install the Audio2car behind the radio. If your vehicle is
equipped with a factory CD changer or other external audio source, you will need to disconnect it from the back of the radio in order to connect the Audio2car interface.
1. Carefully remove the radio from the vehicle. If your radio uses a Security Code, make sure
that you have the code before unplugging the radio. Some vehicles require the use of special
tools to remove the radio. Please consult your vehicle’s dealership or a local car audio professional for instruction or assistance with radio removal if necessary.
2. Make any necessary wiring connections on your vehicle specific harness. Please see
section 2.3 for details on making these wiring connections.
3. Connect the Vehicle Specific Harness to the CD changer port on the back of the radio. Be
sure to make a firm connection but do not force it. If there is difficulty making the connection,
please consult the application guide to confirm your vehicle specific harness selection.
4. Now that the interface is connected to the radio, you will need to test the operation of the
interface before permanently running the RCA cables or 3.5mm headphone cable or re-assembling the dash. First, connect the RCA cables or 3.5mm headphone cable to the Mobile
Device. The Mobile Device should indicate that it is being charged. Turn on the factory radio
and press the button that would activate the factory CD changer to select the Mobile Device.
It may take up to three minutes for the interface to initialize to the radio (this only happens
the very first time you select the Mobile Device). Once the Mobile Device has been selected,
press Play on the Mobile Device. You should be able to hear the music on your Mobile Device
through your factory radio. With the operation of the interface confirmed, you may continue
with the installation. If you experience difficulties in operation, please see our troubleshooting chart in section 3.2.
5. Decide on a convenient location to mount your Mobile Device.
6. Run the black docking cable from the interface to the desired mounting location. Use caution to not cut, pinch, or crimp the cable during this step. Avoid moving parts, vehicle wiring
harnesses and areas of excessive heat when routing the cable.
7. Secure the interface in the dash cavity behind the radio using; double sided tape, Velcro or
wire ties. Make sure to check for proper clearance and avoid moving parts. Take into account
the size of the interface and the wire harness and do not force the interface and harness into
a space that is too tight, damage to the harness may result.
8. Now that the interface is secured and the docking cable has been run, you may reinstall
the radio and replace any panels that may have been removed to access the radio. You are
ready to enjoy your Mobile Device in your vehicle!
13
Chapter 3- Operation
3.1 Operation
SELECTING THE AUDIO DEVICE
To select the mobile device from the radio, press the button that would normally
activate the factory CD changer. This button varies by vehicle manufacturers.
In some applications (using config.#8) the Audio2car is accessed like an XM
reciever, In these cases you will press the appropriate activation button. Some
radio models require pressing the “Seek >” button once, after pressing the CD
button. Yet, it may also be necessary to press Play on the mobile device itself to
begin playback. In some cases, if it is the first time selecting the mobile device
from the radio it may take up to three minutes for the Audio2car to initialize.
RADIO DISPLAY DURING Mobile device OPERTION
Some factory radio’s may show DISC and TRACK numbers on the display of the
radio. The Audio2car interface does not send any information from the mobile
device to the radio. This means that the DISC and TRACK numbers shown on
the display will not and can not reflect the song number on the mobile device due
to the complex nature of the music library. Some factory radio’s may flash zero’s
on the display of the radio, or toggle back and forth between Tracks “1” and “2”.
All these are normal behaviors and do not represent a malfunction.
14
3.2 Trouble Shooting
Symptom
Cause
Remedy
No Power
Blown fuse in vehicle fuse
block.
Replace fuse with same
amp rating. If the fuse
blows again, call tech
support.
No Power
Bad connection
Check cable and wiring
connection.
Alternator noise is heard
(Changes with Engine RPM)
Improper wiring creates a
ground loop
Install a Ground loop isolator or seek professional
service from a local car
audio shop.
Radio is not recognizing
Audio2car interface
Bad cables or cables are
not connected properly
between converter box and
car radio
Check connection and
cables, push in firmly.
Radio is not recognizing
Audio2car interface
Wrong configuration on the
interface
Select the right pconfiguration for your car. (See
section 1.5)
Radio is not recognizing
Audio2car interface
Yellow and black wires are
not connected to Constant
12V+ and Ground. (When
applicable)
Please read wiring instructions in chapter 2 of this
manual and see if your car
requires to connect the
yellow and black cable to
power and ground
Mobile device Audio is Low
or Distorted
Audio2car interface is connected with an external CD
changer or other external
factory audio source
Disconnect the factory
external audio source.
Mobile device is not
charging
Yellow and black wires are
not connected to Constant
12V+ and Ground. (When
applicable)
Please read your vehicles
section in this manual and
see if your car requires to
connect the yellow and
black cable to power and
ground
For consumer technical support call:
866-788-4237 in the US or 727-572-9255 ext.262 for international calls
Hours: 9:30 am-6:00 pm E.S.T. MON - FRI
15
3.3 Warranty
One Year Limited Warranty
The quality controls used in the manufacture of this product will ensure your satisfaction.
This warranty applies only to the original purchaser of this product from an authorized
Peripheral Elecronics dealer.
This warranty covers any supplied or manufactured parts of this product that, upon inspection by Peripheral Electronics authorized personnel, is found to have failed in normal use
due to defects in material or workmanship. This warranty does not apply to installation
expenses.
Attempting to service or modify this unit, operating this unit under conditions other than the
recommended voltage will render this WARRANTY VOID.
Unless otherwise prescribed by law, Peripheral Electronics shall not be liable for any personal injury, property damage and or any incidental or consequential damages of any kind
(including water damage) resulting from malfunctions, defects, misuse, improper installation
or alteration of this product.
All parts of this Peripheral Electronics product are guaranteed for a period of 1 year as
follows:
Within the first 12 months from date of purchase, subject to the conditions above, Peripheral Electronics will repair or replace the product at their discretion, if it is defective in material
or workmanship providing it is returned to an Authorized Peripheral Electronic’s Dealer, with
PROOF OF PURCHASE from an authorized Peripheral Elecronics dealer.
3.4 Warning:
This equipment may be reset by unintentional electrostatic discharge during operation.
Exposure to direct sunlight or extreme heat may cause damage or malfunction.
3.5 FCC Class B Radio Frequency
Interference Statement
This equipment has been tested and found to comply with the limits for a Class B digital
device, pursuant to Part 15 of FCC rules. These limits are designed to provide reasonable protection against harmful interference in a residential installation. This equipment
generates, uses, and can radiate radio frequency energy and, if not installed and used in
accordance with the instructions, may cause harmful interference to radio communications.
However, there is no guarantee that interference will not occur in a particular installation. If
this equipment does cause harmful interference to radio or television recption, which can
be determined by turning the equipment off and on, the user is encouraged to try to correct
the interference by one or more of the following measures:
1. Reorientate or relocate the receiving antenna.
2. Increase the separation between the equipment and reciever.
3. Connect the equipment into an outlet on a circuit differant from that of which
the reciever is connected.
4. Consult the dealer or an experienced radio / television technical for help
Notice : The changes or modifications not expressly approved by the party responsible for
compliance could void the user authority to operate the equipment.
16
Please check out our other products including:
iPod2car
(PXDX)
Programmable auxiliary input device
CD2car
(PCD10)
Complete universal CD changer that connects to
most factory stereos
www.peripheralelectronics.com
Peripheral Electronics®,
a division of AAMP of America™
13160 56th Court Clearwater, Florida 33760
866-788-4237 in the US or 727-572-9255 ext.262 for international calls
[email protected]
©2006 AAMP™ of Florida, Inc.