1
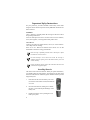
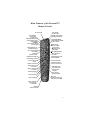
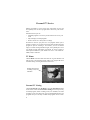
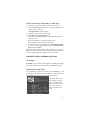
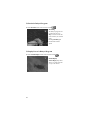
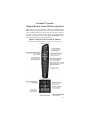
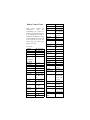
DISHPlayer 500
Personal TV
Remote Control
Copyright © 2000
EchoStar Technologies Corporation
Englewood, Colorado 80112
All rights reserved.
The information contained herein is subject to change without notice.
Revisions may be issued to advise of such changes and/or additions.
Correspondence regarding this publication should be addressed
directly to:
EchoStar Technologies Corporation,
Technical Publications, 90 Inverness Circle East,
Englewood, Colorado 80112
Catalog Number: 101681 Rev AA
Printed in United States
DISH Network™, DISHPlayer™, and the DISH Network™ logo are
trademarks of EchoStar Technologies Corporation.
The WebTV logo is a registered trademark of Microsoft Corporation in
the United States and/or other countries.
Table of Contents
Welcome . . . . . . . . . . . . . . . . . . . . . . . . . . . . . . . . . . . . page 1
Important Safety Instructions . . . . . . . . . . . . . . . . . . . page 2
Installing Batteries . . . . . . . . . . . . . . . . . . . . . . . . . . . . page 2
Main Features of the
Personal TV Remote Control . . . . . . . . . . . . . . . . . page 3
Using the Remote Control . . . . . . . . . . . . . . . . . . . . . . page 4
Personal TV Service . . . . . . . . . . . . . . . . . . . . . . . . . . . page 6
Personal TV and the Original Remote
Control/Wireless Keyboard. . . . . . . . . . . . . . . . . . page 25
Controlling Your
VCR with the Remote Control . . . . . . . . . . . . . . . page 27
Programming the Remote Control . . . . . . . . . . . . . . page 28
Remote Control Codes . . . . . . . . . . . . . . . . . . . . . . . . page 30
FCC Compliance . . . . . . . . . . . . . . . . . . . . . . . . . . . . page 33
Limited Warranty . . . . . . . . . . . . . . . . . . . . . . . . . . . . page 34
Welcome!
Congratulations on your purchase of the Personal TV remote control!
This remote will help you control the main functions of your
DISHPlayer unit as well as simplify the use of the Personal TV service.
To make full use of the Personal TV remote control, subscribe to
Personal TV by contacting the Dish Network™ service center at
1-800-333-DISH (3474). For Personal TV features and operation, see
“Personal TV Service” on page 6. For more information about the use
of your Personal TV remote control, see the User Guide that came with
your DISHPlayer receiver or select Help from TV Home.
You can also program your Personal TV remote control to control most
televisions and video cassette recorders. This is very useful, as it
allows you to adjust the volume of your television, turn your television
on and off, switch television inputs, and control your VCR. To set up
the Personal TV remote control to operate your television and VCR,
see “Programming the Remote Control” on page 28.
Be aware that when you use your new Personal TV remote
control, the original remote control that came with your
DISHPlayer will operate slightly different. The original
remote can be identified by looking on the back. The number
“123477447” is written in bold lettering on the back of the remote. See
page 25 for more information.
1
Important Safety Instructions
For your protection, you must remember certain safety issues while
using this devise. Please keep these and any additional instructions for
future reference.
Installation
Observe Warnings: Carefully follow all warnings on the device and in
the operating instructions.
Heat: DO NOT place the device near heat sources such as radiators,
stoves, heat registers, or other appliances that produce heat.
Care and Use
Cleaning: DO NOT use liquid, abrasive, solvent, or aerosol cleaners.
Use a damp cloth for cleaning.
When Not In Use: Remove the batteries if this device is to be left
unattended or unused for a long period of time.
Refer servicing to qualified personnel when a solid object or liquid
has fallen onto or into the device.
DO NOT attempt to service this device. Refer all servicing to
qualified personnel. Opening covers other than the battery cover will
void the warranty.
Dispose of batteries properly. Follow the instructions that came with
your batteries for proper disposal.
Installing Batteries
The remote control uses AA batteries. When you replace old batteries,
you should replace all of the batteries. Use batteries of the same grade
and do not mix batteries of different grades. Alkaline batteries provide
longer battery life.
1.
Push down on the slot in the battery case cover
(on the back of the remote control) and slide the
cover off.
2.
Insert the new batteries, making sure to match
the plus (+) ends with the plus markings on the
battery case.
3.
Replace the battery cover by sliding the cover
back up into place.
2
Main Features of the Personal TV
Remote Control
Turn TV on/off
Cycle through
video inputs
on your TV
Display PIP (Picture-inPicture window) while
using the Web
CODESET
Set remote to control
your TV/VCR
Switch between TV
and Web viewing
Go to current Home
(TV or Web)
Return to
previous screen
Display TV Listings and
cycle through Favorites
Turn TV sound
on/off
Control TV volume
Display Personal
TV screen
Replay; skip back
7 seconds
Rewind program
Turn satellite
receiver on/off
Display TV program or
Web page information
TV/VCR SAT MODE
Switch between TV/VCR
receiver control
Display recent
channels or Web
Scroll screens,
TV Listings and
Web pages
Select highlighted item
Move yellow box
or cursor
Display Options panel
for TV and Web
Change channels
Record the current
show to Personal TV
Skip forward the
next 30 seconds
Fast Forward
program
Play; resume
playing program
Pause program
Stop recording
Move PIP
(Picture-in-Picture window) while on the Web
Select channels;
enter numbers
in text fields
Return to
previous channel
3
Using the Remote Control
The table below describes the remote functions. The remote control
uses infrared (IR) light to communicate with the DISHPlayer receiver.
You should stay within 30 feet of the receiver when using the remote,
and point it directly at the front panel of the receiver.
Remote Control
Action
top gray arrows
Move yellow box or cursor
GO
Selects item surrounded by yellow box
CHANNEL
Changes satellite (or TV) channels
VOLUME
Controls TV volume
LISTINGS
Displays TV Listings (and cycles through
Favorites lists)
SCROLL
Scrolls TV Listings and Web pages one
page at a time
RECALL
Returns to previous channel
OPTIONS
Displays Options panel (includes “Search
Listings,” “Go Live,” and “Go Interactive”
features)
MUTE
Turns TV sound on/off
PERSONAL TV
Display Personal TV screen
BACK
Returns to previous screen
RECENT
Displays recent channels (or Web pages)
TV/WEB
Switch between TV and Web viewing
HOME
Go to current Home screen (TV Home or
Web Home)
numbers
Select channels; enter numbers in text
fields
PIP
Displays PIP (picture-in-picture) while
using WebTV service
SAT (POWER)
Turns the receiver on/off
TV (POWER)
Turns TV on/off
4
Remote Control
Action
TV/VIDEO
Cycles through TV video inputs
TV/VCR
SAT MODE
On the side of the remote, switches
receiver control between TV/VCR and
Satellite Receiver
ENTER
Moves PIP (Picture-In-Picture) while on
the Web
CODESET
Set code to control your TV and VCR
Replay
Jumps back in the current or recorded
program 7 seconds
Skip
Skips the recorded or paused program
ahead 30 seconds
Pause
Pauses program. Press this button again
to resume play.
Fast Forward
Fast forwards through the current program until another function is selected
Rewind
Rewinds the current program until another
function is selected
Stop
Stops the current recording
Record
Records the current program
Play
Resumes playing the current or recorded
program
INFO
Displays information about current TV
program (or Web page)
5
Personal TV Service
WebTV’s Personal TV service is the wave of the future. It gives you
the capability never to miss a program and to watch it at your convenience.
With Personal TV you can:
• Schedule programs to record on your Personal TV service or your
VCR
• Play and replay recorded programs
• Receive Instant News from your TV Listings
Personal TV also lets you pause live TV programs. When you’ve
paused a program you can then fast forward and rewind through the
program as you are watching it. For instance, you can use instant
replay to see that winning touchdown again, or skip ahead past a scene
you already viewed. Subscription to Personal TV service requires a
subscription in addition to your satellite TV service. Call 1-800-333DISH (3474) to subscribe.
TV Home
The TV Home screen has a link to Personal TV. A green indicator will
light up next to the Personal TV link when a new program has been
recorded. During recording the indicator will be red.
Displays Personal TV
recording events, and
reminders.
Personal TV Listing
Choose Personal TV from TV Home or press the Personal TV button
on the remote control. The Personal TV Listing screen lists previously
recorded programs, future recording events, TV reminders, and VCR
recording events. From this screen you can find information about TV
programs that you’ve already recorded and programs that are sched-
6
uled to be recorded in the future. This is also where you choose
recorded programs to watch.
Reading Personal TV
Listing
Green listings are
recorded programs. Blue
listings are recordings or
reminders that are scheduled to occur in the future.
The highlighted program
is described at the top of
the screen.
Recording a Program On Personal TV
Recording a program on Personal TV is like recording a program on
your VCR only instead of recording on to a tape, you are recording on
to the hard drive of the DISHPlayer receiver. If you record a program
on to your Personal TV service and then decide you want a copy saved
on video tape, follow the instructions “Saving a Recorded Program on
to a Video Tape” on page 16. The DISHPlayer has a limited capacity
for recording (between 4 and 12 hours of record time). Depending on
the model of your receiver, the size of the hard drive, and what you are
recording, your Personal TV service may erase previously recorded
programs if it needs the space to record scheduled recording events.
Note: You cannot change channels while recording. If you try to
change channels, a warning panel will appear at the bottom of your
screen prompting you to stop recording. Select Stop Recording if you
wish to quit recording the current program to Personal TV.
7
To Instantly Record a Program on Personal TV
While watching the program:
•
Press the Record button on the remote control (
).
A record icon will display for a few seconds, then disappear to
indicate the program is being recorded.
Or
1. Press the Info button on the remote control or optional keyboard.
2. Select the Record option on the Program Info screen.
3. Select Record on Personal TV on the Personal TV screen and
select Continue.
The next screen will verify that Recording is scheduled.
4. Select Done.
To stop recording, press the Stop button on your remote control (
)
and select the Stop Recording option from the panel that appears.
To Record a Future Program on Personal TV
1. Select TV Listings from TV Home.
2. Select how you want to view the TV Listings (by today, time, date,
search, category, etc.).
3. Select an upcoming program you want to record from the list
(upcoming programs are colored blue).
The Program Info screen for that program appears.
8
4. Select Record.
The Record screen appears.
Note: The Record on
VCR option will only
appear if your
DISHPlayer has been set
up to control your VCR.
5. Make sure the Record on Personal TV red indicator light is turned
on, then select Continue.
The Recording Scheduled screen appears.
6. Select Done.
The TV Listing screen appears with a red dot next to the program.
This indicates that the program is scheduled to be recorded on Personal TV.
9
To Record a Program Daily or Weekly
1. Select TV Listings from TV Home.
2. Select how you want to view the TV Listings (by today, time, date,
search, category, etc.).
3. Select the program you want to record daily or weekly from the
list.
The Program Info screen for that program will appear.
4. Select Record.
The Record screen appears.
5. Select Record daily or weekly then select Continue.
The Recording Scheduled screen appears.
6. Select Done.
The TV Listings screen appears with several dots next to the program. This indicates that the program is scheduled to be recorded
daily or weekly on Personal TV.
To Record a Future Program on Your VCR
When you record a program using your VCR, the DISHPlayer sends an
IR signal to the VCR which in turn, starts the record function on the
VCR. When the program ends, the receiver then sends a second IR signal to stop the VCR from recording.
To use your VCR with your DISHPlayer, make sure that you first configure the VCR to work with your receiver. For more information on
how to do this see the User Guide that came with your DISHPlayer. If
the DISHPlayer has not been set up to control your VCR, the Record
10
on VCR option will not be displayed on the Personal TV Record
screen. For more information on recording using your VCR see the
User Guide that came with your DISHPlayer.
Note: You cannot change channels while recording. If you try to
change channels, a warning panel will appear at the bottom of the
screen asking you if you want to stop recording. If you choose Stop
Recording, the receiver will stop the VCR from recording at that
point.
Remember, stay in full screen mode when recording using a VCR.
Everything that is displayed on the television screen, including menus,
will be recorded on to the video tape if you don’t.
1. Turn on your VCR and insert a recordable video tape.
2. Select TV Listings from TV Home.
3. Select how you want to view the TV Listings (by today, time, date,
search, category, etc.).
4. Select an upcoming program you want to record from the list
(upcoming programs are colored blue).
The Program Info screen appears.
Note: You must leave your
VCR power ON to record the
program.
11
5. Select Record.
The Record screen appears.
Record on VCR Option
The Record on VCR option
will only appear if you configured your DISHPlayer to
work with your VCR. See
the User Guide that came
with your DISHPlayer.
6. Select Record on VCR and select Continue.
The Recording Scheduled screen appears.
7. Select Done.
The TV Listing screen appears with a red dot inset with a V next to
the program to indicate that the program is scheduled to be
recorded on your VCR.
When the program starts, the receiver will automatically start your
VCR recording and stop it when the program is finished.
Playing and Saving a Recorded Program
Channel 1 is reserved for Personal TV viewing. When you select a
program to be played from Personal TV listings, the receiver will automatically change to this channel. Tune to Channel 1 to see a recording
that you already started playing if you’ve changed channels. Changing
channels will stop the playback of a recorded program. When you tune
back to Channel 1, the recorded program will start playing at the point
when you changed channels.
To Play a Recorded Program on Personal TV
1. Select the recorded program you want to watch from your Personal TV listings (recorded programs appear in green). The Pro-
12
gram Info screen displays information about the recorded
program.
2. Select Play.
The receiver will automatically change to Channel 1 and the program will begin playback. If you stop the program, press Play on
your remote control to resume watching where you left off.
Playback Finished
When the recorded program is finished playing, the Playback Finished screen will appear. Select Erase to permanently erase the program or select Personal TV to go back to your Personal TV listings.
Playback Finished
Select Personal TV to go
back to Personal TV listings.
Select Start Over to watch
the program again.
Select Erase to remove the
program from Personal TV
listings.
13
TV Options Panel
Press the Option button on the remote control or keyboard. The
Options panel will appear at the bottom of the screen.
From this menu, you have three options:
• Select Search Listings to search TV Listings for a program.
• Select Go Live to stop watching the recorded program and start
watching live TV.
• Select Go Interactive to follow an Interactive TV Link (this button
will only be selectable if the program has interactive content associated with it). For more information about Interactive Television
Links see the User Guide that came with your DISHPlayer.
To remove the Options panel from the screen, press the Options button on your remote control or keyboard again.
To Replay a Recorded Program from Personal TV
As long as the program is still available, you can replay a recorded program as often as you like.
Select a program from your Personal TV listings. If you already
watched part of the recording, but stopped it before it finished, the
Start Over button will appear.
Replaying a Recorded Program
Select Continue to start playing
the program where you previously
stopped.
Select Start Over to play the program from the beginning of the
recording.
Select Erase to permanently
remove the program from your
Personal TV listings.
14
Rewinding and Fast Forwarding Through a Recorded
Program
You can rewind or fast forward through a recorded program as you are
watching it. Rewinding and fast forwarding will occur at different rates
depending on the number of times you press the button.
To Rewind a Recorded Program
Press the Rewind button on the remote control (
).
Rewinding
The recording will rewind
until you press Play or until
it reaches the beginning of
the recording.
Pressing the Rewind again
increases the rewind speed.
To Fast Forward a Recorded Program
Press the Fast Forward button on the remote control (
).
Fast Forward
Fast forward advances the
recording until you press Play.
If you fast forward all the way
to the end of the recording,
you will be returned to Live
TV.
Pressing Fast Forward again
increases the speed.
15
Replaying or Skipping Ahead Through a Recorded
Program
The Instant Replay or Skipping Ahead button is useful to jump
around the program more rapidly.
To Replay Part of a Recorded Program
Press the Instant Replay button on the remote control (
).
Instant Replay
Instant Replay skips back
about 7 seconds each time
you press the button.
To Skip Part of a Recorded Program
Press the Skip button on the remote control (
).
Skipping Ahead
Skipping jumps ahead 30
seconds in the recorded
program.
Saving a Recorded Program on to a Video Tape
It is easy to use a video tape to save a copy of a program recorded using
your Personal TV service. This is a good way to make space available
in your Personal TV service for recording new programs.
16
To Save a Personal TV Recording to a Video Tape
1. Put a tape in your VCR and make sure the VCR power is on.
2. From your Personal TV listing screen, select the program that you
want to copy to a video tape.
The Program Info screen will appear.
3. Manually set your VCR to start recording.
4. Select Play on the Program Info screen.
The VCR will record the program as it plays back from your Personal TV service.
5. When the program is over, manually stop the VCR.
The program has been copied on the video tape.
6. You can now remove the program from your Personal TV listings
if you choose by selecting the program from the Personal TV listings and selecting Erase.
Note: You cannot change channels while recording. If you want to
change channels, you must first stop recording the program. Otherwise,
your VCR will record the other channel selections you make.
Schedule Conflicts and Removing Events
TV Listings
TV Listings is your interactive on-line guide to schedule programming
on all of the channels you can watch with your DISHPlayer receiver.
Scheduled Recording Events
If you scheduled a program for recording on your DISHPlayer, a red
dot will appear next to the name of the program. A red dot inset with a
V indicates that the program will be recorded on your VCR.
The red dot indicates that
the event that it is next to
will be recorded on your
Personal TV service. If the
dot is inset with a V, it
will be recorded on your
VCR.
17
Recording Conflicts
If two programs are scheduled to record at the same time, the program
that will be recorded will have a red dot next to it and the program that
will not be recorded will have an X inset in its red dot.
A red dot inset with an X in
the TV Listings screen
indicates a recording event
that will not be recorded
due to a schedule conflict.
Schedule Conflicts
You can only record one program at a time from your DISHPlayer,
either on your Personal TV service or on your VCR. If you are scheduling an event that conflicts with a previously scheduled recording event,
the Conflict screen appears.
Select Continue to cancel the new recording event and record the
existing event.
Select Record Anyway to cancel the existing event and schedule the
new one.
18
Your Personal TV listing screen will display the record conflicts.
The Personal TV listing
screen displays conflicting recording events.
The program listing with
a conflict box will not be
recorded.
Removing a Scheduled Event
To remove a scheduled recording or reminder from your Personal TV
listing, choose the program from your Personal TV listing.
Choose Don’t Record (or Don’t Remind for reminders).
The cancelled event will be removed from the Personal TV listing
screen.
Enhanced TV Pause
The Enhanced TV Pause feature, available as part of the Personal TV
service, lets you pause the television program you are watching as
often as you like. Unlike the standard TV Pause feature, Enhanced TV
Pause has an extended time of delay. After pausing, you can resume
watching where you left off, whenever you are ready. You can also
Rewind, Fast Forward, Instant Replay, and Skip Ahead in the
paused and recorded programs. While you are watching the delayed
portion of the program, the rest of the program is recorded as it airs.
This means that you never have to miss a program again.
An important note to remember when using Enhanced TV Pause is that
the feature affects only the channel you are currently watching. The
other television channels will continue at their normal time. Remember
that Enhanced TV Pause is stopped if you change channels, but not if
you go to TV Home or Web Home.
19
Pausing a Program
Press the Pause button on the remote control (
).
How Enhanced TV Pause
Works
When you tune to a channel, your
receiver automatically starts
recording the program you are
watching.
Pausing stops the playback, not
the recording. Press the Pause
button again to resume playing
where you left off.
The program stops and pause indicator appears on the right side of the
screen.
Resume Watching a Program
Press the Play button on the remote control (
).
Resuming
When you resume playing
the program, it starts
playing right where you
paused, so you don’t miss
a thing.
You are now watching delayed programming instead of live TV.
To Return to Live Programming
•
20
To watch the program as it is being broadcast (skipping the delayed
portion), press the Option(s) button on the remote control or key-
board.
The Options panel appears.
•
Options Panel
The Options panel
displays the title of
the program, the
status (i.e.
delayed), length of
the program, and
time remaining.
Or
Press the Channel button (+ or -) on your remote control or keyboard and select Go Live.
Viewing Live TV
Live programming means
you are watching the channel in real time, with no
delay.
This removes the delay. You will now see the TV program as it is
currently being broadcast. Your Personal TV service will not erase
the saved program (unless you change channels) and will continue
to record the program. This will allow you to still have the ability
to rewind and pause as often as you like.
21
To Rewind a Delayed Program
Press the Rewind button on the remote control (
).
Rewinding
The delayed program will
rewind until you press
Play or until it reaches the
point at which you enabled
delay.
Pressing Rewind again
increases the rewind
speed.
To Replay Part of a Delayed Program
Press the Instant Replay button on the remote control (
).
Instant Replay
Instant Replay skips back
about 7 seconds each time
you press the button.
22
To Fast Forward Through a Delayed Program
Press the Fast Forward button on the remote control (
).
Note: You can only fast forward if you are watching a program when it
is delayed.
Fast Forward
Fast forward advances the
recording until you press
Play. If you fast forward all
the way to the end of the
delay, you will be returned to
Live TV.
Pressing Fast Forward again
increases the speed.
To Skip Ahead in a Delayed Program
Press the Skip Ahead button on the remote control (
).
Note: You can only skip ahead if you are watching a program when it
is delayed.
Skipping Ahead
Skipping jumps ahead 30
seconds in the recorded
program.
Instant News
Instant News is for times when you need to know what’s happening in
the world in an instant. With it you can get stock quotes, headline
news, sport scores, entertainment news, and breaking weather. Instant
News provides headlines and story captions only. To read the entire
story, you will need to subscribe to WebTV Plus service. See the User
Guide that came with your DISHPlayer for instructions to subscribe.
23
To Use Instant News
1. Use the Channel button or numbers on your remote control or
keyboard to get to Channel 201.
The Instant News screen appears.
2. Select a desired news category from the list at the bottom of the
screen or simply page through the headlines by selecting the arrows
at the top of the screen.
3. If you have subscribed to WebTV Plus service, you can select the
CONNECT FOR MORE option to read the entire story or get the
complete report. You will be connected to internet for the complete
news story.
To Personalize Your Instant News
1. Use the Channel button or numbers on your remote control or
keyboard to get to Channel 201.
The Instant News screen appears.
2. Select personalize from the top/right of the screen.
3. Select a category from the list.
4. Follow the instructions to customize the desired category and select
done when finished.
24
Personal TV and the
Original Remote Control/Wireless Keyboard
Before you use your new Personal TV Remote, the Arrow and Go/
Enter buttons on your original remote and wireless keyboard combine
cursor movement/selection with Personal TV functions. However,
once you use the new remote, the Personal TV functions will not be
available on the original remote and the Arrow and Go/Enter buttons
will only function as cursor movement/selection.
Before Using the New Personal TV Remote
Original Remote & Wireless Keyboard combines cursor movement with
Personal TV functions.
25
After Using the New Personal TV Remote
Original Remote & Wireless Keyboard will no longer be able to
control Personal TV functions
26
Controlling Your VCR with the
Remote Control
Several of the buttons on the remote can be used to operate your VCR.
In order for the remote to control your VCR, it must be set up to work
with your VCR. See “Programming the Remote Control” on page 28 to
do this. Below is a diagram of the functions you can use with your
VCR:
Pause video
Record on
video
Rewind
video
Stop
Fast Forward
video
Play video
Note: To operate these functions on your VCR, make sure that the TV/
VCR SAT mode switch is set to TV/VCR. Otherwise, these functions
will operate the Personal TV functions (see previous diagram and
“Using the Remote Control” on page 4).
The functions shown above are the only functions that will operate
your VCR. To operate other functions on your VCR, use the buttons on
the VCR or remote that came with your VCR.
27
Programming the Remote Control
This section explains how to program your remote to control your
television and VCR. This will allow you to adjust the volume, turn the
television on and off, change channels, and control your VCR.
Programming for Television Operation
The remote control is already preprogrammed to control the
DISHPlayer receiver. To program the remote to control your
television, do the following:
1. Find the three-digit code for your TV manufacturer in the Televisions table on page 8. Use the first number listed if more than one
set of numbers appears for your TV.
2. Set the TV/VCR SAT mode switch on the right side of the remote
control to TV/VCR.
3. Press and hold the CODESET button on the left side of the
remote control for six seconds.
4. Enter the appropriate three-digit code, which you found in step 1
for your television model.
5. Press ENTER.
6. Set the TV/VCR SAT mode switch back to SAT.
7. Verify that the code works by pressing the Volume button on the
remote (see below).
8. For quick reference, write the number from step 1 down in the
table on the inside of the back cover of this manual.
The remote control is now programmed to control your TV.
To verify that the remote control operates your TV
With your TV turned on, press the Volume + on the remote control. If
the remote does not change the volume on your TV, repeat the steps
above using a different code listed for your TV manufacturer.
Programming for VCR Operation
To program the remote to control your VCR, do the following:
1. Find the three-digit code for your VCR manufacturer in the VCRs
table on page 9. Use the first number listed if more than one set of
numbers appears for your VCR.
2. Set the TV/VCR SAT mode switch on the right side of the remote
control to TV/VCR.
3. Press and hold the CODSET button on the left side of the remote
for six seconds.
4. Enter the appropriate three-digit code, which you found in step 1,
28
for your VCR model.
Press ENTER.
Leave the TV/VCR SAT mode switch set to TV/VCR to operate
the VCR.
7. For quick reference, write the number from step 1 down in the
table on the inside of the back cover of this manual.
The remote control is now programmed to control your VCR.
5.
6.
To verify that the remote control operates your VCR
Place a video tape in your VCR and press the Play button (
) on the
remote control (make sure the TV/VCR SAT mode switch is set to
TV/VCR).
If the remote control does not operate your VCR, repeat the steps on
the previous page using a different code listed for your VCR
manufacturer.
Note: Your television and VCR must have infrared (IR) remote control
receiving capability in order to be operated with the Personal TV
remote control.
When you’ve finished programming the remote control and want to
use it to control your DISHPlayer receiver, set the TV/VCR SAT
mode switch back to SAT.
29
Remote Control Codes
These tables contain the
manufacturer
codes
for
programming the remote to
control your television and VCR.
Every attempt has been made to
include all manufacturer codes.
If your manufacturer is not listed
or the codes do not work, the
remote may not control your
television or VCR.
Televisions
Admiral
Aiwa
Akai
AOC
Bell & Howell
(Montgomery Wards)
Brocsonic
Centurion
Craig
Croslex
Curtis Mathes
Daewoo
Emerson
Fisher
Fujitsu
Funai
General
Electric
Goldstar
Hitachi
Inteq
30
162, 265, 290
105, 106, 107
110
112
265, 290
110, 112
112
143, 144, 141
210
110, 130, 144
120, 110, 121
143, 141, 144,
110, 240, 145,
146
150
151, 152, 153,
154
159, 155, 156,
157, 158
162, 101, 110,
163
110, 112
180, 110
290, 291
JC Penney
JVC
KTV
LXI
Magnavox
Marantz
MGA
Mitsubishi
MTC
National
NEC
Orion
Panasonic
Philco
Philips
Pioneer
Portland
Prism
Proscan
Quasar
Radio Shack
RCA
Samsung
Sanyo
Scott
Sears
Sharp
Signature
2000
110, 162
190, 191, 192
110, 144
162, 110, 112,
130, 150, 210
210, 110, 112,
212, 213
220
110, 112
220, 110, 112,
265
101, 103
100, 101, 102,
104
110, 112
221
100, 101, 102,
104
210, 110
210
222, 101, 130
110
101
162, 110, 230,
250, 255
101, 103
162, 112, 144,
220
162, 110, 163,
230, 250, 255,
256, 257, 300,
301, 302
260, 110, 112
150, 261, 262,
263, 264
144, 112
130, 110, 112,
150, 162, 210
265, 240, 266
265, 290
Sony
Sylvania
Symphonic
Toshiba
Vidtech
Wards
Zenith
270
210, 110, 112
144
130, 265
180, 110, 112
110, 112, 240
290, 291
VCRs
Admiral
Aiwa
Akai
Audio
Dynamic
Bell & Howell
Broksonic
Canon
CCE
Citizen
Craig
Curtis
Mathes
Daewoo
DBX
Dimensia
Emerson
Fisher
Funai
GE
Go Video
Goldstar
Gradiente
Hitachi
735
727, 732
729, 714, 715,
716
739, 711
705
720, 726
723, 725
743
706
705, 729, 706
745, 724, 727
743, 760, 724,
775
739, 710, 711
745
743, 726, 719,
703, 725, 741,
720
705, 708, 709,
707
727, 726, 720,
734
733, 745, 724
737, 751, 763
706
776, 768, 734,
756
723, 745, 700,
727, 768
Instant
Replay
Jensen
JVC
Kenwood
LG
LXI
Magnavox
Marantz
Marta
Memorex
MGA
Minolta
Mitsubishi
Multitech
NEC
Olympic
Optimus
Orion
Panasonic
Penney
Pentax
Philco
Philips
Pioneer
Proscan
724, 723
739
739, 710, 711,
734
739, 710, 706,
711
759
727, 706, 700,
707, 708, 705,
709
731, 723, 724,
773
739, 710, 711
706
724, 709
738, 740, 747,
748, 741
700, 745
738, 740, 747,
748, 741, 761
747, 727, 704
739, 710, 711,
734
724, 723
728, 721, 735,
706
726, 720
723, 724, 721,
722
724, 700, 745,
705, 739, 710,
711
700, 711, 745
731, 724, 727,
723, 726, 720,
743
731, 723, 724,
731
723
745, 700, 723,
724, 731, 746,
760, 702, 733
31
Quasar
721, 722, 723,
724
Radio Shack 733, 724, 705,
736, 709, 740,
727
RCA
733, 745, 700,
723, 724, 731,
746, 760, 702
Realistic
724, 705, 736,
709, 740, 727
Samsung
737, 702, 704,
733
Sansui
739, 726, 720,
752
Sanyo
705, 709, 705
Scott
760, 702, 704,
709, 738, 740,
747, 748, 726
Sears
705, 706, 707,
708, 700
Sharp
735, 736, 767
Shintom
717
Signature
727, 735
2000
Singer
717
Sony
728, 729, 730
SV2000
727
Sylvania
731, 723, 724,
727
Tashiro
706
Tatung
739, 710, 711
Teac
739, 710, 727,
711
Technics
721, 722, 723,
724
Teknika
724, 727
Toshiba
760, 746, 766
Vector
711
Research
Wards
735, 736, 709,
744, 706
32
Yamaha
Zenith
705, 739, 710,
711
744, 706
FCC Compliance
This device complies with Part 15 of FCC rules. Operation is subject to
the following two conditions:
1. This device may not cause harmful interference.
2. This device must accept any interference that may cause undesired operation.
Radio Interference
This equipment has been tested and found to comply with the limits for
a Class B digital device, pursuant to Part 15 of the FCC Rules. These
limits are designed to provide reasonable protection against harmful
interference in a residential installation. This equipment generates,
uses and can radiate radio frequency energy and, if not installed and
used in accordance with the instructions, may cause harmful interference to radio communications. However, there is no guarantee that
interference will not occur in a particular installation. If this equipment
does cause harmful interference to radio or television reception, which
can be determined by turning the equipment off and on, the user is
encouraged to try to correct the interference by one or more of the following measures:
•
Reorient or relocate the receiving antenna.
•
Increase the separation between the equipment and receiver.
•
Connect the equipment into an outlet on a circuit different from
that to which the receiver is connected.
•
Consult the dealer or an experienced radio/TV technician for help.
In addition, the FCC provides a booklet that can help you. You can
order the booklet from the following address:
How to Identify and Resolve Radio-TV
Interference Problems
Stock No. 004-000-00345-4
U.S. Government Printing Office
Washington, DC 20402
33
Limited Warranty
This warranty extends only to the original user of the DISH NetworkTM
Remote Control (“you,” “your”) and is limited to the purchase price of
the remote control. EchoStar Communications Corporation and its
affiliated companies (“we,” “our,” “us”) warrant this remote control
against defects in materials or workmanship as follows.
For a period of one year from the original date of purchase, if we determine that the remote control is defective subject to the limitations of
this warranty, we will replace the remote at no charge for parts or
labor. We warrant any such work done against defects in materials or
workmanship for the remaining part of the original warranty period.
This warranty does not cover installation of the DISH NetworkTM System; consumer
instruction; physical set up or adjustment of any consumer electronic device; remote
control batteries; signal reception problems; loss of use of the equipment; unused
programming charges due to equipment malfunction; cosmetic damage; damage due to
lightning, electrical or telephone line surges, fire, flood, or other acts of Nature; accident;
misuse; abuse; repair or alteration by other than our factory service; negligence;
commercial or institutional use; improper or neglected maintenance; equipment sold AS IS
or WITH ALL FAULTS; equipment removal or reinstallation; shipping damage if the
equipment was not packed and shipped in the manner we prescribe; nor equipment
purchased, serviced, or operated outside the contiguous United States of America.
REPLACEMENT AS PROVIDED UNDER THIS WARRANTY IS YOUR EXCLUSIVE
REMEDY. WE SHALL NOT BE HELD LIABLE FOR ANY INCIDENTAL OR
CONSEQUENTIAL DAMAGES FOR BREACH OF ANY EXPRESSED OR IMPLIED
WARRANTY ON THIS EQUIPMENT, NOR FOR ANY INCIDENTAL OR
CONSEQUENTIAL DAMAGE RESULTING FROM THE USE OF, OR INABILITY TO
USE, THIS EQUIPMENT. UNDER NO CIRCUMSTANCES SHALL OUR LIABILITY,
IF ANY, EXCEED THE PURCHASE PRICE PAID FOR THIS EQUIPMENT. EXCEPT
TO THE EXTENT PROHIBITED BY APPLICABLE LAW, ANY IMPLIED
WARRANTY OF MERCHANTABILITY OR FITNESS FOR A PARTICULAR
PURPOSE ON THIS EQUIPMENT IS LIMITED IN DURATION TO THE DURATION
OF THIS WARRANTY. WE RESERVE THE RIGHT TO REFUSE TO HONOR THIS
WARRANTY IF WE DETERMINE ANY OF THE ABOVE EXCEPTIONS TO HAVE
CAUSED THIS EQUIPMENT NOT TO HAVE PERFORMED PROPERLY. THIS
WARRANTY SHALL BE VOID IF ANY FACTORY-APPLIED IDENTIFICATION
MARK, INCLUDING BUT NOT LIMITED TO SERIAL OR CONDITIONAL ACCESS
NUMBERS, HAS BEEN ALTERED OR REMOVED. THIS WARRANTY SHALL
ALSO BE VOID IF THE REMOTE HAS BEEN OPENED BY AN UNAUTHORIZED
PERSON (with the exception of opening the battery cover).
34
Notes:
35
Notes:
36
CODES PROGRAMMED INTO REMOTE
Television Code:
VCR Code:
FOR ALL YOUR CUSTOMER NEEDS,
CALL DISH NetworkTM CUSTOMER SERVICE
AT 1-800-333-DISH (3474).
101681 Rev AA