1
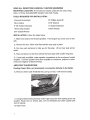
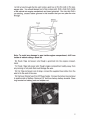
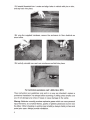
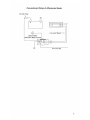
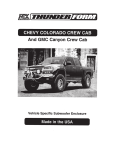
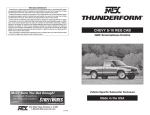
CHEVY COLORADO CREW CAB
And GMC Canyon Crew Cab
Vehicle Specific Subwoofer Enclosure
Made in the USA
READ ALL DIRECTIONS CAREFULLY BEFORE BEGINNING
MOUNTING LOCATION: The enclosure mounts under the rear seat, firing
down, in Chevy Colorado/GMC Canyon Crew Cab Trucks.
TOOLS REQUIRED FOR INSTALLATION:
Powered Screwdriver
#2 Phillips Head Bit
Wire Cutters
5/16" Wrench
6" Bit Holder Extension
3" Socket Extension
18mm Deep Socket
18mm Wrench
3/8" Socket Wrench
INSTALLATION: Follow the steps below
1. Slide front seats to full forward position. This will give you more room to work
with.
2. Remove the four 18mm nuts that hold the rear seat in place.
3. You may want someone to help you for this step. Lift out rear seat and set
aside.
4. Place enclosure on the floor behind the front seats with woofer firing down.
5. If externally amplified, make speaker connections to the enclosure from the
amplifier. Connect speaker wires from amplifier to enclosure, positive to red terminal and negative to black terminal.
AMPLIFIED THUNDERFORM
Routing Power Wire; we recommend a connection directly to the battery.
6. Remove drivers side threshold trim; pull up on trim, it will remove easily.
7. Using furnished wiring harness route 1Oga red power wire starting at pre-amp
location. Route wire on drivers side, over to threshold and under carpet to the
front of vehicle.
8. Open hood.
1
9. Drill a hole through the fire wall. Locate a spot low on the fire wall on the passenger side. You should always look to find a clear path. Drill a hole from inside
of the vehicle into engine compartment and insert grommet. You may also find a
pre-existing, unused rubber grommet in this location that you can pass the wire
through.
Drill Hole
for Grommet
Firewall
Note: To avoid any damage to parts inside engine compartment, drill from
inside of vehicle using a short bit.
10. Route 1Oga red power wire through a grommet into the engine compartment.
11. Route 1Oga red power wire through engine compartment safely away from
any moving or hot parts that could damage the wire.
12. Cut 1Oga red power wire to length, connect the supplied fuse holder from the
wire kit to the end of the wire.
13. Remove 20amp fuse from MTX fuse holder. Connect furnished ring terminal
to positive side of battery. Remove 5/16" bolt from factory battery terminal. Place
ring terminal on battery post and retighten nut.
2
Ignition OFF When Disconnecting Battery
Always turn the ignition OFF when connecting or disconnecting battery cables.
Failing to do so may damage electronic components.
14. Ground amplifier to chassis of vehicle; connect the terminal provided to the
1Oga black wire from furnished wiring harness. A good ground is as important as
the power connection. The ground should be as short as possible and the contact
point should be free of paint and debris.
As always, before screwing or drilling check to make sure you will not damage
any wires, hoses or cause damage to the vehicle.
Factory Speaker Wire Colors
15. In the channel on drivers' side threshold, locate the left rear speaker wires
twisted together and wrapped in black tape. Wire colors for the left rear speakers
are: brown (positive) and yellow (negative). In the channel on the passenger side
threshold, locate the right rear speaker wires twisted together and wrapped in
black tape. Right rear speaker wire colors are: dark blue (positive) and light blue
(negative). Tap into wires with the supplied RCA High Level input wires and route
over to passenger side threshold and to pre-amp of enclosure
Although, MTX has made eve!}' effort to assure proper wiring colors, MTX is not
responsible for any changes made by the vehicle manufacturer which sometime
occur. If wiring colors do not match then physical verification is required.
CONNECTION TO ENCLOSURE
16. Connect speaker wire RCA's to the inputs of pre-amp.
Note: Patented BTL tum on circuit!}'- amplifier senses DC offset provided by "high
powered" or BTL type head units. This feature turns the amplifier on automatically
if you are using high level inputs.
20 Amp Fuse
\
lo1
17. Plug power wire harness into amplifier pre-amp.
3
00
0
0
0
"'
0~
,_
"'
0
0
0
18. Replace 20amp fuse under hood.
19. When amp turns on, LED will display red during diagnostic mode, and then
green, signaling amp is on and functioning. Amp will only turn on when radio is
on.
20. Adjust gain and crossover.
Setting Gain
Turn gain knob on ThunderForm pre-amp to minimum, counter clockwise. Play
a favorite tape or compact disc that contains consistent music and bass. Turn
the source unit to maximum listening level. You may want to turn down the
bass slightly on the source unit. You should know that some source units will
produce distortion or "clip" before the unit reaches maximum volume. Reduce
volume to the loudest listening level before distortion. Turn the gain knob on the
ThunderForm pre-amp clockwise until the speaker starts to distort and reduce
gain to loudest listening level before distortion.
Optional- The EBC, or Electronic Bass Control, allows a remote bass control to
be adjusted from the driver's seat.
Setting Crossover
You should set the crossover to your own personal listening taste. The crossover is adjustable to any frequency between 50Hz (counterclockwise) to 150Hz
(clockwise). As a guideline, the goal is to create the illusion of bass up front. The
higher the crossover point the more "audibly visible" your sub is going to be. Take
your time and really listen to your system, grab a soda and a few of your favorite
tunes and have fun .
TROUBLESHOOTING TIPS IF AMP DOES NOT TURN ON
Check all connections at battery and that fuse is installed
Check speaker wire connections
Check ground
Check fuse on pre-amp
4
21. Reinstall threshold trim. Locate and align holes in vehicle with pins on trim;
and snap back into place.
22. Using the supplied hardware, secure the enclosure to floor of vehicle as
shown below.
23. Carefully reinstall rear seat over enclosure and bolt into place.
For technical assistance call 1-800-CALL MTX.
These instructions are guidelines only and in no way are intended to replace a
professional installation. As always before screwing or drilling check to make sure
you will not damage any wires or hoses or cause damage to the vehicle.
Warning: Batteries normally produce explosive gases which can cause personal
injury. Therefore, do not allow flames, sparks or lighted substances to come near
the battery. When charging or working near a battery, always shield your face and
protect your eyes. Always provide ventilation.
5
Conventional Wiring of Aftermarket Radio
20 Amp Fuse
\
=r
~+
_0_
-
0 0
Ol
lg g--
Low Level SignalOptional EBC
(Electronic Bass Control)
.M!'i ;f;:;j .. ,
0
· 'ol
0
=~
0
Q!.Ol.:-
J:( ·••O•or
• -:l
~,
o!
0
<=CJ
-<=CJ
0
Turn On Lead
6
Warranty Statement
ThunderForm Loaded Enclosures purchased in the United States from an authorized MTX dealer
are guaranteed against defects in material and workmanship for a period of two years from the date
purchased by the end user, and limited to the original retail purchaser of the product.
Amplified ThunderForm Enclosures purchased in the United States from an authorized MTX dealer
are guaranteed against defects in material and workmanship for a period of one year from the date
purchased by the end user, and limited to the original retail purchaser of the product.
Product found to be defective during that period will be repaired or replaced by MTX at no charge.
This warranty is void if it is determined that unauthorized parties have attempted repairs or alterations of any nature. Warranty does not extend to cosmetics or finish . Before presuming a defect is
present in the product, be certain that all related equipment and wiring is functioning properly. MTX
disclaims any liability for other incurred damages resulting from product defects. Any expenses
incurred in the removal and reinstallation of products are not covered by this warranty. MTX's total
liability will not exceed the purchase price of the product. If a defect is present, your authorized MTX
dealer may be able to effect repairs.
Proof of purchase is required when requesting service, so please retain your sales receipt and take
a moment to register your product online at mtx.com.
One Mitek Plaza, Winslow, IL. 61089
1-800-225-5689 mtx.com
21A8251
Mitek Mobile Limited Warranty
Our Guarantee
Mitek Mobile products (including MTX, Streetwires, Coustic and Magnum) purchased in the USA after
1/1/2013 from an authorized Mitek retailer are guaranteed to be free from material defects in products
and workmanship for five (5) years to the original end user purchaser, subject to the terms and conditions
below.
Length of Limited Warranty and Remedy
The warranty period begins the day the product is purchased by the end user, and is limited to the original
retail purchaser of the product.
Free Replacement Period (2 Years)
Products found to be defective in materials or workmanship during the first 2 years will be, at Mitek's
option, repaired or replaced by Mitek at no charge. When a product is replaced during first 2 years, the
warranty does not renew, it continues on from the original date of purchase.
Proration Period (Years 3-5)
The prorated purchase price of any product which becomes defective after the first two years and prior to
the end of the warranty period may be credited toward the purchase of a new Mitek product. The amount
of the proration shall be determined by dividing the purchase price by the number of months of the
warranty period (60), and then multiplying the result by the number of months remaining in the warranty
period. Any partial months will be rounded to the nearest whole month. For example, a product purchased
37 months ago for $100 would be calculated by dividing $100 by 60 months = $1.66/month, multiplied by
23 (the months remaining in the warranty period) for a prorated warranty amount of $38.33.
You are responsible for all costs for removal, reinstallation and proper packaging, shipping, insurance or
other freight charges incurred in the shipment of the product or part to Mitek. Mitek will ship the repaired
or replaced Mitek product or replacement parts to you at no charge. Mitek reserves the right to utilize
reconditioned, refurbished, repaired or remanufactured products or parts in the warranty repair or
replacement process. Such products and parts will be comparable in function and performance to an
original product or part and warranted for the remainder of the original warranty period.
What Is Not Covered
This warranty does not cover the product if it has been subject to neglect, abuse, misuse, incorrect
connection, or if it has been subject to unauthorized repair or alterations of any nature, or if the serial
number has been altered or removed, and the warranty does not extend to cosmetics or finish. This
warranty only applies to products installed and used in the USA.
What You Must Do to Obtain Warranty Service
You must contact Mitek Warranty via our website at MTX.com, or via email at
[email protected], or by calling 800-556-2888. If you did not purchase the product directly from
Mitek, a proof of purchase must be provided in order to receive warranty consideration. You will be issued
a Return Authorization (RA) number which must be written on the outside of the package before returning
the product to Mitek.
No Other Warranties
THE LIMITED WARRANTIES DESCRIBED ABOVE ARE EXCLUSIVE AND IN LIEU OF ANY OTHER
WARRANTIES, EXPRESS OR IMPLIED. MITEK DISCLAIMS AND EXCLUDES ALL OTHER EXPRESS
WARRANTIES, AND DISCLAIMS AND EXCLUDES ALL WARRANTIES IMPLIED BY LAW, INCLUDING
WITHOUT LIMITATION THOSE OF MERCHANTABILITY AND FITNESS FOR A PARTICULAR
PURPOSE. TO THE EXTENT THAT APPLICABLE LAW PROHIBITS THE EXCLUSION OF IMPLIED
WARRANTIES, THE DURATION OF ANY APPLICABLE IMPLIED WARRANTY IS LIMITED TO THE
PERIOD SPECIFIED FOR THE EXPRESS WARRANTY. Some states do not allow limitations on how
long an implied warranty lasts, so the above limitation may not apply to you. Any oral or written
description of any Mitek product is for the sole purpose of identifying it and shall not be construed as an
express warranty.
Limitation of Liability
MITEK'S OBLIGATION TO PROVIDE A CREDIT, OR REPAIR OR REPLACE AT MITEK'S OPTION,
SHALL BE YOUR SOLE AND EXCLUSIVE REMEDY UNDER THIS LIMITED WARRANTY AND
MITEK'S SOLE AND EXCLUSIVE OBLIGATION. MITEK SHALL NOT BE LIABLE FOR INCIDENTAL,
INDIRECT, CONSEQUENTIAL OR SPECIAL DAMAGES ARISING OUT OF OR IN CONNECTION WITH
THE MITEK PRODUCT, ITS USE OR PERFORMANCE. Incidental damages include, but are not limited
to, such damages as loss of time and loss of use. Consequential damages include, but are not limited to,
the cost of repairing or replacing other property which was damaged if the Mitek product does not work
properly.
Some states do not allow the exclusion or limitation of incidental or consequential damages, so the above
limitation or exclusion may not apply to you. This warranty gives you specific legal rights, and you may
also have other rights, which vary from state to state. This limited warranty supersedes all prior warranties
and is not transferable from the original consumer purchaser.
Any assistance Mitek provides to or procures for you outside the terms, limitations or exclusions of this
limited warranty will not constitute a waiver of such terms, limitations or exclusions, nor will such
assistance extend or revive the warranty. Mitek will not reimburse you for any expenses incurred by you
in repairing or replacing any defective product, except for those incurred with Mitek's prior written
permission.