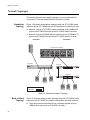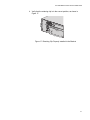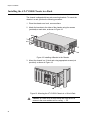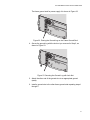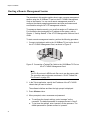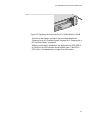
1
CONVERTEON™ Family Media Converter Chassis AT-CV5000 Installation Guide 613-000586 Rev. B Copyright © 2007 Allied Telesis, Inc. All rights reserved. No part of this publication may be reproduced without prior written permission from Allied Telesis, Inc. Allied Telesis is a trademark of Allied Telesis, Inc. Microsoft and Internet Explorer are registered trademarks of Microsoft Corporation. Netscape Navigator is a registered trademark of Netscape Communications Corporation. All other product names, company names, logos or other designations mentioned herein are trademarks or registered trademarks of their respective owners. Allied Telesis, Inc. reserves the right to make changes in specifications and other information contained in this document without prior written notice. The information provided herein is subject to change without notice. In no event shall Allied Telesis, Inc. be liable for any incidental, special, indirect, or consequential damages whatsoever, including but not limited to lost profits, arising out of or related to this manual or the information contained herein, even if Allied Telesis, Inc. has been advised of, known, or should have known, the possibility of such damages. Electrical Safety and Emissions Standards This product meets the following standards. U.S. Federal Communications Commission Radiated Energy Note: This equipment has been tested and found to comply with the limits for a Class A digital device pursuant to Part 15 of FCC Rules. These limits are designed to provide reasonable protection against harmful interference when the equipment is operated in a commercial environment. This equipment generates, uses, and can radiate radio frequency energy and, if not installed and used in accordance with this instruction manual, may cause harmful interference to radio communications. Operation of this equipment in a residential area is likely to cause harmful interference in which case the user will be required to correct the interference at his own expense. Note: Modifications or changes not expressly approved of by the manufacturer or the FCC, can void your right to operate this equipment. Industry Canada This Class B digital apparatus complies with Canadian ICES-003. Cet appareil numérique de la classe A est conforme à la norme NMB-003 du Canada. RFI Emissions FCC Class A, EN55022 Class A, EN61000-3-2, EN61000-3-3, VCCI Class A, C-TICK, CE Warning: In a domestic environment this product may cause radio interference in which case the user may be required to take adequate measures. Immunity EN55024 Electrical Safety EN60950 (TUV), UL 60950 (CULUS) Laser Safety EN60825 3 Translated Safety Statements Important: The indicates that a translation of the safety statement is available in a PDF document titled “Translated Safety Statements” (613-000405) posted on the Allied Telesis website at www.alliedtelesis.com. 4 Contents Preface ............................................................................................................................................................................... 13 Safety Symbols Used in this Document............................................................................................................................... 14 Where to Find Web-based Guides ...................................................................................................................................... 15 Contacting Allied Telesis ..................................................................................................................................................... 16 Online Support ............................................................................................................................................................. 16 Email and Telephone Support ...................................................................................................................................... 16 Warranty ....................................................................................................................................................................... 16 Returning Products....................................................................................................................................................... 16 Sales or Corporate Information .................................................................................................................................... 16 Management Software Updates ................................................................................................................................... 16 Chapter 1: Overview ......................................................................................................................................................... 17 AT-CV5000 Overview .......................................................................................................................................................... 18 Managed AT-CV5000................................................................................................................................................... 18 Unmanaged AT-CV5000 .............................................................................................................................................. 18 System Description.............................................................................................................................................................. 19 Hardware Features....................................................................................................................................................... 19 Software Features ........................................................................................................................................................ 19 Front and Rear Panel Components ..................................................................................................................................... 20 LED Interface Card .............................................................................................................................................................. 21 RS-232 Terminal Port................................................................................................................................................... 21 Interface Card LEDs ..................................................................................................................................................... 22 RESET LINE/EXP Button ............................................................................................................................................. 23 AT-CV5M01 Management Card .......................................................................................................................................... 24 RS-232 Terminal Port................................................................................................................................................... 24 10/100Base-TX Twisted Pair Port ................................................................................................................................ 25 CPU RESET Button ..................................................................................................................................................... 26 LEDs............................................................................................................................................................................. 26 Converteon™ Line Cards .................................................................................................................................................... 28 Link Test ....................................................................................................................................................................... 28 MissingLink™ ............................................................................................................................................................... 28 Smart MissingLink ........................................................................................................................................................ 29 OAM ............................................................................................................................................................................. 29 Line Card Port Descriptions ......................................................................................................................................... 29 Blank Slot Covers ................................................................................................................................................................ 30 Power Supplies.................................................................................................................................................................... 31 Fan Modules ........................................................................................................................................................................ 32 Management Connections................................................................................................................................................... 33 A Few Basics about Media Converters................................................................................................................................ 34 MAC Address Table ..................................................................................................................................................... 34 Duplex Mode ................................................................................................................................................................ 34 Store-and-Forward ....................................................................................................................................................... 35 Pass-through ................................................................................................................................................................ 35 Network Topologies ............................................................................................................................................................. 36 Standalone Topology ................................................................................................................................................... 36 Back-to-Back Topology ................................................................................................................................................ 36 Chapter 2: Installation ...................................................................................................................................................... 39 Reviewing Safety Precautions ............................................................................................................................................. 40 Selecting a Site for the Chassis........................................................................................................................................... 44 5 Contents Unpacking the Chassis ........................................................................................................................................................ 45 Installing the Power Cord Retaining Clip (AC Powered Chassis Only)................................................................................ 46 Installing the AT-CV5000 Chassis in a Rack ....................................................................................................................... 48 Grounding the AT-CV5000 Chassis..................................................................................................................................... 50 Installing a Converteon™ Line Card .................................................................................................................................... 52 Cabling a Converteon™ Line Card in an AT-CV5000 Chassis............................................................................................ 55 Cabling a Fiber Optic Port ............................................................................................................................................ 55 Cabling a Twisted Pair Port .......................................................................................................................................... 58 Cabling an SFP Transceiver......................................................................................................................................... 58 Powering On an AC Powered Chassis ................................................................................................................................ 60 Powering On a DC Powered Chassis .................................................................................................................................. 64 Starting a Local Management Session ................................................................................................................................ 67 Starting a Remote Management Session ............................................................................................................................ 70 Chapter 3: Working with Line Cards and other Modules .............................................................................................. 73 Removing a Converteon™ Line Card .................................................................................................................................. 74 Working with the AT-CV5M01 Management Card............................................................................................................... 76 Installing an AT-CV5M01 Management Card ............................................................................................................... 76 Resetting an AT-CV5M01 Management Card .............................................................................................................. 77 Replacing an AT-CV5M01 Management Card ............................................................................................................. 78 Installing an AT-CM70S Line Card ...................................................................................................................................... 79 Resetting the Line Cards and the Module in the Rear Expansion Slot ................................................................................ 81 Installing an AT-PWR14 AC Power Supply ......................................................................................................................... 82 Installing an AT-PWR15 DC Power Supply ......................................................................................................................... 84 Replacing an AT-CVFAN Module ........................................................................................................................................ 86 Installing a Blank Slot Cover ................................................................................................................................................ 90 Installing an AT-CV5PNL1 Blank Slot Cover ................................................................................................................ 90 Installing an AT-CV5PNL2 Blank Slot Cover ................................................................................................................ 92 Installing an AT-CV5PNL3 Blank Slot Cover ................................................................................................................ 93 Chapter 4: Troubleshooting ............................................................................................................................................. 95 LED Interface Card .............................................................................................................................................................. 95 PS-A or PS-B LED is OFF ............................................................................................................................................ 95 PS-A or PS-B LED is Blinking....................................................................................................................................... 95 FAN-A or FAN-B LED is OFF ....................................................................................................................................... 95 AT-CV5M01 Management Card .......................................................................................................................................... 97 PWR LED is OFF.......................................................................................................................................................... 97 RDY LED is Blinking ..................................................................................................................................................... 97 RDY LED is OFF .......................................................................................................................................................... 97 FLT LED is Blinking ...................................................................................................................................................... 97 FLT LED is Steadily ON................................................................................................................................................ 98 LK LED is OFF ............................................................................................................................................................. 98 Converteon™ Line Cards .................................................................................................................................................... 98 LK LED is Blinking ........................................................................................................................................................ 98 LK LED is OFF ............................................................................................................................................................. 98 Appendix A: Technical Specifications .......................................................................................................................... 101 Physical Specifications ...................................................................................................................................................... 101 Environmental Specifications............................................................................................................................................. 101 Power Specifications.......................................................................................................................................................... 101 Safety and Electromagnetic Emissions Certifications........................................................................................................ 102 Standards .......................................................................................................................................................................... 102 RJ-45 Twisted Pair Port Pinouts ........................................................................................................................................ 103 RS-232 Terminal Port Pinouts ........................................................................................................................................... 104 8-Pin Mini-DIN Console Port Pinouts................................................................................................................................. 105 SC Type Connectors.......................................................................................................................................................... 106 Dual SC Connector..................................................................................................................................................... 106 Simplex SC Connector ............................................................................................................................................... 106 Dual ST Type Connector Cable ......................................................................................................................................... 107 SFP Transceiver Cable...................................................................................................................................................... 108 Appendix B: Cleaning Fiber Optic Connectors ............................................................................................................ 109 6 AT-CV5000 Media Converter Chassis Installation Guide Using a Cartridge-Type Cleaner ........................................................................................................................................ 110 Using a Swab .................................................................................................................................................................... 112 7 Contents 8 Figures Figure 1. AT-CV5000 Media Converter ............................................................................................................................. Figure 2. Front Panel of the AT-CV5000 Chassis ............................................................................................................. Figure 3. Rear Panel of the AT-CV5000 Chassis (AC Version) ........................................................................................ Figure 4. Rear Panel of the AT-CV5000 Chassis (DC Version) ........................................................................................ Figure 5. LED Interface Card Components ....................................................................................................................... Figure 6. AT-CV5M01 Management Card Components.................................................................................................... Figure 7. AT-CV5PNLx Series Blank Slot Covers ............................................................................................................. Figure 8. AT-CV5000 AC Powered Chassis...................................................................................................................... Figure 9. AT-CV5000 DC Powered Chassis...................................................................................................................... Figure 10. AT-CVFAN Module........................................................................................................................................... Figure 11. Locations of Fan Slots A and B on an AT-CV5000 Rear Panel ....................................................................... Figure 12. Standalone Network Topology ......................................................................................................................... Figure 13. Back-to-Back Network Topology ...................................................................................................................... Figure 14. Power Cord Retaining Clip ............................................................................................................................... Figure 15. Power Cord Retaining Bracket ......................................................................................................................... Figure 16. Inserting the Retaining Clip into the Retaining Bracket .................................................................................... Figure 17. Retaining Clip Properly Installed in the Bracket ............................................................................................... Figure 18. Installing a Bracket to the Chassis ................................................................................................................... Figure 19. Mounting the AT-CV5000 Chassis in a 19-inch Rack ...................................................................................... Figure 20. Frame Ground Connectors............................................................................................................................... Figure 21. Connecting the Wire to the Ground Lug ........................................................................................................... Figure 22. Placing the Ground Lug on the Frame Ground Stud ........................................................................................ Figure 23. Securing the Ground Lug with Lock Nut........................................................................................................... Figure 24. Location of the Alignment Guides..................................................................................................................... Figure 25. Inserting a Line Card ........................................................................................................................................ Figure 26. Tightening the Captive Screw........................................................................................................................... Figure 27. Dual SC Port .................................................................................................................................................... Figure 28. Removing the Dust Cover from a Dual SC Fiber Optic Port............................................................................. Figure 29. Connecting to the Dual SC Fiber Optic Port..................................................................................................... Figure 30. Removing the Dust Cover from a Simplex SC Fiber Optic Port ....................................................................... Figure 31. Connecting to the Simplex SC Fiber Optic Port ............................................................................................... Figure 32. Connecting to the Twisted Pair Port ................................................................................................................. Figure 33. Inserting an SFP Transceiver into the SFP Slot ............................................................................................... Figure 34. Removing the Dust Cover from the SFP Transceiver ...................................................................................... Figure 35. Connecting Fiber Optic Cables to the SFP Transceiver................................................................................... Figure 36. ON/OFF Power Switch in OFF Position ........................................................................................................... Figure 37. Power Cord Retaining Clip in the Up Position .................................................................................................. Figure 38. Connecting the AC Power Cord ....................................................................................................................... Figure 39. Securing the Power Cord with the Retaining Clip............................................................................................. Figure 40. ON/OFF Power Switch in ON Position ............................................................................................................. Figure 41. DC Terminal Block............................................................................................................................................ Figure 42. Stripped Wire.................................................................................................................................................... Figure 43. Inserting Wires into a DC Terminal Block......................................................................................................... Figure 44. Connecting a Management Cable to the RS-232 Terminal Port on an AT-CV5M01 Management Card......... Figure 45. Connecting a Management Cable to the RS-232 Console Port on an AT-CM70S Line Card.......................... Figure 46. AT-S70 Main Menu........................................................................................................................................... Figure 47. Connecting a Twisted Pair Cable to the 10/100Base-TX Port on the AT-CV5M01 Management Card ........... Figure 48. Line Card Removal Tool................................................................................................................................... Figure 49. Removing a Line Card from an AT-CV5000 Chassis ....................................................................................... Figure 50. Inserting the AT-CV5M01 Management Card .................................................................................................. 18 20 20 20 21 24 30 31 31 32 32 36 37 46 46 46 47 48 48 50 50 51 51 53 53 54 55 56 56 57 57 58 59 59 59 60 61 61 61 62 64 65 66 67 67 68 70 74 74 77 9 Figures Figure 51. Figure 52. Figure 53. Figure 54. Figure 55. Figure 56. Figure 57. Figure 58. Figure 59. Figure 60. Figure 61. Figure 62. Figure 63. Figure 64. Figure 65. Figure 66. Figure 67. Figure 68. Figure 69. Figure 70. Figure 71. Figure 72. Figure 73. Figure 74. Figure 75. Figure 76. Figure 77. Figure 78. Figure 79. Figure 80. Figure 81. Figure 82. Figure 83. Figure 84. Figure 85. Tightening the Captive Screw........................................................................................................................... 77 Resetting the AT-CV5M01 Management Card ................................................................................................. 78 Inserting an AT-CM70S Line Card.................................................................................................................... 80 Tightening the Captive Screw on the AT-CM70S Line Card ............................................................................ 80 Resetting Converteon™ Line Cards/Rear Expansion Module.......................................................................... 81 Inserting the AT-PWR14 AC Power Supply...................................................................................................... 83 Securing the AT-PWR14 AC Power Supply ..................................................................................................... 83 Inserting the AT-PWR15 DC Power Supply ..................................................................................................... 85 Securing the AT-PWR15 DC Power Supply ..................................................................................................... 85 Removing an AT-CVFAN Module from Fan Slot A........................................................................................... 87 Removing an AT-CVFAN Module from Fan Slot B........................................................................................... 87 Inserting an AT-CVFAN Module into Fan Slot A............................................................................................... 88 Inserting an AT-CVFAN Module into Fan Slot B............................................................................................... 88 Tightening the Screws on the AT-CVFAN Module in Slot A. ............................................................................ 88 Tightening the Screws on the AT-CVFAN Module in Slot B ............................................................................. 89 Inserting an AT-CV5PNL1 Blank Slot Cover .................................................................................................... 91 Tightening the Captive Screw on an AT-CV5PNL1 .......................................................................................... 91 Inserting an AT-CV5PNL2 Blank Slot Cover .................................................................................................... 92 Tightening the Captive Screws on an AT-CV5PNL2 ........................................................................................ 92 Inserting an AT-CV5PNL3 Blank Slot Cover .................................................................................................... 93 Tightening the Captive Screws on an AT-CV5PNL3 ........................................................................................ 94 RJ-45 Connector and Port Pin Layout ............................................................................................................ 103 RS-232 Terminal Port Pinouts ........................................................................................................................ 104 8-Pin Mini-DIN Console Port and Connector Pin Layouts .............................................................................. 105 Dual SC Connector Cable .............................................................................................................................. 106 Simplex SC Connector Cable ......................................................................................................................... 106 Dual ST Connector Cable............................................................................................................................... 107 SFP Transceiver ............................................................................................................................................. 108 SFP Transceiver Cable................................................................................................................................... 108 Ferrule in an SC Connector Plug.................................................................................................................... 109 Unclean and Clean Ferrule............................................................................................................................. 109 Cartridge Cleaner ........................................................................................................................................... 110 Rubbing the Ferrule Tip on the Cleaning Surface .......................................................................................... 110 Lint-Free and Alcohol-Free Swabs ................................................................................................................. 112 Cleaning a Recessed Ferrule ......................................................................................................................... 112 10 Tables Table 1. Table 2. Table 3. Table 4. Table 5. Table 6. Table 7. Safety Symbols .................................................................................................................................................... 14 Status LEDs on the LED Interface Card .............................................................................................................. 22 Status LEDs on the AT-CV5M01 Management Card .......................................................................................... 26 MDI Pin Signals (10/100Base-TX) ..................................................................................................................... 103 MDI-X Pin Signals (10/100Base-TX) ................................................................................................................. 103 RS-232 Terminal Port Pin Signals ..................................................................................................................... 104 8-Pin Mini-DIN Console Port Pinouts ................................................................................................................. 105 11 Tables 12 Preface This guide contains instructions on how to install an AT-CV5000 Media Converter and the Converteon™ Series line cards. This preface contains the following sections: “Safety Symbols Used in this Document” on page 14 “Where to Find Web-based Guides” on page 15 “Contacting Allied Telesis” on page 16 13 Preface Safety Symbols Used in this Document This document uses the safety symbols defined in Table 1. Table 1. Safety Symbols Symbol 14 Meaning Description Caution Performing or omitting a specific action may result in equipment damage or loss of data. Warning Performing or omitting a specific action may result in electrical shock. AT-CV5000 Media Converter Chassis Installation Guide Where to Find Web-based Guides The installation and user guides for all Allied Telesis products are available in portable document format (PDF) on our web site at www.alliedtelesis.com. You can view the documents online or download them onto a local workstation or server. 15 Preface Contacting Allied Telesis This section provides Allied Telesis contact information for technical support as well as sales and corporate information. Online Support You can request technical support online by accessing the Allied Telesis Knowledge Base: www.alliedtelesis.com/support/kb.aspx. You can use the Knowledge Base to submit questions to our technical support staff and review answers to previously asked questions. Email and Telephone Support For Technical Support via email or telephone, refer to the Support & Services section of the Allied Telesis web site: www.alliedtelesis.com. Select your country from the list displayed on the website. then select the appropriate menu tab. Warranty For hardware warranty information, refer to the Allied Telesis web site: www.alliedtelesis.com/support/warranty. Returning Products Products for return or repair must first be assigned a return materials authorization (RMA) number. A product sent to Allied Telesis without an RMA number will be returned to the sender at the sender’s expense. To obtain an RMA number, contact the Allied Telesis Technical Support group at our web site: www.alliedtelesis.com/support/rma. Select your country from the list displayed on the website. Then select the appropriate menu tab. Sales or Corporate Information Management Software Updates You can contact Allied Telesis for sales or corporate information through our web site: www.alliedtelesis.com. To find the contact information for your country, select Contact Us -> Worldwide Contacts. New releases of management software for our managed products are available from either of the following Internet sites: Allied Telesis web site: www.alliedtelesis.com Allied Telesis FTP server: ftp://ftp.alliedtelesis.com If you prefer to download new software from the Allied Telesis FTP server from your workstation’s command prompt, you will need FTP client software and you must log in to the server. Enter “anonymous” for the user name and your email address for the password. 16 Chapter 1 Overview This chapter contains the following sections: “AT-CV5000 Overview” on page 18 “System Description” on page 19 “Front and Rear Panel Components” on page 20 “LED Interface Card” on page 21 “AT-CV5M01 Management Card” on page 24 “Converteon™ Line Cards” on page 28 “Blank Slot Covers” on page 30 “Power Supplies” on page 31 “Fan Modules” on page 32 “Management Connections” on page 33 “A Few Basics about Media Converters” on page 34 “Network Topologies” on page 36 17 Chapter 1: Overview AT-CV5000 Overview AT-CV5000 The AT-CV5000 media converter, as shown in Figure 1, is a modular unit that simplifies the task of building and maintaining a Fast Ethernet or Gigabit Ethernet network. AT-CM 202 AT-CM 202 LK AT LK AT T X RDY MSTR FLT FAN1 M M T X R X M M PS1 PS-A RDY PS-B 235 R X AT FD LK AT FD T X T X RDY SML REAR EXP. CONSOLE LK RDY ML OAM SML ML OAM RESET FAN-A LINE/S FM FAN-B Figure 1. AT-CV5000 Media Converter When you connect workgroup hubs and other switches to the chassis, the AT-CV5000 media converter functions as the focal point of your network. Or you can connect workstations, servers, printers, and routers directly to the chassis so that each device has sole use of a dedicated link to the network. Managed AT-CV5000 A managed AT-CV5000 media converter includes at least one AT-CV5M01 Management Card which contains a CPU. The management card is shipped with the AT-S70 management software preinstalled which allows you to manage the chassis and line cards, even remotely. The management card fits into any of the 18 line card slots on the front of the AT-CV5000 chassis. When more than one management card is installed, one acts as a master card and the others operate as redundant fail-over cards. Unmanaged AT-CV5000 An unmanaged AT-CV5000 media converter has no management card and thus does not provide you with the capability to manage the chassis and line cards through the AT-S70 management software. In order to configure the operational mode of the line cards, you must set the line card’s DIP switches. An unmanaged AT-CV5000 chassis does offers centralized power and air flow to the line cards. The LED interface card provides information about the power supplies and fans and a chassis reset button. The chassis will provide an unmanaged automated sequence power up to permit gradual loading of the power supplies from cold boot. 18 AT-CV5000 Media Converter Chassis Installation Guide System Description Hardware Features Software Features The standard AT-CV5000 Media Converter chassis has the following features: 18 line card/expansion slots with preinstalled AT-CV5PNLx blank slot covers One preinstalled LED interface card which contains: – One RS-232 port to access any module installed in the rear expansion slot – One reset button – Seven status LEDs One rear expansion slot Two preinstalled AT-CVFAN fan modules Two slots in the back for power supplies. The chassis is shipped without any power supplies installed and must contain at least one power supply to be operational. For more information about the power supplies, refer to “Power Supplies” on page 31. One ON/OFF switch for each power supply slot In order to manage the chassis using the AT-S70 management software, you must install at least one AT-CV5M01 Management Card. Otherwise, you must manually set the DIP switches on each line card to the settings appropriate for your network. For information about the management software, refer to the AT-S70 Management Software User’s Guide. 19 Chapter 1: Overview Front and Rear Panel Components Figure 2 shows the front panel of the AT-CV5000 chassis. AT-CV5000 Line Card Slots 1 2 4 3 5 7 6 9 8 10 11 12 LED Interface Card 13 14 15 16 17 RS-232 Terminal Port (to manage any module in the rear expansion slot) 18 AT-CV5LED RDY FLT MASTER FAN1 PS1 PS-A PS-B RDY REAR EXP. CONSOLE Reset Button RESET LINE/EXP FAN-A FAN-B 269 Figure 2. Front Panel of the AT-CV5000 Chassis Figure 3 illustrates the rear panel of the AT-CV5000 AC powered chassis. Fan Tray Slot AC Power Socket AC Power Socket Fan Tray Slot Rear Expansion Slot REAR EXP. SLOT A 100-240VAC~ B B WARNING WARNING This unit might have more than one power input. To reduce the risk of electric shock, disconnect all power inputs before servicing unit. This unit might have more than one power input. To reduce the risk of electric shock, disconnect all power inputs before servicing unit. 100-240VAC~ AT-CVFAN AT-CVFAN A 214 AT-PWR14 Power Supply Module Optional Redundant Power Supply Slot Figure 3. Rear Panel of the AT-CV5000 Chassis (AC Version) Figure 4 illustrates the rear panel of an AT-CV5000 DC powered chassis. Fan Tray Slot DC Terminal Block A WARNING 40-60VDC B B This unit might have more than one power input. To reduce the risk of electric shock, disconnect all power inputs before servicing unit. FOR CENTRALIZED DC POWER CONNECTION, INSTALL ONLY IN A RESTRICTED AREA. WARNING This unit might have more than one power input. To reduce the risk of electric shock, disconnect all power inputs before servicing unit. FOR CENTRALIZED DC POWER CONNECTION, INSTALL ONLY IN A RESTRICTED AREA. 40-60VDC AT-CVFAN AT-CVFAN A DC Terminal Block Fan Tray Slot Rear Expansion Slot 221 AT-PWR15 Power Supply Module Optional Redundant Power Supply Slot Figure 4. Rear Panel of the AT-CV5000 Chassis (DC Version) 20 AT-CV5000 Media Converter Chassis Installation Guide LED Interface Card The LED interface card, as shown in Figure 5, is preinstalled in the AT-CV5000 chassis and is not field-replaceable. The LED interface card features the following components: One RS-232 terminal port with a DB-9 connector One recessed RESET LINE/EXP button Seven system status LEDs AT-C V5 LED RDY MSTR FLT FAN1 PS1 PS-A RDY PS-B Recessed RESET LINE/EXP Button REAR. SLO SLOT CONSOLE RS-232 Terminal Port Status LEDs RESET LINE/E XP FAN-A FAN-B 251 Figure 5. LED Interface Card Components RS-232 Terminal Port You can use the RS-232 terminal port on the LED interface card to establish a local connection to any module present in the expansion slot located in the rear of the chassis. Note This terminal port does not connect to any AT-CV5M01 Management Card in the chassis. Each AT-CV5M01 Management Card contains its own RS-232 terminal port, as shown in Figure 6 on page 24. The RS-232 terminal port on the LED interface card has a DB-9 female connector and uses a straight-through RS-232 cable (not provided). The default settings for the RS-232 terminal port are: Baud rate: 115200 (range 2400 to 115200 bps) 21 Chapter 1: Overview Data bits: 8 Parity: None Stop bits: 1 Flow control: None These default settings are for a DEC VT100 or ANSI terminal, or an equivalent terminal emulation program. Interface Card LEDs Table 1 lists the system status LEDs located on the LED interface card. Table 1. Status LEDs on the LED Interface Card LED RDY (For future use) MSTR (For future use) FLT (For future use) PS-A PS-B 22 State Description Green The module installed in the rear expansion slot has passed diagnostics and is ready. OFF The module installed in the rear expansion slot has failed diagnostics and is not ready, or is not installed. Green This AT-CV5000 chassis is acting as a Stacking Master (via a module installed in the rear expansion slot.) OFF This AT-CV5000 chassis is not a Stacking Master. Green The module installed in the rear expansion slot has a fault condition, or is not installed. OFF The module installed in the rear expansion slot has not reported a fault condition. Green The power supply in slot A is operating normally. OFF The power supply in slot A is OFF, not present, or has failed. Green The power supply in slot B is operating normally. OFF The power supply in slot B is OFF, not present, or has failed. AT-CV5000 Media Converter Chassis Installation Guide Table 1. Status LEDs on the LED Interface Card (Continued) LED FAN-A FAN-B RESET LINE/ EXP Button State Description Green The fan module in fan tray slot A is operating normally. OFF The fan module in fan tray slot A is OFF, not present, or has failed. Green The fan module in fan tray slot B is operating normally. OFF The fan module in fan tray slot B is OFF, not present, or has failed. You can use the recessed RESET LINE/EXP button to reset the line cards and/or the module currently present in the expansion slot in the rear of the chassis. Note This reset button does not allow you to reset any management cards in the chassis. 23 Chapter 1: Overview AT-CV5M01 Management Card The AT-CV5M01 Management Card provides a CPU subsystem for the AT-CV5000 chassis as well as the AT-S70 management software preinstalled that allows you to configure and monitor the status of the converter line cards. For more information about the AT-S70 management software, refer to the AT-S70 Management Software User’s Guide. The AT-CV5000 chassis is shipped without an AT-CV5M01 Management Card and therefore is by default an unmanaged chassis. Note The AT-CV5M01 Management Card is hot-swappable and you can insert it in any line card slot without powering OFF the chassis. The AT-CV5M01 Management Card, as shown in Figure 6, features the following components: One RS-232 terminal port with a DB-9 connector for a local management session One 10/100Base-TX twisted pair port with an RJ-45 connector for a remote management session One recessed CPU RESET button Six CPU status LEDs AT-C V 5M0 PWR 1 RDY FLT LEDs RS-232 Terminal Port 10/100Base-TX Twisted Pair Port Recessed CPU RESET Button LK AT FD CPU RE SET 258 Figure 6. AT-CV5M01 Management Card Components RS-232 Terminal Port 24 The default settings for the RS-232 terminal port are: Baud rate: 115200 bps (range 2400 to 115200 bps) Data bits: 8 AT-CV5000 Media Converter Chassis Installation Guide Parity: None Stop bits: 1 Flow control: None These default settings are for a DEC VT100 or ANSI terminal, or an equivalent terminal emulation program. Note This terminal port does not allow you to connect to any module present in the expansion slot located in the rear of the chassis. To connect to a module in the rear expansion slot, you must use the RS-232 terminal port on the LED interface card, as described in “LED Interface Card” on page 21. 10/100Base-TX Twisted Pair Port The 10/100Base-TX twisted pair port on the management card allows you to establish a remote management session and has a maximum operating distance of 100 meters (328 feet). The port has an 8-pin RJ-45 connector. For the port pinouts, refer to “RJ-45 Twisted Pair Port Pinouts” on page 103. The twisted pair port is 10/100Base-TX IEEE 802.3u Auto-Negotiation compliant and is capable of both 10 megabits per second (Mbps) and 100 Mbps speeds. You can set the port speed manually through the AT-S70 management software or allow the port to set it automatically. With AutoNegotiation, the management card automatically matches the highest possible common speed between the port and the Ethernet hub or switch. For example, if the Ethernet hub or switch is capable of only 10 Mbps, the management card sets the port connected to the end node to 10 Mbps. Note Auto-Negotiation is the default setting on the twisted pair port on the management card. To deactivate Auto-Negotiation and set the speed manually, refer to the AT-S70 Management Software User’s Guide. The twisted pair port on the management card can operate in either halfor full-duplex mode. The twisted pair port is IEEE 802.3u-compliant and will Auto-Negotiate the duplex mode setting. You can disable AutoNegotiation and set the duplex mode manually using the AT-S70 management software. Note In order for the twisted pair port on the management card to successfully Auto-Negotiate its duplex mode with an end node, the end node should also be using Auto-Negotiation. Otherwise, a duplex mode mismatch can occur. Therefore, when you connect an 25 Chapter 1: Overview end node with a fixed duplex mode of full-duplex to a management card port, you should use the AT-S70 management software to disable Auto-Negotiation on the port and set the port speed and duplex mode manually. For 10 Mbps operation, Category 3 or better, 100 Ohm shielded or unshielded, twisted pair cabling is required. For 100 Mbps operation, Category 5 or Enhanced Category 5 (5E), 100 Ohm shielded or unshielded, twisted pair cabling is required. CPU RESET Button The recessed CPU RESET button allows you to reset only the management card. You may need to reset the management card after upgrading the firmware or after you have made a configuration change that requires resetting the module to activate the change. Note This reset button does not reset the line cards and/or the module installed in the expansion slot at the rear of the chassis. LEDs The status LEDs located on the AT-CV5M01 Management Card are described in Table 2. Table 2. Status LEDs on the AT-CV5M01 Management Card LED PWR RDY FLT LK AT 26 State Description Green The management card is receiving power. OFF The management card is not receiving power if this LED is off for more than 10 seconds. Green The management card has passed diagnostics and is ready. OFF The management card has failed diagnostics and is not ready. Green The management card has a fault condition. OFF The management card has not reported a fault condition. Green Link established on the twisted pair port. OFF No link established on the twisted pair port. Blinking Green TX/RX activity detected on the twisted pair port. OFF No activity detected on the twisted pair port. AT-CV5000 Media Converter Chassis Installation Guide Table 2. Status LEDs on the AT-CV5M01 Management Card LED FD State Description Green The twisted pair port is operating in fullduplex mode. OFF The twisted pair port is operating in halfduplex mode. 27 Chapter 1: Overview Converteon™ Line Cards Note For a current list of line cards for the Converteon™ Series Chassis, refer to the Allied Telesis web site or consult your authorized sales representative. For detailed descriptions of these line cards, refer to the documentation shipped with the line cards and/or the Converteon™ Media Converter Line Cards Reference Guide. On some Converteon™ line cards, you can enable or disable the following features by configuring their DIP switches: Link Test Link Test MissingLink™ Mode Smart MissingLink Mode OAM Capabilities The link test is a fast and easy way for you to test the connections between the converter ports and the end nodes that are connected to the ports. If a network problem occurs, you can perform a link test to determine which port is experiencing a problem, and therefore focus your troubleshooting efforts on the cable and end node where the problem resides. The LK LED for the twisted pair port should be green, indicating that it was able to establish a link with its end nodes. If the LK LED is off, the port could not establish a link. Refer to “Troubleshooting” on page 95 for suggestions on how to remedy the problem. For more information on how the LK LED functions, refer to Appendix A in the Converteon™ Media Converter Line Cards Reference Guide. Performing a link test does not interfere with a converter’s ability to pass network traffic. MissingLink™ The MissingLink™ feature enables the ports on the media converter to pass the link status of their connections to each other. When the media converter detects a problem on one of the ports, such as the loss of connection to an end node, the media converter shuts down the connection to the other port, thus notifying the end node that the connection has been lost. For example, if the twisted pair cable to the 10/100Base-TX port on the media converter fails, the line card drops the link on the 100Base-FX fiber optic port. In this way, the media converter notifies the end node connected to the fiber optic port that the connection on the twisted pair 28 AT-CV5000 Media Converter Chassis Installation Guide port has been lost. If the failure occurs on the fiber optic cabling, the line card drops the link to the twisted pair port. Some devices can be configured to take a specific action in the event of the loss of connection on a port, to seek a redundant path to a disconnected end node, or to send out a trap to a network management station, and so alert the network administrator of the problem. Smart MissingLink The Smart MissingLink feature performs exactly the same function as MissingLink™ with one additional feature. When a link is lost on a port, the LK LED of the port that still has a valid connection to its end node starts to blink. This allows you to quickly determine which port still has a valid connection (LK LED blinking) and which port has lost its connection (LK LED is off). For example, if the network twisted pair cable to the 10/100Base-TX port on the media converter fails, the LK LED on the 100Base-FX fiber optic port blinks, indicating a failed connection on the twisted pair port. If the failure starts with the fiber optic cabling, the LK LED on the twisted pair port blinks. This allows you to quickly see which port has failed and troubleshoot your network accordingly. OAM Line Card Port Descriptions The Operation, Administration and Maintenance (OAM) is a group of functions that provides tools and utilities used to manage a network. The OAM feature is 802.3ah-compliant and is used to provide network indication, system configuration, performance monitoring, security management, diagnostic functions and configuration. OAM is described in detail in the AT-S70 Management Software User’s Guide. For a detailed description of each Converteon™ line card, refer to the documentation shipped with the line card or the Converteon™ Media Converter Line Cards Reference Guide. 29 Chapter 1: Overview Blank Slot Covers The AT-CV5PNLx Series blank slot covers are designed to maintain optimal, trouble-free environmental conditions for the modules used in the Converteon™ AT-CV5000 chassis. Every unoccupied slot on the chassis must be covered with a blank slot cover to prevent dust from entering the chassis and to maintain proper airflow, cooling, and ventilation throughout the chassis. There are three AT-CV5PNLx Series blank slot covers: AT-CV5PNL1 – For line cards and AT-CV5M01 Management Card AT-CV5PNL2 – For power supply modules AT-CV5PNL3 – For the rear expansion slot Figure 7 illustrates the AT-CV5PNLx Series blank slot covers. AT-CV5PNL2 223 222 AT-CV5PNL1 AT-CV5PNL3 224 Figure 7. AT-CV5PNLx Series Blank Slot Covers Note Allied Telesis strongly recommends that a blank slot cover be inserted in any slot that does not contain a functioning line card or module. To install a blank slot cover that was removed from the chassis, refer to “Installing a Blank Slot Cover” on page 90. 30 AT-CV5000 Media Converter Chassis Installation Guide Power Supplies The AT-CV5000 chassis is shipped with two rear slots designated for the power supplies. Two power supply options are available: AT-PWR14 AC module AT-PWR15 DC module Caution The AT-CV5000 Media Converter chassis can contain two power supplies of the same type (AC or DC) or a combination of the two versions with the same power ratings. Make sure not to mix power supplies with different power ratings in the same chassis. For information on the power supply module, refer to the documentation that is shipped with the module. An AC powered chassis is shown in Figure 8 and a DC-powered chassis is shown in Figure 9. REAR EXP. SLOT A 100-240VAC~ B B WARNING WARNING This unit might have more than one power input. To reduce the risk of electric shock, disconnect all power inputs before servicing unit. This unit might have more than one power input. To reduce the risk of electric shock, disconnect all power inputs before servicing unit. 100-240VAC~ AT-PWR14 AT-PWR14 POWER POWER FAULT FAULT AT-CVFAN AT-CVFAN A 1163 Figure 8. AT-CV5000 AC Powered Chassis REAR EXP. SLOT A This unit might have more than one power input. To reduce the risk of electric shock, disconnect all power 40-60VDC B B WARNING FOR CENTRALIZED DC POWER CONNECTION, INSTALL ONLY IN A RESTRICTED AREA. WARNING This unit might have more than one power input. To reduce the risk of electric shock, disconnect all power FOR CENTRALIZED DC POWER CONNECTION, INSTALL ONLY IN A RESTRICTED AREA. AT-PWR15 AT-PWR15 POWER POWER FAULT FAULT 40-60VDC AT-CVFAN AT-CVFAN A 1162 Figure 9. AT-CV5000 DC Powered Chassis When two power supplies are installed, one provides full power to the chassis and the one of them works in standby mode. If one power supply fails, the remaining power supply provides all the power to the system, preventing a system failure. 31 Chapter 1: Overview Fan Modules The AT-CVFAN module, as shown in Figure 10, is designed for use with the AT-CV5000 chassis. You can install the same fan module in either fan slot labeled A or B, located at the rear of the AT-CV5000 chassis. For proper operation, two AT-CVFAN modules are preinstalled in the AT-CV5000 chassis. Caution The AT-CVFAN modules are field-replaceable; however, they are not hot-swappable. Therefore, make sure to power OFF the chassis before replacing the fan modules. AT-CVFAN Note The AT-CV5000 chassis operates correctly even with one faulty fan module. However, it will not operate correctly if one fan is missing because this changes the air flow. 201 Figure 10. AT-CVFAN Module Figure 11 illustrates the locations of the two fan modules at the rear of the AT-CV5000 chassis. REAR EXP. SLOT A 100-240VAC~ B B WARNING WARNING This unit might have more than one power input. To reduce the risk of electric shock, disconnect all power inputs before servicing unit. This unit might have more than one power input. To reduce the risk of electric shock, disconnect all power inputs before servicing unit. 100-240VAC~ AT-CVFAN AT-CVFAN A 214 Fan Slot A Fan Slot B Figure 11. Locations of Fan Slots A and B on an AT-CV5000 Rear Panel To replace a fan module if one of the two AT-CVFAN modules failed, refer to “Replacing an AT-CVFAN Module” on page 86. 32 AT-CV5000 Media Converter Chassis Installation Guide Management Connections The AT-CV5000 chassis provides two ports to connect to the AT-S70 management software: For local management, connect to the RS-232 terminal port on the AT-CV5M01 Management Card or to the RS-232 console port on the AT-CM70S line card only. For more information, refer to “Starting a Local Management Session” on page 67. Note You cannot access the AT-S70 management software through the RS-232 port on the LED interface card. For remote management using Telnet, connect to the 10/100Base-TX Ethernet port. For more information, refer to “Starting a Remote Management Session” on page 70. Note When you install an AT-CM70S line card in an AT-CV5000 chassis, you can manage it either through its RS-232 port or through the terminal port on the AT-CV5M01 Management Card. 33 Chapter 1: Overview A Few Basics about Media Converters An Ethernet media converter can interconnect network devices over large distances by transferring Ethernet traffic between twisted pair ports and fiber optic cabling. MAC Address Table A Converteon™ media converter line card has a MAC address table that can store up to 2K to 32 K MAC addresses, depending on the line card model. Refer to the Converteon™ Media Converter Line Cards Reference Guide for the number of MAC addresses that each line card can store. The line card uses the table to store the MAC addresses of the network end nodes connected to the ports, along with the port number on which each address was learned. A line card learns the MAC addresses of the end nodes by examining the source address of each packet received on a port. It adds the address and port on which the packet was received to the MAC table if the address had not already been entered in the table. The result is a table that contains all the MAC addresses of the devices that are connected to the line card’s ports, and the port number where each address was learned. When the line card receives a packet, it also examines the destination address and, by referring to its MAC address table, determines the port on which the destination end node is connected. It then forwards the packet to the appropriate port and on to the end node. If the line card receives a packet with a destination address that is on the same port on which the packet was received, it discards the packet without forwarding it on to any port. Because both the source end node and the destination end node for the packet are located on the same port on the line card, there is no reason for the line card to forward the packet. Duplex Mode Duplex mode refers to the manner in which an end node receives and transmits data. If an end node can receive or transmit data, but not both simultaneously, the end node is operating in half-duplex mode. If an end node can both receive and transmit data simultaneously, the end node is operating in full-duplex mode. An end node capable of operating in fullduplex can handle data much faster than an end node that can only operate in half-duplex mode. The twisted pair ports on the Converteon™ line cards can operate in either half- or full-duplex mode. The twisted pair ports are IEEE 802.3ucompliant and will Auto-Negotiate the duplex mode setting for you. You can disable Auto-Negotiation on the line card ports so that you can set the duplex mode manually through the management software. In order for a line card port to successfully Auto-Negotiate its duplex mode 34 AT-CV5000 Media Converter Chassis Installation Guide with an end node, the end node should also be using Auto-Negotiation. Otherwise, a duplex mode mismatch can occur. A line card port, using Auto-Negotiation, defaults to half-duplex if it detects that the end node is not using Auto-Negotiation. This results in a mismatch if the end node is operating at a fixed duplex mode of full-duplex. Consequently, when you connect an end node with a fixed duplex mode of full-duplex to a line card port, you should use the AT-S70 management software to disable Auto-Negotiation on the port and set the port speed and duplex mode manually. Store-andForward The bridging media converter line cards, for example the AT-CM202, AT-CM2K0S, and CM212x/1 Series line cards, use store-and-forward as the method for receiving and transmitting frames. When an Ethernet frame is received on a line card port, the line card does not retransmit the frame out the destination port until it has received the entire frame and has stored the frame in a port buffer. It then examines the frame to determine if it is a valid frame. The line card discards invalid frames, such as fragments or runts. This ensures that only valid frames are transmitted out the line card ports and that damaged frames are not propagated on your network. Pass-through The non-bridging media converter line cards, for example the AT-CV102 and AT-CV1KSS, use pass-through as the method for receiving and transmitting frames. The line cards can support any frame size. They only support one speed on the copper and fiber ports. These line cards do not support the filtering feature and do not learn any MAC addresses. 35 Chapter 1: Overview Network Topologies This section discusses the network topologies you can create with the Converteon™ Fast and Gigabit Media Converter Line Cards. Standalone Topology Figure 12 illustrates a standalone topology using one AT-CV5000 media converter with an AT-CM202 line card to interconnect two small networks. Network 1 has an AT-FS709FC switch connected to the 100Base-FX port on the AT-CM202 line card in the AT-CV5000 media converter. Network 2 has an AT-8524M switch connected to the 10/100Base-TX port on the AT-CM202 line card in the AT-CV5000 media converter. NETWORK 1 NETWORK 2 AT-CV5000 AT-CV5000 (w/ AT-CM202) 1 2 AT-CM202 4 3 AT-CV1KSS LK AT LK AT 5 AT-CV1KSS 6 AT-CV1KSS LK AT 7 8 AT-CM202 AT-CM202 LK AT LK AT 9 10 AT-CM202 LK AT 12 11 AT-CM202 LK AT 13 14 16 15 AT-CM212A/1 AT-CM212A/1 AT-CM212A/1 LK AT LK AT 18 17 AT-CM212A/1 LK AT LK AT AT-CV5M01 LK AT AT-CV5LED RDY MSTR FLT FAN1 LK AT PS1 S F P S F P S F P F X F F F X X X X X LK AT LK AT LK AT LK AT LK AT LK AT S F P S F P T X RDY LK AT LK AT LK AT FD S F P T X RDY PS-A PS-B RDY REAR EXP. CONSOLE F F X CONSOLE F F X F X RDY RDY T X T X T X RDY RDY RDY RDY ML/SML FD/OAM ML/SML FD/OAM ML/SML FD/OAM ML/SML FD/OAM T X LK AT FD LK AT FD T X RDY RDY RDY LK LK AT FD T X T X RDY AT FD T X RDY RESET LINE/EXP SML ML ML/SML FD/OAM SML ML SML ML SML ML OAM SML ML OAM SML ML OAM SML ML OAM CPU RESET FAN-A FAN-B AT-FS709FC FS709FC 10BASE-T / 100BASE-TX 8 PORT FAST ETHERNET SWITCH WITH 100FX UPLINK AT-8524M AT-8524M 1X POWER 2X 3X 4X 5X 6X 7X 8MDI 8MDI-X 9 LINK/ACT 100M FDX 1 2 3 4 5 6 7 8 9 OR AT-8524M AT-8524M Twisted Pair Fiber Optic Figure 12. Standalone Network Topology Back-to-Back Topology Figure 13 illustrates a back-to-back topology using two AT-CV5000 media converters with AT-CM202 line cards to interconnect two small networks. 36 The media converters themselves are connected together through 100Base fiber optic ports on AT-CM202 line cards. AT-CV5000 Media Converter Chassis Installation Guide Network 1 has an AT-8350GB switch connected to the 10/100Base-TX port on the AT-CM202 line card in the first AT-C5000 media converter. Network 2 has an AT-8524M switch connected to the 10/100Base-TX port on the AT-CM202 line card in the second AT-CV5000 media converter. NETWORK 1 NETWORK 2 AT-CV5000 AT-CV5000 (w/ AT-CM202) 1 2 AT-CM202 4 3 AT-CV1KSS AT-CV1KSS LK AT LK AT 5 6 AT-CV1KSS LK AT 7 8 AT-CM202 AT-CM202 LK AT LK AT 9 10 AT-CM202 LK AT 12 11 AT-CM202 LK AT 13 14 16 15 LK AT AT-CM212A/1 LK AT LK AT 18 17 AT-CM212A/1 AT-CM212A/1 AT-CM212A/1 LK AT AT-CV5M01 LK AT AT-CV5LED RDY MSTR FLT FAN1 LK AT PS1 S F P S F P S F P F X F F F X X X LK AT LK AT LK AT LK AT LK AT S F P S F P T X RDY LK AT LK AT LK AT LK AT FD S F P T X RDY PS-A PS-B RDY F X REAR EXP. CONSOLE F X F X CONSOLE F X F X RDY RDY T X T X RDY RDY RDY ML/SML FD/OAM ML/SML FD/OAM ML/SML FD/OAM ML/SML FD/OAM LK AT FD LK AT FD T X T X RDY T X RDY RDY RDY LK LK AT FD T X T X RDY AT FD T X RDY RESET LINE/EXP SML ML ML/SML FD/OAM SML ML SML ML SML ML OAM SML ML OAM SML ML OAM CPU RESET SML ML OAM AT-CV5000 FAN-A FAN-B 1 AT-CV1KSS 2 3 4 AT-CM202 AT-CV1KSS LK AT LK AT 5 7 6 AT-CV1KSS 8 AT-CM212A/1 LK AT LK AT 12 9 10 AT-CM202 AT-CV1KSS AT-CM212A/1 AT-CM212A/1 LK AT 11 LK AT LK AT LK AT 13 14 AT-CM202 LK AT 18 15 16 17 AT-CM202 AT-CM202 AT-CV5M01 LK AT LK AT LK AT AT-CV5LED RDY MSTR FLT FAN1 LK AT PS1 S F P S F P PS-A PS-B RDY F X F F X X X X X LK AT S F P LK AT LK AT LK AT FD S F P T X T X RDY RDY REAR EXP. CONSOLE F LK AT RDY F X F LK AT S F P RDY S F P F X CONSOLE LK AT S F P F LK AT FD S F P T X T X RDY RDY LK AT LK AT FD T X RDY RDY LK AT LK AT T X RDY T X T X RDY RDY RDY RDY ML/SML FD/OAM ML/SML FD/OAM ML/SML FD/OAM LK AT FD T X RESET LINE/EXP SML ML SML ML ML/SML FD/OAM AT-8350GB SML ML OAM ML/SML FD/OAM SML ML SML ML OAM SML ML OAM CPU RESET FAN-A FAN-B AT-8524M 1 1 1 LINK 100 FULL SML ML 3 5 7 9 11 13 15 17 19 21 23 25 27 29 31 33 35 37 39 41 43 45 47 RPS PWR FAULT S AT-8524M 49 M S 50 M MODE 2 4 6 8 10 12 14 16 18 20 22 24 26 28 30 32 34 36 38 40 42 44 46 48 AT-8524M AT-8524M Twisted Pair Fiber Optic Figure 13. Back-to-Back Network Topology 37 Chapter 1: Overview 38 Chapter 2 Installation This chapter contains the following installation procedures for the AT-CV5000 chassis: “Reviewing Safety Precautions” on page 40 “Selecting a Site for the Chassis” on page 44 “Unpacking the Chassis” on page 45 “Installing the Power Cord Retaining Clip (AC Powered Chassis Only)” on page 46 “Installing the AT-CV5000 Chassis in a Rack” on page 48 “Grounding the AT-CV5000 Chassis” on page 50 “Installing a Converteon™ Line Card” on page 52 “Cabling a Converteon™ Line Card in an AT-CV5000 Chassis” on page 55 “Powering On an AC Powered Chassis” on page 60 “Powering On a DC Powered Chassis” on page 64 “Starting a Local Management Session” on page 67 “Starting a Remote Management Session” on page 70 39 Chapter 2: Installation Reviewing Safety Precautions Please review the following safety precautions before you begin to install the switch. Note The indicates that a translation of the safety statement is available in a PDF document titled “Translated Safety Statements” (613-000405) on the Allied Telesis website at www.alliedtelesis.com Warning: Class 1 Laser product. L1 Warning: Do not stare into the laser beam. L2 Warning: To prevent electric shock, do not remove the cover. No user-serviceable parts inside. This unit contains hazardous voltages and should only be opened by a trained and qualified technician. To avoid the possibility of electric shock, disconnect electric power to the product before connecting or disconnecting the LAN cables. E1 Warning: Do not work on equipment or cables during periods of lightning activity. E2 Warning: Class I Equipment. This equipment must be earthed. The power plug must be connected to a properly wired earth ground socket outlet. An improperly wired socket outlet could place hazardous voltages on accessible metal parts. E4 Pluggable Equipment. The socket outlet shall be installed near the equipment and shall be easily accessible. E5 Caution: Air vents must not be blocked and must have free access to the room ambient air for cooling. E6 Warning: Operating Temperature. This product is designed for a maximum ambient temperature of 40° degrees C. E7 All Countries: Install product in accordance with local and National Electrical Codes. E8 40 AT-CV5000 Media Converter Chassis Installation Guide Warning: As a safety precaution, install a circuit breaker with a minimum value of 15 Amps between the equipment and the DC power source. Always connect the wires to the LAN equipment first before you connect the wires to the circuit breaker. Do not work with HOT feeds to avoid the danger of physical injury from electrical shock. Always be sure that the circuit breaker is in the OFF position before connecting the wires to the breaker. E9 Warning: Do not strip more than the recommended amount of wire. Stripping more than the recommended amount can create a safety hazard by leaving exposed wire on the terminal block after installation. E10 Warning: When installing this equipment, always ensure that the frame ground connection is installed first and disconnected last. E11 Warning: Check to see if there are any exposed copper strands coming from the installed wire. When this installation is done correctly there should be no exposed copper wire strands extending from the terminal block. Any exposed wiring can conduct harmful levels of electricity to persons touching the wires. E12 This system works with positive grounded or negative grounded DC systems. E13 Circuit Overloading: Consideration should be given to the connection of the equipment to the supply circuit and the effect that overloading of circuits might have on overcurrent protection and supply wiring. Appropriate consideration of equipment nameplate ratings should be used when addressing this concern. E21 41 Chapter 2: Installation Caution: Risk of explosion if battery is replaced by an incorrect type. Replace only with the same or equivalent type recommended by the manufacturer. Dispose of used batteries according to the manufacturer’s instructions. Attention: Le remplacement de la batterie par une batterie de type incorrect peut provoquer un danger d’explosion. La remplacer uniquement par une batterie du même type ou de type équivalent recommandée par le constructeur. Les batteries doivent être éliminées conformément aux instructions du constructeur. E22 Warning: For centralized DC power connection, install only in a restricted access area. E23 A tray cable is required to connect the power source if the unit is powered by centralized DC power. The tray cable must be a UL listed Type TC tray cable and rated at 600 V and 90 degrees C, with three conductors, minimum 14 AWG. E24 Warning: Mounting of the equipment in the rack should be such that a hazardous condition is not created due to uneven mechanical loading. E25 Warning: Remove all metal jewelry, such as rings and watches, before installing or removing a line card from a powered-on chassis. E26 Warning: This unit might have more than one power source. To reduce the risk of electric shock, disconnect all power sources before servicing the unit. E30 If installed in a closed or multi-unit rack assembly, the operating ambient temperature of the rack environment may be greater than the room ambient temperature. Therefore, consideration should be given to installing the equipment in an environment compatible with the manufacturer’s maximum rated ambient temperature (Tmra). E35 Caution: Installation of the equipment in a rack should be such that the amount of air flow required for safe operation of the equipment is not compromised. E36 42 AT-CV5000 Media Converter Chassis Installation Guide Warning: Reliable earthing of rack-mounted equipment should be maintained. Particular attention should be given to supply connections other than direct connections to the branch circuits (e.g., use of power strips). E37 Warning: Circuit breaker is used as a disconnection device. To de-energize equipment, shut down the circuit breaker and then disconnect the input wire. E38 43 Chapter 2: Installation Selecting a Site for the Chassis Observe the following requirements when choosing a site for the chassis: 44 If you plan to install the chassis in an equipment rack, check to be sure that the rack is safely secured and that it will not tip over. Devices in a rack should be installed starting at the bottom, with the heavier devices near the bottom of the rack. The chassis is heavy and requires two people to install it. For the weight and dimensions of the chassis, see “Physical Specifications” on page 101. If you are installing the chassis on a table, be sure that the table is level and secure. The power outlet for the chassis should be located near the unit and should be easily accessible. The site should provide easy access to the ports both on the front and the rear of the chassis. This arrangement will make it easy for you to connect and disconnect cables as well as to view the LEDs. To allow proper cooling of the chassis, air flow around the unit and through its vents should be unrestricted. Allow 8 inches around the rear of the chassis for proper airflow. Do not place objects on top of the chassis. Do not expose the chassis to moisture or water. Make sure that the site is a dust-free environment. Use dedicated power circuits or power conditioners to supply reliable electrical power to the device. AT-CV5000 Media Converter Chassis Installation Guide Unpacking the Chassis To unpack the chassis, perform the following procedure: 1. Remove all components from the shipping package. Note Store the packaging material in a safe location. You must use the original shipping material if you need to return the unit to Allied Telesis. 2. Make sure that the following components are included in the package. If any item is missing or damaged, contact your Allied Telesis sales representative for assistance. One AT-CV5000 chassis Two rack-mounting brackets Eight flathead Phillips rack-mounting bracket screws Two power cord retaining clips Two single ground lugs One line card removal tool Documentation CD 3. Place the AT-CV5000 chassis on a level, secure surface. 45 Chapter 2: Installation Installing the Power Cord Retaining Clip (AC Powered Chassis Only) To install the power cord retaining clip on an AT-CV5000 chassis with an AT-PWR14 AC power supply, perform the following procedure: 1. Locate the power cord retaining clip which is shown in Figure 14. Figure 14. Power Cord Retaining Clip 2. Locate the retaining bracket on each side of the AC power connector on the rear of the chassis, as shown in Figure 15. AT-CVFAN A A 100- 240V AC~ WARN IN This un G reduce it might inputs the ris have mo before k of ele re tha servic ctric sho n one ing un ck, power discon input. it. nect To all po wer POW ER Bracket AT-P W R14 FAUL T 275 Figure 15. Power Cord Retaining Bracket 3. With the “u” of the clip facing up, press the sides of the clip toward the center and insert the short ends into the holes in the retaining bracket, as shown in Figure 16. AT-CVFAN A A 100- 240V AC~ WARN IN This un G reduce it might inputs the ris have mo before k of ele re tha servic ctric sho n one ing un ck, power discon input. it. nect To all po wer POW ER AT-P W R14 FAUL T 276 Figure 16. Inserting the Retaining Clip into the Retaining Bracket 46 AT-CV5000 Media Converter Chassis Installation Guide 4. Verify that the retaining clip is in the correct position, as shown in Figure 17. AT-CVFAN A A 100- 240V AC~ WARN IN This un G reduce it might inputs the ris have mo before k of ele re tha servic ctric sho n one ing un ck, power discon input. it. nect To all po wer POW ER AT-P W R14 FAUL T 277 Figure 17. Retaining Clip Properly Installed in the Bracket 47 Chapter 2: Installation Installing the AT-CV5000 Chassis in a Rack The chassis is shipped with two rack-mounting brackets. To mount the chassis in a rack, perform the following procedure: 1. Place the chassis on a level, secure surface. AT-CV5000 2. Attach the brackets to the sides of the chassis using four screws (provided) on each side, as shown in Figure 18 AT-CM 202 LK AT AT-CM 202 LK AT RDY MSTR FLT FAN1 PS1 PS-A RDY PS-B LK AT LK AT T X T X RDY ML/SML RDY FD/OAM ML/SML FD/OAM RESET FAN-A LINE/SF M FAN-B 236 Figure 18. Installing a Bracket to the Chassis 3. Mount the chassis in a 19-inch rack using appropriate screws (not provided), as shown in Figure 19. AT-C M 202 LK AT AT-C M 202 LK AT AT-C V5 LED RDY MSTR FAN1 FLT PS1 PSRDYA PS-B LK AT LK AT T X T X RDY ML/SML RDY FD/OAM ML/SML FD/OAM RESET FAN-A LINE/SFM FAN-B 237 Figure 19. Mounting the AT-CV5000 Chassis in a 19-inch Rack Caution: Air vents must not be blocked and must have free access to the room ambient air for cooling. E6 48 AT-CV5000 Media Converter Chassis Installation Guide Warning: Operating Temperature. This product is designed for a maximum ambient temperature of 40° degrees C. E7 All Countries: Install product in accordance with local and National Electrical Codes. E8 Circuit Overloading: Consideration should be given to the connection of the equipment to the supply circuit and the effect that overloading of circuits might have on overcurrent protection and supply wiring. Appropriate consideration of equipment nameplate ratings should be used when addressing this concern. E21 Warning: Mounting of the equipment in the rack should be such that a hazardous condition is not created due to uneven mechanical loading. E25 Warning: Remove all metal jewelry, such as rings and watches, before installing or removing a line card from a powered-on chassis. E26 Warning: This unit might have more than one power source. To reduce the risk of electric shock, disconnect all power sources before servicing the unit. E30 If installed in a closed or multi-unit rack assembly, the operating ambient temperature of the rack environment may be greater than the room ambient temperature. Therefore, consideration should be given to installing the equipment in an environment compatible with the manufacturer’s maximum rated ambient temperature (Tmra). E35 Caution: Installation of the equipment in a rack should be such that the amount of air flow required for safe operation of the equipment is not compromised. E36 Warning: Reliable earthing of rack-mounted equipment should be maintained. Particular attention should be given to supply connections other than direct connections to the branch circuits (e.g., use of power strips). E37 Warning: Circuit breaker is used as a disconnection device. To de-energize equipment, shut down the circuit breaker and then disconnect the input wire. E38 49 Chapter 2: Installation Grounding the AT-CV5000 Chassis To ensure the safe and proper operation of your AT-CV5000 chassis, you must ground the unit to a ground point using either of the frame ground connectors on the rear panel, as shown in Figure 20. REAR EXP. SLOT A 100-240VAC~ B B WARNING WARNING This unit might have more than one power input. To reduce the risk of electric shock, disconnect all power inputs before servicing unit. This unit might have more than one power input. To reduce the risk of electric shock, disconnect all power inputs before servicing unit. 100-240VAC~ AT-PWR14 AT-PWR14 POWER POWER FAULT FAULT Frame Ground Connectors AT-CVFAN AT-CVFAN A 1163 Figure 20. Frame Ground Connectors Grounding the chassis requires the following items: One ground lug (two are provided) One 12 AWG stranded wire or 14 AWG solid wire (not provided) Crimping tool (not provided) Warning When installing this equipment, always ensure that the frame ground connection is installed first and disconnected last. E11 To attach the frame ground, perform the following procedure: 1. Use a crimping tool to affix the ground lug to one end of the 12 AWG stranded or 14 AWG solid ground wire, as shown in Figure 21. 707 Figure 21. Connecting the Wire to the Ground Lug 2. Remove the lock nut from either frame ground stud on the rear panel of the AT-CV5000 chassis. 3. Place the ground lug on the frame ground stud where you removed the lock nut. 50 AT-CV5000 Media Converter Chassis Installation Guide The frame ground stud for power supply A is shown in Figure 22. AT-CVFAN A A 100240V AC~ WAR NI This NG reducunit migh inputse the ris t have befor k of elemore tha e servi ctric n cing shock,one powe unit. disco r inp nnec ut. To t all powe r AT-P W R14 POW ER FAULT Figure 22. Placing the Ground Lug on the Frame Ground Stud 4. Secure the ground lug with the lock nut you removed in Step 2, as shown in Figure 23. AT-CVFAN A A 100240V AC~ WAR NI This NG reducunit migh inputse the ris t have befor k of elemore tha e servi ctric n cing shock,one powe unit. disco r inp nnec ut. To t all powe r AT-P W POW ER FAULT R14 Figure 23. Securing the Ground Lug with Lock Nut 5. Attach the other end of the ground wire to an appropriate ground (earth). 6. Install a ground wire to the other frame ground stud repeating steps 1 through 5. 51 Chapter 2: Installation Installing a Converteon™ Line Card To install a Converteon™ line card, perform the following procedure: Note The Converteon™ line cards can be installed in any line card slots located in the front panel of the AT-CV5000 chassis. Note For more information about the Converteon™ line cards, refer to “Converteon™ Line Cards” on page 28. Warning: Remove all metal jewelry, such as rings and watches, before installing or removing a line card from a powered-on chassis. E26 Caution Be sure to observe all standard electrostatic discharge (ESD) precautions, such as wearing an antistatic wrist strap, to avoid damaging the device. A line card can be damaged by static electricity. 1. Remove the Converteon™ line card from its shipping package and store the package in a safe place. Note You must use the original package if you need to return the unit to Allied Telesis. 2. Select the line card slot in the AT-CV5000 chassis where you want to install the line card. 3. Remove the AT-CV5PNL1 blank slot cover from the selected slot. Keep the blank slot cover in a safe area in case you remove the line card. The blank slot cover is used to keep dust from getting into the chassis and maintains proper airflow, cooling, and ventilation throughout the chassis. 4. Set the line card’s DIP switches. For more information about the DIP switch settings, refer to the Converteon™ Media Converter Line Cards Reference Guide. 52 AT-CV5000 Media Converter Chassis Installation Guide 5. Locate the top and bottom alignment guides inside the line card slots, as shown in Figure 24. Alignment Guides 6 7 8 9 10 11 12 13 290 Alignment Guides Figure 24. Location of the Alignment Guides 6. Align the line card with the top and bottom alignment guides located inside the slot. 7. Slide the line card into the slot, as shown in Figure 25, until the slot cover is flush with the front of the chassis. 7 8 9 10 AT-C M20 2 LK AT T X M M R X LK AT FD T X 247 RDY SML ML OAM Figure 25. Inserting a Line Card 53 Chapter 2: Installation 8. Use a Phillips screwdriver to tighten the captive screw on the line card, as shown in Figure 26. AT-C M2 02 LK AT T X M M R X LK AT FD T X T X RDY SML ML OA M 249 Figure 26. Tightening the Captive Screw Note Always tighten the captive screw to secure the line card to the chassis. If you purchased an AT-CV5M01 Management Card for the chassis, go to “Working with the AT-CV5M01 Management Card” on page 76. If you purchased additional line cards, repeat this procedure to install the card. Otherwise, go to “Cabling a Converteon™ Line Card in an AT-CV5000 Chassis” on page 55. 54 AT-CV5000 Media Converter Chassis Installation Guide Cabling a Converteon™ Line Card in an AT-CV5000 Chassis Perform the following procedures to connect to the ports that come with the line cards and/or other modules. Note For a current list of line cards for the Converteon™ Series Chassis, refer to the Allied Telesis web site or consult your authorized sales representative. For detailed descriptions of these line cards, refer to the documentation shipped with the line cards and/or the Converteon™ Media Converter Line Cards Reference Guide. Cabling a Fiber Optic Port When attaching a fiber optic cable, be sure to observe the following guidelines: Be sure that the cable connector is firmly locked into place in the port. You should verify that you are using the appropriate type of fiber optic cabling. You should verify that the operating specifications of the converter’s fiber optic port are compatible with the fiber optic port on the remote end node. For example, you cannot connect a fiber optic port with a maximum distance of 500 meters (1,640 feet) and an operating wavelength of 1310 nm to another fiber optic port that has a maximum distance of 20 kilometers (12.4 miles) and an operating wavelength of 1550 nm. Caution Make sure to measure the optical power prior to connecting the cables. High optical power can potentially damage the optical receiver. Cabling a Dual SC Port Dual SC port, shown in Figure 27, consists of two separate connectors. Each connects to a separate fiber strand. One is for receiving data and the other is for transmitting data. When connecting a fiber optic cable to a SC port, be sure that the receiver fiber connector is connected to the transmitter connector on the remote end node, and the transmitter fiber 55 Chapter 2: Installation connector is connected to the receiver connector on the remote node. TX Transmitting Fiber Connector 1 Receiving Fiber Connector RX Figure 27. Dual SC Port To connect a fiber optic cable to a dual SC connector, perform the following procedure: Warning: Class 1 Laser product. L1 Warning: Do not stare into the laser beam. L2 1. Remove the dust cover from the fiber optic port, as shown in Figure 28. T X M M R X LK AT FD T X 284 Figure 28. Removing the Dust Cover from a Dual SC Fiber Optic Port 2. Connect the appropriate optical cable to the port, as shown in Figure 29. LK AT T X M M R X LK T AT FD 285 Figure 29. Connecting to the Dual SC Fiber Optic Port 3. Connect the other end of the optical cable to the link partner. 4. Power ON the end nodes. 56 AT-CV5000 Media Converter Chassis Installation Guide 5. When the connection is established, the LK LED for the fiber optic port should show green. If the LED is OFF, refer to “Troubleshooting” on page 95 for instructions. Cabling a Simplex SC Connector To connect a fiber optic cable to a simplex SC connectors, perform the following procedure: Warning: Class 1 Laser product. L1 Warning: Do not stare into the laser beam. L2 Remove the dust cover from the simplex fiber optic port, as shown in Figure 30. LK AT LK AT FD T 587 Figure 30. Removing the Dust Cover from a Simplex SC Fiber Optic Port 6. Connect the appropriate optical cable to the port, as shown in Figure 31. LK AT LK T AT FD 581 Figure 31. Connecting to the Simplex SC Fiber Optic Port 7. Connect the other end of the optical cable to the link partner. 8. Power ON the end nodes. 9. When the connection is established, the LK LED for the fiber optic port should show green. If the LED is OFF, refer to “Troubleshooting” on page 95 for instructions. 57 Chapter 2: Installation Cabling a Twisted Pair Port When you connect a twisted pair cable to a port, observe the following guidelines: An RJ-45 connector should fit snugly into the port on the converter. The tab on the connector should lock the connector into place. You can use a straight-through or crossover twisted pair cable to connect any type of network device to a port on the converter. To connect to the 10/100Base-TX port, perform the following procedure: 1. Connect the twisted pair cable to the twisted pair port, as shown in Figure 32. LK AT FD LK A CPU RE T X SET RDY ML/SM L F 245 Figure 32. Connecting to the Twisted Pair Port 2. Connect the other end of the RJ-45 cable to the link partner. 3. Power ON the end nodes. When the connection is established, the LK LED for the 10/100BaseTX port should show green. If the LED is OFF, refer to “Troubleshooting” on page 95 for instructions. Cabling an SFP Transceiver To connect a fiber optic cable to an SFP transceiver, perform the following procedure: Warning: Class 1 Laser product. L1 Warning: Do not stare into the laser beam. L2 1. Insert the SFP transceiver into the SFP slot on the line card, as shown 58 AT-CV5000 Media Converter Chassis Installation Guide in Figure 33. S F P LK AT FD T X 534 Figure 33. Inserting an SFP Transceiver into the SFP Slot Note For information about the proper cable type, refer to the SFP transceiver installation instructions. Note Before you install the cable in the SFP transceiver, verify that the optical power input to the transceiver is within its dynamic range. 2. Remove the dust cover from the SFP transceiver in the line card, as shown in Figure 34. S F P LK AT FD T X 535 Figure 34. Removing the Dust Cover from the SFP Transceiver 3. Connect the fiber optic cable to the SFP transceiver, as shown in Figure 35. S F P LK AT FD T X 579 Figure 35. Connecting Fiber Optic Cables to the SFP Transceiver 59 Chapter 2: Installation Powering On an AC Powered Chassis This section describes how to power on an AC powered AT-CV5000 chassis. If your chassis is DC powered, see “Powering On a DC Powered Chassis” on page 64. Note The AT-CV5000 chassis is shipped without any power supplies installed. You must install at least one power supply in order to power on the chassis. For information about installing an AC power supply, refer to “Installing an AT-PWR14 AC Power Supply” on page 82. Caution The AT-CV5000 Media Converter chassis can contain two power supplies of the same type (AC or DC) or a combination of the two versions with the same power ratings. Make sure not to mix power supplies with different power ratings in the same chassis. For information on the power supply module, refer to the documentation that is shipped with the module. Note The AT-PWR14 AC power supply is shipped with four power cords, one each for North America, the UK, Europe, and Australia. Locate the correct power cord for your location before beginning this procedure. To power on an AC powered chassis, perform the following procedure: 1. Make sure that the ON/OFF power switch is in the OFF position, as shown in Figure 36. AT-CVFAN A B A 100-24 0VA C~ AT-P W WAR POWE R FAULT R14 100 -240VA C~ r POWE R FAULT B AT-CV5FAN This NING redu unit migh ce inpu the riskt have more ts befo of re servielectric than one cing shock, powe unit. disco r inpu nnec t. To t all powe AT-P W R14 1131 277 PWR A PWR B Figure 36. ON/OFF Power Switch in OFF Position 60 AT-CV5000 Media Converter Chassis Installation Guide 2. Position the power cord retaining clip in the up position, as shown in Figure 37. A AT-CVFAN B A 100-24 0VA C~ AT-P W WAR This NING redu unit migh ce inpu the riskt have more ts befo of re servielectric than one cing shock, powe unit. disco r inpu nnec t. To t all powe 100 R14 B -240VA C~ AT-CV5FAN POWE R FAULT r AT-P W R14 POWE R FAULT 1132 278 PWR A PWR B Figure 37. Power Cord Retaining Clip in the Up Position 3. Select the power plug that is correct for your region: North America, UK, Europe, or Australia. 4. Plug the power cord into the AC power connector on the rear of the chassis, as shown in Figure 38. AT-CVFAN A B A 100-24 0VA C~ AT-P W WAR This NING redu unit migh ce inpu the riskt have more ts befo of re servielectric than one cing shock, powe unit. disco r inpu nnec t. To t all powe r R14 100 B -240VA C~ AT-CV5FAN POWE R FAULT AT-P W R14 POWE R FAULT 1133 279 PWR A PWR B Figure 38. Connecting the AC Power Cord 5. Secure the cord by lowering the power cord retaining clip, as shown in Figure 39. AT-CVFAN A B A 100-24 0VAC ~ WARN ING This redu unit might ce inpu the risk have mor ts befo of e re servelectric than one icing shock, power unit. disc inpu onnect t. To all pow POWE R FAUL T B 100-2 40VA C~ AT-CV5FAN POWE R FAUL T er AT-P WR1 4 AT-P WR1 4 1134 280 PWR A PWR B Figure 39. Securing the Power Cord with the Retaining Clip 61 Chapter 2: Installation 6. Turn the ON/OFF power switch of the installed power supply module to the ON position, as shown in Figure 40. B NG A 100240V AC~ WAR This NING reducunit migh inputse the ris t h befor k o e ser Power Switches to ON Position migh he ris t have mo efore k of electr re than servic ic sh one po ing un ock, dis wer it. conn input. To ect all powe r AC 100- 240V AC~ POW ER FAULT 518 PWR A 1135 PWR B Figure 40. ON/OFF Power Switch in ON Position 7. Plug the other end of the power adapter to a power outlet. If you purchased a second AT-PWR14 AC power module, repeat this procedure to install the additional module. Refer to “Technical Specifications” on page 101 for power requirements. Caution To further protect the AT-CV5000 chassis, connect each AC power cord to power sources that are operating on different power circuits. This arrangement protects the chassis from a power loss if one of the power circuits fails. Warning This unit might have more than one power source. To reduce the risk of electric shock, disconnect all power cords before servicing the unit. E30 Warning Class I Equipment. This equipment must be earthed. The power plug must be connected to a properly wired earth ground socket outlet. An improperly wired socket outlet could place hazardous voltages on accessible metal parts. E4 8. Check that the POWER LED on the AT-PWR14 AC power module is green. If the POWER LED is OFF or the FAULT LED is ON, refer to “Troubleshooting” on page 95 for instructions. The chassis is now ready for network operations. No further installation steps are required if you do not need to change the 62 AT-CV5000 Media Converter Chassis Installation Guide default parameter settings of the chassis, which are listed in the AT-S70 Management Software User’s Guide. However, if you want to manage the chassis or review the settings, refer to “Starting a Local Management Session” on page 67 and “Starting a Remote Management Session” on page 70. 63 Chapter 2: Installation Powering On a DC Powered Chassis This section describes how to power on a DC powered AT-CV5000 chassis. If your chassis is AC powered, see “Powering On an AC Powered Chassis” on page 60. For information about how to install the power supply, refer to “Installing an AT-PWR15 DC Power Supply” on page 84. Warning: As a safety precaution, install a circuit breaker with a minimum value of 15 Amps between the equipment and the DC power source. Always connect the wires to the LAN equipment first before you connect the wires to the circuit breaker. Do not work with HOT feeds to avoid the danger of physical injury from electrical shock. Always be sure that the circuit breaker is in the OFF position before connecting the wires to the breaker. E9 Warning: For centralized DC power connection, install only in a restricted access area. E23 A tray cable is required to connect the power source if the unit is powered by centralized DC power. The tray cable must be a UL listed Type TC tray cable and rated at 600 V and 90 degrees C, with three conductors, minimum 14 AWG. E24 1. Make sure that the ON/OFF power switch is in the OFF position. 2. Locate the two DC terminal blocks, labeled A and B, on the rear panel of the chassis. 3. Starting from the left side of a terminal block, identify the positive, power supply ground and negative terminals using the symbols below the terminal block in Figure 41. A 40-60VDC INPUT 40-60VDC 1136 PWR A Figure 41. DC Terminal Block 64 250 PWR B AT-CV5000 Media Converter Chassis Installation Guide 4. With a 14-gauge wire-stripping tool, strip the three wires in the tray cable coming from the DC input power source to 8mm ± 1mm (0.31 in., ± 0.039 in.), as shown in Figure 42 on page 65. Warning Do not strip more than the recommended amount of wire. Stripping more than the recommended amount can create a safety hazard by leaving exposed wire on the terminal block after installation. E10 8mm ±1mm (0.31in. ±0.039in.) Figure 42. Stripped Wire 5. Connect the power supply ground wire into the middle of the three terminals; this is the terminal marked with the ground symbol. Inserting the wire into the terminal and tightening the connection with a flathead screwdriver, as shown in Figure 43. Warning When installing this equipment, always ensure that the power supply ground connection is installed first and disconnected last. E11 REAR EXP. SLOT A B B WARNING This unit might have more than one power input. To reduce the risk of electric shock, disconnect all power 40-60VDC WARNING FOR CENTRALIZED DC POWER CONNECTION, INSTALL ONLY IN A RESTRICTED AREA. This unit might have more than one power input. To reduce the risk of electric shock, disconnect all power FOR CENTRALIZED DC POWER CONNECTION, INSTALL ONLY IN A RESTRICTED AREA. AT-PWR15 AT-PWR15 POWER POWER FAULT FAULT 40-60VDC AT-CVFAN AT-CVFAN A 1124 PWR A A re t INGht have mo c s mig of electri WARN unit This the risk reduce DC 40-60V AT-P R POWE T FAUL 65 Chapter 2: Installation A B B WARNING This unit might have more than one power input. To reduce the risk of electric shock, disconnect all power inputs before servicing unit. 40-60VDC WARNING FOR CENTRALIZED DC POWER CONNECTION, INSTALL ONLY IN A RESTRICTED AREA. This unit might have more than one power input. To reduce the risk of electric shock, disconnect all power inputs before servicing unit. FOR CENTRALIZED DC POWER CONNECTION, INSTALL ONLY IN A RESTRICTED AREA. AT-PWR15 AT-PWR15 POWER POWER FAULT FAULT 40-60VDC AT-CVFAN AT-CVFAN A 256 B e pow isconner input. ect all To pow er WR1 5 PWR B FOR CE CONN NTRA A RE ECTIO LIZED DC STRIC N, INS TA POWE TED AREALL ONLY R . IN Figure 43. Inserting Wires into a DC Terminal Block 6. Connect the +48 VDC (RTN) feed wire to the terminal block marked + (plus). 7. Connect the -48 VDC feed wire to the terminal block marked - (minus). Warning: Check to see if there are any exposed copper strands coming from the installed wires. When this installation is done correctly there should be no exposed copper wire strands extending from the terminal block. Any exposed wiring can conduct harmful levels of electricity to persons touching the wires. E12 8. Secure the tray cable near the rack framework using multiple cable ties to minimize the chance of the connections being disturbed by casual contact with the wiring. Use at least four cable ties, separated four inches apart. Locate the first one within six inches of the terminal block. This system will work with a positive grounded or negative grounded DC system. E13 9. Ensure that the circuit breaker is in the OFF position. 10. Connect the supply-cable wires to the circuit breaker. 11. Energize the circuit breaker. 12. Turn the power switch to the ON position. If you installed an optional redundant power supply, repeat this procedure to attach DC wires to the second terminal block. 66 AT-CV5000 Media Converter Chassis Installation Guide Starting a Local Management Session The procedure in this section explains how to start a local management session using the RS-232 terminal port on an AT-CV5M01 Management Card or the 8-pin Mini-DIN port on an AT-CM70S line card installed in the chassis. Note If an AT-CM70S line card is installed in an AT-CV5000 chassis, you can manage the card either through its console port or through the AT-CV5M01 Management Card. Note Only one manager can log in at a time. To start a local management session using the RS-232 terminal port on an AT-CV5M01 Management Card or the 8-pin Mini-DIN on an AT-CM70S line card, perform the following procedure: 1. Do one of the following: a. Connect one end of the RS-232 straight-through management cable to the RS-232 terminal port on the front of the AT-CV5M01 Management Card, as shown in Figure 44. T LK AT FD 244 Figure 44. Connecting a Management Cable to the RS-232 Terminal Port on an AT-CV5M01 Management Card b. Connect the 8-pin Mini-DIN end of the management cable to the RS-232 console port on the front of the AT-CM70S line card, as shown in Figure 45 on page 67. F P 1 CPU RES ET C O N S O L E 2 RCL NML LOTC NML L/A FD 100 T X 3 4 RDY AIS 1 2 910 Figure 45. Connecting a Management Cable to the RS-232 Console Port 67 Chapter 2: Installation on an AT-CM70S Line Card 2. Connect the other end of the cable to an RS-232 port on a terminal or a personal computer with a terminal emulation program. 3. Set the terminal or terminal emulation program to the following defaults: Baud rate: 115200 bps Data bits: 8 Parity: None Stop bits: 1 Flow control: None Note The settings are for a DEC VT100 or ANSI terminal, or an equivalent terminal emulation program. The software initializes and then the login prompt is displayed. 4. When prompted, enter a username and password. To configure the chassis settings, enter “manager” as the username. The default password for manager access is “friend”. To just view the settings, enter “operator” as the username. The default password for operator access is “operator”. Usernames and passwords are case-sensitive. The Main Menu is displayed, as shown in Figure 46. Allied Telesis AT-CV5M01 Management Module Software CV-5000 Chassis Main Menu Module Status and Configuration Remote Module Status and Configuration Administration Image Download System Configuration Quit Figure 46. AT-S70 Main Menu 68 AT-CV5000 Media Converter Chassis Installation Guide Refer to the AT-S70 Management Software User’s Guide for information about how to move through the menus and make menu selections. 69 Chapter 2: Installation Starting a Remote Management Session The procedure in this section explains how to start a remote management session using the 10/100Base-TX port on the AT-CV5M01 Management Card on the chassis. You can use a remote management session to configure the chassis operating parameters and view performance and error statistics using the AT-S70 management software. To manage a chassis remotely, you must first assign an IP address to it. For information about assigning an IP address to the system, refer to Chapter 1, “Getting Started,” in the AT-S70 Management Software User’s Guide. To start a remote management session, perform the following procedure: 1. Connect a twisted pair cable to the 10/100Base-TX port on the front of the AT-CV5M01 Management Card, as shown in Figure 47. LK AT FD LK A CPU RE T X SET RDY ML/SM L F 245 Figure 47. Connecting a Twisted Pair Cable to the 10/100Base-TX Port on the AT-CV5M01 Management Card Note The RJ-45 port runs in MDIX mode. Be sure to use the proper cable. The connector and port pinouts are shown in “RJ-45 Twisted Pair Port Pinouts” on page 103. 2. In the Telnet application, specify the IP address of the AT-CV5000 chassis that you want to access. The software initializes and then the login prompt is displayed. 3. Press <Return> twice. 4. When prompted, enter a username and password. 70 To configure the chassis settings, enter “manager” as the username. The default password for manager access is “friend”. To just view the settings, enter “operator” as the username. The default password for operator access is “operator”. AT-CV5000 Media Converter Chassis Installation Guide Usernames and passwords are case-sensitive. Refer to the AT-S70 Management Software User’s Guide for information about how to move through the menus and make menu selections. 71 Chapter 2: Installation 72 Chapter 3 Working with Line Cards and other Modules This chapter contains the following installation procedures for line cards and other modules in the AT-CV5000 chassis: “Removing a Converteon™ Line Card” on page 74 “Working with the AT-CV5M01 Management Card” on page 76 “Installing an AT-CM70S Line Card” on page 79 “Resetting the Line Cards and the Module in the Rear Expansion Slot” on page 81 “Installing an AT-PWR14 AC Power Supply” on page 82 “Installing an AT-PWR15 DC Power Supply” on page 84 “Replacing an AT-CVFAN Module” on page 86 “Installing a Blank Slot Cover” on page 90 73 Chapter 3: Working with Line Cards and other Modules Removing a Converteon™ Line Card To remove a Converteon™ line card, perform the following procedure: Caution Be sure to observe all standard electrostatic discharge (ESD) precautions, such as wearing an antistatic wrist strap, to avoid damaging the device. A line card can be damaged by static electricity. 1. Select the line card in the AT-CV5000 chassis you want to remove. 2. Using a Phillips screwdriver, loosen the captive screws at the top of the installed line card. 3. Locate the line card removal tool, as shown in Figure 48. 1137 Figure 48. Line Card Removal Tool 4. Hook the slot at the end of the removal tool onto the captive screw at the top of the line card, and pull towards you to remove the card from the chassis, as shown in Figure 49. AT-C M20 2 LK AT LK AT T X RDY ML/SML FD/OAM 1138 Figure 49. Removing a Line Card from an AT-CV5000 Chassis 5. Install an AT-CV5PNL1 blank slot cover in the empty slot, as described in “Installing an AT-CV5PNL1 Blank Slot Cover” on page 90. 74 AT-CV5000 Media Converter Chassis Installation Guide Note The blank slot cover prevents dust from getting into the chassis and maintains proper airflow, cooling, and ventilation throughout the chassis. 75 Chapter 3: Working with Line Cards and other Modules Working with the AT-CV5M01 Management Card This section contains the following procedures: Installing an AT-CV5M01 Management Card “Installing an AT-CV5M01 Management Card,” next “Resetting an AT-CV5M01 Management Card” on page 77 “Replacing an AT-CV5M01 Management Card” on page 78 This section describes how to install an AT-CV5M01 Management Card. Note The AT-CV5M01 Management Card is hot-swappable. You can install it without powering off the Converteon™ chassis. Warning: Remove all metal jewelry, such as rings and watches, before installing or removing a line card from a powered-on chassis. E26 Caution: Be sure to observe all standard electrostatic discharge (ESD) precautions, such as wearing an antistatic wrist strap, to avoid damaging the device. A line card can be damaged by static electricity. To install an AT-CV5M01 Management Card, perform the following procedure: 1. Remove the AT-CV5M01 Management Card from its shipping package and store the package in a safe place. Note You must use the original package if you need to return the unit to Allied Telesis. 2. Select any line card slot in the AT-CV5000 chassis where you want to install the management card and remove the slot cover, if installed. 3. Align the back edge of the management card with the top and bottom alignment guides located inside the slot. Note Avoid touching the line card components. 76 AT-CV5000 Media Converter Chassis Installation Guide 4. Slide the management card into the slot, as shown in Figure 50, until the front of the card is flush with the front of the chassis. 7 8 9 10 AT-C V5M 01 PWR RDY FLT LK AT FD 241 CPU RE SET Figure 50. Inserting the AT-CV5M01 Management Card 5. Secure the AT-CV5M01 Management Card to the chassis by using a Phillips screwdriver to tighten the captive screw on the management card faceplate, as shown in Figure 51. AT-C V 5M01 PWR RDY FLT LK AT FD CPU RE SET 243 Figure 51. Tightening the Captive Screw Note Always tighten the captive screw to secure the management card to the chassis. Leaving a management card partially seated may cause the CPU to halt and subsequently crash. Resetting an AT-CV5M01 Management Card To reset the AT-CV5M01 Management Card, perform the following procedure. 1. Locate the CPU RESET button which is recessed in the front panel of the AT-CV5M01 Management Card. 77 Chapter 3: Working with Line Cards and other Modules Note This CPU RESET resets only the management card, and does not reset the line cards and/or the module installed in the expansion slot at the rear of the chassis. You may need to reset the management card after upgrading the firmware or after you have made a configuration change that requires resetting the module to implement the change. 2. Press the reset button with the tip of a pen or a non-conductive pointed object, as shown in Figure 52. AT-C V 5M0 PWR LK 1 RDY FLT AT FD CPU RE SET 519 Figure 52. Resetting the AT-CV5M01 Management Card Replacing an AT-CV5M01 Management Card When an AT-CV5M01 Management Card is replaced, all the parameter settings saved on the management card are lost. To keep the current parameter settings, upload the configuration file onto a TFTP server before replacing the AT-CV5M01 Management Card. After a new AT-CV5M01 Management Card is installed, you can download the configuration file onto the new management card. For instructions on how to upload and download a configuration file, refer to Chapter 10, “File Downloads and Uploads” in the AT-S70 Software Management User’s Guide. 78 AT-CV5000 Media Converter Chassis Installation Guide Installing an AT-CM70S Line Card The AT-CM70S line card is a double-slot line card that takes up two line card slots in the chassis. Therefore, the process for installing this card differs slightly from the process for installing other Converteon™ line cards. Warning: Remove all metal jewelry, such as rings and watches, before installing or removing a line card from a powered-on chassis. E26 Caution Be sure to observe all standard electrostatic discharge (ESD) precautions, such as wearing an antistatic wrist strap, to avoid damaging the device. A line card can be damaged by static electricity. To install an AT-CM70S line card, perform the following procedure: 1. Remove the AT-CM70S line card from its shipping package and store the package in a safe place. Note You must use the original package if you need to return the unit to Allied Telesis. 2. Remove the AT-CV5PNL1 blank slot covers from two adjacent line card slots. Keep the blank slot covers in a safe area in case you remove the line card. The blank slot covers are used to keep dust from getting into the chassis and maintains proper airflow, cooling, and ventilation throughout the chassis. 3. Locate the top and bottom alignment guides inside the line card slots, as shown in Figure 24 on page 53. 4. Set the line card’s DIP switches. For more information on the DIP switch settings, refer to the Converteon™ Media Converter Line Cards Reference Guide. 5. Align the back edge of the line card with the top and bottom alignment guides located inside the slot. 79 Chapter 3: Working with Line Cards and other Modules 6. Slide the AT-CM70S line card into the two slots, as shown in Figure 53, until the line card is flush with the front of the chassis. 7 8 9 10 AT-C M7 LK OA M 0S T1/E1 S F P 1 CPU RE SET C O N S O L E 2 RCL NML LOTC NML L/A FD 100 3 4 T X RDY AIS 1 2 3 4 TEST 1 2 3 4 907 Figure 53. Inserting an AT-CM70S Line Card 7. Use a Phillips screwdriver to tighten the captive screw on the line card, as shown in Figure 54. AT-CM 7 0S LK OA M T1/E1 S F P 1 CPU RE SET C O N S O L E 2 RCL NML LOTC NML L/A FD 100 T X 3 4 RDY AIS 1 2 3 4 TEST 1 2 3 4 909 Figure 54. Tightening the Captive Screw on the AT-CM70S Line Card Note Always tighten the captive screw to secure the line card to the chassis. 80 AT-CV5000 Media Converter Chassis Installation Guide Resetting the Line Cards and the Module in the Rear Expansion Slot To reset the line cards and the module in the rear expansion slot, perform the following procedure: 1. Locate the RESET LINE/EXP button, which is recessed on the front panel of the LED interface card. Note This RESET LINE/EXP button located on the LED interface card allows you to reset the line cards in the front of the chassis and any module in the rear expansion slot. This button does not reset any management cards in the chassis. 2. Press the reset button with the tip of a pen or a non-conductive pointed object, as shown in Figure 55. AT-C V5 LED RDY MS FAN1 TR FLT PS1 PS-A RDY PS-B REAR SLOT CONSOLE RESET FAN-A LINE/E XP FAN-B 261 Figure 55. Resetting Converteon™ Line Cards/Rear Expansion Module 81 Chapter 3: Working with Line Cards and other Modules Installing an AT-PWR14 AC Power Supply The AT-CV5000 chassis is shipped with two slots in the rear designated for the power supplies, but without any power supplies installed. You must install at least one power supply in order to power on the chassis. Caution The AT-CV5000 Media Converter chassis can contain two power supplies of the same type (AC or DC) or a combination of the two types with the same power ratings. Make sure not to mix power supplies with different power ratings in the same chassis. For information on the power supply module, refer to the documentation that is shipped with the module. Note You can install an additional AT-PWR14 AC power supply while the existing power supply is powered ON. Note The AT-PWR14 AC power supply is shipped with four power cords, one each for North America, the UK, Europe, and Australia. Locate the correct power cord for your location before beginning this procedure. To install the AT-PWR14 AC power supply, perform the following procedure: 1. Remove the AT-PWR14 AC power supply from its shipping package and store the package in a safe place. Note You must use the original package if you need to return the unit to Allied Telesis. 2. Select the power supply slot in the AT-CV5000 chassis where you want to install the AT-PWR14 AC power supply. 3. Make sure that the power switch for that slot is in the OFF position. 4. Remove any slot cover that may be covering that slot. 82 AT-CV5000 Media Converter Chassis Installation Guide 5. Slide the AT-PWR14 power supply into the selected slot, as shown in Figure 56, until the module is flush with the front of the chassis. A A 100 -240VA C~ B WAR This NING redu unit migh ce the t have risk more of elect than ric shoc one powe k, disco r inpu nnec t. To t all powe 100 r AT-P W FAU LT POWE R FAU LT AT-CV5FAN POWE R B -240VA C~ AT-P W R14 R14 1129 209 PWR B PWR A Figure 56. Inserting the AT-PWR14 AC Power Supply 6. Secure the AT-PWR14 AC power supply to the AT-CV5000 chassis by using a Phillips screwdriver to tighten the captive screws, as shown in Figure 57. AT-CVFAN A A 100 100 -240VA -24 0VA C C~ ~ B WAR This NING unit risk of migh servi electric t have more cing unit. shock, discothan one nnect powe all power input r input. To reduc s befor e the e 100 -240VA C~ POWE R FAULT R14 POWE R FAU LT B AT-CV5FAN AT-P W AT-P W R14 1129 212 PWR A PWR B Figure 57. Securing the AT-PWR14 AC Power Supply For information about powering on an AC-powered chassis and starting a management session, refer to “Powering On an AC Powered Chassis” on page 60. 83 Chapter 3: Working with Line Cards and other Modules Installing an AT-PWR15 DC Power Supply The AT-CV5000 chassis is shipped with two slots in the rear designated for the power supplies, but without any power supplies installed. You must install at least one power supply in order to power on the chassis. Caution The AT-CV5000 Media Converter chassis can contain two power supplies of the same type (AC or DC) or a combination of the two types with the same power ratings. Make sure not to mix power supplies with different power ratings in the same chassis. For information on the power supply module, refer to the documentation that is shipped with the module. Note You can install an additional AT-PWR15 DC power supply while the existing power supply is powered ON. To install an AT-PWR15 DC power supply, perform the following procedure: 1. Remove the AT-PWR15 DC power supply from its shipping package and store the package in a safe place. Note You must use the original package if you need to return the unit to Allied Telesis. 2. Select the power supply slot in the AT-CV5000 chassis where you want to install the AT-PWR15 DC power supply. 3. Turn the power switch OFF. 4. Remove any slot cover that may be covering that slot. 84 AT-CV5000 Media Converter Chassis Installation Guide 5. Slide the AT-PWR15 DC power supply into the selected slot, as shown in Figure 58, until the module is flush with the front of the chassis. A A 40-6 0VD C WARNI NG This unit redu migh ce inpu the riskt have more ts befo of re servelectric than one icing shock, powe unit. disco r inpu nnec t. To t all powe r WAR This NING reducunit migh input e the riskt have more s befor of e servielectric than one cing shock, powe unit. disco r input nnec . t all To powe FOR CEN CON TRA NEC LIZE A RES TIO N, INSD DC POW TRICTE TAL D ARE L ONLER Y IN A. B r FOR CEN CON TRA NEC A RES TIONLIZED DC TRIC , INST POW ALL TED ER ONL ARE Y IN A. B AT-P W FAU LT R15 POWE R FAU LT AT-P AT-CV5FAN POWE R WR 15 1225 216 PWR A PWR B Figure 58. Inserting the AT-PWR15 DC Power Supply 6. Secure the AT-PWR15 module to the AT-CV5000 chassis by using a Phillips screwdriver to tighten the captive screws, as shown in Figure 59. A A WAR 40-6 0VD C This NING reducunit migh input e the riskt have more s befor of e servielectric than one cing shock, powe unit. disco r input nnec . t all To powe WARNI NG This unit redu migh ce inpu the riskt have more ts befo of re servelectric than one icing shock, powe unit. disco r inpu nnec t. To t all powe r AT-P W B FOR CEN CON TRA NEC A RES TIONLIZED DC TRIC , INST POW ALL TED ER ONL ARE Y IN A. r AT-P R15 POWE R FAULT B WR1 5 1227 PWR A AT-CV5FAN POWE R FAULT FOR CEN CON TRA NEC LIZE A RES TIO N, INSD DC POW TRICTE TAL D ARE L ONLER Y IN A. 220 PWR B Figure 59. Securing the AT-PWR15 DC Power Supply For information about powering on an DC-powered chassis and starting a management session, refer to “Powering On a DC Powered Chassis” on page 64. 85 Chapter 3: Working with Line Cards and other Modules Replacing an AT-CVFAN Module This section provides instructions for replacing an AT-CVFAN fan module if one fails. Caution For normal operation, the chassis must have two operational fans. Caution The AT-CVFAN modules are field-replaceable; however, they are not hot-swappable. Therefore, make sure to power OFF the chassis before installing the fan modules. Caution Be sure to observe all standard electrostatic discharge (ESD) precautions, such as wearing an antistatic wrist strap, to avoid damaging the device. A fan module can be damaged by static electricity. Warning Remove jewelry before replacing the fan modules. Warning Watch your fingers when handling the fan modules. Warning To avoid electric shock, do not touch the inside of the fan slots. To replace an AT-CVFAN module, perform the following procedure: 1. Power OFF the chassis. 2. Using a Phillips screwdriver, loosen the captive screws at the top and bottom of the installed fan module faceplate. 86 AT-CV5000 Media Converter Chassis Installation Guide 3. Pull the loosened screws to slide the fan out of the chassis, as shown in Figure 60 or Figure 61. A A 100-24 0VAC ~ WARN AT-CVFAN ING This redu unit might ce the have risk of elecmore than tric sho one pow ck, disc er inpu onnect t. To all pow AT-P W POWE R er R14 FAUL T B AT-C V5 POWE R FAUL T PWR AC 100-2 40VA C~ 204 Figure 60. Removing an AT-CVFAN Module from Fan Slot A B B C~ 40VA 100-2 WA unit of This the risk ce redu W AT-P R14 AT-CVFAN t. To er er inpu pow ect all pow one e than disconn e mor shock, hav tric RNING might elec R POWE T FAUL A C 40VA 100-2 ~ V AT-C 5PW RAC 205 FAN A Figure 61. Removing an AT-CVFAN Module from Fan Slot B 4. While you wait for the fan to spin down, unpack the new AT-CVFAN module from the shipping package and store the packaging material in a safe location. Note You must use the original shipping material if you need to return the fan module to Allied Telesis. 5. Carefully remove the fan module from the chassis. 6. To install a new fan, do one of the following: Caution Avoid touching the fan blades. 87 Chapter 3: Working with Line Cards and other Modules a. To install a new fan in slot A, turn the fan so that the handle is on the left and slide the new fan module into the fan slot, as shown in Figure 62. A A 100-24 0VA C~ WA RNI This NG unit the risk migh t have of befo re servelectric more icing shock, than one unit. disco nnecpower inpu t all powe t. To redu r inpu ts ce AT-P W R14 POWE R AT-CVFAN FAULT B AT-C V 5PW 100 B -240VA C~ AT-CV5FA POWE R FAULT 202 RAC Figure 62. Inserting an AT-CVFAN Module into Fan Slot A b. To install a new fan in slot B, turn the fan so that the handle is on the right and slide the new fan module into the fan slot, as shown in Figure 63, until the front of the fan module is flush with the front of the chassis. B B C~ -240VA t. To r r inpu powe t all powe one than disconnec k, NG t have more ric shoc RNI WA unit migh of elect unit. This the riskservicing ce redu before ts inpu 100 R14 W AT-P AT-CVFAN R POWE FAULT A T-CV5FAN A 100 C~ -240VA RAC 5PW V AT-C 203 R POWE FAULT Figure 63. Inserting an AT-CVFAN Module into Fan Slot B 7. Tighten the two captive screws on the fan module, as shown in Figure 64 or Figure 65. AT-CVFAN A A 100-24 0VAC ~ WARN ING This redu unit might ce the have risk of elecmore than tric sho one pow ck, disc er inpu onnect t. To all pow POWE R FAUL T er AT-P W R14 B AT-C V5 POWE R 206 PWR AC 100-2 40VA C~ B AT-CV5FA FAUL T Figure 64. Tightening the Screws on the AT-CVFAN Module in Slot A. 88 AT-CV5000 Media Converter Chassis Installation Guide B ~ AT-CVFAN B t. To er inpu power all pow one onnect e than ck, disc C 40VA 100-2 e mor sho RNINGht hav tric WA unit mig of elec This the risk ce redu W AT-P R14 R POWE T FAUL A 5FAN A C 40VA 100-2 ~ V AT-C 5PW RAC R Figure 65. Tightening the Screws on the AT-CVFAN Module in Slot B To power on the chassis, proceed to the procedure described in “Powering On an AC Powered Chassis” on page 60 or “Powering On a DC Powered Chassis” on page 64. When the connection is established, the appropriate fan LED (FAN-A or FAN-B) on the LED interface card should be green. If the LED is OFF, refer to “Troubleshooting” on page 95 for instructions. 89 Chapter 3: Working with Line Cards and other Modules Installing a Blank Slot Cover If any of the line card or expansion slots in the Converteon™ chassis is unoccupied, it must be covered with a blank slot cover, to keep dust from getting into the chassis and to maintain proper airflow, cooling, and ventilation throughout the chassis. Note Allied Telesis strongly recommends that a blank slot cover be inserted in any slot that does not contain a functioning line card or module. Installing an AT-CV5PNL1 Blank Slot Cover The AT-CV5PNL1 blank slot cover is designed to cover any unoccupied line card or management module slot in the Converteon™ Series chassis. The AT-CV5000 chassis is shipped with 18 line card slots covered with the AT-CV5PNL1 blank slot covers. To install an AT-CV5PNL1 blank slot cover, perform the following procedure: 1. Select the line card you want to remove from the chassis. 2. Disconnect the cables from all the ports in the line card. 3. Cover the fiber optic port with the dust cap. 4. Remove the line card from the slot as described in “Removing a Converteon™ Line Card” on page 74. 5. Insert the AT-CV5PNL1 slot cover into the slot you removed the line card from. 6. Align the back edge of the blank slot cover with the left and right alignment guides. 90 AT-CV5000 Media Converter Chassis Installation Guide 7. Slide the blank slot cover into the slot, as shown in Figure 66, until the slot cover is flush with the front of the chassis. AT-C M 202 LK AT-C M 202 AT LK AT-C M 202 AT LK AT AT-C M 202 LK AT-C M 202 AT LK AT LK AT LK AT T X LK AT T X T X RDY LK AT LK AT RDY ML/SM L FD/ OAM T X RDY ML/SM L FD/ OAM T X ML/SM L FD/ OAM RDY RDY ML/SM L FD/ OAM ML/SM L FD/ OAM 225 Figure 66. Inserting an AT-CV5PNL1 Blank Slot Cover 8. Use a Phillips screwdriver to tighten the captive screw, as shown in Figure 67. AT-C M 202 LK AT AT-C M 202 LK AT AT-C M 202 LK AT AT-C M 202 LK AT AT-C M 202 LK AT LK AT LK AT T X LK AT T X T X RDY ML/SM L FD/ OAM LK AT LK AT RDY ML/SM L FD/ OAM RDY T X T X ML/SM L FD/ OAM RDY ML/SM L FD/ OAM RDY ML/SM L FD/ OAM 272 Figure 67. Tightening the Captive Screw on an AT-CV5PNL1 Note Always tighten the captive screw to secure the blank slot cover to the chassis. 9. Repeat this procedure to install additional AT-CV5PNL1 blank slot covers. 91 Chapter 3: Working with Line Cards and other Modules Installing an AT-CV5PNL2 Blank Slot Cover The AT-CV5PNL2 blank slot cover is designed to cover any unoccupied power supply module slots in the AT-CV5000 chassis model only. To install an AT-CV5PNL2 blank slot cover, perform the following procedure: 1. Remove the AT-CV5PNL2 blank slot cover from its shipping package and store the package in a safe place. Note You must use the original package if you need to return the unit to Allied Telesis. 2. Select the power supply slot in the AT-CV5000 chassis where you want to install the blank slot cover. 3. Align the back edge of the blank slot cover with the alignment guides located inside the slot. 4. Slide the blank slot cover into the slot, as shown in Figure 68, until the slot cover is flush with the front of the chassis. WARNI NG This unit migh redu t have ce the risk of more electric than one shoc pow k, disc er inpu t. onne ct all To pow er 100-24 0VAC ~ 226 Figure 68. Inserting an AT-CV5PNL2 Blank Slot Cover 5. Use a Phillips screwdriver to tighten the captive screws, as shown in Figure 69. WARN ING This unit migh redu t have ce the risk of more electric than one shoc pow k, disc er inpu onnect t. To all pow er 100-24 0VAC ~ 273 Figure 69. Tightening the Captive Screws on an AT-CV5PNL2 92 AT-CV5000 Media Converter Chassis Installation Guide Note Always tighten the captive screws to secure the blank slot cover to the chassis. The AT-CV5PNL3 blank slot cover is designed to cover the unoccupied expansion slot located in the rear of the AT-CV5000 chassis. To install an AT-CV5PNL3 blank slot cover, perform the following procedure: 1. Remove the AT-CV5PNL3 blank slot cover from its shipping package and store the package in a safe place. Note You must use the original package if you need to return the unit to Allied Telesis. 2. Align the back edge of the blank slot cover with the alignment guides located inside the slot. 3. Slide the blank slot cover into the slot, as shown in Figure 70, until the slot cover is flush with the front of the chassis. A AT-CVFAN Installing an AT-CV5PNL3 Blank Slot Cover A 100-240 VAC ~ WAR This NING reducunit migh t have e the risk more of electr than ic shoc one powe k, disco r input nnec . t all To powe r POWE R REAR EXP. SL OT AT-C V5P WRA C FAULT B WARNI This NG redu unit migh ce the t have risk of elecmore than tric shoc one pow k, disc er onne input. To ct all pow er 227 100 -240VA C~ B AT-CV5FAN POWE R FAULT AT-C V5P WR1 4 Figure 70. Inserting an AT-CV5PNL3 Blank Slot Cover 93 Chapter 3: Working with Line Cards and other Modules 4. Use a Phillips screwdriver to tighten the captive screws, as shown in Figure 71. A 40VA C~ WARN ING This unit reduce might inputs the risk have mo before of elec re tha servici tric sho n one pow ng uni ck, disc er inp t. ut. To onnect all pow er AT-P POW ER WR1 4 FAUL T WARN ING This unit reduce might inputs the risk have mo before of elec re tha servici tric sho n o ng uni ck t. AT-P POW ER WR1 4 FAUL T 274 Figure 71. Tightening the Captive Screws on an AT-CV5PNL3 Note Always tighten the captive screws to secure the blank slot cover to the chassis. 94 Chapter 4 Troubleshooting This chapter contains information about how to troubleshoot the chassis and line cards in the event that a problem occurs. Note If after following the instructions in this chapter you are unable to resolve the problem, contact Allied Telesis Technical Support for assistance. Refer to “Contacting Allied Telesis” on page 16 for contact information. LED Interface Card PS-A or PS-B LED is OFF The chassis must have at least one operational power supply, indicated by the PS-A (power supply A) and PS-B (power supply B) LEDs. If one of the power supply LEDs is OFF, but the other LED is ON, perform the following: PS-A or PS-B LED is Blinking FAN-A or FAN-B LED is OFF Verify that the power supply in question is completely installed in its slot. Verify that the power switch of the power supply in question is turned ON. If one or both of the power supply LEDs are slowly blinking, perform the following: Verify that the ON/OFF power switch for that power supply is turned to ON. Verify that the power cord is secured in the connector. Check the fuse or breaker of the circuit that the outlet is on. If the fan module LED is OFF, perform the following: Verify that the fan module reporting trouble is operational. Remove and re-insert the fan module that is reporting trouble. 95 Chapter 4: Troubleshooting Caution For normal operation, both fans must be installed in the chassis. 96 AT-CV5000 Media Converter Chassis Installation Guide AT-CV5M01 Management Card PWR LED is OFF RDY LED is Blinking RDY LED is OFF FLT LED is Blinking If the PWR LED on an AT-CV5M01 card is OFF, perform the following: If the chassis is installed on a desktop, check to be sure that the power adapter is securely connected to a power outlet and that the power adapter cable is securely connected to the rear of the converter. Verify that the power switch is turned ON. Verify that the power outlet has power by connecting another device to it. Try using another power adapter. If the RDY LED on an AT-CV5M01 card is blinking, perform the following: Verify that the settings on the DIP switches and jumpers are correct. Try using the default settings. Remove and re-insert the card. If the RDY LED on an AT-CV5M01 is OFF, perform the following: Verify that the card is firmly inserted in the slot. Remove and re-insert the card. Verify that at least one power supply in the rear of the converter is operational. Make sure that the power cord is securely connected to the power source and to the AC connector on the rear panel of the switch. Verify that the power outlet has power by connecting another device to it. Try connecting the unit to another power source. Try using a different power cord. Check that the voltage from the power source is within the required levels for your region. If the FLT LED on a line card is blinking, no action is required. A blinking FLT LED could indicate that a new version of the management software is being downloaded to the converter or that the converter’s configuration is being changed, such as with the installation of a new line card. The LED will stop blinking after the converter has completed the download or the configuration change is completed. 97 Chapter 4: Troubleshooting FLT LED is Steadily ON If the converter FLT LED is steadily on, a problem has occurred in the converter, perform the following: Try resetting the converter by disconnecting and reconnecting the AC power cord. Try resetting the management card by pressing the reset button on the LED interface card with the tip of a pen or a non-conductive pointy object. Try resetting the line card or the module installed in the rear expansion slot by pressing the reset button on the LED interface card with the tip of a pen or a non-conductive pointy object. Note If the FLT LED remains steadily on, contact Allied Telesis Technical Support for assistance. LK LED is OFF If the LK LED for a twisted pair port on an AT-CV5M01 card is OFF, perform the following: Check that the end node connected to the port is powered ON and is operating properly. Check that the twisted pair cable is securely connected to the twisted pair port on the switch and on the end node. Make sure that the twisted pair cable does not exceed 100 meters (328 feet) and that you are using a Category 5 or better cable. Converteon™ Line Cards LK LED is Blinking LK LED is OFF If the LK LED for either the fiber optic port or the twisted pair port is blinking, refer to Appendix A in the Converteon™ Media Converter Line Cards Reference Guide. If the LK LED for a twisted pair port is OFF, do the following: Check that the end node connected to the port is powered ON and is operating properly. Check that the twisted pair cable is securely connected to the twisted pair port on the switch and on the end node. Make sure that the twisted pair cable does not exceed 100 meters (328 feet) and that you are using a Category 5 or better cable. Check for MissingLink™ option. If the LK LED for a fiber optic port is OFF, do the following: 98 AT-CV5000 Media Converter Chassis Installation Guide Verify that the end node connected to the port is ON and is operating properly. Check that the fiber optic cable is securely connected to the fiber optic port on the media converter and on the end node. Check to be sure that the end node connected to the port is operating at the same port speed. Verify the fiber connections are correct that is the converter’s TX port is connected to the end node’s RX port, and the converter’s RX port is connected to the end node’s TX port. Check to be sure that the end nodes connected to the switch are operating at the same duplex mode. Test the attenuation on the fiber cable to ensure that it does not exceed acceptable values. Verify that you are using the appropriate type of fiber optic cables and that you have not exceeded the maximum operating distances. Check that the operating specifications of the fiber optic port on the end node are compatible with the operating specifications of the fiber optic port on the converter. If you are still experiencing problems after testing and troubleshooting the installation, contact Allied Telesis Technical Support for assistance. Refer to “Contacting Allied Telesis” on page 16 or visit our web site at www.alliedtelesis.com for support information. 99 Chapter 4: Troubleshooting 100 Appendix A Technical Specifications Physical Specifications Dimensions (W x D x H) 34.25 cm x 44.05 cm x 8.68 cm (13.49 in x 17.35 in x 3.42 in) Weight: 6.12 kg (13.5 lbs.) Recommended Minimum Ventilation on All Sides 10 cm (4.0 in) Environmental Specifications Operating Temperature: 0° C to 40° C (32° F to 104° F) Storage Temperature: -25° C to 70° C (-13°F to 158° F) Operating Humidity: 5% to 90% non-condensing Storage Humidity: 5% to 95% non-condensing Maximum Operating Altitude: 3,000 m (10,000 ft.) Maximum Storage Altitude: 4,000 m (13,100 ft.) Power Specifications AC Input Current: 90-120 V AC (3.6A max) 200-240 V AC (1.57A max) (auto-ranging) DC Input Current: -36 to -72 V DC (8.7A max) Nominal Input Frequency: 47-63 Hz 101 Appendix A: Technical Specifications Safety and Electromagnetic Emissions Certifications EMI: FCC Class A, EN55022 Class A, VCCI Class A, C-TICK, CE Immunity: EN55024 Safety: UL60950-1 (CULUS), EN60950-1 (TUV), CAN/CSA C22.2 No. 60950-1 Laser: EN60825 Quality and Reliability: MTBF > 100,000 hrs. Standards IEEE 802.3 (10Base-T) IEEE 802.3u (100Base-TX) 102 AT-CV5000 Media Converter Chassis Installation Guide RJ-45 Twisted Pair Port Pinouts Figure 72 illustrates the pin layout for an RJ-45 connector and port. 8 1 8 1 Figure 72. RJ-45 Connector and Port Pin Layout Table 3 lists the RJ-45 pin signals when a twisted pair port is operating in the MDI configuration at 10 or 100 Mbps. Table 3. MDI Pin Signals (10/100Base-TX) Pin Signal 1 TX+ 2 TX- 3 RX+ 6 RX- Table 4 lists the RJ-45 port pin signals when a twisted pair port is operating in the MDI-X configuration at 10 or 100 Mbps. Table 4. MDI-X Pin Signals (10/100Base-TX) Pin Signal 1 RX+ 2 RX- 3 TX+ 6 TX- 103 Appendix A: Technical Specifications RS-232 Terminal Port Pinouts Figure 72 illustrates the pin layout to an RS-232 terminal port. Figure 73. RS-232 Terminal Port Pinouts Table 5 lists the pin signals on the RS-232 Terminal Port. Table 5. RS-232 Terminal Port Pin Signals Pin 104 Signal 1 Data Carrier Detect 2 Transmit Data 3 Receive Data 4 Data Set Ready 5 Ground 6 Data Terminal Ready 7 Clear to Send 8 Request to Send 9 Ring Indicator AT-CV5000 Media Converter Chassis Installation Guide 8-Pin Mini-DIN Console Port Pinouts Figure 74 illustrates the pin layout of the 8-Pin Mini-DIN console port and connector. 7 6 8 6 7 3 8 4 1 5 2 3 5 4 158 2 1 Figure 74. 8-Pin Mini-DIN Console Port and Connector Pin Layouts Table 6 lists the definitions for the 8-Pin Mini-DIN console port pinouts. Table 6. 8-Pin Mini-DIN Console Port Pinouts Pin Signal 1 NC 2 DTR 3 TX 4 RX 5 DSR 6 GND 7 RTS 8 CTS 105 Appendix A: Technical Specifications SC Type Connectors Dual SC Connector The fiber optic cable, as shown in Figure 75, is used to connect to the dual SC connectors in various Converteon™ line cards. Figure 75. Dual SC Connector Cable Simplex SC Connector The fiber optic cable, as shown in Figure 76, is used to connect to the simplex SC connectors in various Converteon™ line cards. Figure 76. Simplex SC Connector Cable 106 AT-CV5000 Media Converter Chassis Installation Guide Dual ST Type Connector Cable The fiber optic cable, shown in Figure 77, is used to connect to the dual ST connectors in various Converteon™ line cards. Figure 77. Dual ST Connector Cable 107 Appendix A: Technical Specifications SFP Transceiver Cable The SFP transceiver, as shown in Figure 78, is used in various Converteon™ line cards. 482 Figure 78. SFP Transceiver The fiber optic cable, shown in Figure 79, is one of the cable types that can be used to connect to the SFP transceiver. Figure 79. SFP Transceiver Cable 108 Appendix B Cleaning Fiber Optic Connectors The fiber optic connector consists of a fiber optic plug and its adapter. The end of the fiber optic cable is held in the core of the ferrule in the plug. Light signals are transmitted through the core of the fiber. Even minor smudges or dirt on the end face of the fiber, completely invisible to the naked eye, can disrupt light transmission and lead to failure of the component or of the entire system. Therefore, it is of utmost importance to clean all fiber optic connectors before use. Figure 80 shows the ferrule in an SC connector. 177 Ferrule Figure 80. Ferrule in an SC Connector Plug Figure 81 shows part of the end face of an unclean and clean ferrule. 156 Unclean Clean Figure 81. Unclean and Clean Ferrule This appendix provides the following procedures “Using a Cartridge-Type Cleaner” on page 110 “Using a Swab” on page 112 109 Appendix B: Cleaning Fiber Optic Connectors Using a Cartridge-Type Cleaner PUSH OPEN c re Di A PEng TAWipi tion Fiber optic cartridge cleaners are available from many vendors and are typically called “cartridge cleaners,” as shown in Figure 82. 100 Figure 82. Cartridge Cleaner Note Do not use compressed air or aerosol air to clean a fiber optic connector. To clean a fiber optic connector using a cartridge cleaner, perform the following procedure. 1. With one hand, hold the cartridge cleaner and push the lever on the cleaning cartridge in the direction of the arrow to expose the cleaning surface, as shown in Figure 83. 2. Place the ferrule tip on the exposed cleaning surface and rub the ferrule in a downward direction, as shown in Figure 83. 102 Figure 83. Rubbing the Ferrule Tip on the Cleaning Surface Note Rub the ferrule tip on the cleaning surface in one direction only. 110 AT-CV5000 Media Converter Chassis Installation Guide 3. When you reach the end of the cleaning surface, pick up the ferrule tip, rotate and place it at the top and rub downwards at least 2 times. Caution Failing to pick up the ferrule tip when you reach the bottom of the cleaning surface can result in static electricity that can damage the fiber optic cable. 4. If desired, repeat steps 1 and 2. 5. If a fiber inspection scope is available, use the scope to inspect the ferrule end face to make sure that it is clean. 6. Reconnect the cable to the port or protect the ferrule tip with a dust cap. Note Always keep a dust cap on a fiber optic cable when it is not in use. Note Do not touch the end face of the ferrule in the connector. Warning Do not look directly at the cable ends or inspect the cable ends with an optical lens when the cable is connected at the other end. 111 Appendix B: Cleaning Fiber Optic Connectors Using a Swab Specially treated swabs (stick cleaners) are available for cleaning inside connector adapters or hard-to-reach ferrule tips. These swabs, often referred to as “lint free” or “alcohol free” swabs, are available from many vendors, as shown in Figure 84. Stick cleaners are available in both 2.5 mm and 1.25 mm sizes for use on SC and MU connectors respectively. Note NEVER use a household cotton swab and/or alcohol to clean a fiber optic connector. This may leave a residue on the ferrule tip. Figure 84. Lint-Free and Alcohol-Free Swabs Note Do not use compressed air or aerosol air to clean a fiber optic connector. To clean a recessed ferrule using a swab, perform the following procedure. 1. Insert the swab into the adapter as shown in Figure 85 and rub the ferrule tip with the swab. 157 Figure 85. Cleaning a Recessed Ferrule 2. If desired, repeat step 1. 112 AT-CV5000 Media Converter Chassis Installation Guide 3. If a fiber inspection scope is available, use the scope to inspect the connector to make sure that it is clean and to check for scratches, pits, or other problems that may affect performance. Note Always keep a dust cap on a fiber optic cable when it is not in use. Warning Do not look directly at the cable ends or inspect the cable ends with an optical lens when the cable is connected at the other end. 113 Appendix B: Cleaning Fiber Optic Connectors 114