1
Introduction
Thank you for purchasing a Setra Super Count scale. Its ease of operation and durable construction
should provide years of reliable service. While your scale is easy to operate, it is advisable to read
this guide carefully before use. It is designed to help you perform weighing, counting, and related
operations quickly and accurately.
This manual is divided into six sections. Section One, “Installing Your Scale,” explains the proper
installation of your scale. Section Two, “Understanding Your Scale,” explains the various keys, displays, and messages you will encounter while using your scale. Section Three, “Using Your Scale,”
provides the detailed instructions necessary to perform your scale’s various operations. Section Four,
“Advanced Functions” describes the use of the scale’s databases and using APWs in exponential
notation. Section Five “ScriptCoder” describes the scale’s programmable RS-232 output. The appendices include setup information, calibration procedures, examples, a description of RS-232 communications, options and specifications.
Typographical Conventions used in this manual include the following:
1. bold lower case characters indicate specific keys on the scale keyboard.
(e.g. Press — tare. Asks you to press the — key first and then the tare key on the scale
keyboard.)
2. “Quotation marks” enclose messages you receive from the scale display.
3. nnn indicates that a number will appear in the display message.
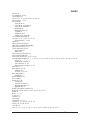
Setra Super CountTM Operator's Manual
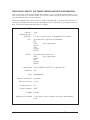
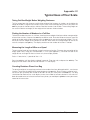
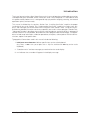
1
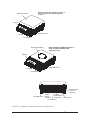
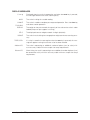
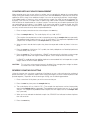
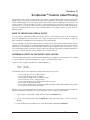
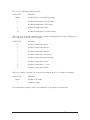
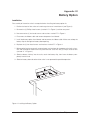
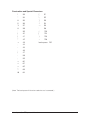
Rectangular weighing platform shown is
used on scales of 27 pound capacity
or more.
Weighing Platform
Display
Adjustable Foot
Keypad
Level Bubble
Weighing Platform
Round weighing platform shown is
used on scales of 5000 gram
capacity or less.
Display
Adjustable Foot
Keypad
Level Bubble
Remote Scale
Connector
(Optional)
Adjustable Foot
Battery
RS-232C
On/Off
Switch
Interface
(Optional)
Connector
DC Connector
Battery Door
FIGURE 1. Components and features of the Setra Super Count.
2
Setra Super CountTM Operator's Manual
Section One
Installing Your Scale
SETUP
1. Locating your scale...
The rugged design of your Setra Super Count scale ensures that it will operate well in typical
factory or office environments. Nonetheless, you should treat your scale as you would any
piece of precision equipment, locating it on a clean, dry surface; protected, where possible,
from extremes of draft and vibration.
2. Leveling your scale...
a. Retract the right rear foot completely into the scale.
b. Adjust the two front feet until the leveling bubble is centered in the circle.
c. Extend the right rear foot until it contacts the mounting surface. Make certain that all
four feet are contacting the mounting surface.
d. Make certain the scale is stable by placing both hands on the scale platform and attempt
to rock the scale. If it moves, adjust the leveling feet until the scale stands firmly on the
mounting surface.
3. Installing the weighing pan...
Using the Allen wrench provided, secure the pan support to the four posts over the sensor.
Next, place the weighing pan over the pan support.
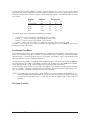
An Allen wrench and four socket head cap
screws are provided to assist in the
An Allen wrench
andframe
four socket
head
installation
of the load
support
for cap
screws
are provided
to assist
in theplatform.
scales
using
a rectangular
weighing
installation of the load frame support for
sclaes using a rectangular weighing
platform.
4. Connecting your scale to an AC outlet...
To connect your scale to an AC outlet, insert the appropriate end of the AC adaptor into an
electrical outlet. Now connect the other end into the back of the scale (see FIGURE 1). Once
you have plugged your scale into a live outlet, it is automatically on, unless the scale is equipped
with a battery, in which case the on-off switch on the rear panel should be in the ‘on’ position to
power-up the scale. The scale draws very little current from an outlet, and may be left connected. This keeps your scale ready to use with no “warm-up” time.
Setra Super CountTM Operator's Manual
3
EXPERIMENTATION
1. Display test...
When your scale is first powered on, it automatically runs through a display test lasting about
six seconds, showing all possible segments which might be displayed. The scale next displays “C nnn g” (where nnn equals the full scale capacity in grams), performs self-diagnostics
to ensure proper operation and then sets itself to zero. A wake up message is always transmitted upon power up. (If a tape printer is connected to the scale, the scale model, capacity and
software version will be printed. If the scale is connected to a computer the wake up message
will be displayed if in the terminal mode. The scale is then ready for use. For best accuracy,
allow the scale to warm up for 5 minutes.
2. Using your scale for the first time...
It is important that you read this Operator’s Manual thoroughly to ensure proper use of your
scale. Nonetheless, experimenting with your scale and its keyboard prior to reading this manual
in its entirety will not harm your scale (provided it is not overloaded) and may actually give you
a better understanding of the instructions in this manual. If you instruct the scale to do something it is not capable of doing, the scale will respond by displaying the message “UnAbLE”. To
continue experimenting, simply press the clear key.
4
Setra Super CountTM Operator's Manual
Section Two
Understanding Your Scale
KEYBOARD FUNCTIONS
zero
Assigns the pan and whatever is currently being weighed a value of zero. While
the scale is determining a stable weight reading, the display will indicate “bUSY”.
NOTE: If a tare value is stored in memory it will be cleared.
sample
size
count
Displays preprogrammed sample sizes (10, 25, 50, or 100 pieces).
Instructs the scale to begin or resume counting. This key may also be used to
“update” the average piece weight for increased counting accuracy.
setup/cal
Instructs the scale to enter a setup or perform a calibration.
apw
Instructs the scale to accept an average piece weight entry.
clear
tare
gross
Clears the last number entered or operation requested, and displays weight.
Instructs the scale to accept a numerical tare weight entry. If a container is
placed on the pan, pressing tare assigns its weight as the “tare” (i.e. container
weight) and saves it in memory. The display will read net weight (i.e. contents
weight).
Toggles between the gross weight and the net weight.
(gross weight - tare weight = net weight)
print
Scale sends displayed and stored or programmed information to a printer, computer (or other RS-232 peripheral device).
units
Converts the weighing units of measure (e.g. changes from grams to ounces).
accum
Sums and stores the results of multiple weighing or counting operations.
id
Instructs the scale to store an identification number of up to 25 digits (e.g. a part
number or account number) to be printed or transmitted to a peripheral device.
display
Instructs the scale to recall the value stored in any of the various registers (e.g.
tare, accumulate, etc.).
reset
Sets all counting and weighing registers to zero. Clears all volatile ID registers.
Assigns the pan and whatever is currently being weighed a value of zero. Displays full scale capacity.
•
Instructs scale to enter a decimal point during numeric entry.
Setra Super CountTM Operator's Manual
5
—
Instructs scale to change the sign of a number. Interpreted as a hyphen when
entered as part of an ID number.
When preceding any register that stores a value, instructs the scale to clear the
stored value from that specific register. (e.g. Pressing the — tare keys will clear
the tare value in memory.)
When preceding the units key, instructs the scale to convert the weighing units
to the factory default (grams).
0-9
Instructs the scale to enter numerical values given for registers such as ID number, count, tare or average piece weight.
LED
low bat
bat charge
remote/local
If lit, battery needs to be charged. (Battery option only)
If lit, battery is installed and is being trickle charged.* (Battery option only)
If lit, the remote scale base is active. (Remote Scale Option only)
* Depending on the condition of the battery and the line voltage this LED
may turn off when the battery is completely charged.
DISPLAY SYMBOLS
OK
gross
apw
accum
tare
PC
Reading shown is gross weight.
Reading shown is average piece weight.
Reading shown is the amount stored in the accumulator register.
Reading shown is the weight stored in the tare register.
Reading shown is given in number of pieces.
g
Reading shown is given in grams.
oz
Reading shown is given in ounces.
lb
Reading shown is given in pounds.
t oz
Reading shown is given in troy ounces.
dwt
Reading shown is given in pennyweights.
c
6
Reading shown is stable. Further operations may be performed.
Reading shown is given in carats.
“x”
Reading shown is given in user-definable units.
NOTE: “x” units are preset in kilograms.
INT
Scale is operating in either a fast or slow fixed integration mode (update rate).
Setra Super CountTM Operator's Manual
DISPLAY MESSAGES
C nnn g
bUSY
UnAbLE
FLASHING
DISPLAY
OFLO
Displayed when the scale is powered on and when the reset key is pressed,
this message identifies the scales rated capacity.
The scale is waiting for a stable reading.
The scale is unable to complete your requested operation. Press the clear key
and select another operation.
The weight on the pan exceeds the capacity of the scale or the scale is under
loaded (the pan or pan support is missing).
The displayed count or weight exceeds six digits (999,999).
UPdAtE
The scale is recalculating the average piece weight to enhance counting accuracy.
TARE CLEAr
If a value is stored in the tare register when the zero key is pressed, this message will appear warning that the tare value has been cleared.
Add nnn PC
The scale is requesting an additional number of pieces (nnn) to satisfy minimum accuracy and/or minimum sample size setup requirements.
Sub nnn PC
When kitting, the scale is requesting that an additional number of pieces (nnn)
be removed to satisfy minimum accuracy and/or minimum sample size setup
requirements.
Setra Super CountTM Operator's Manual
7
Section Three
Using Your Scale
BASIC WEIGHING
To weigh a sample on your scale, use the following procedure:
1. Press the zero key and place the object(s) to be weighed on the pan.
2. Wait for the “OK” symbol, then read the weight from the display.
CONVERTING THE WEIGHING UNITS
To convert from one unit to another, simply press the units key repeatedly. Continue pressing the key
until the units you wish to use are displayed. The order of units is as follows: GRAMS - OUNCES POUNDS - TROY OUNCES - PENNYWEIGHTS - CARATS - “x” UNITS (user defined) - GRAMS. To
return to the factory default (grams) press — units. NOTE: The units displayed can be limited to
certain selected units of measure, and can be restricted to as few as one if desired. See Appendix II,
Setup Functions.
WEIGHING WITH A CONTAINER
You can use your scale to weigh objects (or liquids) by placing or pouring them into a container. To
weigh objects or liquids in this manner, WITHOUT including the weight of the container, use the tare
or zero keys. If you wish to retain the container weight for later reference the tare key should be used.
If you do not need to retain the container weight, and do not need to display or print the gross weight,
use the zero key only. To tare out or zero out the weight of a container, and then weigh the contents
placed or poured into it, use the following procedure:
1. Press the zero key. Place the empty container on the pan.
2. Press the tare or zero key. (If the tare weight is known, a full container may be placed on the
pan. In this case, enter the tare weight through the keyboard and then press the tare key.)
3. Wait for the “OK” symbol. Place or pour objects or liquids into the container.
4. Wait for the “OK” symbol, then read the net weight from the display.
NOTE: When you press the tare key, the container weight is stored in memory and the display will
read zero. You must use the tare key, not the zero key, in step #2 to store the container weight
in memory. To recall the stored tare value, press display tare. To clear the stored tare value,
press — tare.
DISPLAYING THE GROSS WEIGHT
To display the gross weight, press display followed by the gross key. To toggle between the gross
weight and the net weight, press the gross key repeatedly. The gross weight will equal the net weight
unless a container weight has been entered using the tare key (see section, Weighing with a Container).
8
Setra Super CountTM Operator's Manual
NOTE: a.
A customized sample size may be preset by using the minimum sample size setup feature. The scale will never request a sample size less than the preset minimum sample
size. (e.g. If the minimum sample size has been preset at 12 pieces then the sample size
key will display Add 12 PCs, Add 25 PCs, Add 50 PCs, Add 100 PCs, Add 12 PCs...etc.
when pressed repeatedly.)
b. The scale may request that more pieces be added after the initial sampling if a minimum
accuracy requirement has been preset. (For details see the section entitled Using the
Minimum Sample Size or Minimum Accuracy Feature.)
BASIC COUNTING USING THE COUNT KEY
To count a number of like objects on the scale, use the following procedure:
1. Press the zero key.
2. Place a known number of pieces on the pan.
3. Enter the number of pieces through the scale keyboard.
4. Press the count key.
5. Wait for the “OK” symbol.
6. Add pieces until you reach the desired count.
7. Wait for the “OK” symbol, then read the display.
NOTE: The scale may request that more pieces be added after the initial sampling if a minimum
accuracy and/or minimum sample size requirements have been preset.
The operator may choose to employ the counting procedure outlined above which uses the
sample size key, or the procedure given for use of the count key. Both procedures deliver the
same level of accuracy using the same sample size.
10
Setra Super CountTM Operator's Manual
USING THE MINIMUM SAMPLE SIZE & ACCURACY FEATURE
Counting errors can be caused by non-uniformity in the parts being counted or by insufficient sample
weight. To reduce these errors your scale is designed with two special features. The minimum sample
size feature ensures the scale will calculate an average piece weight from a large enough sample
which is nearly equal to the average piece weight of the entire lot. This feature prevents an operator
from using a sample size which is too small and could be “biased”, i.e., not truly representative of the
distribution of unequal parts in the lot to be counted. Setting the scale to require a larger minimum
sample will reduce the error which is introduced by non-uniformity.
The minimum accuracy feature ensures that total sample weight is heavy enough to keep counting
errors very small. The higher the degree of accuracy desired, the larger the total sample weight that
will be required. This means that even if the sample satisfies the minimum sample size requirement it
may still be too light to achieve the accuracy level selected and therefore the scale will request more
pieces.
Your scale has been preprogrammed at the factory with no minimum-sample requirement and a minimum accuracy requirement of 95%. To change the minimum accuracy and/or a minimum sample size
setting refer to Appendix II, Setup Functions.
When the scale is set up to require a minimum sample size or certain degree of accuracy it may
display messages during the counting procedure. The steps are outlined below:
1. Press the zero key.
2. Press the sample size key.
3. The scale display will say “Add nnn PC”, where nnn represents the programmed minimum
sample size.
The sample size requirement can be increased by pressing the sample size key repeatedly.
The predetermined sample size are: 10, 25, 50 and 100 pcs. This sequence of predetermined
sample sizes will repeat itself as the sample size key is pressed. A custom sample size may be
preset by using the minimum sample size setup feature. The scale will never request a sample
size less than the preset minimum sample size. (e.g. If the minimum sample size has been
preset at 12 pieces then the sample size key will display Add 12 PCs, Add 25 PCs, Add 50
PCs, Add 100 PCs, Add 12 PCs...etc. when pressed repeatedly.)
4. When you reach the desired sample size, place the requested number of pieces on the pan.
5. Press the count key.
6. Wait for the “OK” symbol, then read the display.
The scale may request that more pieces be added after the initial sampling if a minimum accuracy requirement has not been met.
If the minimum accuracy requirement has been met, the scale will display the correct number
of pieces and you can proceed to Step 10.
If fewer than the required number of pieces have been placed on the pan, the scale will ask you
to add pieces. In this case, perform Steps 7-11 below.
7. Add the exact number of pieces requested by the scale.
8. Press the count key.
Setra Super CountTM Operator's Manual
11
9. Wait for the “OK” symbol, then read the display. The scale now reads the total number of
pieces on the pan.
10. Add pieces until you reach the desired count.
11. Wait for the “OK” symbol, then read the display.
COUNTING WITH A CONTAINER
You can use a container when counting pieces without including the container weight in the count.
Your scale can do this by “taring out” (subtracting) the weight of the container before it begins counting. If you wish to retain the container weight for later reference, the tare key should be used in step
#3 below. If you do not need to retain the container weight, and do not need to display or print the
gross weight, use the zero key only. To tare out or zero out the weight of a container, use the following
procedure:
1. Press the zero key.
2. Place the container on the pan.
3. Press the tare key or zero key. (If the tare weight is known, a full container may be placed on
the pan in step #2. In this case, enter the tare weight through the keyboard and then press the
tare key.)
4. Wait for the “OK” symbol, then press the sample size key.
5. The scale display will say “Add 10. PC”. (The sample size requirement can be increased by
pressing the sample size key repeatedly. The predetermined sample sizes are: 10, 25, 50 and
100 pcs. This sequence of predetermined sample sizes will repeat itself as the sample size
key is pressed.)
6. When you reach the desired sample size, place the requested number of pieces in the container.
7. Press the count key.
8. Wait for the “OK” symbol, then add pieces until you reach the desired count.
9. Wait for the “OK” symbol, then read the display. The scale will read the total number of pieces
you have placed in the container.
NOTE: You may recall the tare weight by pressing display, tare, but only if it was stored in step #3 by
using the tare key and not the zero key.
DISPLAYING THE GROSS WEIGHT DURING COUNTING
To display the gross weight during a counting procedure, perform the steps below:
1. Press the gross key to display the gross weight.
2. Press count to return to the counting mode.
The gross weight will equal the net weight unless a container weight has been entered using
the tare key (see section, Counting with a Container above).
12
Setra Super CountTM Operator's Manual
COUNTING WITH A KNOWN AVERAGE-PIECE-WEIGHT
The scale can count the number of pieces in a lot by dividing the weight of the lot by the known
average piece weight (APW). To calculate the number of pieces in a lot using the average piece
weight, use the following procedure:
1. Press the zero key.
2. Place the pieces on the pan.
3. Enter the known average piece weight through the keyboard.
4. Press the apw key.
5. Wait for the “OK” symbol, then read the display. The scale now reads the number of pieces on
the pan.
NOTE: a. Before you enter an average piece weight, make sure your scale is reading in the units
you wish to enter.
b. To determine an unknown average piece weight simply use the procedure for counting,
and press display apw when you have a known number of pieces displayed.
COUNTING WITH A KNOWN AVERAGE-PIECE-WEIGHT AND TARE WEIGHT
Items in a filled container can be counted without opening the container if the average piece weight
and tare weights are known. Simply key-in the weight values using the procedure outlined below:
1. Press the zero key.
2. Place a filled container on the pan.
3. Enter the value of the known tare weight and press the tare key.
4. Enter the value of the known average piece weight and press the apw key.
5. Wait for the “OK” symbol and then read the display. The scale now displays the count of items
in the container.
Setra Super CountTM Operator's Manual
13
COUNTING WITH ACCURACY ENHANCEMENT
When counting parts that are not uniform in weight, you can periodically update the average piece
weight (APW) and thereby increase the accuracy. Each time the count key is pressed, the scale will
update the APW as long as the additional weight is less than or equal to the previous sample weight.
If the added weight is more than 100% of the previous sample, the APW will not be updated. For
example, if you start with a sample size of 10 pieces then add 10 more and press the count key, the
APW will be recalculated based on a 20 piece sample. The next time you wanted to update the APW
you could add up to 20 pieces. If you added 11 or more to the original 10 piece sample, the APW
would not be updated and would continue to represent the original 10 pieces. To count using this
accuracy enhancement feature, follow the procedure below.
1. Place an empty container on the scale and press the zero key.
2. Press the sample size key. The scale display will say “Add 10 PCs.”
(The sample size requirement can be increased by pressing the sample size key repeatedly.
The predetermined sample sizes are: 10, 25, 50 and 100 pcs. This sequence of predetermined
sample sizes will repeat itself as the sample size key is pressed.)
3. When you reach the desired sample size, place the requested number of pieces in the container.
4. Press the count key. Wait for the “OK” symbol, then slowly add pieces until the displayed count
is increased by 100% or less.
5. Press the count key. The scale displays “UPdAtE” and automatically calculates a new average
piece weight based on the larger number of pieces, and is ready to continue counting.
If “UPdAtE” is not displayed, the additional pieces have exceeded 100% of the previous sample
weight and the APW will not be updated.
CAUTION:
This accuracy enhancement feature is disabled if the average piece weight has been
scanned in from a bar code or entered via a computer.
REVERSE COUNTING OR KITTING
Using this feature, you can place a container full of pieces on your scale and count the number of
pieces removed. This is especially helpful when kitting (counting out a certain number of pieces to be
packed together). To perform reverse counting or kitting, use the following procedure:
1. Place a container full of pieces you wish to count on the pan.
2. Press the zero key then press the sample size key.
3. The scale display will say “Add 10. PC”. (The sample size requirement can be increased by
pressing the sample size key repeatedly. The predetermined sample sizes are: 10, 25, 50 and
100 pcs. This sequence of predetermined sample sizes will repeat itself as the sample size
key is pressed.)
4. When you have selected the desired sample size, REMOVE the indicated number of pieces
from the container.
5. Press the count key.
14
Setra Super CountTM Operator's Manual
6. Remove pieces until the display reads the number of pieces you wish to count out or kit.
7. Press the zero key.
8. Repeat Steps 6 and 7 as many times as needed.
NOTE: a. If the average piece weight is known, you may press the — key, enter the average piece
weight, and press the apw key in place of Steps 2-5.
b. If the sample size is not large enough to satisfy the minimum accuracy requirement the
display will read “SUb nnn.PC”. Remove the specified number of pieces (i.e. nnn) from
the container, then press the count key.
c. It is possible that the required sample size is larger than the quantity needed for each kit.
For instance, the required sample size is 100 pieces but only 50 pieces are to be kitted
together. In this case follow steps 1 through 5 above, then proceed as follows: place the
100 piece sample back into the container and press the zero key. Continue with steps 6
through 8 above.
ACCUMULATING RESULTS BY WEIGHT OR COUNT
It is sometimes necessary to accumulate weights or counts of various batches; e.g., the number of
capacitors counted or the total weight of fasteners weighed out during a day. The scale can be used
to simultaneously accumulate both weights and counts.
To accumulate a weight, use the following procedure:
1. Enter the weighing mode by pressing the reset key or the clear and zero keys (if in the counting mode).
2. To begin accumulating weights, clear the weight accumulator by pressing 0 accum while in
the weighing mode.
3. Place the object to be weighed on the pan.
4. Press the accum key. This weight is then added into the accumulator. The total accumulated
weight is then displayed.
5. Press the clear key. The current weight is displayed.
6. Repeat steps 3-5 anytime you wish to accumulate the weights of further measurements.
7. Press the display accum keys. The scale now reads the accumulated weight.
NOTE: The clear key must be pressed after completing each accumulation.
To accumulate a count (or reverse count, if kitting), use the following procedure:
1. Press the zero key.
2. Press the sample size key. The scale will display “Add 10. PC”. (To increase the sample size,
continue to press the sample size key until the scale displays the desired number.)
Setra Super CountTM Operator's Manual
15
3. Place the requested number of pieces on the pan. Press the count key. [To begin accumulating counts, clear the count accumulator by pressing 0 accum.]
NOTE: (If you press 0 accum while in the weighing mode, you will clear the weight accumulator.)
4. Add (or remove, if kitting) the desired pieces.
5. Press the accum key. The count is added into the accumulator and the total accumulated
count is then displayed.
6. Press the clear key to display the count currently on the scale pan.
7. Repeat steps 4-6 anytime you wish to add to the accumulated count.
8. Press the display, accum keys. The number of pieces shown is the total number accumulated.
NOTE: Pressing reset or — clear will clear the contents of both accumulators.
USE OF THE “INT” MODE
The Setra Super Count automatically adjusts the display update rate to provide stable performance
under environmental conditions such as vibration or draft. However, certain applications may require
that a fixed display update rate be set. When weighing in the presence of vibration or draft a slower
display update will provide a more stable reading. When filling containers to a target weight or count,
a fast display update can help prevent overshooting the target.
Either a slow or fast display update is available when the scale is in the INT mode. The factory default
setting for the INT mode is a fast display update. Refer to the Setup Functions in Appendix II to alter
the mode from fast to slow. To enter the INT mode, press the int key. The INT symbol will appear in the
display. Exit this mode by repressing the int key. This mode can be used while performing weighing
or counting operations.
ASSIGNING AN I.D. NUMBER TO A BATCH
To assign an ID number (such as a part number or an account number) to a given batch, use the
following procedure:
1. Enter the number you wish to assign (up to 25 digits).
2. Press the id key.
3. To recall the ID number, press display id.
NOTE: a. The ID number you have entered will be assigned to all batches until a new ID number is
entered or the reset key is pressed. To clear an ID number, press the — id keys.
b. If an ID number of more than six digits is used, the scale will display the last six digits
entered, but will store and print the entire number (up to its limit of 25 digits). For example,
if 123456789 is entered, the scale will display 456789, but will store and print 123456789
(as explained in “Printing Out Information”).
c. The — key may serve as a dash (hyphen) during ID number entry. Simply press the —
key wherever you wish to insert a dash (you may use as many dashes as you need,
however, no more than one dash may be used consecutively).
16
Setra Super CountTM Operator's Manual
ENTERING, RECALLING & CLEARING ADDITIONAL ID ENTRIES
A total of seven separate ID numbers may be entered. These multiple ID numbers may be used to
represent additional information related to a particular batch (i.e. vendor, lot number, etc.)
To enter additional ID numbers, use the following procedure:
1. Press the setup/cal key.
2. Enter the number you wish to assign (up to 25 digits, as indicated above).
3. Press the id key.
4. Enter a number from 1-7 to indicate which ID entry this data is to be assigned to.
5. Repeat steps 1-4 to assign additional ID entries to a given batch.
NOTE: a.
The ID entry numbers one, five and seven is not erased by the reset key or when the
scale is powered off. These entry numbers can be used to store the Company name
and address or any information that you wish to print with every transaction.
b. ID field number six cannot be used if your Setra scale is equipped with the optional time/
date feature.
To recall any of the seven ID entries, perform the following procedure:
1. Press the setup/cal key.
2. Press the display key.
3. Press the id key.
4. Enter a number from 1-7 to indicate which ID entry is to be recalled.
To clear any one of the seven ID entries, perform the following procedure:
1. Press the setup/cal key.
2. Press the — key.
3. Press the id key.
4. Press the ID number from 1-7 to indicate which ID entry is to be cleared.
NOTE: To clear all ID entries at once, except ID numbers one, five and seven, press the reset key.
(ID numbers one, five and seven must be cleared using the procedure outlined directly above.)
When the seven additional ID numbers are printed, the identifying entry numbers will not be printed.
We therefore suggest these numbers be formatted, if possible, to be easily recognized by the users
as to what their meaning signifies. (e.g. A date can be entered as 01-05-91, or an employee id
number may be 123-45-6789).
Setra Super CountTM Operator's Manual
17
PRINTING OUT INFORMATION
The Super Count is designed to print out requested or stored information regarding a given batch
when connected to an optional serial printer (see Appendix I). The default RS-232 output from the
scale is all available fields formatted for a label on a Dymo Setra 300 printer.
1. Connect the printer’s AC adaptor to a 110-volt outlet.
2. Connect the other end of the adaptor to the printer.
3. Connect the 6 pin telephone jack end of the printer connection cord to the printer's "Input"
port.
4. Connect the male RJ45 end of the connection cord to the scale’s female RJ45 port.
5. Perform the necessary counting or weighing procedures on the scale.
6. Press the print key on the scale.
7. Repeat Steps 5 through 6 any time you wish to print out information.
NOTE: a.
b.
18
The print output can be changed for either printing on receipt paper or another label
format on the Dymo Setra 300 printer. Refer to the Print Format in the Setup
Functions.
When using a printer other than the Dymo Setra 300, reset the print format and match
baud rate and parity of your scale to the match the printer(see Setup
Functions).
Setra Super CountTM Operator's Manual
Section Four
Advanced Functions
COUNTING WITH APW VALUES IN EXPONENTIAL NOTATION
The scale is able to accept an unlimited number of significant digits through the keyboard and serial
port for APW values when the APW values are stored using exponential notation. For example,
.0000567891 can be stored as 5.67891E-5. Using APW values in exponential notation is recommended
when counting small parts in pounds (lbs).
RECALLING APW VALUES IN EXPONENTIAL NOTATION
There is an alternate command sequence for displaying the APW with increased resolution. The
standard command sequence for displaying the APW is to press the display key then the apw key.
This recalls and displays the APW as six digits (.0000012345 will be displayed as .000001). To display the APW in exponential notation, the command sequence is setup/cal, display, apw. The scale
will display the APW as two alternating messages: the mantissa and the exponent (.0000012345 will
be displayed as 1.2345 followed by E - 05). These two messages will continue to display alternately
until another command is received.
NOTE:
The command sequence for displaying the APW in exponential notation is only valid when
entered through the scale’s keyboard.
STORING A NEW I.D. & APW/TARE IN THE SCALE DATABASE
The Super Count can store up to 256 different, ten character part numbers and their associated
average piece weight (APW) and tare values in memory which may be retrieved simply by entering
the ID. This data can be transmitted to a printer or computer.
Once an ID number is entered the scale will automatically search its memory for a matching ID
number. If a match is found, the APW and tare values will be retrieved and the scale will enter the
counting mode. If no match is found, the scale will accept the entry as a new ID.
To perform the following procedure the database must be enabled and the APW and tare values must
be left unprotected. (To enable the system refer to Appendix II, DATABASE SETUP.) (See PROTECTING THE APW/TARE VALUES to select a specific ID protection.)
To store a new ID and its associated APW and tare values follow the steps below:
1. Press the reset; key to zero the scale and clear the ID, APW and tare registers.
2. Create a valid APW and tare, either by entering the values through the keyboard, with a bar
code scanner or by performing the tare and sampling procedures.
3. Enter the ID; up to ten characters.
4. Press the id key, then the setup/cal key and finally the apw key.
5. The scale will quickly display “StOrEd” and return to the previous weighing or counting mode.
The APW and tare values are now stored and may be retrieved when the ID number is reentered. If “StOrEd” is not displayed, make sure the database is enabled.
If the scale displays “UnAbLE” the ID protection is set to “LOC AL”. The ID protection setup should be
changed to “LOCOLD” or “NO LOC” to store a new ID in memory.
Setra Super CountTM Operator's Manual
19
COUNTING WITH THE DATABASE
To perform the following procedure the automatic APW/tare retrieval system must be enabled. To
enable the system refer to DATABASE SETUP.
To count parts using a stored APW follow the steps below:
1. Press the reset key. This will zero the scale and clear the ID, APW and tare registers.
2. Enter the ID, up to ten characters.
3. Press the id key.
4. The scale will automatically enter the counting mode if a matching ID is found. Parts may now
be placed on the pan to be counted. Note; the APW and tare will reflect the values stored
under the recalled ID.
If no matching ID is found, the scale will accept the entry as a new ID and will not enter the counting
mode.
PRINTING IDs & APW/TARE VALUES FROM THE DATABASE
This setup allows the stored IDs and their associated APW and tare values to be transmitted to a
printer, computer or another scale as backup.
To transmit the stored IDs and their associated APW and tare values use the following procedure:
1. Enter — 17776 and press the setup/cal key.
2. The scale will display “ID SC.”
3. To transmit the ID, APW and tare values to another scale or computer press the setup/cal key.
To transmit the data to a printer press the clear key.
4. The scale will display “ID PR.” To print the data to a serial printer press setup/cal. To exit this
setup press the clear key.
NOTE: A backup copy of the stored IDs may be transmitted to a computer and stored on disk.
Selecting “ID SC” will instruct the scale to also send the control codes which are required
when the data is read back into the scale. When the data is later transmitted back to the scale
from a computer, each record (1 record = 1 ID and associated APW and tare value) must be
followed by a 3 second delay. The Save and Restore program that comes with the Auto Count
200 can be used to backup the scale database.
UPDATING AN ID AND APW/TARE VALUES IN THE DATABASE
To perform the following procedure the database must be enabled and APW and tare values must not
be protected. (To enable the system refer to DATABASE SETUP.) (See PROTECTING THE APW/TARE
VALUES to select a specific form of ID protection.)
To update an ID and its associated APW and tare values follow the steps below:
1. Enter the ID and press the id key. The scale will enter the counting mode.
20
Setra Super CountTM Operator's Manual
2. Update the APW and/or tare, either by entering the values through the keyboard, bar code or
by performing the tare and sampling procedures.
3. Press the setup/cal key and then the apw key.
4. The scale will display “ChAngE”. To permanenty store these updated values press setup/cal.
The scale will quickly display “StOrEd” and return to the previous weighing or counting mode.
The new values are now stored with the ID in memory.
To exit without changing the existing APW and tare values press the clear key.
If the scale displays “LOcKEd” the stored IDs are protected. The ID protection setup should be set to
“NO LOC” before the APW and/or tare value may be changed.
DELETING AN ID AND APW/TARE VALUES FROM THE DATABASE
To perform the following procedure, the database must be enabled and the APW and tare values
must not be protected. (See section entitled DATABASE SETUP to enable the database and PROTECTING THE APW/TARE VALUES to select a specific protection mode.)
To delete an ID and its associated APW and tare values follow the steps below:
1. Enter the ID and press the id key. The scale will enter the counting mode.
2. Press the setup/cal key then the — and apw keys.
3. The scale will display “dELEtE.” Press setup/cal to delete the ID, APW and tare values. The
scale will briefly display “GOnE.”
Press clear to exit this procedure without deleting the existing ID, APW and tare values.
If the scale displays “UnAbLE” the stored IDs are protected. The ID protection setup should be set to
“NO LOC” before the APW and/or tare value may be deleted.
COUNT/WEIGHT ACCUMULATOR DATABASE
The Super Count can be programmed to accumulate the weight and count for 256 different, ten
character part numbers. The accumulated count and weight are stored in non-volatile memory until
they are cleared. The count/weight accumulator database feature can only be used if the APW/tare
database is disabled, likewise the APW/tare database can only be used if the count/weight accumulator database is disabled. (To enable this feature, see COUNT/WEIGHT ACCUMULATE BY ID SETUP
in Appendix II.)
Setra Super CountTM Operator's Manual
21
ACCUMULATING COUNT BY ID
To accumulate the count by ID number, perform the following steps.
1. Press the reset key. This will zero the scale and clear the ID, APW and tare registers.
2. Enter the ID, up to ten characters.
3. Press the id key. The scale will automatically load the accumulated count value into the count
accumulator. (If entering a new ID, a value of 0 will be loaded.)
4. Create a valid APW, either by entering the value through the keypad, a bar code scanner, or by
performing the sampling procedure.
5. Place the pieces to be counted on the scale.
6. Press the accum key. The scale will update the count accumulator, copy the new value into the
id-accumulator memory and then display the accumulated count.
7. Press clear to return to the count. Press print if you wish to print the new accumulated value.
(See print setup below.)
ACCUMULATING WEIGHT BY ID
To accumulate the weight by ID number, perform the following steps.
1. Press the reset key. This will zero the scale and clear the ID, APW and tare registers.
2. Enter the ID, up to ten characters.
3. Press the id key. The scale will automatically load the accumulated weight value into the weight
accumulator. (If entering a new ID, a value of 0 will be loaded.)
4. Place the material to be weighed on the scale.
5. Press the accum key. The scale will update the weight accumulator, copy the new value into
the id-accumulator memory, and then display the accumulated weight.
6. Press clear to return to the weight. Press print if you wish to print the new accumulated value.
(See print setup below.)
PRINTING THE ACCUMULATED COUNT OR WEIGHT
To print the accumulated value, follow the steps below.
1. Enter the ID, up to ten characters.
2. Press the id key. The accumulated value for the ID will be copied from memory into the accumulator register.
3. Press the print key.
NOTE: The scale must be setup to print the desired accumulator register (see ScriptCoder or Appendix II). Accumulating by ID does not store the number of entries in the accumulator.
22
Setra Super CountTM Operator's Manual
CLEARING THE ACCUMULATED COUNT OR WEIGHT
The count and weight accumulators are stored in non-volatile memory. They will be retained when the
scale is powered down. Follow the appropriate procedure below to clear the accumulator registers.
To clear an ID count accumulator:
1. Enter the ID, up to ten characters.
2. Press the id key.
3. Enter the count mode by entering an APW or sampling.
4. Enter 0 and press accum. Both the count accumulator and ID count accumulator will be set to
zero.
To clear an ID weight accumulator:
1. Enter the ID, up to ten characters.
2. Press the id key.
3. Press clear if the scale is not displaying the weight.
4. Enter 0 and press accum. The scale will set both the weight accumulator and ID weight accumulator to zero.
To clear all ID count and weight accumulators:
1. Press the setup/cal key, enter 0 and press accum. The scale will set all accumulators to zero.
EXAMPLES OF ACCUMULATING COUNT BY ID
A manufacturer wants to accumulate the number (count) of widgets produced by several operators.
Each operator will produce approximately 100 widgets before delivering them to a stocking location.
At the stocking location, an inspector will count the widgets by sampling them on the scale. In addition, the inspector wants to record how many widgets were produced by the operator, the operator’s
ID number, the time of day and the total number of widgets produced so far that day.
RESETTING COUNT AND WEIGHT ACCUMULATOR REGISTERS
The inspector wants to count the widgets produced during the shift; therefore, the ID count accumulators should be cleared at the beginning of each shift.
1. Enter the count mode by entering an APW or sampling.
2. Press setup/cal, enter 0 and press accum. The scale will set the count and weight accumulators and all ID count and weight accumulators to zero.
Setra Super CountTM Operator's Manual
23
COUNT A BATCH OF WIDGETS AND RECORD THE TRANSACTION
The inspector wants to count the number of widgets in a batch delivered to stock by an operator and
print a record of the transaction.
1. Press the reset key. This will zero the scale and clear the ID, APW and tare registers.
2. Enter the operator’s ID number, up to ten characters.
3. Press the id key. The scale will automatically load the accumulated count value into the count
accumulator.
4. Create a valid APW, either by entering the value through the keypad, a bar code scanner, or by
performing the sampling procedure.
5. Place the pieces to be counted on the scale.
6. Press the accum key. The scale will update the count accumulator and then copy the new
accumulator value into the ID-accumulator memory.
7. The scale will display the accumulated count.
8. Press clear to return to the count.
9. Press print to print the information for this batch. (See printer setup below.)
10. Remove the pieces from the scale.
PRINTER SETUP FOR THIS EXAMPLE
The inspector wants to print a record with the following format:
ID#: 1234
145 pc
10:27 am
ACC 1210 pc
This format can be achieved using the ScriptCoder feature. The code sequence is:
ID#: 1234
10:27 am
Codes: 73 68 35 58 32 128 32 32 32 32 32 154 13 10
145 pc
ACC 1210 pc
Codes: 143 112 99 32 32 32 32 32 32 65 67 67 32 144 112 99 13 10
If using the ScriptCoder program, the count accumulator and weight accumulator selections in Appendix XI can be used for the scale output. The count accumulated number of entries and weight
accumulated number of entries cannot be used when printing multiple accumulators by ID.
24
Setra Super CountTM Operator's Manual
MULTIPLE IDENTICAL LABELS
The Super Count scale can be programmed to print the same label up to nine times with or without
sequential numbering (see ScriptCoder for sequential numbering). To print multiple identical labels,
perform the following steps on the scale keypad:
1. Press the setup/cal key followed by the script’s identifying number, and then the print key. (For
example, setup/cal, 1, print.)
2. The display will read “LAbELS”. Enter a number (1-9). The scale will immediately begin printing
the number of labels entered.
The scale will then return to printing single labels which can be accessed by entering the script
identifying number followed by the print key.
INTERFACING WITH A COMPUTER
The Setra Super Count is designed to interface with a wide variety of computer equipment. If your
scale is connected to a computer, transmit information to the computer by following the instructions
given for “Printing Out Information.” For further details, see Appendix VI.
Setra Super CountTM Operator's Manual
25
Section V
ScriptcoderTM Custom Label Printing
Setra Super Count scales with firmware 1.8 or higher, can be programmed to print custom label
designs on any serial printer, limited only by the printer’s capabilities. This feature, called ScriptCoder™,
allows a label design, or RS-232 output, to be written using a series of codes which are stored in the
scale’s memory. The set of codes, or script, is executed each time the specific label design is selected to print. The script can be written to create a customized output to a serial dot matrix printer,
thermal bar code printer, or even a data collection device. The Super Count can store up to ten
different scripts.
WAYS TO CREATE AND STORE A SCRIPT
A script contains preprogrammed text and data which is transmitted from the scale to the printer
when the appropriate print command is sent. There are three ways to create and enter a script; the
best method to use depends on the complexity of the label design.
The first method may be performed using only a Super Count and involves entering codes directly
through the scale keypad. The second method involves scanning codes into the scale using a bar
code menu chart available in the ScriptCoder Label Design & Cable Kit (Setra P/N 404910). Finally,
the third method involves writing the script using the ScriptCoder PC program and downloading it to
the scale via the RS-232 port (also available with the ScriptCoder kit).
ENTERING A SCRIPT VIA THE SUPER COUNT KEYPAD
All of the codes required for a script may be entered directly through the scale keypad. This method
is most suitable for simple label designs as shown in the following example.
To print the part number and APW on a label to appear as:
Part #: 123-456
APW: 2.56789 g
the following transmission sequence would be required from the scale:
- transmit the text “Part #:” and one space
- transmit the contents of the ID register
- transmit one carriage return and one line feed
- transmit the text “APW:” and one space
- transmit the contents of the APW register and one space
- transmit the unit designation letter
- transmit one carriage return and one line feed (for longer labels add linefeeds to the end of
this script to advance to the next label)
Before a script can be entered into the scale’s print memory, the scale must be setup to accept the
programming codes. To perform this setup and enter a script, follow the steps below:
1. Enter the print setup code —1111 and then press the setup/cal key.
2. “SEt Pr” will be displayed. Press 0, setup/cal to enter the script mode. “SCrIPt” will be displayed.
3. Enter the identifying number for this script, 0 through 9, followed by setup/cal.
26
Setra Super CountTM Operator's Manual
To program the script as the default label design, enter 0. This will program the scale to print
this label design each time the print key is pressed. To print scripts with identifying numbers 19, the corresponding number needs to be entered followed by the print key on the scale’s
keypad (ex. 3 print).
CAUTION:
An existing script will be erased from memory when its identifying number is reentered.
4. The display will read “CodES”. Enter each code’s number followed by the setup/cal key. (Ex.
65 setup/cal for the capital letter A. Refer to the Appendix XI for specific code listings.) “CodES”
will reappear on the display after each code is entered.
NOTE: To clear an incorrect number from the display, press the clear key. Then enter the correct
number.
If setup/cal was pressed after an incorrect number was entered, enter the code 251 followed
by the setup/cal key as a backspace command. Then enter the proper code and press
setup/cal to proceed.
5. When the script is finished, enter 0 then setup/cal. The scale will return to the normal weighing
mode.
CAUTION:
To erase ALL scripts stored in the scale’s memory, enter a —10 as the script identifier
number, followed by the setup/cal key. The scale will return to the normal weighing
mode.
To produce a label with Part # and APW as shown below, enter the following script. (s/c = setup/cal
key on the scale keypad)
Part #:
APW:
123-456
+2.56789 G
SCRIPT CODES -
Part #: (ID 0 is default register) <CR><LF>
80 s/c, 97 s/c, 114 s/c, 116 s/c, 32 s/c,
35 s/c, 58 s/c, 32 s/c 128 s/c, 13 s/c, 10 s/c
SCRIPT CODES -
APW: (APW register) (Units ltr) <CR><LF>
65 s/c, 80 s/c, 87 s/c, 58 s/c, 32 s/c, 141 s/c,
32 s/c, 149 s/c, 13 s/c, 10 s/c (to add line feeds enter 10 s/c here)
0 s/c (to end script)
Each time the print key is pressed, the scale will output the above label and advance the printer to the
next label.
NOTE: A numeric part number or ID can be entered through the scale’s keypad. Alphanumeric ID’s
will have to be entered via a bar code wand, a stand-alone alphanumeric keypad attached to
the scale’s RS-232 port or a PC connected to the scale.
Setra Super CountTM Operator's Manual
27
PRINTING LABELS WITH SEQUENTIAL NUMBERING
The Super Count scale can number packages sequentially (ex. 1 of 3). The sequence can only be
printed using a script program.
To set the numbering sequence:
1. Press the setup/cal key, then press the count key. The display will read “01oF01”.
The first two digit number, XX, will increment by one each time the print key is pressed, until XX
equals the YY value. The second two digit number, YY, represents the total number of packages in a lot.
2. Press the setup/cal key to change the sequence numbers. The scale will display “_ _ oF01”. To
retain the XX value previously displayed simply press the setup/cal key. To set a new XX value,
enter a number (0-99). Press the setup/cal key.
3. The scale will display “XXoF_ _”. To retain the YY value previously displayed, press the setup/
cal key. To set a new YY value, enter a number (0-99) which is equal to the total number of
packages in the sequence. Press the setup/cal key.
To view the current sequence on the scale display:
1. Press the setup/cal key, then press the count key. The display will read “XXoFYY”.
The first two digit number, XX, will increment by one each time the print key is pressed, until XX
equals the YY value. The second two digit number, YY, represents the total number of packages in a lot.
2. Press the clear key to accept these numbers and resume normal operation.
28
Setra Super CountTM Operator's Manual
Appendix I
User-Definable Units
It is often convenient to weigh in user-defined units. Conversion factors can be entered through the
keyboard to be multiplied by the displayed weight, or divisors can be entered to be divided into the
displayed weight. The conversion factor will remain in memory even after the scale is powered off.
“x” UNITS
“x” units can be directly changed by entering a factor or divisor. To measure in “x” units, proceed as
follows:
1. Calculate the ratio you wish to enter. If your ratio is in grams per “x” unit, ounces per “x” unit,
pounds per “x” unit, etc., you will enter a divisor. Proceed with Steps 2 through 7.
If your ratio is in “x” units per gram, “x” units per ounce, “x” units per pound, etc., you will enter
a factor. Proceed with Steps 2 through 7, skipping Step 3.
2. Press the units key until the display reads in the known units from which you wish to convert.
3. If you are entering a divisor, press —.
4. Enter the conversion ratio.
5. Press the units key.
6. Place an object on the scale.
7. Wait for the “OK” symbol, then read the display. The reading given is in “x” units.
Setra Super CountTM Operator's Manual
29
Appendix II
Setup Functions
PRINT FORMAT
The print format setup controls the printout of various measured and stored numbers. You may setup
the scale to have two different print formats for printing labels:bar code labels and/or for English
(human readable) printing. In addition, ten custom print formats are available using the ScriptCoder
feature. (See Section V, ScriptCoder Custom Label Printing for details.)
The key sequence — 1111 may be formatted for bar code or English (human readable) labels and
determines the printing device and specific data that shall print when the print key is pressed. The
key sequence — 4444, (also referred to as ALTERNATE PRINT) may also be formatted for bar code or
English labels, and determines the printing device and specific data that shall print when the • print
keys are pressed. To format the information to be printed, use the following procedure:
1. Press the — key.
2. Enter 1111 or 4444.
3. Press the setup/cal key. The display will read “SEt Pr.”
4. Enter 0 if you are going to program the scale using the ScriptCoder feature. Refer to Section V
for programming instructions or the ScriptCoder operator’s manual available with ScriptCoder
Label Design & Cable Kit (Setra P/N 404910).
Enter 1 if it is connected to a Dymo Setra 300 printer with paper; press the setup/cal key and
continue to step #6.
Enter 2 if it is connected to a Setra Auto Count™ 200 bar code printer option; press the setup/
cal key. The scale’s print format is now set and this procedure is complete.
Enter 3 if it is connected to a Dymo Setra 300 printer with labels; press the setup/cal key and
continue to step #5.
If you are not using a Setra printer or Setra Auto Count see ‘NOTE: c’ at the end of this setup to
determine which number (0, 1, 2, or 3) is most appropriate for your system configuration.
Press clear if you do NOT wish to proceed.
5. For option 3, the display will read “LinES”. The scale now asks how long the labels will be,
measured in terms of lines (for most printers 6 lines = 1 inch). For the Dymo Setra 300 printer,
enter 0 and setup/cal to enter a formfeed command. For other printers, to determine the number of lines, measure with a ruler the distance from the top of one label to the top of the next
label in inches and multiply by six. Enter this value and press the setup/cal key.
Regardless of the number of lines of information to be printed, the Super Count will advance
the printer the same preset distance each time. CAUTION: The scale will not print more lines of
information than the number entered in this step.
6. Read the display. The scale now asks if you wish to print the “TARE” weight.
30
Setra Super CountTM Operator's Manual
7. Enter 1 if you wish to print the TARE weight (enter 0 if you do not).
8. Press the setup/cal key.
9. Read the display. The scale now asks if you wish to print the “GROSS” weight.
10. Enter 1 if you wish to print the GROSS weight (enter 0 if you do not).
11. Press the setup/cal key.
12. Read the display. The scale now asks if you wish to print the “APW” , average piece weight.
13. Enter 1 if you wish to print the APW (enter 0 if you do not).
14. Press the setup/cal key.
15. Read the display. The scale now asks if you wish to print the “ACCUM”, accumulated weight
(or count).
16. Enter 1 if you wish to print the ACCUM (enter 0 if you do not).
17. Press the setup/cal key.
18. Read the display. The scale now asks if you wish to print the “PC”, quantity of pieces (count).
19. Enter 1 if you wish to print the quantity of pieces counted (enter 0 if you do not).
20. Press the setup/cal key.
NOTE: a. Your print output is now formatted. To change the print format, simply repeat Steps 1-20
above using the same input numbers in step #2.
b. To create an additional print format for another printing device or to create an alternate
print format for the same printing device, simply repeat Steps 1-20 above using the other
input numbers in step #2. For example, if you entered 1111 in step #2 to set the current
print format and now want an alternate format enter 4444 in step #2 before setting the
new print format.
c. The Super Count can be used with serial data printers other than those supplied by
Setra, as long as the printer has a minimum buffer of 1K and no RS-232 “handshaking”
requirement.
If the length of the printout is unlimited and there is no need for spacing between each
printout, format the Super Count as if you are using a Dymo Setra 300 printer with paper
which is equivalent to a dot matrix printer by entering the number 1 in step #4.
If you require a uniform printout length such as when printing on adhesive backed labels,
format the Super Count as if you are using the Dymo Setra 300 with labels and choose
the number of spaces desired after entering the number 3 in step #4.
d. For customized output and formatting for both bar code and text printers see ScriptCoder
Custom Label Printing in Section V.
Setra Super CountTM Operator's Manual
31
PROGRAMMING A MINIMUM SAMPLE SIZE
This feature allows you to preset the minimum number of pieces that will be requested when the
sample size key is pressed. To enter the minimum sample size you wish to have used when counting,
use the following procedure:
1. Press the — key.
2. Enter 2222.
3. Press the setup/cal key. The display will read “PC nnn”, where “nnn” is the current minimum
sample size setting.
4. Enter the minimum number of pieces you wish to be used.
5. Press the setup/cal key.
NOTE: To discontinue use of the Minimum-Sample-Size feature, repeat this procedure and enter 0 in
Step #4.
PROGRAMMING A MINIMUM ACCURACY
This feature allows you to preset the minimum accuracy level used by the scale based on the sample
weight. To enter a specific minimum accuracy level, use the following procedure:
1. Press the — key.
2. Enter 3333.
3. Press the setup/cal key. The display will read “ACnn.nn”, where “nn.nn” is the current minimum accuracy setting.
4. Enter the desired accuracy in percent. (A number between 95 and 99.99, e.g., 99.9.)
5. Press the setup/cal key.
NOTE: For any given sample, the scale automatically calculates the number of pieces needed to be
added to the sample, if any, based upon the sample weight necessary to achieve a desired
accuracy. The higher the accuracy selected, the larger the sample weight the scale will request. To discontinue use of the Minimum Accuracy feature, repeat this procedure and enter
0 at Step #4.
Programming the minimum accuracy does not compensate for piece weight variations in the
sample. It is always recommended that a large enough sample is used when determining an
average piece weight.
32
Setra Super CountTM Operator's Manual
PROGRAMMING BAUD RATE AND PARITY
The Setra Super Count is capable of interfacing with a wide variety of computer equipment. To set the
baud rate (the rate at which the scale sends information to a computer or printer) and parity, use the
following procedure:
1. Press the — key.
2. Enter 5555.
3. Press the setup/cal key. The display will read “CAL br”.
4. Enter the baud rate. Choose either 300, 600, 1200, 2400, 4800, or 9600, depending on the
baud rate required by your printer or computer.
5. Press the setup/cal key. The display will read “P- 012”.
6. Enter the desired parity. Choose either no parity (enter 0), odd parity (enter 1), or even parity
(enter 2). If you are unsure, try entering 0 for no parity. If the scale cannot communicate with
your computer, consult the computer’s or printer’s manual to determine the required baud rate
and parity.
7. Press the setup/cal key.
8. REPEAT STEPS 1-7 TO ENSURE THIS BAUD RATE & PARITY IS RETAINED EVEN AFTER POWER
IS REMOVED FROM THE SCALE.
NOTE: The factory default baud rate setting is 2400 and no parity. The scale will transmit with the
parity selected; however, it does not check the parity it receives.
DISPLAY HYSTERESIS
Display hysteresis can prevent the apparent “jumpiness” of the scale display in the weighing mode
from moving one digit to the next. For example: If the weight is nearly equal to 235.65 grams, the
display may toggle between 235.6 and 235.7. By performing the following procedure the scale can
be setup to prevent changes to the display that are less than 1 displayed increment, providing greater
stability in the weight reading. The display hysteresis may be enabled or disabled by performing the
following procedure:
1. Press the — key.
2. Enter 6666.
3. Press the setup/cal key. The display will read “H - 01”.
4. Enter 1 to enable the display hysteresis or enter 0 to disable the display hysteresis.
5. Press the setup/cal key.
NOTE: The display hysteresis does not affect the display in the counting mode.
The factory default display hysteresis setting is enabled (i.e. 1).
Setra Super CountTM Operator's Manual
33
DISPLAYING CAPACITY, SOFTWARE VERSION AND SETUP INFORMATION
Setra is continually making improvements to its products. As a result the operating software, or firmware, of the scale has a revision number. The revision number may prove useful in communicating
with your dealer or Setra in case of difficulty.
Information regarding the scale’s particular setup can be obtained at any given time; however, it is
necessary to connect the scale to a printer or computer, as this information is transmitted via the serial
port. The format of the printed information is as follows:
Setra SUPER COUNT
Capacity:
Software Version:
Time/Date:
Print:
Alt Print:
nnn g
n.n
n:nn AM, nn (month) (year) - if equipped with P/N 404625
Dymo Setra 300, Auto Count or ScriptCoder
NET
TARE
only if setup to print
GROSS
“
APW
“
ACCUM
“
PIECES
“
Dymo Setra 300 or Auto Count
TARE
only if setup to print
GROSS
“
APW
“
ACCUM
“
PIECES
“
Label Header: YOUR COMPANY NAME, ETC. (if defined in ID 7)
Baud Rate: nnnn
Parity: none/odd/even
Minimum Sample Size: nnn pieces
Minimum Accuracy: nn.nn%
“x” units per gram = nnn
Display Hysteresis: on/off
Int Mode: fast/slow
Weighing Units Enabled: ‘x’ units, grams, ounces, pounds, troy ounces, pennyweights,
carats
34
Setra Super CountTM Operator's Manual
To view the scale’s capacity, software version and to print current setup information, follow this procedure:
1. Press the — key. Then enter 7777.
2. Press the setup/cal key. The scale will display “rEF n.n”, where “n.n” is the software version
number. At the same time the scale will transmit all current setups via RS-232 to a printer,
computer or other external device.
3. Press the clear key. The scale will display “nnn g”, where nnn is the capacity of the scale in
grams.
4. Press the clear key to return the scale to normal operation.
RESTORING THE FACTORY DEFAULT SETUPS
The many features described in this section allow the user to customize the Setra Super Count to suit
a particular application. However, in doing this, it is also possible to inadvertently setup the scale in
such a way that it will not operate as expected. To reset the scale to the original factory defaults follow
the steps outlined below.
The factory defaults are set as follows:
-
Baud Rate equal to 2400 and no parity.
-
print is assigned to a standard serial tape printer to Dymo Setra 300 label format with
all available data being printed.
-
alt print is assigned to the Setra Auto Count 200 bar code label printer.
-
No minimum sample size.
-
The minimum accuracy is 95%.
-
The display hysteresis is enabled.
-
The int mode is set to fast update.
-
All weighing units enabled.
-
Database disabled.
To restore the factory default set-ups use the following procedure:
1. Press the — key.
2. Enter 8888.
3. Press the setup/cal key. The display will read “dEFALt”.
4. Press the setup/cal key to restore the factory defaults. Press clear if you do not wish to proceed.
WARNING:
Restoring the factory default setups will erase any span calibration and return
the Super Count to the factory calibration.
Setra Super CountTM Operator's Manual
35
SETTING THE TIME AND DATE
Your Setra Super Count scale may be equipped with an optional time/date feature. If this option has
been installed, set the time and date using the following procedure:
1. Enter —9999.
2. Press the setup/cal key. The display will read “00-99”.
3. Enter the year, any number from 0 to 99; e.g. enter 91 if the year is 1991.
4. Press the setup/cal key. The display will read “01-12”.
5. Enter the month, from 1 to 12; e.g. enter 6 for June.
6. Press the setup/cal key. The display will read “01-31”.
7. Enter the day, from 1 to 31; e.g. 25 for the twenty-fifth.
8. Press the setup/cal key. The display will read “00-23”.
9. Enter the hour, in 24 hour time; e.g. 12:00 PM (noon) is 12, 11:00 AM is 11, 3:00 PM is 15, 11:00
PM is 23, 12:00 AM (midnight) is 0, etc.
10. Press the setup/cal key. The display will read “00-59”.
11. Enter the minutes, from 0 to 59.
12. Press the setup/cal key.
NOTE: If your scale does not have the time/date stamp option, it will ignore the command — 9999
setup/cal.
SETTING DISPLAY UPDATE RATE (INT MODE)
The Setra Super Count scale automatically adjusts the update rate of the displayed information to
provide optimum performance in various environmental conditions, such as vibration or draft. However, certain applications may require a fixed display update. The INT Mode is factory preset to
provide a rapid display update (short integration time) for filling pieces to a target count. The use of
this Mode can be altered to provide a slow display update (long integration time) for weighing in the
presence of draft or vibration. Follow the procedure below to change the functionality of the INT Mode
to either a slow or rapid display update:
1. Enter —11110.
2. Press the setup/cal key. The display will read “INT 1 or 0”.
3. Press 1 for a long integration time (vibration control). Press 0 for a short integration time (filling).
4. Press the setup/cal key.
36
Setra Super CountTM Operator's Manual
UNITS ENABLE/DISABLE SELECTION
The units enable/disable feature controls which weighing units the scale will toggle between when the
units key is repeatedly pressed. The units of measure can be limited to two, three, four, etc. or it can
be entirely disabled so that only one unit of measure can be displayed. For example, if only the grams
and pounds units are enabled, pressing the units key repeatedly will toggle between grams and
pounds. To enable or disable units, follow this procedure:
1. Enter —12221.
2. Press the setup/cal key. The display will now read “CAL U”. Press the setup/cal key again.
3. Read the display. The scale now asks if you wish to enable the ‘X’ units.
4. Enter 1 if you wish to enable the ‘X’ units (enter 0 if you wish to disable the ‘X’ units.)
5. Press the setup/cal key. Read the display. The scale now asks if you wish to enable grams.
6. Enter 1 if you wish to enable grams (enter 0 if you wish to disable grams.)
7. Press the setup/cal key. Read the display. The scale now asks if you wish to enable ounces.
8. Enter 1 if you wish to enable ounces (enter 0 if you wish to disable ounces.)
9. Press the setup/cal key. Read the display. The scale now asks if you wish to enable pounds.
10. Enter 1 if you wish to enable pounds (enter 0 if you wish to disable pounds.)
11. Press the setup/cal key. Read the display. The scale now asks if you wish to enable troy
ounces.
12. Enter 1 if you wish to enable troy ounces (enter 0 if you wish to disable troy ounces.)
13. Press the setup/cal key. Read the display. The scale now asks if you wish to enable pennyweights.
14. Enter 1 if you wish to enable pennyweights (enter 0 if you wish to disable pennyweights.)
15. Press the setup/cal key. Read the display. The scale now asks if you wish to enable carats.
16. Enter 1 if you wish to enable carats (enter 0 if you wish to disable carats.)
17. Press the setup/cal key.
NOTE: If you attempt to disable all units, the scale will respond “UnAbLE”. This feature affects the
units convert function by displaying only the units that are enabled in the following sequence
of units: ‘X’ units, grams, ounces, pounds, troy ounces, pennyweight and carats.
Pressing —, units will return the scale to the factory default units, if it is enabled, otherwise it
will display the next unit that is enabled.
Setra Super CountTM Operator's Manual
37
PIECE WEIGHT PER THOUSAND
When counting extremely small parts, accuracy and efficiency can be increased if the APW is representative of 1000 pieces rather than of a single piece. The piece weight per thousand mode allows
the scale to count tiny parts using an APW that is 1000 times the weight of one part. The factory
default setting for this mode is an average piece weight for a single piece. This mode is enabled
using the following steps:
1. Enter — 14443 and press the setup/cal key.
2. The scale will display “APW 1”.
3. To select an APW representative of a single piece press setup/cal.
To select the piece weight per thousand mode, press the clear key.
4. The scale will display “APW 1000”.
5. To select an APW representative of 1000 pieces, press the setup/cal key.
Press clear to exit this procedure without changing the setting of this mode.
CAUTION: Any APWs that were previously stored will be incorrect if this mode is changed. All APWs
will become representative of either one piece or 1000 pieces depending on how the
mode was set previous to the change.
APW/TARE SCALE DATABASE SETUP
This setup must be enabled before any ID’s and their associated APW and tare values may be stored.
The factory default for this setup is disabled.
NOTE:
An ID’s associated APW may be stored with no tare value but a tare value may not be stored
without an APW.
To enable the scale database, use the following procedure:
1. Enter — 15554 and press the setup/cal key.
2. The scale will display “AUTO ? APW.”
3. Press the setup/cal key to store the APW value associated with the ID or press the clear key to
exit this setup.
4. The scale will display “AUTO ? TARE.”
5. Press the setup/cal key to store the tare value associated with the ID or if you do not wish to
store the tare value press the clear key.
6. The scale will now display “CLEAR.” The database is now enabled and can be used to store
ID’s and their associated APW and/or tare values.
If this is not the first time you have enabled the database feature then you may already have
values stored. Press the clear key if you do not want to lose any of these existing APW and/or
tare values.
Press the setup/cal key to clear all IDs and their APW and/or tare values that may have been
previously stored.
38
Setra Super CountTM Operator's Manual
7. The scale displays “SUrE ?.” This is a safety device to prevent you from accidentally erasing
the database memory.
Pressing the clear key will NOT erase any IDs and associated values that may have previously
been stored.
Pressing the setup/cal key will PERMANENTLY erase any IDs and associated values that may
have previously been stored.
PROTECTING THE APW/TARE VALUES
The database allows you to add an ID and its associated APW and tare values to the scale’s memory
or change any existing values. The existing values may be protected in one of three ways; first only
new ID’s may be added and no changes may be made to existing values; second, new ID’s may be
added to memory and existing APW and tare values may be changed; third, no new ID’s may be
added and existing values may not be changed.
To select the specific protection mode, perform the procedure outlined below:
1. Enter — 16665 and press the setup/cal key.
2. The scale will display “LOCOLD.” In this mode the existing IDs and associated APW and tare
values are protected and new IDs may be entered. To select this protection press the setup/
cal key. To select another protection mode press the clear key.
3. The scale will display “NO LOC.” In this mode new IDs may be stored in memory and existing
APW and tare values may be changed. To select this protection press the setup/cal key. To
select another protection mode press the clear key.
4. The scale will display “LOC AL.” In this mode new IDs may not be entered and existing APW
and tare values may not be changed. To select this protection press the setup/cal key. To exit
this setup without making any changes press clear.
The factory default for this setup is “LOCOLD”, which protects existing IDs and allows new IDs to be
stored.
COUNT/WEIGHT ACCUMULATE BY ID SETUP
This setup should be performed to enable the “accumulate by ID feature”. The factory default for this
setup is disabled.
To enable accumulate by ID, follow the procedure below.
1. Enter —21109 and press the setup/cal key.
2. The scale will display “Id ACCUM on”.
3. Press the setup/cal key to enable accumulation by ID and resume normal operation. All data
stored for the ID accumulate and ID database features will be erased.
4. Press the clear key and the scale will display “Id ACCUM oFF”.
5. Press the setup/cal key to disable accumulation by ID or press the clear key to exit this procedure without changing the setting of this mode.
Setra Super CountTM Operator's Manual
39
CONTINUOUS PRINT MODE
The Super Count’s continuous print feature allows you to program the scale to print at specified time
intervals. For example, to print every five seconds you would enter 5 and press the print key. Since
the key sequence is the same for initiating a script to print, the factory default for this setup is disabled.
To change the continuous print mode follow the steps below:
1. Enter —22220 and press the setup/cal key. The scale will display “IntPrt”.
2. To Enable the Continuous Print Mode
Press the setup/cal key. The scale will return to the normal weighing mode.
To Disable the Continuous Print Mode
Press the clear key. The scale will display “no Int”. Press the setup/cal key to disable the
continuous print mode. The scale will return to the normal weighing mode.
To Exit This Procedure
Press the clear key to exit from this procedure without changing the status of the continuous
print mode.
If the continuous print mode is enabled, the number that corresponds to the selected time interval
cannot be used as a script’s identifying number. For example, if you wanted to print every 7 seconds,
the number 7 could not be used as an identifying number to store a script.
40
Setra Super CountTM Operator's Manual
Appendix III
Calibration
The Setra Super Count is highly stable, and requires infrequent calibration. While it may be calibrated
as often as desired, the factory calibration is adequate for most counting applications. For precise
weighing applications, or for APW entry via bar code or computer, periodic calibrations may be desirable. These calibrations can be done quickly and easily using the scale keyboard and a high accuracy Class F or Class S stainless steel weight.
CALIBRATING YOUR SCALE
To calibrate your scale (for a calibration weight contact your dealer), use the following procedure:
1. Remove all objects from the pan.
2. Level the scale.
3. Press the reset key.
4. Press the units key until the scale reads in the units of the known weight.
5. Place the known weight on the pan.
6. Enter the value of the known weight.
7. Press the setup/cal key.
NOTE: To ensure maximum accuracy, a weight should be used which is as close as possible to the
capacity of the scale.
Setra Super CountTM Operator's Manual
41
Appendix IV
Typical Uses of Your Scale
Taring Out Box Weight Before Weighing Fasteners
To fill an empty box with fasteners and find the weight of the fasteners in the box, not including the
weight of the box, using the tare function of your scale. Place the empty box on the scale, press the
tare key to tare out the box weight, and then load the fasteners into the box. The resulting weight on
the scale will be the net weight, or the weight of the fasteners without the box.
Finding the Number of Washers in a Full Box
To find the number of washers in a full box, knowing the tare weight of the box and the average weight
of one of the washers, first press the zero key to zero the scale. Place the full box on the pan, enter the
weight of the box when empty and then press the tare key to tare out the weight of the box. This will
leave you with the weight of the contents of the box. Next enter the average weight of one of the
washers and press the apw key. The display would show the number of washers in the box.
Measuring the Length of Wire on a Spool
To measure the length of wire coiled on a spool use the tare function. First enter the tare weight of the
empty spool. Next, using your user-definable “x” units (see Appendix I), calculate the ratio of the
weight of one unit length of wire to a known unit; for example, pounds.
Ratio = 1 foot of wire / .1 pounds of wire = 10.
Press the unit key until the display weighed in pounds. Enter the ratio, and press the unit key. The
display will then read in feet of wire and indicate “x” in the display.
Counting Resistors Placed in a Bag
To store the weight of an empty bag and count the number of resistors being placed in it, use the tare
function. To tare out the weight of the empty bag press the tare key. Place a known number of resistors on the pan and enter the number of resistors on the pan, then press the count key. The bag
should then be filled until the scale display shows the number of resistors desired. If the scale has
been formatted to transmit the tare and count to a printer, you would press print to make a permanent
record of the transaction.
42
Setra Super CountTM Operator's Manual
Kitting Microchips in Bags of 25
To kit microchips in bags of 25, you need to know the average piece weight of one microchip. Place
the box full of chips on the scale and press the zero key to zero out the weight of the full box of chips.
Next press the “—” key (indicating you are removing pieces) and enter the average piece weight of
one microchip. Press the apw key and remove microchips until the scale reads “25”. Then zero the
scale and repeat the process until the desired number of kits has been completed.
Counting Non uniform Plastic Lids with Accuracy Enhancement
Suppose you wish to use a large sample size because your plastic parts are not uniform, but want to
avoid hand counting 100 pieces onto the scale. Start by hand counting 10 parts onto the scale, enter
10 then press the count key. Now add 10 more pieces and press the count key again (the number of
pieces added must be 100% or less of the previous sample weight). Each time the count key is
pressed the scale recalculates the APW using the larger sample, in this case, 20 pieces. Next, add 20
more pieces and press the count key. Repeat this two more times, once adding 40 pieces and then
20 more, pressing the count key after each addition. Note, you do not have to hand count each
addition, the Super Count will do it for you.
Setra Super CountTM Operator's Manual
43
Appendix V
Glossary of Terms
ACCURACY
The degree of conformity of a measured value to the true value.
AVERAGE PIECE WEIGHT
The mean weight in a sample of like pieces.
BAUD RATE
The rate at which your scale transmits or receives information to or from a computer or peripheral
device.
DISPLAY HYSTERESIS
The tendency of a scale with a fluctuating reading to stabilize on the most consistent value.
GROSS WEIGHT
The weight of the contents (net weight) combined with the weight of its container (tare weight).
KITTING
Repeatedly removing a given number of pieces for inclusion in a kit; e.g., removing the number of like
transistors necessary to manufacture a radio.
NET WEIGHT
The weight of the contents of a container, without the weight of the container.
PARITY
A bit used to check the validity of the data word.
PRECISION
The degree of reproducibility of an average value derived from multiple measurements usually expressed as one standard deviation (or one sigma).
REGISTER
A memory location within the scale where specific data is stored.
REPRODUCIBILITY
See PRECISION.
TARE WEIGHT
The weight of a container without its contents.
44
Setra Super CountTM Operator's Manual
Appendix VI
RS-232 Serial Data Communications
The Setra Super Count comes equipped with a bi-directional RS-232 interface. Users who have purchased a Dymo Setra 300 Printer may simply follow the directions under “Printing Out Information” to
connect the scale with that unit. Users who are interfacing a scale to the Setra Bar Code System Auto Count 200 should follow the installation instructions in the Operator’s Guide for that equipment.
The RS-232 software conventions are discussed in the first part of this appendix. The interface hardware is discussed in the second part of this appendix. For information on connection and data type,
consult “The RS-232 Interface Hardware” section.
Interfacing a Setra Super Count Scale to a Computer
The bi-directional RS-232 interface not only allows the scale to transmit data to a computer, but also
enables a computer to control the scale. Since the baud rate of this interface is selectable (see
Appendix II - “BAUD RATE”), virtually any computer or terminal with an RS-232 interface can be
connected to the scale. Setra scales do not support either hardware or software handshaking. This
section describes the conventions and formats used to communicate with a Setra Super Count.
Sending Commands to the Scale
All functions which exist on the keyboard may also be accessed by a computer or terminal using the
RS-232. Simply send the ASCII character which corresponds to a function. These characters are
shown in the following table.
Function
ASCII
Hexadecimal
Function
ASCII
Hexadecimal
accum
apw
setup/cal
clear
units
count
gross
id
print
•
display
tare
zero
sample size
M
A
F
K
U
C
G
S
P
•
•
T
Z
O
4D
41
46
4B
55
43
47
53
50
2E
2E
54
5A
4F
0
1
2
3
4
5
6
7
8
9
reset
int
remote scale*
0
1
2
3
4
5
6
7
8
9
X
I
<
2D
30
31
32
33
34
35
36
37
38
39
58
49
45
* For a scale with a remote base in a computer driven system, you may want the remote scale command to remain as E. Since E has been redefined for exponential notation input in software releases
V1.6 and higher, this could cause a conflict. The following setup allows the user to redefine E back to
the remote scale command. If E is redefined to the remote scale command, exponential entry is not
possible. The setup default is to use “E” as the command for exponential notation.
Setra Super CountTM Operator's Manual
45
To redefine the command used for accessing the remote scale follow this procedure:
1. Enter — 19998 and press the setup/cal key.
2. The scale will display “SCI E”. To use “E” as the command for exponential notation, press
setup/cal. To use “E” as the command for the remote scale, press clear.
3. The scale will display “rS E”. To use the “E” command for the remote scale command, press
setup/cal. To exit without altering the use of the “E” command, press the clear key.
Below are additional commands available via RS-232:
Function
ASCII
Hexadecimal
Function
ASCII
Hexadecimal
ID START
ID FINISH
WAKE UP
/
$
W
2F
24
57
JUMP
VERIFY
Immediate Print
J
V
#
4A
56
23
Never include a carriage return or line feed in any command sequence. The scale uses any command character as a terminator for an input string.
For example, to enter a tare weight of 1000 (in the units currently being displayed), simply send
“1000T”. This will enter the number 1000 into the TARE register. To enter an average piece weight of
12.35, send “12.35A”.
Sending Alpha-numeric ID #s to the Scale
Alphanumeric identification numbers (ID#s) may be entered into the scale through the RS-232 interface. Setra scales do not have alpha-numeric keyboards, so the RS-232 interface is the only means of
entering such ID#s.
Since Setra scales recognize upper-case ASCII characters as commands, you must instruct the scale
to ignore entries as commands when entering alpha-numeric ID#s. Special control sequences are
used to disable interpretation of alpha-numeric characters.
To enter an ID# from a computer or RS-232 keyboard, send the following string to the scale:
/ [string identifier] $ S
The ID START (or introducer), “/”, instructs the scale to ignore subsequent characters as commands.
The ID FINISH (or terminator), “$”, instructs the scale to interpret subsequent characters as commands. Everything between the start and finish will be stored as the identifier. The ID# entry command, “S”, instructs the scale to enter the string identifier into the ID# register.
46
Setra Super CountTM Operator's Manual
The following table lists additional identification fields:
ASCII
S
D
R
L
N
Y
H
B
Note:
Hexadecimal
53
44
52
4C
4E
59
48
42
Equivalent ID Field
0
1
2
3
4
5
6
7
Field # 1, 5 and 7, are not cleared when the reset key is pressed or when the unit is powered
off. If your scale is equipped with the time and date option, field #6 is not accessible. If your
scale is not equipped with this option, field #6 is accessible for an ID entry.
The command letters indicated can be used in place of “S” in the command:
/ [string identifier] $ S
The string identifier may consist of any uppercase ASCII character (A-Z), any number (0-9), a space,
or a hyphen (-). It may be up to 25 characters in length. Lowercase ASCII character (a-z) are translated into uppercase by the scale. All other characters are ignored by the scale.
DO NOT SEND A CARRIAGE RETURN, CR, OR A LINE FEED, LF, DURING OR AFTER THE STRING
IDENTIFIER.
Receiving Data From the Scale Using the Immediate Print Mode
When a scale is connected to a computer, it is suggested that immediate print (“#”) be used. In
response to this command the scale will transmit whatever number or message appears in the scale
display. The “string format” output is shown below:
+/- 1 2 3 4 5 6 . c0 c1 c2 c3 CR LF
The first six digits represent the number field. A + or - sign always precedes a weight reading, and a
decimal point is always transmitted, though their exact location depends on the number transmitted.
Numbers with less than six digits are preceded by spaces and the sign is always adjacent to the
leading digit. The specific location of the decimal point depends on the precision of the number
transmitted.
“c0” is the INT mode character.
CHARACTER
I
MEANING
Scale is in the INT mode
(space)
Scale is not in the INT mode
“c1” is the “mode” character. It describes what the number being transmitted represents. The follow-
Setra Super CountTM Operator's Manual
47
ing is a list of all possible mode characters:
CHARACTER
MEANING
(space)
Number field is a message or net weight
G
Number field represents GROSS weight
T
Number field represents TARE weight
A
Number field represents APW
M
Number field represents ACCUM contents
“c2” is the “units” character. It describes the units of the number being transmitted. The following is a
list of all possible characters sent in this digit:
CHARACTER
MEANING
G
Number is expressed in grams
O
Number is expressed in ounces
P
Number is expressed in pounds
Y
Number is expressed in troy ounces
D
Number is expressed in pennyweights
K
Number is expressed in carats
X
Number is expressed in “x” units
C
Number is expressed in pieces
“c3” is the “stability” character. This character corresponds to the “OK” symbol on the display.
CHARACTER
(space)
S
MEANING
Reading is not stable
Reading is stable
The immediate print output is always transmitted with a carriage return and line feed.
48
Setra Super CountTM Operator's Manual
To read data that may be stored in a specific memory register, you must first instruct the scale to
display the data held in the particular memory register, and then to transmit the displayed data to the
computer. For example, to read the contents of the following registers, the following codes must be
transmitted.
Register
Tare
Accumulator
Count
APW
Gross
Net
Transmit
.T#
.M#
.C#
.A#
.G#
.GG#
Hexadecimal
2E
54
23
2E
4D
23
2E
43
23
2E
41
23
2E
47
23
2E
47 47 23
The following are some examples of immediate print output:
“– – +12.3-GPS” means that the GROSS weight is 12.3 lbs stable.
“– – +10000—C-” means 10000 pcs, and the reading is not stable.
“– – +84.6-TO-” means that the TARE weight is 84.6 ounces.
“– – +14.2I-P-” means the NET weight is 14.2 pounds, and the scale is in the INT mode.
“UNABLE” means that the scale is cannot comply with your request. Press the clear key or transmit
the letter K to clear the display.
Continuous Print Mode
For continuous data output, use the continuous print mode to print the contents of the display every
time a new reading or message is available. The rate at which data is updated is variable and ranges
from once every .2 seconds up to once every six seconds. This mode is useful if the computer/scale
software interface runs as a background process.
The continuous data mode is initiated by sending 0P over the RS-232, or by pressing 0 then print on
the scale keypad. This mode is canceled by sending “—P” or pressing — then print on the keypad.
Values greater than 0 can be used for longer intervals between data transmittals.
In the continuous print mode, any messages that appear in the display, including error messages
such as “UnAbLE”, will be transmitted over the RS-232 port. The continuous print mode always transmits “string format”, regardless of which print format is selected.
NOTE: To enable continuous printing, a setup code must first be entered (see Appendix II). It is
recommended that the baud rate be set at 2400 or higher to ensure that all of the scale output
is transmitted, If the baud rate is set too low, the internal output buffer in the scale may
overflow.
The Jump Function
Setra Super CountTM Operator's Manual
49
The Jump Function causes the scale to immediately operate in a given weight unit. Using this function
insures that numbers, such as tare weight or average piece weight, entered through the RS-232
interface are interpreted in the correct units. For example, if the average piece weight was stored by
a computer in grams, it would be necessary to ensure that the scale was operating in grams prior to
sending the APW to the scale. This feature is only available through the RS-232 interface.
To use the .Jump Function, send the following to the scale: nJ. Where “J” is the Jump function command and “n” is the unit code. The units code ranges from 0 to 6 as shown:
Units Code
0
1
2
3
4
5
6
Unit
“X” Units
grams
ounces
pounds
ounces:troy; ounces
pennyweights;
carats
Do not send any number other than 0-6. For example, to enter an average piece weight of 0.23456
grams from a computer, send “1J0.23456A”. The “1J” sets the scale for operation in grams. The
“0.23456A” tells the scale to enter that weight into the APW register. The Jump Function prevents
misinterpretation of values entered from a computer.
The Verify Function
When many scales or other peripherals are connected to a computer, it is sometimes useful for the
computer to be able to check on the status of these devices. The verify function can be used to
determine the model number of a scale and determine that the scale is functioning correctly. To
invoke the verify function, transmit an ASCII “V”. If the scale is functioning correctly, it will send one of
the following messages followed by carriage return and line feed:
“Setra SUPER COUNT, 1000 grams”
“Setra SUPER COUNT, 2500 grams”
“Setra SUPER COUNT, 5000 grams”
“Setra SUPER COUNT, 12500 grams”
“Setra SUPER COUNT, 25000 grams”
“Setra SUPER COUNT, 34000 grams”
“Setra SUPER COUNT, 50000 grams”
Status After Power is Applied
All Setra scales have an internal nonvolatile memory for storing certain status information. This memory
does not erase when power is removed from the unit. All setup functions (such as print format, minimum pieces, minimum accuracy, baud rate, and user conversion factors) are stored in this memory.
As a result, the baud rate and print format will not need to be reset each time the scale is turned on.
During the first 30 seconds of operation, the scale will run through a self-diagnostic procedure. When
the unit is ready to be used, it will identify itself by transmitting a “wake-up” message. (This message
can also be invoked by sending a “W” to the scale.)
The RS-232 Interface Hardware
50
Setra Super CountTM Operator's Manual
Although Setra scales can communicate with almost any RS-232 device, the built-in interface does
not include the complete protocol. Only the transmit and receive lines of the standard interface are
used.
The data format is:
1 start bit
8 data bits including parity
1 stop bit
10 bits per frame (framing errors ignored)
NOTE: The scale will transmit using the parity selected; however it does not check the parity it receives.
Use an RS-232 cable to connect the external device to the scale, or construct one following the
instructions below.
The serial port uses an eight pin modular connector. The pinout is as follows:
1
2
3
4
5
6
7
8
ground
transmit out
receive in
no connection
no connection
optional +5V @ 250 ma*
ground
ground
8
1
Modular Jack
Connector
(in back of scale)
* If the fuse (Setra P/N 404722) is installed, power is provided for the Auto Count 200 or an intelligent
bar code wand (Setra P/N 403676), CCD or laser scanner.
NOTE: The “handshake” signals, such as “Clear To Send” (CTS), are not implemented. This requires
that the peripheral have a minimal buffer (15 characters).
In addition, some computers requiring handshaking will need a connection between two pins on the
computer’s connector named DTR and DSR (Data Terminal Reading and Data Set Ready). CTS may
also need to be jumpered to RTS at your computer interface (Clear to Send and Ready to Send).
The maximum recommended cable length is 15 meters. The cable may be longer if it has less than
2,500 pF capacitance. The load impedance of the device connected should be between 3,000 and
7,000 ohms with not more than 2,500 pF shunt capacitance. For more information, consult EIA Standard RS-232: “Interface Between Data Terminal Equipment Employing Serial Data Interchange.”
The following is a short example of a BASIC program which will a) set the PC’s “COM” port for use with
a Setra Super Count scale, b) obtain a verification message, c) clear and zero the scale, d) set the
Setra Super CountTM Operator's Manual
51
scale units to grams, e) set the ID to ABC-123, f) read the ID back from the scale and g) wait for a
stable reading and obtain a weight. This program will work with an IBM* PC type .computer using
BASIC A or GW BASIC version 3.0 or higher.
100
CLS
120
PRINT “ Setra 404 SCALE COMMUNICATIONS TEST”
140
PRINT “ PLEASE INPUT THE SCALE’S BAUD RATE .... USUALLY 2400”
160
INPUT BAUD$
180
PRINT” PLEASE INDICATE WHICH COMPUTER COM PORT YOU ARE USING (1 OR 2)”;
200
INPUT I%
220
IF I%=2 THEN PORT$=“COM2” ELSE PORT$=“COM1”
240
REM: OPEN THE COMMUNICATIONS PORT & DISABLE ALL HANDSHAKES
260
REM: 8 DATA BITS WITH NO PARITY AND 1 STOP BIT IS SELECTED
280
O$=PORT$+”:”+BAUD$+”, N, 8, 1, RS, CS, DS,CD”
300
OPEN O$ FOR RANDOM AS #1
320
REM: VERIFY THE SCALE MODEL
340
REM: SCALE COMMANDS DO NOT USE A <CR> OR <LF>
360
REM: NOTE USE OF (;) AT END OF PRINT #1 STATEMENTS
380
PRINT #1, “V”;
400
INPUT #1, A$
420
PRINT “SCALE MODEL IS: “;A$
500 LOCATE 7, 7: PRINT “PRESS ‘Z’ TO ZERO THE SCALE OR PRESS ‘Q’ TO QUIT”
520 REM: THIS COMMAND, ‘#’ REQUESTS THE SCALE TO TRANSMIT DISPLAYED WEIGHT
540 PRINT #1, “#”;
560 INPUT #1, A$
600 REM: THIS DISPLAYS THE WEIGHT TRANSMITTED BY THE SCALE
620 LOCATE 10, 10: PRINT “
640 LOCATE 10, 10: PRINT “THE WEIGHT ON THE SCALE IS: “;A$
699 REM: THIS CHECKS IF A COMMAND HAS BEEN REQUESTED VIA THE PC KEYBOARD
700 K$ = INKEY$
720 IF K$ = ““ THEN GOTO 500
740 IF K$ = “Q” OR K$ = “q” THEN GOTO 1000
760 IF K$ = “Z” OR K$ = “z” THEN GOTO 800
780 GOTO 500
800 REM: THIS WILL ZERO THE SCALE
COMMAND IS ‘Z’
820 PRINT #1, “Z”
840 REM: THIS WILL REQUEST THE READING FROM THE SCALE COMMAND ‘#’
860 REM: THIS READING WILL NOT BE SENT UNTIL THE SCALE IS ZEROED
880 PRINT #1, “#”;
900 INPUT #1, A$
920 GOTO 500
1000 REM: THIS IS THE END OF THE PROGRAM
* IBM is a registered trademark of International Business Machines, Inc.
52
Setra Super CountTM Operator's Manual
Appendix VII
Accessories and Options
The following accessories are available for the Setra Super Count. Ask you dealer for current price
information and/or a demonstration.
Part #
Description
401160
Dymo Setra 300 Printer - 2.25" wide receipt/label thermal printer. Direct connect for
English only or barcode printing with ScriptCoder or to the AutoCount 200 for
barcoding.
Dimensions: 4"w x 8"l x 6.25"h(100mm x 200 x 160mm).
404530
BATTERY CONNECTOR ASSEMBLY - designed for portability, this option permits
battery operation. Included is an “on-off” switch, external and internal battery charger
and a DC power clip. A battery is NOT included.
404620
BATTERY - this camcorder style lead-acid battery will provide up to twenty-four hours
of scale operation on a full charge. Battery is 12 VDC, 2.3 ampere hours. Use of this
battery is limited to scales equipped with the BATTERY CONNECTOR ASSEMBLY
(Setra part number 404530.)
404150
AUTO COUNT 200 - scale bar code option allows use of the Setra Super Count for
reading and printing bar code labels. Includes a scanning wand.
404520
REMOTE SCALE OPTION - the Remote Scale Option allows the Setra Super Count to
be used for sampling, as well as for displaying weight and count for conventional
strain gage load cell bases. Option includes analog to digital converter and 7 pin
connector. Excites up to four load cells in one base.
404625
TIME/DATE PRINTOUT - for applications requiring a permanent record of the time
and date of each transaction an optional Time/Date feature can be installed that will
automatically transmit this information to a peripheral device each time the print key
is pressed.
404910
SCRIPTCODER LABEL DESIGN & CABLE KIT - this programming option allows
customization of labels to include any alphanumeric information, scale data fields or
ASCII control characters to print any label format including bar codes on thermal
printers.
Setra Super CountTM Operator's Manual
53
Appendix VIII
In Case of Difficulty
If you have reached a state in which the scale will no longer follow your instructions, remove all weight
from the pan and press the reset key. If this does not solve the problem, try briefly unplugging the unit
from its power source; then, plug the unit in again.
If the scale displays “d nOS”, it may have been subjected to an extreme discharge of static electricity
or power line fluctuations. To restore operation follow the procedures outlined below. Note, the user
setups will be restored to the original factory defaults, including calibration settings.
1. Press the clear key. The scale will now perform tests to verify its operation and reset all of the
setups to the factory defaults. The scale will then display “PASS”.
2. Press the clear␣ key. The scale will now perform the normal segment test, display the capacity,
count down to zero and then enter the weighing mode.
If the unit displays any unusual messages during the warm-up period, or does not return to normal
operation, contact an Authorized Setra Service Center or Setra Systems, Inc., as service may be
required.
If the scale displays the “bUSY” message for an extended period of time, or the displayed reading is
unstable, too much vibration or draft may be present. To correct this condition, move the scale away
from the source of vibration or shield the scale from draft. If vibration or draft is not the cause of the
instability, service may be required.
If “UnAbLE” is displayed during calibration, check to make sure you are using the correct calibration
weight.
If you experience difficulty in sampling during a counting operation, check the “setup” of the scale. To
restore the factory default setups use the following procedure:
1. Enter — 8888 and press the setup/cal key. The display will read “dEFALt”.
2. Press the setup/cal key to restore the factory defaults. Press clear if you do not wish to proceed.
To clear all print setups, including all scripts, use the following procedure:
1. Enter — 1111 and press the setup/cal key. The display will read “SEtPr”.
2. Enter 0 and press the setup/cal key. The display will read “SCrIPt”.
3. Enter —10 and press the setup/cal key.
NOTE: All scripts and print setups will be deleted and nothing will be outputted from the RS-232 port
until the scale is reprogrammed (see Appendix II and Section V for details about the ScriptCoder
feature.)
54
Setra Super CountTM Operator's Manual
If the RS-232 interface does not function correctly, first check that the correct RS-232 cable is being
used, and that all cable connections are secure. Next, reset the baud rate of the scale to match the
external device. See Appendix II, “Setup Functions.” Now, make certain the data formats are identical. See Appendix VI, “RS-232 Serial Data Communications.” If data transmission or reception is still
not possible, be certain that the cable is the correct type. (When communicating with certain types of
devices, especially computers, it may be necessary to “cross” the receive and transmit lines of the
interface. That is, the receive line of the scale must connect to the transmit line of the external device.
Likewise, the transmit line of the scale must connect to the receive line of the external device. Special
cables can be purchased for this purpose from a computer dealer.) See Appendix VI for more information.
If the problem still persists, contact your dealer or consult Appendix XI, “Limited Two-Year Scale
Warranty,” for more information.
Setra Super CountTM Operator's Manual
55
Appendix IX
Battery Option
Installation
Disassembly of the entire scale is not required when installing the battery option kit.
1. Position the back of the scale so it overhangs the rear of a work bench (see Figure 2).
2. Remove the (2) Phillips head screws (marked “A” in Figure 2) and the rear panel.
3. Next remove the (2) hex head screws and washers marked “D” in Figure 2.
4. Disconnect the ribbon cable and remove the power circuit board.
5. Install the battery option circuit board and reconnect the ribbon cable. Make sure to loop the
battery clip out through the battery door opening.
6. Replace the (2) hex head screws and washers marked “D” in Figure 2.
7. Before replacing the rear panel, remove the pre-cut knockout for the power switch with a hammer and screwdriver. Mount the rear panel onto the scale with the (2) Phillips head screws
(marked “A” in Figure 2).
8. Slide the battery halfway into the scale, attach the battery clip, then insert the battery completely into the scale.
9. Slide the battery door closed and the scale is now powered for portable operation.
A
A
D
D
Figure 2. Installing the Battery Option.
56
Setra Super CountTM Operator's Manual
Battery Use for Portable Operation
A fully charged battery will allow a Setra scale to operate for approximately 24 hours before recharging is needed. The battery will last one-half as long or about 12 hours if the scale is equipped with
either a Remote Scale Option or an Auto Count 200. If the scale is equipped with both the Remote
Scale Option and an Auto Count 200, the battery will only last one-third as long, or eight hours if fully
charged. The “low bat” indicating light on the front panel of the scale will light up approximately one
hour before recharging is necessary. When battery power is too low for proper scale operation the
circuit will automatically shut off the battery and the scale will cease operation.
Replacement batteries can be ordered from Setra Systems (part number 404620.)
Battery Charging
When the “low bat” indicator light on the front panel of the scale turns on, use the following procedure
to recharge the battery:
1. Plug the AC Adaptor, (Setra part number 404712) into an electrical outlet, and plug the power
cable into the scale. Do not remove the battery. The scale will automatically recharge the
battery from the electrical outlet.
2. The “low bat” indicator light will remain on during recharging until the battery reaches 40% of
its rated capacity. This will take about 2.5 hours with the scale power switch in the “ON” position, and 2 hours and 10 minutes with the switch “OFF”. A battery powering a scale alone will
reach 95% of its rated capacity in 8 hours if the power switch is in the “ON” position and in 7
hours if the switch is “OFF”. Note that the indicator light will not light up if the scale switch is
“OFF”.
3. If the scale is equipped to power a Remote Scale Option or the Auto Count 200 from the scale’s
battery, it is recommended that battery recharging be done with the scale power switch in the
“OFF” position.
4. The “bat charge” indicating light on the front panel of the scale will stay on until the battery
reaches 95% of its rated capacity. Note that the “bat charge” light will not be lit if the scale
power switch is in the “OFF” position.
Battery charging time may vary slightly depending upon the temperature in the scale operating
environment. For applications requiring continuous scale operation it is recommended that the
battery be removed from the scale and recharged using the external battery charger(Setra part
number 404719).
Setra Super CountTM Operator's Manual
57
Appendix X
Specifications
Setra SUPER COUNT™
CAPACITY
REPRODUCIBILITY
NON-LINEARITY
2.2 lb
+/-0.00002 lb
0.00002 lb
+/-0.00002 lb
5.5 lb
+/-0.00005 lb
0.00005 lb
+/-0.00005 lb
11.0 lb
+/-0.0001 lb
0.0001 lb
+/-0.0001 lb
27.0 lb
+/-0.0005 lb
0.0005 lb
+/-0.0005 lb
55.0 lb
+/-0.001 lb
0.001 lb
+/-0.001 lb
75.0 lb
+/-0.002 lb
0.002 lb
+/-0.002 lb
110.0 lb
+/-0.002 lb
0.002 lb
+/-0.002 lb
CAPACITY
REPRODUCIBILITY
READABILITY
NON-LINEARITY
1000 g
+/-0.01 g
0.01 g
+/-0.01 g
2500 g
+/-0.02 g
0.02 g
+/-0.02 g
5000 g
+/-0.05 g
0.05 g
+/-0.05 g
12,500 g
+/-0.2 g
0.2 g
+/-0.2 g
25,000 g
+/-0.5 g
0.5 g
+/-0.5 g
34,000 g
+/-1.0 g
1.0 g
+/-1.0 g
50,000 g
+/-1.0 g
1.0 g
+/-1.0 g
Internal Counting :
1 Part in 500,000
Counting Accuracy:
Selectable from 95% to 99.99%
Minimum Sample Size:
Selectable from 1 to 999 pieces
Display Update Speed:
Up to 5 times per second
Display Units:
Counting Capacity:
Data Communications:
Selectable Baud Rates:
58
READABILITY
grams, ounces, pounds, troy ounces, pennyweights,
carats, user-definable units
999,999 pieces
Bi-directional RS-232
300,
600,
1200,
2400,
4800,
9600
Setra Super CountTM Operator's Manual
Selectable Parity:
Display:
Pan:
Operating Temperature:
AC Adaptor:
Platform/Pan Dimensions:
even/odd/none
6-digit LCD
Stainless Steel
40˚ to 110˚F (5˚ to 43˚C)
Input - 110 VAC / 60 Hz
Output - 16 VDC @ 550ma
1000 g (2.2 lb.)
2500 g (5.5 lb.)
5.12” diameter 130 mm
5.12” diameter 130 mm
5000 g (11 lb.)
6.31” diameter 160 mm
12,500 g (27 lb.)
25,000 g (55 lb.)
34,000 g (75 lb.)
50,000 g (110 lb.)
Overall Dimensions:
Shipping Weight:
All models:
11” x 14”
11” x 14”
11” x 14”
11” x 14”
280 mm x 355 mm
280 mm x 355 mm
280 mm x 355 mm
280 mm x 355 mm
14.12”w x 15.59”l x h (see below)
358.65 mm x 396 mm x h (see below)
1000 g (2.2 lb.)
2500 g (5.5 lb.)
4.88”
4.88”
124.0 mm (feet retracted)
124.0 mm (feet retracted)
5000 g (11 lb.)
4.97”
126.4 mm (feet retracted)
12,500 g (27 lb.)
25,000 g (55 lb.)
34,000 g (75 lb.)
50,000 g (110 lb.)
5.73”
5.73”
5.73”
5.73”
145.4 mm
145.4 mm
145.4 mm
145.4 mm
(feet retracted)
(feet retracted)
(feet retracted)
(feet retracted)
Super Count - 1000g-5000g: 20 lb. (9.1 Kg)
Super Count - 12,500g - 50,000g: 26 lb. (11.8 Kg)
Specifications subject to change without notice.
Setra Super CountTM Operator's Manual
59
Appendix XI
Script Codes for Keypad Entry
The following tables show the codes for the ASCII characters, ASCII control codes and Setra scale
data codes.
ASCII Characters
A
B
C
65
66
67
a
b
c
97
98
99
0
1
2
48
49
50
D
E
F
G
H
I
J
K
L
M
N
O
P
Q
R
S
T
U
V
W
X
Y
Z
68
69
70
71
72
73
74
75
76
77
78
79
80
81
82
83
84
85
86
87
88
89
90
d
e
f
g
h
i
j
k
l
m
n
o
p
q
r
s
t
u
v
w
x
y
z
100
101
102
103
104
105
106
107
108
109
110
111
112
113
114
115
116
117
118
119
120
121
122
3
4
5
6
7
8
9
space
51
52
53
54
55
56
57
32
.
60
Setra Super CountTM Operator's Manual
Punctuation and Special Characters
!
“
#
33
34
35
[
\
]
91
92
93
$
%
&
‘
(
)
*
+
,
.
/
:
;
<
=
>
?
@
36
37
38
39
40
41
42
43
44
45
46
47
58
59
60
61
62
63
64
^
94
—
95
‘
96
{
123
|
124
}
125
~
126
backspace 251
(Note: The backspace will clear the code that was last entered.)
Setra Super CountTM Operator's Manual
61
Setra Scale Data
ID 0
ID 1
ID 2
128
129
130
transmit ID field 0 “S” id
transmit ID field 1 “D” id
transmit ID field 2 “R” id
ID 3
ID 4
ID 5
ID 6
ID 7
Gross
Net
Tare
A.P.W.
A.P.W. exp.
Count
Acc Count
Acc Ct Ents
Acc Weight
Acc wt Ents
Units word
Units ltr.
Setra codes
131
132
133
134
135
138
139
140
141
142
143
144
145
146
147
148
149
150
Units jump code
X of “x or y seq.”
Y of “x or y seq.”
Time
151
152
153
154
Date
155
Pause(.1)
156
transmit ID field 3 “L” id
transmit ID field 4 “N” id
transmit ID field 5 “Y” id
transmit ID field 6 “H” id time, if installed
transmit ID field 7 “B” id
transmit gross weight in external resolution
transmit net weight in external resolution
transmit tare weight in external resolution
transmit APW in internal resolution
transmit APW in exponential notation
transmit count
transmit count accumulator value
transmit count accumulator entries
transmit weight accumulator
transmit weight accumulator entries
transmit units label, e.g., “grams”, “pounds”
transmit units letter, e.g., “g”, “p”
ignored in scale, interpreted during setup to insert
the appropriate scale control codes.
transmit units code number and J, e.g., “1J”, “3J”
transmits the X of the “X of Y” sequence.
transmits the Y of the “X of Y” sequence.
transmit the time hh:mm AM, from the Super Count
with time/date option.
transmit the date mm/dd/yy, from the Super Count
with time/date option.
Pause for a specified time before continuing to
transmit the script.
(Argument code 1 to 99, e.g. 5 = .5 second pause,
25 = 2.5 second pause.)
62
Setra Super CountTM Operator's Manual
Format Codes
Format Length
160
Set the length of the field to be printed.
(Argument code 1 to 99.)
Format Precision
161
Set the precision of the field to be printed. (Argument code 0 to 6.)
Format Sign
162
Transmit the “+” and “-” sign or only the “-” sign as
appropriate. (Argument code “+” or “-”, 43 or 45,
respectively.)
Justification
163
Justify the field to the left or right. (Argument code
“R” or “L”, 82 or 76, respectively.)
Fill Character
164
The fill is the character to be repeated in order to
justify the field and create the desired length.
(Argument code: any printable character, e.g., “*”,
“0”, or space, 42, 48 or 32, respectively.)
Setra Super CountTM Operator's Manual
63
ASCII Control Characters
64
soh
stx
1
2
ctrl A
ctrl B
esc
fs
27
28
etx
eot
enq
ack
bel
bs
ht
lf
vt
ff
cr
so
si
dle
dcl
dc2
dc3
dc4
nak
syn
etb
can
em
sub
3
4
5
6
7
8
9
10
11
12
13
14
15
16
17
18
19
20
21
22
23
24
25
26
ctrl C
ctrl D
ctrl E
ctrl F
ctrl G
ctrl H
ctrl I
ctrl J
ctrl K
ctrl L
ctrl M
ctrl N
ctrl O
ctrl P
ctrl Q
ctrl R
ctrl S
ctrl T
ctrl U
ctrl V
ctrl W
ctrl W
ctrl Y
ctrl Z
gs
rs
us
del
29
30
31
127
Setra Super CountTM Operator's Manual
Appendix XII
Setra Systems, Inc.
Limited Two-Year Scale Warranty
Setra Systems, Inc. warrants the scales it manufactures to be free from defects in material and
workmanship. Upon return, transportation charges prepaid, to Setra’s factory within two (2) years of
the date of purchase, Setra will repair or replace, at its option, any scale which it determines to
contain defective material or workmanship and will return said scale to purchaser, transportation
prepaid, at any point in the United States. Setra shall not be obligated, however, to repair or replace
scales which have been repaired by unauthorized parties, abused, improperly installed, altered, or
otherwise misused or damaged, even if by accident, in any way. Setra will not be responsible for any
dismantling, reassembly or reinstallation charges.
Nothing in this warranty shall be construed as a warranty for merchantability or fitness for any specific use or purpose, and this warranty is in lieu of all other warranties, express or implied. Setra shall
not be held liable under the terms of this warranty for any special, indirect, incidental or consequential damages claimed in connection with the scales performance or availability.
Setra Systems, Inc.
Weighing Systems Division
159 Swanson Road · Boxborough, MA 01719 · (978) 263-1400
Setra Super CountTM Operator's Manual
65
INDEX
01oF01 28
AC adaptor 3, 18, 59
accessories 53
accum 5, 6, 15, 22, 23, 24, 31, 34, 45, 48
accumulate 5, 15, 31
accumulator
count by id 22
count by id, example 23
count by id, setup 39
database 22
database, clear 23
multiple 24
weight by id 22
weight by id, setup 39
accumulator database 22
accuracy 4, 10, 11, 32, 41, 44, 58
enhancement 7, 14, 43
add nnn 7
alphanumeric keypad 27
apw (See average piece weight)
ASCII character 45, 47, 50
ASCII characters 46, 60
punctuation 61
special 61
ASCII control characters 64
ASCII control codes 60
Auto Count 200 30, 35, 45, 51, 53, 57
average piece weight 5, 6, 7, 11, 13, 14, 15, 19, 22, 23, 26, 31, 32, 34, 38, 39, 41, 42, 43, 44, 45, 46,
48, 49, 50
exponential notation 19
non-uniformity 11, 32
piece weight variations 11, 32
backup 20
bar code 41, 45, 53
label 30, 53
scanner 19, 22, 24
bar code wand 27
intelligent 51
BASIC program 52
bat charge 6
battery 3, 6, 53
charging 57
external charger 57
portable operation 57
replacement 57
battery connector assembly 53
baud rate 18, 33, 34, 35, 44, 45, 49, 50, 53, 55, 58
buffer 49
bUSY 5, 7, 54
C nnn g 4, 7
cable 51, 55
CAL br 33
calibration 5, 41, 54
capacity 4, 5, 7, 34, 35, 41, 54, 58
carats 6, 8, 37, 48, 50, 58
ChAngE 20
clear 4, 5, 6, 7, 8, 9, 15, 16, 17, 20, 22, 23, 24, 28, 30, 35, 39, 45, 52, 54
66
Setra Super CountTM Operator's Manual
accum 16
Clear To Send 51
code 24, 26, 49, 60
format 63
sequence 24
CodES 27
CompuCount™ 25
computer 4, 20, 25, 33, 34, 41, 44, 45, 46, 47, 49, 50, 51, 52, 55
computer.. 19
container 5, 8, 9, 12, 14, 15, 44
filling 16
continuous print 40
continuous print mode 49
control codes 20
conversion factor 29, 50
conversion ratio 29
count 1, 5, 7, 9, 10, 11, 12, 13, 14, 15, 16, 18, 20, 24, 28, 31, 36, 42, 43, 45, 49, 53, 54
accumulate 16, 22, 31
accumulator 23, 24
mode 33
reverse 14, 15
d nOS 54
data collection device 26
database 21, 38, 39
accumulator 22
accumulator, clear 23
dEFALt (See default)
default 6, 8, 16, 33, 35, 38, 54
dELEtE 21
display 1, 5, 8, 17, 45, 59
accum 15, 16
apw 13, 19
count 15, 16
flashing 7
gross weight 8, 12
hysteresis 33, 34, 35, 44
id 16
message 1, 4
messages 11, 30, 31, 32, 33, 35, 37, 54
sequential numbering 28
stable 16
symbols 6
tare 8, 12
test... 4
units 8, 58
update rate 16, 36, 58
draft 3, 16, 36, 54
dwt (See pennyweights)
error message 49
examples 14, 16, 19, 31, 33, 37, 42, 46, 49, 50, 52
exponential notation 19
factory default 6, 37, 39
filling 36
firmware 34
format codes 63
full scale 4, 5
GOnE 21
grams 4, 5, 6, 8, 29, 33, 35, 37, 48, 50, 52, 58
Setra Super CountTM Operator's Manual
67
gross weight 5, 6, 8, 12, 31, 34, 44, 45, 48, 49
handshaking 31, 45, 51
hardware 45, 51
hexadecimal 45, 47, 49
hysteresis 44
id 5, 6, 16, 17, 20, 21, 22, 23, 38, 39, 45, 46, 47, 52
protect 19, 20
Id ACCUM oFF 39
Id ACCUM on 39
ID PR 20
ID SC 20
identification 46
immediate print 47, 49
installation 1, 45
INT 6, 16, 34, 35, 36, 45, 47, 49
integration time 36
interface 25, 45, 46, 50, 51, 53, 55
IntPrt 40
inventory adjustments 25
jump function 46, 50
keyboard 1, 4, 5, 8, 10, 12, 13, 19, 29, 41, 43, 45, 46
alphanumeric 27
keypad entry 22, 24
script 25, 26
kilograms 6
kitting 7, 14, 15, 43, 44
label
design 26
design, simple 26
design,default 27
printer 30
labels 9
bar code 30, 53
customization 53
English 30
Header 34
human readable 30
multiple, identical 25
sequential numbering 28
LED 6
leveling 3
line feed 30, 46, 47, 49, 50
LinES 30
LOC AL 19, 39
LOcKEd 20
LOCOLD 19, 39
low bat 6, 57
mantissa 19
memory 5, 6, 8, 20, 21, 22, 24, 26, 27, 29, 39, 44, 49, 50
messages 1, 48, 50, 52, 54
error 49
wake up 4
minimum accuracy 7, 10, 11, 15, 32, 34, 35, 50, 58
minimum sample size 7, 10, 11, 32, 34, 35, 50, 58
model 4, 50, 59
NET 34
net weight 5, 8, 42, 44, 48, 49
no Int 40
68
Setra Super CountTM Operator's Manual
NO LOC 19, 20, 21, 39
non-linearity 58
OFLO 7
OK 6, 8, 10, 11, 12, 13, 14, 29, 48
ounces 5, 6, 8, 29, 37, 48, 49, 50, 58
troy 6, 8, 48, 50, 58
output 24, 26, 27, 49
pan 3, 59
parity 18, 33, 34, 35, 44, 51, 59
part number 26, 27
PASS 54
PC 6, 7, 31
pennyweights 6, 8, 37, 48, 50, 58
peripheral device 5, 44, 53
pounds 6, 8, 29, 37, 42, 48, 49, 50, 58
precision 44
print 4, 5, 8, 9, 12, 16, 17, 18, 22, 24, 27, 30, 31, 34, 35, 45, 53
accumulated values 22
alternate 30, 31, 34, 35
bar code 53
continuous mode 40, 49
continuous mode, disable 40
continuous mode, enable 40
format 30, 31, 34, 50
Immediate 46, 47, 49
labels 30
multiple identical labels 25
sequentially numbered labels 28
specified time intervals 40
time & date 34, 53
printer 5, 19, 20, 34
baud rate 33
buffer 31
connecting 18
Dymo Setra 300 18, 30, 31, 34, 35, 45, 53
line feeds 30
other 18
parity 33
serial 18, 26
serial tape printer 35
tape 4, 53
thermal bar code 26
protecting IDs 19, 20
quantity 31
readability 58
recall 5, 8, 12, 16, 17
rEF n.n 35
register 44
registers 5, 19, 44, 49
remote 45
remote scale 6
Remote Scale Option 53, 57
reproducibility 44, 58
reset 5, 7, 15, 16, 17, 19, 22, 24, 35, 41, 45, 47, 50, 54, 55
resolution 19
internal counting 58
reverse counting 15
RS-232 5, 26, 27, 31, 45, 46, 49, 50, 51, 54, 55, 58
Setra Super CountTM Operator's Manual
69
sample 5, 8, 11, 14, 32, 44
custom 11
sample size 9, 10, 11, 12, 14, 15, 43, 45
minimum (See minimum sample size)
scale data 62
scale data codes 60
scanner
bar code 19
script 26, 28, 40, 54
codes 60
entering 26
entering, keypad 26
erase all 27, 54
identifying number 25, 27, 40
keypad entry 60
writing 26
SCrIPt 26
ScriptCoder 18, 24, 26, 30, 53
print setup 30
ScriptCoder Label Design & Cable Kit 26, 30
segment test 54
self-diagnostics 4
sequential numbering 25, 28
display 28
serial data printers 31
serial port 34, 51
service 54
SEt Pr 26, 30
SEtPr 54
setting 11, 16, 31, 33, 36
setup 3, 7, 10, 11, 16, 18, 26, 30, 33, 34, 35, 39, 49, 50, 54, 55
setup function
1111 30, 31, 54
2222 32
3333 32
4444 30
5555 33
6666 33
7777 35
8888 35, 54
9999 36
—21109 39
—22220 40
setup/cal 5, 17, 19, 20, 28, 30, 31, 32, 33, 35, 36, 37, 39, 41, 45, 54
setup/cal, 23
software 25, 45, 49
version 4, 34, 35
Specifications 59
StOrEd 19, 20
string format 49
Sub nnn 7, 15
tare 1, 5, 6, 7, 8, 12, 13, 30, 34, 38, 39, 42, 44, 45, 46, 48, 49, 50
tare weight 13, 44
time-date
example 23
time-date option 17, 34
ID 6
setting 36
70
Setra Super CountTM Operator's Manual
to order 53
transmission sequence 26
troy ounces 6, 8, 37, 48, 50, 58
typographical conventions 1
UnAbLE 4, 7, 19, 21, 37, 49, 54
units 5, 6, 8, 13, 29, 34, 35, 41, 42, 45, 46, 48, 50, 52, 58
enable/disable 8, 37
user-definable 6, 29, 37, 42, 58
X 29
UPdAtE 7, 14
display (See display )
verify function 46, 50
vibration 3, 16, 36, 54
volatile ID 5
WAKE UP 46
wake up message 4
warm up 4
warranty 55, 65
weighing 1, 3, 5, 6, 8, 15, 16, 18, 33, 36, 41, 42, 54
weight
accumulate 22
accumulator 23, 24
XXoFYY 28
zero 4, 5, 7, 8, 9, 10, 11, 12, 13, 14, 15, 42, 43, 45, 52, 54
Setra Super CountTM Operator's Manual
71
FCC WARNING
This equipment has been tested and found to comply with the limits for a Class A digital device,
pursuant to Part 15 of the FCC Rules. These limits are designed to provide reasonable protection
against harmful interference when the equipment is operated in a commercial environment. This
equipment generates, uses, and can radiate radio frequency energy and, if not installed and used in
accordance with the instruction manual, may cause harmful interference to radio communications.
Operation of this equipment in a residential area may cause harmful interference in which case the
user will be required to correct the interference at their own expense.
72
Setra Super CountTM Operator's Manual
Setra Super CountTM Operator's Manual
73