1
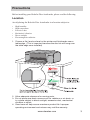
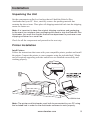
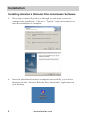
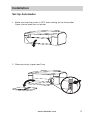
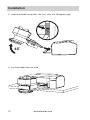
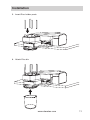
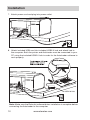
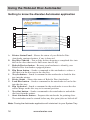
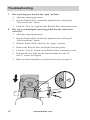
USER GUIDE
Aleratec
RoboJet Disc Autoloader™
Part No. 360104
Copyright/Model Identification
The content of this manual is for informational purposes only and is subject
to change without notice.
This manual is copyright with all rights reserved. Under copyright laws, this
manual and the software described within may not be copied, except in the
normal use of the product(s) described within or to make a backup copy.
Copyright© 2011
Aleratec, Inc.
9851 Owensmouth Avenue
Chatsworth, CA 91311 U.S.A.
Aleratec® is a registered trademark and RoboJet Disc Autoloader™ is a
trademark of Aleratec, Inc.
Check out Aleratec Online!
• Blog.Aleratec.com
• Facebook.com/Aleratec
• Twitter.com/Aleratec
• YouTube.com/Aleratec
Please record the following information to help expedite any warranty
claim:
Model No. _ _____________________ Serial No.______________________
Date Purchased _________________________________________________
Place of Purchase _______________________________________________
www.aleratec.com
Radio/TV Interference Statement
The equipment described in this guide emits radio frequency energy. If it
is not installed in accordance with the manufacturer’s instructions, it may
cause interference with radio or television reception.
This equipment has been tested and found to comply with the limits for a
Class B digital device, pursuant to Part 15 of the FCC Rules. These limits
are designed to provide reasonable protection against harmful interference
in a residential installation.
This equipment generates, uses, and can radiate radio frequency energy.
If not installed and used in accordance with the instruction manual, this
equipment may cause harmful interference to radio communications.
However, there is no guarantee that interference will not occur in a
particular installation. If this equipment does cause harmful interference to
radio or television reception, which can be verified by turning the equipment
off and on, the user is encouraged to try to correct the interference by one or
more of the following measures:
• Reorient or relocate the receiving antenna.
• Increase the separation between the equipment and the receiver.
• Connect the equipment to an electrical outlet on a circuit that is different from
the circuit to which the receiver is connected.
• Consult your dealer or an experienced radio/TV technician for help.
This equipment has been certified to comply with the limits for a Class B
computing device, pursuant to FCC Rules. In order to maintain compliance
with FCC regulations, shielded cables must be used with this equipment.
Operation with non-approved equipment or unshielded cables is likely to
result in interference to radio and TV reception. The user is cautioned that
changes and/or modifications made to this equipment, without the approval
of manufacturer, could void the user’s authority to operate this equipment.
www.aleratec.com
www.aleratec.com
Table of Contents
Introduction........................................................................................1
Product Features...................................................................................... 1
Included Items.........................................................................................1
Key Items................................................................................................. 2
Precautions........................................................................................3
Location...................................................................................................3
Printer Requirements............................................................................... 4
Installation..........................................................................................5
Unpacking the Unit..................................................................................5
Printer Installation................................................................................... 5
Minimum Hardware and Software Requirements...................................6
Operation................................................................................................. 6
Transportation..........................................................................................6
Installing Aleratec’s RoboJet Disc Autoloader Software.........................7
Setup Autoloader.....................................................................................9
Using the RoboJet Disc Autoloader........................................13
Powering on the Printer.........................................................................13
Getting to know the Aleratec Autoloader application............................16
Using the Aleratec RoboJet Disc Autoloader Application.....................18
Troubleshooting..............................................................................20
Specifications..................................................................................24
Technical Support...........................................................................26
Service and Support........................................................................27
Technical Support FAX Back Form................................................30
www.aleratec.com
www.aleratec.com
Introduction
Thank you for purchasing the Aleratec RoboJet Disc Autoloader. Please
read this User Guide thoroughly before using this product.
Product Features
The Aleratec RoboJet Disc Autoloader is a fully automatic disc loading system
for compatible printers. Features include:
▪▪ Up to 100 disc capacity
▪▪ Autoloader lets you add more blanks and remove finished discs
while the system is printing
▪▪ Simple, reliable and fast disc feed system
▪▪ Easy installation
Included Items
E
A
F
B
C
G
D
A.
B.
C.
D.
USB2.0 Hub
USB cable
Disc Bin, 50 and 100 Disc Capacity
Power Adapter cable
E. Disc Bin, 100-Disc Capacity
F. Disc Bin, 50-Disc Capacity
G. 2 Autoloader Disc Trays (one is
already in the Autoloader unit)
www.aleratec.com
1
Introduction
Key Items on the RoboJet Disc Autoloader
D
A
E
B
F
C
A.
B.
C.
D.
2
Disc Holder Post Slots
Disc Load Mechanism
Disc Bin Holder
Autoloader Disc Tray
G
E. Printer Mode Switch
F. USB Port
G. Power Port
www.aleratec.com
Precautions
Before installing your RoboJet Disc Autoloader, please read the following.
Location
Avoid placing the RoboJet Disc Autoloader in a location subject to:
•
•
•
•
•
•
High humidity
High temperature
Excessive dust
Mechanical vibration
Direct sunlight
Electromagnetic radiation
1. Choose a flat, level surface for the printer and Autoloader near a
table edge. (This is important because the disc bin will hang over
the table edge once installed)
2. Allow adequate clearance for moving parts.
3. Do not place near heat sources such as radiators or air ducts, or
in a place subject to direct sunlight, excessive dust, mechanical
vibration or shock.
4. Good care will help assure maximum product life. Improper
operating environment and misuse may void the warranty.
www.aleratec.com
3
Precautions
Printer Requirements
The RoboJet Disc Autoloader is designed to work specifically with the Epson
Artisan 50 inkjet printer (not included), although it can also be made to work with
certain other models of Epson inkjet printers which support disc printing. Below
is a list of other compatible Epson printer models.
Designed for Epson Artisan 50
Can also work with Epson models:
Asia: R290, T50
America: R280
Europe: R285, P50
Japan: E301, E302
4
www.aleratec.com
Installation
Unpacking the Unit
Set the components on flat level surface that will hold the RoboJet Disc
Autoloader and your PC. Next, carefully remove the packing material that
contains the above items. Then place all shipping materials back into the shipping
carton for future use.
Note: It is important to keep the original shipping container and packaging.
In the event you misplace your packaging and need to ship the RoboJet Disc
Autoloader, you must first contact the service department to purchase a new
shipping container for a small fee.
Check for all the components and proceed to the next step.
Printer Installation
Intall Printer:
Follow the instructions that came with your compatible printer product and install
the printer. Connect the printer to your computer using the included hub.* Make
sure all required supporting software and drivers are installed successfully and
working properly.
USB2.0 Hub
Note: The printer and Autoloader must both be connected to your PC using
the included hub in order for the Autoloader software to work properly.
www.aleratec.com
5
Installation
Minimum Hardware and Software Requirements
It is recommended that you operate your new RoboJet Disc Autoloader with PC
systems that exceed the minimum hardware requirements to ensure smooth and
efficient operation.
Pentium III 1GHz, 1GB DRAM (2GB DRAM recommended)
Windows 7, XP, Vista, 2000 SP4
Available USB2.0 port
Operation
Do not move the RoboJet Disc Autoloader during operation. This may cause it to
malfunction during operations.
Avoid exposing the RoboJet Disc Autoloader to sudden changes in temperature
as condensation may form inside. Operating the RoboJet Disc Autoloader
immediately after a sudden increase in temperature may result in damage.
Transportation
Keep the original packing materials for future moving or shipping of the
RoboJet Disc Autoloader.
6
www.aleratec.com
Installation
Installing Aleratec’s RoboJet Disc Autoloader Software
1. When you place the installation CD into your computer’s drive, the
installation screen should appear.
If you do not see this, it means that autorun feature of Windows is disabled
and you have to start this program manually. In order to do it you have to go
to “My Computer” (Windows XP) or “Computer” (Windows Vista/7), right
click on the CD/DVD drive that you are using, select “Explore/Open” and
double click on AUTORUN.exe. If your PC does not have an optical drive
that can read CDs, contact Aleratec support with your purchase information.
2. Install the Prolific Driver.
3. Install the .NET Framework
4. Click RoboJet Disc Autoloader on the installation menu to begin the
installation process. If a “User Account Control” message pops up on
your screen, please click “Yes” to proceed.
www.aleratec.com
7
Installation
Installing Aleratec’s RoboJet Disc Autoloader Software
5. The setup wizard will guide you through several steps screens to
configure the installation. Choose a “Typical” setup and continue on
until the installation is complete.
6. Once the installation has been completed successfully, you will see
shortcuts for the “Aleratec RoboJet Disc Autoloader” application on
your desktop.
8
www.aleratec.com
Installation
Set Up Autoloader
1. Make sure that the printer is OFF when setting up the Autoloader.
Open manual feed door on printer
2. Remove printer “paper feed” tray
www.aleratec.com
9
Installation
3. Insert Autoloader into printer “disc tray” slots at a 45 degree angle
45˚
4. Lay Autoloader down on table
10
www.aleratec.com
Installation
5. Insert Disc holder posts
6. Attach Disc bin
www.aleratec.com
11
Installation
7. Attach power cord and plug into power outlet
8. Attach included USB cord into included USB2.0 hub and attach hub to
the computer. Both the printer and Autoloader must be connected to your
PC using the included USB2.0 hub in order for the Autoloader software to
work properly.
USB2.0 Hub
Note: Make sure the RoboJet software/driver installation is complete before
connecting the Autoloader to the computer.
12
www.aleratec.com
Using the RoboJet Disc Autoloader
Powering on the Printer
The design of the Epson printer does not allow for it to power on properly.
with a disc tray attached. Because of this, the RoboJet Disc Autoloader is
designed with a physical “Printer Mode Switch” that can be used to simulate the
absence of the disc tray. Whenever the printer is powered on, the Printer Mode
Switch must be in the paper mode which is indicated by a paper icon indicating
the switch position. Once the printer has initialized and shows a steady green
light on its power button, then the Printer Mode Switch can be pushed forward
to the disc icon position, which signals the printer that discs are to be printed.
Printer Mode Switch
Disc Position
Paper Position
1. Move Printer Mode Switch to paper position.
www.aleratec.com
13
Using the RoboJet Disc Autoloader
Powering on the Printer
2. Power on the printer.
3. Wait for printer to initialize and show a steady green indicator on its
power button.
14
www.aleratec.com
Using the RoboJet Disc Autoloader
Powering on the Printer
4.
Move Printer Mode Switch to the disc position.
5.
Load blank discs.
Note: The RoboJet Disc Autoloader can process up to 100 standard discs. However, Aleratec
HydroGuard inkjet printable discs have a special printable surface that resists moisture, smears
and smudges, and is slightly thicker than standard discs. As a result, the unit can only process
up to 85 HydroGuard discs before completed discs in the output bin must be removed. Some
types of discs are also “stickier” than others, especially when taken from a brand new spindle.
It often helps to “fan” these discs prior to loading them into the Autoloader (briefly separate
each individual disc from the one above and below it on the spindle).
6.
Now you are ready to print discs!
www.aleratec.com
15
Using the RoboJet Disc Autoloader
Getting to know the Aleratec Autoloader application
A
B
C
G
D
H
E
I
F
J
A. Printer Status Panel – Shows the status of your RoboJet Disc
Autoloader equipped printer, if one is detected.
B. Dry Disc Timeout – Sets a delay before dropping a completed disc into
the bin for discs that need a little more time to dry.
C. Refresh Devices button – Rescans your hardware to identify your
RoboJet Disc Autoloader equipped printer.
D. Flip Down button – Sends a command to the autoloader to release a
disc that is in the disc tray to the disc bin.
E. Tray In button – Sends a command to the autoloader to load the disc
tray into the printer.
F. Device Status – Shows the status of RoboJet Disc Autoloader.
G. Load Disc button – Sends a command to the autoloader to load a disc
into the disc tray.
H. Flip Up button – Sends a command to the autoloader to reset the disc
release hinge on the disc tray to its normal position.
I. Tray Out button – Sends a command to the autoloader to unload the
disc tray from the printer.
J. Start Autoloader button – Prepares the autoloader for printing discs.
The autoloader must be started before any disc print jobs are kicked off.
Note: Closing the Autoloader application will minimize it to your System Tray.
16
www.aleratec.com
Using the RoboJet Disc Autoloader
Getting to know the Aleratec Autoloader application
1. Once you’ve run the Aleratec RoboJet Disc Autoloader Application, the
program will automatically scan for an autoloader equipped printer. If
the correct components are not found, the Device Status will display
“Device Not Ready” and no printer will show up in the Printer Status
Panel.
If this happens, please check that your printer and autoloader are installed
correctly and being recognized properly by your computer. Once all the
components are installed properly, click the “Refresh Devices” button to
re-scan your computer’s hardware.
Successful detection will show a “Device Ready” status.
www.aleratec.com
17
Using the RoboJet Disc Autoloader
Using the Aleratec RoboJet Disc Autoloader Application
1. To begin printing, just click on the “Start Autoloader” button. The
Device Status will show “Autoloader Started”.
18
www.aleratec.com
Using the RoboJet Disc Autoloader
Using the Aleratec RoboJet Disc Autoloader Application
2. You may now use Epson Print CD or any other optical disc printing
application to print your discs. When configuring the print settings,
make sure to choose the appropriate media type for the printer.
3. When your discs are printing, an Epson “CD/DVD tray not set
correctly” warning message will appear. Please ignore this warning.
www.aleratec.com
19
Troubleshooting
1. Autoloader not being detected.
▪▪ Make sure that both the printer and Autoloader are connected to
the computer using the included USB2.0
hub and that they are connected to
the correct hub ports.
2. Disc is loading, but nothing is getting printed.
▪▪ There is a problem with your printer installation. Check to make
sure that your printer is being detected properly and that you can
print from it. Make sure the Autoloader unit is positioned correctly
(see page 3).
3. Epson “CD/DVD tray not set correctly” warning message appears
when printing.
▪▪ This is normal.
Please ignore.
20
www.aleratec.com
Troubleshooting
4. “Source Selected..” Error
▪▪ The printer is still in “paper” printing mode instead of “disc”
printing mode. Push the Printer Mode Switch on the Autoloader to
the “disc” position.
Disc Position
Printer Mode Switch
Paper Position
5. “Unload Disc Error”
▪▪ A completed disc has not been dispensed properly into the disc
collection bin. Clear the disc and click the “Continue” button.
6. “No Disc Loaded..” Error
▪▪ There are not enough blank discs in the Autoloader to complete
the job. Load blank discs and click the “Continue” button.
This error can also happen when a completed disc has not been
dispensed properly. If this is the case, clear the disc(s) and click the
“Continue” button.
www.aleratec.com
21
Troubleshooting
7. Disc tray hinge gets stuck in the “open” position.
1. Abort any ongoing processes.
2. Stop the RoboJet Disc Autoloader application by clicking the
“Stop Autoloader” button
3. Click the “Tray Up” button on the RoboJet Disc Autoloader screen
8. Disc tray gets misaligned (not being pulled into the Autoloader
correctly).
1. Abort any ongoing processes
2. Stop the RoboJet Disc Autoloader application by clicking the
“Stop Autoloader” button
3. Slide the Printer Mode Switch to the “paper” position
4. Remove the RoboJet Disc Autoloader from the printer
5. Click the “Tray In” button on the RoboJet Disc Autoloader screen
6. Push the disc tray back into the unit and make sure the “B”
and “C” arrows are aligned
7. Make sure the Autoloader is positioned correctly (see page 3).
c
B
www.aleratec.com
c
B
S
22
Troubleshooting
7. Click the “Tray Out” button so that the tray is pulled into the Autoloader
c
S
c
S
8. Reattach the Autoloader to the printer and slide the Printer Mode Switch back to the “disc” position
9. The disc bin is getting too full for operation prior to 100 discs.
▪▪ Optical discs vary in thickness depending on the type,
manufacturing and coatings. Thicker discs will take up more space
in the disc bin and reduce the total capacity of the Autoloader. The
unit has been designed so that you can remove completed discs
while a job is in progress, allowing you to increase a job’s capacity.
10. Discs are frequently getting stuck when being loaded from the
dispenser or dropping into the disc bin.
▪▪ Some types of discs are also “stickier” than others, especially when
taken from a brand new spindle. It often helps to “fan” these discs
prior to loading them into the Autoloader (briefly separate each
individual disc from the one above and below it on the spindle).
www.aleratec.com
23
Specifications
Compatible Printers
• Epson Artisan 50 or equivalent
Disc Capacity
• 100
System Requirements
• Pentium III 1GHz, 1GB DRAM (2GB DRAM
recommended) Windows 7, XP, Vista, 2000 SP4
• 2 Available USB2.0 ports
Operation Environment
• Operating Temperature: 50º F to 90º F (10º C to 32º C)
• Humidity: 15% to 80%
Dimensions
(without disc bin or guide rods)
• Width
• Height
• Length
Weight
• 1.2kg / 2.6lb
Electrical Specifications
• Input Voltage
• Input Frequency
24
www.aleratec.com
12.75 inches (324mm)
7.75 inches (197mm)
11 inches (280mm)
100-240V AC
50/60 Hz
Specifications
For best results we recommend:
Aleratec HydroGuard Inkjet Printable Duplicator Grade DVD/CD recordable
media (90-Pack CD-R part number: 110119, DVD+R part number: 300117, and
DVD-R part number: 230116).
•• Smear, Smudge and Water-Resistant Disc Surface
•• Glossy inkjet printable surface with uniform whiteness from hub to
outer edge
•• Superior Print Quality with bright, vibrant colors
•• Quick Drying Disc Surface
Aleratec Inkjet Printable Duplicator Grade Blu-ray recordable, 25-Pack media
(4x BD-R part number: 370102, 6x BD-R part number: 370104).
Check the Aleratec website at www.aleratec.com for additional Inkjet printable
media.
www.aleratec.com
25
Technical Support
After reading this User Guide, if you need additional assistance with this
product, please contact Aleratec Technical Support. Our technical staff will
be happy to assist you, but they may need your help to better assist you.
Calling Aleratec Technical Support without all the necessary information
can be both time consuming and frustrating. Therefore, please try to have
the following information ready before calling:
1. Serial Number - the serial number is located on the bottom of the
RoboJet Disc Autoloader.
2. Any questions or problems, please provide enough information so our
technical staff can recreate and diagnose it.
Technical Support Addresses and Phone Numbers
XX By e-mail: [email protected]
XX By Telephone: 1-818-678-0484
Technical Support Group can be reached 8:00 AM to 5:00 PM, Pacific
Time, Monday through Friday, excluding U.S. holidays.
Please try to call from a phone near your computer system.
XX Access is available 24 hours a day, 365 days a year, via:
The World Wide Web at: www.aleratec.com
FAX at: 1-818-678-0483
26
www.aleratec.com
Service and Support
Aleratec, Inc., Limited Warranty
This Limited Warranty covers defects encountered in the course of
normal use of this product and does not apply to damage from improper
use, abuse, accidents, unauthorized service, or inadequate packaging
when shipping the product to Aleratec, Inc. This warranty does not
cover excessive ink contamination or failure related to the use of
refurbished or refilled cartridges.
Aleratec, Inc. provides the following limited warranty for this product
only if the product was originally purchased for use, not re-sale, from
Aleratec, Inc., an Aleratec, Inc. authorized dealer or distributor, or any
other Aleratec, Inc. approved reseller for this product. This product is
warranted to be free from defects in workmanship and material for a
period of one year from the date of your original purchase.
If the product fails during normal and proper use within the warranty
period, Aleratec, Inc. will, at its option, repair or replace the product at
no cost (except shipping and insurance). This limited warranty does not
include service to repair damage from improper installation, accident,
disaster, misuse, abuse, or modifications to the subsystem, or by any
other causes unrelated to defective materials or workmanship.
www.aleratec.com
27
Service and Support
Please Note:
This Warranty is valid only within the United States and Puerto Rico,
and applies only to products that are new and unopened on the date
of purchase. For areas outside the United States and Puerto Rico,
contact the authorized dealer from whom you purchased this product to
determine which warranty, if any, applies.
THIS LIMITED WARRANTY CONSTITUTES YOUR SOLE AND
EXCLUSIVE REMEDY, AND THE SOLE AND EXCLUSIVE
LIABILITY OF ALERATEC, INC., AND IS IN LIEU OF ALL
OTHER WARRANTIES, EXPRESSED OR IMPLIED, INCLUDING,
BUT NOT LIMITED TO ANY IMPLIED WARRANTY OF
MERCHANTABILITY OF ITEMS FOR A PARTICULAR PURPOSE.
Your sole remedy shall be repair or replacement, with new or
refurbished components, as provided in this Limited Warranty.
Aleratec, Inc. shall not be liable for any direct, indirect, special
incidental products or consequential damages, including, but not
limited to, any loss of data or loss of profits or business, regardless of
the form of action or theory of liability resulting from any defect in,
or use of, this product (even if Aleratec, Inc. has been advised of the
possibility of such damages).
In any event, the liability of Aleratec, Inc. under this Limited Warranty,
for damages to you or any third party, regardless of the form of action
or theory of liability, shall not exceed the purchase price you paid for
this product.
Some states do not allow limitations of the disclaimer of implied
warranties, the period an implied warranty lasts, or the exclusion or
limitation of incidental or consequential damages, so the exclusions and
limitations stipulated in this Limited Warranty may not apply to you.
This Limited Warranty gives you specific legal rights, and you may
have other rights which vary from state to state.
28
www.aleratec.com
Service and Support
To Obtain Warranty Service:
You must ship your subsystem to the authorized dealer where your
subsystem was purchased within the one year warranty period and
no later than thirty days after discovery of claimed defect, whichever
occurs first. In either case, you must provide proof of original purchase
before any warranty service can be performed. Products and parts
provided as a result of warranty service may be other than new but
will be in good working order and become your property at the time of
exchange. At the same time, the exchanged products or parts become
the property of Aleratec, Inc.
When shipping the subsystem for service, you agree to insure the
Duplicator, to prepay shipping charges, and to use the original shipping
container or equivalent. Any service outside the scope of this limited
warranty shall be at Aleratec, Inc.’s or its Authorized Service Provider’s
rates and terms then in effect.
This warranty gives you specific legal rights; you may also have other
rights which vary from state to state.
www.aleratec.com
29
Technical Support FAX Back Form
Aleratec, Inc.
Technical Support Fax Back Form
Please record the following information to help expedite any warranty claim:
Model No.:_ _____________ Serial No.: _____________________________
Date Purchased: ________________________________________________
Place of Purchase:_______________________________________________
To: Technical Support Group FAX: 1-818-678-0483
FROM:_ _____________________FAX: _____________________________
E-MAIL: _ ____________________________________________________
RE:_ ________________________TEL: _____________________________
DATE:________________# OF PAGES: _____________________________
I am experiencing the following problems with my RoboJet Disc Autoloader:
_____________________________________________________________
_____________________________________________________________
_____________________________________________________________
_____________________________________________________________
_____________________________________________________________
By answering these questions, your problem will be solved more rapidly.
Make copies as necessary. You can reach us electronically at: www.aleratec.
com on the internet.
30
www.aleratec.com
Document Number: 360104_UG_ENG_Rev. A Specifications subject to change without notice.
Copyright © 2011
Aleratec, Inc.
9851 Owensmouth Avenue
Chatsworth, CA 91311 U.S.A.
www.aleratec.com