1
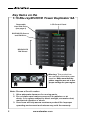
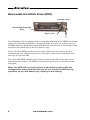
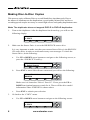
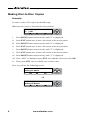
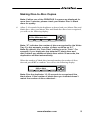
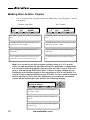
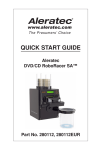
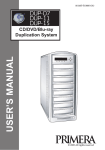
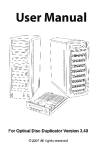
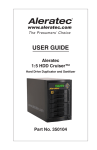
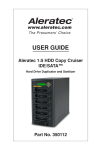
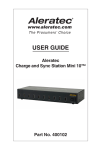
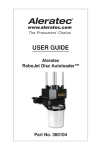
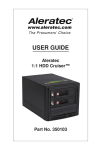
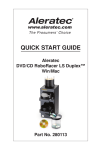
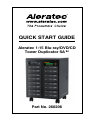
® QUICK START GUIDE Aleratec 1:15 Blu-ray/DVD/CD Tower Duplicator SA™ Part No. 260206 Welcome! Congratulations on your purchase of an Aleratec 1:15 Blu-ray/DVD/CD Tower Duplicator SA, considered by industry experts to be one of the finest BD/DVD/CD Duplicators available. The entire Aleratec team is committed to providing you with courteous service. Our knowledgeable staff will strive to make owning and operating your new Aleratec 1:15 Blu-ray/DVD/CD Tower Duplicator SA a pleasant experience. This Quick Start Guide will lead you step-by step through the basic operation procedures of your 1:15 Blu-ray/DVD/CD Tower Duplicator SA. We at Aleratec appreciate your selection of our product, and wish you great success and enjoyment of your new 1:15 Blu-ray/DVD/CD Tower Duplicator SA. www.aleratec.com Product Features The Aleratec 1:15 Blu-ray/DVD/CD Tower Duplicator SA is a stand alone disc duplication system with the capability of simultaneously producing up to 15 BD/DVD/CD copies, and no computer is required. •• Removable 2TB Hard Disk Drive to store disc images. •• Aleratec only USB fast key instantly connects Hard Drive to a PC. •• USB 3.0/2.0 connection for fast loading of image files from a PC. •• Duplicate from ISO image files, NRG image files, or even directories and files not packaged into a disc image file* * Duplicating from folders on the Duplicator HDD is only supported for CDs and DVDs. Included Items •• 1:15 Blu-ray/DVD/CD Tower Duplicator SA •• Power Cords (2) •• USB 3.0 Cable •• Quick Start Guide (this document) •• Installation CD •• Aleratec Registration Card •• Cyberlink BD Software •• HDD Tray Keys (2) www.aleratec.com 1 Key Items on the 1:15 Blu-ray/DVD/CD Tower Duplicator SA Removable Hard Disk Drive (see page 4) LCD Control Panel BD/DVD/CD Source and RW Drive BD/DVD/CD RW Drives* Warning: This product has two manually switchable power supplies. Make sure that the power supplies are set to the proper voltage for your region. Note: Choose a Good Location 1. Allow adequate clearance for moving parts. 2. Do not place near heat sources such as radiators or air ducts, or in a place subject to direct sunlight, excessive dust, mechanical vibration or shock. 3. Good care will help assure maximum product life. Improper operating environment and misuse may void the warranty. 2 www.aleratec.com Introduction LCD Control Panel (View may vary from picture) 1 Duplicator ver: X.XX COPY PRESCAN 4 5 6 Initialize 1-15 USB 3 2 ESC ENT SOURCE 7 8 9 1. Display shows all functions and messages. 2. ESC button is used to cancel a selected function. 3. ENT button is used to execute a selected function. 4. COPY button will start the “Autocopy” menu function. 5. USB button will take you directly to the USB On/Off mode option. 6. PRESCAN button allows you to scan and detect any bad sectors existing in the Master Disc. 7. SOURCE button will allow you to change the source drive that the duplicator uses for loading master discs. The default for this option is the BD/DVD/CD source drive. 8. UP arrow is used to scroll up through functions or menus. 9. DOWN arrow is used to scroll down through functions or menus. www.aleratec.com 3 Removable Hard Disk Drive (HDD) Carriage Lever Removable Hard Disk Drive Key in Lock Your Duplicator SA is equipped with a removable hard disk drive (HDD) for storing images of frequently copied discs. Storing an image of a disc you want to copy on an HDD improves duplication speed, and adds the convenience of not having to look around for the actual source disc you want to copy. Your removable HDD provides extra security, in that you can remove the drive containing the disc images and put it in a safe place where no un-authorized users can copy or view the data. The removable HDD includes a keyed lock to protect the data on the drive from being misused or stolen. The HDD is used in the copy process as described in the user guide. Note: The HDD will not work unless it is secured in position with the carriage lever and locked with the key. Do not unlock the HDD during operation, as you will destroy any copies you are making. 4 www.aleratec.com Unpacking the Unit Your system was shipped in one box and contains the 1:15 Blu-ray/DVD/CD Tower Duplicator SA and cables. Carefully open the box and remove the top protective foam padding. Remove the contents with care to avoid damage. Note: It is important to keep the original shipping container and packaging. In the event you misplace your packaging and need to ship the 1:15 Blu-ray/DVD/CD Tower Duplicator SA, you should first contact technical support to purchase a new shipping container. Shipping the 1:15 Blu-ray/DVD/CD Tower Duplicator SA without proper packaging will void your warranty. Connect the Cables and Apply Power Plug power cords into the two power supplies of the 1:15 Blu-ray/DVD/CD Tower Duplicator SA, also located on the rear side. Make sure the red switches are set to match your local voltage. Plug into power outlets. If you’d like to access the unit’s internal HDD, plug the USB 3.0 Cable into the USB connector located on the center rear of the 1:15 Blu-ray/DVD/CD Tower Duplicator SA. Connect the other end of the USB cable into an available USB 3.0 or 2.0 port on your PC. Note: Use only with a USB 3.0 or 2.0 port. This system cannot be used with USB 1.1, as this will greatly affect system performance. If windows displays a message that a fast USB device is detected on a slow USB port, then you will need to upgrade your computer by adding a USB 3.0 or 2.0 port. www.aleratec.com 5 Making Disc-to-Disc Copies This process copies a Master Disc to several blank discs simultaneously. Due to the nature of simultaneous disc duplication, a good quality Master Disc and lower recording speeds maybe necessary to ensure high success and quality duplications rates. Note: The duplicator does not support DVD-R to DVD+R duplication. Turn on the duplicator. After the duplicator has booted up, you will see the following display: Aleratec 1. COPY COPY 2. 1.00 1. ESC USB PRESCAN SOURCE ENT Make sure the Source Drive is set to the BD/DVD/CD source drive. It is very important to make sure that your current Source Drive is the BD/DVD/ CD source drive in order to avoid unnecessary error messages. To check the Source Drive, do the following: Use UP or DOWN arrow buttons to navigate to the following screen, or press the “SOURCE” Fast Key: Aleratec 7. Select Source COPY b. USB PRESCAN 1.00 a. ESC SOURCE ENT Press ENT to enter Select Source menu and you will see the following: Drive 1 Port 0.0 XXXXXX USB PRESCAN COPY ESC SOURCE ENT Make sure it is located at “Drive 1 Port 0.0”. If not, press the UP or DOWN navigation button to search for it. There will be drive model information where XXXXXX is shown above c. Go back to the “COPY” menu. a. Use UP or DOWN arrow button to navigate to the following screen: Aleratec 1. COPY COPY 6 1.00 3. Press ENT to submit your selection. ESC USB PRESCAN SOURCE www.aleratec.com ENT Making Disc-to-Disc Copies Start the Copy Process. a. Insert your Master Disc and blank discs into their corresponding tray(s) and press the ENT button. You will see the following display: Duplication Mode: Load and Copy COPY b. USB PRESCAN ESC SOURCE ENT “Duplication Mode” offers three choices: ▪▪ ▪▪ ▪▪ Load and Copy On the Fly Prompt Press UP or DOWN arrow button to display your desired mode. Press the ENT button to confirm. “No Counter” can be used when you prefer to copy continuously with no interruption. (It will still count the number of copies, but it will not notify you when to stop.) To select the “No Counter”, press ENT when you see the above screen. Then skip to step “d” on page 19 of this User Guide. Counter: No Counter COPY USB ESC PRESCAN SOURCE ENT “Specify Counter” lets you to select the number of copies you want to make. The duplicator will count the number of copies you’ve made and prompt you when the desired number of copies has been completed. Counter: Specify Counter COPY USB ESC PRESCAN SOURCE ENT Press ENT button to select. Enter between 1 to 9999 copies. Specify Counter: [0 ] OK? COPY USB PRESCAN c. 4. ESC SOURCE ENT Enter a 4-digit number to specify the number of copies you want to make. To specify a number less than 4 digits, fill the leading spaces with “0”s (any leading “0” will be skipped). For example, “0234” will give you two hundred and thirty four copies, and “0010” will give you ten copies. www.aleratec.com 7 Making Disc-to-Disc Copies Example: To enter a value of 21 copies, do the following Make sure the cursor is located at the first position: Specify Counter: [X ] OK? i. USB PRESCAN COPY ESC SOURCE ENT Press DOWN button consecutively until “0” is displayed. ii. Press ENT button once to move the cursor to the next position. iii. Press DOWN button consecutively until “0” is displayed. iv. Press ENT button once to move the cursor to the next position. v. Press DOWN button consecutively until “2” is displayed. vi. Press ENT button once to move the cursor to the next position. vii. Press DOWN button consecutively until “1” is displayed. viii. Now, “0021” is displayed, press ENT once and the cursor moved to OK. ix. Then, press ENT once to submit your counter value. Now you will see the following screen: Preparing... Waiting for Master USB COPY ESC PRESCAN SOURCE ENT OR Preparing... Waiting for Blanks 8 USB PRESCAN COPY ESC SOURCE www.aleratec.com ENT Making Disc-to-Disc Copies Note: If either one of the PREVIOUS 2 screens are displayed for more than 2 minutes, please check your Master Disc or blank discs for quality. Allow 5-10 seconds for the duplicator to detect both your Master Disc and blank discs. After your Master Disc and blank discs have been recognized, you will see the following display: Preparing... X Disc Detected, Go? COPY USB PRESCAN ESC SOURCE ENT Note: “X” indicates the number of discs recognized by the Writer Tray. For this example, number of discs could be up to 7 Note: By default, the “Auto Start” setting is set to “Auto”. For example, if your duplicator has detected 7 blank discs and didn’t detect any additional blank discs within 30 seconds, the duplication will start automatically. When the number of blank discs inserted matches the number of discs detected press ENT to confirm. You will see the following display: Processing... Please Wait COPY USB PRESCAN d. ESC SOURCE ENT Note: Give the duplicator 10-15 seconds to recognize all the blank discs. If the number of blank discs you inserted doesn’t match the number of discs detected... www.aleratec.com 9 Making Disc-to-Disc Copies e. 2 or 3 seconds after copying begins the following “Copy Progress” screen will appear: Counter Specified Copying... 0/21 12% COPY USB No Counter 4012MB 481MB PRESCAN Copying... 0 12% SOURCE COPY USB 4012MB 481MB PRESCAN SOURCE “4012MB” indicates the capacity of the Master Disc. “4012MB” indicates the capacity of the Master Disc. “481MB” indicates the current progress of the duplication in terms of MB. “481MB” indicates the current progress of the duplication in terms of MB. “12%” indicates the current progress of the duplication. “12%” indicates the current progress of the duplication. “0/21” indicates you have a project size of 21 copies and you have made 0 copies so far. “0” indicates that you have made 0 copies so far. Note: It is normal to see the progress indicator stay at 0-10% and at 100% for approximately 30 seconds during CD duplication. Additionally it is normal to see the progress indicator stay at 0-10% and at 100% for up to 1 minute during DVD duplication. There is a delay caused by the initializing and finalizing stage of disc duplication. Due to this delay, it is normal to see progress indicators stay at 100% for up to several minutes before moving on. Once the disc duplication is completed, successful copies will be ejected and you will see the following display: COPY USB ( 3) PRESCAN PASS 3 FAIL 0 Waiting for Blanks ESC SOURCE “PASS 3” indicates that you’ve just made 3 successful copies. “FAIL 3” indicates that you have no failure in this run. “3” indicates that you’ve successfully copied 3 copies so far. 10 www.aleratec.com ENT Making Disc-to-Disc Copies To continue making additional copies, remove the successfully completed copies from the ejected trays and replace with blank discs. To terminate your project and return to the main menu, press ESC. If you’ve specified a counter value you will see the following display when your project is completed: 21 Disc Copied Press OK to Finish USB PRESCAN COPY ESC SOURCE ENT If you see above message, you can press ENT to go back to main menu. Note: If you enabled the counter and the number of blank discs you have inserted is greater than the number you requested, you will receive a message indicating you have inserted more discs than what you need. You can continue to copy or you can eject the extras discs. Note: Failed discs will not be ejected automatically. You will need to manually eject these. www.aleratec.com 11 Recommended Media For best results, Aleratec Duplicator Grade media is recommended. Aleratec Media BD-R 4x Duplicator Grade Blu-ray 10-Pack ™ White BD-R 4x Inkjet Printable Duplicator Grade Media 25-Pack™ Aleratec BD-R 6x Duplicator Grade Blu-ray Media 10-Pack™ White Inkjet Printable BD-R 6x Duplicator Grade 25-Pack™ Part No. 370101 Part No. 370102 Part No. 370103 Part No. 370104 Aleratec Silver Duplicator Grade DVD+R 100-Pack™ Aleratec Silver Duplicator Grade DVD-R 100-Pack™ Aleratec Silver Duplicator Grade CD-R 100-Pack™ Part No. 300118 Part No. 230118 Part No. 110121 HydroGuard 16x DVD+R Inkjet Printable Duplicator Grade Media 90-Pack™ HydroGuard 16x DVD-R Inkjet Printable Duplicator Grade Media 90-pack™ HydroGuard 52x CD-R Inkjet Printable Duplicator Grade Media 90-Pack™ Part No. 300117 Part No. 230116 Part No. 110119 Please visit www.aleratec.com for the most current listing of available Aleratec Duplicator Grade Blu-ray Media. 12 www.aleratec.com Technical Support Addresses and Phone Numbers ►► By e-mail: [email protected] ►► By Telephone: 1-818-678-0484 – Skype: support.aleratec.com Technical Support Group can be reached 8:00 AM to 5:00 PM, Pacific Time, Monday through Friday, excluding U.S. holidays. Please try to call from a phone near your computer system. ►► Access is available 24 hours a day, 365 days a year, via: The World Wide Web at: www.aleratec.com FAX at: 1-818-678-0483 www.aleratec.com 13 ® Document Number: 260206_QSG_ENG_Rev. B Specifications subject to change without notice. Copyright © 2013 Aleratec, Inc. 9851 Owensmouth Avenue Chatsworth, CA 91311 U.S.A. www.aleratec.com