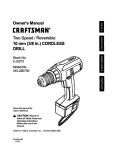
1
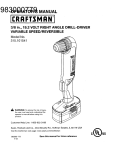
OWNERS
MANUAL
MODEL NO.
315.111450
CAUTION:
Read Rules
for
Safe Operation
and instructions
3/8 INCH
CORDLESS DRILL
SINGLE-SPEEDREVERSIBLE
Carefully
Introduction
SAVE THIS
MANUAL
FUTLIRE
REFERENCE
SEARS, ROEBUCK
_QXj9
Operation
FOR
Designed exc_usive}y for arid sold only by
AND CO, Dept 698/73tA,
Sears Tower. Chicago.
IL 60684
FULL ONE YEAR WARRANTY
ON CRAFTSMAN
CORDLESS
DRILL
If this Craftsman Cordless Drill falls to give complete satisfaction
within one year from the date of put.chase, RETURN IT TO THE NEAREST SEARS STORE THROUGHOUT THE UNITED STATES and Sears wilt
replaceit, freeof charge.
isused for
the dateof purchase.
If this cordless drill
commercial
This warranty gives you specific
state
or rentat purposesthis warranty
lega! rights,
applies
for only 90 days from
and you may also haveother rights whichvaryfrom state to
SEARS, ROEBUCKAND CO
DEPT. 698/731A
SEARS TOWER
CHICAGO, IL 60684
IMPORTANI'
SAFETY
RULES FOR POWER
TOOLS
READ ALL INSTRUCTIONS
1 KNOW YOUR POWER TOOL -- Read owner's manual carefully Learn its applications and limitations as well as the specific potential hazards related to this toot,
2. GUARD AGAINST ELECTRICAL SHOCK BY PREVENTING BODY CONTACT WITH
GROUNDED SURFACES. For example: Pipes, radiators, ranges, refrigerator
enclosures.
3_ KEEP WORK AREA CLEAN, Cluttered areas and benches invite accidents
4_ AVOID DANGEROUS ENVIRONMENT. Don't use power tool in damp or wet focalions or expose to rain. Keep work area well liL
5. KEEP CHILDREN AWAY° All visitors should wear safety glasses and be kept a safe
distance from work area. Do not let visitors contact tool or extension cord
6 STORE IDLE TOOLS. When not ir_ use, tools should be stored in a dry, high or
locked-up place -- out of the reach of children.
7_ DON'T FORCE TOOL° It wilt do the job better and safer at the rate for which it was
designed
8 USE RIGHT TOOL Don't force small tool or attachment to do the job of a heavy duty
tool Don't use tool for purpose not intended w for example -- Don't use a circular
saw for cutting tree limbs or logs
9 WEAR PROPER APPAREL° No loose clothing or jewelry to get caught in moving
parts Rubber gloves and nomskid footwear are recommended when working out.doors. Also, wear protective hair coverir_g to contain long hair.
10. USE SAFETY GLASSES with all tools, Also face or dust mask if operation is dusty,
tl. SECURE WORK. Use clamps or a vise to hold work it's safer than using your hand
and it frees both hands to operate tool_
12 DON'T OVERREACH. Keep proper footing and balance at all times. Do not use
where support is unstable
13 MAINTAIN TOOLS WITH CARE. Keep tools sharp at all times, and clean for best and
safest performance. Follow instructions for lubricating and changing accessories.
Page 2
RULES FOR SAFE OPERATION (CONTINUED)
!4,. REMOVE ADJUSTING KEYS AND WRENCHES. Form habit of checking to see thdt
keys and adjusting wrenches are removed from tool before turning it on,
15. NEVER USE IN AN EXPLOSIVE ATMOSPHERE_ Normat sparking of the motor could
ignite flammable liquids, gases or fumes,
t6 KEEP HANDLES DRY, CLEAN, AND FREE FROM OIL AND GREASE. Always use a
clean cloth when cleaning.. Never use brake fluids, gasoline, petroleum_based
products, or any strong solvents to clean your tool,
17. STAY ALERT. Watch what you are doing and use common sense, Do not operate
tool when you are tired. Do not rush°
t8. CHECK DAMAGED PARTS. Before further use of the tool, a guard or other part that
is damaged should be carefully checked to determine that it will operate properly
and perform its intended function. Check for alignment of moving parts, binding of
moving parts, breakage of parts, mounting, and any other conditions that may affect
its operation. A guard or other part that is damaged should be properly repaired or
replaced by an authorized service center,
19, DO NOT USE TOOL IF SWITCH DOES NOT TURN IT ON AND OFF, Have defective
switches replaced by authorized service center°
20, DRUGS, ALCOHOL, MEDICATION. Do not operate _ooI while under the influence of
drugs, alcohol, or any medication_
21. CUTTING, DRILLING, OR DRIVING SCREWS INTO ELECTRICAL WIRING IN
WALLS, CEILINGS, OR OTHER AREAS CAN CAUSE BLADE, BIT, OR CHUCK TO
BECOME ELECTRICALLY LIVED Grasp only the insulated handle(s) or plastic
housing when using the tool
22 WEAR HEARING PROTECTION DURING EXTENDED PERIODS OF OPERATION°
IMPORTANT SAFETY RULES FOR BATTERY TOOLS
23 Battery tools do not have to be plugged into an electrical outlet, therefore they are
always in operating condition., Be aware of possible hazards when not using your
battery tool or when changing accessories°
24. USE ONLY THE CHARGER PROVIDED WITH YOUR BATTERY TOOL. Do not
substitute any other charger. Use of another charger could cause batteries to explode causing possible serious injury.
25 DO NOT PLACE BATTERY TOOLS OR THEIR BATTERIES NEAR FIRE OR HEAT.
They may explode°
26 DO NOT CHARGE BATTERY TOOL IN A DAMP OR WET LOCATION°
27. Your battery tool shoutd be charged in a location where the temperature is more
than 50°F but less than 100"F.
28 Under extreme usage or temperature conditions, battery leakage may occur, if liquid
comes in contact with your skin, wash immediately with soap and water, then
neutralize with lemon juice or vinegar. If liquid gets in your eyes, flush them with
clean water for at _east 10 minutes, then seek immediate medical attention.
29, If carrying your battery tool at your side, make sure it is not running and your finger
is not on the switch, Avoid accidental starting.
30 SECURE WORK before applying power. NEVER hold workpiece in your hand or
across your legs.
31, SAVE THESE INSTRUCTIONS. Refer to them frequently and use them to instruct
third party user° If you loan someone this tool, loan them these instructions also_
Page 3
IMPORTANT SAFETY INSTRUCTIONS
FOR CHARGER
1. SAVE THESE INSTRUCTIONS° This manual contains
important
safety and
operating instructions for battery charger Part Number 999555-007.
2. Before using battery charger, read atl instructions and cautionary markings in this
manual, on battery charger, and product using battery charger.
3. __To
reduce risk of injury, charge only nickel-cadmium type rechargeable
batteries. Other types of batteries may burst causing personal injury and damage,
4o Do not e_,pose charger to rain or snow.
5. Use of an attachment not recommended or sold by the battery charger manufacturer
may result in a risk of fire, electric shock, or injury to persons.
6. To reduce risk of damage to charger body and cord, pul! by charger body rather than
cord when disconnecting
charger. _
7. Make sure cord is located so that it will not be stepped on, tripped over, or otherwise
subjected to damage or stress_
8 An extension cord should not be used unless absolutely necessary. Use of improper
extension cord could result in a risk of fire and electric shock_ tf extension cord
must be used, make sure:
a. That pins on plug of extension cord are the same number, size and shape as
those of plug on charger.
b. That extension cord is properly wired and in good electrical condition; and
c. That wire size is large enough for AC ampere rating of charger as specified
below:
i .......,,,,,i
iF;e,........
AWG
.....
i,,_AWG Size 0fC0rd/Length0!i.O0rd,,
18
t8
Feet
........
18
ii i...." i
16
I
9. DO NOT OPERATE CHARGER WITH A DAMAGED CORD OR PLUG. If damaged,
have replaced immediately by a qualified serviceman..
10. Do not operate charger if it has received a sharp blow, been dropped, or otherwise
"damaged in any way; take it to a qualified serviceman
11 Do not disassemble charger; take it to a qualified serviceman when service or repair
is required. Incorrect reassembly may result in a risk of electric shock or fire_
12. To reduce risk of electric shock, unplug charger from outlet before attempting any
maintenance or cleaning. Turning off controls will not reduce this risk_
13. Do not use charger outdoors.
14_ Disconnect charger from power supply when not in use.
i,
'_
i'
i_ I_
,Jl
youreyes,whichcanresultin severeeyedamage.Beforecommencingpowertoot!
I
!!
face shieldwhenneeded,We recommendWide Vision SafetyMaskfor useoverJ
spectaclesor standardsafetyglasseswith sideshields,availableat SearsCatalog|
Orderor Retail Stores.
I
JD
The operation
of any Power Tool can result in iorelgt_ objects
Page 4
being thrown into I
OPERATION
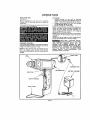
KNOW YOUR DRILL
See Figure 1_
Before attempting
to use your drill, familiarize
yourself with el! operating
features and safety requirements,
If any pads are missing do not operate your drill untie
the missing parts are replaced.
TO CHARGE
1, Connect
charger to your drill
by inserting
charger plug Into input jack, NOTE: As shown In
Figure 1, input Jack is located at the rear of toot
2 Charger can be used with normal house voltage
of 110.120 volts, 60 Hz. AC only.
3, Connect charger Io power supply
NOTE: The LED indicator, which is located above the
switch, will iight up when charger is properly con.
nected to power supply Thts light indicates your
drill is charging and will rematn on until charger ts
disconnected from power supply.
NOTE: Do not operate your drill while it is connected
to the charger. The driving ability of your drill will not
increase,
NOTE: After normal usage, your drtlI usually requires
3 hours of charging time to be fully charged
YOUR DRILL _ONTAINS
SPECIAL
HIGH TEMPERATURE
BATTERIES TO HELP PREVENT
BATTERY
DAMAGE
WHEN
LEFT
ON
CHARGE
FOR EXTENDED
PERIODS
OF TIME,
HOWEVER, ONCE THE BATTERIES OF YOUR DRILL
BECOME
FULLY CHARGED,
WE RECOMMEND
THAT YOU UNPLUG
YOUR
CHARGER
FROM
POWER
SUPPLY
THEN
DISCONNECT
THE
CHARGER FROM YOUR DRILL..
CHARGING YOUR DRILL
Your drill has been shipped in a low charge condition
to prevent possible problems. Therefore, you should
charge tt at least 5 hours prior to use
NOTE:Your drill wltl not reach fult charge the first
ttme it is charged.
Allow several cycles (drilling
followed by recharging) for your drill to become fully
charged,
DRILL
UT JACK
CHARGER
PLUG
SELECTOR
LED INDICATOi_i//
l
SWITCH
TRIGGER
WRIST STRAP
Page 5
BATTERY CHARGER
OPERATION
(Cont.)
BATTERIES
Your ddtl
is equipped
with
5 nickel-cadmium
rechargeabte
batteries
Length of service from each
charging will depend on the type of work you are doing
'[he nickel,.cadmium
batteries in this tool have been
designed to last for the life of the unit under normal
operating conditions.
Therefore, do not disassemble
your drill and attempt to replace them, Handling of
these batteries, especially
when wearing rings and
jewelry, could result in a serious burn
WRIST STRAP
A wrist strap ts provided to reduce the chances of
dropping
your drill, Place one hand through wdst
strap when carrying your dr_il See Figure 4.
FORWARD
REVERSE
SWITCH
The switch on your drill is designed for single speed
drilling
For normal drilling operatfon,
depress the
switch trigger atl the way.
SELECTC
SWITCH
TRIGG ER
POSITION
(LOCK,OFF)
REVERSIBLE
Your dri!l has the feature of being reversible
The
direction
of rotation
is controlled
by a selector
located above the switch trigger. See Figure 2. With
your drill he{d in normal
operating
position,
the
direction of rotor{on selector should be positioned to
the left of the switch for drilling
The drill direction Is
reversed when the selector is to the right of the
switch
When the selector is in center position, the
switch trigger Is locked,,
Fig, 2
CHUCK KEY
STORAGE
TO PREVENT
GEAR
DAMAGE,
ALWAYS ALLOW THE CHUCK ON YOUR DRILL TO
COME TO A COMPLETE STOP BEFORE CHANGING
THE DIRECTION OF ROTATION.
To stop your drill release switch trigger and allow
your drill to come to a complete
stop.
CHUCK
KEY
NOTE: To lock switch trigger, place the direction of
rotation selector in center position. See Figure 2
CHUCK KEY
A chuck key has been packed with your drill for use
when installing or removing bits tt is also used when
removing the chuck See Figure 3
CHUCK
Fig
KEY STORAGE
When not in use the chuck key can be placed in the
storage area located on the back of your ddt! See
Figure 3
Page 6
3
OPERATION
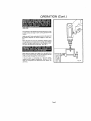
INSTALLING
BITS
1 Lock switch trigger on your
direction of rotation selector
(Cont.)
---- ....
ddtt by placing the
in center position.
2 Close chuck jaws to a point where the opening is
slightly larger than the bit size you intend to use,
3 insert your drilJ bit into chuck the full length of the
jaws as shown in Figure 4,
4" Remove chuck key from chuck key storage
See
Figure 3
5 Tighten chuck jaws by placing chuck key tn each
o! the three holes, and tighten in a clockwise
direction.
DO NOT USE A WRENCH TO TIGHTEN
OR LOOSEN THE CHUCK,
6. Remove
storage
the chuck
key and return
to chuck
BIT
CHUCK KEY
HOLE
WRIST
STRAP
key
Fig 4
REMOVING
BITS
t. Lock switch trigger on your
direction
of rotation selector
2 Remove chuck
Figure 3
dri]! by placing the
In center position
key from chuck
key storage,
See
.t
3 Loosen chuck jaws using the chuck key, DO NOT
USE A WRENCH TO TIGHTEN OR LOOSEN THE
CHUCK,,
4. Remove drill
5 Remove
storage,
bit from
chuck
key
chuck
and
jaws.,
return
to
chuck
key
CHUCK REMOVAL
The chuck
accessories
must be removed
To remove:
in order
1 LOck switch trigger on your
direction
of rotation selector
2 Remove chuck
Figure 3
to use some
Ftg 5
drill by placing the
in center position
key from chuck
key storage
See
3. Close the chuck jaws. Insert chuck key into chuck
and tap sharply with a mallet in a clockwise
direction as shown in Figure 5
4, Open the chuck jaws and remove the chuck screw
by turning it in a clockwise direction
See Figure 6
NOTE: The chuck screw has left hand threads
5. Inserl the chuck key in chuck and tap sharply in a
counterclockwise
direction
to loosen it on spin.
die, I1 can now be unscrewed by hand, See Figure
7,
6 Return chuck
key to chuck
key storage,
The chuck
may become
loose on spindle
and
develop
a wobble.
Also, the chuck
screw
may
become loose causing the chuck jaws to bind This
will prevent them from closing
To tighten, follow
these steps:
1, Lock swflch trigger
direction
of rotation
2 Open the chuck
on your
selector
drill by placing the
in center position
jaws
3 Insert chuck key in chuck
a clockwise
direction
and tap with a mallet
in
4. Tighten the chuck screw
has left hand threads
NOTE; "The chuck screw
Page 7
Fig 6
OPERATION (Cont.)
DRILLING
The material to be drilled should be secured in a vise
or with ciamps to keep it from turning as the drill bit
rotates
Hold your drill lirmly and place the bit at the point te
be drilled, Depress the switch trigger to start your
drill
Move the drill bit into the workpiece applying only
enough pressure to keep the bit cutting
Do not force
your drill or apply side pressure to elongate a hoie
Let your drill and bit do the work See Fig 8
When drHting metals use a light oil on the drill btt to
keep it from overheating, The oil will prolong the lile
of the bit and increase the drilling action
tf the bit jams in workpiece or tf the dtiH stalis,
re_ease switch
trigger immediately.
Remove the bit
from the workpiece
and determine
the reason for
jamming
Page 8
MAINTENANCE
GENERAL
Avoid using solvents when cleaning plastic parts Most plastics are susceptible to various types of oommeP
cial solvents and may be damaged by their use, Use clean cloths to remove dirt, dust, oil, grease, etc,
ACCESSORIES
......
THE FOLLOWING
RECOMMENDED
ACCESSORIES ARE CURRENT AND WERE .............
AVAILABLE AT THE TIME THIS MANUAL WAS PRINTED,
5,,Pc, Power Screwdriver
Cat, No 9 25602
No, 2 Phillips/8.,10
Cat No 9 25603
Bit Set
Slotted.
No, 3 PhiUips/6-8
Stotted,
Cat, No 9_ 25604
7,Pc Screwdriver
Cat, No 9. 2555
2 Ea
t3,Pc, Power Screwdriver/Nutdriver
Cat No,, 9 25653
Set and Case
30-Pc Power Screwdriver/Nutdriver
Cat No. 9 25654
Set and Case
7,Pc Power Nutdriver
Cat No 9_925655
2 Ea
t7,Pc
Bit Set and Case
Cat
Power
No.. 9
Bit Set
Screwdriver/Nutdriver
High Speed Bits (For Wood or Metal)
Doweling Jig
Cat No _9 4186
_i'_'_='J_'!,lJJ[=]_The
use ot attachments
REPLACEMENT
SERVICING
or accessories
not listed
might
Part Number
ii
PARTS
Description
999555_007
,ll
PARTS
USE ONLY IDENTICAL
REPLACEMENT
_
. ,.
Hole Square
Cat No, __92596
q t
WHEN
Set and Case
25657
Battery
ii
iq ,
,Hll
Charger
Ill
"
Page g
--
'_ ...................
be hazardous,.
3/8"
Max,,
NOTES
Page 10
NOTES
Page 11
1"
OWNERS
MANUAL
SERVICE
MODEL
NO.
315.111450
HOW TO ORDER
REPAIR
3/8 INCH
CORDLESS DRILL
SINGLE-SPEED
REVERSIBLE
Now that you have purchased your Drill, shoutd a
need ever exist for tepai[ parts or service, simply
contact any Sears Service Center and most Sears,
Roebuck and Co, stores Be sure to provide all pertinent facts when you call or visit.
The model number of your Drill wiil be found on the
plate attached to the motor housing.
WHEN ORDERING
THE FOLLOWING
REPAIR PARTS,
INFORMATION:
ALWAYS
GIVE
PARTS
o PART NUMBER
o PART DESCRIPTION
* MODEL NUMBER
315 111450
•
NAME OF ITEM
Cordless
Drill
All parts listed may be ordered from any Sears Service Center and most Sears stores
If the parts you need are not stocked _ocally, your
order will be electronically
transmitted to a Sears
Repair Parts Distribution Center for handling
............
::
,L,Im.
i
......................
-' ........... _
..............
,,,,u, i i it,i
ill
i
Hqu,
p
SEARS, ROEBUCK AND CO Dept 698/731A, Sears Tower, Chicago, IL 60684