1
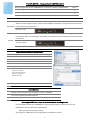
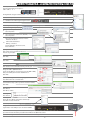
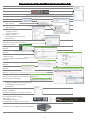
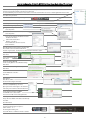
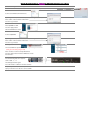
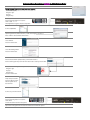
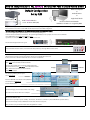
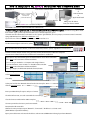
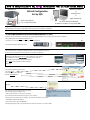
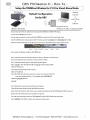
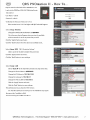
QRS Music Wifi Adapters Guide
Table of Contents
Page 2 ……………………….. TP-Link TL-WR702N
Page 6 ……………………….. EnGenuis ETR9330
Page 8 ……………………….. ASUS WL330N3G
Page 10……………………….. ASUS WL330GE
Page 12……………………….. TrendNet TEW-654TR
TP-Link TL-WR702N - Configurations for QRS PNOmation II
How to configure the TP-Link TL-WR702N from “Stand Alone” Mode to “Network Mode”
Page 2
How to Configure the TP-Link TL-WR702N from Network to “Stand Alone” Mode
Page 3
How to Configure the TP-Link TL-WR702N to Stand Alone Mode after a TP-Link Reset
Page 4
The TP-Link AND the PM II unit must be programmed to switch modes.
There is no connec on to the Internet. The user wirelessly connects to the TP‐Link (SSID = QRSPNO) and PM II delivers control on Google Chrome, or Safari, at the IP Address of 192.168.1.1. PM II and the users Wi‐Fi device Stand Alone communicate only with each other. #3 Light = Green
The TP‐Link is programmed to connect to the users home network. PM II is programmed to get an IP Address from the local router. The advantage is that the Wi‐Fi control device can be connected to the Internet and s ll control PM II. Network
#3 Light = Yellow
The TP‐Link will NOT connect to a 5GHz home router. Apple Products: iPad; iPhone and iTouch
If you’re using an Apple device, use these steps in place of those on the following pages.
Set a Static IP on your device
A
Go to Settings then Wi-Fi
B
Connect to the “QRSPNO”
C
Touch the blue circle to the right of “QRSPNO”.
D
Select “Static”
E-G
H
Enter the following:
IP address: 192.168.0.5
Subnet mask: 255.255.255.0
Router: 192.168.0.254
DNS: 192.168.0.254
Repeat above and at “E” select “DHCP”.
Android Device
Se ngs / Wireless Networks / Wi‐Fi Se ngs / Connect to “QRSPNO” Press the more bu on and select Advanced. Select “Use Sta c IP” and enter the same numbers as for Apple products above. Please update PMII to the latest Driver version before switching modes.
Connect to PMII and click on the QRSPWR icon at upper right of display to see the current version..
Download the current Driver from the QRS website.
http://qrsmusic.com/support_pmii.asp
Copy update to a USB memory drive and plug drive into USB port on piano.
1 How to configure the TP-Link TL-WR702N from “Stand Alone” Mode to “Network Mode”:
[Windows 7 & Google Chrome Example] On the QRS PNOmation II remote control:
Press the following buttons in sequence…
SHIFT FUNC 9 9 1
Third light flashes red/green and then yellow.
Set a Static IP on your device
A
Left-Click on the network signal strength indicator.
B
Connect to the “QRSPNO”
C
After you’re connected go back and select “Open Network and Sharing Center”
D
Select “Change Adapter Settings”
E
Right-Click over your active “Wireless Network Connection
Select “Properties”.
F
Select “Internet Protocol Version 4 (TCP/IPv4)”
Select “Properties”.
G
Select “Use the following IP address” and enter:
IP address: 192.168.0.5
Subnet mask: 255.255.255.0
Gateway: 192.168.0.1
Press the OK button, wait a few seconds.
Close all windows.
Open your browser and navigate to 192.168.0.254
Enter “admin” as the User Name and Password.
Press the “Log In” button.
Click “Quick Setup”
Click “Next”
Select “Bridge Mode”
Click “Next”
Click the “Survey” button.
Click “Connect” for the SSID of the network you wish to join
Change the SSID to “QRSPNO Network”
Under “Security Options” choose the type of security (WEP or WPA)
Enter your network password in the “PassWord” box
Click “Next”
If prompted, change the channel setting displayed.
Press “OK” and then do so and click “Next”
Select “Disable Security” (Unless you want to secure the network)
Click “Next”
Click “Reboot”
Click “OK” to confirm.
Restarting
Close browser
Re-do steps A-G above.
At step “G” select “Obtain an IP address automatically”
Press “OK” and close all windows.
Connect to your home network
PLx light # 3 should be YELLOW.
Lighted button on the PMII processor should be FLASHING.
The TP-Link is now linked to your home network and ready for “Network Mode” on the PMII.
If you did not hear the IP address press SHIFT and then INFO on the QRS remote control.
Open Safari or Google Chrome and enter the IP address heard from the speaker.
2 How to Configure the TP-Link TL-WR702N from Network to “Stand Alone” Mode:
[Windows 7 & Google Chrome Example]
Set a Static IP on your device
A
Left-Click on the network signal strength indicator.
B
Connect to the “QRSPNO Network”
C
After you’re connected go back and select “Open Network and Sharing Center”
D
Select “Change Adapter Settings”
E
Right-Click over your active “Wireless Network Connection
Select “Properties”.
F
Select “Internet Protocol Version 4 (TCP/IPv4)”
Select “Properties”.
G
Select “Use the following IP address” and enter:
IP address: 192.168.0.5
Subnet mask: 255.255.255.0
Gateway: 192.168.0.1
Press the OK button, wait a few seconds.
Close all windows.
Open your browser and navigate to 192.168.0.254
Enter “admin” as the User Name and Password.
Press the “Log In” button.
Click “Quick Setup”
Click “Next”
Select “Router Mode”
Click “Next”
Change the SSID to QRSPNO
Set Channel to “Auto”
Under “Security Options:” select “Disable Security”
Click “Next”
Under “WAN Connection Type” select “Dynamic IP”
Click “Next”
Under “MAC Clone” select “No”
Click “Next”
Click “Reboot”
Click “OK”
Restarting
Wait for the TP-Link configuration to finish and restart.
Close browser when 100% complete.
H
Re-do steps A-G above.
At step “G” select “Obtain an IP address automatically”
Press the OK button, wait a few seconds.
Close all windows.
The device is now ready for “Stand-Alone Mode” on the PMII.
Connect to the QRSPNO
Open Safari or Google Chrome and navigate to 192.168.1.1
On the QRS PNOmation II remote control:
Press the following buttons in sequence…
SHIFT FUNC 9 9 0
The third light should be green.
Press SHIT INFO to confirm the 192.168.1.1 address.
Lighted button #3 on the PMII processor should be SOLID green.
3 How to Configure the TP-Link TL-WR702N to Stand Alone Mode after a TP-Link Reset:
[Windows 7 & Google Chrome Example]
The TP-Link has been pre-programmed from QRS so it’s not necessary to reset it. But, if the SSID name shown on the back of the TP-Link
appears in your wireless network connection list, it’s been reset.
To reset the WR702N, press and hold the “Reset” button on the side of the TP-Link for 8 seconds, or until the light blinks at lease 3 times.
Set a Static IP on your device
A
Left-Click on the network signal strength indicator.
B
Connect to the WiFi SSID listed on the back of the TL-WR702N.
C
After you’re connected go back and select “Open Network and Sharing Center”
D
Select “Change Adapter Settings”
E
Right-Click over your active “Wireless Network Connection
Select “Properties”.
F
Select “Internet Protocol Version 4 (TCP/IPv4)”
Select “Properties”.
G
Select “Use the following IP address” and enter:
IP address: 192.168.0.5
Subnet mask: 255.255.255.0
Gateway: 192.168.0.1
Press the OK button, wait a few seconds.
Close all windows.
TP-Link_50B880 in our example. Open Google Chrome and navigate to 192.168.0.254
Enter “admin” as the User Name and Password.
Press the “Log In” button. You may have to wait for the TP-Link below to appear.
Click “Quick Setup”
Click “Next”
Select “Router: Router Mode”
Click “Next”
Change the SSID to QRSPNO
Under “Security Options:” select “Disable Security”
Click “Next”
Under “WAN Connection Type” select “Dynamic IP”
Click “Next”
Under “MAC Clone” select “No”
Click “Next”
Click “Reboot”
Click “OK” to confirm.
The TP-Link will configure and restart.
Connect to the QRSPNO, step “A” above.
Open your browser and navigate to 192.168.0.254
If necessary, enter “admin” as the ID and Password
Under “Advanced Settings” click DHCP
Under DHCP Server” select “Enable”
Press “Save” and “OK” and close Google Chrome.
Re-do steps A-G above.
At step “G” select “Obtain an IP address automatically”
Press “OK”
Close all windows.
On the QRS PNOmation II remote control:
Press the following buttons in sequence…
SHIFT FUNC 9 9 0
The third light should be green.
Press SHIT INFO to confirm the 192.168.1.1 address.
4 How to Reset the EnGenius ETR9330 for QRS’ “Default” Stand Alone Mode:
[Windows 7 & Google Chrome Example]
Press and hold the WPS button for about 10 seconds. Release after the power button flashes a few times.
Connect to the EnGenius xxxx Wi-Fi device.
Open Google Chrome, Android browser, or Safari, and navigate to 192.168.0.1
Enter “admin” as the User Name and Password.
Press the “Log In” button.
Select Wireless
Enter “QRSPNO” for SSID1.
Press the “Apply” button.
Wait for the EnGenius to reload.
Connect to QRSPNO.
Open Google Chrome, Android browser, or Safari, and navigate to 192.168.0.1
Enter “admin” as the User Name and Password.
Press the “Log In” button.
Select System / LAN.
Select “User-Defined” option from the Secondary DNS drop down box.
[Can’t get to this setting using an iPad]
Enter “192.168.1.1” as the Secondary DNS address.
Press the “Apply” button and wait for EnGenius to reload.
Close browser.
On the QRS PNOmation II remote control:
Press the following buttons in sequence…
SHIFT FUNC 9 9 0
The third light should be green.
Press SHIT INFO to confirm the 192.168.1.1 address.
Verify that you are still connected to QRSPNO
Open your browser to 192.168.1.1 to connect to PMII.
How to Configure the EnGenius ETR9330 for QRS “Network” Mode:
[Windows 7 & Google Chrome Example]
You will need the information about your home network:
Network Name (SSID)
Encryption Type
Key Type
Encryption Key
On the QRS PNOmation II remote control:
Press the following buttons in sequence…
SHIFT FUNC 9 9 1
Third light flashes red/green and then solid yellow.
Connect to QRSPNO.
Open Google Chrome, Android browser, or Safari, and navigate to 192.168.0.1
Enter “admin” as the User Name and Password.
Select “Wizard”.
Press the “Next” button.
Select “Client Bridge Mode”
Press the “Next” button.
Enter the Network Name (SSID) to match your home Wi-Fi device.
Click on the Encryption drop-down box and select mode to match your home Wi-Fi.
Select/Enter the following to match your home’s Wi-Fi device:
Encryption Type
Key Type
Encryption Key
Press the “Next” button.
Verify “Setup Successful”
Press the “Reboot” button.
Wait for system reboot.
Close browser.
Connect to your home network.
On the QRS PNOmation II remote control:
Press the following buttons in sequence…
SHIFT INFO
Note the IP address heard from the speaker.
Open Safari or Google Chrome and enter the IP address heard from the speaker.
How to Setup the ASUS WL 330N3G Wireless for PMII in Stand-Alone Mode
PNOmation II
Power Cable
Wireless Computer
or
Android Device
or
Apple iPad/iTouch
Default Configuration
Set by QRS
ASUS 330N3G Wireless
set as an Access Point (AP)
No access from home Network
IP Address 192.168.1.1is assigned by PMII
All systems are shipped in Stand-Alone mode: [1] The PLx Network light is green and [2] you should see “QRSPNO ####” when viewing your local Wi-Fi devices .
These instructions are used to reset the PMII and the ASUS wireless to the default configuration.
For best results, go to qrsmusic.com. to download and install the latest PMII driver update. Instructions using Driver V3.66.
If the “Power” light is yellow, tap the PLx button once so that the light turns green.
Point the remote at the button on the PLx box. The “System” light will flash, w/ voice prompts, on remote control commands.
Using a QRS Remote: Press SHIFT then FUNC then 9 9 0.
If you have one of the smaller QRS remotes: press F1/Source then 9 9 0..
PLx The PLx Network light should now be green.
Power System Network Press and Hold the “Restore’ button, on the back of the ASUS, until the “power” light flashes at least 3 times.
DISCONNECT the Ethernet cable from PMII or the ASUS device.
View the available wireless devices using your iPad, iTouch, Android device or Wireless Computer.
If the ASUS was “restored” correctly you should see “ASUS” in your available Wi-Fi devices list.
Connect to the “ASUS” from the list and wait until a connection is established.
Apple devices may automatically open the Authentication screen when connection.
Enter admin in the User Name and Password fields.
If you are using an Android or a Computer and Google Chrome:
In your web browser, enter 192.168.1.1 in the URL address window.
Enter admin in the User Name and Password fields.
Click the Log In button.
Apple Google The ASUS programming window opens.
Select Access Point.
Enter the “QRSPNO” in the Wireless name (SSID) field.
Our example uses QRSPNO Test
Click the APPLY button.
The ASUS will apply, save and restart with the new settings.
Close the browser window when 100% complete.
Reconnect the Ethernet cable.
Wait for the voice prompt to report: “Standby”...“Connected”...”IP Address is...192.168.1.1”. [Press FUNC INFO to repeat IP address]
You can now wirelessly connect to PNOmation II via the ASUS wireless access point..
Enter [192.168.1.1] in your Internet web browser, Google Chrome or Safari..
Android How To Setup ASUS WL 330N3G Wireless for PMII in Network Mode
PNOmation II
Computer
or
Android Device
or
Apple iPad/iTouch
Your wireless network router
Wireless or Cable
connection to
your Home Network
Internet Modem
PMII gets its IP address
from your home network
ASUS 330N3G set as an Ethernet Adapter
DISCONNECT the Ethernet cable from PMII or the ASUS device.
For best results, go to qrsmusic.com. to download and install the latest PMII driver update. Instructions using Driver V3.66.
If the “Power” light is yellow, tap the PLx button once so that the light turns green.
Point the remote at the button on the PLx box. The “System” light will flash, w/ voice prompts, on remote control commands.
Using a QRS Remote: Press SHIFT then FUNC then 9 9 1.
If you have one of the smaller QRS remotes: press F1/Source then 9 9 1.
The PLx Network light should now be yellow.
Power System Network Press and Hold the “Restore’ button, on the back of the ASUS, until the “power” light flashes at least 3 times.
View the available wireless devices using your iPad, iTouch, Android device or Wireless Computer.
Connect to the “ASUS” from the list and wait until a connection is established.
Apple devices may automatically open the Authentication screen when connection.
Enter admin in the User Name and Password fields.
If you are using an Android or a Computer and Google Chrome:
In your web browser, enter 192.168.1.1 in the URL address window.
Enter admin in the User Name and Password fields.
Click Log In (Apple) or click the OK (Android/Chrome) button.
Apple Google Programming window opens.
Select Network Adapter.
Close Help
Select your local wireless Network device from the Site Survey list.
Click the Connect button.
Enter your Network Key if requires and press Connect.
The ASUS will connect, save and restart with the new settings.
Close the browser window when 100% complete.
Connect your wireless device to your home network.
Reconnect the Ethernet cable
Wait for the voice prompt to report: “Network”...“Connected”...”IP Address is...192.168.1.xxx”.
[FUNC INFO to repeat the IP Address]
Open your web browser and enter the IP address and connect to PNOmation II through your home Network.
Android How To Setup the ASUS WL 330gE Wireless for PMII in Stand-Alone Mode
PNOmation II
Reset
Wireless Computer
or
Android Device
or
Apple iPad/iTouch
Default ConfiguraƟon
Set by QRS
ASUS 330gE Wireless
set as Access Point (AP)
No access from home Network
IP Address 192.168.1.1is assigned by PMII
All systems are shipped in Stand-Alone mode: [1] The PLx Network light is green and [2] you should see “QRSPNO ####” when viewing your local Wi-Fi devices .
These instructions are used to reset the PMII and the ASUS wireless to the default configuration.
Press and hold the Reset button on the edge of the ASUS until the power light flashes at least three times.
For best results, go to qrsmusic.com. to download and install the latest PMII driver update. Instructions using Driver V3.66.
If the “Power” light is yellow, tap the PLx button once so that the light turns green.
Point the remote at the button on the PLx box. The “System” light will flash, w/ voice prompts, on remote control commands.
Using a QRS Remote: Press SHIFT then FUNC then 9 9 0.
PLx If you have one of the smaller QRS remotes: press F1/Source then 9 9 0.
The PLx Network light should now be green.
Power System Network View the available wireless devices using your iPad, iTouch, Android device or Wireless Computer.
If the ASUS was “reset” correctly you should see “ASUS” in your available Wi-Fi devices list.
Connect to the “ASUS” from the list and wait until a connection is established.
Open Apple Safari, Android Web Browser or Google Chrome on a Computer:
In your web browser, enter 192.168.1.220 in the URL address window.
The “Authentication Required” dialog box will appear.
Enter admin in the User Name and Password fields.
Click Log In.
The ASUS programming window opens.
Select the AP Tab
Enter “QRSPNO for the SSID name.
Click the FINISHED button.
Click OK
The ASUS will save and restart with the new settings
Wait for the progress to complete, 100%.
At this point you will loose connection to the ASUS...
Close the browser window when the progress is 100% complete.
Wait for the voice prompt to report: “Standby”...“Connected”...”IP Address is 192.168.1.1”
[FUNC INFO to repeat the IP Address.]
Connect your wireless device to “QRSPNO”.
Open Google Chrome, Safari or your Android browser and enter 92.168.1.1 to connect to PMII.
Apple Google Chrome Android How To Setup ASUS WL 330gE Wireless for PMII in Network Mode
PNOmation II
Computer
or
Android Device
or
Apple iPad/iTouch
Your wireless network router
Wireless or Cable
connection to
your Home Network
Internet Modem
PMII gets its IP address from your home network
Reset ASUS 330gE set as an Ethernet Adapter
For best results, go to qrsmusic.com. to download and install the latest PMII driver update. Instructions using Driver V3.66.
Press and hold the Reset button on the edge of the ASUS until the power light flashes at least three times.
If the “Power” light is yellow, tap the PLx button once so that the light turns green.
Point the remote at the button on the PLx box. The “System” light will flash, w/ voice prompts, on remote control commands.
Using a QRS Remote: Press SHIFT then FUNC then 9 9 1.
If you have one of the smaller QRS remotes: press F1/Source then 9 9 1.
PLx The PLx Network light should now be yellow.
Power System Network View the available wireless devices using your iPad, iTouch, Android device or Wireless Computer.
Connect to the “ASUS” from the list and wait until a connection is established.
Open Apple Safari, Android Web Browser or Google Chrome on a Computer:
In your web browser, enter 192.168.1.220 in the URL address window.
The “Authentication Required” dialog box will appear.
Enter admin in the User Name and Password fields.
Click Log In.
Apple The ASUS programming window opens.
Click on the Adapter tab.
In the Available Network List , click on the radio button for your local network.
Our example shows ASUS QRS AP.
Click the Connect button.
You may need to provide a password to your network.
Use the “Add” button if your local network is hidden.
Enter the password of your home router if required.
This yellow message box will appear.
Click OK
The ASUS will save and restart with the new settings
Wait for the Progress to complete.
At this point you will loose connection to the ASUS...
Close the browser window when the progress is 100% complete.
Wait for the voice prompt to report the new IP Address from your network: “Network”...“Connected”...”IP Address xxx.
[FUNC INFO to repeat the IP Address]
Connect your wireless device to home router.
Open Google Chrome, Safari or your Android browser and enter IP Address that was reported to connect to PMII.
Google Chrome Android