1
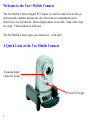
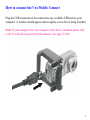
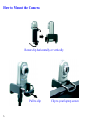
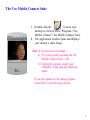
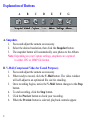
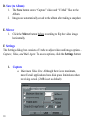
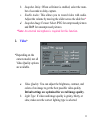
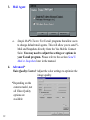
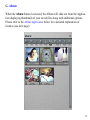
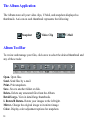
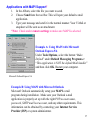
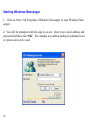
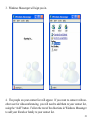
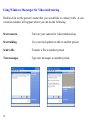
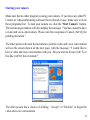
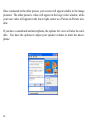
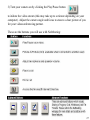
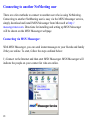
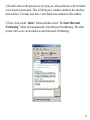
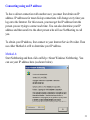
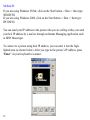
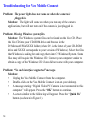
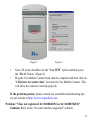
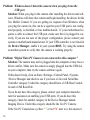
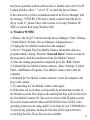
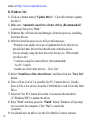
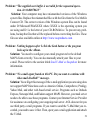
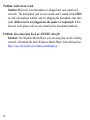
Table of Contents
Welcome to the Veo™ Mobile Connect ............................................................ 2
Minimum System Requirements ...................................................................... 3
Software and Installation ................................................................................. 4
How to connect the Veo Mobile Connect .................................................... 5-6
The Veo Mobile Connect Suite ................................................................... 7-15
How to send Snapshots and Videos ......................................................... 16-18
Microsoft® Windows Messenger & NetMeeting .................................... 19-33
Troubleshooting ........................................................................................ 34-40
Additional Help and Resources ..................................................................... 41
1
Welcome to the Veo™ Mobile Connect
The Veo Mobile Connect Digital PC Camera is a terrific camera for on-the-go
professionals, students and anyone else who wants to communicate more
effectively over the Internet. Share digital photos in seconds. Send video clips
in a snap. Videoconference with ease.
The Veo Mobile Connect gets you connected ... with style!
A Quick Look at the Veo Mobile Connect
Focusing Knob
(adjust to focus)
Power ON Light
2
Minimum System Requirements
Hardware
PC with an AMD K6 or Pentiumclass processor that operates at 300 MHz or faster
32 MB or more RAM
280 MB of available hard drive space
CD-ROM Drive
One available USB port on your computer to plug in the camera
Display adapter capable of 800x600 in 16 bit color
Standard microphone for sending video mail and videoconferencing
messages (Microphone not included)
Internet connection
(Required for video mail and videoconferencing software)
Software
Microsoft Windows 98, 2000, Me, or XP
Internet browser application, i.e. Microsoft Internet Explorer, AOL
E-mail Program, i.e. Microsoft Outlook, Yahoo E-mail, AOL
Note: To find the version number of your Windows operating
system, select Settings from the Windows Start menu. Open
Control Panel, and double-click on the System icon. The System
Properties dialog box indicates the version number.
3
Software and Installation
Install the software before connecting your Veo Mobile Connect!
If you have already plugged the camera into the computer, please unplug it
before installing the software.
1. Insert the CD-ROM into your CD-ROM
drive.
2. Autorun will display the Veo Mobile
Connect Installation screen.* Click
Install.
3. On the Install window, de-select any
additional software you do not wish to
install. Click Continue.
4. Follow the prompts to finish the
installation.
Restart your computer to complete the
installation.
5. After your computer restarts, you may
plug your camera into the USB port.
*Note: If Autorun does not start, choose Run from the Windows Start Menu.
Assuming your CD-ROM drive is the D drive, type “d:\Autorun” in the Run
dialog box. If Autorun still does not run, consult your computer manual or
manufacturer to locate the CD-ROM drive.
4
How to connect the Veo Mobile Connect
Plug the USB connector on the camera into any available USB port on your
computer. A window should appear and recognize a new device being installed.
Note: If your computer does not recognize a new device installed, please refer
to the Troubleshooting section of the manual (see pages 34-40).
5
How to Mount the Camera
Rotate clip horizontally or vertically
Pull to clip
6
Clip to your laptop screen
The Veo Mobile Connect Suite
1. Double-click the
icon on your
desktop or click on Start->Programs->Veo
Mobile Connect->Veo Mobile Connect Suite.
2. The Application window opens and displays
your camera’s video image.
Note: If you do not see an image:
a) Try closing and re-opening the Veo
Mobile Connect Suite - OR
b) Unplug the camera, restart your
computer. Then plug the camera in
again.
If you still cannot see any images, please
consult the Troubleshooting section.
7
Explanation of Buttons
A
B
C
D
E
F
G
A. Snapshots
1. Focus and adjust the camera as necessary.
2. Select the desired resolution, then click the Snapshot button.
3. The snapshot button will automatically save photos to the Album.
Note: Depending on your Capture settings, snapshots are captured
in either .JPG or .BMP file format.
B. V-Mail (Compressed Video for E-mail Purposes)
1. Focus and adjust the camera as necessary.
2. When ready to record, click the V-Mail button. The video window
will self-adjust to an optimized file size for emailing.
3. Once recording begins, notice the V-Mail button changes to the Stop
button.
4. To end recording, click the Stop button.
5. Click the Preview button to check your recording.
6. When the Preview button is selected, playback controls appear.
8
7. To send your V-mail, finish viewing the video or click Stop on the playback controls. You must click Stop or finish playback so that Preview
and Send buttons reappear.
a. Click Send to launch your default E-mail program - OR
b. If you are using America Online or web-based e-mail, please refer to
the Send V-Mail or Snapshots section on Page 16 to Page 18. If you
are unable to launch your e-mail program, it is possible that your
e-mail program cannot be designated as a Mail Agent. Please refer to
Page 18 for assistance on manually attaching a V-Mail or Snapshot.
8. To save a copy of your V-Mail to the Album, click the Save button.
Note: All V-Mail files are captured in an executable (.EXE) file
format for easy e-mailing and viewing.
C. Capture (Uncompressed Video)
1. Focus and adjust the camera as necessary.
2. When ready, click Capture to begin recording.
3. Notice the Capture button changes to the Stop button.
4. Click Stop at any time to end recording.
5. Before saving your video to your Album, click Preview.
6. Playback controls will appear.
7. To save to the Album, finish viewing the video or click Stop.
8. Click the Save button to save the captured video to the Album.
Note: Captured videos are saved in the .AVI file format for video
editing.
9
D. Save (to Album)
1. The Save button stores “Capture” video and “V-Mail” files to the
Album.
2. Images are automatically saved to the album after taking a snapshot.
E. Mirror
1. Click the Mirror button before recording to flip the video image
horizontally.
F. Settings
The Settings dialog box consists of 3 tabs to adjust video and image options –
Capture, Video, and Mail Agent. To access options, click the Settings button:
1.
10
Capture
a. Maximum Video Size: Although there is no maximum,
most E-mail applications have disk space limitations when
receiving e-mail. (2MB is set as default)
b.
Snapshot Delay: When self-timer is enabled, select the number of seconds to delay capture.
c. Enable Audio: This allows you to record video with audio.
Adjust the volume by moving the slider across the slide bar.*
d. Snapshot Image Format: Select JPEG for compressed pictures
and BMP for uncompressed pictures.
*Note: An external microphone is required for this function.
2.
Video*
*Depending on the
camera model, not all
Video Quality options
are available.
a.
b.
Video Quality: You can adjust the brightness, contrast, and
colors of an image to get the best possible video quality.
Default settings are optimized for overall image quality.
Light Type: If video and image quality is grainy, blurry, or
slow, make sure the correct lighting type is selected.
11
3.
Mail Agent
a.
4.
Simple MAPI Clients: For E-mail programs that allow users
to change default mail agents. This will allow you to send VMail and Snapshots directly from the Veo Mobile Connect
Suite. You may need to adjust the settings or options in
your E-mail program. Please refer to the section Send VMail or Snapshots later in the manual.
Advanced*
Video Quality Control: Adjust the color settings to optimize the
image quality.
*Depending on the
camera model, not
all Video Quality
options are
available
12
G. Album
When the Album button is selected, the Album will slide out from the Application displaying thumbnails of your saved files along with additional options.
Please refer to the Album Application below for a detailed explanation of
features (see next page).
13
The Album Application
The Album stores all your video clips, V-Mail, and snapshots displayed as
thumbnails. An icon on each thumbnail represents the following:
Snapshot
Video Clip
V-Mail
Album Tool Bar
To review and manage your files, click once to select the desired thumbnail and
any of these tools:
Open- Open files.
Send- Send files by e-mail.
Print- Print snapshots.
Save- Save to another folder or disk.
Delete- Delete any unwanted files from the Album.
Detail/Large- View in detail/large thumbnails.
L Rotate/R Rotate- Rotate your images to the left/right.
Mirror- Change the original image to its mirror image.
Color- Display color adjustment options for snapshots.
14
View Files
1. Click once on thumbnail to select the file to be viewed.
2. Choose Open from the tool bar.
3. Double-clicking on the thumbnail will also open the file.
Note: Snapshots will open in your default viewing application. When
viewing video clips and V-Mail from Album, your default media
player will open.
Print Snapshots
1. Select the snapshot to be printed and click the Print button.
Note: For best snapshot print quality, adjust print size relative to image
resolution. Typically, the smaller the print size, the better the
print quality.
Save (to Folder or Disk)
1. Select the desired file to be saved and click the Save button.
2. Choose desired save location and follow normal procedures.
Send V-Mail or Snapshots
In order to send V-Mail and Snapshots directly from the Veo Mobile Connect
Suite, your E-mail program should have options to change your default mail
agent, otherwise known as Messaging Application Program Interface (MAPI).
For E-mail programs and all web-based e-mail that do not support MAPI, please
refer to the Manually Attaching Files section on Page 18. If the information
located in this section is not sufficient, you may need to contact your E-mail or
web-based E-mail provider for further assistance.
15
How to send Snapshots and Videos
America Online
AOL does not support MAPI functions. If you click the Send
button in the Veo Mobile Connect application, it will not respond.
a. To send V-Mail and Snapshots to AOL and non-AOL members:
i. Click on the AOL Write icon.
ii. Click on the Attachments button.
iii. Click on the Attach button and change the directory to
C:\Program Files\Veo Mobile Connect\Album.
iv. Double click on the desired file, i.e., cap[###].exe for V-Mail or
cap[###].bmp/.jpg files for Snapshots.
v. The file should appear in the Attachments window. Click OK.
vi. Your V-Mail/snapshot is attached. To send, click Send Now.
16
Applications with MAPI Support*
1. In the Album, select the file you want to send.
2. Choose Send from the tool bar. This will open your default e-mail
application.
3. Type your message and send it in the normal manner. Your V-Mail or
snapshot will be sent as an attachment.
*Note: Check under camera settings to make sure MAPI is selected.
Example A: Using MAPI with Microsoft
Outlook Express 5/6
Under Tools/Options, select the button “Make
Default” under Default Messaging Programs->
“This application is NOT the default Mail handler”
and then click OK. Restart your computer.
Microsoft Outlook Express 5/6
Example B: Using MAPI with Microsoft Outlook
Microsoft Outlook automatically setup your MAPI e-mail
program during installation. Make sure your Outlook e-mail
application is properly set up with the right POP account name,
password, SMTP mail host account, and any other requirements. This
information can be obtained by contacting your Internet Service
Provider (ISP) or system administrator.
17
Web-based e-mail programs
Web-based e-mail such as Hotmail or Yahoo! Mail do not support the “Send”
button in the Veo Mobile Connect Suite. When using web-based e-mail, you will
need to attach the snapshot or videos to your e-mail.
1. Log-in to your web-based e-mail.
2. Compose a new e-mail message.
3. Depending on your web-based e-mail service, look for the Attach, Attachments, or Insert option to attach your snapshot or video. You will be
prompted to browse for the desired file you want to attach.* Follow the
directions provided by your web-based e-mail service to attach the file(s).
4. Once the file(s) has been attached to your e-mail, click the appropriate
button to send off your e-mail with the snapshot or video attached to it.
*Note: Snapshots and V-Mail residing in the Album should have this
location in your hard drive: C:\Program Files\Veo Mobile Connect\Album.
Manually Attaching Files
1. Open your E-mail program and compose a new mail message.
2. Depending on your E-mail program, choose attach, insert, or browse to
locate the desired file.*
3. Once the file is attached, click the appropriate button to send.
*Note: Snapshots and V-Mail residing in the Album should have this
location in your hard drive: C:\Program Files\Veo Mobile Connect\Album
18
Microsoft Windows Messenger Guide
Microsoft Windows Messenger has been included with Microsoft Windows XP
to provide the latest in point-to-point videoconferencing. To ensure that you
obtain the most from your camera experience, we have compiled this brief
instruction guide to help you get started. Note that this guide is provided only
as a reference and is not endorsed by Microsoft.
To obtain additional assistance with Microsoft Windows Messenger beyond
what is outlined in this guide, refer to the support options on Page 33.
19
Starting Windows Messenger
1. Click on Start->All Programs->Windows Messenger to start Windows Messenger.
2. You will be prompted with the sign in screen. Enter your e-mail address and
password and then click “OK”. For example, any address ending in @hotmail.com
or @msn.com can be used.
20
3. Windows Messenger will sign you in.
4. The people on your contact list will appear. If you want to connect with another user for videoconferencing, you will need to add them to your contact list,
using the “Add” button. Follow the rest of the directions in Windows Messenger
to add your friends or family to your contact list.
21
Using Windows Messenger for Videoconferencing
Double-click on the person’s name that you would like to connect with. A conversation window will appear where you can do the following:
Start camera
Turn on your camera for videoconferencing
Start talking
Use your microphone to talk to another person
Send a file
Transfer a file to another person
Text messages
Type text messages to another person
22
Starting your camera
Make sure that no other program is using your camera. If you have any other PC
Camera or videoconferencing software that is already in use, make sure to close
these programs first. To turn your camera on, click the “Start Camera” button.
The text message window will also display the message, “You have asked to have
a video and voice conversation. Please wait for a response or Cancel (Alt+Q) the
pending invitation.”
The other person who sent the invitation to join the video and voice conversation
will see the screen shown on the next page, with the message: “I would like to
have a video and voice conversation with you. Do you want to Accept (Alt+T) or
Decline (Alt+D) the invitation?”
The other person has a choice of clicking “Accept” or “Decline” to begin the
video and voice conversation.
23
Once connected to the other person, your screen will appear similar to the image
pictured. The other person’s video will appear in the large video window, while
your own video will appear in the lower right corner as a Picture-in-Picture window.
If you have a soundcard and microphone, the options for voice will also be available. You have the options to adjust your speaker volume or mute the microphone.
24
Microsoft Windows NetMeeting
Microsoft NetMeeting has been included with your camera to provide
videoconferencing capabilities. As one of the most widely distributed and
versatile videoconferencing applications on the market, you will be able to
communicate with anyone in the world as long as all parties are connected
through Microsoft NetMeeting. As a result of its large distribution base, you
will find that most owners of a pc camera will already have some exposure to
the software and probably own a copy.
Although this is an excellent program to become acquainted with, it can be
rather complicated the first time you set up a conference. To ensure that you
obtain the most from your camera experience, we have compiled this brief
instruction guide to help you get started.
However, since this is a Microsoft program we cannot offer any support for
this product beyond what is outlined in this guide. To obtain additional
assistance with Microsoft NetMeeting, directly from Microsoft, please refer
to the NetMeeting web site at: http://www.microsoft.com/windows/
netmeeting.
25
How to use Microsoft NetMeeting
Once you have all the necessary components of Microsoft NetMeeting installed
and tested to ensure it is working properly, this section of the guide will provide
some basic tips on videoconferencing. If you require additional assistance, more
information can be obtained from Microsoft at: http://www.microsoft.com/
windows/netmeeting
IMPORTANT: Make sure the Veo Mobile Connect Suite and any other video
camera applications are closed before starting Microsoft NetMeeting.
1) Look for the NetMeeting icon on your desktop or Quick Launch bar and then
double-click on it to start Microsoft NetMeeting.
2) Microsoft NetMeeting will start and you will see a window similar to the one
shown below:
26
3) Turn your camera on by clicking the Play/Pause button
to initiate the video stream (this may take up to a minute depending on your
computer). Adjust the camera angle and focus to ensure a clear picture of you
for your videoconferencing partner.
These are the buttons you will use with NetMeeting:
27
Connecting to another NetMeeting user
There are a few methods to connect to another user who is using NetMeeting.
Connecting to another NetMeeting user is easy via the MSN Messenger service,
simply download and install MSN Messenger from Microsoft at http://
messenger.msn.com. Directions for installing and setting up MSN Messenger
will be shown on the MSN Messenger webpage.
Connecting via MSN Messenger:
With MSN Messenger, you can send instant messages to your friends and family
if they are online. To start, follow the steps outlined below:
1) Connect to the Internet and then start MSN Messenger. MSN Messenger will
indicate the people on your contact list who are online.
28
2) Double-click on the person you are trying to videoconference with to initiate
a text-based conversation. This will bring up a window similar to the interface
shown below. You may now have a text-based conversation in this window.
3) Next, click on the “Invite” button and then select “To Start Microsoft
NetMeeting” which will automatically start Microsoft NetMeeting. The other
person will receive an invitation to start Microsoft NetMeeting.
29
4) If the other person you are connecting to accepts the invitation to start
Microsoft NetMeeting, you will automatically be connected. You will receive
video in a window similar to this. The person who you are calling will appear in
the large main window while you will appear in the smaller Picture-in-Picture
window.
Note: If you are using a dial-up connection, the video will move at approximately 5-10 frames per second. Faster Internet connections such as DSL or
cable modem will result in even faster frame rates. This translates into smoother
motion and clearer video.
30
Connecting using an IP address:
To have a direct connection with another user, you must first obtain an IP
address. IP addresses for most dial-up connections will change every time you
log on to the Internet. For this reason, you must get the IP address from the
person you are trying to contact each time. You can also determine your IP
address and then send it to the other person who will use NetMeeting to call
you.
To obtain your IP address, first connect to your Internet Service Provider. Then
use either Method A or B to determine your IP address.
Method A:
Start NetMeeting and then click on Help->About Windows NetMeeting. You
can see your IP address here (as shown below).
31
Method B:
If you are using Windows 98/Me, click on the Start button -> Run -> then type:
WINIPCFG
If you are using Windows 2000, click on the Start button -> Run -> then type:
IPCONFIG
You can send your IP address to the person who you are calling or they can send
you their IP address by e-mail or through an Instant Messaging application such
as MSN Messenger.
To connect to a person using their IP address, you can enter it into the highlighted area (as shown below). After you type in the person’s IP address, press
“Enter” on your keyboard to connect.
32
Microsoft Windows Messenger and NetMeeting
Support & Resources
This guide has been intended to provide a brief introduction to Microsoft
NetMeeting. For more in-depth questions or to obtain technical support for
Microsoft NetMeeting, please refer to the information listed below. The
resources listed below are third-party sources and are neither endorsed nor
supported by the camera manufacturer and have been provided only as a
reference.
Microsoft Windows NetMeeting: http://www.microsoft.com/windows/
netmeeting
(800) 936-5700 [Toll Free/Pay per incident]
(425) 635-7123 [Toll Call/No charge support]
MSN Messenger: http://messenger.msn.com
The Windows NetMeeting Zone: http://www.netmeet.net
Meeting by Wire: http://www.meetingbywire.com
33
Troubleshooting for Veo Mobile Connect
Problem: The power light does not come on when the camera is
plugged in.
Solution: The light will come on when you run any of the camera
applications, but will not turn on if the camera is just plugged in.
Problem: Missing Windows system files.
Solution: The Windows system files can be found on the Veo CD. Place
the Veo CD into your CD-ROM drive and browse in the
D:\Microsoft\WinXXXX folder (where D:\ is the letter of your CD-ROM
drive and XXXX corresponds to your version of Windows). Select the files
that Windows is asking for and copy them into C:\Windows\System. Some
files may still require the Windows CD. Contact your computer vendor to
obtain a copy of the Windows CD if one did not come with your computer.
Problem: “No such interface supported” message.
Solution:
•
Unplug the Veo Mobile Connect from the computer.
•
Double-click on the Veo Mobile Connect icon on your desktop.
•
A message stating: “Digital Video PC Camera is not connected to this
computer” will appear. Press the “OK” button to continue.
•
A screen similar to the following will appear. Press the “Quick fix”
button (as shown in Figure 1).
34
Figure 1
•
•
Figure 2
Next, fill in the checkbox for the “Use VFW” option and then press
the “Fix it” button. (Figure 2)
Plug the Veo Mobile Connect back into the computer and then click on
“Click here to restart video” to restart the Veo Mobile Connect. This
will allow the camera to start up properly.
If the problem persists, please consult our extended troubleshooting tips
on our website at http://www.veoproducts.com
Problem: “Class not registered. hr=0x80040154 (or hr=0x800706F8)”
Solution: Refer to the “No such interface supported” solution.
35
Problem: Windows doesn’t detect the camera when you plug it into the
USB port.
Solution: When you plug in the camera after installing the drivers and software, Windows will detect the camera and begin installing the drivers for the
Veo Mobile Connect. If you are getting no response from Windows when
you plug the camera in, this can be a sign that your USB port is not configured properly, is disabled, or has malfunctioned. If your motherboard requires a cable to connect the USB port, make sure that it is plugged in correctly. If you are not sure of the proper configuration, please contact your
system or motherboard manufacturer. If your USB controller is not listed in
the Device Manager, enable it in your system BIOS. Try using the camera
on another system to verify that the camera is working properly.
Problem: “Digital Video PC Camera is not connected to this computer”
Solution: The camera may not be plugged into the computer or may have a
driver conflict. Make sure the camera is snugly plugged into the USB slot
on your computer, then try the camera software again.
If this doesn’t help, click on Start->Settings->Control Panel->System>Device Manager and check to see if you have a Universal Serial Bus
Controller category. Under this category should have a USB Host Controller and a USB Root Hub.
If you do not have this category, please contact your computer manufacturer for assistance on enabling your USB ports. If you do have this
category, check for another category in the Device Manager named
Imaging Device. Under this category should be the Veo PC Camera.
If the Veo PC Camera has a yellow “!” or red “X” next to it, this means it
36
may have a problem with the software driver. Double-click on the Veo PC
Camera with the yellow “!” or red “X” to check the Device Status.
If the camera has a yellow exclamation mark in the Device Manager with
the message: “NTKERN.VXD device loader could not load the device
driver (Code 2)” please follow either section A (if using Windows 98/
98SE) or section B (if using Windows Me):
A. Windows 98/98SE:
1) Remove the Veo PC Camera from the Device Manager. (Start->Settings>Control Panel->System->Device Manager->Imaging Device)
2) Unplug the Veo Mobile Connect from the computer.
3) Go to C:\Program Files\Veo Mobile Connect and double-click on a
program named: cleanup. Press the “Scan and Delete” button in order for
the program to clean the installation of the Veo Mobile Connect.
4) After the cleanup program has completed, press the “Exit” button.
5) Uninstall the Veo Mobile Connect software. (Start->Settings->Control
Panel->Add/Remove Programs->Veo Mobile Connect) and restart the
computer.
6) Reinstall the Veo Mobile Connect software, restart the computer, and
plug in the camera.
7) Try launching the Veo Mobile Connect Suite again.
8) If this does not work, there could possibly be mismatched versions of
the Windows system files. Replace the mismatched files with the files from
the Veo Mobile Connect CD. The correct version of the Windows system
files can be found under D:\Microsoft\WinXXXX where XXXX is the
operating system you are using and D:\ is the letter of your CD ROM drive.
To prevent any problems, backup the files that will be replaced before
overwriting the files. These files are also available
37
online at http://www.veoproducts.com.
B. Windows Me:
1) Click on a button named “Update Driver.” Click this button to update
the driver.
2) Make sure “Automatic search for a better driver. (Recommended)”
is selected, then press “Next.”
3) Windows Me will then proceed through a detection process, searching
for better drivers.
4) After the detection process you will get this message:
“Windows was unable to locate an updated driver for this device,
but did find other drivers that should work with this device.
You are already using the best driver for this device. What would
you like to do?
· Continue using the current driver. (Recommended)
Veo PC Camera
· Install one of the other drivers. - View List”
5) Select “Install one of the other drivers” and then click the “View List”
button.
6) There will be a list of 1-4 possible Veo PC Camera drivers. Usually,
there will be a few drivers from the CD ROM drive and 1 from the Hard
Drive.
7) Select the Veo PC Camera driver that is located on the hard drive
(C:\Windows\INF) to update the driver.
8) Press “Next” and then press the “Finish” button. Windows will prompt
you to restart the computer. Click “Yes” to restart the
computer.
9) You should now be able to use the Veo Mobile Connect software.
38
Problem: “The supplied user buffer is not valid for the requested operation. hr=0x80070618”
Solution: Your computer may have mismatched versions of the Windows
system files. Replace the mismatched files with the files from the Veo Mobile
Connect CD. The correct version of the Windows system files can be found
under D:\Microsoft\WinXXXX where XXXX is the operating system you
are using and D:\ is the letter of your CD-ROM drive. To prevent any problems, backup the files that will be replaced before overwriting the files. These
files are also available online at http://www.veoproducts.com
Problem: Nothing happens after I click the Send button or the program
locks up in the Album.
Solution: You need to configure your email program to be the default
MAPI client correctly. You can also manually attach your files to your
e-mail. Please refer to the section titled Send V-Mail or Snapshots for more
information.
Problem: “No e-mail agent found on this PC. Do you want to continue with
video mail disabled?” message.
Solution: You will get this message if the e-mail application you are using does
not support MAPI functions such as America Online, CompuServe, Prodigy,
Yahoo Mail, and other web-based email service. Programs such as Outlook
Express, Netscape Mail, and Eudora support MAPI. However, your mail server
needs to be able to use these programs. Contact your Internet Service Provider
for assistance on configuring your outgoing mail server. AOL does not let you
use third party e-mail programs. If you want to send the V-Mail that you recorded, you need to save it first. Then, open your e-mail application and attach
the V-Mail.
39
Problem: Audio doesn’t work
Solution: Make sure your microphone is plugged into your sound card
correctly. The microphone jack on your sound card is usually labeled MIC
or with a microphone symbol. Also try plugging the microphone into other
jacks. Make sure it is not plugged into the speaker or output jack. If this
does not work, please refer to your sound card or microphone manuals.
Problem: You cannot play back an AVI/EXE video file.
Solution: The Windows Media Player you are using may not be working
correctly. Download the latest Windows Media Player from Microsoft at
http://www.microsoft.com/windows/mediaplayer
40
Additional Help and Resources
For detailed Technical Support, Frequently Asked Questions, and resources
about the Veo Mobile Connect, the website is accessible directly by clicking the
? (Online help) button on the top right hand corner of the Album or by
selecting the Veo logo at the bottom of the application. The website is also
accessible at the following URL address: http://www.veoproducts.com.
For technical support by phone, please call (408) 474-0494.
Technical support hours are Monday through Friday from 8:30 am to 5:30 pm
Pacific Time.
Statement of Limited Warranty
Xirlink Inc. warrants that for a period of 1 (one) year from the date of purchase
that this product 1) is free from manufacturer defects in materials and workmanship and 2) conforms to its specifications. If this product does not function
due to manufacturer defects during the warranty period, Xirlink, Inc., at its
option, will either replace this product with one that is functionally equivalent
or will refund your purchase price. These are your exclusive remedies under this
warranty. Please call (408) 350-8403 for warranty service.
This product is distributed and sold by Xirlink Inc. For all non-technical
comments and questions related to this product, please contact Customer
Service at (408) 350-8403.
Veo Mobile Connect is a registered trademark of Xirlink, Inc.
All other products and company names mentioned herein are the trademarks or
registered trademarks of their respective owners.
41