1
Owner's
|nstructio
_=m61mDtlm_===_ll_
Important
Regarding
Viewing
Warranty
Television
Information
Format
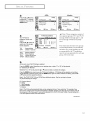
Standard screen format televisions (4:3, the aspect ratio of the screen width to height) are
primarily designed to view standard furmat full motion video. The images displayed on
them should primarily be in the standard 4:3 ratio furmat and constantly moving.
Displaying stationary graphics and images on screen, such as the dark top and bottom
letterbox bars (wide screen pictures), should be limited to no more than 15% of the total
television viewing per week.
Wide screen format televisions (16:9, the aspect ratio of the screen width to height) are
primarily designed to view wide screen format full motion video. The images displayed
on them should primarily be in the wide screen 16:9 ratio furmat, or expanded to fill the
screen if your model offbrs this feature, and constantly moving. Displaying stationary
graphics and images on screen, such as the dark side bars on non expanded standard
furmat television video and programmbl 8, should be limited to no more than 15% of the
total television viewing per week.
Additionally, viewing other stationary images and text such as stock market reports,
video game displays, station logos, web sites or computer graphics and patterns, should
be limited as described above for all televisions. Displaying any stationary images that
exceed the above guidelines can cause uneven aging of picture tubes (CRTs) that leave subtle,
but permanent
burned in ghost images in the television picture. To avoid this, vary the pro
gramming
and images, and primarily display full screen moving images, not stationary patterns or
dark bars. On television models that offer picture sizing features, use these controls to
view the diffbrent furmats as a full screen picture.
Be careful in the selection and duration of television formats used for viewing. Uneven
CRT aging as a result of furmat selection and use, as well as other burned in images, is
not covered by your Samsung limited warranty.
2
CONTENTS
Chapter
J
1: Your
New
TV
................
5
List cf Features ...........................................
Accessori_ s ..............................................
Familiarizi_g Yours4f with The TV ............................
Front Pand ButtoHs ................................
Side Panel Jacks ...................................
Rear Panel Jacks ...................................
Remme CoHtrol ....................................
Chapter
2: Installation
.................
,5
,5
6
11
7
8
9
11
Culmecting VHF and UHF Arltennas .........................
Antennas with 300 ohm Flat WvvinLeads ...............
Antennas with 7_ohm Round Leads ..................
Separate VNF and UNF Antennas .....................
Colmecting Cable TV .....................................
Cable without a Cable Box ..........................
Colmectiilg to a Cable Pox that Descrambles All Cimnn4s..
Colmecting to a Cable Pox that Descrmnbtes Some Chalmels
Colmecting a VCR........................................
Colmectiilg an _VHS VCR ..........................
Colmectiilg a Second VCR to Record from tile TV .........
Connecting a DVD Player ..................................
Ccmnecting a Camcorder ...................................
Itlstalling Batteries in the Remote Comrol ......................
Chapter
3: Operation
..................
Turning tile TV ()u aild Off .................................
Plug & Play Feature ......................................
ViewiIlg tile Menus aud O>Screen Displays ....................
Viewqng the Me_us ................................
Viewqng the Display ...............................
Sdecting a Menu Language .................................
Memorizing the Charnels ..................................
Sdec-ti_g the Video Signal_ource .....................
Storing Channels > Memory (Automatic Method) ........
Adding a,,d Erasing Chan_,4s (Manual Method) ..........
Changing Channels .......................................
Using the Channel Butto*_s ..........................
Directly Accessing CbaHt_4s .........................
Using the eRE CH Button to select tile Previous Ctnalme[...
Channel Scan ....................................
Labeling the Channels .....................................
Settling the Ck;ck .........................................
Customizing the Picture ...................................
Using Automatic Picture Settings ............................
Adjusting the Volume .....................................
Using the Mute Button .............................
Customizing the Sound ....................................
Using Automatic SuuIld Settings .............................
Viewing an External Signal Source ...........................
Setti_g the Signal Somce ............................
Assiguing Names to External input mode ...............
11
11
12
12
12
12
13
13
1,5
it;
17
17
18
19
20
20
20
22
22
22
23
24
24
2,5
26
27
27
27
27
27
28
29
32
33
34
34
35
36
37
37
38
3
CONTENTS
Chapter
]
4: Special
Features
.............
39
Cha,_gi_g the Cc_lorTone ..................................
Changing the Screen Size ..................................
Digital Noise Reduction ...................................
Tilt ...................................................
Using the R.Surf Feature ...................................
Choosing a Multi Channd Sound (MTS) Soundtmck .............
Extra sound settings (Auto Volume, Turbo SouIld or Pscudo Stereo) . .
Setting the On/Off Timer ...................................
Setting the Sleep Timer ....................................
Setting the Preferred Volu_ne Level ...........................
Using the VChip .........................................
Viewing Closed Capticms ..................................
Setting the Blue Screen Mode ...............................
Setting The O_/()ff Melody .................................
Viewing the Demonstration .................................
Customizing You_-Remote CoIltrol ...........................
Setting Up Your Remote Control m Operate YouIVCR(Cable box
or DVDplaye0 ....................................
Chapter
5: Troubleshooting
.............
Ideiltif'yiilg PIoblems ......................................
Appendix
............................
Cleaning a_d Mai_tai_i_g Y_ur TV ...........................
Usiilg Yuur TV in Ailother Country ...........................
Specifications ...........................................
4
39
40
41
42
43
44
45
46
47
48
49
56
57
58
59
60
60
61
61
62
62
62
62
Your
NEw TV
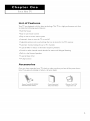
List
of Features
Yuur TV was designed
includes the following
with the latest technolog3_
special features:
This TV is a high performance
unit that
• Full Flat Screen
Easy to use remote
control
Easy to use on screen menu system
Automatic
timer to turn the TV oil and off
Adjustable
picture and sound settings
Automatic
channel
tuning for up to 181 channels
A special filter to reduce or eliminate
A built h] multi
that can be stored in the TVh memory
channel
Built in, dual channel
reception
sound decoder
problems
for stereo and bilingual
listening
speakers
A special sleep timer
\/'Chip
function
Accessories
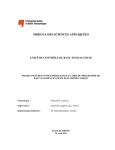
Once you have unpacked your TV, check to make sure that you }]ave all the parts shown
here. If any piece is missing or broken, call your dealer.
f(emote Con_rol(AA5900325B)/
AAABa[lmries(4301000121)
Owner's Inslmctions/
Saibl
Gukle Manual
Warl_my
Card; 2EA/
Re_4ist_ation Card
5
I
Your
NEw TV
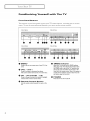
Familiarizing
Front
Panel
Yourself
with
The
TV
Buttons
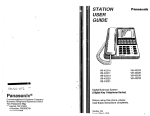
The buttons on the front panel control your TV_ basic features, including the on screen
menu. To use the more advanced features, you must use the remote control.
TX P3235
TX P2734
TX P2730
TX P2728
(hi,,_
_
_.
_(w
¸¸¸¸i!¸¸¸¸¸¸!!¸
i___!iiiiiiiiiiii____iiii__i___:::::__ii__!__
__i!!!!!!!!!!!i___;!!!!!!!!!!____i__
_i_" 7
--"_!
I I I
@@@@@@@
0
O
MENU
Press
to see 8rl on-screen
menu
of yOUr TV's
tures.
VOL
- and
+
Pressto increaseor decrease the volume.
Also used to select items on the on-screen menu.
O
CH
_/(5")
and
CH /_(&)
Pressto change channels.Also press to highlight
various items on the on-screen menu.
O
6
Remote
Control
Sensor
Aim tile remote control towards this spot on the
TV
•
•
I
I/
00
TIMER
indicator
When tile TV is turned on, the TIMER indicator
blinks five times. This indicator illuminates when
the TIMERmode is setto the "On" position after
setting the c{ock and either the Ontimer or Off
timer, with the remote control Even if the power is
turned off, this indicator stays lit. (Clock must be
set before using this function.}
fea-
0
•
O
POWER
Pressto turnthe TVon andoff.
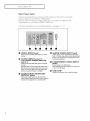
Your
NEw TV
Side
Panel
]
Jacks
You can use the side panel jacks
sionally,
such
as a camcorder
to connect
or video
an
game.
A/V
component
(For information
that is user] only
oil connecting
occa
equipment,
see page 18.)
TX-P3235
TX-P2734
I
I
TX-P2730/TX-P2728
r---.
I
i
. :@
Au.lo:
::l_l
0
'i
!1
IN_'.g
@
-0
0
AUDIO
INPUT
jacks
Usedto connect the audio signals from a camcorder
or video game.
O
VIDEO
INPUT
jack
Usedto connect a video signal from a camcorder or
video game.
O
SUPER
VIDEO
INPUT
jack
S-Videosignal from an S-VHSVCRor DVD
ptayer.
Note: In S-Video mode,Audio Output dependswhat
kind of audio input source is connected to the side
audio input jacks(AV2).
O HEADPHONE
Connect a set of external headphonesto this jack for
private listening.
7
I
Your
Rear
Use the
NEw TV
Panel
Jacks
rear pane[jacks
continuous[y,
Because
components
there
such
to connect
as a VCR
or a
an A/V component
DVD
are two sets of input
(i.e.,
a VCR and
For more information
a
jacks,
you
VIDEO
INPUT
jack
Video signalsfrom VCRs,DVDplayers and similar
devices.
o
AUDIO
INPUTS
(INPUT1
and 2)/DVD
AUDIO
INPUTS
(INPUT 2)
Audio signals from VCRs,DVDplayers and similar
devices,
Usethese jacks to connect the audio signals from a
DVDplayer when using the DVDvideo input jacks.
When not usingthe DVD jacks,those audio jacks
function as audio for Video 2 or S-VIDEO.
AUDIO-VIDEO
MONITOR
OUTPUT
jacks
These audio-video signals are identical to A/V
signals being displayed on the bigscreen. (Typically
used asthe input signals for a recordingVCR.)
8
will
be connected
two
different
A/V
etc.)
equipment,
O
O
can connect
DVD, 2 VCRs,
on connecting
that
player.
O
O
see pages 11
17.
SUPER
VIDEO
INPUT
jack
S-Video signal from an S-VHSVCRor DVDplayer.
Note: in S-Videomode,Audio Output depends what
kind of audio input source is connected to the side
audio input jacks(AV2).
COMPONENT
VIDEO
INPUT
jacks
Connect video from a DVDplayer.
Note: OnlybIack and white signals are output from
a monitor in DVDmode.
O
VHF/UHF
Comlectto an antennaor to a cableTVsystem.
I
Your
NEw TV
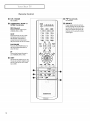
Remote
Control
Yuu can use the remote
always
point
Yuu can
box.
]
it directly
also use your
See page
control
at the
remote
up to about
23 feet from the T_/[ When
control
to operate
your
Set
Tup Box, VCR, DVD
0
Turnsthe TV on and off.
S.MODE
Adjust the TV sound by selecting
one of the preset factory settings
(or select your personal,customized
sound settings).
O
P.MODE
Adjust the TV picture by selecting
one of the preset factory settings
(or select your personal,customized
picture settings).
_I
Number
buttons
Pressto select channels directly on
the TV.
+100
Pressto select channels over 100.
For example,to select
channel 121,press "+100,"then
press "2" and "1."
O
VOL-.VOL÷
Press
to increase
or decrease
MUTE
Pressto temporarily cut off
the sound.
SLEEP
Press to select a preset time interval for automatic shutoff.
O MENU
Displaysthe mainon-screenmenu.
O
and
cable
MODE
Selects a target Oeviceto be controlled bythe Samsung remote control (i.e.,TV,Set Top Box,VCR,Cable
box, or DVD}.
PRE-CH
Tunesto the previouschannel
@
W/VIDEO
Pressto displayallof the available
videosources(be.,Antenna/Cable,
VCR).
0
CHA
and CHV
(Channel
Up/Down)
PressCHA or CHv to change
channels.
INFO
Pressto see the time, channel,etc.,
on-screen.
EXIT
Pressto exit the menu.
the
voJume.
O
the remote,
60 for details.
(0t POWER
O
using
TV_
P.SIZE
Pressto change the screen size.
Your choices are Normal,Zoom.
Up.Down.Left.
Right
(&._'.<.l_)
/
ENTER
Pressto setect highlight up,down,
left, or right.While usingthe onscreen menus,press ENTERto activate {or change} a particular item.
TURBO
Press to turn the TURBOsound On
or Off.
MTS
(Multichannel
Television
Stereo)
Press
to choose
stereo_
mono
or
SeparateAudio Program (SAP
broadcast).
@ R.SURF
Press the R.SURFbutton to automatically return to a preferred
channel after a user-presettime
dela_
9
I
Your
NEw TV
Remote
Control
CH. SCAN
Notavailable.
_) PIP Controls
Notavailable.
VCR(DVD.
DVRor
STB) Controls
_)
Pressto rewind a tape in your
VCR(DVD,DVRor STB).
STOP
Pressthis button to stop a tape
duringptey,record, rewind or
fast forward. If the button is
pressed duringFull-Automatic
play,the function will be can-celled.
V0L
CH
PLAYIPAUSE
Pressthe PLAY/PAUSE
button to
play back prerecordedtapes or
pausethe tape.
FF
Pressto fast forward the tape in
your VCR(DVD,DVRor STB}.
_)
SET
Usethis button when you are setting up your remote control to operate your Set Top Box,VCR,Cable
box or DVD.
R.SURF
®
RS_E
]I,JRBO IVlTS
O'LSCAN.......
-0
00®
10
RESET
If your remote control is not functioning properly,take out the batteries and press the reset button for
about 2~3 seconds. Re-insert the
batteries and try using the remote
control again.
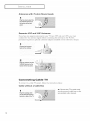
INSTALLATION
Connecting
VHF
and
UHF
Antennas
If your antenna has a set of leads that
look like this, see "Antennas with
300 ohm Flat l_vin Leads" below.
If your antenna has one lead that looks
like this, see "Antennas with 75 ohm
Round Leads" on next page.
If you have two antennas,
VHF and UHF Antennas"
Antennas
with
see "Separate
on next page.
300-ohm
Flat
Twin
Leads
If"you are ushlg an offair anterma (such as a roof antenna
300-ohm twin fiat leads, follow the directions below.
oi- "rabbit ears") that has
1
P{acethe wires from the
twin leads under the
screws onthe 300-75ohm
adaptor (not supplied),Use
s screwdriver to tighten
the screws_
2
PIugthe adaptor mm me
VHF UHFterminal on me
bottom otthe 3ackeanet
11
INSTALLATION
Antennas
with
75-ohm
Round
Leads
Plugthe antenna lead into
the VH F/UHFterminal on
the bottom of the back
panel,
Separate
VHF
and
UHF
Antennas
If' you have two separate antennas for your TV (one VHF and one UHF), you must
combine tile t_vo antenna signals before connecting tile antennas to the TVI This
procedure requires an optional combiner adaptor (availabie at most electronics shops).
Connect both antenna
leadsto the combiner.
Connecting
To connect
Cable
to a cable
without
Cable
TV system,
a Cable
¸1¸¸¸¸¸
Plug the incoming
into the VHF/UHFantenna
termina{en back of the T_!
12
TV
follow
the instructions
below.
Box
_,I
Because
this TV is cable-ready,
you do not need a cable box to view
unscrambled
cable channels.
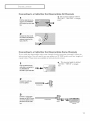
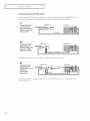
INSTALLATION
Connecting
]
to a Cable
Box
that
Descrambles
All Channels
-ql This terminal might be labeled
"ANT OUT", "VI IF OUT" or simply,
"OUT".
Findthe cable that is connected to the ANTENNA
OUTtermina{on your cable
box.
Connectthe other end of
this cableto the VHF/UHF
antenna terminal on the
back of the TV.
Connecting
to a Cable
Box
that
Descrambles
Some
Channels
If"your cable box descrambles
only some channels (such as premium channels), fullow the
instructions
below. You wilI need a two way splitter, an RF (A/B) switch, and fuur lengths of
coaxial cable. (These items are available at most electronics stores.)
This terminal might be labeled
"ANT IN", "VI IF IN" or simply,
"IN".
1
F_ndand dmconnectthe
cable that is connected to
me ANTENNA IN
Terminalon yourcaote BOX
2
Connectthis cableto a
two-way
so{itte{
neon
g Cable
Splitter
3
Connecla coaxial cable
betweenan OUTPUTtermi--"
{lal On the
SD itter
and the
Intern no Caisle
Nterminalonthe cable
box.
13
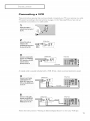
INSTALLATION
Connect a coaxialeabte
between the ANTENNA
OUTterminal on the cable
box andthe B-IN terminal
on the RF(A!B) switch.
Connect another cable
between the other0UTterminal on the splitter and
Incemillg
Cable
_
SplitIet
RFIA/Bi
Switch
Cable
Box
b_om_
Cable
the A-IN terminal on the
RF(A!B) switch.
Splitter
RF{A/BI
Switch
Cable
Box
Connectthe last coaxial
cable between the OUT
terminal on the RF(A/B)
SWitChand the VHF/UHF
terminal on the rear of the
TV.
Incemirlg
CabJe
Splitter
RF{AfB}
Cable Box
TV Rear
Switch
After you've made this connection,
set the A/B switch to the "A" position for normal view
ing. Set the A/B switch to tile "B" position to view scrambled channels. (When you set tile
A/B switch to "B", you will need to tune your TV to the cable box_ output channel, which is
usually channel 3 or 4.)
14
INSTALLATION
]
Connecting
These blstructions
a VCR
assume
that you have already
connected
your
TV to
an antenna
or a cable
TV system(according
totheinstructions
on pagesi] ]4).Skipstep1 ifyou havenotyet
connected
toan antennaora cablesystem.
1
Unplug the cable or
antonnaffom the backof
2
VCRRear Parlel
Connect the cableor
antenna to the
ANTENNA IN terminal on
the back of the VCB,
_
"_rQ,.
Irtcomlrm
|_
CaNe or
Art[enna
_
'_
_ _ C')
[--
VCRRearPanel
Connect a coaxial cable
between the ANTENNA
OUTterminal on the VCR
and the antenna
terminal onthe TkL
IV Rear Pane]
mmm _
]
(
Y
CoaxialC_ble
A coaxial cable is usually included
with a VCP_. (If' not, check your local electronics
TVRearPanel
VCR Rear Pallel
Connect a set of audio
cablesbetween the
store).
AUDIOOUTjacks on the
VCRand the AUDIO jacks
on the TV.
Connect a video cable
Follow the instructions
VCRRearPanel
in
"Viewing an External
TV Rear Pallel
Signal Source"
to view your VCR tape.
15
INSTALLATION
Connecting
an S-VHS
VCR
Your Samsung TV can be connected
connection delivers a better picture
TO
2
be_in,
_oI[ow
steps
to an S Video signal from an S VHS VCI_. (This
as compared to a standard VHS VCR.)
VCR Rear Parle[
TV Rear Parte_
::
Connecta setof audio
VCR Rear Pallel
Make sure the jacks you are using are underneath
Connect an S-video
cable between the
TVRear Panel
the number
VCR Real Pallel
"2."
TV Rear Panel
Video Cable
S-VIDEOOUTjack on the
VCRand the
S-VIDEOINPUT
jack on the TV.
An S video cable is usually included
electronics store.)
16
with all S VHS VCR. (If not, check your local
INSTALLATION
Connecting
]
a Second
VCR
to Record
from
Your TV can send out signals of its picture and sound
Tu do this, connect your second VCR as follows:
the
TV
to be recorded
by a second
TV Rear Panel
VC[_.
VCRlaputPanel
Connecta setof audio
AUDIoCables
betweenouT
jackstheell
the
_
_=
TVandtbeAUO,O,N,
ac sootbe CO.
®
Audio Cable
(The VCR input jacks might be either on the front or on back of the VCR.)
Connect a video cable
between the VIDEO0UT
TV Rear Panel
VCRlaputPanel
jack on the TV and the
VIDEO IN jackon the
VCR.
Lvideo
CaNe
Refer to your VCR_ instructions
of connection.
Connecting
The rear panel,jacks
for more information
a DVD
about
Player
on your TV make it easy to connect
1
Connecta setof audio
cablesbetweenthe
how to record using this kind
a DVD player to your TVI
TVRearPane,
_DVD
Player
Rear
Panel
_)
the TVandtheAUDIO
AUDIO
iNPUT2jackson
OUTjacks
onthe OVD
player.
Audio
Cable
TV Rear Panel
Connecta videocable
betweenthe COMPONENTINPUT(Y,Pb,Pr)
ackson theTVandthe
COMPONENTVlDE0
OUT
(Y,Pb,Pr) acksonthe
DVDplayer.
Note: For an explanation
DVD
Player
Rear
Panel
r_
Video Cable
of Component
video, see your DVD player's owner's
manual.
17
INSTALLATION
Connecting
a Camcorder
The side panel jacks oil your TV make it easy to connect a cameorder to your T_ They allow
you to view the camcorder tapes without using a VGR. (Also see "Viewing an External Signal
Source" oil page 37)
jackson
theA!V
camcorder.
Locate the
output
They are usuatly found on
the side or back of the
camcordec
2
Camcolder
Output
J_cks
_]
_11_
_
co,,,oo,,o,
Connectan audiocable
betweentheAUDIO
OUTPUT
jackonthe
caalcorderandthe
AUDIOterminalson !he
sid_Q!tbeTV.
output
Jscks
Connecta videocable
betweentheVIDEOOUTPUTjackonthe camcorderandtheVIDEOtot-
Output
Jacks
TV ,,oPo,,o,
_oc_
_
_Cor_r_octo_
TV S_dePanel
Camcorder
<Era
Video
CaNe
minalonthe sideof the
:_ ___
The audio video cables shown here are usually included with a Camcorder.
(If not, check
your local electronics store.) If your camcorder is stereo, you need to connect a set of' two
cables.
Note: This figure shows the Standard
your TV may be different.
18
connector_aek
panel. The actual configuration
for
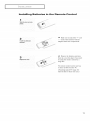
INSTALLATION
Installing
]
Batteries
in the
Remote
Control
Siide the cover out completely.
1
"-"
Installtwo AAA size
batteries.
diagram
/
-_1
them
Replacethe cover,
Make sm'e to match
ends of the batteries
inside
Remove
the eolnpartnmnt.
the batteries
in a cool,
be using
the "+" and
with the
dry place
the remote
and store
if you won't
control
for a
long time.
The remote control can be used
to about 23 feet froln the TV.
(Assuming
batteries
typical
TV usage,
last for about
up
the
one year.)
19
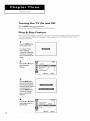
OPERATION
Turning
the
TV
On
and
Off
Pressthe POWERbutton on the remote control.
You can also use the POWER button
Plug
&
Play
on the fl'ont panel.
Feature
When the TV is initially powered
On,
five baMc customer settings proceed automatically
and subsequently:
Setting the language, Video signal source, Ant. input cheek, Auto
program and Clock.
1
Pressthe POWERbutton
onthe "emote control
The message"Plug &
Play" is displayed.
It flickers for a littte wh{le
and then the "Language"
merlu is au[oma_icalt\ OISOlaVeO
2
Setup
Press the 41 or I_ bu_on to
setect the des{red
language
_lb
Adjust
[]_
Skip
_
Adjust
ITn
Skip
3
Pressthe MENU button
then the'_.nt Inout check"
s au_omaticaI_ d_splayed,
Make sure that the antenna
s conl ected to the TV.
Pressthe ENTERbutton
and then the"Channel"
menu _sautomatma \
d_spmyed.
4
Pressthe _11or I_ button to
select s_gnaIsource {A_r,
STD.HRC, RCt
2O
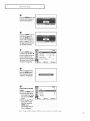
]
OPERATION
5
=rossthe MENU button and
then the '_,uto Program"is
a u[oms[iCatlV
otsolayeo.
6
_ressthe ENTERbutton to
start '_,uto Program"el
pressthe MENU button to
re_urn..refer to '_.uto program" on page25dThe TV
witl begin memorizing atl of
me avaiJablechannels.
Time
=tessthe ENTERbutton
andthen pressthe 4 or Ib
button TOmoveme hour or
minute. Setthe hour or
minute by pressingthe • or
• button (refer to"Setting
the Ctock"on page30,)
Move
_
Enter
rm
Return
8
When you have finished
oress the MENU button.
The message"Enjoy youl
watching." is displayed.
9
Setup
If youwant to reset this
feature
)1)Pressthe MENU button
{2}Pressthe • or • button t_ selectthe "Setup,
men press the ENTER
DUN'On.
!3}Press the • or •
ITN Return
but-
ton to select'PIug &
Play",then press the
ENTERbutton.
The message"Plug &
Play" is displayed,
Note: PJug & Play feature doesn't
work when in the AV mode.
21
OPERATION
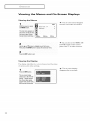
Viewing
Viewing
the
the
Menus
and
On-Screen
Displays
Menus
The on-screen
menus disappear
fl'om the screen after two minutes.
thescreen.,ts,efts,dohssT"ems'nmenuspoe
fiveicons:
lnput,
Picto,e,
i! !ili
¸ ¸¸¸¸¸¸¸¸¸¸¸¸¸¸¸¸
Sound, Channeland Setup.
• Move
_
Enter
ITf3Exit
2
_ll Yuu can also use the MENU,
and VOL buttons on the control
Use the _,. and V butt0ns t0 highlight 0he 0f the 5 ic0ns,
panel
of the TV to make selections.
Press the EXIT button to exit.
Viewing
the
Display
The dispIay identifies the current
of certain audio video settings.
channel
and the status
The on-screen
disappear
Press the INE0 button,
The on,screen display
shows any or all of the following: Active channel,
the channel label, signal,
picturemode,sound mode,
MTS and the current time,
22
displays
after ten seconds.
CH
]
OPERATION
Selecting
a Menu
Language
2
Pressthe •
Setup
or V button
to select'_Language';then
p_essthe ENTERbatton_
Configuracibn
Pressthe _1 or I_ button
to select the appropriate
language:"English",
'_£sps_o1"or '_Fran_eis!'.
Pressthe EXITbutton to
exit.
0 Mover
41' Ajustar
rm R_gresar
23
OPERATION
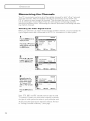
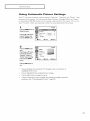
Memorizing
the
Channels
Yuur TV can memorize and store all of the available channels for both "off air" (antenna)
and cable channels. After the available channels are memorized,
use the CHA
and
CH v buttons to scan through the channels. This eliminates the need to change than
nels by entering the channel digits. There are three steps for memorizing channels:
selecting a broadcast source, memorizing
the channels (automatic) and adding and delet
ing channels (manual).
Selecting
the
Video
Signal-source
Before your television can begin memorizing the available channels, you must specif,/the
type of' signal source that is connected to the TV (i.e., an antenna or a cable system).
ressthe.E..buttento
display the menu,
Add_e_te
: Oele e_
PresstheA0rVbuttuntepress _
setect"Channel';then
_ar_a
: _,o
the ENTERbutton
.=Move _n,e,
_Return
Pressthe A or V buttun
to setect '_ir/CATV'; then
press the ENTI I1button
v_Move
<_
Adjust
Channel
Bepeetedly press the
_1orI_bu_o.tucycle
A._ P_ _
_,-
throughthese choices:
"Air" (antenna) "STD';
_HRC'!or "IRC'_(al! cabte
Move
_[b Adjust
ITR Return
Pressthe EXITbuttonto
exit,
Note:
STD,
TV systems.
HRC
the type of cable
At this point
to "Storing
24
and IRC
Contact
your
system
the signal
Channels
identify
local
that
exists
source
in Memory"
various
cable
types
company
in your
has been
(next
of cable
to identify
particular
selected.
page).
area.
Proceed
]
OPERATION
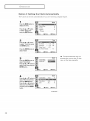
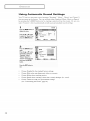
Storing
Channels
in Memory
(Automatic
Method)
....
I
First, select the corrioctsg halsource (Air, STD,HRC,
IRC).See steps ! _3 on previous page.
_Move
_, Adjust
[]]]Return
-4 The TV automatically
3
=ressme ENTERbutton
_ostart"Auto Program
TheTVwttl begin memorizing all of the available
channels.
cycles
through all of the available channels
and stores them in fllelilOi\y.
This takes about one to two minutes.
After a the available channels are stored, the
Channetmenu reappears.
Press the MENU button to
skt_ ano _ressthe ENTER
DU_TOR
[OS[OD.
25
OPERATION
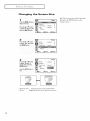
Adding
and
Erasing
Channels
(Manual
Method)
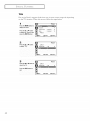
First, press the CH A or CH v button or the number buttons
toselectthechannelyou want to add or delete.
O Move
(_
Enter
ITR Return
Channel
Pressthe • or • button
to se!ect'_.dd!Detete';
then press the ENTEB
button,
A_toemg_m
Move
Pressthe • Or•
(_
Enter
ITR Return
button
to setect '_.dded'! or
"DeJeted"then press the
ENTERbutton,
Add/Delete
A r C_v
_
:
:
:
_me
i.,_
Pressthe EXITbutton to
exit,
26
_
Move
(_l
Enter
[]_
Return
]
OPERATION
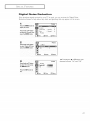
Changing
Using
the
Channels
Channel
Pressthe CII /N
W'hen
or CII _/
you press
CH /X
Buttons
button to change channels.
or CH V,
the TV changes
channels
in sequence.
channels
that the TV has nmmorized.
(The TV must have memorized
You will not see channels
that were either erased or not memorized.
Directly
Accessing
You will see all the
at least three
channels.)
Channels
Use the number buttons to quickly tune to any channel.
Pressthe number buttons to go directly to a channel,For example,
to setect channel 27,press "2" then '!7!: The TV Wi!t change channels
when you pressthe second ourober.
When
OF llot
you use the
IllelllOrized.
To select a channel
then "2".)
number
buttons,
you
can
directly
select
channels
over 100, press the +100
button.
(For chmmel
that
were
either
erased
122, press "+I(X)" then "2"
To change to single-digit channels (0 9) faster, press "0" betore the single digit.
(For channel "4" press "0" then "4".)
Using
the
PRE-CH
Button
to
select
the
Pressthe PRE-CHbutton,
The TV witlswitch to the
Iast channelviewed.
Channel
Previous
Channel
-,11 To quick]y switch between two
channeIs that are far apart, tune to
one channeI, then use the number
button to select the second channel.
Then. use the PRE Ct{ button to
quick]y a]ternate between them
Scan
The TV automatically scan all of the channelsit has memorized.
27
OPERATION
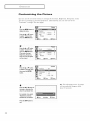
Labeling
the
Channels
Use this feature to assign an easy to zenqernber label to any channel (i.e., "CBS",
"ESPN", "PBS2", CNNI", etc.) A label consists of four fields, wheze each field is a [ettez,
a numbez, "*", oz a blank. When the INFO button is pressed, the channel Jabel win
appear next to the channel numben
1
Press the CHA
or UHV
button to tune to the
channelthat wdt be labeled.
-,9 Note: You cannot select "Name"
in the AV mode.
2
Press the MENU button to
d_seIavthe men_
Press the • or •
button
AI_'/GA[
V
_ A
_'0Move
_
Enter
vMove
(_Enter
to select "Channel",then
press the ENTERbutton.
rm Return
Pressthe • or• button [o
select "Name'_
Press the ENTERbutton m
eegin labeling.The left-morn
field witt be highhght.
,Each label has four [ietds.
ITRReturn
Seetop paragraph.
4
=ressthe • or • button
to seIecta letter, a numoer
"_" or a blank.
Channel
A_CM
(Pressing• or • butto_
"esults in this seouence
A.B..-Z *. blank.O.1.-,9
4b Move
_Adjust
5
ITRReturn
Channel
=ressthe • bu[mn to
switchto the next field
Jvhichwi be highlight.
Select a second Ie[mr or
d_g_tusingthe • or •
_utton. as above.
Repeatthe processto select
the Iast two d_gits.
_ress tee EXIT button to
_xiT.
28
41)Move
_Adjust
ITRReturn
]
OPERATION
Setting
Setting
the
the clock
Clock
is necessary
in order
to use the various
timer
features
of the T_
Also, you can check the time while watching the TV (,Justpress tile INFO button.)
Option
1: Setting
the
Clock
Manually
1
Setup
=tessthe MENLIbutton to
display me menu.
P_u_&Pray
)tess the • or • button
to select "SetuD'_then
press the ENTERbutton.
_.._o_1
_ _or_
2
=ressthe • or • button
to select"Time", then )ress
the ENTERbutton
Sleep _ I_r
: Off
=tessthe ENTERbutton to
select 'Clock".
0
3
=tessthe ENTERbutton to
select"Clock Mode".
_ressthe • or • butmn to
select"Manual", then oress
the ENTERbutton
Move
_
Enter
rm
Return
Clock
ClockMode
:
t;_ck 8_t
0 Move
_
Enter
rm Return
-_1
4
Clock
=tessthe • o- • button to
select "Clock Set",then
pressthe ENTERbutton
ran.
selecting
41.Move
_,_ Adjust
ITRReturn
by holding
tons).
the hours,
the proper
You can change
ing the • or •
=tessthe 41or • button to
move to "Hour" or "Minute"
Setthe clock you want oy
pressingthe • or • butto_
men oress the ENTERbut-
When
sure to select
(am or pro).
down
be
time of day
the hours by pressbutton repeatedly
(or
either
of these but-
The current time will appear every
time you press the INFO button.
=tessthe FJ(IT
button to
ex=t.
29
I
OPERATION
Option
2: Setting
]
the
Clock
The Clock can be set automatically
Automatically
if'you are receiving
a digital signal,
1
Pressthe MENU button to
d_so_vme menu
;resstheAerVbutton
to seIect"Setuolthen
;reesthe ENTERbutton.
0
Move
(_
Enter
ITN Return
2
Pressthe • or • button
t
"
toseect
Tree.then
press
the ENTERbutton.
OH _nmel
_I_et/
* o : ,. - a n
}'irIler
Ofl
: Of
Pressthe ENTERoutton [o
select "Clock",
Move
_
Enter
3
ITN Return
Clock
Pressthe ENTERnutton Eo
setect "Clock Mode".
Pressthe • or • button m
seIect"Autel then 3ressme
ENTERbunion.
case, set the time manuall)_
Move
(_
Entel
4
Pressthe • ar • button to
setect"PBS Channe{'_then
_ressthe ENTERbutton.
_ress the <1 or Ib button [o
rTR Return
Clock
COCk
#/ode
r A
select your local PBSchan_el,then press the ENTER
DUITO_I,
Move
,_,Ataust
FIT) Return
continued...
30
"q
Certain broadcasts
may not
transmit the correct time. In this
]
OPERATION
-_l
5
Clock
CI_Ck _od_
=tessthe • or • button to
select "Time Zone".then
PB_C_a_el
Time Zone
DST
press the ENTERbutton.
=ressthe • or • button to
semcEne :ime zone for vour
IocaI area.ttlen Dressttle
ENTERbutton
4_gl_
: A_r
:_
:
3
•
_
The set time can be changed
according
to the broadcasting
and signal
time.
when you set up auto
If there
is a diffk, rence between
real time and set time,
manual time.
0
Move
_
Enter
rm
station
the
please set up
Return
• ATL
Aflanlic
EAST : Eastern
2EN
2entral
MTN. : Moumair
PAC.
Pacific
ALAS. : Alaska
IlAW
I [awaii
6
=tessthe • or •
Clock
button to
select "DST" (Daylight
SavingTime),then pressthe
ENTERbutton
=ressthe • or • button to
select "Yes"or "No".than
pressthe ENTERbutton.
DST
0
Move
[_
Enter
rm
Return
=tessthe EXITbutton to
extt.
31
OPERATION
Customizing
the
Picture
You can use the on screen menus
Tint
and
"Automatic"
according
to personal
settings.
to change
preference.
See next
the Contrast,
Brightness,
(Alternatively.
you
can
Sharpness,
Color,
use one of' the
page.)
1
Pi_ur_
Pressthe MENU button to
display the menu.
Color 'TO_
: Nem_a
Pressthe • or • button
to setect '_Picture",then
press the ENTERbutton_
O Move
_
Enter
ITR Return
Pictur_
Pressthe • er • button
to setect'Custem'; then
(Thewords Contrast
Cotor andTint witl apposr
on the screen,)
OMove
C_IEnter
ITRReturn
_Move
C_J Enter
ITR Return
After ac{justing an item, the gauge
will automatically disappear (after
about 10 seconds).
Pressthe -< or I_ button to
increase or decreasethe
value of S particular item.
Forexample,if you select
'tBrightness" pressing
the I_ button increases it,
Pressthe EXITbutton to
exit
32
@Move
O' Adjust
ITNReturn
]
OPERATION
Using
Automatic
Picture
Settings
Yuuz TV has three automatic picture settings ("Dynamic", "Standard" and "Movie" ) that
are preset at the factor> You can activate either Dynamic, Standard, Movie or Custom
by pressing the EMODE button (oi- by making a selection from the menu). Or, you can
select "Custom" which automatically recalls your personalized picture settings.
1
Pressthe MENU button to
displaythe menu.
Pressthe •
or Y button
to select'f Picture';then
pressthe ENTERbutton.
2
Picture
=ressthe ENTERbutton
8g_ n.
=tessthe •
or •
Mode
burton
to select the'*Dynamlc'_
"Standard" "Movie" or
"Custom" otcture setting,
men oress the ENTER
F _or8
v- Move
[_
Enter
rm
Return
button,
=ressme EXITbutton to
exit.
Choose Dynamic tot viewing the TV during the day or when there is
brightlight in the room.
Choose Standard fur the standard factory settings.
Choose Movie when viewing the movie.
Choose Custom if you want to acljust the settings according to personal
preDrence (see "Customizing the Picture", page 33).
33
OPERATION
Adjusting
the
Volume
Pressthe VOL+ or- VOL- button to increase or decreasethe volume.
Using
the
MUTE
Button
At any time, you can temporarily
cut off' the sound
using the MUTE button.
1
To turn mute off, pressthe MUTE button to again, or simply press
either the VOL÷ or VOI.- button.
34
OPERATION
I
Customizing
the
Sound
Y_u can use tbe on-screen menus to adjust the bass, treble and balance according
to _nd_v_d'da_ ;:)reference. (/\[ternativeiy, you car_ use otto of tbe "automatic" settings.
See next page.)
1
Sound
PresstheMENUbuttonto
Press the A or •
button
then pressthe ENTERbut-
_
B_
: 50
Baanc_-
:
ea.
te
se,oct
a a tico,a,,tem,
Move
C_
Eater
Custom
L_0 R50
[]]] Return
4
Press the 411
or I_ button to
increase or decreasethe
value of a particularitem.
For example,if you select
';Treble';pressingthe I_
button increases it,
P_essthe EXIT button to
exit.
35
OPERATION
Using
Automatic
Sound
Settings
Your TV has fuur automatic sound settings ("Standard", "Music", "Movie" and "Speech")
that are preset at the factory. Yuu can activate either Standard, Music, Movie or Speech
by pzesshl 8 the &MODE button (or by makin 8 a selection from the menu). Or, you can
select "Custom", which automatically
recalls your personalized
sound settings.
1
_
so.nd
Press the MENU buttonto
display the rnenu.
_c#slo
_TS
A_t; v£!_
_ #o_
Press the • Or• button
to selectthe "Sound';then
press the ENTERbutton.
Move
_
:
Stereo
#ff
Enter
,
ITR Return
2
Sound
Press the ENTERbutton
again
Pressthe • or •
*
Mode
button
repeatedl_to select the
'Standard" "Music"
'Mev _",'SDeech"e[
'Custom" sound settings,
men presstne ENTER
BUtton
_Move
(';_Enter
ITRReturn
Pressthe EXITbutton tc
8×It.
Choose
Standartf
Choose
Music when
Choose
Movies
Choose
Speech when
Choose
Custom
(see "Customizing
36
fbr the standard
watching
when watching
watching
to recall your
the Sound",
factory
music
settings.
videos
or concerts.
movies.
a show
that is mostly
personalized
page 35).
settings.
dialogue
(Le., news).
]
OPERATION
Viewing
an
External
Signal
Source
Use the remote control to switch between viewing Mgnals from connected
such as VCRs, DVD, Set T<_pBox and the TV source (broadcast or cable).
Setting
the
Signal
equipment,
Source
Quick
way to access
the external
Pressthe MENU button to
signal source: Just press the
"TV/VIDEO"
button on the remote
disp{aymenu,then
ENTERbutton.
control.
Input
2
Source List
=ressme ENTERbutton
again.
=tessthe • or Y button
to select s_gna_source,
men Dressthe ENTER
button,
Move
_
Enter
rm Return
37
OPERATION
Assigning
Names
to External
input
mode
1
Pressthe MENU button to
display menu,then press the
ENTERbutton,
Move
(_
Enter
ITRReturn
Input
Pressthe • or V button
_
to setect the'_EditName';
_
,,,.........
then press the ENTER
button.
L
OM°ve
_
Enter
ITRReturn
Edit Name
Pressthe • or _ button
to se!ect the Source List,
then press the ENTER
4
Pressthe A or V button
to setect externat device
(VCR, DVD,CabteSTB,
Sat. STB,AV Recv,,DVD
Resv,,Game,Camcorder,
DVDCembo),then press
the ENTERbutton.
Set other signsI soerces
(AV2,S-Video,Component)
using the same method as
listed above,
i
i
Pressthe EXITbutton to
exit,
38
SPECIAL
FEATURES
Changing
the
Color
0
Move
Tone
_
Enter
¸2¸¸¸¸¸¸¸¸
Press the •
1333Return
Picture
or •
button
te select '!Celer Tene'_then
m
Cus_om
press the ENTERbutton.
#Move
[_
Enter
rm
Return
Picture
Pressthe • or • button
to select "Cool2",'_Ceotl",
"%ermal",'Warml" or
"Warm2" accordingto personal preference,then
pressthe ENTERbutton.
Press the EXITbutton to
exit.
Move
[_ Enter
rm Return
39
I
SPECIAL
FEATURES
Changing
the
Screen
Size
-4
1
H
Pressthe MENU button to
displaythe menu.
Pressthe • or •
4
__
button
to seIect the "Picture' then
press the ENTERbutton_
C_st _
Size
iii_i!ii
: _¢_rr,a_
=
"_ oo_
v" Move
(_
Enter
ITR Return
Picture
Pressthe • or •
betten
to se{ect"Size",then press
the ENTERbutton.
i iiiiiiii
oo,0 i!
Move
3
ENTERbutton,
Enter
ITnReturn
_
Pressthe • Or• button
tOseiect"Normel" or
"Zoom",then pressthe
_
_
P_ct"re
OoZe
: _.'_i_l
C_Olm
Co_o_Tone
: HorIY_a
Size
:
r_
Pressthe EXITbutton to
Move
(_
Ente_
ITR Return
• Normal
(4:3) :
Sets the picture to 4:3 normal mode.
• Zoom :
Magnifies the size of the picture on screen.
4O
Quick
way to access
the Screen size:
Just press the F_SIZE button
remote control
Pot_r_
on the
SPECIAL
FEATURES
Digital
Noise
If" the broadcast
Reduction
]
feature
signal
Reduction
received
to help
by your
reduce
TV is weak,
any static
you
and ghosting
can
activate
that
may
the
appear
Digital
oil the
Noise
screen.
1
Press the MENU button to
(JlSOIaVElle IllellU.
Pressthe • or • button
Io select the "Picture'; then
oress the ENTERbutton.
0
Move
_
Enter
rm
Return
2
Pressthe •
or •
button
to select"Digital NR';then
oress the ENTERbutton.
Move
[_
Enter
3
rm Return
Picture
-411 Pressing the • or • button will
alternate
between "On" and "Off".
Pressthe • or • button
_osetect"On';then Dress
the ENTERbu[mn.
Pressthe EXITbutton to
exit
Move
_
Enter
rm
Return
41
I
SPECIAL
FEATURES
-nit
Due to the Earth_
magnetic
on the TV_ location.
When
field
theze may be same minoz
this occurs,
follow
the steps
1
Pressthe MENU button to
display the menu.
Pressthe • or • button
to setect the "Picture".then
Dressthe ENTERbutton.
0 Move
(_
Entel
2
Pressthe • or •
to setect "Th_
ITN Return
Picture
button
Move
4b Adjusl
FIllRetum
Move
<b Adjusl
rm Return
3
Pressthe _11
or • button m
adjust the Tilt
Pressthe EXIT DUtton
tC
exit.
42
image tilt
below.
depending
SPECIAL
Using
FEATURES
the
]
R.Surf
Feature
This f_ature allows you to set the TV to return to a particular channel after a certain
amount of thne. For example, you may be watching a channel when commercials start.
Y_u can set the R.Surf to "5 minutes", then switch channels. After minutes, the TV will
return to the original channel. 'l_uuse the R.Surf _%atm-e:
1
While youare watching trio
channelto which you want
to return, oress the It.SURF
button,The on-screen displaywill read "Surf off"
2
=rossthe I].SURFbutton
again to set the timer m
thirty, secono intervals, Jo
to five minutes.
3
The time youset will begin counting Jown on the screen.
When the time runs out the TV witl return to the channet you
were watching when you set the t_mer.
43
I
SPECIAL
FEATURES
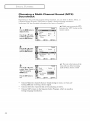
Choosing
Soundtrack
a Multi-Channel
Sound
(MTS)
Dependhlg oil the particular program being broadcast, you can listen to Stereo, Mono, or
a Separate Audio Program. (SAP audio is usually a foreign language translation.
Sometimes SAP has unrelated information
like news or weather.)
1
Pressthe MENU button to
d_sDlavme menu.
-,9
Quick
Just
press
reillote
way
the
to access
"MTS"
the
button
MTS:
on
the
cont 1"ol.
Pressthe • or • button
to setect the "Sound".then
oress the ENTERbutton.
Move
[_
Enter
rm Return
2
Pressthe • or • button
m setect the "MTS. mer
oress the ENTERbutton.
The text at the bottom
3
Sound
menu
audio
Press the • or • button
to seIect"Mono". "Stereo" or
"SAP': then nressme
ENTERbutton.
Press the EXITbutton m
exit.
44
0
Choose
Mono
having
difficulty
Choose
Stereo
Choose
SAP to listen
foreign
language
Move
for channels
receiving
for channels
to the
translation.
(_
that
Enter
that
ITR Return
are broadcasting
a stereo
or if you
are
signal.
are broadcasting
Separate
in mono,
Audio
in stereo.
Program,
which
of the
tells you if the incoming
is Mono, Stereo or SAR
is usually
a
SPECIAL
FEATURES
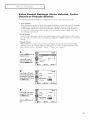
Extra
Sound
]
Sound
Settings
(Auto
or Pseudo
Stereo)
The following
sound
settings can be a@usted
Volume,
to suit your personal
Turbo
preferences
Auto Volume
Each broadcasting
station has its own signal conditions, which can make it necessary
to adjust the volume every time the channel is changed. "Auto volume" lets you
automatically
adjust the volume of the desired channel by lowering the sound out
put when the modulation
signal is high oi by raising the sound output when the
modulation
signal is low.
Turbo Sound
Turbo sound emphasizes
You can select the turbo
control.
the bass and treble frequencies to add fullness
sound by simply pressing the "TURBO" button
to the sound.
on the remote
Pseudo Stereo
"Pseudo Stereo" converts a monaural sound signal into two identical left and right
channels. Once the "Pseudo Stereo" is set to "On" or "Off", the setting applies to the
sound effects such as "Standard", "Music", "Movie" and "Speech".
1
=tessthe MENU bu_mn m
displav the menu.
_ressthe • button to
select the "Sound': then
_or8
presstne ENTERbutton.
Move
[_
Enter
rm
Return
2
Sound
=tessthe • or • button
to select the reouired item
IAoto Volume,TurboSound
_seudoStereo then Dress
the ENTERbutton
Move
_
Enter
3
rm
Return
Sound
=tessthe • or • button
to select"On, mer DreSS
the ENTERho_zen
Auto Volume
=tessthe EXITbutton to
exit.
0 Move
:
1_ E_ter
rm Return
45
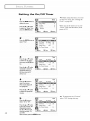
SPECIAL
FEATURES
Setting
the
On/Off
"timer
<1
1
Setup
Pressthe MENU button to
d_solavme menu.
Pressthe • or • button
to seIect the "Setue".then
oress Ihe ENTERbutton.
Befiare using
Clock"
P_8 & P_a_
V-Chio
C_bo_
_Ju_
(_
you must
(See "Setting
Enter
of TV.)
ITR Return
2
Time
Pressthe ENTERbutton m
select "Time".
Of_ hmer
Move
05: oeam
[_ Enter
Of I
ITf3Return
3
Time
Pressthe • or • button
to seiect the "On Timer'
_leck
ee: 3{_aIYl
men cress the ENTERbutTon.
Pressthe •
or •
button
eeeatedl_to se{ectthe
approprmtehours h.e.
the hour when the TV
wil{turf on._
4
Time
Press the I_ b_tton to
select the rnmutes.
•The minutes digits will
be highiignmo,
T_ffTilne
* ,, :
a_
Otl
Pressthe•o,•hutten
to se{ectthe
aooroonate
e_ Move
_ Adjust
ITR Return
m{nu[es
To deactivate
5
Time
Pressthe • b_tton to
select "On" or "Off",
46
Pressthe • or • button
to turn the on-timer"On'[
(Repeatedlypressing
the • or • button wilt
_ Move
alternate between "Or
and "Off"
When finishea, _ress the MENU button.
the
on page 30).
When any of the timers are set, the
"Timer" LED will illuminate
(front
panel
Move
the timer,
set the TV's clock.
0 Adjust
rm Return
select
"Off" during
the "On time,"
this step.
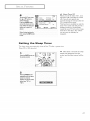
SPECIAL
FEATURES
]
Absent
6
_
TOset the Off Timer, press
the i orVbuttonto
select"Off Time'_
Pressthe ENTERbutton
Time
¢l_k
_ O_T_er
09: 30a!_
O_:30a_
@ Move
_F Adjust
O_
1333
Return
When finished setting the
timer, press the EXIT button
to exit.
Setting
the
Off
"On", your
leakage accident or overheating,
caused by yore" TV left on flara long
time due to the timer "On" (when
you are away on holiday,
example).
Sleep
The sleep timer automatically
(from 30 to 180 minutes
shuts
for
"Hmer
off the TV after
a preset
time
-41
1
Power
you set the timer
television
will eventually
be turned
off, if you do not operate any
controls dm'ing the 3 horn's after the
TV is turned on by timer.
This function
is available in only the
timer "On" inode and will prevent a
and set the hours and minutes. (Follow the same pro7
cedure as in steps 3_5
When
After about
Pressthe SLEEPbutton on
display
screen,
me remo[e con[rol.
set.
5 seconds,
the sleep
will disappear
from the
and the time interval will be
2
Pressthe SLEEPbutton
reoeatedtv untdthe aoerooriatetime interval
appears (any of the preset
valuesfrom "Off" to
"180"1.
47
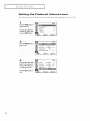
SPECIAL
FEATURES
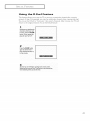
Setting
The
preferred
the
volume
Preferred
can be set for when
1
Press
theMENU
betto°
t0
display the menu.
2
Pressthe ENTERbutton m
setect"Time"
3
Pressthe • or • button to
setect "OnTimer Volume".
Pressthe _1 or • bu_on
tG aojust votumelevel
Press the EXITbutton tc
exit.
48
_
Volume
the timer
automatically
Setup
,_,
p_g & Pay
Level
turns
oil the 'F_/_
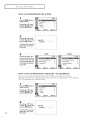
SPECIAL
FEATURES
Using
the
]
V-Chip
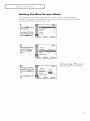
The V Chip Dature automatically
locks out programming
that is deemed inappropriate
for children. The user must first enter a PIN (personal ID number) before any of the
VChip restrictions can be set up or changed.
Note : When the V chip feature is active, channel
Setting
Up
Your
Personal
ID Number
auto program
fbatures do not function.
(PIN)
Pressthe MENU button to
disp!ay the men#.
Press the • or • button
to select the "Setup'; then
pross the ENTERbutton.
Ca_tio _
Move
Pressthe •
or •
_
Enter
ITRReturn
button
to select the "V-Chip':then
pressthe ENTERbutton,
Enter PIN
EnterPIN
The "Enter PIN" screen wi!t
appear.Enter your 4-digit
PiN number,
NOD:The default p!N nombe[ for a new TV set is "[}-0-8-0".
3
<usA>
After enterinr a vagdPiN
numoer.the"V-Chio"
..... _ __c_
screen
YV P_rP_;4
wilt
aDDea[
_ressthe • or V button
ano smect"Change PIN."
While the "Change pro"
field is selected, press me
ENTER Dutt0n.
The Changepin screen wi
aooear.Choose any 4-d_gits for Your PIN and enter
V-Chip
V-Chip
: _m
_l_Ime.
_
_PAA _atm
Move
4
<Canada>
[_
Enter
rm
Return
Move
(_
Enter
ITn Return
_1 Note: If you miner the PIN.
ChangePiN
EnterNew PIN
Drr,ss [ne relllOte_cont£o]
:....
lollowing sequence
pin to 0_()-0-0:
k_ys in the
which
resets
the
POWER OFF -1, MUTE + 8 -1, 2
4 '+ POWER ON.
ConfirmNew PiN
ConfirmNewPIN : ....
in@in.
As soon asthe 4 dig_tsare entered the "Confirm ne_ Din" screen
aBBeers.Re-enter the same 4 digits.When the Confirm screen
disappears,your PIN has been memorized.
=tessthe BIT button to exit.
49
I
SPECIAL
How
FEATURES
to Enable/Disable
the
V-Chip
1
Setup
Pressthe MENU button to
d_sol_/ me menu.
Pressthe • or • button
to setect the "Setuo".then
oress the ENTERbutton.
2
Pressthe • or • button
to seIect the "V-Chip';then
oress Ihe ENTERbutton.
Enter PIN
Enter PIN
: ....
The "Enter PIN" screen witl
appear.Enteryour 4-digit
PIN numuer,
<USA>
3
To enabiethe V-Chip feature, 3ressthe • button so
that the "V-CI' p Lock" field
sYes.(Pressing the • button wi]l atternam oe_ween
Yes and No.i
<Canada>
V-Chip
TV Pa_
_ md_lme_
_PA_ R_[_n4
_@PlA Hatting
Ca_adb_
Move
How
to Set
_
up Restrictions
Enter
ITR Return
Using
the
"TV
O Move
E_gl[sh
_
Enter
Fm Return
guidelines"
First, set up a personal identification
number (PIN), and enable the V Chip.
(See previous section.)
Parental restrictions can be set up using either of two methods:
The TV guidelines or the MPAA rating,
1
Press the MENU button to
display the menu.
Pressthe • or • botten
tosetectthe"Setup",then
press th e ENTERbutton.
Move
Pressthe • or • botten
to seIect the "V-Chip';then
press the ENTERbutton:
5O
The '_EnterPIN" screen witl
appear. Enteryour 4:digit
PIN number,
_
Enter
ITR Return
Enter PIN
Enter PIN
: ....
SPECIAL
FEATURES
]
<USA>
3
=ressthe • or • button
to select the "TV Parental
Guidelines':then DreSSme
ENTERbutton
<Canada>
a}P ,A _at_r_g
0
Move
_
Enter
_PA_
rm
Return
Rat_
_ove
-_
[_
Note:
Enter
These
two separa[e
rTf3 Return
categories
groups:
consist
of
TV-Y and TV-Y7
The' TV Parental
Guidelines"screen wdt
tyoun R children
througn age 7'. and
TV-G through TV-MA (eveJ vbodx
8Deeal:
else{.
=ressthe • • buttons to
select one of the six ageDaseo
Ca[egorIes:
TV-Y
TV-Y7
Young ."nt_eren
Children 7 and over
B: B[ocked
Move
_
...................................
TV-G
TV-PG
TV-14
TV-MA
Generalaudience
Parent Guidance
V _wers 14andover
Mature audience
U: Unldocked
Enter
rm
Return
The restrictions
for these two groups
work indet)endentlv:
If a household
includes
very young
as young
adults,
must
children
De set up separate
grou t-
as well
the TV guidelines
btor
each age
See next step.
5
At this Do=nt.one of the TV-Batings is selectee
_ressthe ENTER button: DeDendiagon your existtag se_uo,a letter "U" or =B" Wi Deselectee.
)U= Unbiecked,B= Blocked)
White the "U" or "B" ts reD,press=ne• or • button to block or unblockthe category.
_ressthe MENU button onceto save the TV Parental GuideJines,ATV-Rating Wt_lDeselectee. _ndno letters
witJ be selected.To exit this screer 3tessthe MENU button again.To seJect a different TV-Rating,pressthe •
or • button andthen reoeatthe ]recess
klote1:The TV-YT,TV-PG,TV-14andTV-MA have additiona_oottons. Seethe next steo to cnange
any of the folJowing sub-ratings:
FV: Fantasvviolence
D: Diatog
L: Adutt language
S Sexua{ situation
V: _ otence
klote2: The V-Chinwit[ automatica , block certain categoriesthat are "more restrictive." For example,if vou
block'TV-Y" category,then TV-Y7will automatical{, be blocked, Similarly,if you block the TV-G category,then all
me camgories m the" young adult" grou_ wilt be blecked lTV-G,TV-PG.TV-14andTV-MA The sub-ratings (D,L.
S.V) work together stmdartv._Seenext section
continued...
51
I
SPECIAL
FEATURES
6
Now to setme Fv D.L S andV sub-ratings:
First setect one of these TV-Ratings: TV-Y7TV-PG.TV-14or TV-MA (See Steo 4.on erewoes pagel.
Next Nhile the TV-Rating s selectee, repeatedly press the I1_button, This will cycle tTrough the evadablesubratings {FV.L.S.D orVL
A letter I"U" or"B"I wilJ he displayedfor each sub-rating. While the "U" or'B" is selected, oress the • or •
button to mange the sub-rating
Pressthe MENU button once to save the TV ParentatGuidelines.ATV-Rating wilJ be selected, and no tetters
will he seJected.Toexit this screen, press the MENU button again,To select a different TV-Rat:-g, press the A
or • buttonand then repea_me process.
Note: The V-chip witl automatmalty block certain categories that are "More restrictive". Forexampte,it vou block
'L"sub-ratinginTV-PG.thenthe'l'-'sub-ra_mgsinTV-14ansTV-MAwi
]utomatiealtv be DmcKea
7
Pressthe EXITbutton to clea| atl the screens. 'Or )roceed to the next section, aria set up additional restrictions
based on the MPAA codesw.
How to Set up Restrictions
13. R. NC-17.
X
using
the
MPAA
Ratings:
G. PG.
PG-
The ivIPAArating system uses the Motion Picture Association of America (MPAA)system,
and its main application is for movies. (Eventually, movie videocassettes will be encoded
with MPAAratings.) When the VChip lock is on, the TV will automatically block any
programs that are coded with o_ectionable ratings (either MPAAor TV Ratings).
1
Setup
Pressthe MENU button to
display the menu,
Pressthe • Or• button
to setect the "Setup",then
press the ENTERbutton.
Pressthe • or • button
to seteet the "V-Chip'_then
press the ENTERbutton:
The '_EnterPIN" screen witl
appear.Enteryour 4_digit
PiN number,
52
Enter PiN
Enter PIN
: ....
SPECIAL
FEATURES
]
3
<Canada>
<USA>
=ressthe • or • button
to select the"MPAA
Rating';then press m_
ENTERbutton
O Move
(_
Enter
ITf3 Return
#
_Aove
(_
Note:
4
• button to semc[ _ particular MPAA camgory.
=ressingthe • or • button wdt Cycle mrough tne
ITf3 Return
The V-Chip
cally block
The "MPAA Rating" screen
wilt appear.
Repeatedtvpress the • or
Enter
will automati-
any category
restrictive."
For example,
the '?G-13"
category,
that
then
is "more
if you block
"R," "NC-
17." and "X" will automatically
blocked also.
•
Move
_
Enter
rm
be
Return
MPAA categories:
G
Generalaudience_qorestrictions
PG
_arenta guloancesuggested
PG-13
_G-13 _arentsstrongly cautmned
R
R _Restdcted.Childrenunder17should
be accomoan_edbvan aaum.
NC-17
No childrenunderage17.
X
X {Adultsonh,.
NR
Not rated.
While a oamcu_arcategory _sselected, pressENTERto activate it.
A letter P'U" or"B") will be selected. Pressthe • or • button to
select'U" or "B'_
=tessthe EXITbutton to save the settings and to ctearaltscreens.
How
to Set
up Restrictions
Using
the
1
Canadian
English
Setup
Press the MENU button to
dispIay the meng.
Press the • or • button
to select the "Setup'; then
press the ENTERbutton.
_
VCbp
C_pt_oi
Move
Pressthe • or• button
to select the "V-Chip';then
press the ENTERbutton,
_
Enter
ITf3 Return
Enter PIN
Enter PIN
: ....
The 'tEnter PIN'! screen wilt
appear.Enteryour 4:digit
PIN number,
53
continued...
I
SPECIAL
FEATURES
3
V-Chip
Pressthe•orVbutton
to setectthe "Canadian
Enggsh'_thenoresst_e
ENTERbu[mn.
0
Move
_
Enter
ITR Return
4
The "CanadianEnglish"
screen will appear,
Repeatedlypress tile A or
• button to select a oarttcular CanadianEnggshcategory. Pressingthe • or •
button will cycle mrouc
the CanadianEnglishcate-
14+
I_
U
8: Blocked
Move
U: Unt}locked
_
Enter
ITR Return
gories
E
Exemp_programmingincludes..news,soorzs
dpcumentadesandother informarioprograrnrnmg.talkshows,music vtdeos,ano
14+
Programmingcontainsthemes or contentwhich
rna, _ot besuitable for viewersunderthe age
of 14.
vanewprogrammmg
Prograrnrnm_intendedfor childrenunder ageg.
18+
Adultprograrnmmg.
C8+
ProgramminggenerallyconsideredacceptaPle
for children8,.earsand overto watch ontheir
own.
While a particalarcategory tssetec[eo, press ENTER
to activate tt
A letter I"U" or"B"] wilt be selected. Press the • or
G
Generaprogramming,suitable for all audiences.
•
PG
ParentaIGuidance.
Pressthe EXIT button to savethe settings andto
clear atlscreens,
C
How
to Set
up Restrictions
Using
button to select'U" or "B':
the
Canadian
Press the MENU button to
display the menu,
Pressthe • Or• button
>Chip
to setect the "Setup",then
pressthe ENTERbutton.
Captior_
Move
Pressthe • or • button
to setect the "V-Chip':then
press the ENTERbutton:
The '_EnterPIN" screen will
appear.Enteryour 4_digit
PIN number,
54
_
Enter
ITnReturn
Enter PIN
Enter PIN
: ....
French
SPECIAL
FEATURES
]
3
=tessthe AorVbutton
to selectthe"Canadian
French'_thenDressme
ENTERbuz[on
4
The "CanadianFrench'
screen wdt appear
Repeatedtvpress the • or
v button to select _ particular CanadianFrench category. Pressing the • or Y
button wilt cycle through
the CanaaianFrenchcate-
Move
_
Enter
rm
Return
gories
E
Exemptprogrammingncludes...news
sporzs,documentaries
andother information
programmingtalk shews,music videos,and
vanew programming.
G
General
8 arts+
8+ General-Notrecommendedlot young
children.
13 arts+ Programmingmay not be suitablefor
children undertheage of 13.
How
to Reset the
Blocks
a Channel
TV after the
("Emergency
16 ans+ Programmingis not suitablefor childre/
underthe age of 16.
18 ans+ Programmingrestricted to adults
Whi{e a oart_cularcategory _sselected Dress
ENTERto activate it
._ letter P'U" or'B") wgl be selected.Pressthe • or
Y button to select'U" or "B".
Press the EXIT buzmn to save me semngs ane zo
3tear eli screens
V-Chip
Escape")
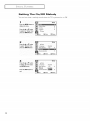
Ifthe TVis tenedto a restrictedchannel,theV-Chipwill blockit.The screenwill goblankandthe followingruesTo resumenormal viewing, tune to a different channel using the number buttons. Under certain conditions
(dependingon the rating of the local TV programs) the V-Chip mighT Iock oct el{!he channe!s
_!d this case, use
the V-Chipfunction for an 'emergencyescape";
Pressthe MENU button to display the menu. PRessthe • or V button to setect the '_Setup?menuand press the
ENTERbutton.
Pressthe • or V button to select the "V-Chip" menu and press the ENTERbutton. Enteryour PIN number,and
pressthe I_ button to temporarily disable the V-Chip Lock.
55
I
SPECIAL
FEATURES
Viewing
Closed
Captions
Your TV decodes and displays the closed captions that are broadcast with certain TV shows.
These captions are usually subtitles for the hearing impaired oi- foreign language translations.
A[[ VCRs record the dosed caption signal from television programs, so home recorded video
tapes also provide closed captions. Most pre recorded commercial video tapes provide dosed
captions as well. Check for the closed caption symbol in your television schedule and on the
tape's packaging: [_.
1
Setup
Pressthe MENU button to
disolatthe menu.
Pressthe • or • button
to select the "Setuo",then
oress the ENTERbutton.
OMove
(._JEnter
ITRReturn
2
Pressthe • or • button
to select the "Caotion",ther
cress the ENTERbutton
_me
_Move
Setup
{__]JEnter
FrnReturn
-_
3
Pressthe ENTERbutton
then oress the • or •
outton to turn ctoseecaptiomn_ "On" or"0ff"
Pressthe ENTERbutton.
Caption
Caption
:
(_Y Enter
during
betore
captions
[TOReturn
-ql
Caption
Pressthe • or • button to
select "Mode" then press
the ENTERbutton.
Pressthe • or • button to
select "Caption" or "Text';
then cress the ENTERbut-
In "Caption"
mode,
captions
appear at the bottom of the screen,
and they usually cover only a small
portion of the picture.
In "_[_xt" mode,
information
unrelat-
ed to the program,
such as news or
weather, is displayed.
Text otken cov,OMove
(_JEnter
ITRReturn
5
Dependingon the particular broadcast, _tmight be necessarv[o
make changesto "Channels" and"Field"
Usethe •, •, _1 and I_ buttons to make the changes,/ Follow
the same procenureas _ns[eos 3~4 above,}
56
occur
closed caption transmissions,
espe_
eialiy those of live events. There may
appear when you change channels.
These are not maltunctions
of the TV.
4
Pressthe EXIT b_tton to exit.
and unusual
soiiletiiiles
be a small delay
• Move
IOn.
Misspellings
characters
ers a large portion
"_
DitIbrent
of the screen.
channels
display dit1>rent
carries additional
and fields
intormation:
inflarmation
Field
that
supplements
the intormation
in Field
1. (For example,
Channel
1 may have
subtitles
in English, while Channel
has subtitles
in Spanish.)
SPECIAL
FEATURES
Setting
the
]
Blue
Screen
Mode
If no signal is being received or the signal is very weak, a blue screen automaticaI[y
replaces the noisy picture background.
If you wish to continue viewing the poor picture,
you must set the "Blue screen" mode to "Off".
1
_
Setup
Pressthe MENU button tO
display the mese.
Pressthe •
,
PI_
er V butte,,
to selectthe"Setup';then
press the ENTERbutton.
& Pley
¢_tk,,,
_
_ _1ore
0
Move
_
Enter
2
ITf3 Return
Setup
Press the • or V button
to select "Blue Screen_,
then press the ENTER
button,
Move
[_
Enter
ITR Return
-.9 Pressing the • or • button will
alternate
between
"On" and "Off".
exit
_Move
_
Enter
ITn Return
57
I
SPECIAL
FEATURES
Setting
You can hear
The
clear
On/Off
a melody
sound
Melody
when
the TV is powered
1
Pressthe MENU button to
display the menu.
Press the • OrV button
to select the "Setup",then
press the ENTER button,
0
Move
(_
Enter
ITR Return
Setup
Pressthe • or V button
to setect "_Metody",then
press the ENTERbutton.
Demog_traSo _
,=Move
(_
Enter
ITR Return
(_
Enter
ITR Return
Pressthe • or V button
to select "On",then press
the ENTERbutton.
Pressthe EXITbutton to
exit,
v_ Move
58
on or Off.
SPECIAL
FEATURES
Viewing
]
the
T_3become
familiar
the in built
demonstzation.
Demonstration
_vith the vai-ious ]_]enus
pzovided
1
by youz
television,
you can view
Setup
=ressthe MENIJbutton zo
displavthe menu.
=rossthe •
or •
button
to select the "Setup, men
press me ENTERbutton.
Move
_
Enter
rm
Return
Move
_
Enter
rm
Return
2
Pressthe •
or •
button
te select"Demonstration,
men Dressme ENTER
_]u_ton,
3
Input
Each of the menu options
is d_sp_ayedin turn.
When youw_shto stop
the demonstration press
an_ button on the remo_e
con_I'OL
Move
_
Enter
rm
Exit
_ress the EXITbutton to exit.
59
SPECIAL
FEATURES
J
Customizing
Your
Remote
Control
Your TV comes equipped with a universal remote control. In addition to controlling the TV]
the universal remote control can also operate a Set 'Fop Box, VCR, Cable box and DVD (even
if your VCR, Cable box and DVD are made by manufacturers
other than Samsung).
• The remote control
Setting
or DVD
Up Your
player)
might not be compatible
Remote
Control
with alI VCRs, DVD players and Cable boxes.
to Operate
Your
VCR
(Cable
box
1
Turn off your VCR{Cablebox or DVO player).
2
Press the M00E button and make sure that the VCRtCABLEor DVOI LEDis
41 The remote control has five
modes: TV, STB, VCR, CABLE
and DVD.
umlnated
3
Onyou,"Samsung "emo[e con[ro_ pressthe SET out,on.
"q Make sure you enter
4
S digits
Enter3 dig_ts of the VCR %hie box or DVD [_iaver!code listed on next page
for your brand of VCR{CaLe box or DVD olaver
of the code, even if the first digit
is a '0". (If more than one code
listed, try the fiist one.)
5
_l If your VCR (Cable box or
DVD player) does not turn on,
Pressthe POWERbutton on the remote control. YourVCR Cable box or DVD
ptayer_shoutd turn on. If your VCR(Cablebox or DVD olayerlturns on your
remo[e control is now set correct
it, pc,at steps 2, 3, and 4, but try
one, of the, other codes Iiswd %r
(Cable box or DVD player)
6
Onceyour remo[e control _sset uo. otess the MODE button any time ,.ouwan[
m use the remo_eto ooerazevourVCR ICablebox or DVDplayerJ
When your remote is in the TV mode, the VCR (or DVD player) control
PLAY/PAUSE
and FF) will still operate your VCR (or DVD player)
When your remote control
trol your TV's volume
60
is in the VCR
(CABLE or DVD)
buttons
mode, the volume
(REW,
buttons
STOP,
still con
SPECIAL
FEATURES
Remote
Control
]
Codes
VCR
0oo
Samsung
OI 8
Codes
Candle,Cil_ze_,Emerson
036
EledTohoaleEmerson,
059
P oneer
060
JCP_nny
Real;sticSeo_sToshikoTeknika
037
RadioShackRealistic,Sharp
RCA
061
Candle,C l{zen,Poltland
Totevision
038
MagnavoxMa_anlz Phil_
062
Cano_,CurtisMathes,
LG(GoId_tar) RadioShuck,
LGIGaldsta_
)
003
004
005
019
BroksonicEricsson
021
Craig Fishe_RadioSl_ack,
006
063
RCA
Dae_oo Erne_sonSems_ng,
041
Geae_alEledric Mul_tech
064
Shinon1
042
065
066
Mag_avox _shleo, Sylvania
Cdar_/me C_r_sMaShesDB,
Sansang
?ioneer
RCA
LG(Gold_r) HarmanKa_don
043
_me_so_
067
Bell&Ho'_ell_Fishe_]C Pe_
JCPenny_
JC[,Kenwood
044
Ma_antzNEC
_itachi JC_enr_ _entax,RCA
Sears
069
070
/G(GoId_tar)
]CL Kenwo_d,Ma_antz NEC
Aiwa C_r_sMaShesDy_alech
045
Hitachi
071
Emef£on
Sanyo,Sears,T_ndy
E_e_s_nF_ai Hi[achi lloyd
046
RCA
073
Crtis MaPqesNEC
Hilachi ]C Penny,Pentax
LXIMTC,M_lti_echRadioS_ack
047
Sony
074
Emef£on
Pionee_RCA,Sears¸Toshiba
Reol;stiqSignature_bania
048
S_a_p
076
CrtisMahes En,ersonTMK
Admiral,OpfimusRadioShack¸
_mpha_ic Tand_Teat, Te_nika
050
_me_so_%ot_
077
Emef£onSea
AudiaDynamics¸DB,]C Pe_
051
_me_so_%rasing
078
RCA,T_ac
Candle¸Citizen Oaig,
JC_Ken_,ood Maran_zNEC
052
Fisl_e
_ RadiaShack,Realistic
079
Emef£on
CurtisMathes General_edric
Pioneer¸Sansui
Sears
082
KLH
General_leclricPROSCAN
Quartz¸RadioShack¸Realistic,
Realistic¸
Sharp
017
RadioS_ack Reos_icSylvania
_ogik Multi_e_h,
Shinto_
CurtisMathes Dirqe_sia
016
Mag_avox Fanasonic_ilco,
Marantz NEC,Tatung,Teac
040
009
015
GeneralEledrc, ]C Penny,
]C _en_ }CL Kenwood,
AudiaDynamics¸Candle¸Ci_ize_
Daewaa /G(GoId_tar)
Daewaa
014
039
Reol;sticSanio Sears
007
008
011
?hilips,_bania
Daewoo
022
%ot_ Toshiba
023
024
025
Emef£on
Fisher
Ma_anrz NEC
GoVideo¸JCPenny_
MTC
026
Akai Shinlo_ Sow
053
_r_and Q_asar
084
Panasonic
M_ltitech,RCA,Samsung,
027
Fisher¸Sears
054
Ca_dle Citizen Daewoo
085
Dae_'oo
ToteYision
028
Fishe_RadioShack¸Realistic,
_r_and Sharp
086
Panasonic
Ca_dle Ci_izen_
CurlisMashes
088
Adn@d
Ernerson_
GeneralEledr;c,
029
Sears¸Toshiba
E_e_son
CanonC_r_sMashes,
055
_G[Golds_ar_
ICL I{en'_'ood,
InstantRepla_]C Penn_
030
Teknika
]CL Magnavox,Marantz
031
Akai %msung
056
Marantz NEC,PentexResearch÷
_me_so_
Panaso_ic_ilco, P_ilips
032
Akai Ericsson
057
fishe_ Sears,Toshiba
QuasaBRadioSl_ac_,Realistic
035
Shinlo_ Sony
058
_me_so_%ot_ Toshiba
RCASylvaniaTechnics,Teknika
Cable
000
Son,sung
001
Nawoo
002
TaeFyung_ng
003
DeoRyung
Box
Codes
EasternInt_rna_onalHanqin
038
GI ]erro d
057
Regal
039
gnika
058
021
Hamlin Regal
040
Magna_ox Philps Unika
059
022
Zenith
Viewslar
060
Magnavox Phi@sRegen_y_
063
Toconl
Viewslar
065
Z_nith
020
Ua wf_al
004
DongK_k
023
GI Je_rold
005
DaeHan
024
Oak Osk Sign_a
006
LGIGoId
s_a_
)
025
Toco_
042
Han_li_
066
Starga_2000
007
Saewao
026
Pioneer
044
GI ]errold
067
Sylvania,Texscan
008
RCA
027
Mag_avox _ilips Vie_,star
045
Hitachi Macom
069
PanasonicZenith
010
Regency
028
Pioneer
046
Oak
070
Je_dd
011
HamlinPanasonicRegal,
029
Mag_avox _ilips Tocom
047
_anasonic
071
Vie_star
048
Magnavox Phili_sViewsta_
072
%msung
049
Magnavox Phi@sUnika
Viewslar
073
074
GI Je_rold
050
Zenith
075
Samsung
041
Tocon_
%msung
012
G},HamlinJerrold
030
013
G},]e_rold
03]
015
AnvisionCableS_a_Eagle
032
016
Magnavox_PhilipsRandt@,
033
051
Hitachi Macom
076
Viewsta_
034
Mag_avox _Shilips
Vie_star
052
?ionee_Sems_ng,
Warne_Amex
077
017
NSC
035
RCA,Panaso_ic,
Sp_uce_
054
Geae_alI_strurnen_
klitachi
019
SylvaniaTexscan
036
037
Mag_av°x _Shilips
Vie_star
056
]errol_, Signature¸Starcom
Han_li_
DVD
Je_dd
RCA
Codes
_ana_onic
Crtis Mahes
?hilips
?ROSCANRCA
61
TROUBLESHOOTING
If the TV seems to have a problem, first try this list of possible problems and solutions.
If none of these troubleshooting
tips apply, then call your nearest service center.
Identifying
Problems
Problem
Possible
Poor picture
Try another channel
Adjust the antenna.
Check all wire connections.
Poor sound
quality
Solution
Try another channel
Adjust the antenna.
No picture or sound.
Try another channel
Press the TV/VIDEO button.
Make sure the TV is plugged in.
Check the antenna connections.
No color, wrong
Make sure the program is broadcast in color.
Adjust the picture settings.
If the set is moved or turned hi a different
colors or tints.
direction, the power
30 minutes.
Picture
rolls vertically
The TV operates
erratically
The TV won't turn on.
62
should
be OFF for at least
Adjust the antenna.
Check all wire connections.
Unplug the TV for 30 seconds,
operating it again.
then try
Make sure the wall outlet is working.
APPENDIX
Cleaning
and
Maintaining
Your
TV
With proper care, your TV unit will give you many years of service. Please _'c_]]c_r these
guide[ines to get the maximum performance
Kom your TV
Placement
Do not place the TV near extremely
Do not place the TV near appliances
such as vacuum cleaners.
hot, cold, humid oi- dusty places.
with electric motors that create magnetic
fields,
Keep the ventilation openings clear; do not place the TV on a soft surface, such as
cloth or paper.
Place the TV in a vertical position only.
Liquids
Do not handle
damage.
liquids near or on the TE Liquids that spill into it can cause serious
Cabinet
Never open the cabinet or touch the parts inside.
Wipe your TV with a clean, dry cloth. Never use water, cleaning
chemicals.
Do not put heavy objects on top of the cabinet.
fluids, wax, or
Temperature
If' your TV is suddenly moved from a cold to a warm place, unplug the power cord,
and allow at least two hours ft_r moisture that may have formed inside the unit to dry
completel}4
Using
Your
TV
in Another
Country
If you plan to take your TV with you to a foreign country, please be aware of the different
television systems that are in use around the world. A TV designed ft_r one system may
not work properly with another system due to differences in the TV channel frequencies.
Specifications
_!@1
[}illensions
Immincbq
IX P3235
TXP2734
1TX
P2730
TXP2728
AC120
V
ACI20V
AC120
V
AC120
V
60Hz
60Hz
60Hz
60Hz
[60 Wats
150Watts
150 \_ia_t,s
[50 Watts
730X 485X 575/
806X 493X598/
766X558X586/
910X 585X690/
3583X2303X2717 2874X1909X2264 3173X1941X2354 3016X2197X2307
68/14992
435/9590
44/9700
41/9039
63
ELECTROMCS
1-800-SAMSUNG
(1-800-726-7864)
U.S.A
Samsung
Electronics
Service Division
400 Valley
Mount
Road,
Arlington.
America
Suite 201
NJ 07856
Wa,VVV Salllsungusa.conl
CANADA
Samsung
Electronics
Canada
Inc.
Samsung
Customer
Care
7037 Financial
Drive
Mississauga,
L5N 6R3
Ontario
WWW.samsung.ca
AA68-03283A-00