1
Owner's
Instructions
l Warninq
Safety
! Important
Instructions
CAUTION
CAUTION: TO REDUCE THE RISK OF ELECTRIC SHOCK, DO NOT
REMOVE COVER (OR BACK). NO USER SERVICEABLE PARTS INSIDE.
REFER SERVICING TO QUALIFIED SERVICE PERSONNEL.
dangerous
to make any kind of contact with any inside part of
This symbol indicates high voltage is present inside, It is
this product.
This symbol alerts you that
operation and maintenance
important literature
concerning
has been included with this producL
Note to CATV system installer: This reminder
is provided to call CATV system
installer's attention
to Article 820 40 of the National Electrical Code (Section 54 of
Canadian Electrical Code, Part I), that provides guidelines
for proper grounding
and, in particular,
specifies that the cable ground shall be connected
to the
grounding
system of the building as close to the point of cable entry as practical.
Caution: FCC/CSA regulations state that any unauthorized
ehanges
tlons to this equipment may void the user's authority to operate it.
Caution: To prevent etectric
and fully insert the plug.
shoek, match
or modillca
the wide Made of plug to the wide slot,
Attention: pour eviter les chocs electriques, introduire la lame le ptus large de la
fiche dans la borne correspondante
de la prise et pousserjusqu'au
fond.
Important:
copyrighted
One Federal Court has held that unauthorized
recording of
TV programs is an infringement
of U.S. copyright laws.
Certain Canadian programs may also be copyrighted
and any unauthorized
recording
in whole or in part may be in violation of these rights.
To prevent
hazard,
damage
do not
which
expose
this
may
result
appliance
in fire or electric
to rain
shock
or moisture.
As an ENERGY STAR Partner,
Samstmg Electronics America, Inc. has determined that this product or product
model meets the ENERGY STAR guidelines for energy efficiency
Thank
Thank
you
technolo[L_z
You
for choosing
for
Samsung!
We designed
it with
Your new
it one of the best products
will
convenient,
dependable
Important
Samsung
Samsung
TV represents
easy to use on screen menus
ties, making
provide
Choosing
in its class.
service
We are proud
and eiljoyment
Safety
the
latest
in television
and closed captioning
capabili
to offer you a product
that
for years to come.
Information
Always be careful when using your TV receiver. To reduce the risk of fire, electrical shock,
and other injuries, keep these safety precautions
in mind when installing, using, and
maintaining your machine.
• Read
all safety
• Keep
the safety
• Heed
all warnings
and
and
• Follow all operating
operating
operating
instructions
before
instructions
on the TV receiver
and
operating
for future
in the
your
T_
I-eference.
operating
instructions.
and use instructions.
• Unplug the TV receiver from the wall outlet before cleaning.
liquid or aerosol cleaners.
Use a damp
cloth; do not use
• Never add any attachments
and/or equipment
without approval of the manufacturer.
additions can inci-ease the risk of fire, electric shock, oi- other personal injury,
Such
• Do not use the TV receiver where contact with or immersion in water is a possibility,
near bath tubs, sinks, washing machines, swimming pools, etc.
such as
• Do not place the TV on an unstable cart, stand, tripod, bracket, or
table where it can fail. A falling TV can cause serious injury to a
child or adult, and serious damage to the appliance. Use only with
a cart, stand, tripod, bracket or table recommended
by the manu
facturer or sold with the TV_ Follow the manufacturer% instruc
tions when mounting the unit, and use a mounting accessory rec
ommended
by the manufacturer.
Move the FV and cart with care.
Quick stops, excessive force, and uneven surfaces can make the
unit and cart unsteady and likely to overturn.
• Provide ventilation for the TV receiver. The unit is designed with slots in the cabinet for yen
tilation to protect it from overheating.
Do not block these openings with any object, and do
not place the TV receiver on a bed, sd'a, rug, or other similar surface. Do not place it near a
radiator or heat register. If you place the FV receiver on a rack or bookcase, ensure that there
is adequate ventilation and that you've followed the manufacturer% instructions
fur mount
ing.
• Operate your TV receiver only from the type of power source indicated on the marking
If you are not sure of the type of power supplied to your home, consult your appliance
or local power company,
label.
dealer
• Use only a grounded or polarized outlet. For your safety, this TV is equipped with a polarized
alternating current line plug having one blade wider than the other. This plug will fit into the
power outlet only one way, If you are unable to insert the plug fully into the outlet, try
reversing the plug. If the plug still does not fit, contact your electrician to replace your outlet.
EAFFIY
1
• Protect the power cord. Power supply cords should be routed so that they won't be walked
on or pinched by objects placed on or against them. Pay particular attention to cords at
plugs, convenience
receptacles, and the point where they exit from the unit.
• Unplug the TV from the wall outlet and disconnect the antenna or cable system during a
lightning storm or when left unattended
and unused fur long periods of thne. This will pre
vent damage to the unit due to lightning and power line surges.
• Avoid overhead power lines. An outside antenna system should not be placed in the vicinity
of overhead power lines or other electric light or power circuits or where it can fail into such
power lines or circuits. When installing an outside antenna system, be extremely careful to
keep from touching the power lines or circuits. Contact with such lines can be fatal.
• Do not overload
shock.
the wall outlet or extension
cords. Overloading
can i-esult in fire or electric
• Do not insert anything through the openings in the unit, where they can touch
voltage points or damage parts. Never spill liquid of any kind on the TV[
• Ground outdoor antennas. If an outside antenna or
cable system is connected to the TV, be sure the
antenna or cable system is grounded so as to provide
some protection against voltage surges and built up
static charges. Section 810 of the National Electrical
Code, ANSI/NFPA No.70 1984, provides information
about proper grounding of the mast and supporting
structure, grounding of the lead in wire to an antenna
discharge unit, size of grounding conductors,
location
of antenna discharge unit, connection to grounding
electrodes, and requirements
for the grounding elec
trode.
_EC
N_I_ONA_eLEC/RICALCODE
dangerous
_'OWER
SERVICE GROL_N_N_
_LEC/_OOESY$1EM
_NE_A_1250.
PA_IH)
• Do not attel_qpt to service the TV yourself. Refer all servicing to qualified service personnel.
Unplug the unit from the wall outlet and refer servicing to qualified service personnel under
the following conditions:
when the power supply cord or plug is damaged
if"liquid has been spilled on the unit or if' objects have fallen into the unit
if"the TV has been exposed to rain or water
if"the TV does not operate normally by following the operating instructions
if"the TV has been dropped or the cabinet has been damaged
when the TV exhibits a distinct change in performance
• If you make adjustments
yourself', adjust only those controls that are covered by the operat
ing instructions.
Adjusting other controls may result in damage and wiII often require exten
sive work by a qualified technician to restore the TV to normal.
• When replacement
parts are required,
specified
by the manufacturer
or those
Unauthorized
substitutions
may result
be sure the service technician
uses i-eplacement
parts
that have the same characteristics
as the original
part.
in additional
damage
to the unit.
• Upon completion
of any service or repairs to this T_/] ask the service techniciarl
perform safety checks to determine that the TV is in a safe operating condition.
to
This device complies
with part 15 of the FCC Rules. Operation
is subject to the
following two conditions:
(1) This device may not cause harmful interference,
and
(2) This device must accept any interference
that may cause undesired
operation.
2 s_ _v
This television
receiver provides
with § 15.1 19 of the FCC rules.
display
of television
closed
captioning
in accordance
1)
Read these hlstructions.
[_
OUBLE INSULATED When servidng
Keep these instructions.
use only identical replacement parts.
Heed all warnings.
4)
Follow aI[ hlstruetions.
Do not use this apparatus
near water.
Clean only with dry cloth.
Do not block any ventilation
instructions.
openings,
Install
hi accordance
Do not insta[] near any heat sources such as radiators,
(including amplifiers) that produce heat.
9)
with the manufacturerZ
heat registers,
or other apparatus
Do not defeat the safety purpose of the polarized or grounding
type plug. A polarized
plug has two blades with one wider than the other. A grounding type plug has two blades
and a third grounding
prong. The wide blade or the third prong are provided for your
safety. If the provided plug does not fit into your outlet, consult an electrician for replace
ment of the obsolete outlet.
10) Protect the power cord from being from being walked on or pinched particularly
convenience
receptacles, and the point where they exit from the apparatus.
11) Only use attachments/accessories
specified
12) Use only with cart, stand, tripod, bracket,
with the apparatus. When a used, caution
avoid injury from tip over.
at plugs,
by the manufacturer.
or table specified by the manufacturer,
or sold
when moving the cart/apparatus
combination
to
13) Unplug this apparatus.
When a cart is used, use caution
combination
to avoid injury from tip over.
when moving the cart/apparatus
14) Refer all servicing to qualified service personnel. Servicing is required when the apparatus
has been damaged in any way, such as power supply cord or plug is damaged, liquid has
been spilled or objects have fallen into the apparatus, the apparatus has been exposed to
rain or moisture, does not operate normally, or has been dropped.
EAFKIY3
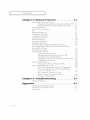
CONTENTS
Chapter
]
1: Your
New
TV
...............
List of Featuzes .........................................
Familiarizing Yuurself with The TV ..........................
Front Panel Buttons ..............................
Front Pand lacks ................................
Rear Panel Jacks .................................
Remote Control .................................
Chapter
2: Installation
................
1.1
1.l
1.2
1.2
1.3
1.4
1.5
2.1
Connecting VHF and UHF Antennas ........................
2.1
Antennas with 300 ohm Flat ]bvin Leads ..............
2.1
Antennas with 75 ohm Round Leads .................
2.2
Separate VHF and UHF ArlteDlqas....................
fi.fi
Connecting Cable TV ....................................
2.2
Cable without a Cable Box .........................
2.2
Connecting to a Cable Box that Descrambies All Channe]s. . 2.3
Connecting to a Cable Box that Descran/bles Some Channels . . 2.3
Connecting a VCR ......................................
2.4
Corlnecting an S VHS VCR.........................
2.6
Connecting a Second VCR to Record from the TV .......
2.7
Connecting a DVD Player (480i/480p) .......................
2.7
Connecting a Digital TV Set Top Box (480p/1080i) .............
2.8
Connecting a Camcorder .................................
2.9
Chapter
3: Operation
..................
"l_rning tile TV On and Off................................
Plug & Play Feature .....................................
Viewing the Menus and On Screen Displays ...................
Viewing the Menus ...............................
Viewing the Display ..............................
Selecting a Menu Language ................................
Memorizing the Channels .................................
Selecting the Video Signal source ....................
Storing Channels in Memory (Automatic Method) .......
Adding and Ezasing Channels (Manual Method) ........
Changing Channels .....................................
Using the Channel Buttons .........................
Dizectly Accessing Channels ........................
Using the PRE CH Button to select the Previous Channel..
Adjusting the Vulume ....................................
Using Mute .....................................
Labeling the Channels ...................................
Setting the Clock .......................................
Option l: Setting the Clock Manually ................
Option 2: Using the Local PBS Channel to
Automatically Set the TV Clock .....................
Customizing the Picture ..................................
Using Automatic Picture Settings ...........................
Customizing the Sound ..................................
Using Automatic Sound Settings ............................
Viewing an External Signal Source ..........................
3.1
3.1
3.1
3.3
3.{_
3.{_
3.4
{3.5
{3.5
3.6
3.7
3.8
3.8
3.8
3.8
{3.8
3.8
3.9
{3.10
3.10
{3.11
{3.13
3.14
{3.15
{3.1B
{3.17
(}o
_
/s 1
CONTENTS
Chapter
4: Special
Features
............
Customizing Yc_urRemote Control ..........................
Setting Up Your Remote Control to Operate Your VCR (or DVD)
Setting Up YourRemote Control to Operate YourCable Box ....
Fine llming Channels ....................................
LNA (Low Noise Amplifier) ...............................
Tilt ..................................................
41
41
43
44
45
46
Digital Noise Reduction ..................................
Changing the Screen Size .................................
Changing the Color Tone .................................
Using the R.Surf Feature ..................................
Freezing the Picture .....................................
Setting the On/Off Timer .................................
Setting the Sleep Thner ...................................
Choosing a Multi Channel Sound (MTS) Sonndtrack
............
Extra sound settings (Turbo Sound Surround Anto Vc_lume
Melody. BBE or Woofer) ..................................
Viewing Closed Captions .................................
Viewing Picture in Picture ................................
Activating Picture in Picture ........................
Selecting a Signal Source (External A/V) for PIP .........
Changing the Size of the PIP Window ................
Swapping the Contents of the PIP image and Main image
Changing the PIP Channel
.........................
Using the _Chip (Option) ................................
Setting
Up Yonr Personal ID Number (PIN) ............
How to Enable/Disable the _Chip ..........................
47
48
49
410
4 if)
4 11
4 12
4 13
kIow to Set up
Restrictions
Using
the "TV gnidelines"
the MPAA Ratings:
(;.PG. PG 13. R. NC-17 X ........................
k[ow to Set up Restrictions
How
to Reset
the TV after
5: Troubleshooting
............
...........................
Cleaning and Maintaining Your TV ..........................
Using Yc0urTV in Another Country .........................
Specifications ..........................................
2
(ION
I_N
l%
4 21
422
422
423
423
425
the _Chip
Identifying Problems ....................................
Appendix
.
414
416
417
417
418
419
420
using
Blocks a Channel ("Emergency Escape") ...............
Viewing the Demorlstratiorl
........................
Chapter
4.1
426
427
5.1
51
a.1
A. 1
A. 1
A. 1
Your
List
NEw TV
of
Features
_uz TV was designed with the latest technology. This TV is a high per_zmance unit that
includes the following special featuzes:
• Full Flat Screen
Easy to use remote control
Easy to use on screen menu system
Automatic timer to tuzn the TV on and off
Adjustable picture and sound settings that can be stozed in the TVh memory
Automatic channel tuning for up to 181 channels
A special filter to reduce or etiminate reception pzoblems
Fine tuning contzoI foz the shazpest pictuze possible
A built in multi channel sound decodez for stezeo and bilingual listening
Built in, dual channel speakers
A special sleep timer
Headphone jack foz pzivate listening
16:9 letter box fozmat avaitable depending upon souzce
Picture in Picture (TXMS297HF/TXMS097WHF/TXMS298HF/
TXMSO98WHF/TXM 2798HF)
_._
( ]IAPI}I
O
:Yo/
}<N
%%1_
I
Your
NEw TV
Familiarizing
Front
The
Panel
buttons
menu.
Yourself
with
The
TV
TV_ basic
fbatures,
hlcludhlg
Buttons
on the front
To use the more
pane[
advanced
control
your
f_atures,
you must use the remote
the on
screen
control.
TXM2797HF
TXM3297HF
TXM3097WHF
TXM2796HF
TXM3296HF
TXM3096WHF
• TXM2798HF
• TXM3298HF
• TXM3098WHF
-0
-0
-0
-0
O
O
"-.°..°.=°"
O TV/VIDEO
(TXM3298HF/TXM3098WHF/
TXM2798HF)
Pressto changebetweenviewingTVproprams
andsignalsfromothercomponents.
0
MENU
Press to see an on screen menu of your TV's
features.
O
VOL-,
+
Press to increase or decrease the
volume. Also used to select items on the on
mscreen menu,
0
CH _'andCH
&
Press to change channels, Also press to high
light various items on the on screen menu.
0
STANDBY
indicator
Lights up when you turn the power off,
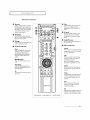
Remote
Control
Sensor
Aim the remote control towards this spot on the
TV.
POWER
Press to turn the TV on and off,
(_u_m }_o_
Y_ _<N \_ rv
1.2
I
Your
NEw TV
Front
Panel
You can
use the front
siona[l_
such
see pages
2.1
I
Jacks
pane[jacks
as a camcorder
to connect
or video
game.
an A/V component
(For information
O
1.3
(;]]API}I
D
: Yot}¢
Nt_
AUDIO
is used
on[y
occa
equipment,
2.8.)
• TXM2798HF
• TXM3298HF
• TXM3098WHF
TXM2797HF
TXM3297HF
TXM3097WHF
TXM2796HF
TXM3296HF
TXM3096WHF
O
that
on connecting
INPUT
jacks
O
SUPER
VIDEO
INPUT
jack
Used to connect the audio signals from a cam
corder or video game.
S-Video signal from an S VHSVCRor DVD
player,
VIDEO
INPUT
jack
Used to connect a video signal from a cam
HEADPHONE
jack
Connect a set of external headphones to this
corder or video game.
jack for private listening.
IV
I
Your
Rear
NEw TV
Panel
Jacks
Use the zeaz panel jacks to connect an AA/component
that will be connected
continuousl_
such as a VCR or a DVD playez.
Because theze are two sets of inputjacks,
you can connect two different A/V
components
(i.e., a VCR and a DVD, 2 VCRs, etc.)
For more infurmation
oil connecting
e
0
AUDIO-VIDEO
equipment,
•
MONITOR
OUTPUT
jacks
Connect to the audio/video inputjacks of a
recording VCR,
Note: The Monitor Out does not operate in
Component 1 or 2 modes,
O,0,OVIDEO
INPUT
jack
Video and Audio signals from VCRs,DVD players
and similar devices,
Note: The commonjack of component 1 and
AV2, component 2 and AV3 input jacks are
exclusive relation with each otheE
0
COMPONENT
1 INPUT
jacks
(480i/480p/1080i)
Connect to the audio and component output
jacks of a DVD player or Set Top Box,
Note: Only black and white signals are output
from a monitor in DVD/DTVmode.
see pages 2.1
2.8.
e
O COMPONENT
2 INPUT
jacks
(480i/480p/1080i)
Connect to the audio and component output
jacks of a DVD player or Set-Top Box,
Note: Only black and white signals are output
from a monitor in DVD/DTV mode.
ANT IN
Connectto an antennaor to a cable TVsystem,
i_1 SUB-WOOFER
SPEAKER
OUT (TXM3298HF/TXM3098WHF
/
TXM2798HF)
Connectto the Subwoofer speakerjack (builtin
Subwoofercable),
Your
NEw TV
Remote
]
Control
You can use the remote control up to about
always point it dh-ectly at the T#
You can also use your remote control
for details.
23 feet from the T_/[ When using the remote,
to operate
your VCR and cable box. See page 4.1
O POWER
O
[urns the TV on and off,
O
Selects a target device to be con
trolled by the Samsung remote
control (i.e., TV,VCR,Cable box, or
DVD),
Number
buttons
Press to select channels directly
on the TV.
O
+100
Press to select channels over 100.
For example, to select
channel 121,press" +100/' then
press" 2" and" I,"
O
DISPLAY
Press to see the time, channel,
etc., on-screen. Also press to exit
(quit) the menu system.
O
P.SIZE
Press to change the screen size,
Your choices are Normal, Zoom1,
Zoom2 or Wide screen.
O
_)
O
_)
_)
R.SURF
Press the R.SURFbutton to auto
matically return to a preferred
channel after a user preset time
delay.
0
TV/VIDEO
Press to display all of the
avai{able video sources (Le., AV1,
AV2, AV3, S VIDEO).
Press to add or erase channels in
VOL
-, VOL
+
Press to increase or decrease the
volume(Also used to make selec
tions on the on screen menus).
the TV's memory.
TV/COMPONENT
Press to switch tile TV or COMPO
NENT1, 2 mode,
_)
MENU
Displays the main on screen
menu,
and CHI"
(Channel
Up/Down)
Press CHA or CHV to change
channels(Also used to highlight
selections on the on screen
@ MUTE
Press to temporarily cut off
the sound,
PRE-CH
runes to the previous channel.
MTS
(Multichannel
Television
Stereo)
Press to choose stereo, mono or
Separate Audio Program (SAP
broadcast).
menus).
S.MODE
Adjust tile TV sound by selecting
one of the preset factory settings
(or select your personal, cus
tomized sound settings),
RESET
If your remote control is not func
tioning properly, take out the bat
teries and press the reset button
for about 2-3 seconds. Rednsert
O CHA
P.MODE
Adjust tile TV picture by selecting
one of the preset factory settings
(or select your personal, cus
tomized picture settings).
ADD/ERASE
O
SET
Use this button when you are set
ting up your remote control to
operate your VCR,Cable box, or
DVD),
the batteries and try using the
remote control again,
O
MODE
O
TXM2797HF / TXM3297HF/ TXM3097WHF
TXM2796HF/ TXM3296HF/TXM3096WHF
STILL(Main)
Press to stop the action during a
particular scene. Press again to
resume normal video.
Note: The still function doesn't
operate in Component1,2 mode.
J
Your
NEw TV
Remote
VCR
Control
_)
Controls
PIP
Controls
(TXM3297HF/TXM3097WHF)
Press to rewind a tape in your
VCR,
PIP
Press this button to control the PIP
window,
STOP
Press this button to stop a tape
during play, record, rewind or
fast forward, If the button is
SOURCE
Press to select one of the available
pressed during Full Automatic
play, the function will be can
celled,
signal sources for the PIP window
(i,e,, AV1, AV2, AV3).
SWAP
PLAY
FF
Exchanges the video signal that is
currently displayed on the main
screen with the signal in the PIP
window,
Press to fast forward the tape in
your VCR.
CH
Press the PLAYbutton to play
back prerecorded tapes.
Displays the available channels in
sequence (These buttons change
channels in the PiP window only).
TXM2797HF / TXM329?HF / TXM3097WHF
TXM2736HF/ TXM3236HF/TXM3096WHF
Your
NEw TV
Remote
]
Control
@
O Power
Turns the TV on and off,
O
Number
Selects a target device to be con
trolled by the Samsung remote
control (i.e., TV,VCR,Cable box, or
DVD),
buttons
Press to select channels directly
on the TV.
+100
Press to select channels over 100.
For example, to select
channel 121,press" +1007 then
press" 2" and" 1:
OH&
and
@
Pre-CH
runesto tile previouschannel.
@
TV/Video
Press to display all of the available
video sources (i.e., AV1, AV2, AV3,
S VIDEO).
@ TV/Component
Press to switch the TV or COMPO
NENT mode.
O
@
@
menus).
@
Press to temporarily cut off
the sound,
@
BBE
A Sound related function that
operates the treble, bass, and
boost the function based to 650dB
standards and reverses the phase
to produce replicated sound that is
close to the original sound.
@
MTS
(Multichannel
Television
Stereo)
Press to choose stereo, mono or
Separate Audio Program (SAP
broadcast).
EQ.
Press to select Equalizer menu
directly,
P.size
Press to change the screen size,
Your choices are Normal, Zoom1,
Zoom2 or Wide screen,
P.Mode
AdJustthe TV picture by selecting
one of the preset factory settings
(or select your personal, cus
tomized picture settings).
S.Mode
Adjust the TV sound by selecting
one of the preset factory settings
(or select your personal, cus
tomized sound settings),
TXM3298HF / TXM3098WHF / TXM2798HF
N_
I_
PiP
Press this button to control the PIP
window,
@ Mute
1.7 CHAPU*
0 : Yotl_
Still(Main)
Press to stop the action during a
particular scene, Press again to
resume normal video.
Note: The still function doesn't
operate in Component 1, 2 mode.
VOL
-, VOL
+
Press to increase or decrease the
volume (Also used to make selec
tions on the on screen menus).
O
Menu
Displays the main on screen
menu,
OHm"
(Channel
Up/Down)
Press CHA or CHV to change
channels (Also used to highlight
selections on the on screen
O
MODE
I
Your
NEw TV
Remote
_)
Control
Set
Reset
If your remote control is not func
tioning properly, take out the bat
teries and press the reset button
for about 2-3 seconds, Re-insert
Use this button when you are setting up your remote control to
operate your VCR,Cable box, or
DVD),
the batteries and try using the
remote control again.
_)
R.surf
Press the R,SURFbutton to auto
Display
Press
to see the
time,
matica]ly return to a preferred
channel after a user preset time
delay,
channel,
etc,, on screen, Also press to exit
(quit) the menu system.
!_
Add/Erase
Pressto addor erasechannelsin
the TV'smemory,
Sleep
Press to select a preset time inter
val for automatic shutoff.
VCR
@
Controls
PIP Controls
Source
sto_
Press to select one of the available
Press this button to stop a tape
during play, record, rewind or
fast forward, If the button is
signal sources for the PIP window
(i.e., AV1, AV2, AV3),
pressed during Full Automatic
play, the function will be can
celled.
Still
Press to stop the action during a
particular scene, Press again to
resume normal video.
Note: The still function doesn't
Press to rewind a tape in your
VCR.
operate in Component 1,2 mode.
k/Pause
Press the P]ay/Pausebutton to
play back prerecorded tapes or
pause the tape.
Locate
Press to move the PIP window to
any of the four corners of the TV
screen.
FF
Press to fast forward the tape in
your VCR,
Exchanges the video signal that is
currently displayed on the main
screen with the signal in the PIP
window,
Size
Press to make the PIP window
small, large, double screen or
stock ticker window.
CH
Displays the available channels in
sequence (These buttons change
channels in the PlP window only).
(
TXM3238HF/
TXM3098WHF / TXM2798HF
(:.w.}_o,_
Y)t N_wrb 1.8
INSTALLATION
Connecting
VHF
and
UHF
Antennas
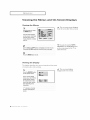
If your antenna has a set of leads that
look like this, see "Antennas with
3OO ohm Fiat 7%vin Leads," below.
If your antenna has one lead that looks
like this, see "Antennas with 75 ohm
Round Leads," oil page 2.2.
If you have two antennas,
VHF and UHF Antennas,"
Antennas
with
see "Separate
oil page 2.2.
300-ohm
Flat
Twin
Leads
If"you are using an off air antenna (such as a roof antenna
300 ohm twin fiat leads, follow the directions below.
1
Place the wires from the
twin leads under the
screws
on the 300-75 ohm
aoap[o/_no[
SUpD_Ie{]_
use a screw[lrlver
[o
[tg_ten file SC_W_
Plug the adaptor into the
VHF/UH[ terminal on the
bottom of the back panel.
2,1
(I{APltl
iv(>
]
Si\l],\i{)
or "rabbit ears") that has
INSTALLATION
Antennas
]
with
75-ohm
Round
Leads
Plug the antenna lead into
the VHF/UHE
terminal on the bottom of
the back panel
Separate
VHF
If you have
combine
This
and
two separate
the two antenna
procedure
requires
UHF
Antennas
antennas
for your
signals
before
TV (one
connecting
an optional
combiner-adaptor
Cable
TV
VH1_ and
one
the antennas
(available
UHF), you
T_
must
to the
at most
electronics
shops).
Connect both antenna
leads to the combiner.
2
Plug the combiner
into the VHF/UHFter_
minal on the bottom
of the rear panel,
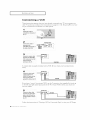
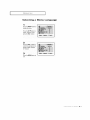
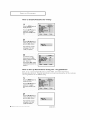
Connecting
To connect
Cable
to a cable TV system, follow the instructions
without
a Cable
1
Plug the incoming cable
into the VHF/UHF
antenna terminal on back
below.
Box
-,11 Because
this TV is
cable-ready,
you do not need a
cable box to view unscrambled
cable
channels.
ofthe TV.
(}
lAP]
] _(
}
]NSIAI
AI(
}N
2,2
INSTALLATION
Connecting
]
to a Cable
Box
that
Descrambles
All Channels
_,9 This terminal might be labeled
"ANT OUT," "VHF OUT," or simply,
"OUT."
Find the cable that is corn
nected to the ANTENNA
QUTterminal on your
cable box.
Connect the other end of
this cable
antenna
terminal on the back of
the TV,
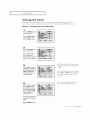
Connecting
to a Cable
Box
that
Descrambles
Some
Channels
If your cable box descrambles only some charmels (such as premium channels), follow the
instructions below. You will need a two way splitter, an RE (A/B) switch, and four lengths of"
coaxial cable. (These items are available at most electronics stores.)
-ql This terminal might be labeled
"ANT IN ," "VI [F IN," or simply,
"IN."
1
Find and dlSCo-nect the
cable that is connected to
[he ANTENNA tN
[ermmat or] your
cable box.
2
Connect this cable to a
[wo-way Spll[[eE
_=,--_[
Incoming
Cable
8pl_ter
3
CoRnet[
a coaxial cable
between
an OUTPUT[er-
minal on the splitter and
[he IN terminal on the
cable box.
2.3
(IIAP]
I IV(}
]NSI\I],\I
f_N
-Incemi_l
Cable
8plltt_
m
Cable Box
]
INSTALLATION
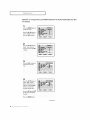
Connect a coaxial cable
between the ANTENNA
OUT terminal on the cabIe
bQxand the B_IN terminal
on the MB switch.
In_om/n
g
Cable Splitter
_
_
O_o BOX
RF(A/B)
SwiSh
5
Connect another cable
_
between the other OU]
terminai on the splitter
and the A* IN terminal on
the RF (A/B) switch.
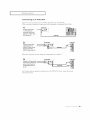
InComing
CabkD
Splitter
RF(,_/B)
8witch
CableBox
Connect the last coaxiat
cable between the OUT
terminat on the RF(A/B)
switch and the VHFiUHF
terminaJ on the rear of the
[V,
Ir._raing
Cable
Splitter
Cable Box
RF (A_)
Switch
"rv Rear
After you've made this connection, set the A/B switch to the "A" poMtion fur normal viewing.
Set tile A/B switch to the "B" poMtion to view scrambled channels. (When you set tile A/B
switch to "B," you will need to tune your TV to tile cable box_ output channel, which is usu
ally channel 3 oi- 4.)
(}
I,\P]
1%_(
1 ]NSIAI
AI(/N
2.4
INSTALLATION
]
Connecting
a VCR
These instzuctions assume that you have already connected your TV to an antenna or a
cable TV system (accozding to the instructions
oil pages 2.1 2.3). Skip step 1 if you have
not yet connected to an antenna or a cable system.
1
unplug the cable or
antenna from the back of
Ihe T_Z
2
VCR Rear Panel
Connect the cable om
antenna tOthe
ANTENNA IN terminal on
{he back of the VCR,
Cable or
_nna
3
_
_mo
L
TV Rw pL_I
'_CRRaw P_I
[
Connec[ _ coaxial cable
between the ANTENNA
OUTterminaI on the VCR
and tile antenna
[erm_nai on the TV
A coaxia
st oi-e).
_
_
_
®
C_181 C_lo
-able is usuali,
iHcluded
with a VCR. (if not, check your local electrouics
VCR Rear psr_
Connect a set of audio
cables between the
W
ReSt Panel
--
AUDIO OUTjacks on the
VCRand the AUDIO
`jacks AV1_AV3)onthe TV.
If you have a "rnono" (non stereo) VCR, use the _connector
(not supplied) to hook up
to the [eft and right audio input jacks of the TVI If your VCR is stereo, you must con
nect two cables.
VCR _r
Connect a video cable
between the VIDEOOUT
jackontheVCRandthe
VIDEO'Jack(AV!7Av3) on
t"eT
v17ollow the
25
(HAP]
I IV(>
]NS
\l],&
{)N
_.
w
par_l
_
_
pei1el
_" _)
__
ca_e
II
II
II
II
LL "
instIuctions
hi "Viewing
a VCR
or Camcozdez
'["ape" to view
your
VCR tape.
INSTALLATION
Connecting
]
an S-VHS
VCR
Your TV can be connected to an S Video signal from an S VHS VCR.
(This connection delivers a better picture as compared to a standard VHS VCR,)
VORl_mr PHI
To begin, follow steps
_,
_'_ '_
l_ 3 in the previous
section to connect the
antenna or cable to your
L_
cb_ ®
VCRand your TV,
WRwP_
c_
_.
Connect a set of audio
cables between the
AUDIO OUTjacks on the
VCRand the AUDIO
INPUI ]jack s o n the W
Make sure the jacks you are using are underneath
3
the number
"1."
VOR ROarpIIr_l
IV Side Pan_
Connect an S-video cable
between the S-VIDEOOU]
jack on the VCRand the
S-VIDEO INPUTjack on
An S video cable is usually hlcluded
electronics store.)
S-'_IdeoCable
with an S VHS VCR. (If not, check your local
(]}
I,\P]
{I
1%%(
}
]NSIAI
AI
( }N
2,6
INSTALLATION
Connecting
]
a Second
VCR
to
Record
from
the
TV
Your TV can send out signals of its picture and sound to be recorded
To do this, connect your second VCR as follows:
VC_
Input p_e_]
by a second
VCR.
TV Rear P_I
Connect a set o[aadJo
cables between the
AUDIO OUTjacks on the
TV and LheAUDIO IN
Audio_lo
jacks 0n the VCR:
(The VCR input jacks might be either on the front or on back of the VCR.)
V_
Connecta videocable
betweenthe VIDEOOUT
jack onthe TVandthe
VIDEOINjackontheVCR
VId_
The rear paneljacks
patrol
CWale
I I
Refer to your VCR's instructions
of' connection.
Connecting
(480i/480p)
TV _t
InpUt P_
for more information
a DVD
about how to record using this kind
Player
on your TV make it easy to connect
a DVD player
to your TV[
TV Roar peeml
Connecta set of audio
cablesbetweenthe AV-2
INPUT(VCR)
orAW3
INPUT(VCR)jacks
onthe
TVandthe AUDIOOUT
jacks on the DVDplayer.
_dloc_
Cennecta videocable
betweenthe COMPO_
NENT1iNPUT(Y/V,pm
PR)or COMPONENT
2
INPUT(Y/V,PB,P£)jacks
on the TVandthe DVDOUT(Y,PmPR)jackson
the DVDplayer.
Note: For an explanation
2.7
(llA}*]
I
INS
\I]A
(3N
v_o
of' Component
video, see your DVD player's
owner's
manual.
INSTALLATION
Connecting
(480p/1080i)
]
a Digital
TV Set-Top
Box
Connect the Y, P,, and P_ video outputs of the set top box to their corresponding
inputs
on the TVI Next, connect the Left and Right audio from the set top box to the corre
sponding L and R terminals on the TV[ (The connections
for a typical set top box are
shown below'.)
_
Top EI_XRear I_nel
_
TV Re_ P_I
between the ANTENNA
OUTterminal on the Set
lop Box and the antenna
terminaI on the TV.
Connect a set of audio
cables between the AV-3
/I
v,o,_ c_
--
INPUT(VCR)or AW2
INPUT(VCR)jacks on the
TV and the AUDIO OUT
_ab c_
jacks on the Set Top Box,
Connect a video cable
between the COMPO
NENT 2 INPUT (Y/V,PB,
P_)or COMPONENT1
--
w.oc_.
!NPUT (Y/V,PB,PR)jacks
on the TV and the VIDEO
OUT (Y,PB,P_)jacks on
the Set Iep Box,
Note: For an explanation
of Set top box, see your Set top box owner's
manual.
(}
l,\P]
l _&(
)
]NSIAI
AI
( )N
2.8
INSTALLATION
]
Connecting
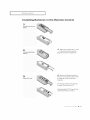
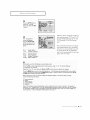
a Camcorder
The side pane[ jacks on your TV make it easy to connect a camcorder to your TVI They allow
you to vie_ Vthe cameorder tapes without using a VCR. (Also see "Viewhlg an External Signal
Source" on page 3,17)
Locate the A/V output
jacks on the camcorder.
they are usuatty found on
/_"_
_'_r_
the side or bagk o!the
camcorde r,
_
_
Can_order
_lr_o_tputJacks
_]
"_ Side Panel
C41f_der
Out_t
Jacks
Connect an audio cable
between the AUDIO OUTs
PUTjack on the camcorder and the AUDIO
terminals on the TV,
Au_'0 Cable
corder
eUTjackand
onthe
theVIDEOter_
camminal on the TV.
audio
your local
cables.
29
(IIA}*]
I
IV()
INS
\I]A
/)N
vkleo
cables
e[ectrorfics
Y-C_ne6tor
TV Side Panel
Gamcorder
OutputJacks
Connect a video cable
between the VIDEOOUT-
The
_-
shown
store.)
L_<[]:rc
VideoCable
here are usualiy
included
with
is stereo,
you
If' your
camcorder
a Camcorder.
rleed
to connect
(If' not,
check
a set of two
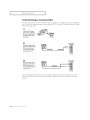
INSTALLATION
Installing
]
Batteries
in the
Remote
Control
Make sure to match the "+" and
"-" ends of the batteries with the
diagram inside the compartment.
_,9
them
Remove
the batteries
in a cool,
dry place
be using the remote
and store
if you wonk
control
fbr a
long time.
The remote control can be used up
to about 23 ff,et fl'om the Tg[
(Assuming typical TV usage, the batteries last for about one year.)
_ _iiiii%!ii% i_!i
ii
_%_
liiiilllllllii(
_,ii
ii iii
_'% iiiiii
OPERATION
Turning
the
TV
On
and
Off
Press the POWERbutton on the remote control.
You can also use the POWER
Plug
& Play
button
on the front
panel.
Feature
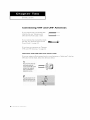
When the TV is initially powered On, five basic customer settings proceed automatically
and subset uently: Setting tile language, Video signal source, Ant. input check, Auto pro
gram, and Coek.
Press the POWERbutton
on the remote control,
1"he message _Plug &
Play_ is displayed,
it flickers for a little while
and then the _Language _
menu is automatically
displayed,
Press the VOL_ or VO_-button to select the
desired language.
Press the MENU button to
enter the language, and
then the t Channel" menu
is automatica}ly displayed.
:3
Press the VOL+or VOLbutton to aetectthe
_leeL_
•
u_e
*
desired video signat
source,
Dess the MENU button to
enter the v deo s gnal
source, and then the
i_ii_t_!_}iiiiiiiiiiiiiiiiiiiiiiiiiiiiiiiii_
¸ii_i_iiiiiiii
}Ant Input check" is
automatically displayed,
continued...
OPERATION
]
4
Make sure that the
an[enna
IS connec[eQ
re
the TV.And then press me
VOL+or VOL- button to
acuva[e Auto Program or
press the MENU button to
skiD,(refer to "Auto
program on page 3,6.)
Em_zit
5
Press the VOL+or VOLbutton to move to [he hour
or m_nute. Set the hour or
'
)_
C.1A_k
Tim
.-s.-Im
--_--m off
mmnu[eBy pressing the
CHA or CtlV button,
*efer to ° Sett 3g me
CLOCKOnpage 3.10 _
6
When/ou lave finished,
press the MENU button.
The message" Enjoy your
watcn_ng., s omsplayeo.
7
If you want to reset this
feature
)lPress the MENU button
(21Pressthe CHV button
three t(mes to select the
Function menu and
Dress the _/O1+button,
i31Press the OHV button
L
1osetect Plug & Play
ano press the VOL_ out*
[on
The message" Plug &
Play 5 e_splayee.
Note: Plug & Play fFature doesn't
on or when in the A/V mode.
work when the _chip
is
(;H,_,.
r]]_]]:
1% OI,]}l;_l_N
3.2
]
OPERATION
Viewing
Viewing
the
the
Menus
and
On-Screen
Displays
Menus
The on-screen menus disappear
fl'om the screen afier thirty seconds.
With the power on, press
the MENU button,
The main menu appears
on the screen. Its left si
has five icons: Picture,
SQund,Channel, Function
and PIR
2
Use the CHA and CHV buttons to highlight one of the 5 icons.
Then press the VOL÷button to access the icon's sub-menu.
-91 You can also use the MENU,
CHANNEL, and VOLUMEbuttons
on the control panel of the TV to
make selections.
Press the MENU button to exit,
Viewing
the
Display
The display identifies the current channel and the status
of'certain audio video settings.
-91 The on screen displays
disappear after ten seconds.
Press the DISPLAYbutton
on the f_mote control.
_he on-screen display
shows any er a!l of the fok !
Iowing: Active channel,
the channel label, video
source, the time, and the
time remaining on the
has been manuat{y fine
tuned.)
3.3
(}I,\P
11
rim];];:1%'(>_.}}_,.,i
_,N
OPERATION
Selecting
]
a Menu
Language
1
Press the MENU button to
display th e menu
Press the OH• button to
select" Function", then
press the VOL+ button
i77
!__
2
Press the VOL + button to
select the appropriate laBguage: Engtish Esoanot
or Fran_a_s.
3
Press the MENU button to
exit,
!_ i_ i _i iiiill¸_
7 ii_i! _i )!
]
OPERATION
Memorizing
the
Channels
Your TV can memorize and store all of the available channels for both "off air" (antenna)
and cable channets. After the available channels are memorized,
use the CH • and
CN • buttons to scan through the channels. This eliminates the need to change chan
nets by entering the channel digits. There are three steps for memorizing
channels:
selecting a broadcast source, memorizing
the channels (automatic) and adding and delet
ing channels (manual).
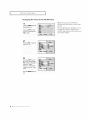
Selecting
the
Video
Before your television
type of signal source
Signal-source
can begin i;qemorizing
the available
channels,
you must specify
that is connected
to the TV (i.e., an antenna
of a cable system).
1
Press the MENU button to
oIsptay me menu
Press the CU V button m
select" Channel' men
Dress the VOI.+ button
2
Repeatedly press the
VOI. + button to cycle
through these choices:
ANT (antenna) STD, HRC
or IRC(all cable TV).
_,_/eaw
_
s_
Note: STD, HRC and IRC identify/various types of cable
TV systems. Contact your local cable company to identify/
the type of cable system that exists in your particular area.
At this point the signal source has been setected. Proceed
to "Storing Channels in Memory" (next page).
35
(}l,\p l_ rim]]: 1_, o,,}},,,,i,,N
the
OPERATION
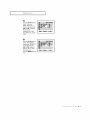
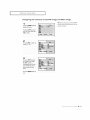
Storing
]
Channels
in Memory
(Automatic
Method)
First, select the correct
signal source (1
HRC, IRC).See steps ! _4
Onprevious page.
Press the MENU button to
disPlaYth e menu,
Press the CH V button to
select" Channel!, then
presMhe VOLt button.
2
¸
[
Press the CH V button to
select" Auto
3
_ The all
TV ofautomatically
through
the available cycles
channels
and stores them in memory. This
Press the VOK+ button,
The TV wilt begin
memorizing all of the
available channels,
takes
about
Press
MENU
one to two minutes.
After att the available
channels are stored, the
Auto program menu reap_
pears, Press th_ MENU
button to exit,
Note: Channel
auto pl'ogram
at any time to interrupt
the illelllortzation
process
to the Channel
menu.
does not function
when
the V_chip is active.
and return
]
OPERATION
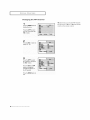
Adding
and
Erasing
Channels
(Manual
1
Press the MENU button to
display the menu.
Press the CH • button to
select t Channet" i then
Press the VOL+ button.
Press the CH •
button
or CH •
to select
Add/Erase", then press
the VOL+ button,
Press the VOL+ button.
n
Press the CH •/•
button
or the number buttons to
select the channel you
want to add or erase
Press the MENU button.
Pressthe CH A or CH •
button to select ° Setect_.
Press the VOL+or 90Lbutton to select" Added!
Press the MENU button to
exit.
3.7
(}I,\P
iI
ri]R];];:1%'o_,}}_,,,i
_,N
Method)
OPERATION
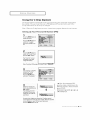
]
Changing
Using
the
Channels
Channel
Buttons
Press the CH • or CH _ button to change channels,
When
you press CH •
or CH V, the TV changes
channels
in sequence.
channels
that the TV has memorized.
(The TV must have memorized
You will not see channels
that were either erased or not memorized.
Directly
Accessing
Use the number
buttons
You will see all the
at least three
channels.)
Channels
to quickly
tune to any channel.
Press the number buttons to go directly to a channel,
For example, to select channel 27, press" 2" then _7%
The TVwill change channels when you press the
second number.
When
you use
not illelilOrized.
the
number
buttons,
you
can
directly
select
channels
that
were
either
erased
or
To select a channel over 100, press the +100 button.
(For channel 122, press "+100" then "2" then "2".)
To change to single-digit channels (0 9) thster, press "0" before the single digit.
(For channel "4" press "0" then "4".)
Using
the
PRE-CH
Button
to select
the
Previous
Channel
-,!11 Xb quickly
switch
between
two
Press the PRE-CHbutton,
channels that are far apait, tune to
one channel, then use the number
The W wilt switch to the last channeI viewed,
button
Then
quickly
Adjusting
the
to select the second
channel
use the PRE CII button
alternate
between
to
them.
Volume
Press V0L + or - V0L to increase or decrease the volume.
Using
Mute
At any time, you can temporarily
cut off the sound
using the Mute button.
1
Press MUTE and the sound cuts off
The word _Mute Wtll aDDe_lr In IRe ioweFIeft corner c" me
screen,
2
To turf mute ofI oress MUTE again, or simply 3ress either the
VOL- or VOL+ button,
(;H,v, *_ r._H:
I_
OI'I}/A
/_N
3.8
]
OPERATION
Labeling
the
Channels
Use this feature to assign an easy to remember label to any channel (i.e., "CBS", "ESPN",
"PUS2", CNN l", etc.) A label consists of'four fields, where each field is a letter, a num
ber, "_", ora blank. When the DISPLAY button is pressed, the channel label will appear
next to the channel number.
1
Press the CH •
or CH •
button
m
11
to tune [o [he channe[ tNat Wll
be Iabelec
-<1 Note: You cannot select
"Labe]ing" in the A/V mode.
2
Press LheMENU button to dis.
pla_ the menu, ther Bresstbe
CH•bu_ontoselect
_Channet
Press the VOL+ DUE[On
3
aress the CH • button to select
Labeling
_ress the VOL+ button to begin
abehng, The left-most field wilt
3e hightigntee
'Each label has four fields
e)8ove
±ld_just
_nzi_
See top paragrapn.J
4
Press the CH • or CH • button
to select a lette[ a number, _ '' ,
or a Blank IPressing the CH •
button results in this seauence
A,B-,.Z,'. blank,O,1 ,9},
Press the VOL+ DU[[On tO
switch
tO the next field
which
willbe highlighted.
Select a
second letter or dig_t using the
CH • and OH • buttons as
_1_
z CIlIJ.
above. Repeat the process m
select [_te last two otgI[s
Press the MENU button to set the label and clear the menus from
the screen,
39
(}I,\P
11
rIIRH: 1_,'c>_,}}_,,,i
_,N
OPERATION
Setting
]
the
Clock
Setting the clock is necessary in order to use the various timer features of' the TM
Also, you can check the time while watching the TV (Just press the DISPLAY button).
Option
1: Setting
the
Clock
Manually
1¸
Press the MENU button to
disptay the menu.
Press the Ctl Y button t0
select _Function", then
ptess the VOL + buttQn,
2
Press the CH • button to
select _]ime" menu,
Press the VOL÷ button:
The Time menu wili
appear on the screen, and
Clock" witl be h!gh+!ght+
ed,
-ql
Press the VOL÷ button
again (the hours digits wilI
be high+ighted)Press the
CH • or CH Y button
When
seIecting
to select the proper
or PM).
CZoek
the hours,
be sure
time of day (AM
ogsoom
You can change
the CH •
repeatedly until the cot+
rect hour appears,
the hours
or CH •
(or by holding
down
by pressing
button
repeatedly
either
of these
buttons)
The time will appear
every time
you press the DISPLAY button.
After the hour is entered,
Press the V0L + button.
Clock
09_30_
(at this point the minutes
digits will be highlighted),
Pressthe CH A or CH V
button to select the
correct minutes
After selecting the correct
minutes, press the V0[ +
Press the MENU button to
exit.
(;HA+'H r._+_: IV C)l,]}e'_/_ 3.10
[
OPERATJ_ON
Option
2: Using
TV Clock
the
Local
PBS
Channel
1
Press the MENU button to
dispJay the menu.
Press the CH _ button to
select "Funetioo", then
press the VOL+ button,
Press the CH Y button to
select _Auto clock set"
menu then press the VOI.
P_ess theVOL+ button to
select Auto clock set
Or)",
Press the CH V button to
select" PBS channel" :
While°PBS channel"is
selected,
presstheVOL +
button to activate the
channel-number field,
i!!_iiiiiiiii_
_ _
_iiiiiiii_i_
iiiiiii_
Press the CN • a
to select_
Press the MENU button,
continued...
to Automatically
Set
the
OPERATION
]
5
Press the CH V button to
select" Time zone"
While "Time zone" is
SeleCiec [net press IRe
VOL+or VOL-to change
the Time zone
Seouence: ATL. EAST
CEN. MTN. PAC.,ALAS.
HAW..
_,_,_
±hz_
m]l_t.t
6
Press the CH V button to
select" DST"(Daylight
saving time). While _DSF
is seIected, press the
VOL+or VOL- button to
lee
indicate ?Yes" or" NO"
The clock is set,
Press the MENU button to
exit.
(;HA_'
H r._H:
IV
Ol'l}/'_
/_
3.1
2
]
OPERATION
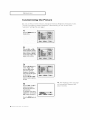
Customizing
the
Picture
You can use the on screen menus to change the Contzast,
Tint and according to pezsonal preference.
(Alternatively,
"automatic" settings. See next page.)
Brightness, Shazpness, Color,
you can use one of' the
1
Press the MENU button to
display ment
2
Press the VOL- or VOL+
outran repeatedly, until the
word °Custom" is selected
_WhenCustomis higel_getec the words"Adjust" will
aooear on the screen,i
3
Press the CU • button to
select "Aejus[. men
presstheVOt+ button
fee words Contrast
Brightness. Sharpness
Color and Tint will appear
on the screen,
Press the OHA or 6U •
button to select a 3articu*
lar tem
Press the VOL- or V0L +
button to increase or
decrease the value of a
particular item.
For example, if you select
Brightness," pressing the
VOL+ button increases it,
Press the MENU button to
exit,
3q
3 (H.v, _[ h]R}]: rv o_.}}_/,i_
,N
I_gh_u
_y_,e
±_{_
= 50
_=lt
-_1 After ac{justing an item. the gauge
will automaticaBy disappear (after
about 5 seconds).
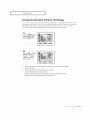
OPERATION
Using
]
Automatic
Picture
Settings
Yuur TV has three automatic picture settings ("Dynamic", "Standard" and "Movie" ) that
are preset at the factor_ You can activate either Standard, Mild or Dynamic by pressing
the RMODE button (oi by making a selection from the menu). Or, you can select
"Custom" which automatically
recalls your personalized
picture settings.
1
Press the MENU button m
display the menu, then
Dress the VOL+ button
2
[
PresstheVOL- or VOL+
buttonto selectthe
Dynamic_,"Standard,I'
Movie," or _Custom_
_61.a_.__
Picturesetting.
Choose
light
Dynamic
for viewing
the TV during
the day or when
there
is bright-
in the room.
Choose
Standard
Choose
Movie when viewing
Choose
Custom
preDrence
for the standard
tactory
settings.
the movie.
if you want to ad.just the settings
(see "Customizing
the Picture,
accordings
page 3.13).
to personal
]
OPERATION
Customizing
the
Sound
The sound settings can be adjusted to suit your personal perfbrences.
(Alternatively, you can use one of the "automatic" settings. See next page.)
-_1
Press the MENU button to
display the menu.
Press the CH • button to
select the "Sound", then
press the VU[ + button.
Press the VOL- or VOL
button repeatedly, until
the word _Custom" is
selected (When Custom is
selected, the words
Equalizer! will appear on
the screen).
Press the CH • button to
select" Equalizer", then
pres s tb_ rot÷ butto n.
Press the rot-
or rot
+
buttons to highlight a par.
ticoler item to be channel.
Press the C11• or C11•
buttons to increase or
decrease the value of a
particular item.
Press the MENU button
exit,
a.1 5 (.,,1,.
_11,_,1;:
rv' o_,}}_,,,n
,N
Note: The Wooff,r function
TXM3098WI
tF/TXM3298I
IF models
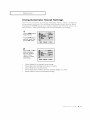
OPERATION
Using
]
Automatic
Sound
Settings
Yuur TV has four automatic sound settings ("Standard," "Music," "Movie," and "Speech")
that are preset at the factory. Yuu can activate either Standard, Music, Movie or Speech
by pressing the &MODE button (or by making a selection from the menu). Or, you can
select "Custom," which automatically
recalls your personalized
sound settings.
Press the MENU button to
dispIay the menu,
Press the CHV button to
select the _Sound", then
press the VO[ + butten.
2
Press the VO[ - or got +
nuEon repeatedly to
select the °Stanoam,
Music," "Movie,"
Speech" or" Custom
sound settmgs.
Choose
Standalff
Choose
Music when
for the standard
Choose
Movies when
watching
Choose
Speech when
watching
Choose
Custom
watching
to recall your
factory
music
settings.
videos
or concerts.
movies.
a show
that is mostly
personalized
dialogue
(i.e., news).
settings.
(;.,,,_,H r._H: IV Ol,I}/'_/_ 3.1 6
]
OPERATION
Viewing
You must
an
select
the appropriate
1
Press the MENU button to
o_splayme menu,
Press the CH _ button to
select "Channel , then
aress the VOL+button.
2
Press [he CHVbuttonto
setect _TV _V"
3
Press the VOL+button,
Youwilt switch between
viewing me stgnats coming from equipmen( con*
nected to the IV's A/V
jacks, and the TV signal
3.1 7 c.,,],T, h]RH: rv o_,}}_,',i_
,N
External
mode
Signal
in order
to view
Source
the
external
signal
on the T_
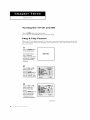
SPECIAL
FEATURES
Customizing
Your
Remote
Control
Y_mr TV comes equipped with a "universal" remote control. In addition to
controlling the TV] the universal remote can also operate a VCR, DVD and a cable box
(even if your VCR and cable box are made by manufacturers
other than Samsung).
Note: Tbe minute control migfit not be compatible with all DVD pla,ye_s, VCRs, and Cable boxes.
Setting
Up
Your
Remote
Control
to Operate
Your
VCR
(or DVD)
_
Press the MODEbutton and make sur e that the VCR (or DVD)
The remote control has four
modes
: 'TV,
VCR , 'Cable
and
"DVD." Press the "MODE" button to
LEDis illuminated
switch
the remote
control
to the "VCR"
(or DVD) mode.
On your Samsang remote control, press the SET button.
_1
Make sure you enter 3 digits of the
code, even if the first digit is a "0."
Enter 3 digits of the VCR(or DVD) code listed on the next
page for your brand o[ VCR(or DVD).
If more than one code listed,
one.
5
Press the POWERbuttoo on the remote control Your VCR
_
If your VCR (or DVD) does not turn
on, repeat steps 2, 3, and 4, but try one of
the other codes listed tbr the brand of
(or DVD)should turn on. If your VCR(or DVD)turns on, your
your
remote conl_oI is now set correctly.
If no other codes are listed,
000 through
089.
particular
try the first
VCR (or DVD).
try each code,
.,"VCR"
When
isi.the
(or your
DVD)remote
n,ode, control
the volume
butOnce your remote control is set up, press the MODE button
any time you want to use the remote to operate your VCR (or
tons
DVD).
When
still control
your
your TV's volunm.
remote
is in the "TV" mode,
the VCR control buttons (PLAY,PAUSE,
etc.) will still operate your VCR.
4.1
CHAPTER FOUR:
SPECIAL FEATURES
SPECIAL
VCR
Codes
FEATURES
Admiral
Aiwa
006, 079
015
Akai
017, 022, 023, 027, 030
Audio Dynarr_:s
Bell & Howell
Broksonic
Candle
Cannon
Citizen
Coloro/me
014, 016
002
010
007, 009, 013, 045, 046, 052
008, 053
007, 009, 013, 045, 046, 052
014
Craig
Curds-Mathes
Daewoo
DBX
Dimensia
]
007, 012
000, 007, 008, 014,
015, 046, 053, 064, 067
013, 045, 076
014, 016
000
I)),na_b_
Eleaxohome
015
027
Emerson 0_,[gg, 010,011,015,020,023,027,
034,041,042,047,049,057,062,_5, 067,1_8,070
Fisher
002,012,018,010,043,048,058
Funai
015
GE
000, 007, 008, 032, 053
Go Video
007
Harman Kardon
014
Hitachi
005, 015, 035, 036
Instant Replay
JC Penney
002,
016,
JCL
008, 002,
JVC
Kenwood
002,
DVD
008
005, 007, 008, 014,
030, 035, 051, 053
014, 016, 030, 046
002, 014,088, 089
014, 016, 030, 046
KLH
LG
Lk_d
Logik
IXI
Magnavox
Marantz
Marta
MEI
073
00g, 014, 046,060
015
031
015
008, 029, 053,056
002, 008, 014, 016,
029, 030, 046,061
099
008
Memorex
MGA
Midland
008, 009, 012,015
027
032
Minota
I_ltsubishi
005,035
005, 027, 035,040
Momgome_
ward
006
MTC
007,015
Multitech
007, 015, 031,032
NEC
002, 014,016,030, 046,061,064
Optimus
Panason_
Pentax
Pentex Resereh+
phflco
006
008, 053, 075,077
005,035
046
008, 029, 053,056
Phflips
Pioneer
Portland
ProScan
008,029
005, 016, 033,050
044, 045,052
000
Quartz
002
Quasar
008,053
Radio Shack/Bealistic
002, 006, 008,
009, 012, 015, 019, 027, 045,053
RCA
000, 005, 007, 008, 028,
035, 037,054, 069
Semsang
007, 013, 022, 032,042,077
Sar-sui
016
Sanyo
002, 012
Scott
013, 041,049, O_
Sears
002, 005, 009, 012, 018,
019, 035,043, 048
Sharp
006, 027,039, 045
Slfmtom
017, 026,031,055
Signature
015
Sony
017,026, 038
Sylvania
008,015, 029,053, 056
Symphorflc
015
Tandy
002_015
Tashiko
O00
Tatung
030
Teac
015,030, 069
T_
008
Termka
008, 009,015, 021
TMK
067
Toshiba
005, 013, 019,048, 049
Totevision
0_7,009
Unitech
007
Vector Research
014, 016
Victor
016
VideoConcepts
014, 016
Vide_c
007
Wards
005, 006, 007,008,009,
012, 013, 015, 027,031,035
Yamaha
002,014,016,000,046
Zenith
011,017,026, 079
Codes
Philips
Proscan
RCA
Toshiba
Pfunasomc
001
002
002
003
004
Sony
Samsung
008
000
CHAPTER
17OURZ
SPECIAL
FEATURES
4.2
SPECIAL
FEATURES
Setting
Up
Your
]
Remote
Control
to
Operate
Your
Cable
Box
1
Turn off yOUrcane box
The remote
2
control
has four
"VCR',
"Cable"
Press the MODE button and make sure that the CABLE _ED
'modes":
"DVD'.
IS iiiumlnatec
Press the "MODE"
remote
"TV',
control
button
and
to switch
to the "Cable"
the
mode.
3
Onyour Samsung remote control press the SET buttor
Make sure you enter
code,
Enter 3 digits of the cable box code listed beIow for your
even if the first digit
more than one code listed,
one.)
.. ifyour
cable
box
does
notturo
on,
other codes listed tbr your particular
brand of cable box (if no other codes
repeat steps
2, 3, and 4, but try one of the
try each cable
tons still control
the VCR control
box,
etc.) will still operate
007, 008
007, 008
Eagle
EasternInt.
General Instrument
007, 008
002
046
GI
004, 005,
025, 030, 036,
Ham]in
003, 012,
Hitachi
023,
068,
034,
043,
024,
069
048
046
004, 005, 015, 023,
025, 030, 036, 046, 062,
Maeom
037,
Magnavox
007, 008, 019,
026, 028, 029, 032, 033, 040,
024,
065
043
021,
041
Jerroid
FOUR:
SPECIAL
FEATURES
015,
067,
013,
037,
NSC
Oak
Oak Sigma
Panasonic
009
016, 038
016
003, 027, 039, 061,
073, 074
Philips
007, 008, 019, 021,026,
028, 029, 032, 033, 040, 041
Pioneer
018, 020, 044, 074, 077
Rendtek
007, 008
RCA
000, 027, 066
Regal
003, 012, 013
Regency
002, 033
SA
070, 071,072
Samsang
014,003, 022, 063, 064
are
000
remote control is
mode, the volume
Once your remote c0ntto! is set up, press the MODE button
any time you want to use the remote to operate your cable
Anvision
Cablesmr
box code,
1)77).
When your
in the "CABLE"
CHAPTER
(if
try the first
Press the POWERbutton, Your cable box should turn on, Ifyour
cable box tarns on, your remote control is now _set up" correctly,
through
4.3
of the
is a "0."
5
listed,
Cable
Box
Codes
3 digits
Signature
Sprucer
Starcom
but-
your TV's volume. Also,
buttons (PLAY, PAUSE,
your VCR.
046
027
046
Stargate 2000
058
Sylvania
01 i,059
Te:mcan
011,059
To€ore
017,021,049,050,055,073
Unika
031,032,
041
Uinversal
051, 052
Viewster
Warner
Zenith
007, 008, 019, 021,026,
028, 029, 032, 033, 040, 041
Amex
044
014, 042, 057, 061,
075, 076
SPECIAL
Fine
FEATURES
]
Tuning
Channels
Use fine tuning
to manually
adjust
a particular
channel
for optional
reception.
Select the appropriat e
channel
Press MENU to display
Press the CH • button to
select the t Channel", then
press the VOL+butto n.
Press the 6H Y button to
select" Fine tune".
<1
Pressthe VOL+or VOLbuttonto adjustthe fine
Afl:er you at!just
"*" will appear when
PLAY while watching
the fine tuning,
you press DIS_
this channel.
Z
To store the fine tuning
setting in the TV's memory,
press the CH •
button.
('i_" wi!) appear)
TOreset the fine tuning to
_oo", press the CH V but_
Press the MENU button to
exit.
CHAPTER
FOUR:
SPECIAL
FEATURES
4.4
SPECIAL
LNA
FEATURES
(Low
]
Noise
If" the TV is operating
the reception
in a weak
(a low-noise
Amplifier)
signal
preamplifier
area, sometimes
boosts
the LNA
the incoming
function
can improve
signal).
Press the MENU button to
display the menu,
Press the CH V button
twice to select the
"Picture", then press the
VOL+button
-41 Pressing VOL - or VOL + will
alternate between "On" and "OfL"
Press the VOL, or VOL+
button to select LNA ?on."
Press the MENU button to
exit
45
( ,_,,,,1,111¢
]_o ,,:s,,}(,,1 it,,,,] ,}s
Note: The Demostration function
doesn't appears in TXM2796HE
TXM3296HE TXM3096WHE
TXM2797HF models.
SPECIAL
FEATURES
]
13It
Due to the Earth_
TV's location.
magnetic
When
this
field
occurs,
there
follow
may be same
the steps
minor
image
tilt depending
on the
below.
Press the MENU button to
disp ay the menu.
Press the CN T button
twice to select the
Picture", then press the
',JOE+
button.
Press the Clty button to
seIect" RFunction", then
press the VOL+ button,
II,hI[_iu
•
Press the CH V button to
seiect" Titf' then
press
buttons to adjust the TitL
Press
exit,
(}l,\p
1[
F(tH
SP}
IA]
FIK]t)}#iS
4.6
SPECIAL
FEATURES
Digital
Noise
If"the broadcast
Reduction
]
feature
signal
Reduction
received
to help
reduce
by your
TV is weak,
any static
and
you
ghosting
can activate
that
the Digital
may appear
Noise
on the screen.
Press the MENU button to
display the menu, then
tess the VOL +button to
select the" picture" menu
Z
Pressthe CH V button to
select"DigitaI NR"
O£f
Pressing
Press the VOL+ or VOLbutton to select Digital
NR"On%
Press the MENU button to
exit.
4.7 ( .A,,.,¢]_) ,,:s,,,(,., ].,,, ,,s
the VOL- or VOL+ but_
ton will alternate
"Off".
between
"On" and
SPECIAL
FEATURES
Changing
]
the
Screen
TXM3097WHF/TXM3098WHF
Size
/ TXM3096WHF
Press the RSIZE button to change me screen
k
• Wide:
• Panorama:
• Zooml:
• Zoom2:
• 4:3(Normal_:
Sets the picture to 16:9 wide mode.
Use this mode tor the wide aspect ratio ni a panoramic
picture.
Magnifies the size of the picture on screen.
You can also move the picture on screen using thejoystick
up or down.
Magnifies the size of the picture more than Zooml.
You can also mow th_ picture on screen using the.joystick
up or down.
Sets the picture to 4:3 normal mode.
Notes: Screen size cannot bo changed in the PIP mode. When the Aspect button is selected
and then the appropriate
OSD On-Screen
Dksplay) is displayed,
the Channel
Up/Down buttorts don't operate lor about three seconds.
TXM3297HF
TXM3298HF
• Normal:
, Zoo m 1:
• Zoom2:
Wide:
/ TXM2797HF
/ TXM2798HF
Sets the picture to
Magnifies the size
You can also move
Magni[_es the size
You can also move
Sets the picture to
/ TXM2796HF
/ TXM3296HF
/
4:3 normal mode.
of the picture on screen.
the picture on screen using the joystick
of the picture more than Zooml.
the picture on screen using thejoystick
16:9 wide mode.
(ll,\P
up or down.
up or down.
l_
F()uI
_l'}
IA]
FIMUI¢:S
4.8
SPECIAL
FEATURES
Changing
]
the
Press th
display the menu, then
press the VOL+ button to
select the "Picture" menu.
2
Press the CH V button to
seIect°ColorTone".
3
Press the VOL+ or VOL buttons to select
"Normal"" Warm 1",
'Cool 1"; !'Warm 2" or
° Cool2" according to
persenai Preference.
Press the MENU button to
exit,
4.9 ( ,,.,,,,,,,,_
];,3,,:s,,,(,., ].,,,, ,,s
Color
Tone
SPECIAL
FEATURES
Using
the
]
R.Surf
Feature
This feature allows you to set the TV to return to a particular channel after a certain
amount of time. For example, you may be watching a channel when commercials start.
Yuu can set the R.Surf to "5 minutes", then switch channels. After mhlutes, the TV vvri[]
return to the original channel To use the R.Surf feature:
WhiIe you are watching
the channel to which you
want to return, p[ess
R,SURF_The omscreen
display wig lead "Surf
on,
Press R.SURFagain to set
the timer in thirty second
intervals! up to five mint
utes .............................
The time you set will begin counting down on the screen.
When the time runs out, the TV will return to the channel
you were watching when you set the timer,
Freezing
the
Picture
-,9
Note: The still function
operate
in Component
doesn't
1, 2 mode.
Press the STILLbutton to freeze a moving picture,
(normal sound will still be heard,)
press again to cance L
( }lAP
11
[OUR
SP}
IA]
]']
%]t)RIS
4.1 o
SPECIAL
FEATURES
Setting
the
]
On/Off
Timer
-_l
Before using
set the TV's clock.
Clock"
the tinier,
you must
(See "Setting
the
on page 3.10).
display the menu.
When any of the timers are set, the
"Timer" LED will illuminate
(front
Press the CH Y button to
select ?Function",then
panel
press the VOL+ button,
Press the CH V button to
select "Time", then press
the VOL+ button.
3i
Press the CH V button to
select "On timeY,
Press the VOL÷button to
select the vOntime" hours,
(The hours digits will be
highlighted.)
Press the Ctl • or CI1 T
button repeatedly to select
the appropriate hours (Le.,
the hour when the TV wil!
turn on,)
4
Press the VOL+ button to
select the _Ontime" mira
utes,
(The minutes digits will be
highlighted.)
Press the CH • or CH Y
button to select the appropriate minutes.
4.1 1 ( HAPIi}¢
],o }Q:
S]'iL]M
] }A]%
}QiS
om_tJ_
oez3omoff
of TV.)
i
SPECIAL
FEATURES
i
To deactivate
select
the "On time,"
"Off" during
this step.
Press the VO/÷ button to
select ?On/Off"
Press the OH• or 61-1•
button to turn the on4imer
On.* (Repeatedly pressing
the OH• or OH• button
wilt alternate between on
When finished, press the
rOt + button.
-,4
if no flmction
(including
To set the Offtime, press
the OH• button to select
front
three
remote
buttons
control
buttons
or
panel buttons)
are operated
hours afl:er the TV is turned
for
on
with the by "On time" feature, the
TV will be automatically
turned off.
Press the goL + button
and set the hours and
minutes. (Follow the same
procedure as in steps I_6
When finished setting the timer, press the MENU button to exit,
Setting
the
Sleep
The sleep timer automatically
(from 10 to 180 minutes).
shuts
Timer
off the TV after
1
a preset
time
_1 After about 5 seconds,
the sleep
display will disappear
from the
screen, and the time interval will be
set.
Press the SLEEPbutton repeatedly until the appropriate time
interval appears (any of the preset values from _Off" to
"tS_')
( }lAP
11
_()UR
SP}
IA]
]'1%]URIS
4.1 2
SPECIAL
FEATURES
Choosing
Soundtrack
]
a Multi-Channel
Sound
(MTS)
Depending on the particular program being broadcast, you can listen to Stereo, Mono, oia Separate Audio Program. (SAP audio is usually a foreign language translation.
Sometimes SAP has unrelated information
like news or weather.)
-,9
Quick
1
Just
press
Press the MENU button to
£elllOte
way
the
to access
"MTS"
the
button
MTS:
on
the
control
display the menu,
Press the CHV button
once to select the
"Sound", then press the
VOL+button,
Press the CHY button to
:_
_i i !iii
i
The text at the bottom
menu
audio
Press the VOL+ or VOL
tells you if the incoming
is stereo, SAP, or mono.
button repeatedly to
select %tereo", ° SAP", or
Press the MENU button to
exit,
Choose
Stereo for channels
that are broadcasting
in stereo.
Choose Mono for channels
having difficulty receiving
that are broadcasting
a stereo signal.
in mono,
Choose
foreign
4.1 3 ( H/,,PI}
}¢],) }_:s],}c]M];}A]%
}a}
S
SAP to listen to the Separate
language translation.
Audio
Program,
of the
which
or if you are
is usually
a
SPECIAL
FEATURES
]
Extra
sound
settings
(Turbo
Sound,
Surround,
Auto
Volume,
Melody,
BBE
Woofer)
The following
sound
settings
can be adjuster]
to suit your personal
or
preferences.
• Turbo Sound (TXM2796HF / TXM3296HF / TXM3096WHF)
Turbo sound emphasizes the bass and treble frequencies to add fullness to the sound.
• Surround
Yuur Samsung TV can create a "surround" effect such that the sound seems to come
from all directions. Once the "Surround" is set to "On", the setting applies to sound
effects such as Standard, Music, Movie and Speech.
• Auto Volume
Each broadcasting
station has its own signal conditions,
which can make it necessary
to adjust the volume every time the channel is changed. "Auto volume" lets you
automat ically adjust the volume of the desh-ed channel by lowerh]g the sound output
when the modulation signal is high or by raising the sound output when the modula
tion sig hal is low.
• Melody
You can hear clear a melody
sound vvhen the TV is powered
on OF Off'.
• BBE(TXM3297HF
/ TXM3097WHF
/ TXM2797HF
/ TXM3298HF
/
TXM3098WHF
/ TXM2798HF)
A Sound related function that operates the treble, bass, and boost the function based
to 650dB standards and reverses the phase to produce replicated sound that is close to
the original sound.
• Woofer (TXM2798HF / TXM3298HF / TXM3098WHF)
Woofer sound emphasizes the bass frequencies to add fullness to the sound.
Press the MENU button to
display the menu,
Press the CHV button to
select the _Sound ", then
press the v01. + button.
Setting
Woofer
2-1
Sound
TXM2798I tF / TXM3298HF
TXM3098WtIF
r_essthe CHV buttonto
select" Woofer",then
pressthe VOL- or VOL+
buttonto selectWoofer
on
continued...
(
}lAP
ii
_(
t)}_
SP}
IA]
],]
%]t)}_lS
4.
_
4
SPECIAL
FEATURES
Settings
Turbo
Volume,
Melody
]
Sound.
Surround,
Auto
or BBE
Press the CHY button to
select "S.Function" ; the
press the VOL+ button,
3
i._i_
_,
TXM2796I tF / TXM3296ItF
TXM3096WttF
Press the CHV or CHV
button to select the
required Eem, me D_ess
[he VOL + button to selec]
_On
Press the MENU button to
exl[
_llmm
_lleleet
[133
hl'_
TXM3298I tF / TXM3098WIIF
TXM2798I tF / TXM3297ttF
TXM3097WHF / TXM2797IIF
4.1 5 (;HAI'I}
1¢]'o I/:SP}?(2]'_]
] I/k]%
}/}?s
SPECIAL
FEATURES
Viewing
Closed
]
Captions
Yuur TV decodes and displays the closed captions
These captions are usually subtitles for the bearing
lations. All VCRs record the closed caption signal
ed video tapes also provide closed captions. Most
vide closed captions as welI. Check for the closed
and on the tape_ packaging: [_,
that are broadcast with certain TV shows.
impaired oi- foreign language trails
from television programs, so home record
pre recorded commercial video tapes pro
caption symbol in your television schedule
Press the MENU button to
display the menu,
Press the OH• button to
select the" Function"
then press the VOI.+ button.
12
i i _ii
i
_ i i
Press the OH• button to
select the "Caption"; then
press the VOL# button,
Misspellings
3
characters
and unusual
soi_letiiiles
occur
during
Press the VOI. - or VOI. +
DU[[On[Oturn closea
closed
captioning on/off.
small delay befbre captions
appear when
you change channels.
These are not
malfunctions
of the TV
those
-ql
4
caption
of live events.
in caption
mode,
There
especially
may be a
captions
appear
at
the bottom of the screen, and they usually cover only a small portion
of the
Press the (}H • DUt[ORtO
select" Mode" me_ press
VOI. - or VOI. + to select
°Caotior or Text
picture.
In text mode, information unrelated to
the program, such as news or weather, is
displayed. %xt of ran covers a lm_,e
portion of the screen.
Diftk,rent
Depending on the particular broadcast _tm_gnt ee necessary
make cnanges to "Channels" and _Field
Use the OH A, OH•, gel + and VOL- buttons to make the
cnanges, IFoltow the same oroceaure as tn steos 3-4 above
Press the MENU button to exit.
transmissions,
to
channels
and fields
display different information:
carries additional
infornlation
supplements
the information
(For example,
Channel
1 may
subtitles
subtitles
in English, while
in Spanish.)
( }l,%P
11
_()u}¢
Sp}
Field 2
that
in Field 1.
have
Channel
IA]
]'1%]U}¢IS
2 has
4.1 6
SPECIAL
FEATURES
]
Viewing
Picture-in-Picture
(TXM3297HF/TXM3097WHF/TXM3298HF/
TXM3098WHF/TXM2798HF)
You can use the PIP feature to simultaneously
to watch two video sources.
Note:The PIP feature does not work with DVD signals and S Video mode.
When PIP is selected in the Zoom mode,
into the Normal mode.
Activating
the Mode is automatically
converted
Picture-in-Picture
Quick
Press the MENU button to
disPlaY the menu,
way to access
Just press the PIP button
remote control
the PIP:
on the
Press the CFI_ to select
the _PiP"; then press the
VOL+ button,
2
Press the VOL+ button to
select PIP On
Dress the MENU button to
exit
4.1 7 ( HAPIi}¢
],o }_:_],1
( ]M] },%]%
}ais
If you turn TV off while watching
and turn it on again,
will disappear.
the PIP window
SPECIAL
FEATURES
Selecting
a Signal
]
Source
(External
A/V)
for
PIP
Quick way to access
1
Just press the SOURCE
remote control.
Press the MENU button to
the PIP source:
button
on the
o_sp_ay _ne menu
Pressthe
CHVtoselect
the °PIP" tnen pressme
VOL+bu_on
2zl_
2
r_'ess the VOL+ button to
select PIP On,°
,<1
3
Press the CHV to select
ihe "TVIAV men press
theVOL + buttonreoea[_
edly to cycle through all Of
[r]e
aV_IIBDie
Slgrlal
SOUFCeS:
_TV AV1 "AV2" and
"AV3"
Press the MENU button to
eXit
For more
external
information
A/V components
nals, see "Viewing
Tq/&q
z TV
Source"
about
and sig-
an External
Signal
on page 3.17.
If you select
"TV',
the PIP image is
the same as the main
image.
SPECIAL
FEATURES
Changing
the
]
Size
of the
PIP Window
-.,el Quick way to access
1
Pressthe MENU button to
display the menu
Press the SIZE button
through
Press the CHV to select
the _PiP" then oress the
VOL+ button,
PIP
_SLse
3
Press the CHT to se_ec[
the "Size', then press me
VOL ÷ button repeatedly to
select the" Doable
Screen _, _Large Screen",
Small Screen" or" Stock
ticker".
Press the MENU button to
exit,
4.1 9 ( HAl,I}
1_],) R:_PiL]M
] }A]%
171S
this sequence:
window, large window,
stock ticker window.
2
Press the V0L+ bu_mnm
se_ec[ PiP ° On
the PIP size:
Just press the SIZE button
control.
t
_ _e
See,_
on the remote
repeatedly
double
to cycle
screen
small window
and
SPECIAL
FEATURES
Swapping
the
]
Contents
of the
PiP
image
and
-_
1
Main
image
Quick way to access
the SWAP:
,Just press
Press the MENU button to
l'elllote
the SWAP button
cont 1"oi.
on the
oIsplay [Be menu
Press the CUV
to selec_
the"PiP"
[hen press the
VOL + button
2
D'ess the VOE + button to
select PIP" On."
/
_PIF
I O=
Iltrap
l_
_=_1, t
1.
.
[]3_gzlt
3
Press the CHT to select
the" Swap, men press
the VOL + button,
The mage m me PiP winctow w
appear ORthe
main screeR, anti ViCe
versEl
Press the MENU button to
exit,
(}l,%P
ii
F()UR
_}'}
IA]
]'1%]URIS
4.20
SPECIAL
FEATURES
Changing
the
]
PiP Channel
_1 Quick way to access
1
Press the MENU button [o
display me menu
Press the CHV [o se_ec[
the _ PiP"
men nress the
VOL + button,
2
Press the VOL+ button to
select PiP _On."
3
Press the CHV to select
[he"Channel
inert pres._
the VOL + button.
Press [he CHA c* CHV
button to cha_ge [ne
channel that appears _n
[ne PIP window.
Press the MENU button to
exl[
4.21
( HAPIE}¢
]? )
}/: _PECIA]
the PIP channel:
Just press the CHA or CHY
J'E_]
RES
color)
on the remote
control.
button(blue
SPECIAL
FEATURES
Using
]
the V-Chip
(Option)
The VChip
feature automatically
locks out programming
that is deemed inappropriate
for children.
The user must first enter a PIN (personal
ID number)
before any of' the
_Chip
restrictions
can be set up oi- changed.
Note
: When
Setting
the k/chip
feature
Your
Personal
Up
is active,
channel
auto program
ID Number
features
do not function.
(PIN)
1
Press the MENU button to
display me menL.
Press the CH • button to
select the" Function
inert Dress[he VOL + but[oF
2
Press the CU • button to
select the _V-chip", then
press the VOI + button.
The" Enter Pin" screer
wilt appear. Enter your
4-d,g,t PIN number,
Note: The default PIN number for a new TV set is 0-0-0-0
.
3
After entering a valid PIN
number the ° V-ch,p
screen
Wttt aDDear,
Press the CH • button
and select °Change p,n
-_
4
While the "Change pin'
field is selected Dressthe
VOL+ button,
[he Change p _ screer
wilt appear. Choose any
4-digits for your PIN and
enter the-
Note:
if you turget
the PIN,
press the remote-control
following
sequence,
keys in the
which
resets
the
pin to 0-()-0-0:
POWER
OFF +
4 -} POWER
MUTE
-} 8 -} 2 -}
ON.
As soon as the 4 dig_tsare enterea the "Confirm new pin"
screen appears, Re-enter the same 4 d,g,[s, When the Confirm
screen a_sappears,your PIN has 3een memorizea,
Press the MENU button to exit,
(}D%P
11
_ou}¢
S}'_
IA]
]']
%]U}¢IS
422
SPECIAL
How
FEATURES
]
to Enable/Disable
the
V-Chip
1
Press the MENU button to
o_sp_aythe menu,
Press the CH • button to
select the _Function
men Dress the V0L + button,
i!!!__iiiiiiiii_i _ _ _iiiiiii!i
_ i¸_ _ iiiiiii_ii
2
Press EneCH • button to
select the"V*chiD men
Dress [Re VOL + button,
The" Enter Pin" screer
witl appear Enter your
4*di§ t PIN number
3
To enable the V-Chip
[eature, press the VOL+
button so that the "V_Chip
lock" field is Yes
3ressing the VOL+ button
witl alternate between Yes
and No
How
to Set
up
Restrictions
Using
the
"TV
guidelines"
First, set up a personal identification number (PIN), and enable the V Chip.
(See previous section.)
Parental restrictions can be set up using either of two methods:
The TV guidelines or the MPAA rating,
Press the MENU button to
display the menu,
Press the Old• button to
select the" Function"
then press the VOL÷ button.
2
Press the CH • button to
select the"V chip" then
Press the VOL+ button,
The" Enter Pin" screen
wilt appear, Enter your
4_digit P!N number,
4.23
(
HAI'I}}#
]'(3
}/:
SP}(]]%]
]
}A]%
}/}S
continued...
I
SPECIAL
FEATURES
]
Press the 6H • button to
select the _TV guidelines" ; then press the VOL
-.,I Note: These categories
consist ot
two separate groups: TV-Y and TV-Y7
4
Lyoung children througn
a_e 7}. and
TV-G through TV-MA
everybody
elsel
The "TVguidelines'
5Green
Wttt aDDea[,
Press the CH • CN •
buttons to setect one of
[Re SiX age-Dasefl
care
gor{es:
The restrictions
@NOVS
TV*Y
W-Y7
Young childrer
Children 7 and ovPr
TV*G
TV*PG
W-14
W-MA
General audience
Parent Guidance
Viewers 14 and over
Mature audience
ilIlee_
_Izlt
work
{br these two groups
independently:
includes
very young
as young
adults,
must
group.
If a household
children
as well
the TV guidelines
De set up separately
_br each age
See next stepj
5
At this point, one of the W-Ratings _s selected
IblUe cotorl
Press the re/+
button: DeDenomg on your ex sting setup, a letter" U" or" B" wilt start D{{nKmg
J= UnDtOCked.B= Bloekedl
While the" U" or" B' s rea oress the CH • or CH • button [o biOCKor UNOIOCK
me category.
PresstheMENUbuttononcetosavetheTVguideline_
ATWRatingwHtDesetectealBLUE
andnoIetters
wilt blink. ]o exit this screen Bress the MENU button again. To select a different TV-Raung, press the ON•
or CH •
button
arc{ [Ben
repeat
[Re process.
Note 1: The TV*YT.IV-PG TVd 4 and TV4.tA have additionat oBtions. Seethe next sLeD1ochange
any of the following sub-ratings:
FV:Fantasy vtotence
D: Dialog
L: Adult language
S: Sexual situation
V: Violence
Note 2: The V-CL o Wltt automabcatt3 DIOCKcerLaln categories that are "more restrictive." For exampte if
you block "TV_Y" category, then TV-Y7will automaticaII, be blocked. Similarly, if you block the TV_Gcategory, then alt the categories m the young adutt" group will be blocked [V-G. TV-PG.TV-14 and TV-MA The
sub-ratings (D, L S. Vl work together s_mtiarU.{See next section
SPECIAL
FEATURES
]
6
How to set the FV.D. L S and V sub-ratings:
First, select one of these TV-Ra[tngs:TV-YT.TV-PG,TV-14 or TV_MAtSee Steo 4, on prevtous page_.
Next while the TV_Ratingis selected (BLUE), repeatedly press the VOL+ button, This wi_ cycte in/ouch [ne
available suD-ra[tngs (FV,L B, D or Vl,
A blinking etter f" U" or" B°_will be disptayed for each sub-rating. While the" U" or" B" is DttnKtng,press
the CH • or CN V button to change the sub-rating,
Press the MENU button once to save the TV guidelines. A TWRating will be selected {BLUE ane no te[ters
wilt blink, To exit this screen, press [ne MENU button again, Fo select a different TV*Rating, press the OH•
or CI-I• button and then repeat me orocess
Note: The wcnio wtttautomation • block certain categories that are" More restrictive". For example, if you
block L suo-raung {n[V-PG. then the" L" sub-raengs in TV*14and TV-MA wilt automatically be blocked,
7
Press the MENU button three times to clear all the screens, tOr eroceed to the next section, ann set uo
additional restrictions based on the MPAA codes
How to Set up Restrictions
13, R, NC-17,
X
using
the
MPAA
Ratings:
G, PG,
PG-
The MPAA rating system uses the Motion Picture Association of' America (MPAA) system,
and its main application is lbr movies. (Eventually: movie videocassettes will be encoded
with MPAA ratings.) When the VChip lock is on, the TV wi]l automatically block any
programs that are coded with oiqiectionable ratings (either MPAA or TV Ratings).
Press the MENU button to
display the menu.
Press the OH• button to
select the" Function"
2
Press the CH • button to
select the"V chip" then
press the ViOL+button,
The _Enter Pin" screen
wilt appear. Enter your
4 digit P!N number,
continued...
4.25
(
HA['I}}#
]'(3
}/:
SP}(71%]
I
IA]%
}/}S
SPECIAL
FEATURES
]
3
The"V_chip" spreen will
appear.
Press the CH V button to
_'
select" MPAA rating",
then press the VOL+ button.
-,9 Note:
4
The" MPAA rating screen
wilt appeaRepeatedly press the CH V
The V-Chm
callv block
cestrictivo."
u
will automatb
any category that is mor_
[?or examt_]e, if vou block
rn( "PG- 13" category, then "R." "NC17." and "X" will automatically
be
blocked
DUt[On lO SeleCl a
particular MPAA category
Pressing the CH • butto_
wilt cycle through the
MPAA categortes:
#_
G
Generalaudience ,qo restrictions
PG
Parental gutaancesuggesree,
±_l_
also.
133]_zl_
.PG-13PG*13 tParents strongt_ cauuonee
R
R 'Restricted. Children under 17shoutd
be accomDallieo oyan aaul[I,
NC-17
No children under age 17,
X
X rAdultson_yt,
NR
\lot rated.
While a pamcu{ar category tsselected press VOL+ to activate it.
Aletter
J" or"B'rlwiiibeo_sp_ayeo. PresstheCHAor
CH•
button to select ° u" or" B'
Press the MENU button to save the settings and to ctear a
screens,
How
Blocks
to
Reset
a Channel
the
TV
after
("Emergency
the
V-Chip
Escape")
If the TV is tuned to a restricted channel, the V_Chipw!l! bloqk ib The screen wi!l go blank and the following
message will appear; ?Excessive rating."
To resume normat viewing, tune to a different channei using the number buttons, Under certain conditions
(depending on the rating of the iocal W programs) the V_Chip might iock out all the channels, In this case,
use the V_Chip [unction for an _emergency espape'! :
Press the MENU button to dispiay the menu. Press the CH • button to select the" Function" menu and press
the VOL+ button,
Press the CH • button to select the "V_chip" menu and press the VOL+ button. Enter your PIN number, and
press the VOL+ button to temporariiy disable the V_ChipLock
(}lAP
ii
F()UR
_}'}
IA]
]'1%]U}#IS
426
SPECIAL
FEATURES
]
Viewing
the Demonstration
[fXM3297HF/TXM3097WHF/TXM3298HF/
TXM3098WHF/TXM2798HF)
Tu become fm<ni]iar
wit}]
thevarious
menus pro'_ided
by yourtelevision,
you cP_n
v[e_
r
the in built demonstration.
1
Press
theMENUbutton
[o
a_soley
themenu
)tess the CH V button
twice io SeleCt [n_,
Picture'
men Dress[no
VOL+ button,
2
Press the CH • button to
Setect" P.Eunction' t[_en
press the VOL+button.
3
Press the CH •
button to
seiect" Demontration
then Bress [no VOL+ but-
0_
4
Each of the menu options
s a_bDayeo in [urn.
When you wish to stop
the demonstrabon
Bress
any DUEORon [[18 remo[e
cootroI,
±_1_
/ Iz]3_y4t
-'-I
" I
f
P[ess the MENU button to
eXI[,
=_)i!i!iiiiiiiiii!)_i_)i)i)i)i)i)i)i)i)i)i)i)il
TROUBLESHOOTING
If the TV seems to have a problem, first try this list of possible problems and solutions.
If none of these troubleshooting tips apply, then call your nearest service center.
Identifying
Problems
Problem
Possible Solution
Poor picture
Try another channel.
Adjust the antenna.
Check all wire connections.
Poor sound quality.
Try another channel.
Adjust the antenna.
No picture or sound.
Try
No color, wrong colors or tints.
Make sure the program is broadcast in color.
Adjust tile picture settings.
another channel.
Press the TV/VIDEO button.
Make sure the TV is plugged in.
Check the antenna connections.
If the
set is moved
oi turned
in a different
direction, the power should be OFF fur at least
30 minutes.
5.1
( HAP]ER
]?IVE
ROt
Picture rolls vertically.
Adjust the antenna.
Check all wire connections.
The TV operates erratically
Unplug the TV for 30 seconds, then try
operating it again.
The TV won't turn on.
Make sure the wall outlet is working.
I_IESi]©OIIN(
APPENDIX
Cleaning
and
Maintaining
Your
TV
With proper care, your TV unit will give you many years of service.
guidelines to get the maximum performance
from your T_/_
Please fo]lo_;v these
Placement
Do not place the TV near extremely
Do not place the TV near appliances
such
as vacuuE;]
hot, cold, humid or dusty places.
with electric motors that create magnetic
fields,
cleaners.
Keep the ventilation openings clear; do not place the TV on a soft surface,
cloth or paper.
Place the TV in a vertical position only.
such as
Liquids
Do not handle
damage.
liquids
near or on the T_/_Liquids
that spill into it can cause serious
Cabinet
•
•
Never open the cabinet or touch the parts inside.
Wipe your TV with a clean, dry cloth. Never use water, cleaning
chemicals.
Do not put heavy objects
fluids, wax, or
on top of the cabinet
Temperature
If"your TV is suddenly moved from a cold to a warTi1 place, unplug the power cord,
and allow at least two hours for moisture that may have formed inside the unit to dry
completel_
Using
Your
TV
in Another
Country
]f you plan to take your TV with you to a foreign country, please be aware of the different
television systems that are in use around the worM. A TV designed for one system may
not work properly with another system due to diff'erences in the TV channel frequencies
Specifications
Model
TXM2796HFiT)CM2797HF
TXTIS096%i
HE:f)OclBO97WH 7XM3296HF
iT_cI3297HF
TXNI2798HE
DimenslOm
]XM3098WHE
TXNISE08HF
AC12OV
ACEOV
ACEOV
60Hz
6OHz
6OHz
IOOW
100W
100W
745x@Sx5?OiE933x1961x22:14
890x576x558i3504x2268x2197
910x612x685i3583x2409x2697
704x542x619i2772x213:lx2_37
829x557x619i3261x2193x2437
826xSS2x?19i3252x2291x2831
'16/10HI
,16/10141
67/M771
465/10252
578/I2743
68,8/15168,
APPENDIX
A.
1
MEMO
A.2
A_,p_NI)JX
MEMO
]
MEMO
A.4
A_,p_NI)JX
ELECTRONICS