1
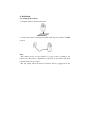
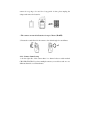
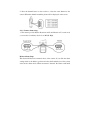
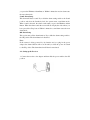
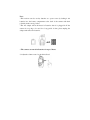
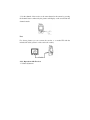
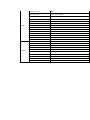
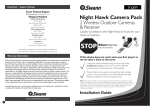
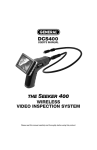
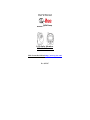
QSW8209
LCD Baby Monitor
Wireless Camera
Visit Us on the Web at http://www.q-see.com
Rev 092507
Contents
1
2
3
4
5
6
Packing List
Diagram
Structure
Installation
Specifications
FCC and EU
1. Packing List
1) 2.4GHz Wireless Camera ╳ 1
2) 2.4GHz Wireless Receiver ╳ 1
3) AV cable ╳ 1
4) Power Adapter for camera ╳ 1
5) Power Adapter for receiver ╳ 1
Note: AA Batteries are not included
2. Diagram
3. Structure
3-1. Layout of Camera
3-2. Layout of Receiver
4. Installation
4-1. Setting up the Camera
1. Setup the camera in the desired location
2. Connect the camera to the adapter and then slide the power switch to the ON
position
Note:
--This camera can also use dry batteries as a power source by loading 4 AA
batteries into the battery compartment on the back of the camera with their
polarities in the correct position.
--The AC adapter will work instead of batteries after it is plugged in. If the
camera is not going to be used for a long period of time, please unplug the
adapter and remove the batteries.
* The camera can run off of batteries for up to 5 hours (IR OFF)
3. Rotate the rounded head of the camera to the desired angle for surveillance.
4-1-1. Camera channel setup
1. On the right side of the camera there is a channel selector switch marked
CH1,CH2,CH3,CH4. If you have multiple cameras you would set each one on a
different channel to avoid interference.
2. Press the channel button on the receiver to select the same channel as the
camera. When the channels match the picture will be displayed on the screen.
4-1-3. Camera alarm setup
1. The camera provides Motion Detection and Sound Detection. For each mode
you can select 3 sensitivity levels: Low, Middle, High.
Motion Alarm Setup:
This alarm will detect movement in front of the camera. If you slide the alarm
setting switch to the Motion position and select the Sensitivity level, the system
enters motion alarm mode. When movement is detected, the alarm sounds until
you press the Eliminate Alarm Button. Within 1 minute the motion alarm starts
the next alarm circle.
Sound Alarm Setup:
This alarm will detect sound. If you slide the alarm setting switch to the Sound
position, and select the Sensitivity level, the system enters sound alarm mode.
When sound is detected, the alarm sounds until you press the Eliminate Alarm
Button. When the alarm sounds the screen will also display the video unless you
have pressed the Sleep button. Within 1 minute the sound alarm starts the next
alarm circle.
Off Alarm Setup
This option turns off the alarm function. If you slide the alarm setting switch to
the Off position. The alarm function is disabled.
Note:
If the camera is being powered by dry batteries and you plug in the power
adapter, the alarm function will not work until you slide the power off switch
to the ON position. The alarm function will then be reactivated.
4-2. Setting up the Receiver
1. Connect the receiver to the adapter and then slide the power switch to the ON
position.
Note:
--This receiver can also use dry batteries as a power source by loading 4 AA
batteries into the battery compartment at the back of the camera with their
polarities in the correct position.
--The AC adapter will work instead of batteries after it is plugged in. If the
camera is not going to be used for a long period of time, please unplug the
adapter and remove the batteries.
* The camera can run off of batteries for up to 5 hours.
2. Adjust the volume control to the desired level.
3. Set the channel of the receiver to the same channel as the camera by pressing
the channel button continuously, the pictures will display on the screen when the
channels match.
:
Note
For clearer pictures you can connect the receiver to a monitor/TV with the
included AV cable (yellow for video and red for audio).
4-2-1. Operation of the Receiver
1. Volume adjustment
Slide “Volume Switch” to adjust the volume of the receiver.
2. Channel selection
Press “CH button” to select the desired channel.
3. Channel Looping
Hold the “CH button” for three seconds to enter the loop mode. All the available
channels will be displayed one by one (default interval is 5 seconds).
4. Sleep Mode
Press the “Sleep Button” to shut down the LCD display and keep the voice
function. Press the button again and recall the normal working mode. This can
save energy.
5. Eliminate Alarm button
Press “Eliminate Alarm” button to stop alarm voice. Within 1 minute, the alarm
enters the next circle automatically.
5. Specifications
GENERAL
Item
Value
Transmission Frequency
ISM 2,400~2,483 MHz
Transmission Power
10mW/CE; 2mW/FCC
Operating Frequency
2414MHz;2432MHz;2450MHz;2468MHz
Unobstructed Effective Range
100m (328ft)(Min.)
Modulation Mode
FM
Operating Temperature
-10 ~ +50(Degree C) / +14~ +122(Degree F)
Operating Humidity
≤85%RH
CAMERA
RECEIVER
Imaging Sensor Type
CMOS
Picture Total Pixels
PAL:720×480 Pixels;
NTSC: 720×576 Pixels
Horizontal Resolution
380 TV Lines
View Angle
PAL:55°; NTSC:55°
Minimum Illumination
0Lux
BandWidth
18M
Night Vision Range
5m
Battery Working Time
5 hours (IR OFF)
Motion Detection Distance
5m (16ft)
Sound Control Sensitivity
>63dB
Consumption Current
120mA(IR OFF)(Max.) & 220mA(IR ON)(Max.)
Power Supply
DC +8V
Dimensions(W×D×H)
86*48*135 mm (3.5*2*5.5 in)
Weight
146 g (5.2 oz)
LCD Screen Type
2.4 inches TFT-LCD
Effective Pixels
480×240
Receiving Sensitivity
≤-85dBm
Video System
NTSC/PAL
Battery Working Time
5 hours
Color Configuration
R.G.B.delta
Consumption Current
200mA(Max.)
Power Supply
DC +8V
Dimensions(W×D×H)
86*54*143 mm (3.5*2.25*5.75 in)
Weight
142 g (5 oz)
* Actual transmission range may vary according to weather, Location,
interference and building construction.
* All the specifications are subject to minor change without prior notice.
6. FCC information
This device complies with part 15 of the FCC Rules. Operation is subject to
the following two conditions:
(1) This device may not cause harmful interference.
(2) This device must accept any interference received, including interference
that may cause undesired operation.
Changes or modifications not expressly approved by the party responsible
for compliance could void the user’s authority to operate the equipment.
CAUTIONS:
Do not expose the device to water or other liquids.
Turn off the Camera/Receiver when the system is not in use.
Make sure the power adapter is easily accessible.
Only remove the Camera/Receiver from the main power line by
unplugging the adapter.
Do not cut the DC power cable of the device to fit with another power
source.
Make sure batteries are disposed of properly.
EU Environmental Protection
Electrical waste products (discharged batteries) should not
be disposed of with household waste.
Please recycle where facilities exist.
Check with your Local Authority or
retailer for recycling advice.
TRADEMARKS
All brand names and products are registered trademarks of their respective
Companies.
DISCLAIMER
The information in this document is subject to change without notice. The
manufacturer makes no representations or warranties with respect to the contents
hereof and specifically disclaim any implied warranties of selling or
functionality for any particular purpose.
LEGAL DISCLAIMER
Warning: Your security camera is a quality digital product.
You have to take utmost care while handling this product
in order to ensure its reliability & durability.
Digital Peripheral Solutions Inc.
8015 E Crystal Drive.
Anaheim, CA 92807,
1-877-998-3440.
Q-See Tech Support in U.S.A.
Mon-Fri: 9 am 5 pm PST.
TEL:1-877-998-3440
E-mail: [email protected]
Website: www.q-see.com