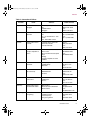
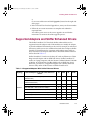
1
install.book Page i Wednesday, November 20, 2002 3:43 PM
Sniffer Portable
Installation Guide
Release 4.7.5
install.book Page ii Wednesday, November 20, 2002 3:43 PM
COPYRIGHT
Copyright © 2002 Networks Associates Technology, Inc. All Rights Reserved. No part of this
publication may be reproduced, transmitted, transcribed, stored in a retrieval system, or
translated into any language in any form or by any means without the written permission of
Networks Associates Technology, Inc., or its suppliers or affiliate companies. To obtain this
permission, write to the attention of the Network Associates legal department at: 3965 Freedom
Circle, Santa Clara, California 95054, or call (972) 308-9960.
TRADEMARK ATTRIBUTIONS
ActiveSecurity, ActiveHelp, ActiveShield, Antivirus Anyware (and design), Bomb Shelter, Building a
World of Trust, Certified Network Expert, CipherLink, Clean-Up, Cleanup Wizard, Cloaking, CNX,
CNX Certification Certified Network Expert (and design), Compass 7, CyberCop, CyberMedia,
CyberMedia Uninstaller, Data Security Letter (and design), N Design (logo), Design (rabbit with hat),
Discover (and design), Disk Minder, Distributed Sniffer System, Distributed Sniffer System (in
Katakana), Dr Solomon’s, Dr Solomon’s (label), Enterprise Secure Cast, EZ Setup, First Aid,
ForceField, Gauntlet, GMT, GroupShield, Guard Dog, HelpDesk, Homeguard, Hunter, IC Expert,
ISDN Tel/Scope, LAN Administration Architecture (and design), LANGuru, LANGuru (in Katakana),
LANWords, Leading Help Desk Technology, LM 1, M (and design), Magic Solutions, Magic
University, MagicSpy, MagicTree, MagicWin, MagicWord, McAfee, McAfee (in Katakana), McAfee
(and design), McAfee Associates, MoneyMagic, More Power To You, Multimedia Cloaking, NetCrypto,
NetOctopus, NetRoom, NetScan, Net Shield, NetShield, NetStalker, Net Tools, Net Tools (in
Katakana), Network Associates, Network General, Network Uptime!, NetXRay, Notesguard, Nuts &
Bolts, Oil Change, PC Medic, PC Medic 97, PCNotary, PGP, PGP (Pretty Good Privacy), PocketScope,
Pop-Up, PowerTelnet, Pretty Good Privacy, PrimeSupport, RecoverKey, RecoverKey-International,
ReportMagic, Registry Wizard, RingFence, Router PM, Safe & Sound, SalesMagic, SecureCast, Service
Level Manager, ServiceMagic, Site Meter, Smart Desk, Sniffer, Sniffer (in Hangul), SniffMaster,
SniffMaster (in Hangul), Sniffmaster (in Katakana), SniffNet, Stalker, Stalker (stylized), Statistical
Information Retrieval (SIR), SupportMagic, Switch PM, TeleSniffer, TIS, TMach, TMeg, Total
Network Security, Total Network Visibility, Total Service Desk, Total Virus Defense, T-POD, T-POD
(stylized), Trusted Mach, Trusted Mail, UnInstaller, Virex, Virex-PC, Virus Forum, ViruScan,
VirusScan, VShield, WebScan, WebShield, WebSniffer, WebStalker, WebWall, Who’s Watching your
Network, Wingauge, ZAC 2000, and Zip Manager are registered trademarks of Network
Associates, Inc. and/or its affiliates in the US and/or other countries. All other registered and
unregistered trademarks in this document are the sole property of their respective owners.
LICENSE AGREEMENT
NOTICE TO ALL USERS: FOR THE SPECIFIC TERMS OF YOUR LICENSE TO USE THE
SOFTWARE THAT THIS DOCUMENTATION DESCRIBES, CONSULT THE LICENSE.TXT
OR OTHER LICENSE DOCUMENT THAT ACCOMPANIES YOUR SOFTWARE, EITHER AS
A TEXT FILE OR AS PART OF THE SOFTWARE PACKAGING. IF YOU DO NOT AGREE TO
ALL OF THE TERMS SET FORTH THEREIN, DO NOT INSTALL THE SOFTWARE. IF
APPLICABLE, YOU MAY RETURN THE PRODUCT TO THE PLACE OF PURCHASE FOR A
FULL REFUND.
Part Number: NAI-412-0061-4, Release 4.7.5, November, 2002
install.book Page iii Wednesday, November 20, 2002 3:43 PM
Table of Contents
Preface . . . . . . . . . . . . . . . . . . . . . . . . . . . . . . . . . . . . . . . . . . . . . . . . . . . . . vii
About This Manual . . . . . . . . . . . . . . . . . . . . . . . . . . . . . . . . . . . . . . . . . . . . . . .vii
Other Manuals for the Sniffer Portable . . . . . . . . . . . . . . . . . . . . . . . . . . . . . . .vii
Contacting Network Associates . . . . . . . . . . . . . . . . . . . . . . . . . . . . . . . . . . . . ix
Customer Service . . . . . . . . . . . . . . . . . . . . . . . . . . . . . . . . . . . . . . . . . . . . ix
Technical Support . . . . . . . . . . . . . . . . . . . . . . . . . . . . . . . . . . . . . . . . . . . ix
Getting Help with Web Site Downloads . . . . . . . . . . . . . . . . . . . . . . .x
Sniffer University Training . . . . . . . . . . . . . . . . . . . . . . . . . . . . . . . . . . . . . . . . . .x
International Contact Information . . . . . . . . . . . . . . . . . . . . . . . . . . . . . . . . . . . .x
Chapter 1. Installing Sniffer Portable 4.7.5 . . . . . . . . . . . . . . . . . . . . . . 1-1
System Requirements . . . . . . . . . . . . . . . . . . . . . . . . . . . . . . . . . . . . . . . . . . . 1-1
Unpacking Sniffer Portable 4.7.5 . . . . . . . . . . . . . . . . . . . . . . . . . . . . . . . . . . . 1-2
Default User Name\Password for Turnkey Units . . . . . . . . . . . . . . . . . . 1-2
Before Installing Sniffer Portable 4.7.5 . . . . . . . . . . . . . . . . . . . . . . . . . . . . . . 1-3
Notes on Installing on top of Sniffer Portable 4.7 . . . . . . . . . . . . . . . . . 1-3
Update Network Drivers! . . . . . . . . . . . . . . . . . . . . . . . . . . . . . . . . . 1-4
Sniffer Portable 4.7.5 and Sniffer Voice 2.1 . . . . . . . . . . . . . . . . . . 1-4
Uninstalling Previous Versions of Sniffer Portable . . . . . . . . . . . . . . . . . . . . 1-5
Installing Sniffer Portable 4.7.5 . . . . . . . . . . . . . . . . . . . . . . . . . . . . . . . . . . . . 1-6
Installation Notes . . . . . . . . . . . . . . . . . . . . . . . . . . . . . . . . . . . . . . . . . . . 1-7
Removing the QoS Packet Scheduler Service . . . . . . . . . . . . . . . 1-7
Removing the MAC Bridge Miniport Driver . . . . . . . . . . . . . . . . . 1-10
Registering Sniffer Portable . . . . . . . . . . . . . . . . . . . . . . . . . . . . . . . . . 1-10
Installing Microsoft Tools . . . . . . . . . . . . . . . . . . . . . . . . . . . . . . . . . . . 1-11
Power Considerations for Sniffer Portable Laptops . . . . . . . . . . . . . . . . . . 1-11
Sniffer Portable 4.7.5 and McAfee VirusScan . . . . . . . . . . . . . . . . . . . . . . . 1-11
McAfee VirusScan Settings for Sniffer Portable 4.7.5 . . . . . . . . . . . . 1-12
Downloading Sniffer Portable Upgrades from the Web . . . . . . . . . . . . . . . 1-12
Supported Adapters and Sniffer Enhanced Drivers . . . . . . . . . . . . . . . . . . 1-13
Additional Enhanced Driver Installation Resources . . . . . . . . . . . . . . 1-14
Installation Guide
iii
install.book Page iv Wednesday, November 20, 2002 3:43 PM
Table of Contents
Chapter 2. Installing Adapters and Sniffer Enhanced Drivers . . . . . . . 2-1
Installing Adapters and Sniffer Enhanced Drivers on Windows XP . . . . . . 2-1
Installing Adapters and Sniffer Enhanced Drivers on Windows NT . . . . . . 2-3
Installing Adapters and Sniffer Enhanced Drivers on Windows 2000 . . . . . 2-7
First Time Installation . . . . . . . . . . . . . . . . . . . . . . . . . . . . . . . . . . . . . . . 2-8
Updating an Existing Driver . . . . . . . . . . . . . . . . . . . . . . . . . . . . . . . . . 2-10
Installing Adapters and Sniffer Enhanced Drivers on Windows 98 SE . . . 2-14
Chapter 3. Installing Madge Adapters and Enhanced Drivers . . . . . . . 3-1
Installing Madge Adapters and Enhanced Drivers . . . . . . . . . . . . . . . . . . . . 3-2
Windows NT . . . . . . . . . . . . . . . . . . . . . . . . . . . . . . . . . . . . . . . . . . . . . . . 3-2
Windows XP . . . . . . . . . . . . . . . . . . . . . . . . . . . . . . . . . . . . . . . . . . . . . . . 3-5
Configuring Madge Mk2 PCMCIA\CardBus Adapters (Windows XP)
3-6
Windows 2000 . . . . . . . . . . . . . . . . . . . . . . . . . . . . . . . . . . . . . . . . . . . . . . 3-7
First Time Installation . . . . . . . . . . . . . . . . . . . . . . . . . . . . . . . . . . . 3-7
Updating an Existing Driver . . . . . . . . . . . . . . . . . . . . . . . . . . . . . . 3-8
Configuring Madge Mk2 PCMCIA\CardBus Adapters (Windows
2000) . . . . . . . . . . . . . . . . . . . . . . . . . . . . . . . . . . . . . . . . . . . . . . 3-10
Windows 98 SE . . . . . . . . . . . . . . . . . . . . . . . . . . . . . . . . . . . . . . . . . . . . 3-10
Installing Madge PCI Adapters and Enhanced Drivers . . . . . . . . . . . . . . . . 3-14
Installing Madge PCMCIA and CardBus Adapters and Enhanced Drivers 3-15
Appendix A. Network Associates
Support Services . . . . . . . . . . . . . . . . . . . . . . . . . . . . . . . . . . . . A-1
Adding Value To Your Network Associates Product . . . . . . . . . . . . . . . . . . .A-1
PrimeSupport Options for Corporate Customers . . . . . . . . . . . . . . . . .A-1
The PrimeSupport KnowledgeCenter Plan . . . . . . . . . . . . . . . . . .A-1
The PrimeSupport Connect Plan . . . . . . . . . . . . . . . . . . . . . . . . . .A-2
The PrimeSupport Priority Plan . . . . . . . . . . . . . . . . . . . . . . . . . . .A-3
The PrimeSupport Enterprise Plan . . . . . . . . . . . . . . . . . . . . . . . .A-4
Ordering a Corporate PrimeSupport Plan . . . . . . . . . . . . . . . . . . . . . . .A-5
Network Associates Consulting and Training . . . . . . . . . . . . . . . . . . . . . . . .A-7
Professional Services . . . . . . . . . . . . . . . . . . . . . . . . . . . . . . . . . . . . . . .A-7
Jumpstart Services . . . . . . . . . . . . . . . . . . . . . . . . . . . . . . . . . . . . .A-8
Network Consulting . . . . . . . . . . . . . . . . . . . . . . . . . . . . . . . . . . . . .A-8
iv
Sniffer Portable
install.book Page v Wednesday, November 20, 2002 3:43 PM
Table of Contents
Educational Services . . . . . . . . . . . . . . . . . . . . . . . . . . . . . . . . . . . . . . . .A-9
Index . . . . . . . . . . . . . . . . . . . . . . . . . . . . . . . . . . . . . . . . . . . . . . . . . . .Index-1
Installation Guide
v
install.book Page vi Wednesday, November 20, 2002 3:43 PM
Table of Contents
vi
Sniffer Portable
install.book Page vii Wednesday, November 20, 2002 3:43 PM
Preface
About This Manual
Sniffer® Portable is a powerful network analysis tool that enables you to
monitor and troubleshoot your network. This document describes the
system requirements and installation procedures for Sniffer Portable. The
document contains the chapters listed and described in Table i.
Table i. Sniffer Portable Installation Guide Chapters
Chapter
Description
Chapter 1
Installing Sniffer Portable provides the minimum system requirements for a
Sniffer Portable system, installation prerequisites, installation instructions, and lists
enhanced drivers available with the Sniffer Portable installation.
Chapter 2
Installing Adapters and Enhanced Drivers provides adapter and enhanced driver
installation instructions for Ethernet and FDDI topologies.
Chapter 3
Installing Madge Adapters and Enhanced Drivers provides Madge adapter and
enhanced driver installation instructions for Token Ring topologies.
Other Manuals for the Sniffer Portable
Table ii lists other manuals provided by Network Associates to describe
specific Sniffer Portable features.
Table ii. Additional Sniffer Portable Manuals
Manual
Contents
Sniffer Portable Getting Started
Guide
Provides a comprehensive overview of
all Sniffer Portable features.
Sniffer Pro Expert Alarms
Reference
Describes each of the alarms
generated by the Sniffer Portable’s
Expert analyzer, along with their
related thresholds.
Sniffer Wireless Installation and
Operations Guide
Describes how to install, configure, and
operate the Sniffer Portable with a
supported wireless network adapter.
Switch Expert Connection and
Configuration Guide
Describes how to connect and
configure the Sniffer Portable to use
Switch Expert features.
Installation Guide
vii
install.book Page viii Wednesday, November 20, 2002 3:43 PM
Preface
Table ii. Additional Sniffer Portable Manuals
Manual
viii
Contents
ATM Adapters Installation,
Connection, and Configuration
Guide
Describes how to install, connect, and
configure the Sniffer Portable when
using ATM hardware. Describes ATM
interface pods.
ATMbook Installation, Connection,
and Configuration Guide
Describes how to install, connect, and
configure the ATMbook to capture and
generate packets using Sniffer
Portable.
Full Duplex 10/100 Ethernet
Installation and Operations Guide
Describes how to install, connect, and
configure the Sniffer Portable when
using the Full Duplex Ethernet PCI
adapter.
Gigabit Ethernet Installation and
Operations Guide
Describes how to install, connect, and
configure the Sniffer Portable when
using the Gigabit Ethernet PCI
adapter.
WAN Adapters Installation,
Connection, and Configuration
Guide
Describes how to install, connect, and
configure the Sniffer Portable when
using the LM2000 or HSSI adapter.
Snifferbook Ultra Installation and
Operations Guide
Describes how to install and configure
the Snifferbook Ultra unit and optional
Phys.
Snifferbook Installation and
Operations Guide
Describes how to install, connect, and
configure the Sniffer Portable when
using the Snifferbook.
Using the Sniffer Analyzer
WANbook
Describes how to install, connect, and
configure the Sniffer Portable when
using the WANbook.
Using the Fast Ethernet Full Duplex
Pod
Describes how to install, connect, and
configure the Sniffer Portable when
using the Fast Ethernet Full Duplex
Pod.
Expert Analyzer Output File Format
Describes the format and contents of
the CSV file exported by the Expert
analyzer.
Sniffer Portable
install.book Page ix Wednesday, November 20, 2002 3:43 PM
Preface
Contacting Network Associates
Customer Service
For questions, comments, or requests concerning the software or
hardware you purchased, your registration status, or similar issues,
contact the Network Associates Customer Service department. The
department hours of operation are 8:00 AM to 8:00 PM Central time,
Monday through Friday.
Table iii. Contact Information for Corporate-licensed Customers
Phone
(800) SNIFFER (800- 764-3337)
E-Mail
[email protected]
Web
http://www.nai.com
Mail
Network Associates Customer Service
13465 Midway Rd.
Dallas, Texas 75244
USA
Technical Support
Network Associates is dedicated to customer satisfaction. We provide
answers to technical support issues on the following World Wide Web
site: http://www.support.nai.com
If the automated web services do not have the answers you need,
corporate-licensed customers can call 1-800-SNIFFER (1-800-764-3337)
Monday through Friday between 8:00 AM and 8:00 PM Central time to
contact Network Associates.
To provide the answers you need quickly and efficiently, the Network
Associates technical support staff needs some information about your
computer and software. Please have this information ready before you
call:
• Sniffer product name and version number
• Computer brand and model
• Additional hardware or peripherals connected to your computer
• Operating system and version number(s)
• Network type and version, if applicable
• Contents of your AUTOEXEC.BAT, CONFIG.SYS, and system
LOGIN script
Installation Guide
ix
install.book Page x Wednesday, November 20, 2002 3:43 PM
Preface
• Specific steps to reproduce the problem
Getting Help with Web Site Downloads
To get help with navigating or downloading files from the Network
Associates Web sites or FTP sites, call Corporate Customer Support at
1-972-308-9960.
Sniffer University Training
Since 1991, over 70,000 customers have completed Sniffer University
training. Our customers typically are Network Administrators, Field
Technicians, Network Managers, and Technical Support personnel for
medium to large size companies that proactively manage and
troubleshoot expanding networks.
Customers find our education to be of great value in enhancing and
updating their skills as well as providing an opportunity for achieving a
Sniffer-specific certification through the Sniffer Certified Professional
Program (SCPP).
We provide complete course and registration information regarding
Sniffer University worldwide training and certification on our World
Wide Web site: http://www.sniffer.com/education/default.asp
International Contact Information
To contact Network Associates outside the United States, use the
addresses, phone and fax numbers listed in Table iv.
Table iv. International Offices
Location
x
Name
Address
Phone and Fax
Australia
Network Associates
Australia
Level 1, 500 Pacific Highway
St. Leonards, NSW
Sydney, Australia 2065
Phone:
61-2-8425-4200
Fax:
61-2-9439-5166
Austria
Network Associates
Austria
Pulvermuehlstrasse 17
Linz, Austria
Postal Code A-4040
Phone:
43-732-757-244
Fax:
43-732-757-244-20
Sniffer Portable
install.book Page xi Wednesday, November 20, 2002 3:43 PM
Preface
Table iv. International Offices
Location
Name
Address
Phone and Fax
Belgium
Network Associates
Belgique
BDC Heyzel Esplanade, boîte
43
1020 Bruxelles
Belgique
Phone:
0032-2 478.10.29
Fax:
0032-2 478.66.21
Brazil
Network Associates
do Brasil
Rua Geraldo Flausino Gomez
78
Cj. - 51 Brooklin Novo - São
Paulo
SP - 04575-060 - Brasil
Phone:
(55 11) 5505 1009
Fax:
(55 11) 5505 1006
Canada
Network Associates
Canada
139 Main Street, Suite 201
Unionville, Ontario
Canada L3R 2G6
Phone:
(905) 479-4189
Fax:
(905) 479-4540
China
Network Associates
People’s Republic of
China
New Century Office Tower,
Room 1557
No. 6 Southern Road Capitol
Gym
Beijing
People’s Republic of China
100044
Phone:
8610-6849-2650
Fax:
8610-6849-2069
Denmark
Network Associates
Denmark
Lautruphoej 1-3
2750 Ballerup
Danmark
Phone:
45 70 277 277
Fax:
45 44 209 910
Finland
NA Network
Associates Oy
Mikonkatu 9, 5. krs.
00100 Helsinki
Finland
Phone:
358 9 5270 70
Fax:
358 9 5270 7100
France
Network Associates
France S.A.
50 Rue de Londres
75008 Paris
France
Phone:
33 1 44 908 737
Fax:
33 1 45 227 554
Germany
Network Associates
Deutschland GmbH
Ohmstraße 1
D-85716 Unterschleißheim
Deutschland
Phone:
49 (0)89/3707-0
Fax:
49 (0)89/3707-1199
Hong Kong
Network Associates
Hong Kong
19th Floor, Matheson Centre
3 Matheson Way
Causeway Bay
Hong Kong 63225
Phone:
852-2832-9525
Fax:
852-2832-9530
Installation Guide
xi
install.book Page xii Wednesday, November 20, 2002 3:43 PM
Preface
Table iv. International Offices
Location
Name
Address
Phone and Fax
Italy
Network Associates Srl
Centro Direzionale Summit
Palazzo D/1
Via Brescia, 28
20063 - Cernusco sul Naviglio
(MI)
Italy
Phone:
39 02 92 65 01
Fax:
39 02 92 14 16 44
Japan
Network Associates
Japan, Inc.
Shibuya Mark City West 20F
1-12-1 Dougenzaka,
Shibuya-ku
Tokyo 150-0043, Japan
Phone:
81 3 5428 1100
Fax:
81 3 5428 1480
Latin America
Network Associates
Latin America
1200 S. Pine Island Road, Suite
375
Plantation, Florida 33324
United States
Phone:
(954) 452-1731
Fax:
(954) 236-8031
Mexico
Network Associates
de Mexico
Andres Bello No. 10, 4 Piso
4th Floor
Col. Polanco
Mexico City, Mexico D.F. 11560
Phone:
(525) 282-9180
Fax:
(525) 282-9183
The
Netherlands
Network Associates
International B.V.
Gatwickstraat 25
1043 GL Amsterdam
The Netherlands
Phone:
31 20 586 6100
Fax:
31 20 586 6101
Portugal
Network Associates
Portugal
Av. da Liberdade, 114
1269-046 Lisboa
Portugal
Phone:
351 1 340 4543
Fax:
351 1 340 4575
South Africa
Net Tools Network
Associates
South Africa
Hawthorne House
St. Andrews Business Park
Meadowbrook Lane
Bryanston, Johannesburg
South Africa 2021
Phone:
27 11 700-8200
Fax:
27 11 706-1569
South East
Asia
Network Associates
South East Asia
78 Shenton Way
#29-02
Singapore 079120
Phone:
65-222-7555
Fax:
65-220-7255
Spain
Network Associates
Spain
Orense 4, 4a Planta.
Edificio Trieste
28020 Madrid, Spain
Phone:
34 9141 88 500
Fax:
34 9155 61 404
xii
Sniffer Portable
install.book Page xiii Wednesday, November 20, 2002 3:43 PM
Preface
Table iv. International Offices
Location
Name
Address
Phone and Fax
Sweden
Network Associates
Sweden
Datavägen 3A
Box 596
S-175 26 Järfälla
Sweden
Phone:
46 (0) 8 580 88 400
Fax:
46 (0) 8 580 88 405
Switzerland
Network Associates
AG
Baeulerwisenstrasse 3
8152 Glattbrugg
Switzerland
Phone:
0041 1 808 99 66
Fax:
0041 1 808 99 77
Taiwan
Network Associates
Taiwan
Suite 6, 11F, No. 188, Sec. 5
Nan King E. Rd.
Taipei, Taiwan, Republic of
China
Phone:
886-2-27-474-8800
Fax:
886-2-27-635-5864
United
Kingdom
Network Associates
International Ltd.
227 Bath Road
Slough, Berkshire
SL1 5PP
United Kingdom
Phone:
44 (0)1753 217 500
Fax:
44 (0)1753 217 520
Installation Guide
xiii
install.book Page xiv Wednesday, November 20, 2002 3:43 PM
Preface
xiv
Sniffer Portable
install.book Page 1 Wednesday, November 20, 2002 3:43 PM
Installing Sniffer Portable 4.7.5
1
1
This chapter provides the system requirements, installation instructions,
and online upgrade instructions for the Sniffer Portable 4.7.5 software, and
introduces the Sniffer supported adapters and enhanced drivers.
System Requirements
Table 1–1 lists the minimum recommended hardware and third-party
software requirements to run Sniffer Portable 4.7.5.
Table 1–1. Sniffer Portable 4.7.5 System Requirements
Item
Requirement
Computer
Pentium III running at 600 MHz or better (Windows XP)
Pentium II running at 400 MHz or better (All Other Supported Operating Systems)
256 MB RAM Minimum System Memory (Windows XP)
128 MB RAM Minimum System Memory (All Other Supported Operating Systems)
150 MB or more of free hard drive space (Windows XP)
125 MB or more of free hard drive space (All Other Supported Operating Systems)
CD-ROM Drive
Operating
System
Microsoft Windows XP Professional Edition with Service Pack 1
Microsoft Windows NT 4.0 (Server & Workstation) with SP 6a and Security Rollup
Package (SRP)
Microsoft Windows 2000 (Professional & Advanced Server) w/ SP 2
Microsoft Windows 98 Second Edition (SE)
Monitor
VGA color monitor with 800x600 resolution
Adapter Card
Network adapter card configured with an IP address and connected to the network
(see Supported Adapters and Sniffer Enhanced Drivers on page 1-13)
Browser with
Internet
Access
Microsoft Internet Explorer with Microsoft Virtual Machine:
• Version 5.5 with SP 1 or SP 2 on Windows NT, 2000, and 98 SE
• Version 6.0 on Windows NT, XP, 2000, and 98 SE
Installation Guide
1-1
install.book Page 2 Wednesday, November 20, 2002 3:43 PM
Installing Sniffer Portable 4.7.5
Table 1–1. Sniffer Portable 4.7.5 System Requirements
Item
Requirement
Media Player
Media Player:
• Version 6.4.07.1112 on Windows NT
• Version 7.00.00.1954 on Windows 2000 and 98 SE
• Version 8.00.00.4487 on Windows XP
Virtual
Machine
Microsoft Virtual Machine
NOTE: Microsoft Virtual Machine is not included as part of the default Internet
Explorer installation. You can use Windows Update to add this component.
Unpacking Sniffer Portable 4.7.5
Ensure that you have received the following items:
• Sniffer Portable 4.7.5 CD
• Sniffer Portable 4.7.5 Release Notes (included on CD)
• Sniffer Portable 4.7.5 Installation Guide (this document)
• Sniffer Portable 4.7.5 Getting Started Guide
• Packing list
• License agreements
NOTE: Please check the packing list for additional items relevant to your
configuration requirements or purchase.
If any items are missing or damaged, notify your reseller or Network
Associates immediately.
Default User Name\Password for Turnkey Units
Turnkey Sniffer Portable units are shipped with the following default user
name and password:
• User Name — Administrator
• Password — (no password)
NOTE: For security purposes, it is highly recommended that you assign a
non-blank password to the Administrator account after the first login.
1-2
Sniffer Portable
install.book Page 3 Wednesday, November 20, 2002 3:43 PM
Installing Sniffer Portable 4.7.5
Before Installing Sniffer Portable 4.7.5
The Sniffer Portable 4.7.5 CD includes the software you need to get started
using Sniffer Portable 4.7.5. For a quick, successful Sniffer Portable 4.7.5
installation, have the following information ready:
• Your name and business title
• Company or organization name
• Email address
• Company address (includes city, state, country, and postal code)
• Phone and FAX numbers
• Product serial number
Before you install Sniffer Portable 4.7.5, review the following installation
notes:
• For Windows NT: To install the Sniffer Portable 4.7.5 software on a
Windows NT system, you must have system administrator (sa)
privileges.
• For Windows XP: To install the Sniffer Portable 4.7.5 software on a
Windows XP system, you must have system administrator (sa)
privileges.
• For Windows 98 SE: If you are installing Sniffer Portable 4.7.5 on
Windows 98 SE, you are asked if you would like to make the Sniffer
enhanced drivers available in Windows. If you select Yes, do not
reboot your system when prompted at the end of the installation
process and follow the steps on page 2-14 to complete the driver
installation.
• For IBM Thinkpad laptop users: Sniffer Portable 4.7.5 supports the
Intel (R) PRO + miniPCI Adapter card. Before you install Sniffer
Portable 4.7.5, we recommend updating the latest BIOS for your
laptop, then downloading and installing the latest Intel driver to
minimize Sniffer Portable installation issues. With the Intel (R) PRO +
miniPCI Adapter card, no additional Sniffer enhanced driver is
necessary.
Notes on Installing on top of Sniffer Portable 4.7
Unlike previous versions of the Sniffer Portable software, Sniffer Portable
4.7.5 can be installed directly over any existing 4.70.xx version of Sniffer
Portable. The procedure is described in Installing Sniffer Portable 4.7.5 on
page 1-6. Before performing such an installation, however, you should be
aware of the following:
Installation Guide
1-3
install.book Page 4 Wednesday, November 20, 2002 3:43 PM
Installing Sniffer Portable 4.7.5
• You must update existing Network Associates enhanced drivers to
gain the benefits of the new release.
• You must follow the correct installation sequence for Sniffer Voice 2.1
to work with Sniffer Portable 4.7.5.
Each of these topics is described below.
Update Network Drivers!
If you install Sniffer Portable 4.7.5 on top of an existing Sniffer Portable
installation, you must update the Network Associates drivers for any
adapter cards supported by Sniffer Portable 4.7.5 to receive the benefits of
the updated software! Chapter 2, Installing Adapters and Sniffer Enhanced
Drivers describes how to update existing Network Associates drivers.
Sniffer Portable 4.7.5 and Sniffer Voice 2.1
Sniffer Portable 4.7.5 can be installed on top of an existing Sniffer Portable
4.7 installation, with or without Sniffer Voice 2.1 installed. However, if
you are a Sniffer Voice 2.1 customer, you must install Sniffer Voice 2.1 on
top of Sniffer Portable 4.7 before installing Sniffer Portable 4.7.5. Sniffer
Voice 2.1 can not be installed on top of Sniffer Portable 4.7.5!
The complete supported installation sequence for Sniffer Voice 2.1
customers is as follows:
1. Install Sniffer Portable 4.7.
2. Install Sniffer Voice 2.1.
3. Install Sniffer Portable 4.7.5.
Uninstalling Sniffer Voice 2.1 from Sniffer Portable 4.7.5
If you have a Sniffer installation with both Sniffer Portable 4.7.5 and
Sniffer Voice 2.1, you must uninstall Sniffer Voice 2.1 before uninstalling
Sniffer Portable 4.7.5. Simply uninstalling Sniffer Portable 4.7.5 will not
uninstall Sniffer Voice 2.1.
Keep in mind, however, that if you uninstall Sniffer Voice 2.1 from Sniffer
Portable 4.7.5, you cannot reinstall Sniffer Voice 2.1 on top of Sniffer
Portable 4.7.5. If you have uninstalled Sniffer Voice 2.1 from Sniffer
Portable 4.7.5 and need to reinstall it, you must:
1. Uninstall Sniffer Portable 4.7.5
2. Install Sniffer Portable 4.7.
3. Install Sniffer Voice 2.1.
1-4
Sniffer Portable
install.book Page 5 Wednesday, November 20, 2002 3:43 PM
Installing Sniffer Portable 4.7.5
4. Install Sniffer Portable 4.7.5.
Uninstalling Previous Versions of Sniffer Portable
Sniffer Portable 4.7.5 can be installed on top of an existing Sniffer Portable
4.70.xx installation. However, if there is a version of Sniffer Portable
installed on the target machine with a release number less than 4.70, you
must remove it before installing the Sniffer Portable software. Use the
following procedure to uninstall a previous version of Sniffer Portable:
NOTE: If Sniffer Voice 2.0 is installed on the target machine, it must be
uninstalled before you uninstall the Sniffer Portable software.
To uninstall a previous version of Sniffer Portable:
1. Log in to the Sniffer PC machine with Administrator privileges.
2. Go to Start > Settings > Control Panel.
3. Start the Add/Remove Programs control panel.
4. In the window that appears, is there an entry for Sniffer Voice 2.0?
– If yes, uninstall Sniffer Voice 2.0 and reboot the computer before
uninstalling the Sniffer Portable software.
– If no, select the entry for the Sniffer Portable software and click
Add/Remove.
5. During the uninstallation, the wizard will ask you if you would like to
remove unused shared files. Click Yes to all to remove all unused
shared files.
6. Reboot the computer.
The target PC is now ready for installation of the Sniffer Portable 4.7.5
software.
Installation Guide
1-5
install.book Page 6 Wednesday, November 20, 2002 3:43 PM
Installing Sniffer Portable 4.7.5
Installing Sniffer Portable 4.7.5
Use the following procedure to install the Sniffer Portable 4.7.5 software.
The Installation Notes on page 1-7 section provides information on some
different steps that may appear depending on the target system’s
operating system and existing configuration.
To install Sniffer Portable 4.7.5:
1. Insert the Sniffer Portable 4.7.5 CD in the CD-ROM drive.
– If the target PC supports the autorun function, an installation menu
will automatically appear. Select the Install Product option from
this menu.
– If the installation menu does not appear automatically, then:
a. Go to Start > Run.
b. Enter <drive letter>:\setup and click OK.
<drive letter> is the physical drive letter of the CD-ROM drive.
2. Follow the on-screen instructions until the Sniffer Portable 4.7.5
software is installed successfully.
NOTE: You must enter valid license key information during installation
to install and run the Sniffer Portable 4.7.5 software successfully. In the
Sniffer Portable User Registration dialog box, the Sniffer Serial Number
field is case-sensitive. Enter the serial number in uppercase letters,
separated by a hyphen. For example: AB123-456CD-EFG78-9HIJK.
1-6
Sniffer Portable
install.book Page 7 Wednesday, November 20, 2002 3:43 PM
Installing Sniffer Portable 4.7.5
Installation Notes
During installation of the Sniffer Portable 4.7.5 software, the Setup
program will perform some different steps depending on the target
system’s operating system and existing configuration. The following notes
describe some common occurrences during Sniffer Portable 4.7.5
installations, as follows:
• Removing the QoS Packet Scheduler Service on page 1-7 (Windows XP and
Windows 2000)
• Removing the MAC Bridge Miniport Driver on page 1-10 (Windows XP)
Removing the QoS Packet Scheduler Service
To improve analyzer performance, Network Associates recommends that
the QoS Packet Scheduler service provided with Windows XP and
Windows 2000 be unbound from any adapters used with Sniffer Portable
4.7.5.
The QoS Packet Scheduler service supports the 802.1P traffic prioritization
system, allowing for the implementation of best-effort Quality of Service
by conforming 802.1P equipment. The service is optional on Windows
2000. However, on Windows XP, the service is automatically bound to
each installed adapter driver.
There are several ways to remove the QoS Packet Scheduler Service from
adapters to be used with Sniffer Portable 4.7.5:
• Uninstall the QoS Packet Scheduler service entirely during the
installation of the Sniffer Portable 4.7.5 software.
• Uninstall the QoS Packet Scheduler service entirely after the
installation of the Sniffer Portable 4.7.5 software.
• Unbind the QoS Packet Scheduler service from selected individual
adapters after the installation of the Sniffer Portable 4.7.5 software.
Each method is described below.
NOTE: Uninstalling the QoS Packet Scheduler service removes it from all
installed adapters. Unbinding from individual adapters allows you to
preserve the service for use with any non-Sniffer adapters.
Ë IMPORTANT: Sniffer Portable 4.7.5 can only check for the existence
of the QoS Packet Scheduler Service during installation. If you rebind
Installation Guide
1-7
install.book Page 8 Wednesday, November 20, 2002 3:43 PM
Installing Sniffer Portable 4.7.5
the QoS Packet Scheduler Service to a Sniffer adapter at a later time,
that adapter will experience decreased Sniffer performance.
Uninstalling the QoS Packet Scheduler Service During Sniffer
Portable 4.7.5 Installation
At the conclusion of the installation of Sniffer Portable 4.7.5 on either
Windows XP or Windows 2000, Setup provides you with the option of
completely removing the QoS (Quality of Service) Packet Scheduler
service from the target system (Figure 1–1).
To uninstall the QoS Packet Scheduler service completely, enable the
Uninstall the QoS Packet Scheduler Service option and click Finish.
Figure 1–1. Removing the QoS Packet Scheduler Service
Uninstalling the QoS Packet Scheduler Service After Sniffer
Portable 4.7.5 Installation
Use the following procedure to uninstall the QoS Packet Scheduler Service
after Sniffer Portable 4.7.5 is installed:
To completely remove the QoS Packet Scheduler Service after Sniffer
Portable 4.7.5 installation:
1. Open the Network Connections folder by selecting the Start >
Settings > Network Connections option.
2. Right-click on any of the Connection entries in the folder and select the
Properties command from the menu that appears.
1-8
Sniffer Portable
install.book Page 9 Wednesday, November 20, 2002 3:43 PM
Installing Sniffer Portable 4.7.5
The Connection Properties dialog box appears, as in Figure 1–2.
Deselect the checkbox
next to the QoS Packet
Scheduler entry and click
OK to unbind the service
from this adapter.
Select the QoS Packet
Scheduler entry and click
Uninstall to remove the
service completely.
Figure 1–2. Local Area Connection Properties Dialog Box
3. Select the QoS Packet Scheduler entry and click Uninstall.
A confirmation box appears.
4. Click OK to confirm that you want to uninstall the QoS Packet
Scheduler service completely.
The QoS Packet Scheduler service is uninstalled.
5. Click OK on the Connection Properties dialog box.
Unbinding the QoS Packet Scheduler Service from Selected
Adapters
Use the following procedure to unbind the QoS Packet Scheduler Service
from selected adapters:
To unbind the QoS Packet Scheduler Service from selected adapters:
1. Open the Network Connections folder by selecting the Start >
Settings > Network Connections option.
2. Right-click on the Network Connection entry from which you want to
unbind the QoS Packet Scheduler service and select the Properties
command from the menu that appears.
Installation Guide
1-9
install.book Page 10 Wednesday, November 20, 2002 3:43 PM
Installing Sniffer Portable 4.7.5
The Network Connection Properties dialog box appears, as in Figure
1–2 on page 9.
3. Deselect the checkbox next to the QoS Packet Scheduler entry and
click OK.
4. Repeat this procedure for each adapter you want to use with Sniffer
Portable 4.7.5.
Removing the MAC Bridge Miniport Driver
To improve analyzer performance, Network Associates recommends that
the Network Bridge service provided with Windows XP not be used on a
Sniffer Portable 4.7.5 PC.
During installation of Sniffer Portable 4.7.5, Setup checks to see if you have
an existing Network Bridge. If an existing Network Bridge is found, Setup
provides the option of removing it automatically. If you do not remove an
installed network bridge automatically during installation, you can still
remove it manually after installation using the procedure below.
Ë IMPORTANT: Sniffer Portable 4.7.5 can only check for the existence
of a network bridge during installation. If you add a network bridge
after Sniffer Portable 4.7.5 installation, Sniffer Portable performance
will be decreased.
To remove a network bridge in Windows XP:
1. Open the Network Connections folder by selecting the Start >
Settings > Network Connections option.
The Network Connections folder appears.
2. Under the Network Bridge section, right-click on the Network Bridge
entry and select the Delete command in the menu that appears.
3. Click Yes to confirm that you want to delete the network bridge.
Registering Sniffer Portable
You can register Sniffer Portable in two ways:
• Internet. Use the Internet registration option during the installation
procedure.
• Fax. Print and fax the registration form to Sniffer.
1-10
Sniffer Portable
install.book Page 11 Wednesday, November 20, 2002 3:43 PM
Installing Sniffer Portable 4.7.5
Installing Microsoft Tools
Microsoft Internet Explorer and Microsoft Virtual Machine are required to
run Sniffer Portable 4.7.5. To use the Sniffer Portable 4.7.5 dashboard and
capture panel, you must install Microsoft Virtual Machine. You can install
the latest version from www.microsoft.com/windows/ie.
Power Considerations for Sniffer Portable Laptops
Most laptop computers include power configuration options that let you
specify whether the computer should be allowed to go into a standby or
hibernate mode after a specified period of inactivity. For computers
actively running Sniffer Portable, these options should always be
disabled to preserve stable system performance!
For example, MS-Windows 98 SE, 2000, and XP laptop computers include
a Power Options Properties control panel. The Power Options Properties
control panel is accessed by starting the Display control panel (Start >
Settings > Control Panel > Display), clicking on the Screen Saver tab and
then clicking the Power button. In this example, the following settings
should be made for active Sniffer Portable operations:
• Power Schemes Tab
– Turn off hard disks = Never
– System standby = Never
• Hibernate Tab
– Enable hibernate support = Disabled
NOTE: Some laptop vendors include their own proprietary software to
perform power configuration tasks. In these cases, you may need to make
similar changes in the configuration menu provided by the vendor.
Sniffer Portable 4.7.5 and McAfee VirusScan
McAfee VirusScan Corporate 4.5.1 with Service Pack 1 is included with
turnkey versions of Sniffer Portable 4.7.5 (for example, versions of Sniffer
Portable 4.7.5 purchased along with the Dolch FlexPAC PC). The purchase
of a turnkey version of Sniffer Portable 4.7.5 entitles the user to one year of
Knowledge Base support. After this period, you must renew your
VirusScan support contract. The VirusScan support contract must be
renewed separately from your Sniffer Portable support contract.
Installation Guide
1-11
install.book Page 12 Wednesday, November 20, 2002 3:43 PM
Installing Sniffer Portable 4.7.5
McAfee VirusScan Settings for Sniffer Portable 4.7.5
Some of McAfee VirusScan’s normal default settings can potentially
interfere with Sniffer Portable 4.7.5 performance. In particular, scheduled
scans can interfere with Sniffer Portable 4.7.5 tasks. Because of this, the
version of McAfee VirusScan included with turnkey versions of Sniffer
Portable 4.7.5 is provided with most scheduled scan tasks disabled by
default. To scan the Sniffer Portable PC, start a scan manually, instead.
The exact changed settings are summarized below:
• The Enable System scan option in the Detection tab of the System
Scan Properties dialog box is disabled. Disabling this option also
disables all the other options in the tab.
• The Enable Internet download scanning option in the Detection tab
of the Download Scan Properties dialog box is disabled. Disabling this
option also disables all the other options in the tab.
• In the VirusScan Console, the scheduled tasks for Scan My Computer,
Scan Drive ‘C’, and Weekly Scan are all left unscheduled.
Downloading Sniffer Portable Upgrades from the
Web
After installing Sniffer Portable 4.7.5 from the Product CD, you can
download available upgrades from the Web. Before downloading
upgrades, you need your product Grant number and any applicable serial
numbers or valid license key information.
IMPORTANT: After downloading an upgrade, you must reinstall the
Sniffer enhanced driver.
If you elect to download upgrades from the web and your system does not
have sufficient disk space available, you will not be able to complete the
upgrade. An error message appears, stating that the executable you are
attempting to run is corrupted. However, this error message is caused by
insufficient space on the hard drive, not a corrupted file. See System
Requirements on page 1-1.
To download upgrades from the Web:
1. Got to http://www.sniffer.com/naicommon/download/upgrade
/login.asp.
1-12
Sniffer Portable
install.book Page 13 Wednesday, November 20, 2002 3:43 PM
Installing Sniffer Portable 4.7.5
or
Go to www.sniffer.com and click Upgrades (located on the right side
of the page).
2. In the Licensed User Product Upgrade box, enter your Grant number.
3. Follow the on-screen instructions to complete and submit the
requested form.
You will be given access to the secure upgrade site and further
instructions to continue the online upgrade process.
Supported Adapters and Sniffer Enhanced Drivers
The Sniffer Portable 4.7.5 CD includes Sniffer enhanced drivers for
supported network adapter cards. Enhanced drivers modify the adapter
to provide additional functionality to the card. For example, an enhanced
driver may enable you to view additional network data or improve Sniffer
Portable 4.7.5 performance by capturing and decoding more traffic on
busy networks. Later chapters detail how to install the Sniffer enhanced
drivers listed in Table 1–2.
Sniffer Portable 4.7.5 works on a desktop PC with any Ethernet or Token
Ring network adapter with an NDIS 3.0+ driver. Sniffer Portable 4.7.5
works on a laptop computer with the Xircom CardBus Ethernet II 10/100
or Madge 16/4 Token Ring CardBus (Mk2) with an NDIS 5.0+ driver.
However, you must use a supported adapter with a Sniffer enhanced
driver to fully utilize all the features of Sniffer Portable 4.7.5.
Table 1–2. Supported Adapters With Sniffer Enhanced Drivers
Topology
Ethernet
Network Adapter Cards with Sniffer Enhanced
Drivers
XP
2000
NT
98 SE
Adaptec PCI Ethernet Adapter (ANA-21140/UC &
ANA-6911/UC)
X
X
X
Adaptec PCI Ethernet Adapter
(ANA-6911A/TX/TXC)
X
X
X
X
X
IBM Etherjet CardBus Ethernet Adapter
X
X
Intel PRO/100 + miniPCI Ethernet Adapter
X
X
Xircom CardBus Ethernet II 10/100 (CBE2)
X
X
X
X
Xircom Realport CardBus Ethernet Adapter
X
X
X
X
Xircom Realport2 CardBus Ethernet Adapter
X
X
X
X
X
X
X
IBM 10/100 EtherJet CardBus Adapter
Installation Guide
1-13
install.book Page 14 Wednesday, November 20, 2002 3:43 PM
Installing Sniffer Portable 4.7.5
Table 1–2. Supported Adapters With Sniffer Enhanced Drivers
Topology
Token
Ring
FDDI
Network Adapter Cards with Sniffer Enhanced
Drivers
XP
2000
NT
98 SE
Madge PCMCIA Smart 16/4 Ringnode Mk2 (20-01)
X
X
X
X
Madge 16/4 CardBus Adapter Mk2 (20-03)
X
X
X
X
Madge Smart 16/4 PCI Ringnode Mk2/BM2 (51-02)
X
X
X
Madge Smart 16/4 PCI Ringnode Mk3 (51-04)
X
X
X
NuCard PCI FDDI Adapter
X
Additional Enhanced Driver Installation Resources
Table 1–3 contains a list of supported adapters and enhanced drivers that
are not documented in this guide. Please see the document listed below for
detailed information and installation instructions for that adapter and
enhanced driver.
Table 1–3. Additional Supported Adapters and Enhanced Drivers
Network Adapter Cards with Sniffer
Enhanced Drivers
Installation and Configuration
Information
Sniffer Symbol Spectrum24 PCMCIA
See the Sniffer Wireless: Installation
and Operations Guide.
Sniffer Cisco Aironet 340/350
PCMCIA
Sniffer Agere ORiNOCO Gold
PCMCIA
Enterasys RoamAbout PCMCIA
Proxim Harmony 802.11a CardBus
Sniffer FDX PCI Card
See the Sniffer Pro: Full Duplex
Ethernet Installation and Operations
Guide.
Sniffer HSSI PCI Adapter
See the Sniffer Pro: WAN Adapter
Cards Installation, Connection, and
Configuration Guide.
Sniffer LM2000 ISA Adapter
1-14
Sniffer ATM SAR Adapter
See the Sniffer Pro: ATM Adapter
Card Installation, Connection, and
Configuration Guide.
Sniffer (Xyratex) Gigabit Ethernet PCI
Adapter (SX, LX)
See the Sniffer Pro: Gigabit Ethernet
Installation and Operations Guide.
Sniffer Portable
install.book Page 1 Wednesday, November 20, 2002 3:43 PM
Installing Adapters and Sniffer
Enhanced Drivers
2
2
After installing the Sniffer Portable software, install the adapter and
Sniffer enhanced driver appropriate to your Sniffer Portable
configuration. This chapter provides detailed installation instructions for
the Sniffer enhanced drivers for Ethernet and FDDI adapters.
NOTE: Unless otherwise noted, the instructions support Notebook PC,
PAC 65, and Sniffer FlexPAC platforms.
Use Table 2–1 to quickly find the adapter and Sniffer enhanced driver
installation instructions you need for your Sniffer Portable PC
configuration.
Table 2–1. Finding What You Need in this Chapter
To perform the following...
Install Sniffer supported adapters and
enhanced drivers for Ethernet topologies
Install Sniffer supported adapters and
enhanced drivers for FDDI topologies
for...
see...
Windows XP
page 2-1
Windows NT
page 2-3
Windows 2000
page 2-7
Windows 98
SE
page 2-14
Windows NT
page 2-3
Installing Adapters and Sniffer Enhanced Drivers
on Windows XP
The Sniffer enhanced drivers for Windows XP are plug and play drivers.
The Sniffer enhanced drivers are placed in the <local install
drive>:\Program Files\ Nai\SnifferNT\Driver directory during the Sniffer
Portable installation. Table 2–2 lists the supported adapters for Windows
XP and the subdirectories where the Sniffer enhanced drivers can be
found.
Installation Guide
2-1
install.book Page 2 Wednesday, November 20, 2002 3:43 PM
Installing Adapters and Sniffer Enhanced Drivers
Table 2–2. Windows XP Sniffer Enhanced Driver Locations
Supported Adapter
<local install drive>:
\Program Files\Nai
\SnifferNT\Driver\...
Sniffer (Intel)
Intel\WinXP
Sniffer (Xircom)
Xircom\WinXP
Sniffer (IBM)
Ibm\WinXP
To install a Sniffer supported adapter and driver in Windows XP:
1. Make sure the Sniffer Portable software is installed. If it is not
installed, install it now according to the directions in Uninstalling
Previous Versions of Sniffer Portable on page 2-5.
2. Log in to Windows XP as an Administrator.
3. Insert the adapter in an available card slot on the target machine.
Windows XP automatically detects the new card and installs its native
device driver.
4. Open the Network Connections folder by selecting the Start > Control
Panel > Network Connections option.
5. Right-click on the Network Connection entry associated with the
adapter you just inserted and select the Properties command from the
menu that appears.
The Network Connections Properties dialog box appears.
6. Click the Configure button.
The Adapter Properties dialog box for the selected adapter appears.
7. Click on the Driver tab.
8. Click the Update Driver button.
The Hardware Update Wizard starts.
9. Select the Install from a list or specific location (Advanced) option.
and click Next.
10. Select the Don’t search option and click Next.
11. Click the Have Disk button.
The Install from Disk dialog box appears prompting you to supply the
path to the driver to install.
2-2
Sniffer Portable
install.book Page 3 Wednesday, November 20, 2002 3:43 PM
Installing Adapters and Sniffer Enhanced Drivers
12. Click the Browse button and navigate to the path where the driver for
the selected adapter is installed. See Table 2–2, above, for the location
of the appropriate driver files.
13. Click Open on the Browse dialog box.
You are returned to the Install from Disk dialog box.
14. Click OK on the Install from Disk dialog box.
If the operating system is configured to alert you to unsigned drivers,
a dialog box will appear warning you that you are about to install a
driver that has not been verified by Microsoft Corporation.
15. Click the Continue Anyway button to continue the installation.
The wizard installs the driver. When it has finished, it displays a
screen indicating that the driver is installed.
16. Click the Finish button to complete the installation.
You are returned to the Adapter Properties dialog box.
17. Click the OK button to clear the Adapter Properties dialog box.
Installing Adapters and Sniffer Enhanced Drivers
on Windows NT
The Sniffer enhanced drivers for Windows NT are not plug and play and
must be manually installed. If you have a previously installed driver, you
must first uninstall the driver before installing the Sniffer enhanced driver.
The Sniffer enhanced drivers are placed in the <local install
drive>:\Program Files \Nai\SnifferNT\Driver directory during the Sniffer
Portable installation. Table 2–3 lists the supported adapters for Windows
NT and the subdirectories where the Sniffer enhanced drivers can be
found.
Table 2–3. Windows NT Sniffer Enhanced Driver Locations
Supported Adapter
<local install drive>:
\Program Files\Nai
\SnifferNT\Driver\...
Sniffer (Adaptec) PCI Ethernet Adapter
(ANA-21140/UC & ANA-6911/UC)
adaptec\WinNT
Sniffer (Adaptec) PCI Ethernet Adapter
(ANA-6911A/TX/TXC)
Sniffer (Xircom)
Xircom\WinNT
Installation Guide
2-3
install.book Page 4 Wednesday, November 20, 2002 3:43 PM
Installing Adapters and Sniffer Enhanced Drivers
Table 2–3. Windows NT Sniffer Enhanced Driver Locations
Supported Adapter
<local install drive>:
\Program Files\Nai
\SnifferNT\Driver\...
Sniffer (IBM)
Ibm\WinNT
Sniffer (NuCard) FDDI
fddi\WinNT
To install adapters and Sniffer enhanced drivers on Windows NT:
1. Ensure Sniffer Portable software is installed. If it is not installed, install
it now. See Uninstalling Previous Versions of Sniffer Portable on page 1-5.
2. If you have a previously installed driver (a previous version of a
Sniffer driver or another vendor’s driver), you must first uninstall the
driver before installing the Sniffer enhanced driver. Remove drivers in
Windows NT through the Adapters tab of the Network control panel.
3. Shut down the computer.
4. Following the manufacturer’s instructions, insert the supported
adapter into an available slot in your computer.
5. Start the computer and log in to Windows NT as an Administrator.
6. Go to Start > Settings > Control Panel, and double-click Network.
7. Click the Adapters tab.
8. Click Add.
9. In the Select Network Adapter dialog box, click Have Disk.
10. In the Insert Disk dialog box, enter the directory path where the
Sniffer enhanced driver is located. See Table 2–3 for Sniffer enhanced
driver locations.
For example, enter C:\Program Files\Nai\SnifferNT\Driver\Xircom\WinNT
for a Xircom Sniffer enhanced driver.
11. Click OK.
2-4
Sniffer Portable
install.book Page 5 Wednesday, November 20, 2002 3:43 PM
Installing Adapters and Sniffer Enhanced Drivers
12. Select the appropriate adapter in the Select OEM Option dialog box
(Adaptec example shown in Figure 2–1) and click OK.
Figure 2–1. Select OEM Option (Adaptec Example)
13. A Configuration dialog box with the adapter name in the title bar
appears. An Adaptec example is provided in Figure 2–2, a FDDI
example is provided in Figure 2–3.
Do not change the default setup specific to your installed adapter.
Click OK.
Figure 2–2. Adapter Configuration Properties (Adaptec Example)
Installation Guide
2-5
install.book Page 6 Wednesday, November 20, 2002 3:43 PM
Installing Adapters and Sniffer Enhanced Drivers
Figure 2–3. Adapter Configuration Properties (FDDI Example)
14. Click the Bindings tab to initialize the adapter.
15. Click the Protocols tab, select TCP/IP Protocol, then click Properties.
The Microsoft TCP/IP Properties dialog box opens (Figure 2–4).
Figure 2–4. Microsoft TCP/IP Properties Dialog Box (Adaptec
Example)
2-6
Sniffer Portable
install.book Page 7 Wednesday, November 20, 2002 3:43 PM
Installing Adapters and Sniffer Enhanced Drivers
16. In the Microsoft TCP/IP Properties dialog box, ensure the correct
adapter name is highlighted in the Adapter field.
17. Select one of the following IP address settings for the adapter:
• Obtain an IP address from a DHCP server. Reads and assigns the
IP address for the driver automatically.
• Specify an IP address. You must manually enter IP address
information for the driver in each field.
18. Click OK.
19. Click Close.
20. If an application error occurs in rundll32.exe, click Cancel in the error
message box. All added or modified settings will be saved.
21. Restart your computer.
Installing Adapters and Sniffer Enhanced Drivers
on Windows 2000
The Sniffer enhanced drivers for Windows 2000 are plug and play drivers.
The Sniffer enhanced drivers are placed in the <local install
drive>:\Program Files\ Nai\SnifferNT\Driver directory during the Sniffer
Portable installation. Table 2–4 lists the supported adapters for Windows
2000 and the subdirectories where the Sniffer enhanced drivers can be
found.
Table 2–4. Windows 2000 Sniffer Enhanced Driver Locations
Supported Adapter
<local install drive>:
\Program Files\Nai
\SnifferNT\Driver\...
Sniffer (Adaptec) PCI Ethernet Adapter
(ANA-21140/UC & ANA-6911/UC)
adaptec\Win2K
Sniffer (Adaptec) PCI Ethernet Adapter
(ANA-6911A/TX/TXC)
Sniffer (Intel)
Intel\Win2K
Sniffer (Xircom)
Xircom\Win2K
Sniffer (IBM)
Ibm\Win2K
The driver installation procedure for Windows 2000 is somewhat different
depending on whether you are updating an existing driver (either a
previous version of the Sniffer driver or another vendor’s driver) or
Installation Guide
2-7
install.book Page 8 Wednesday, November 20, 2002 3:43 PM
Installing Adapters and Sniffer Enhanced Drivers
installing the adapter and driver for the first time. Use the appropriate
procedure below.
• First Time Installation on page 2-8
• Updating an Existing Driver on page 2-10
First Time Installation
For Windows 2000, you install an adapter for the first time by inserting the
card in the PC and using the Found New Hardware Wizard, as follows.
To install an adapter and driver in Windows 2000 for the first time:
1. Make sure the Sniffer Portable software is installed. If it is not
installed, install it now. See Uninstalling Previous Versions of Sniffer
Portable on page 1-5.
2. Insert the supported adapter into an available slot in your computer
following the manufacturer’s instructions.
3. Start the computer and log in as an Administrator.
Windows 2000 presents the Found New Hardware Wizard to help
you install a new driver for the newly detected adapter (Figure 2–5).
NOTE: If Windows 2000’s plug-and-play feature automatically
installs a driver for the adapter instead of starting the Found New
Hardware Wizard, turn to Updating an Existing Driver on page 2-10 to
update the existing driver.
2-8
Sniffer Portable
install.book Page 9 Wednesday, November 20, 2002 3:43 PM
Installing Adapters and Sniffer Enhanced Drivers
Figure 2–5. The Wizard
4. Click Next in the Wizard window shown in Figure 2–5.
The Install Hardware Device Drivers window appears.
5. Select the Search for a suitable driver for my device option and click
Next.
The Locate Driver Files window appears.
6. Check only the Specify a location option and click Next.
The Found New Hardware Wizard prompts you to supply a path to
the device driver.
7. Click the Browse button and browse to the location of the Sniffer
enhanced driver. See Table 2–4 for Sniffer enhanced driver locations.
8. Click the OK button.
Windows 2000 scans for the driver and presents the Driver Files
Search Results window indicating that it has found the driver you
specified in the previous step.
9. Click Next on the Driver Files Search Results window.
The Digital Signature Not Found warning appears asking you if you
want to continue the installation.
10. Click Yes on the Digital Signature Not Found warning to continue the
installation.
11. Click Finish.
Installation Guide
2-9
install.book Page 10 Wednesday, November 20, 2002 3:43 PM
Installing Adapters and Sniffer Enhanced Drivers
12. Restart the computer.
Updating an Existing Driver
For Windows 2000, you update an existing driver using the Device
Manager. The procedure is the same regardless of whether you are
updating the vendor’s existing driver or a previous version of the Sniffer
driver.
To update an existing driver in Windows 2000:
1. Make sure the Sniffer Portable software is installed. If it is not
installed, install it now. See Uninstalling Previous Versions of Sniffer
Portable on page 1-5.
2. Make sure a supported adapter is installed in the target machine.
3. Start the computer and log in to Windows 2000 as an Administrator.
4. Start the Device Manager as follows:
a. Right-click on the My Computer icon and select the Properties
command from the menu that appears.
b. In the dialog box that appears, click on the Hardware tab.
c. Click the Device Manager button.
d. Expand the Network Adapters entry by clicking the + sign
adjacent to its entry.
5. Right-click on the entry for the adapter to be updated and select the
Properties command from the menu that appears.
NOTE: Right-click on the Sniffer (Adaptec) PCI Fast Ethernet
(ANA-6911/UC) adapter for DEC 21140 chips or Sniffer (Adaptec)
PCI Fast Ethernet (ANA-6911ATXC/ATX) adapter for DEC 21143
chips.
6. In the Adapter Properties dialog box, click the Driver tab.
7. Click the Update Driver button.
The Upgrade Device Driver Wizard starts.
8. Click Next in the Welcome dialog box.
9. In the Install Hardware Device Drivers dialog box (Figure 2–6), select
“Display a list of known drivers for this device so that I can choose
a specific driver” and click Next.
2-10
Sniffer Portable
install.book Page 11 Wednesday, November 20, 2002 3:43 PM
Installing Adapters and Sniffer Enhanced Drivers
Figure 2–6. Install Hardware Device Drivers (Adaptec Example)
10. In the Select Network Adapter dialog box (Figure 2–7), select the
appropriate adapter and click Have Disk.
NOTE: If you installed Sniffer (Adaptec) adapters, select Sniffer
(Adaptec) PCI Fast Ethernet (ANA-6911/UC) for DEC 21140 chips or
Sniffer (Adaptec) PCI Fast Ethernet (ANA-6911ATXC/ATX) for DEC
21143 chips.
Installation Guide
2-11
install.book Page 12 Wednesday, November 20, 2002 3:43 PM
Installing Adapters and Sniffer Enhanced Drivers
Figure 2–7. Select Network Adapter Dialog Box (Adaptec Example)
11. In the Install From Disk dialog box, browse to the location of the
Sniffer enhanced driver. See Table 2–4 for Sniffer enhanced driver
locations.
Figure 2–8. Install From Disk Dialog Box (Adaptec Example)
12. Click OK.
2-12
Sniffer Portable
install.book Page 13 Wednesday, November 20, 2002 3:43 PM
Installing Adapters and Sniffer Enhanced Drivers
13. In the Start Device Driver Installation dialog box, click Next.
Figure 2–9. Start Device Driver Installation (Adaptec Example)
14. At the message “Digital Signature Not Found,” click Yes to
successfully continue the Sniffer enhanced driver update.
15. Click Finish.
16. Restart the computer.
Notes on Previous Driver Installations on Windows 2000
For backup purposes, if you had previously installed drivers, your
original drivers are copied into the <local install directory>:\Program
Files\Nai\Sniffer\Driver\<Vendor name> \Win2K directory.
Installation Guide
2-13
install.book Page 14 Wednesday, November 20, 2002 3:43 PM
Installing Adapters and Sniffer Enhanced Drivers
Installing Adapters and Sniffer Enhanced Drivers
on Windows 98 SE
The Sniffer enhanced drivers for Windows 98 SE are plug and play
drivers. The Sniffer enhanced drivers are placed in the <local install
drive>:\ProgramFiles\ Nai\Sniffer\Driver directory during the Sniffer
Portable installation. Table 2–5 lists the supported adapters for Windows
98 SE and the subdirectories where the Sniffer enhanced drivers can be
found.
Table 2–5. Windows 98 SE Sniffer Enhanced Driver Locations
Supported Adapter
<local install drive>:
\Program Files\Nai
\Sniffer\Driver\...
(Sniffer (Adaptec) PCI Ethernet Adapter
(ANA-21140/UC & ANA-6911/UC)
adaptec\Win9x
Sniffer (Adaptec) PCI Ethernet Adapter
(ANA-6911A/TX/TXC)
Sniffer (Xircom)
Xircom\Win9x
Sniffer (IBM)
Ibm\Win9x
To install adapters and Sniffer enhanced drivers on Windows 98 SE:
1. Ensure Sniffer Portable software is installed. If it is not installed, install
it now. See Uninstalling Previous Versions of Sniffer Portable on page 1-5.
2. Shut down the computer.
3. Following the manufacturer’s instructions, insert the supported
adapter into an available slot in your computer.
4. Start the computer and log in as an Administrator.
Windows 98 SE automatically detects the new hardware and opens a
Wizard. The Wizard helps you find a device driver for the hardware.
5. Complete the steps in the Wizard to load the adapter and Sniffer
enhanced driver.
6. If prompted, restart the computer.
2-14
Sniffer Portable
install.book Page 15 Wednesday, November 20, 2002 3:43 PM
Installing Adapters and Sniffer Enhanced Drivers
Notes on Previous Adapter and Driver Installations on
Windows 98 SE
• If you have a previously installed adapter on Windows 98 SE, when
your computer restarts, Windows 98 SE automatically detects your
adapter and starts a Wizard to install the Sniffer enhanced drivers.
If Windows 98 SE does not detect the adapter, you can add the
adapters through the Start > Settings > Control Panel > Network
menu. The Sniffer enhanced drivers will be displayed in the adapter
list.
• If you have a previously installed driver, perform the following:
1. Go to Start > Settings > Control Panel and double-click Network.
2. From the list box at the top of the Configuration tab, select any
Sniffer supported adapter and click Remove.
3. Select OK and close the Network dialog box.
4. Restart your computer.
5. When your computer restarts, Windows 98 SE automatically
detects your adapter and starts a Wizard to install the Sniffer
enhanced drivers.
NOTE: For backup purposes, your original drivers are copied into the
<local install directory>:\Program Files\Nai\Sniffer\Driver\<Vendor name>
\Win9x directory.
Installation Guide
2-15
install.book Page 16 Wednesday, November 20, 2002 3:43 PM
Installing Adapters and Sniffer Enhanced Drivers
2-16
Sniffer Portable
install.book Page 1 Wednesday, November 20, 2002 3:43 PM
Installing Madge Adapters and
Enhanced Drivers
3
3
After installing the Sniffer Portable software, install the adapter and
enhanced driver appropriate to your Sniffer Portable configuration. This
chapter provides detailed installation instructions for Madge adapters and
Sniffer enhanced drivers.
NOTE: If you are installing a Madge Mk2 PCMCIA or CardBus adapter on
either a Windows 2000 or Windows XP PC, you must set some
configuration options for the card manually. Instructions on how to do
this are found in the corresponding installation sections starting on page
3-5 and page 3-7.
Use Table 3–1 to quickly find the adapter and enhanced driver installation
instructions you need for your Sniffer Portable PC configuration.
Table 3–1. Finding What You Need in this Chapter
To perform the
following...
Install Madge adapters
and enhanced drivers
Install Madge PCI
adapters and enhanced
drivers
Installing Madge PCMCIA
and CardBus adapters
and enhanced drivers
for...
see...
Windows NT
page 3-2
Windows XP
page 3-5
Windows 2000
page 3-7
Windows 98
SE
page 3-10
Windows NT
page 3-14
Windows 2000
page 3-7
Windows 98
SE
page 3-10
Windows NT
page 3-15
Windows XP
page 3-5
Windows 2000
page 3-7
Windows 98
SE
page 3-10
Installation Guide
3-1
install.book Page 2 Wednesday, November 20, 2002 3:43 PM
Installing Madge Adapters and Enhanced Drivers
Installing Madge Adapters and Enhanced Drivers
The instructions provided in this section detail installing supported
Madge adapters and enhanced drivers for PII, PIII and FlexPAC systems.
Windows NT
The Madge adapters and the Sniffer enhanced drivers for Windows NT
are not plug and play and must be manually installed. The Madge
enhanced drivers are placed in the <local install drive>: \Program
Files\Nai\SnifferNT\Driver\TRMadge directory during the Sniffer
Portable installation.
NOTE: See Installing Madge PCI Adapters and Enhanced Drivers on page 3-14
for instructions on installing Madge PCI adapters and enhanced drivers
on Windows NT, and Installing Madge PCMCIA and CardBus Adapters and
Enhanced Drivers on page 3-15 for instructions on installing Madge
PCMCIA and CardBus adapters and enhanced drivers on Windows NT.
To install Madge ISA adapters and enhanced drivers on Windows NT:
1. Ensure Sniffer Portable software is installed. If it is not installed, install
it now. See Uninstalling Previous Versions of Sniffer Portable on page 1-5.
2. If you have a previously installed driver (a previous version of a
Sniffer driver or another vendor’s driver), you must first uninstall the
driver before installing the Sniffer enhanced driver. Remove drivers in
Windows NT through the Adapters tab of the Network control panel.
3. Shut down the computer.
4. Following the manufacturer’s instructions, insert the supported
adapter into an available slot in your computer.
5. Start the computer and log in to Windows NT as an Administrator.
6. Go to Start > Programs > Administrative Tools (Common) > Windows
NT Diagnostics.
7. In the Windows NT Diagnostics dialog box, click the Resources tab.
The interrupt numbers currently in use on the computer are listed.
8. Choose an available IRQ and record the number for later use.
9. Click I/O Port in the Windows NT Diagnostics dialog. The I/O
addresses currently in use on the computer are listed.
3-2
Sniffer Portable
install.book Page 3 Wednesday, November 20, 2002 3:43 PM
Installing Madge Adapters and Enhanced Drivers
NOTE: The Madge ISA card only supports the following I/O locations:
0A20, 1A20, 2A20, and 3A20.
10. Choose an available I/O address from the supported list in Step 9 and
record the number for later use.
11. Click OK to exit the Windows NT Diagnostics dialog.
12. Next run the Token Ring configuration program from DOS to
configure the hardware settings on the Madge ISA adapter card. The
configuration program is installed when you install the Sniffer
Portable software.
13. Insert a DOS boot disk in the floppy drive. Sniffer does not supply a
DOS boot disk.
14. Navigate to the following directory:
<local install drive>:\Program Files\Nai\SnifferNT\Driver\TRMadge
15. Type trcfg at the prompt to run the trcfg.exe program.
16. Press F4 to start the Token Ring configuration program.
17. Select the Madge Smart 16/4 AT Plus Ringnode adapter and press
Enter.
18. Change the Token Ring configuration options to the recommended
settings listed in Table 3–2. Press Tab to select a field, then press Enter
to see a list of possible values, and then press F4.
Table 3–2. Token Ring Configuration Options
Option
Recommended Setting
Transfers
16bit PIO
IO Port
The address recorded in Step 9.
Ring Speed
4 or 16 depending on your network.
Interrupt
The number recorded in Step 7.
Smartrom
Disabled
19. When prompted to update the card configuration, press F4 (yes), and
press F4 again to exit the program.
20. Eject the DOS boot disk and restart the computer.
21. To complete the enhanced driver installation, turn to the enhanced
driver installation instructions on page 2-3 and continue the procedure
starting at Step 6.
Installation Guide
3-3
install.book Page 4 Wednesday, November 20, 2002 3:43 PM
Installing Madge Adapters and Enhanced Drivers
Notes on Previous Adapter Installations on Windows NT
If you have a Madge adapter card installed and working with a
non-Sniffer driver, you should install the Sniffer enhanced driver. The
instructions provided in this section detail installing enhanced drivers for
pre-existing or pre-installed Madge adapters on your Sniffer PC.
To install enhanced drivers for existing Madge adapters on Windows NT:
1. Ensure Sniffer Portable software is installed. If it is not installed, install
it now. See Uninstalling Previous Versions of Sniffer Portable on page 1-5.
2. If you have a previously installed driver, you must first uninstall the
driver before installing the Sniffer enhanced driver. Remove drivers in
Windows NT through the Adapters tab of the Network control panel.
3. Go to Start > Settings > Control Panel, and double-click Network.
4. Click the Adapters tab, select the Madge adapter, then click
Properties.
5. Record the I/O, IRQ, transfer method, and then click Cancel.
6. Click the Adapters tab, select the Madge adapter, and then click
Remove.
7. Click Add.
8. In the Select Network Adapter dialog, click Have Disk.
9. In the Insert Disk dialog box, specify the directory (including
complete path) where the enhanced driver is located. The default
location is shown below:
<local install drive>:\Program Files\Nai\SnifferNT\Driver\TRMadge\WinNt
10. Select Network Associates Smart 16/4 AT Plus Ringnode, then click
OK.
11. In the Configuration dialog box, change the settings to match the
configuration settings recorded in Step 5.
12. At this time, you can set any network related settings (for example,
TCP/IP settings). When set, click OK to close the Network dialog box.
13. If an application error occurs in rundll32.exe, click Cancel in the error
message box. All added or modified settings will be saved.
14. Restart the computer.
3-4
Sniffer Portable
install.book Page 5 Wednesday, November 20, 2002 3:43 PM
Installing Madge Adapters and Enhanced Drivers
Windows XP
The Sniffer enhanced drivers for Windows XP are plug and play drivers.
The Madge enhanced drivers are placed in the <local install drive>:
\Program Files\Nai\SnifferNT\Driver\TRMadge\WinXP directory during
the Sniffer Portable installation.
To install Madge adapters and enhanced drivers in Windows XP:
1. Make sure the Sniffer Portable software is installed. If it is not
installed, install it now according to the directions in Uninstalling
Previous Versions of Sniffer Portable on page 3-5.
2. Log in to Windows XP as an Administrator.
3. Insert the adapter in an available card slot on the target machine.
Windows XP automatically detects the new card and installs its native
device driver.
4. Open the Network Connections folder by selecting the Start > Control
Panel > Network Connections option.
5. Right-click on the Network Connection entry associated with the
adapter you just inserted and select the Properties command from the
menu that appears.
The Network Connections Properties dialog box appears.
6. If the QoS Packet Scheduler service is listed in the This connection
uses the following items list, disable it now by deselecting the
adjacent checkbox. See Unbinding the QoS Packet Scheduler Service from
Selected Adapters on page 3-9 for details.
7. Click the Configure button.
The Adapter Properties dialog box for the selected adapter appears.
8. Click on the Driver tab.
9. Click the Update Driver button.
The Hardware Update Wizard starts.
10. Select the Install from a list or specific location (Advanced) option.
and click Next.
11. Select the Don’t search option and click Next.
12. Does your adapter appear in the Wizard’s list?
– If yes, highlight its entry and click the Have Disk button.
– If no, simply click the Have Disk button.
Installation Guide
3-5
install.book Page 6 Wednesday, November 20, 2002 3:43 PM
Installing Madge Adapters and Enhanced Drivers
The Install from Disk dialog box appears prompting you to supply the
path to the driver to install.
13. Click the Browse button and navigate to the path where the driver for
the selected adapter is installed. The drivers for Madge adapters on
Windows XP are located at:
<local install drive>: \Program Files\Nai\SnifferNT\Driver\TRMadge\WinXP
14. Click Open on the Browse dialog box.
You are returned to the Install from Disk dialog box.
15. Click OK on the Install from Disk dialog box.
If the operating system is configured to alert you to unsigned drivers,
a dialog box will appear warning you that you are about to install a
driver that has not been verified by Microsoft Corporation.
16. Click the Continue Anyway button to continue the installation.
The wizard installs the driver. When it has finished, it displays a
screen indicating that the driver is installed.
17. Click the Finish button to complete the installation.
You are returned to the Adapter Properties dialog box.
18. Click the OK button to clear the Adapter Properties dialog box.
Configuring Madge Mk2 PCMCIA\CardBus Adapters (Windows XP)
Before you can use the Madge Mk2 PCMCIA or CardBus adapter with
Sniffer Portable on a Windows XP PC, you must set some configuration
options manually. The following procedure explains how.
To configure the Madge Mk2 PCMCIA or CardBus adapter:
1. Open the Network Connections folder by selecting the Start >
Settings > Network Connections option.
2. Right-click on the Network Connection entry associated with the
Madge Mk2 adapter and select the Properties command from the
menu that appears.
The Network Connections Properties dialog box appears.
3. Click the Configure button.
The Adapter Properties dialog box for the Madge Mk2 adapter
appears.
4. Click on the Advanced tab and make the following configuration
changes:
3-6
Sniffer Portable
install.book Page 7 Wednesday, November 20, 2002 3:43 PM
Installing Madge Adapters and Enhanced Drivers
• Set Promiscuous mode support to Yes.
• Set Respond to TEST/XID frames to No.
• Set Ring Speed to 16 Mbit/s.
5. Click Close.
Windows 2000
The Madge enhanced drivers are placed in the <local install drive>:
\Program Files\Nai\SnifferNT\Driver\TRMadge directory during the
Sniffer Portable installation.
The driver installation procedure for Windows 2000 is somewhat different
depending on whether you are updating an existing driver (either a
previous version of the Sniffer driver or another vendor’s driver) or
installing the adapter and driver for the first time. Use the appropriate
procedure below.
• First Time Installation on page 3-7
• Updating an Existing Driver on page 3-8
First Time Installation
For Windows 2000, you install an adapter for the first time by inserting the
card in the PC and using the Found New Hardware Wizard, as follows.
To install an adapter and driver in Windows 2000 for the first time:
1. Make sure the Sniffer Portable software is installed. If it is not
installed, install it now. See Uninstalling Previous Versions of Sniffer
Portable on page 1-5.
2. Insert the Madge adapter into an available slot in your computer
following the manufacturer’s instructions.
3. Start the computer and log in as an Administrator.
Windows 2000 presents the Found New Hardware Wizard to help
you install a new driver for the newly detected adapter.
NOTE: If Windows 2000’s plug-and-play feature automatically
installs a driver for the adapter instead of starting the Found New
Hardware Wizard, turn to Updating an Existing Driver on page 3-8 to
update the existing driver.
4. Click Next in the Wizard window.
Installation Guide
3-7
install.book Page 8 Wednesday, November 20, 2002 3:43 PM
Installing Madge Adapters and Enhanced Drivers
The Install Hardware Device Drivers window appears.
5. Select the Search for a suitable driver for my device option and click
Next.
The Locate Driver Files window appears.
6. Check only the Specify a location option and click Next.
The Found New Hardware Wizard prompts you to supply a path to
the device driver.
7. Click the Browse button and browse to the <local install drive>:\ Program
Files\Nai\SnifferNT\Driver\TRMadge\Win2K directory.
8. Click the OK button.
Windows 2000 scans for the driver and presents the Driver Files
Search Results window indicating that it has found the driver you
specified in the previous step.
9. Click Next on the Driver Files Search Results window.
The Digital Signature Not Found warning appears asking you if you
want to continue the installation.
10. Click Yes on the Digital Signature Not Found warning to continue the
installation.
11. Click Finish.
12. Restart the computer.
13. Manually configure the Madge Mk2 driver for Sniffer Portable
operations using the procedure in Configuring Madge Mk2
PCMCIA\CardBus Adapters (Windows 2000) on page 3-10.
Updating an Existing Driver
For Windows 2000, you update an existing driver using the Device
Manager. The procedure is the same regardless of whether you are
updating the vendor’s existing driver or a previous version of the Sniffer
driver.
To install Madge adapters and enhanced drivers on Windows 2000:
1. Make sure that the Sniffer Portable software is installed. If it is not
installed, install it now. See Uninstalling Previous Versions of Sniffer
Portable on page 1-5.
2. Make sure a supported adapter is installed in the target machine.
3. Start the computer and log in to Windows 2000 as an Administrator.
4. Start the Device Manager as follows:
3-8
Sniffer Portable
install.book Page 9 Wednesday, November 20, 2002 3:43 PM
Installing Madge Adapters and Enhanced Drivers
a. Right-click on the My Computer icon and select the Properties
command from the menu that appears.
b. In the dialog box that appears, click on the Hardware tab.
c. Click the Device Manager button.
d. Expand the Network Adapters entry by clicking the + sign
adjacent to its entry.
5. Right-click on the entry for the Madge adapter and select the
Properties command from the menu that appears.
6. In the Adapter Properties dialog box, click the Driver tab.
7. Click the Update Driver button.
The Upgrade Device Driver Wizard starts.
8. Click Next in the Welcome dialog box.
9. Select “Display a list of known drivers for this device so that I can
choose a specific driver.”
10. Click Next.
11. In the Upgrade Device Driver wizard, click Have Disk.
12. In the Install From Disk dialog box, browse to the <local install drive>:\
Program Files\Nai\SnifferNT\Driver\TRMadge\Win2K directory.
13. Click OK.
14. In the Upgrade Device Driver wizard, select the installed Madge
adapter.
15. Click Next.
16. In the dialog box that appears, click Next.
17. At the message “Digital Signature Not Found,” click Yes to continue
the driver update.
18. Click on the General tab in the Connection Properties dialog box. If
the QoS Packet Scheduler service is listed in the Components
checked are used by this connection list, disable it now by deselecting
the adjacent checkbox. See Unbinding the QoS Packet Scheduler Service
from Selected Adapters on page 3-9 for details.
19. Click Finish.
20. Restart the computer.
21. Manually configure the Madge Mk2 driver for Sniffer Portable
operations using the procedure in Configuring Madge Mk2
PCMCIA\CardBus Adapters (Windows 2000) on page 3-10.
Installation Guide
3-9
install.book Page 10 Wednesday, November 20, 2002 3:43 PM
Installing Madge Adapters and Enhanced Drivers
Configuring Madge Mk2 PCMCIA\CardBus Adapters (Windows
2000)
Before you can use the Madge Mk2 PCMCIA or CardBus adapter with
Sniffer Portable on a Windows 2000 PC, you must set some configuration
options manually. The following procedure explains how.
To configure the Madge Mk2 PCMCIA or CardBus adapter:
1. Start the Device Manager as follows:
a. Right-click on the My Computer icon and select the Properties
command from the menu that appears.
b. In the dialog box that appears, click on the Hardware tab.
c. Click the Device Manager button.
d. Expand the Network Adapters entry by clicking the + sign
adjacent to its entry.
2. Right-click on the entry for the Madge Mk2 adapter and select the
Properties command from the menu that appears.
3. Click on the Advanced tab and make the following configuration
changes:
• Set Promiscuous mode support to Yes.
• Set Respond to TEST/XID frames to No.
• Set Ring Speed to 16 Mbit/s.
4. Click Close.
Windows 98 SE
For Windows 98 SE, the Madge adapter is not plug and play. The
following sections describe how to install the Madge adapter and the
Sniffer enhanced driver. The enhanced drivers are placed in the <local
install drive>:\Program Files\Nai\Sniffer\Driver\TRMadge directory
during the Sniffer Portable installation.
To install Madge adapters and enhanced drivers on Windows 98 SE:
1. Ensure Sniffer Portable software is installed. If it is not installed, install
it now. See Uninstalling Previous Versions of Sniffer Portable on page 1-5.
2. Shut down the computer.
3. Following the manufacturer’s instructions, insert the Madge adapter
card into an available slot in your computer.
3-10
Sniffer Portable
install.book Page 11 Wednesday, November 20, 2002 3:43 PM
Installing Madge Adapters and Enhanced Drivers
4. Start the computer.
5. Go to Start > Settings > Control Panel, and double-click System.
6. Click the Device Manager tab and highlight the Computer entry.
7. Click Properties.
8. In the Computer Properties dialog box, select an available IRQ and
record the number for later use.
9. Click Input/output (I/O) at the top of the Computer Properties dialog
box. The I/O addresses currently in use on the computer are listed.
NOTE: The Madge ISA card only supports the following I/O
locations: 0A20, 1A20, 2A20, and 3A20.
10. Choose an available I/O address and record the number for later use.
11. Exit the System Properties dialog box.
12. Next run the Token Ring configuration program from DOS to
configure the hardware settings on the Madge adapter card. The
configuration program is installed when you install the Sniffer
Portable software.
13. Go to Start > Shut Down, select Restart the computer in MS-DOS
mode, and click Yes.
14. At the DOS prompt, navigate to the following directory:
<local install drive>:\Program Files\Nai\Sniffer\Driver\trmadge
15. Run the trcfg.exe program by typing trcfg at the prompt.
16. Press F4 to start the Token Ring configuration program.
17. Select the Madge Smart 16/4 AT Plus Ringnode adapter and press
Enter.
18. Change the Token Ring configuration options to the recommended
settings listed in Table 3–3.
19. Press Tab to select the field, press Enter to see a list of possible values,
and then press F4.
Table 3–3. Token Ring Configuration Options
Option
Setting
Transfers
16bit PIO
IO Port
The address recorded in Step 7.
Installation Guide
3-11
install.book Page 12 Wednesday, November 20, 2002 3:43 PM
Installing Madge Adapters and Enhanced Drivers
Option
Setting
Ring Speed
4 or 16 depending on your network.
Interrupt
The number recorded in Step 9.
Smartrom
Disabled
20. When prompted to update the card configuration, press F4 (yes), then
press F4 again to exit the program.
21. Go to Start > Settings > Control Panel, and double-click Network.
22. Click the Configuration tab.
23. From the list box at the top, select all Sniffer supported adapters that
are not using Sniffer enhanced drivers and click Remove.
24. Click Add.
25. Select Adapter, then click Add.
26. In the Manufacturers list box, select Network Associates, Inc.
27. In the Network Adapters list box, select Network Associates Smart
16/4 AT Plus Ringnode, then click OK. A configuration menu will
appear.
28. Change the hardware settings to match the settings recorded in Step 7
and Step 10, and click OK.
29. At this time, you can set any network related settings (for example,
TCP/IP settings).
30. Select OK to close the Network dialog box.
31. Restart the computer.
Notes on Previous Adapter Installations on Windows 98 SE
If you have a Madge adapter card already installed, perform the
following.
To install enhanced drivers for existing Madge adapters on Windows NT:
1. Go to Start > Settings > Control Panel, and select Network.
2. Select the Madge adapter card and click Properties.
3. Click the Resources tab and record the hardware settings for this
adapter for later use.
4. Click Cancel, then click the Configuration tab.
5. From the list box at the top of the Configuration tab, select the Madge
adapter card and click Remove.
3-12
Sniffer Portable
install.book Page 13 Wednesday, November 20, 2002 3:43 PM
Installing Madge Adapters and Enhanced Drivers
6. Click Add.
7. Select Adapter, then click Add.
8. In the Manufacturers list box, select Network Associates, Inc.
9. In the Network Adapters list box, select Network Associates Smart
16/4 AT Plus Ringnode, then click OK.
10. In the Configuration tab of the Network dialog box, select Network
Associates Smart 16/4 AT Plus Ringnode, then click Properties.
11. Change the hardware settings to match the setting recorded in Step 3,
then click OK.
12. At this time, you can set any network related settings (for example,
TCP/IP settings).
13. Click OK to close the Network dialog box.
14. Restart the computer.
Installation Guide
3-13
install.book Page 14 Wednesday, November 20, 2002 3:43 PM
Installing Madge Adapters and Enhanced Drivers
Installing Madge PCI Adapters and Enhanced
Drivers
The instructions provided in this section detail installing supported
Madge PCI adapters and enhanced drivers for PII, PIII and FlexPAC
systems running Windows NT.
NOTE: For Windows 2000 and Windows 98 SE, the instructions for
installing the Madge PCI adapter and enhanced driver are the same as the
instructions for Installing Madge Adapters and Enhanced Drivers for Windows
2000 on page 3-7 and Windows 98 SE on page 3-10.
To install Madge PCI adapters and enhanced drivers on Windows NT:
1. Ensure Sniffer Portable software is installed. If it is not installed, install
it now. See Uninstalling Previous Versions of Sniffer Portable on page 1-5.
2. If you have a previously installed driver (a previous version of a
Sniffer driver or another vendor’s driver), you must first uninstall the
driver before installing the Sniffer enhanced driver. Remove drivers in
Windows NT through the Adapters tab of the Network control panel.
3. Shut down the computer.
4. Following the manufacturer’s instructions, insert the Madge PCI
adapter card into an available slot in your computer.
5. Start the computer.
6. Go to Start > Settings > Control Panel.
7. Double-click the Network icon, then click the Adapters tab.
8. Click Add.
9. In the Select Network Adapter dialog box, click Have Disk.
10. In the Insert Disk dialog box specify the complete path for the Madge
PCI Adapter enhanced driver.
11. Click OK.
12. In the Select OEM Option dialog box select Sniffer (Madge)
Automated Installation - RECOMMENDED and click OK.
The Network dialog box appears with the Madge PCI adapter
installed.
13. In the Network dialog box, click Close to perform the bindings.
The TCP/IP Setup dialog box appears.
3-14
Sniffer Portable
install.book Page 15 Wednesday, November 20, 2002 3:43 PM
Installing Madge Adapters and Enhanced Drivers
14. In the Adapter drop down list, select the installed adapter.
15. Enter the IP Address and Subnet Mask, and click OK.
16. Restart the computer.
Installing Madge PCMCIA and CardBus Adapters
and Enhanced Drivers
The instructions provided in this section detail installing supported
Madge PCMCIA and CardBus adapters and enhanced drivers for
Windows NT laptop systems.
NOTE: For Windows XP, Windows 2000, and Windows 98 SE, the
instructions for installing the Madge PCMCIA and CardBus adapter and
enhanced driver are the same as the instructions for Installing Madge
Adapters and Enhanced Drivers for Windows XP on page 3-5, Windows 2000 on
page 3-7, and Windows 98 SE on page 3-10.
To install Madge PCMCIA and CardBus adapters and enhanced drivers
on Windows NT:
1. Ensure Sniffer Portable software is installed. If it is not installed, install
it now. See Uninstalling Previous Versions of Sniffer Portable on page 1-5.
2. If you have a previously installed driver (a previous version of a
Sniffer driver or another vendor’s driver), you must first uninstall the
driver before installing the Sniffer enhanced driver. Remove drivers in
Windows NT through the Adapters tab of the Network control panel.
3. Shut down the computer.
4. Following the manufacturer’s instructions, insert the Madge PCMCIA
or CardBus adapter card into an available slot in your computer.
5. Start the computer.
6. Go to Start > Settings > Control Panel.
7. Double-click the Network icon, then click the Adapters tab.
8. Click Add.
9. In the Select Network Adapter dialog box, click Have Disk.
10. In the Insert Disk dialog box specify the complete path for the Madge
PCMCIA or CardBus adapter enhanced driver.
11. Click OK.
Installation Guide
3-15
install.book Page 16 Wednesday, November 20, 2002 3:43 PM
Installing Madge Adapters and Enhanced Drivers
12. In the Select OEM Option dialog box, select Sniffer (Madge)
PCMCIA/CardBus Adapter MK2 and click OK.
13. In the Setup Message dialog box, click OK.
The Network dialog box appears with the Madge PCMCIA or
CardBus adapter installed.
14. In the Network dialog box, click Close to perform the bindings.
The TCP/IP Setup dialog box appears.
15. In the Adapter drop down list, select the installed adapter.
16. Enter the IP Address and Subnet Mask, and click OK.
17. Restart the computer.
3-16
Sniffer Portable
install.book Page 1 Wednesday, November 20, 2002 3:43 PM
Network Associates
Support Services
A
A
Adding Value To Your Network Associates Product
Sniffer Technologies network management software helps to ensure that
the critical technology you rely on functions smoothly and effectively.
Taking advantage of a Network Associates support plan extends the
protection you get from your software by giving you access to the
expertise you need to install, monitor, maintain and upgrade your system
with the latest Network Associates technology. With a support plan
tailored to your needs, you can keep your system or your network
working dependably in your computing environment for months or years
to come.
Corporate customers can choose from four levels of extended support
under the Network Associates Corporate PrimeSupport program.
PrimeSupport Options for Corporate Customers
The Corporate PrimeSupport program offers these four support plans:
• PrimeSupport KnowledgeCenter Plan
• PrimeSupport Connect Plan
• PrimeSupport Priority Plan
• PrimeSupport Enterprise Plan
Each plan has a range of features that provide you with cost-effective and
timely support geared to meet your needs. The following sections describe
each plan in detail.
The PrimeSupport KnowledgeCenter Plan
The PrimeSupport KnowledgeCenter Plan gives you access to an
extensive array of technical support information via a Network Associates
online knowledge base, and download access to product upgrades from
the Network Associates website. If you purchased your Network
Associates product with a subscription license, you receive the
PrimeSupport KnowledgeCenter Plan as part of the package, for the
length of your subscription term.
A-1
install.book Page 2 Wednesday, November 20, 2002 3:43 PM
Network Associates Support Services
If you purchased a perpetual license for your Network Associates product,
you can purchase a PrimeSupport KnowledgeCenter Plan for an annual
fee.
To receive your KnowledgeCenter password or to register your
PrimeSupport agreement with Network Associates, visit:
http://www.nai.com/asp_set/support/introduction/default.asp
Your completed form will go to the Network Associates Customer Service
Center. You must submit this form before you connect to the
PrimeSupport KnowledgeCenter site.
With the PrimeSupport KnowledgeCenter Plan, you get:
• Unrestricted, 24-hour-per-day online access to technical solutions
from a searchable knowledge base within the Network Associates
website
• Electronic incident and query submission
• Technical documents, including user’s guides, FAQ lists, and release
notes
• Online data file updates and product upgrades
The PrimeSupport Connect Plan
The PrimeSupport Connect Plan gives you telephone access to essential
product assistance from experienced technical support staff members.
With this plan, you get:
• In North America, unlimited toll-free telephone access to technical
support from Monday through Friday, 8:00 AM to 8:00 PM Central
Time
• In Europe, the Middle East, and Africa, unlimited telephone access to
technical support, at standard long-distance or international rates,
Monday through Friday, from 9:00 AM to 6:00 PM local time
• In the Asia-Pacific region, unlimited toll-free, telephone access to
technical support, Monday through Friday, from 8:00 AM to 6:00 PM
AEST
• In Latin America, unlimited telephone access to technical support, at
standard long-distance or international rates, Monday through
Friday, from 9:00 AM to 5:00 PM Central Time
• Unrestricted, 24-hour-per-day online access to technical solutions
from a searchable knowledge base within the Network Associates
website
• Electronic incident and query submission
A-2
Sniffer Portable
install.book Page 3 Wednesday, November 20, 2002 3:43 PM
Network Associates Support Services
• Technical documents, including user’s guides, FAQ lists, and release
notes
• Data file updates and product upgrades via the Network Associates
website
The PrimeSupport Priority Plan
The PrimeSupport Priority Plan gives you round-the-clock telephone
access to essential product assistance from experienced Network
Associates technical support staff members. You can purchase the
PrimeSupport Priority Plan on an annual basis when you purchase a
Network Associates product, either with a subscription license or a
one-year license.
The PrimeSupport Priority Plan has these features:
• In North America, unlimited toll-free telephone access to technical
support from Monday through Friday, 8:00 AM to 8:00 PM Central
Time
• In Europe, the Middle East, and Africa, unlimited telephone access to
technical support, at standard long-distance or international rates,
Monday through Friday, from 9:00 AM to 6:00 PM local time
• In the Asia-Pacific region, unlimited toll-free, telephone access to
technical support, Monday through Friday, from 8:00 AM to 6:00 PM
AEST
• In Latin America, unlimited telephone access to technical support, at
standard long-distance or international rates, Monday through
Friday, from 9:00 AM to 5:00 PM Central Time
• Priority access to technical support staff members during regular
business hours
• Responses within one hour for urgent issues that happen outside
regular business hours, including those that happen during weekends
and local holidays
• Unrestricted, 24-hour-per-day online access to technical solutions
from a searchable knowledge base within the Network Associates
website
• Electronic incident and query submission
• Technical documents, including user’s guides, FAQ lists, and release
notes
• Data file updates and product upgrades via the Network Associates
website
Installation Guide
A-3
install.book Page 4 Wednesday, November 20, 2002 3:43 PM
Network Associates Support Services
The PrimeSupport Enterprise Plan
The PrimeSupport Enterprise Plan gives you round-the-clock,
personalized, proactive support from an assigned technical support
engineer. You’ll enjoy a relationship with a support professional who is
familiar with your Network Associates product deployment and support
history, and who will call you at an interval you designate to verify that
you have the knowledge you need to use and maintain Network
Associates products.
By calling in advance, your PrimeSupport Enterprise representative can
help to prevent problems before they occur. If, however, an emergency
arises, the PrimeSupport Enterprise Plan gives you a committed response
time that assures you that help is on the way. You may purchase the
PrimeSupport Enterprise Plan on an annual basis when you purchase a
Network Associates product, either with a subscription license or a
one-year license.
With the PrimeSupport Enterprise Plan, you get:
• Unlimited, toll-free telephone access to an assigned technical support
engineer on a 24-hour-per-day, seven-day-per-week basis, including
during weekends and local holidays.
NOTE: The availability of toll-free telephone support varies by region
and is not available in some parts of Europe, the Middle East, Africa,
and Latin America.
• Proactive support contacts from your assigned support engineer via
telephone or e-mail, at intervals you designate
• Committed response times from your support engineer, who will
respond to pages within half an hour, to voice mail within one hour,
and to e-mail within four hours
• Assignable customer contacts, which allow you to designate five
people in your organization who your support engineer can contact in
your absence
• Optional beta site status, which gives you access to the absolute latest
Network Associates products and technology
• Unrestricted, 24-hour-per-day online access to technical solutions
from a searchable knowledge base within the Network Associates
website
• Electronic incident and query submission
A-4
Sniffer Portable
install.book Page 5 Wednesday, November 20, 2002 3:43 PM
Network Associates Support Services
• Technical documents, including user’s guides, FAQ lists, and release
notes
• Online data file updates and product upgrades
Ordering a Corporate PrimeSupport Plan
To order any PrimeSupport Plan, contact your sales representative, or
• In North America, call Network Associates at (972) 308-9960, Monday
through Friday from 8:00 AM to 7:00 PM Central Time. Press 3 on your
telephone keypad for sales assistance.
• In Europe, the Middle East, and Africa, contact your local Network
Associates office. Contact information appears near the front of this
guide.
Installation Guide
A-5
install.book Page 6 Wednesday, November 20, 2002 3:43 PM
Network Associates Support Services
Table A–1. Corporate PrimeSupport Plans at a Glance
Plan
Feature
Knowledge Center
Plan
Connect Plan
Priority Plan
Enterprise Plan
Technical
support via
website
Yes
Yes
Yes
Yes
Software
updates
Yes
Yes
Yes
Yes
Technical
support via
telephone
—
Monday–Friday
Monday–Friday, after Monday–Friday, after
hours emergency
hours emergency
access
access
North America:
8 AM–8 PM CT
North America:
8 AM–8 PM CT
Europe, Middle East,
Africa:
Europe, Middle East,
9 AM-6 PM local time Africa:
9 AM-6 PM local time
Asia-Pacific:
8 AM-6 PM AEST
Asia-Pacific:
8 AM-6 PM AEST
Latin America:
Latin America:
9 AM-5 PM CT
9 AM-5 PM CT
North America:
8 AM–8 PM CT
Europe, Middle East,
Africa:
9 AM-6 PM local time
Asia-Pacific:
8 AM-6 PM AEST
Latin America:
9 AM-5 PM CT
Priority call
handling
—
—
Yes
Yes
After-hours
support
—
—
Yes
Yes
Assigned
support
engineer
—
—
—
Yes
Proactive
support
—
—
—
Yes
Designated
contacts
—
—
—
At least 5
Response
charter
E-mail within one
business day
Calls answered in 3 Within 1 hour for
minutes, response in urgent issues after
one business day
business hours
After hours pager: 30
minutes
Voicemail: 1 hour
E-mail: 4 hours
A-6
Sniffer Portable
install.book Page 7 Wednesday, November 20, 2002 3:43 PM
Network Associates Support Services
The PrimeSupport options described in the rest of this chapter are
available only in North America. To find out more about PrimeSupport,
Training and Consultancy options available outside North America,
contact your regional sales office. International contact information
appears in the Preface of this guide.
Table A–2. International Prime Support Information
Country or Region
Phone Number*
Bulletin Board System
Germany
+49 (0)69 21901 300
+49 89 894 28 999
France
+33 (0)1 4993 9002
+33 (0)1 4522 7601
United Kingdom
+44 (0)171 5126099
+44 1344-306890
Italy
+31 (0)55 538 4228
+31 (0)20 586 6128
Netherlands
+31 (0)55 538 4228
+31 (0)20 586 6128
Europe
+31 (0)55 538 4228
+31 (0)20 688 5521
Latin America
+55-11-3794-0125
+55-11-5506-9100
* Long distance charges may apply.
Network Associates Consulting and Training
The Network Associates Total Service Solutions program provides you
with expert consulting and comprehensive education that can help you
maximize the security and performance of your network investments. The
Total Service Solutions program includes the Network Associates
Professional Consulting arm and the Educational Services program.
Professional Services
Network Associates Professional Services is ready to assist you during all
stages of your network growth, from planning and design, through
implementation, and with ongoing management. Network Associates
consultants provide an expert’s independent perspective that you can use
as a supplemental resource to resolve your problems. You’ll get help
integrating Network Associates products into your environment, along
with troubleshooting assistance or help in establishing baselines for
network performance. Network Associates consultants also develop and
deliver custom solutions to help accomplish your project goals—from
lengthy, large-scale implementations to brief problem-solving
assignments.
Installation Guide
A-7
install.book Page 8 Wednesday, November 20, 2002 3:43 PM
Network Associates Support Services
Jumpstart Services
For focused help with specific problem resolution or software
implementation issues, Network Associates offers a Jumpstart Service that
gives you the tools you need to manage your environment. This service
can include these elements:
• Installation and optimization. This service brings a Network
Associates consultant onsite to install, configure, and optimize your
new Network Associates product and give basic operational product
knowledge to your team.
• Selfstart knowledge. This service brings a Network Associates
consultant onsite to help prepare you to perform your new product
implementation on your own and, in some cases, to install the
product.
• Proposal Development. This service helps you to evaluate which
processes, procedures, hardware and software you need before you
roll out or upgrade Network Associates products, after which a
Network Associates consultant prepares a custom proposal for your
environment.
Network Consulting
Network Associates consultants provide expertise in protocol analysis
and offer a vendor-independent perspective to recommend unbiased
solutions for troubleshooting and optimizing your network. Consultants
can also bring their broad understanding of network management best
practices and industry relationships to speed problem escalation and
resolution through vendor support.
You can order a custom consultation to help you plan, design, implement,
and manage your network, which can enable you to assess the impact of
rolling out new applications, network operating systems, or
internetworking devices.
To learn more about the options available:
• Contact your regional sales representative.
• In North America, call Network Associates at (972) 308-9960, Monday
through Friday from 8:00 AM to 7:00 PM Central Time.
• Visit the Network Associates website at:
http://www.nai.com/asp_set/services/introduction/default.asp
A-8
Sniffer Portable
install.book Page 9 Wednesday, November 20, 2002 3:43 PM
Network Associates Support Services
Educational Services
Network Associates Educational Services builds and enhances the skills of
all network professionals through practical, hands-on instruction. The
Educational Services technology curriculum focuses on network fault and
performance management and teaches problem-solving at all levels.
Network Associates also offers modular product training so that you
understand the features and functionality of your new software.
You can enroll in Educational Services courses year-round at Network
Associates educational centers, or you can learn from customized courses
conducted at your location. All courses follow educational steps along a
learning path that takes you to the highest levels of expertise. Network
Associates is a founding member of the Certified Network Expert (CNX)
consortium. To learn more about these programs:
• Contact your regional sales representative.
• Call Network Associates Educational Services at (800) 395-3151 Ext.
2670 (for private course scheduling) or (888) 624-8724 (for public
course scheduling).
• Visit the Network Associates website at:
http://www.nai.com/naicommon/services/education.asp
Installation Guide
A-9
install.book Page 10 Wednesday, November 20, 2002 3:43 PM
Network Associates Support Services
A-10
Sniffer Portable
install.book Page 1 Wednesday, November 20, 2002 3:43 PM
Index
Numerics
2000
see Windows 2000
98 SE
see Windows 98
A
Adaptec
adapters ....................................1-13, 2-3
enhanced driver location 2-3, 2-7, 2-14
adapters
installing Madge adapters .............. 3-2
installing on Ethernet ...................... 2-4
installing on FDDI ............................ 2-4
supported for Sniffer Pro .............. 1-13
ATM SAR adapter
see the ATM Adapters Installation,
Connection, and Configuration Guide
C
Cardbus adapter installation .................. 3-15
Cisco adapter
see the Sniffer Wireless Manual
Connect Plan .............................................. A-2
consulting services ....................................A-7
drivers
see enhanced drivers
E
educational services, description of ....... A-9
enhanced drivers
function ........................................... 1-13
installing on Windows 2000 . 2-3, 2-10,
2-14
installing on Windows 98 ............. 3-10
installing on Windows NT ............. 2-3
installing on Windows XP .............. 2-1
location (Windows 2000) ......... 2-2, 2-7
location (Windows NT) ................... 2-3
plug and play (Windows 2000) 2-1, 2-7,
3-5
enhanced Madge drivers
installing on Windows 2000 ........... 3-7
installing on Windows 98 ............. 3-10
installing on Windows NT ............. 3-2
installing on Windows XP .............. 3-5
Enterasys RoamAbout adapter
see the Sniffer Wireless Manual
Enterprise Plan .......................................... A-4
error messages during Sniffer Pro installation
1-12
contacting
Customer Service ............................... ix
international NAI offices ................... x
NAI Technical Support ..................... ix
Ethernet supported adapters ................. 1-13
Customer Service ......................................... ix
enhanced driver location ................ 2-4
supported adapters ........................ 1-14
F
FDDI
D
FDX PCI adapter
see the Full Duplex Guide
default user namepassword for turnkey units
1-2
downloading Sniffer Pro upgrades ....... 1-12
Installation Guide
Index-1
install.book Page 2 Wednesday, November 20, 2002 3:43 PM
Index
removing ......................................... 1-10
G
Gigabit Ethernet adapter
see the Gigabit Ethernet Installation and
Connection Guide
H
HSSI PCI adapter
see the Installing, Connecting, and
Configuring WAN Hardware Guide
I
IBM
adapters ........................................... 1-13
enhanced driver location .2-2, 2-4, 2-7,
2-14
installation requirements (Sniffer Pro) .... 1-1
installing
enhanced drivers on Ethernet ........ 2-4
Madge adapters ................................ 3-2
Microsoft Internet Explorer .......... 1-11
Microsoft Virtual Machine ............ 1-11
Sniffer Pro .......................................... 1-6
insufficient space error ............................ 1-12
Intel
enhanced driver location ................ 2-2
ISA (Madge) drivers
see Madge ISA drivers
K
KnowledgeCenter ..................................... A-1
L
laptop, supported ..................................... 1-13
LM2000 ISA adapter
see the Installing, Connecting, and
Configuring WAN Hardware Guide
Madge drivers
see enhanced Madge drivers
Madge ISA adapters
installing in Windows 98 .............. 3-10
installing on Windows 98 ............. 3-10
installing on Windows NT .... 3-2, 3-10
installing the enhanced driver
(Windows 98) .............................. 3-10
installing the enhanced driver
(Windows NT) .............................. 3-4
Madge ISA drivers
installing on Windows 2000 ........... 3-7
installing on Windows 98 ............. 3-10
installing on Windows NT ........... 3-10
Madge PCI adapter installation ............. 3-14
Madge PCMIA adapter installation ...... 3-15
McAfee VirusScan
settings for turnkey Sniffer Portable
units .............................................. 1-11
messages (errors) during installation ... 1-12
Microsoft Internet Explorer, installing . 1-11
Microsoft Virtual Machine, installing ... 1-11
MVM
see Microsoft Virtual Machine
N
NAI Enhanced drivers
see enhanced drivers
NAI Technical Support, contacting ........... ix
Network Associates
consulting services .......................... A-7
educational services ........................ A-9
international offices .............................x
Sniffer University ............................ A-7
NT
see Windows NT
M
MAC Bridge Miniport Driver
Index-2
Madge Cardbus adapter installation .... 3-15
Sniffer Portable
NuCard
adapter ............................................. 1-14
install.book Page 3 Wednesday, November 20, 2002 3:43 PM
Index
enhanced driver location ................ 2-4
supported adapters ........................ 1-13
supported topologies .................... 1-13
uninstalling ....................................... 1-5
upgrades available on the Web ... 1-12
O
ordering PrimeSupport plans .................. A-5
P
password
default for turnkey units ................. 1-2
PCI adapters installation ......................... 3-14
PCMIA adapter installation .................... 3-15
plug and play drivers ...........2-1, 2-7, 3-5, 3-7
power considerations for Sniffer Portable 1-11
Prime Support ............................................ A-6
Priority Plan ............................................... A-3
product registration ................................. 1-11
product training
see Sniffer University
Professional Consulting Services ............ A-7
Q
QoS Packet Scheduler Service
removing ........................................... 1-7
R
registering Sniffer Pro ............................. 1-11
requirements for installation .................... 1-1
S
SAR (ATM) adapter
see the ATM Adapters Installation,
Connection, and Configuration Guide
Sniffer enhanced drivers
see enhanced drivers
Sniffer Portabe
power considerations .................... 1-11
Sniffer Pro
installing ............................................ 1-6
registration ...................................... 1-11
Sniffer University .................................. x, A-7
supported laptops .................................... 1-13
supported topologies (Sniffer Pro) ........ 1-13
Symbol Spectrum adapter
see the Sniffer Wireless Manual
system requirements (Sniffer Pro) ........... 1-1
T
Technical Support ........................................ ix
Token Ring supported adapters ............ 1-14
topologies
see supported topologies
Total Education Services .......................... A-7
training
see Sniffer University
U
uninstalling Sniffer Pro ............................. 1-5
upgrades, downloading .......................... 1-12
user name
default for turnkey units ................. 1-2
W
Windows 2000 .......................................... 2-14
IBM enhanced driver location ........ 2-7
installing adapters ........................... 2-7
installing enhanced drivers .......... 2-10
installing Madge enhanced drivers 3-7
plug and play drivers .2-1, 2-7, 3-5, 3-7
Xircom CardBus Ethernet II 10/100 2-3
Xircom enhanced driver location .. 2-7
Windows 98
Adaptec enhanced driver location 2-14
IBM enhanced driver location ...... 2-14
installing enhanced drivers .......... 2-14
Installation Guide
Index-3
install.book Page 4 Wednesday, November 20, 2002 3:43 PM
Index
Madge ISA adapter installation ... 3-10
Madge ISA driver installation ...... 3-10
Xircom enhanced driver location 2-14
Windows NT
Adaptec enhanced driver location 2-3
adapter and driver installation ...... 2-3
IBM enhanced driver location ........ 2-4
installing adapters ............................ 2-4
installing enhanced drivers ............ 2-4
Madge ISA adapter installation ..... 3-2
Madge ISA driver installation ........ 3-2
Xircom enhanced driver location .. 2-3
Windows XP
IBM enhanced driver location ........ 2-2
installing adapters ............................ 2-1
installing enhanced drivers ............ 2-1
installing Madge enhanced drivers 3-5
Intel enhanced driver location ....... 2-2
Xircom enhanced driver location .. 2-2
X
Xircom
Cardbus Ethernet II on Windows 2000
2-3
enhanced driver location 2-2 to 2-3, 2-7,
2-14
Xyratex adapter
see the Gigabit Ethernet Installation and
Connection Guide
Index-4
Sniffer Portable