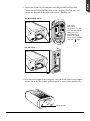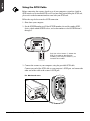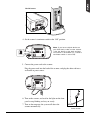
1
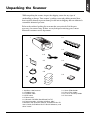
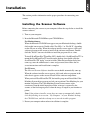
Microtek
ArtixScan 120tf
Installation and Operation Manual
Copyright© 2003 by Microtek International, Inc.
All rights reserved.
Trademarks
Microtek®, ArtixScanTM, and ScanWizardTM Pro are trademarks or registered trademarks of
Microtek International, Inc. Macintosh® and Apple ® are registered trademarks of Apple
Computer, Inc. Windows® is a registered trademark of Microsoft Corporation. Adobe® and
Acrobat® are registered trademarks of Adobe Systems Incorporated. All other products or name
brands are trademarks of their respective holders.
Important
Documents that you scan may be protected under copyright law. The unauthorized use of such
documents could be a violation of the rights of the copyright holder. Microtek bears no
responsibility for the unauthorized use of copyrighted materials.
To obtain optimal results from the Microtek scanning software and user's manual, you should be
familiar with such Windows concepts as pointing, clicking, dragging, and selecting from menus and
dialog boxed. If these things are new to you, refer to your Microsoft Windows User's Guide.
I49-003469 A
February 2003
Microtek Lab, Inc.
16941 Keegan Avenue, Carson, CA 90746
Main: 310-687-5800, Fax: 310-687-5950, http://www.microtekusa.com
Microtek International, Inc.
6, Industry East Road 3, Science Based Industrial Park, Hsinchu, 30077, Taiwan
Tel: 886-3-5772155, Fax: 886-3-5772598, http://www.microtek.com
Microtek Europe B.V.
Klompenmaker Str. 76, 3194DE Hoogvliet-RT, The Netherlands
Tel: 31-10-2425688, Fax: 31-10-2425699, http://www.microtekeurope.com
ii
Contents
Federal Communications Commission Interference Statement
iv
Introduction
1
System Requirements ........................................................................ 1
Environmental Requirements ............................................................ 2
Unpacking the Scanner
3
Taking a Closer Look .......................................................................... 4
Installation
5
Installing the Scanner Software ........................................................ 5
Connecting the Scanner to Your Computer ........................................ 6
Using the FireWire Cable .............................................................. 6
Using the SCSI Cable ................................................................... 8
Positioning Your Originals
10
A. Positioning the Transparent Film ..................................................10
Using the 35mm Slide Holder ................................................... 10
Using the 35mm Filmstrip Holder .............................................. 11
Using the 6 x 9 cm Filmstrip Holder ......................................... 12
B. Inserting the Film Holder .............................................................. 13
C. Ejecting the Film Holder ............................................................... 13
Your First Scan
14
Performing Color Calibration
16
Installing MSP ................................................................................... 16
The Color Calibration Target ............................................................ 16
Positioning Your Target ..................................................................... 17
Calibrating Your Target ..................................................................... 18
Loading a Profile .............................................................................. 19
Specifications
20
Additional Documentation in the CD-ROM
20
iii
Federal Communications Commission Interference Statement
This equipment (Model: MTS-120tf) has been tested and found to comply with the limits for a
Class B digital device, pursuant to Part 15 of the FCC rules. These limits are designed to provide
reasonable protection against harmful interference in a residential installation. This equipment
generates, uses and can radiate radio frequency energy and, if not installed and used in accordance
with the instructions, may cause harmful interference to radio communications. However, there is
no guarantee that interference will not occur in a particular installation. If this equipment does
cause harmful interference to radio or television reception, which can be determined by turning the
equipment off and on, the user is encouraged to try to correct the interference by one or more of
the following measures:
•
•
•
•
Reorient or relocate the receiving antenna.
Increase the separation between the equipment and receiver.
Connect the equipment into an outlet on a circuit different from that to which the receiver is
connected.
Consult the dealer or an experienced radio/TV technician for help.
Caution: Changes or modifications not expressly approved by the manufacturer responsible for
compliance could void the user's authority to operate the equipment.
This device complies with Part 15 of the FCC Rules. Operation is subject to the following two
conditions: (1) This device may not cause harmful interference, and (2) this device must accept
any interference received, including interference that may cause undesired operation.
Responsible Party:
Loi Han
Microtek Lab, Inc.
16941 Keegan Avenue
Carson, CA 90746
USA
Phone: 310-687-5800
Fax: 310-687-5950
iv
Tested to Comply
With FCC Standards
FOR HOME OR OFFICE USE
Introduction
The ArtixScan 120tf is a single-pass, dual interface (FireWire and SCSI), 42-bit, highresolution scanner designed for scanning transparent media such as film, slides, and
filmstrips.
This manual will help you in the installation and operation of your scanner, with the
information provided covering both Macintosh and PC environments.
System Requirements
• CD-ROM drive (for installing software)
• Color display with 24-bit color output capability
• 128MB RAM or more recommended
Macintosh
• FireWire (IEEE 1394)
- iMac DV or Mac G3/G4 with built-in FireWire port
- Mac OS 9.x or OS X
• SCSI
- iMac or Mac G3/G4 with built-in SCSI port
- Mac OS 8.6, 9.x, or OS X
PC and compatibles
• FireWire (IEEE 1394)
• SCSI
- Pentium II PC or later with FireWire port or available
PCI slot for installing included FireWire host adapter
- Microsoft Windows 98SE, Me, 2000 or XP
- Pentium II PC or later with a SCSI card installed
- Microsoft Windows 95, 98, 98SE, Me, 2000 or XP
ArtixScan 120tf Installation and Operation Manual
1
Environmental Requirements
Before unpacking your scanner, make sure that the location where the scanner will be
installed is large enough for easy operation.
•
Make sure that the operating environment for the scanner is free of dust and other
contaminants.
•
Allow adequate ventilation space (no less than 39.8" or 91.6 cm) around the
scanner.
•
Place the scanner on a flat, stable surface that is not subject to vibration.
•
Make sure that the scanning surface will not be exposed to direct sunlight or other
sources of bright light.
•
Avoid placing the scanner close to sources of extreme cold or heat.
•
Avoid connecting the scanner to a power source that might experience power
surges.
•
Avoid positioning the scanner in the path of heavy traffic where it may get
bumped.
•
Place the scanner within 3 feet of the computer. Use the FireWire cable or the SCSI
cable that came with your scanner.
Once the scanner has been placed in a suitable location and is ready to be connected
to the host computer, it is time to proceed with installation of the necessary hardware
and software components for the scanner.
2
ArtixScan 120tf Installation and Operation Manual
Unpacking the Scanner
While unpacking the scanner, inspect the shipping carton for any signs of
mishandling or damage. Your scanner’s packing carton and padding material have
been carefully chosen to prevent damage to the unit in shipping and can withstand a
reasonable amount of pressure.
Refer to the enclosed packing list to ensure that you received all of the parts
necessary for scanner setup. If there are any damaged or missing parts, contact
Microtek's customer service department.
3-1
1
4
3
2
1
3-2
6
5
4
3
2-4
2-1
Fire
2
1
3-3
2-5
Wir
e
2-2
2-6
3-4
2-3
1. ArtixScan 120tf scanner
2-1. FireWire card
2-2. FireWire cable
2-3. SCSI cable
2-4. Power cord
2-5. Microtek CD-ROM (ScanWizard Pro TX)
2-6. Documentation: Includes ArtixScan 120tf
Installation and Operation Manual, ScanWizard Pro TX
User’s Guide, ScanWizard Pro TX Quick Reference, and
other inserts.
3-1. 35mm Slide Holder
3-2. 35mm Film Holder
3-3. 6 x 9 cm Filmstrip Holder
3-4. Dust cover
ArtixScan 120tf Installation and Operation Manual
3
Taking a Closer Look
READY Indicator (orange)
Eject button
POWER button (yellow)
Feed slot
SCSI terminator
switch
FireWire ports (2)
SCSI ID switch
SCSI ports (2)
Power connector
4
ArtixScan 120tf Installation and Operation Manual
Installation
This section provides information on the proper procedure for connecting your
scanner.
Installing the Scanner Software
Before connecting the scanner to your computer, follow the steps below to install the
scanner software:
1. Turn on your computer.
2. Insert the Microtek CD-ROM into your CD-ROM drive.
For Macintosh users:
When the Microtek CD-ROM icon appears on your Macintosh desktop, doubleclick on this icon to open it. Double-click “For OS 9.x” or “For OS X”, depending
on the OS you are using. When the software installer screen appears, click each
software program on the screen to install all the software components. Doubleclick the “Install” icon on each folder to install the programs one at a time.
To install ScanWizard Pro TX on Mac OS X, double-click “ScanWizard Pro TX” to
mount the ScanWizard Pro TX installer on the desktop, then double-click the
ScanWizard Pro TX "mpkg" icon in its folder. When the installation dialog box
comes up, enter the administrator' s name and password, then follow the onscreen instructions until installation is complete.
For PC users:
The Microtek Scanner Software installer screen should automatically come up.
When the software installer screen appears, click each software program in the
order that it appears on the screen to install all the software components.
When you install ScanWizard Pro TX, the installer program will install the Color
Matching System driver program and ask you to perform Color Matching for your
monitor and printer. The Color Matching System feature ensures color
consistency from the initial input phase when an image is captured by the
scanner, to the final output process when the image is output to your monitor or
printer.
Note: If the software installer screen does not come up automatically, doubleclick the following in succession: “My Computer” on your Windows desktop;
the CD-ROM icon; and then cdsetup.exe to start the installer program.
3. Restart your computer when software installation is complete.
ArtixScan 120tf Installation and Operation Manual
5
Connecting the Scanner to Your Computer
The ArtixScan 120tf comes with both FireWire and SCSI-2 built-in interfaces. You may
choose either FireWire (IEEE-1394) or SCSI as the interface for connection between
the scanner and computer. (Choose only one interface – either FireWire or SCSI, but
not both.)
Using the FireWire Cable
Before connecting the scanner, check to see if your computer system is FireWireready. FireWire-ready means you can connect the scanner to your computer using the
provided FireWire cable.
System is FireWire-ready
•
For Macintosh users, your computer should be equipped with a built-in FireWire
port, designated with the FireWire symbol “ ”.
•
For PC users, the FireWire card should be installed and should work properly in
your computer.
System is Not FireWire-ready
If your system is not FireWire-ready, you will need to install a FireWire card. For more
details on how to install the FireWire card, please refer to the “FireWire Installation
Guide” on a separate documentation included with your scanner package.
Alternatively, you can use the SCSI interface to connect your scanner.
For FireWire-ready Systems:
1. Connect the power cord to your scanner.
Plug the power cord into the back of the scanner, and plug the other end into a
power source (power surge protector highly recommended). Make sure no other
cable is connected to the scanner except the power cord at this point.
6
ArtixScan 120tf Installation and Operation Manual
2. Connect the scanner to your computer, using the provided FireWire cable.
Connect one end of the FireWire cable to your computer’s FireWire port, and
connect the other end of the cable to the scanner’s FireWire port.
For Macintosh users
The latest
Macintosh
computers (i.e., G3,
G4, later-generation
iMacs, etc.) are
equipped with a
built-in FireWire
port, usually labeled
with the “ ” logo.
6
+
For PC users
6
+
3. Press the power button on the front panel, and wait for the lights to stop blinking
and stay on steady. The scanner will be detected by your system automatically.
Power button
ArtixScan 120tf Installation and Operation Manual
7
Using the SCSI Cable
Before connecting the scanner, check to see if your computer system has a built-in
SCSI interface or an installed SCSI card. If you need help on installing the SCSI card,
please refer to the documentation that came with your SCSI card.
Follow the steps below to make a SCSI connection.
1. Shut down your computer.
2. Set the SCSI ID number to 6. If the SCSI ID number 6 is used by another SCSI
device, check which SCSI ID is free, and set the number to a free SCSI ID from 2
through 5.
Push the minus button (-) above the
SCSI ID number to decrease the
number; push the plus button (+) to
increase the number.
3. Connect the scanner to your computer, using the provided SCSI cable.
Connect one end of the SCSI cable to your computer’s SCSI port, and connect the
other end of the cable to the scanner’s SCSI port.
For Macintosh users
6
+
8
ArtixScan 120tf Installation and Operation Manual
For PC users
6
+
4. Set the scanner’s terminator switch to the “ON” position.
Note: If you have multiple devices on
your SCSI chain, make sure the scanner
is the last device on the chain and that
the scanner is terminated (i.e., scanner's
terminator switch is set to ON).
ON
OFF
SCSI TERM
5. Connect the power cord to the scanner.
Plug the power cord into the back of the scanner, and plug the other end into a
wall outlet or power source.
6. Turn on the scanner, and wait for the lights on the front
panel to stop blinking and stay on steady.
7. Turn on the computer; the system will detect the
scanner automatically.
Power button
ArtixScan 120tf Installation and Operation Manual
9
Positioning Your Originals
When your scanner has been installed successfully, you can begin to scan slides and
transparencies with the film holders. Included in the scanner package are three types
of film holders — 35mm slide holder, 35mm filmstrip holder, and 6 x 9 cm filmstrip
holder. This section provides information on how to position your original with the
various film holders.
A. Positioning the Transparent Film
Using the 35mm Slide Holder
The 35mm slide holder can hold up to four mounted slides.
Flip the 35mm slides face down and place it into the holder.
4
3
2
1
10
ArtixScan 120tf Installation and Operation Manual
Using the 35mm Filmstrip Holder
Six frames can be mounted into the 35mm filmstrip holder.
1. Push to open the holder.
2. Flip the 35mm filmstrip face down and place it into the holder. Align the frame-byframe partitions on your filmstrip to match the partitions on the holder.
3. Close the 35mm filmstrip holder.
Slightly adjust the 35mm filmstrip by pushing the holder lid to ensure the
filmstrip’s partitions to match the holder’s partitions.
6
5
4
3
2
1
Caution: When the filmstrip holder is closed and the 35mm filmstrip is aligned
correctly, do not lock the holder lid against the side of the holder (indicated by an
arrow mark) by force or touch the filmstrips. If you do so, this will bend the
original and may result in out-of-focus scans.
ArtixScan 120tf Installation and Operation Manual
11
Using the 6 x 9 cm Filmstrip Holder
The 6 x 9 cm filmstrip holder allows you to scan varying sizes of transparencies,
including 6 x 4.5 cm, 6 x 6 cm, 6 x 7 cm, and 6 x 9 cm. The maximum number of film that
can be loaded depends on the size of your film (e.g., the 6 x 4.5 cm can hold up to 4
pieces of film; 2 pieces for the 6 x 9 cm film).
1. Push to open the holder.
2. Flip the 35mm filmstrip face down and place it into the holder and ensure that the
filmstrip’s edge is against the side of the holder.
3. Close the holder lid and lock it by sliding it toward the side (indicated by an arrow
mark).
3
3
2
2
1
2
2
1
1 6x9cm
6x7
cm
12
ArtixScan 120tf Installation and Operation Manual
1
6x6c
6x4.5 m
cm
B. Inserting the Film Holder
When the slides or filmstrips are correctly loaded, push the holder into the scanner’s
feed slot in the arrow direction, where the arrow mark appears on the holder’s topend. The scanner then auto loads the holder.
Note: Before you insert the film holder, it is best to start up the ScanWizad Pro TX
program. You can do this by starting up ScanWizard Pro TX in stand-alone mode, or
by launching it from your image-editing program (such as Adobe Photoshop). When
the holder is inserted, you can perform a preview scan.
C. Ejecting the Film Holder
Push the Eject button of the scanner to eject the film holder.
Eject button
ArtixScan 120tf Installation and Operation Manual
13
Your First Scan
1. Launch ScanWizard Pro TX (either as a stand-alone by clicking on the program
icon, or by using the File-Import or File-Acquire command from your imageediting program such as Adobe Photoshop).
The first time you launch ScanWizard Pro TX, you will be asked to perform Color
Matching for your monitor and printer. (Dialog boxes below show appearance in
Windows OS, Mac OS X, and Mac OS 9.x.)
Monitor selection
shown here is set in
the ColorSync Control
Panel
Color Matching
features
Immediately updates the Preview window
image when a new setting is selected. This
will reflect colors consistent with the newly
selected profile.
Scan Material icon
2. Once ScanWizard Pro TX is launched, ScanWizard Pro TX will automatically
detect and configure the film folder that you are using.
Film Size icon
For Mac OS 9.x and Windows users, ScanWizard Pro TX enables the
corresponding Scan Material and Film Size icons in the Preview window. If you
are using 35mm film, click the Scan Material icon. From the submenu that appears,
choose Positive Transparency or Negative Film, depending on your film type.
If you are using the 6 x 9 cm filmstrip holder, click the Scan Material icon to
choose Positive Transparency or Negative Film; then click the Film Size icon to
select one of the film sizes from the submenu.
For Mac OS X users, choose Positive or Negative
from the Scan Material menu. The Film Size window
will automatically appear only if you are using the 6 x
9 cm filmstrip holder. Choose a film size, depending
on your film type.
Scan Material menu
14
ArtixScan 120tf Installation and Operation Manual
3. Click the Overview button to start a thumbnail overview of your original.
Note: If you do not need to overview the original, skip steps 4 &5 and directly
prescan the original after selecting its frame position in the Job Panel window.
4. Select the image you want to scan by clicking on its thumbnail in the Job Panel
window (at the same time, making sure the corresponding checkbox is checked).
The selected image is highlighted. Before you perform the actual scan, you need
to do a prescan to see a clear view of the image.
3
5
6
7
2
4
Job Panel window
Settings window
Preview window
5. Click the Prescan button in the Preview window. At the end of the prescanning
process, the prescan image will appear in the Preview window.
6. Click the Scan Frame tool from the Preview window Toolbar, and adjust the
flashing scan frame (marquee) around the selected area of the image that you wish
to scan. Alternatively, you can click and hold pointer inside the frame and drag
the frame to the selected area.
7. If you like what you see in the Preview window, click the Scan button to start
scanning. You will be asked to enter a file name for the scanned image.
If you launch ScanWizard Pro TX in an application program, the image is then
delivered to your application, where the image can be saved, printed, or modified
further.
For more details on various scanning scenarios, refer to the ScanWizard Pro TX
User's Guide included in your scanner package.
ArtixScan 120tf Installation and Operation Manual
15
Performing Color Calibration
The Microtek Scanner ICC Profiler (MSP) is a scanner calibration and profiling utility
program exclusively designed for Microtek scanners. Used together with the color
calibration target, the ICC Profiler determines the color attributes of your scanner
accurately, then generates an ICC profile tailored exclusively for the scanner you are
using under ScanWizard Pro TX.
The Microtek Scanner ICC Profiler utility is included in the CD-ROM that contains
ScanWizard Pro TX. Select the Microtek Scanner ICC Profiler option to install.
Installing MSP
For Mac OS 9.x users:
Insert the Microtek CD-ROM into your CD-ROM drive. Open the ICC Profiler folder,
then double-click the Installer icon to install the program.
For Mac OS X users:
Installation is not required. When you install ScanWizard Pro TX, the Scanner ICC
Profiler program is installed as well.
Note: In Mac OS X, do not attempt to uncheck the ICC Profiler option when you
install ScanWizard Pro TX, as this component is essential and the installation
procedure will not allow you to bypass this component.
For PC users:
Insert the Microtek CD-ROM into your CD-ROM drive. When the software installer
screen appears, click on the “Install” option for the Scanner ICC Profiler program,
then follow the on-screen instructions until the program finishes installing.
Note: The ScanWizard Pro TX program should be already installed in your system
before you install MSP. Otherwise, MSP will not work.
The Color Calibration Target
Included in your scanner package is an industry-standard Transparency Kodak color
target (Kodak Q-60E3, 35mm slide). The calibration target is very delicate and must be
handled carefully, as follows:
•
Gently remove the target from its protective sleeve and avoid touching the target
image surface.
•
When not in use, keep the target in its sleeve and away from light and heat.
Note: To keep the colors in your scanner consistent, you should perform color
calibration on a regular basis. Professional photographers, graphic designers or
others who require extremely precise color may wish to calibrate the scanner every
time it is used.
16
ArtixScan 120tf Installation and Operation Manual
Positioning Your Target
Place the Kodak Q-60E 35mm target face up (as shown in the illustration below). Place
the target on the first frame of the 35mm slide holder, then insert the holder into the
scanner.
Proper positioning of the target on the scanner is important for a successful
calibration.
93
-19
.7/1
IT8 1:03
200
199
7/1IT8. 1:03
200
AK
KOD E
0E3
Q-6 ACHROMl Film
EKT essiona
Prof
3
k
Koda
35.8
AK
OD
3 K OME m
E
0
Q-6 TACHRnal Fil
EK fessio
Pro
a
Kod
k
8
35.
Make sure the Kodak©
logo appears here.
ArtixScan 120tf Installation and Operation Manual
17
Calibrating Your Target
1. With the target properly positioned in the scanner, turn on your scanner and let it
warm up for about five minutes.
2. Launch the Microtek Scanner ICC Profiler calibration program.
In Macintosh, locate the Microtek ICC Profile folder and double-click the ICC
Profile icon. In Windows, select the Start menu, Programs, Microtek ScanWizard
Pro TX for Windows, then Microtek Scanner ICC Profiler.
3. The main dialog box appears. Set the appropriate parameters, click the Start
Profiling button, then follow the screen instructions to generate your ICC profile.
Choose the scanner
model you are currently
using
Select "Positive" for the
target
Checking this box
improves image
quality by
compensating for
artifacts in the
shadow portion of the
image
Select the date code and
target type to match your
target
Select the way the tonal
reproduction curve of the
profile should be
controlled
4. A dialog box will appear at the end of the calibration process. Give a file name to
save the created ICC profile. For details, refer to the help file of your Scanner ICC
Profiler program.
5. When calibration is done, click the Close button to exit the Scanner ICC Profiler
program.
For more details on how to calibrate the target and to generate the profile, refer to the
help feature of the Microtek ICC Profiler program.
18
ArtixScan 120tf Installation and Operation Manual
Loading a Profile
Once the profile has been produced, follow the steps below to load the profile that
was just created.
1. Launch ScanWizard Pro TX.
2. For Mac OS 9.x users: From the Preview window, click the Scan Material icon, and
select “Positive Transparency” for slides and transparencies.
For Mac OS X users: Select “Positive” from the Scan Material menu.
For PC users: From the Preview window, click the Scan Material icon, and select
“Positive Film” for slides and transparencies.
3. From the Settings window, click on the Scanner Profile list box and select the
profile you have just created.
ArtixScan 120tf Installation and Operation Manual
19
Specifications
Interfaces
Two FireWire (IEEE-1394) ports; two SCSI-2 ports
Dynamic Range
4.2 Dmax
Scanning Modes
Color, grayscale, and black-and-white in a single
scanning pass
42-bit color input and output
14-bit grayscale
Scanning Area
6 x 9 cm Max., 6 x 7 cm, 6 x 6 cm, 6 x 4.5 cm, 25 x 38 mm
Resolution
Optical: 4,000 dpi x 4,000 dpi
Interpolated: 16,000 dpi x 16,000 dpi
Transmission Speed
4 Mbytes/s (FireWire)
2 Mbytes/s (SCSI)
Dimensions (L x W x H)
19.8" x 10.8" x 5.5" (504 x 274 x 142 mm)
Weight
17.6 lb (8 kg)
Voltage
AC 90V to 264V, 47-63 Hz
Environment
Operating temperature: 50° to 95°F (10° to 35°C)
Relative humidity: 20% to 80%
Additional Documentation in the CD-ROM
Additional documentation is provided in the Microtek CD-ROM that contains
ScanWizard Pro TX, Scanner ICC Profiler, troubleshooting, etc. If you experience
problems with the hardware or software, you can open the file that you wish to view
with Adobe Acrobat Reader or your browser, then read or print the information.
20
ArtixScan 120tf Installation and Operation Manual