1
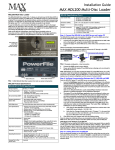
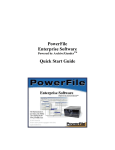
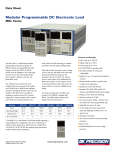
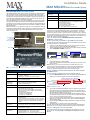
Installation Guide
MAX MDL200 Multi-Disc Loader System
MAX MDL200 Multi Disc Loader System
PowerFile Specifications (Cont.)
The MDL200 Multi Disc Loader (FIG. 1) allows you to transfer up to 200 discs (DVD or
CD), and load the content on a MAX server. The MAX MDL200 Multi Disc Loader
System comes as a kit that includes a PowerFile Multi-Disc Loader, a Windows® PC
pre-loaded with all required software, pre-configured for plug and play operation. The
PowerFile has three IEEE1394 (FireWire) ports for communication with the PC (see
FIG. 1), and includes all cables necessary to get started.
To use the MDL200 System, you’ll connect the PowerFile to the PC and to the target
MAX server as described in this document. The MAX MDL200 software application
(pre-loaded on the PC) allows you to specify an IP address for the target MAX server,
and manage the process of loading discs into the PowerFile and loading the media to
a target MAX server.
Note: This document is only intended to provide a short cut to installing and using the
PowerFile and the MAX MDL200 software application. For detailed instructions, refer
to the MDL200 Multi-Disc Loader System Operation/Reference Guide (available
online at www.amx.com).
Average Disc to Disc
Access Time:
4 seconds
Dimensions (HWD):
8 3/4" x 17” x 20" (22.22cm x 43.18cm x 50.80cm)
(front)
Disc loading slot
(insert discs
here to load the
internal carousel).
Weight:
30 lbs (13.60 kg)
Included Accessories:
• Windows® PC (P4 with IEEE 1394 capabilities, configured
with MAX MDL200 software for managing the PowerFile.
• LCD Monitor (for the PC)
• 6’ (1.83m) IEEE 1394 cable
• 6’ (1.83m) Ethernet Crossover cable
• 6’ (1.83m) AC Power cable
• 6” (1.83m) HDMI-toDVI Conversion cable
IMPORTANT NOTE CONCERNING THE INCLUDED PC:
The PC that is included with the MDL200 system is pre-configured for use with the
PowerFile, and is loaded with the MAX MDL200 software application. The software
loaded on this machine requires a certain environment to operate properly in enabling
up to 200 CD/DVD loading. Any changes to the PC may cause it to stop performing its
intended task of loading CD/DVD. AMX cannot be responsible for this operation if you
change the operational software environment.
Refer to the included insert titled “MAX MDL200 Multi-Disc Loader System Desktop PC” for important details.
Step 1: Connect the PowerFile to the MAX Server and PC
Do not use the external transport control
pushbuttons - use the controls provided
in the MAX MDL200 software application instead.
Power button
The PowerFile first needs to be connected to the PC and the MAX server that you will
be loading the media to, as described below.
1.
Connect one of the IEEE 1394 ports on the rear of the PowerFile to the IEEE
1394 port on the PC, using the included IEEE 1394 cable.
2.
Use the included Ethernet crossover cable to connect the PC directly to the MAX
server’s ETHERNET CONTROL port (FIG. 2).
Ethernet Crossover Cable (included)
IEEE 1394
cable
PC
PowerFile
MAX Server
FIG. 2 Example configuration - direct connection
3.
4.
(rear)
IEEE 1394 ports
Power cable connector
FIG. 1 PowerFile Multi Disc Loader (front and rear panel components)
Connect the MAX server’s power cable(s).
Power up the PowerFile, PC and MAX server, allowing up to one minute for the
server to boot up.
Note: Alternatively, you can also connect the PC to the MAX server via a LAN
connection (refer to the MDL200 Multi-Disc Loader System Operation/Reference
Guide for details). Using the PowerFile on a LAN connection may result in slow
loading, due to network configuration and the amount of network traffic.
Storage Capacity:
200 discs, 4.7 GB/disc
Step 2: Verifying Communication Between the PC, PowerFile
and MAX Server
Power Requirements:
• Voltage: 110 – 240V AC (autosensing)
• Frequency: 50/60 Hertz
• Consumption: 45 watts (peak), 35 watts (normal)
Once the PowerFile, PC and MAX server are connected and powered up:
1.
Launch the MAX MDL200 application on the PC (double-click the MAX MDL200
desktop icon to launch the program and access the main window).
AC Current Draw
(AMP):
• .45A - Bootup/Power Cycle Peak
• .45A - Normal Usage Peak
Interface
Specifications
(IEEE 1394):
• Bus interface IEEE-1394 compliant
• Data transfer rate 100, 200, and 400Mbps
• Three 6-pin IEEE-1394 ports
DVD-ROM drives:
Two DVD-ROM drives
Drive Specifications:
• Supports most popular CD & DVD formats (DVD-RAM, DVDRW and DVD+ are not supported).
• Random seek: 90 ms (DVD-ROM); 80 ms (CD-ROM)
• Random access: 110 ms (DVD-ROM); 85 ms (CD-ROM)
• Data Transfer Rate:
- Sustained DVD 8,112KBps (6x)
- CD (Mode 1) 4,800KBps (32x)
- CD (Mode 2) 5,475KBps (32x)
PowerFile (FG 2179-01) Specifications
Front Panel Components:
• Power switch
• Disc-loading slot
• Transport Control buttons and Display (not used - use MAX
MDL200 to control the PowerFile. Refer to the MAX-MDL200
Multi-Disc Loader System Operation/Reference Guide for
details.
Rear Panel
Connectors:
• Three IEEE 1394 ports
• Power Cable connector: IEC connector for AC power cable.
Reliability:
• Mechanism MTBF: 1,000,000 swaps
• Power On Hours: 100,000
Operating
Environment:
•
•
•
•
Operating Temperature: 5° to 40° C; 41° to 104° F
Storage Temperature: -10° to 60° C; 14° to 140° F
Operating Humidity: 10% - 90% relative humidity
Storage Humidity: 5% - 95% relative humidity, non-condensing
Indicates whether the PC is connected
and communicating with the MAX server
Status Bar
Indicates whether the PowerFile is
connected to the PC and running
FIG. 3 MAX MDL200 Status Bar
2.
The PC and the MAX MDL200 application are pre-configured to allow communication between the PC, the PowerFile and the MAX server. The status bar (at
the bottom of the dialog) should indicate that you have successfully connected to
the PowerFile and the MAX server (see FIG. 3):
The center area of the status bar should indicate that the PowerFile (C200) is
connected and running, and the icon on the right side of the status bar should be
green to indicate communication with the server.
If you are not communicating with either the PowerFile or the MAX server, first
verify that your cables are connected properly. Then select File > Settings to
open the Settings dialog.
Verify that the Max MMS/IMS IP address indicated here matches that of the target MAX server.
3.
Click OK to save your changes and close the Settings dialog.
Once the status bar indicates that you are connected to both the PowerFile and the
MAX server, then you are ready to load discs (DVDs and CDs) into the PowerFile.
Step 3: Loading Discs Into the PowerFile
Discs are physically loaded into the PowerFile through the vertical slot on the front
panel of the unit, using the Changer > Load Range and Load All options in MAX
MDL200.
1.
First verify that the PowerFile is powered up (the power switch is located on the
lower-left of the front panel), and communicating with the PC and the target
MAX Server (refer to “Step 2: Verifying Communication Between the PC, PowerFile and MAX Server” for details).
2.
Select Changer > Load Range or Load All from the MAX MDL200 menu bar.
The Changer > Load Range and Load All options operate the same, except
that Load Range allows you to specify a range of slots to load (in the Start Disc/
End Disc fields).
3.
This prompts the PowerFile to present each open slot on the disc carousel so
that you can load a disc into each one. If there are already some discs loaded
in the carousel, the PowerFile will automatically skip any slot positions that are
already occupied and present the next open slot for loading.
You will hear the PowerFile’s internal carousel spin to the next available empty
slot and stop. At this point you have approximately 10 seconds to insert a disc.
Note that at this point the discs that have been loaded are indicated on the MAX
MDL200 main screen, but without any title or media information since they have not
yet been identified by the program.
Step 4: Loading Media to the Target MAX Server
Once all of the disks have been loaded into the PowerFile, you are ready to load
DVD and CD media to the MAX server.
Step One: Verify the Transfer Setting
Before you start, select File > Settings to open the Settings dialog and set the
Record discs with multiple matches option to the desired setting:
• If set to Yes: Discs that were not positively identified will be transferred. As a
result, these discs will not have any disc information associated with them.
• If set to No: This option causes the PowerFile to skip transferring any discs
that have multiple title matches, or that are not positively identified. These discs
can later be identified manually, by transferring the same range of discs again.
Since MAX MDL200 will not attempt to transfer any disc that has already been
marked as transferred, it will only transfer the discs that were manually identified.
This is the default (and recommended) setting.
Step Two: Transfer Discs
Once the discs have been loaded into the PowerFile, you can begin the process of
transferring the media:
1.
Set the First Disc/Last Disc range on each drive.
Note: The first disc on Drive 2 must be greater than the last disc of Drive 1
(valid disc numbers are 1-200).
2.
Press the Record button to begin transferring (on the drive(s) that you want to
use), and let the PowerFile run until the process is complete.
3.
The status of each disc is indicated in the Status column as it is being identified
and transferred. Once complete, the Status message indicates that the media
was successfully loaded on the MAX server. Note that the PowerFile loads one
disc at a time per drive.
4.
As each disc is read it is automatically loaded to the MAX server.
5.
MAX MDL200 displays a message to inform you when all discs in the specified
range have been loaded to the server.
6.
Once the process is complete, you should verify the contents of the MAX
server via the WinMAX application (Movies and Music tabs).
Note: You can use the WinMAX application to re-identify any discs that display
with incorrect or incomplete disc information If necessary. You can also use
WinMAX to manually enter/edit disc information as needed. Refer to the WinMAX Instruction Manual (available online at www.amx.com) for details.
If one or more discs cannot be identified:
While MAX MDL200 settings can allow you to proceed with transferring discs that
could not be identified, it is recommended that you set MAX MDL200 to skip discs
with multiple matches. Once the transfer process is complete, these discs can be
identified manually by selecting the best title match for each from the multiple
possible title matches found in the database.
1.
Double-click on a title in MAX MDL200 to open the Multiple Matches dialog.
2.
Specify a search method (Title - default setting or UPC). Enter the disc title (or
UPC code) in the Search field. The results are displayed in the lower window.
• If you selected to search by Title, enter part of the title of the desired CD or
DVD. For best results, enter a single word and let the program return a list of all
titles that contain that word. Use a multi-word search to refine the results if necessary.
• If you selected to search by UPC, enter the UPC code as it appears on the disc
packaging.
• For either search method, avoid using asterisks or other wild-card characters
to achieve the best results.
3.
Click the Search button.
4.
Select the best match and click OK to assign the selected title (and associated
media information) to the disc.
Verifying Disc Information
In some cases in which the program has indicated more than one possible match for
a disc, it may not be obvious which of the possible matches represents the best
match for the disc. In these cases you should eject the disc momentarily so that you
can visually check the physical label on the disc. The Eject and Load buttons on the
Multiple Matches dialog allow you do this quickly:
1.
Double-click on the disc/slot in question (in the Disc/Slot Window) to access
the Multiple Matches dialog. Review the list of possible title matches in this
dialog.
2.
Click on the Eject button in the Multiple Matches dialog. This option ejects the
disc from the PowerFile. Remember that you have approximately 10 seconds
to remove the disc from the slot.
Note that by using the Eject and Load buttons in the Multiple Matches dialog,
the program retains any disc information that exists for this disc.
This is also true for the Load and Eject buttons in the New Title Entry dialog.
By contrast, if you eject a disc from the PowerFile via the Eject options in the
Changer menu, or the Disc Context Menu, all disc information is lost. These
options are intended to be used at the point that the disc is being permanently
removed from the PowerFile, once the loading process is complete.
Look at the disc label to discern which of the possible title matches best
matches this disc.
Press the Load button in the Multiple Matches dialog, and replace the disc in
the Disc Loading Slot.
Select the best possible match in the Multiple Matches dialog and click OK.
Note: Do not close the Multiple Matches (or New Title Entry dialog) until the
disc has been reloaded. If the dialog is closed while the disc is still ejected, the
slot will be set to <empty>, and all disc information will be lost.
3.
4.
5.
Manually Entering Disc Information
If no suitable title matches are found, then you may enter the information manually
via the New Title Entry dialog:
1.
Click New Entry in the Multiple Matches dialog to open the New Title Entry dialog. This dialog contains a text field where you can manually enter a title for this
disc. For DVDs, you can also associate a Genre, Aspect Ratio and Sound
option to the disc.
If necessary. you can use the Eject and Load buttons in the New Title Entry
dialog to eject the disc so that you can review any information that is printed on
the disc label:
a. Press Eject to eject the disc (at which point you have approximately 10
seconds to physically remove the disc from the disc loading slot on the
PowerFile).
b. When you’re finished, press the Load button and replace the disc (labelside facing to the right) in the carousel (you have 10 seconds after
pressing the Load button to insert the disc).
2.
Click inside the Title text field, and type the title that you want to associate with
this disc.
3.
For DVDs, use the drop-down menus to select a Genre, Aspect Ratio and
Sound option, and click OK to accept the new disc information.
Removing Discs From The PowerFile
When you’re finished transferring all of the discs in the PowerFile, remove them from
the unit:
• To unload a single disc, right-click on the disc title and select Eject from the
context menu.
• To unload a selected range of discs, select Changer > Eject Range and specify the range of discs you want to eject (in the Start Disc/End Disc fields).
• Alternatively you can use the Changer > Eject All command to eject all of the
discs.
In any case, as each disc is ejected, it must be manually removed from the carousel
on the front of the PowerFile. You have 10 seconds to remove the disc before it is
pulled back into the unit and the eject command is cancelled.
Clearing Disc Information From the Disc/Slot Window
By default, all disc information is displayed in the Disc/Slot Window until it is
manually cleared. Select File > Reset All to reset (clear) all of the disc information in
the Disc/Slot Window.
The Reset All command also stops the transfer and/or identification processes.
Troubleshooting Ethernet Communications Problems
•
•
•
The Link (L) LED next to the Ethernet port on the MAX server should be on. If
not, check your cables and connectors.
Verify that the IP address and Subnet Mask settings are appropriate for your
network configuration.
If you are connecting to the server via a direct connection with a PC (using a
crossover Ethernet cable), be sure that the IP Address of the Network card in
your PC is in the same range as the server, but not the same address as the
server.
For example, a network card setting of 192.168.1.31 will work with the default
server IP address of 192.168.1.30.
DVD Region Code Settings on the PowerFile
The PowerFile has two internal DVD-ROMs, each of which may require that you
specify a DVD region code setting different than the default setting of Region 1. Note
that you can set the region code on each drive, and you may choose to specify
different region codes for each one. Refer to the MAX-MDL200 Multi-Disc Loader
System Operation/Reference Guide for instructions on changing the DVD Region
Code Settings.
Notice: MAX Products are not designed or intended to, and may not be used to,
violate anyone’s copyright or other intellectual property rights. Each user of the MAX
Products may only use the Products in connection with materials legally owned or
licensed by such user and only to the extent such ownership or license rights permit
such use.
For full warranty information, refer to the AMX Instruction Manual(s) associated with your Product(s).
065-004-2781 8/06
©2006 AMX. All rights reserved. AMX and the AMX logo are registered trademarks of AMX.
AMX reserves the right to alter specifications without notice at any time.
3000 RESEARCH DRIVE, RICHARDSON, TX 75082 • 800.222.0193 • fax 469.624.7153 • technical support 800.932.6993 • www.amx.com
93-2179
REV: J