1
Operation/Reference Guide
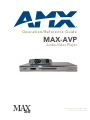
MAX-AVP
Audio-Video Player
Document ID: 065-004-2964
Last Revised: 9/06/2006
AMX Limited Warranty and Disclaimer
AMX warrants its products to be free of defects in material and workmanship under normal use for three (3) years from
the date of purchase from AMX, with the following exceptions:
•
Electroluminescent and LCD Control Panels are warranted for three (3) years, except for the display and touch
overlay components that are warranted for a period of one (1) year.
•
Disk drive mechanisms, pan/tilt heads, power supplies, and MX Series products are warranted for a period of one
(1) year.
•
AMX Lighting products are guaranteed to switch on and off any load that is properly connected to our lighting
products, as long as the AMX Lighting products are under warranty. AMX does guarantee the control of dimmable
loads that are properly connected to our lighting products. The dimming performance or quality cannot be
guaranteed due to the random combinations of dimmers, lamps and ballasts or transformers.
•
Unless otherwise specified, OEM and custom products are warranted for a period of one (1) year.
•
AMX Software is warranted for a period of ninety (90) days.
•
Batteries and incandescent lamps are not covered under the warranty.
This warranty extends only to products purchased directly from AMX or an Authorized AMX Dealer.
All products returned to AMX require a Return Material Authorization (RMA) number. The RMA number is obtained
from the AMX RMA Department. The RMA number must be clearly marked on the outside of each box. The RMA is
valid for a 30-day period. After the 30-day period the RMA will be cancelled. Any shipments received not consistent
with the RMA, or after the RMA is cancelled, will be refused. AMX is not responsible for products returned without a
valid RMA number.
AMX is not liable for any damages caused by its products or for the failure of its products to perform. This includes any
lost profits, lost savings, incidental damages, or consequential damages. AMX is not liable for any claim made by a
third party or by an AMX Dealer for a third party.
This limitation of liability applies whether damages are sought, or a claim is made, under this warranty or as a tort claim
(including negligence and strict product liability), a contract claim, or any other claim. This limitation of liability cannot
be waived or amended by any person. This limitation of liability will be effective even if AMX or an authorized
representative of AMX has been advised of the possibility of any such damages. This limitation of liability, however, will
not apply to claims for personal injury.
Some states do not allow a limitation of how long an implied warranty last. Some states do not allow the limitation or
exclusion of incidental or consequential damages for consumer products. In such states, the limitation or exclusion of
the Limited Warranty may not apply. This Limited Warranty gives the owner specific legal rights. The owner may also
have other rights that vary from state to state. The owner is advised to consult applicable state laws for full
determination of rights.
EXCEPT AS EXPRESSLY SET FORTH IN THIS WARRANTY, AMX MAKES NO OTHER WARRANTIES,
EXPRESSED OR IMPLIED, INCLUDING ANY IMPLIED WARRANTIES OF MERCHANTABILITY OR FITNESS FOR
A PARTICULAR PURPOSE. AMX EXPRESSLY DISCLAIMS ALL WARRANTIES NOT STATED IN THIS LIMITED
WARRANTY. ANY IMPLIED WARRANTIES THAT MAY BE IMPOSED BY LAW ARE LIMITED TO THE TERMS OF
THIS LIMITED WARRANTY.
Table of Contents
Table of Contents
MAX-AVP Audio/Video Player ............................................................................1
Overview .................................................................................................................. 1
Product Specifications ............................................................................................. 2
Supported Resolutions ............................................................................................ 4
Media Playback......................................................................................................... 5
Media Playback via WinMAX........................................................................................... 5
Upgrading the AVP’s Firmware ................................................................................ 5
Configuring the MAX-AVP ........................................................................................ 6
Installation ..........................................................................................................7
Overview .................................................................................................................. 7
As a Stand Alone DVD Player ................................................................................... 7
As a Networked Component of a MAX System ........................................................ 7
Adding the AVP to a MAX System ........................................................................... 8
Step One: Installing the MAX-AVP Key In the MAX-HT Server ....................................... 8
Step Two: Connecting the AVP to a MAX-HT Server and Display Device ....................... 9
DVD and CD Playback .............................................................................................. 9
Region Code Settings ............................................................................................... 9
Screensaver Operation ........................................................................................... 10
Standby Mode ........................................................................................................ 10
Entering STANDBY mode ............................................................................................. 10
Exiting STANDBY mode / Entering ON mode............................................................... 10
Troubleshooting Ethernet Communications .................................................................. 11
Rack Mounting the MAX-AVP ................................................................................. 11
HDMI-to-DVI Conversion Cable (MDL200 Kit) ........................................................ 13
IMPORTANT NOTE! ...................................................................................................... 14
Technical Explanation.................................................................................................... 14
Changing the DVD Region Code Setting ..........................................................15
Overview ................................................................................................................ 15
DVD Regions (1-6) ......................................................................................................... 16
Default Region Code Setting ........................................................................................ 16
MAX-AVP Remote Controller ...........................................................................17
Overview ................................................................................................................ 17
MAX-AVP Remote IR Codes .................................................................................. 18
Extra IR Codes ........................................................................................................ 20
MAX-AVP Audio-Video Player
i
Table of Contents
MAX-AVP User Interface ..................................................................................21
Overview ................................................................................................................ 21
Playing Local Content (CDs and DVDs) ................................................................... 21
Inserting a DVD or CD................................................................................................... 22
Playback of a Local CD............................................................................................ 22
Skipping Tracks ............................................................................................................. 22
Scanning Within Tracks.................................................................................................. 22
Repeating Individual Tracks or the Entire CD................................................................ 22
Random Play.................................................................................................................. 23
CD Playback Display Screen .......................................................................................... 23
Playback of a Local DVD ......................................................................................... 24
Pause/Step .................................................................................................................... 24
Accessing the DVD Menu .............................................................................................. 24
Skipping Chapters ......................................................................................................... 24
Scanning Within Chapters ............................................................................................. 24
Slow Motion Playback: .................................................................................................. 24
Repeating Individual Chapters or the Entire Movie....................................................... 25
Creating a Looped Segment (Repeat A-B) .................................................................... 25
DVD Audio Settings ...................................................................................................... 25
Multiple/Alternate Angles ............................................................................................. 25
Subtitles ........................................................................................................................ 26
The No Function Symbol ............................................................................................... 26
Movie Playback Display Screen ..................................................................................... 26
Accessing Media Stored on the MAX Server .......................................................... 27
MAX Server – Main Page ........................................................................................ 27
MAX Server Pages – Movie Options ............................................................................. 28
Browse For Movies........................................................................................................ 28
Browse Movies by Genre .............................................................................................. 29
Browse Movies by Cover ............................................................................................... 30
Search For Movies ......................................................................................................... 31
Movie Details Page ....................................................................................................... 33
Working With Bookmarks ....................................................................................... 33
Creating Bookmarks ...................................................................................................... 34
Recalling Bookmarks ..................................................................................................... 34
Additional Notes Regarding DVD Content ............................................................. 35
DVD Aspect Ratios ........................................................................................................ 35
MAX Server Pages – Music Options........................................................................ 35
Browse For Music .......................................................................................................... 36
Browse Music by Genre................................................................................................. 37
Browse Music by Cover ................................................................................................. 38
ii
MAX-AVP Audio-Video Player
Table of Contents
Browse Music by Artist.................................................................................................. 38
Search For Music ........................................................................................................... 39
Music Details Page ........................................................................................................ 40
Working With Playlists ............................................................................................ 41
Creating an Audio Playlist ............................................................................................. 42
Creating a New Playlist ................................................................................................. 43
Adding Items to an Existing Playlist .............................................................................. 43
Editing Playlists....................................................................................................... 44
Renaming Playlists......................................................................................................... 44
Deleting an Item From a Playlist: .................................................................................. 44
Reorder Items in a Playlist............................................................................................. 45
Deleting a Playlist From the System.............................................................................. 45
Recalling Playlists for Playback ............................................................................... 46
Playing an Entire Playlist ............................................................................................... 46
Playing an Individual Item in a Playlist........................................................................... 46
Playlist Playback Controls.............................................................................................. 46
Setup Page ............................................................................................................. 46
Setup Page – Settings tab............................................................................................. 47
Setup Page – Tuning tab ............................................................................................... 49
Setup Page – Locale tab................................................................................................ 49
Setup Page – System Information tab ........................................................................... 50
DVD Language Codes............................................................................................. 51
MAX-AVP Audio-Video Player
iii
Table of Contents
iv
MAX-AVP Audio-Video Player
MAX-AVP Audio/Video Player
MAX-AVP Audio/Video Player
Overview
NOTICE: MAX Products are not designed or intended to, and may not be used to, violate anyone’s
copyright or other intellectual property rights. Each user of the Products may only use the Products in
connection with materials legally owned or licensed by such user and only to the extent such ownership
or license rights permit such use.
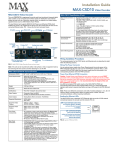
The MAX-AVP (FIG. 1) Audio-Video Player provides standard media playback and control
functionally, featuring multiple audio and video outputs. The MAX-AVP functions as a standalone
player, and as a player for MAX server content. Key features of the AVP include (See Product
Specifications on the following page for details):
Plays DVDs (and audio CDs) from its internal DVD/CD player.
Plays audio and video content over a CAT5 network interface from a MAX-HT server.
Provides A/V output in multiple formats: Component Video, Composite Video, S-Video and
HDMI™ (High-Definition Multimedia Interface).
Provides both analog stereo and coaxial digital audio outputs. The supported digital audio
outputs are Dolby® Digital (S/PDIF), Dolby® Digital-Plus (Surround 5.1, 7.1), and DTS®
Surround.
IR Receiver and Power/Standby LED
Disc Eject button
Disc slot
Power Connector
(front)
Digital Audio (see Specifications table for details)
Power switch
Analog Stereo
Ethernet (to MAX Server)
(rear)
HDMI
Component Video
S-Video
Composite Video
Setup Key number (required for setup)
is printed on a decal on the bottom panel
MAX-AVP
IR Remote
Controller
FIG. 1 MAX-AVP
MAX-AVP Audio-Video Player
1
MAX-AVP Audio/Video Player
Use the included hand-held IR remote controller to control the AVP, and navigate the MAX-AVP UserInterface to select server-based media content (CDs and DVDs) for playback, as well as configure the
AVP. For details on the remote controller and the built-in User-Interface:
Refer to the MAX-AVP Remote Controller section on page 17.
Refer to the MAX-AVP User Interface section on page 21.
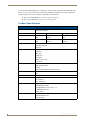
Product Specifications
MAX-AVP (FG2178-51) Specifications
Power:
• 13.5 VDC 4.4A external power supply (included)
• 110-240 VAC 50/60 Hz
Current Draw:
DC:
AC:
Supported media types:
Peak
Running
• Current:
0.94
0.74
• Watt:
12.502
9.82
• Current:
0.125
0.101
• Watt:
14.925
12.0594
• DVD
• DVD+R/-R/-RW/+RW
• Audio CD
Supported formats:
• MPEG-2 MP/ML
• AC3 audio
• MP3 audio
• LPCM audio
• PCM audio
• MPEG2 Layer 2 audio
• FLAC audio
Video outputs:
• Composite video
• RGB Component video
• S-Video
• HDMI™ (High-Definition Multimedia Interface)
Video broadcast standards
• NTSC
• PAL
Supported Resolutions:
• See Supported Resolutions table for detailed specs.
Supported Aspect Ratios:
• 4:3 - Pan & Scan (full screen)
• 4:3 - Letterbox
• 16:9 - Widescreen
Audio Outputs:
• Digital:
- Dolby® Digital (S/PDIF)
- Dolby® Digital-Plus (Surround 5.1, 7.1)
- DTS® Digital Surround
• Analog: stereo
Front Panel Components:
• IR Receiver and Power/Standby LED
• CD/DVD-ROM drive slot
• Disc Eject button
2
MAX-AVP Audio-Video Player
MAX-AVP Audio/Video Player
MAX-AVP (FG2178-51) Specifications (Cont.)
Rear Panel Connectors:
• 1/4” DC power connector
• Power Switch
• Ethernet port: RJ-45 Ethernet port provides 10/100 network connectivity
between the AVP and the MAX server
• HDMI™ output: 19-pin HDMI cable connector
• Component Video output: 3 RCA connectors (Green, Blue, Red)
• S-Video output: Mini-Din4 port
• Composite Video output: RCA connector (Yellow)
• Analog Audio outputs (R/L): RCA connectors (Left = White, Right = Red)
• Coaxial (digital) Audio output: RCA connector (Orange)
Operating Environment:
• Operating temperature: 0º to 50º C (32° to 122° F)
• Storage temperature: -45º to +85º C (-49° to 185° F)
• Operating relative humidity: 5% to 85% (non-condensing)
• Intended for indoor use only
Dimensions (HWD)
• 2" x 17" x 12.44" (50.67 mm x 431.80 mm x 316.10 mm)
(without rack ears):
• 1 RU (mounts in a standard 19” equipment rack)
Weight:
10.10 lbs (4.58 kg)
Included Accessories:
• AMX PS4.4 Power Supply (FG423-44)
• Handheld IR Remote Controller (FG2178-52)
• Audio/Video Cables (one of each):
- HDMI™ cable (6.5’ / 2.0m - FG10-2178-05)
- Component Video cable (6’ / 1.82m - FG10-2178-05)
- S-Video cable (6’ / 1.82m - FG10-2178-01)
- Composite Video cable (6’ / 1.82m - FG10-2178-04)
• Rackmount brackets (set of 2 - FG62-2178-46)
Other AMX Equipment:
Certifications:
• NXA-ENET24 Managed Ethernet Switch (FG2178-60)
• FCC/CE Class B
• EN60950
Trademark
Acknowledgements:
• HDMI, and “High-Definition Multimedia Interface” are trademarks or registered
trademarks of HDMI Licensing LLC.
• “Dolby” and the double-D symbol are trademarks of Dolby Laboratories.
• “Dolby Digital” and “Dolby Digital-Plus” are registered trademarks of Dolby
Laboratories.
• “DTS” is a registered trademark of DTS, Inc.
MAX-AVP Audio-Video Player
3
MAX-AVP Audio/Video Player
Supported Resolutions
MAX-AVP Supported Resolutions
Mode Name
Resolution
Outputs
NTSC (M)
525 line (480vis), 60 Hz, Interlaced, standard NTSC
• Composite
• Component
• HDMI
NTSC (M) Japan
525 line (480 vis), 60 Hz, Interlaced, NTSC with Japanese
black-level
• Composite
• Component
• HDMI
PAL (BG)
625 line (576 vis), 50 Hz, Interlaced, standard PAL
• Composite
• Component
• HDMI
PAL M
525 line (480 vis), 60 Hz, Interlaced, NTSC framing with PAL color
• Composite
• Component
• HDMI
PAL 60
525 line (480 vis), 60 Hz, Interlaced, NTSC framing with PAL color
• Composite
• Component
• HDMI
Mode Name
Resolution
Outputs
480i60
525 line (480vis), 60 Hz, Interlaced, standard NTSC
• Composite
• Component
• HDMI
480p59
525 line (480 vis), 59.96Hz, NTSC Progressive Scan
• Component
576p50
625 line (576 vis), 50 Hz, PAL Progressive Scan
• Component
• HDMI
• HDMI
HDMI-only
modes
ATSC/DTSC standards for NTSC-style systems (59/60 hz) and PAL-style systems
(50hz)
• 720p59
• 1080i50
• 720p60
• 1080i59
• 720p50
• 1080i60
• 1080p50
• 1080p59
• 1080p60
4
MAX-AVP Audio-Video Player
MAX-AVP Audio/Video Player
Media Playback
When a DVD (or CD) is inserted into the local drive, the AVP works like a stand-alone DVD player. It
displays the DVD menu on the video output device. There are two ways to control the AVP:
Use the handheld IR Remote Control (included) to navigate the MAX User Interface and DVD
menus.
Refer to the MAX-AVP Remote Controller section on page 17 for details on the
remote controller (including IR Code descriptions).
Refer to the MAX-AVP User Interface section on page 21 for instructions on using
the MAX-AVP UI.
Use the WinMAX software to control the AVP and manage content (DVDs/CDs) on the
MAX-HT server. Refer to the WinMAX Instruction Manual for details.
The IR Remote Control also allows you to select which video source to view (either the AVP’s DVDROM or server content).
Playback from the AVP’s local DVD drive overrides playback of content from the
MAX-HT server: if you are playing content from a server, and then insert a DVD or
CD into the AVP, the media being received from the server will be interrupted, and the
DVD or CD will load and play.
Media Playback via WinMAX
WinMAX Server Control Software is a Windows®-based application provided by
AMX to enable control of MAX servers from any Windows PC. The PC must be
connected to the MAX Server directly or via a network. Multiple PCs running WinMAX
may control the Server simultaneously.
WinMAX is available for download via the Dealers area of the www.amx.com website
(Tech Center > Application Files).
To play a DVD located on the MAX-HT Server: In WinMAX, open the Movies tab. Select the
Output Zone that is associated with the AVP that you will use for display, then select a DVD
title, and click the Play button.
To play a CD located on the MAX-HT Server: In WinMAX, open the Music tab. Select the
Output Zone that is associated with the AVP that you will use for playback. Then, select a CD
title, and click the Play button.
Upgrading the AVP’s Firmware
The "bilbo.ISO" file is a CD-Image file which can be opened most CD burning applications and then
used to reproduce content onto a new disc. The following items are required to properly create a MAXAVP firmware update CD:
CD Burner
CD burning application
burnable media (CD-R/CD-RW)
The following procedures must be followed when updating on-board firmware:
1. Download the current MAX-AVP firmware ISO file from the Firmware Files section of the
amx.com Tech Center to a local drive.
2. Load your blank media into your CD burner drive and launch your media burning application.
MAX-AVP Audio-Video Player
5
MAX-AVP Audio/Video Player
3. Locate your local copy of the ISO file and choose to record a new disc from a disc image (ISO
image) to a new blank media (CD-R/CD-RW recommended).
Do not burn a "data disc". Do not drag and drop the ISO file. The final disc image
should contain a directory of multiple files rather and a single ISO file on the disc.
4. Once the new media has been created, insert it into the MAX-AVP and cycle power to the unit.
Upon restart, the AVP detects the files on the firmware update CD and begins the update process.
5. Do not interrupt this update process. Once the update is complete, the MAX-AVP will eject the disc.
6. Immediately after the disc is ejected, cycle power on the unit again.
When the unit again restarts, it has completed the update process and is now ready to use.
Configuring the MAX-AVP
Refer to the Setup Page section on page 46 for details on configuring the MAX-AVP.
6
MAX-AVP Audio-Video Player
Installation
Installation
Overview
There are two approaches to installing the MAX-AVP: either as a standalone DVD player, or as a
networked component of a MAX system. Both methods are described below:
As a Stand Alone DVD Player
The MAX-AVP can be installed and used as a stand-alone DVD player, in which case it behaves like any
other consumer-level A/V component and offers several A/V output options:
1. Connect one of the two audio outputs on the AVP (Analog R/L or Coaxial) to an audio amplifier.
2. Connect one of the four video outputs (HDMI™, Component, S-Video or Composite) on the AVP to
a display device.
As a Networked Component of a MAX System
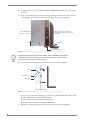
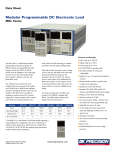
MAX-HT servers communicate via Ethernet to up to 25 MAX-AVM Audio-Video Modules
and/or MAX-AVP Audio/Video Players.
Multiple AVMs and/or AVPs require a Gigabit Ethernet switch (not included) as indicated in
FIG. 1.
MAX-AVP
MAX-AVP
10/100
MAX-AVP
10/100
MAX-AVP
10/100
ETHERNET CONTROL (GB)
10/100
Gigabit Ethernet
Switch
10/100
MAX-HT Server
(rear panel
connectors)
A/V OUT (GB)
10/100
10/100
MAX-AVM
MAX-AVM
10/100
MAX-AVM
MAX-AVM
FIG. 1 Example installation using multiple MAX-AVPs and AVMs
MAX-AVP Audio-Video Player
7
Installation
Adding the AVP to a MAX System
There are two procedures involved in adding the MAX-AVP to a MAX System:
IMPORTANT! MAX-HT Servers require a 24-hour initialization period. This simply
entails powering up the server and letting it charge and initiate for 24 hours before
use. Failure to allow this initialization to complete may cause performance problems
during media playback.
Step One: Installing the MAX-AVP Key In the MAX-HT Server
In order for the AVP(s) in the system to be recognized by the MAX-HT server, they must each be added
to the system.
Use the Server Configuration options in the WinMAX software application (available for download at
www.amx.com) to add AVPs to the MAX-HT server.
The process for adding AVPs to the MAX-HT server is identical to adding AVMs, and
AVPs are added as AVMs in the Add Output Modules admin menu:
1. Open the System Information tab in WinMAX, and click on the Server Configuration button to
access the MAX Admin menu.
2. Go to Output Module Setup > Add Output Module > AVM to access the Enter Output Number
dialog.
3. In the Enter Output Number field, enter an available server output/zone number (range =
1 - 33). Click OK to proceed.
The server will not allow you to assign an output to an output/zone that is already in
use. To determine which server outputs are already being used, select View from the
Output Module Setup menu.
If other output modules (AOM, AVM or AVP) have already been added to the server, then
assign the AVP to the next available output.
Note that AVPs take only one output on the MAX-HT server.
4. In the Enter Serial Number field, enter the Setup Key (number) of the AVP you are adding to the
system in the text box.
The Setup Key number is printed on a decal located on the underside of each AVP
enclosure.
5. The system will notify you that the module has been added to the system. Click OK to return to the
Output Module Setup menu.
Once the module has been added, select View from the Output Module Setup menu. The
module you just added should appear in the list of Installed Output Modules. AVP modules are
listed by output /zone number assignment, serial number and IP address.
Select Remove to remove an existing output module from the system.
8
MAX-AVP Audio-Video Player
Installation
Step Two: Connecting the AVP to a MAX-HT Server and Display Device
Be sure to power up the MAX-HT server before applying power to the MAX-AVP.
1. Use audio cables (not included) to connect to the audio output on the AVP to an audio amplifier.
2. Use one of the four video cables (HDMI, Component Video, S-Video or Composite to connect to the
video output on the AVP to the display device.
3. Use an Ethernet cable to connect the AVP’s Ethernet port to a Gigabit Ethernet switch.
4. Use an Ethernet cable to connect the Gigabit switch to the A/V OUT connector on the
MAX-HT server.
5. Connect the AVP’s included power supply.
6. Turn on the power switch (on rear panel), and allow up to one minute for the AVP to initialize.
IR-controlled devices are sensitive to plasma radiation emitted from plasma displays.
For best results when mounting the MAX-AVP unit in close proximity (within 12
inches) to a plasma screen, situate the MAX-AVP so that it is not facing the screen.
DVD and CD Playback
The MAX-AVP features an internal DVD-ROM drive for playback of individual DVDs.
Once you have established communication with the AVP via WinMAX, you can use WinMAX to initiate
and control playback of movies or music.
Region Code Settings
Note that for DVDs, the region code of the DVD disc must match the region code setting on the on the
internal DVD drive on the AVP.
By default, AVP units are set to Region Code 1.
Refer to the DVD Region Code Settings insert for details and instructions on changing the Region Code
setting on MAX devices.
The Region Code Setting can only be changed a total of 4 times from the factory
default setting.
MAX-AVP Audio-Video Player
9
Installation
Screensaver Operation
Screensaver timeout is a parameter that is set through the setup pages.
The default setting is 30 minutes.
The screensaver countdown is reset by reception of any IR code from the Remote Controller.
The screensaver is disabled when video playback is active and not paused.
If the screensaver timeout is set to 0, the screensaver is disabled.
If the screensaver timeout is set to any non-zero value (1-30 minutes inclusive):
After screensaver timeout minutes have elapsed with no activity, the screen dims to
3/4 the current level.
After a second screensaver timeout period with no activity, the screen dims to 0
levels (black screen).
After a third screensaver timeout period with no activity, the AVP’s outputs are
turned off, and the unit automatically enters standby mode (see below).
Any event which resets the screensaver countdown wakes the screensaver until the
unit goes to standby, at which point only activities which bring the unit out of
standby are accepted.
Standby Mode
If the POWER key is pressed or the screensaver times out 3x consecutively, the unit enters “standby
mode.” If playback was in progress when standby mode is entered, the playback is automatically stopped
and a placeholder is saved if possible.
This is a feature intended to protect Plasma and CRT displays from screen burn-in,
and to allow some displays to automatically shut off when they detect that the signal
is no longer present.
Entering STANDBY mode
1. When the unit is ON, press the POWER key on the remote.
2. When the unit has been idle or content has been paused for the configured screensaver timeout time,
the screensaver will be activated. If the unit remains idle or paused for a second screensaver timeout
period, it will automatically stop any in-progress material and enter STANDBY.
Exiting STANDBY mode / Entering ON mode
When the unit is in STANDBY mode:
1. Press the POWER key on the remote. The user is taken to a splashscreen / intro screen.
2. Press the MAX key on the remote. The user is taken to the MAX menu if the unit is connected to a
MAX server, or prompted to enter the setup screens otherwise.
3. Press the SETUP key on the remote. The user is prompted to enter the setup screens.
4. Press the PLAY key on the remote. If a disc is in the DVD drive, it will begin playing.
5. Eject the disc in the DVD drive. The unit will not wake up if there is no disc to eject.
6. Insert a disc in the DVD drive. The disc will automatically begin playing.
7. Issue a command from WinMAX (or the MAX server) to play content.
8. Issue a command from the MAX server to update the firmware of the AVP.
10
MAX-AVP Audio-Video Player
Installation
9. If a disc is in the local drive, MENU will invoke the DVD Menu.
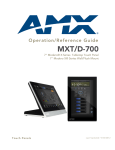
Troubleshooting Ethernet Communications
In case of Ethernet communications problems, check the following:
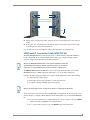
The Link (L) LED next to the Ethernet port should be on (FIG. 2). If not, check your cables
and connectors.
Connect a display device to the AVP to view the Configuration Page for the IP settings (IP
Address and Subnet Mask), and verify that these settings are appropriate for your network
configuration.
A - Activity LED
lights when receiving data packets
L - Link LED
lights (full-on when the Ethernet cables
are connected and terminated correctly
FIG. 2 Ethernet port LEDs
Refer to the MAX Servers Instruction Manual (available online at www.amx.com), as
well as the individual Installation Guides for details and installation instruction on
MAX Servers.
Rack Mounting the MAX-AVP
The MAX-AVP comes with rack-ears, to allow mounting the unit in a standard 19" equipment rack - the
AVP will take up a single rack space.
The rack-ear kit includes two steel rack ears and eight sets of flat washers, split lock-washers, and nuts.
The MAX-AVP rack-ears (FIG. 3) feature four mounting posts, to provide a clean installation. These
mounting posts require that the rack-ears are secured to the unit from inside the chassis, so you will have
to remove the cover, as described below:
Rack-mounting holes
(secure the chassis and rack-ears
to the equipment rack)
Mounting Posts (secure the Rack-Ear to the chassis)
FIG. 3 MAX-AVP rack-ears
1. Turn off the AVP, and disconnect the power cord and all connecting cords.
2. Place the unit face up on a soft and dry flat surface.
3. On the rear panel, remove the four screws that secure the top of the enclosure to the bottom (FIG. 4)
and keep them in a safe place for further use:
Remove the four screws that secure the top of the chassis to the bottom
FIG. 4 Remove the four screws that secure the top of the enclosure to the bottom
MAX-AVP Audio-Video Player
11
Installation
4. Carefully remove the top of the chassis. The rack-ears will mount to the sides of the top section of
the chassis.
5. Insert the four mounting posts on the rack-ear into a matching set of holes on the chassis, with the
rack-mounting holes on the rack ears facing forward and away from the chassis (FIG. 5).
Insert the 4 mounting posts on the
rack-ears into a matching set of holes
on the chassis
MAX-AVP chassis
(top section - top view)
front
Rack-ear
Side panel of chassis
FIG. 5 Insert the four mounting posts on the rack-ear into a matching set of holes on the chassis
There are several rows of holes on the top section of the chassis that can be used for
installing the rack-ears. In this example, we’ll use the second row of holes from the
front to facilitate securing the washers and nuts
6. On each of the four mounting posts, install washers and secure with a nut (FIG. 6):
nut
split lock-washer
flat washer
Rack-ear
Side panel of chassis
FIG. 6 Install the flat washer, split lock-washer and nut to each of the four mounting posts
a. Place a flat washer on the mounting post, so that it rests against the inside surface of the chassis.
b. Place a split lock-washer on top of the flat washer.
c. Place a nut on top of the split-lock washer and secure.
Repeat these steps for the three remaining mounting posts.
7. Repeat steps 5 and 6 to install the other rack-ear on the other side of the chassis (FIG. 7).
12
MAX-AVP Audio-Video Player
Installation
Secure the rack-ears to
the inside of the chassis
front
FIG. 7 Secure the rack-ears to the inside of the chassis
8. Put the chassis sections back together and secure the two sections with the four screws removed
earlier.
9. Remove the "feet" from the bottom of the unit. Each foot is secured to the chassis with a single
screw. Keep the feet and screws for further use.
Once the rack-ears have been installed, the AVP can be mounted into the equipment rack.
HDMI-to-DVI Conversion Cable (MDL200 Kit)
The MAX MDL200 Multi Disc Loader System comes as a kit that includes a PowerFile Multi-Disc
Loader, a Windows® PC pre-loaded with all required software, pre-configured for plug and play
operation, equipped with a LCD monitor, keyboard and mouse.
Refer to the MAX MDL200 Multi Disc Loader System Installation Guide and
Operation/Reference Guide (available online at www.amx.com) for detailed
instructions on using the MDL200 kit to bulk-load media to a MAX Server.
The HDMI-to-DVI conversion cable allows you to connect the LCD monitor that comes with the
MDL200 kit directly to a MAX-AVP Audio-Video Player, to access the AVP’s Setup Pages.
Options in the AVP’s Setup pages allow you to complete initial configurations on the AVP, including:
Audio and video output settings
Fine tuning options (such as brightness, contrast and saturation)
Localization settings (including Region Code settings)
Refer to the Setup Page section on page 46 for details on configuring the MAX-AVP.
You do not need the conversion cable to use the MDL200, it is included with the kit so that you can use
the LCD monitor to configure a MAX-AVP. Note that the MAX-AVP is not part of the MAX-MDL200
kit.
To connect the LCD monitor to a MAX-AVP, use the conversion cable to connect the HDMI
output on the AVP to the DVI input on the LCD monitor.
To access the AVP’s setup pages, press the SETUP button on the AVP remote.
MAX-AVP Audio-Video Player
13
Installation
IMPORTANT NOTE!
Because of limitations specific to HDMI video output, the HDMI-to-DVI conversion cable is not
suitable for viewing DVDs containing copyrighted content. This includes most commercial DVDs.
You can use the HDMI-to-DVI conversion cable to configure a MAX-AVP, but not to view
content played on the AVP.
To view content played on the AVP, connect the AVP to an actual HDMI display device. Refer
to the MAX-AVP documentation for instructions on using the AVP to playback media.
If playback of copyrighted content is attempted (via the conversion cable), the AVP may need
to be rebooted to re-initialize the HDMI signal.
Technical Explanation
HDCP ("High-Bandwidth Digital Content Protection") is a form of digital rights management designed
to control digital A/V content as it travels across DVI or HDMI connections.
Standard HDMI (High-Bandwidth Digital Content Protection) specifications require that the target
display device for an HDMI signal must provide HDCP protocol for copyrighted content. If the
connected display device does not provide valid HDCP handshaking, the HDMI signal will not be
displayed. Typically, HDMI-capable video monitors provide HDCP protocol, but most computer
monitors do not. This is the case with the LCD monitor included with the MDL200 kit.
14
MAX-AVP Audio-Video Player
Changing the DVD Region Code Setting
Changing the DVD Region Code Setting
Overview
All DVD players and most DVD discs are labeled for operation within a specific geographical region in
the world. This is know as a Region Code.
DVD discs are encoded for a specific region, and must match the region code of the physical DVD drive
to be played. Region code recognition only applies to the physical DVD disc and the physical DVDROM drive. For example, the U.S. is in Region 1. This means that all DVD players sold in the U.S. are
made to Region 1 specifications. As a result, Region 1 players can only play Region 1 DVD coded discs.
Regional codes are entirely optional for the maker of a DVD disc. Discs without region locks
will play on any DVD player in any country.
DVD discs may have multi-region codes, such as Region 1,2 and 4 and will play in drives
coded with the corresponding region code. On the back of each DVD package, you will a find
a region number (1 - 6).
On a MAX system, if a DVD disc is inserted into a DVD-ROM drive that has a region code
different from that of the DVD, you will receive an error message indicating that there is no
disc in the drive when you attempt to identify the disc (via the Identify Disc option in the
WinMAX software application.
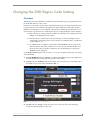
Use the Region Control options on the Setup Page - Locale tab to change the DVD region code setting
on the MAX-AVP:
1. Highlight DVD Region and press SELECT to scroll through the different region codes (displayed in
the text field) until you see the region that you want to set the AVP to.
2. Highlight and select Set Region. The system prompts you to verify this action, and reminds you of
the number of region code changes still allowed (FIG. 1):
FIG. 1 Changing DVD Region Code Settings dialog
3. Highlight and select Accept to change the region code, or Cancel to return to the Setup Page –
Locale tab without changing the region code.
MAX-AVP Audio-Video Player
15
Changing the DVD Region Code Setting
DVD Regions (1-6)
The following table lists the six international DVD Region Codes used by all DVD-ROMs:
• REGION 1:
USA, Canada
• REGION 2:
Japan, Europe, South Africa, Middle East, Greenland
• REGION 3:
S.Korea, Taiwan, Hong Kong, Parts of South East Asia
• REGION 4:
Australia, New Zealand, Latin America (including Mexico)
• REGION 5:
Eastern Europe, Russia, India, Africa
• REGION 6:
China
2
5
2
1
2
6
3
5
4
4
2
Default Region Code Setting
By default, all MAX DVD-ROM drives are set to read DVDs with Region 1 encoding (for U.S., Canada
and U.S. Territories). Depending on what region of the world you are installing and operating the MAXAVM, you may need to change the region code setting in order to read DVDs from other regions.
Each DVD-ROM drive adheres to the (CCA licensing organization) requirement that the drive must be
set to a region specific code to play authorized DVDs for that region. The requirement allows for the
DVD-ROM region code to be changed a maximum of five (5) times in a drive. The fifth time, the region
code is "locked" permanently in the drive. This procedure is mandated for all DVD-ROM manufactures
that carry the DVD logo and applies to all DVD-ROM drives used throughout the MAX system.
Since the AVP is set to Region 1 as the default factory setting, there are 4 additional
changes allowed. (for a total of five allowed).
Refer to the Setup Page section on page 46 for detailed descriptions of all of the
options available via the MAX-AVP Setup Page.
16
MAX-AVP Audio-Video Player
MAX-AVP Remote Controller
MAX-AVP Remote Controller
Overview
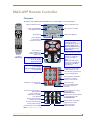
The buttons on the MAX-AVP hand-held IR remote controller (FIG. 1) are described below:
Opens the DVD main menu
Toggles standby ON/OFF,
stops playback if active
Stops playback
Pauses playback;
if already paused,
step ahead one frame
MAX-AVP
Remote
Controller
(FG 2178-52)
Pause playback;
bring up MAX menu
on GUI (if connected to
MAX server)
Toggles through fast-forward (+)
and fast-rewind (-) modes:
2x, 4x, 8x, 16x, and
Play (normal speed)
Alpha-numeric keypad
for entering data
Note: Press ENTER or SELECT
to enter the data
Opens the DVD Title menu
Ejects the disc in the AVP
Begin/resume playback
Navigation buttons
(up, down, left, right)
Press SELECT to select the
currently highlighted item
Note: The SELECT button is
functionally identical to the
ENTER button.
Returns to the previous screen
Skips to the next chapter
or track (+), or skip to the
previous (-) chapter or
track.
Note: These buttons also
allow you to scroll up/down
through lists in the MAX
User-Interface
Toggles through slow motion
(forward only) modes: 1/2x,
1/4x, 1/8x, Play (normal speed)
Invokes the Display Menu
Pauses playback, and displays
information on currently
playing content (if known)
Backspace in an alpha-numeric
editing field
Sets/clears A and B markers for
A-B repeat mode
Toggles repeat mode:
chapter, title, none (DVD);
track, disk (CD)
Changes spoken language
(if allowed by content)
Invokes the AVP Setup Page
Changes displayed angle
(if alternate angles are available)
Clears all pop-ups
Sends entered alpha-numeric
data (can be used in place
of SELECT)
Sets a bookmark at the current
playback location
(remote DVDs only)
Displays a list of saved bookmarks
for currently playing media
(remote DVDs only)
Displays subtitles (if available)
Toggles between “shuffle”
(random) and normal
sequenced playback
FIG. 1 MAX-AVP Remote Controller
MAX-AVP Audio-Video Player
17
MAX-AVP Remote Controller
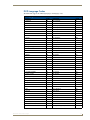
MAX-AVP Remote IR Codes
MAX-AVP Remote IR Codes
Remote Key
Playback Function
GUI Function
POWER
Toggle standby on/off (stops playback if active).
Toggle standby on/off
Refer to the Standby Mode section on page 10
for details.
MENU
DVD Menu call
N/A
TITLE
DVD Title (Top) menu call
N/A
EJECT
Eject the local disk
Eject the local disk
STOP
Stop playback
Clear Placeholder
PAUSE/STEP
Pause playback; if already paused: step ahead
one frame
N/A
PLAY
Select currently highlighted button
Begin playing local disk; resume from trick
modes (4 steps fast forward (2x, 4x, 8x, 16x),
5 steps rewind (1x, 2x, 4x, 8x, 16x), slow motion,
Pause)
UP
Determined by content menus
Move active GUI selection up.
DOWN
Determined by content menus
Move active GUI selection down.
LEFT
Determined by content menus
Move active GUI selection left.
RIGHT
Determined by content menus
Move active GUI selection right.
SELECT
Determined by content menus
Select currently highlighted button
MAX
Pause playback; bring up MAX menu on GUI (if
connected to MAX server).
Bring up / take down MAX menu
on GUI (if connected to MAX server)
Refer to the Accessing Media Stored on the
MAX Server section on page 27 for details.
18
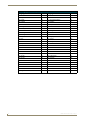
RETURN
DVD Return function – action depends on content
Return to previous menu screen
SCAN+
Toggle through fast-forward modes: 2x, 4x, 8x,
16x, Play (normal speed)
N/A
SCAN-
Toggle through fast-rewind modes: 2x, 4x, 8x,
16x, Play (normal speed)
N/A
SKIP/SCROLL+
Skip to next segment of program chain (chapter,
track for a CD, etc.)
Scroll up a list in the GUI.
SKIP/SCROLL-
Skip to previous segment of program chain
(chapter, track for a CD, etc.)
Scroll down a list in the GUI.
1
Input numerical data to decoder (must hit
ENTER or SELECT to input number) – action
depends on content.
Input alpha-numerical data to a dialog.
2abc
Input numerical data to decoder (must hit
ENTER or SELECT to input number) – action
depends on content.
Input alpha-numerical data to a dialog.
3def
Input numerical data to decoder (must hit
ENTER or SELECT to input number) – action
depends on content.
Input alpha-numerical data to a dialog.
4ghi
Input numerical data to decoder (must hit
ENTER or SELECT to input number) – action
depends on content.
Input alpha-numerical data to a dialog.
5jkl
Input numerical data to decoder (must hit
ENTER or SELECT to input number) – action
depends on content.
Input alpha-numerical data to a dialog.
MAX-AVP Audio-Video Player
MAX-AVP Remote Controller
MAX-AVP Remote IR Codes (Cont.)
Remote Key
Playback Function
GUI Function
6mno
Input numerical data to decoder (must hit
ENTER or SELECT to input number) – action
depends on content.
Input alpha-numerical data to a dialog.
7pqrs
Input numerical data to decoder (must hit
ENTER or SELECT to input number) – action
depends on content.
Input alpha-numerical data to a dialog.
8tuv
Input numerical data to decoder (must hit
ENTER or SELECT to input number) – action
depends on content.
Input alpha-numerical data to a dialog.
9wxyz
Input numerical data to decoder (must hit
ENTER or SELECT to input number) – action
depends on content.
Input alpha-numerical data to a dialog.
0 / SPACE
Input numerical data to decoder (must hit
ENTER or SELECT to input number) – action
depends on content.
Input alpha-numerical data to a dialog.
BKSPC
N/A
Backspace in an alpha-numeric
editing field.
ENTER
Send entered numeric data; optional – can be
used in place of SELECT.
Enter alpha-numeric data.
(Optional: can use SELECT key)
SLOW
Toggle through slow motion (forward only)
modes: 1/2x, 1/4x, 1/8x, Play (normal speed)
N/A
DISPLAY
Bring up display menu (informational menu for
current content)
N/A
INFO
Pause playback and bring up information on cur- N/A
rently playing content, if known.
CLEAR
Remove all popups from screen.
Remove all popups from screen
and return to known navigation state.
REPEAT
Toggle repeat mode: chapter, title, none (DVD);
track, disk (CD).
N/A
A-B
Set / clear A and B markers for A-B repeat
mode.
N/A
MARKER
Set a bookmark at the current playback location. N/A
Refer to the Working With Bookmarks section
on page 33 for details.
MARKER
SEARCH
Display a list of saved bookmarks for currently
playing media.
N/A
Refer to the Working With Bookmarks section
on page 33 for details.
AUDIO
Change spoken language (if allowed by content).
N/A
ANGLE
Change displayed angle (if allowed by content)
N/A
RANDOM
Toggle between “shuffle” (random) track/chapter/playlist-element selection and normal
sequenced playback
Same as for playback.
SUBTITLE
Change displayed subpicture stream (primary
use is subtitles) (if allowed by content).
N/A
SETUP
Call & bring up SETUP GUI screens.
Call & bring up SETUP GUI screens.
Refer to the Setup Page section on page 46 for
details.
MAX-AVP Audio-Video Player
19
MAX-AVP Remote Controller
Extra IR Codes
These IR codes are provided for convenience for use by other AMX controls. They do not exist on the
remote itself:
20
IR Function
Playback Function
GUI Function
Discrete Power ON
Take out of standby mode
Take out of standby mode
Discrete Power OFF
Put into standby mode
Put into standby mode
MAX-AVP Audio-Video Player
MAX-AVP User Interface
MAX-AVP User Interface
Overview
When the AVP is first powered up, via the power switch on the rear panel, the first screen displayed is the
MAX-AVP Startup screen. Allow the AVP a minute to boot up and load its system software.
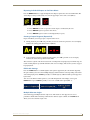
Once the AVP is ready to use, the main splash screen (FIG. 1) is displayed. At this point, you can either
insert a CD or DVD for playback, or access content stored on the MAX Server.
FIG. 1 MAX-AVP Splash Screen
If a disc is loaded in the AVP, the Splash Screen displays the message: "Disc
Loaded and Ready" (as opposed to the "No disc present" message shown above).
Playing Local Content (CDs and DVDs)
“Local Content” is media (CD or DVD) that is physically loaded in the AVP, as
opposed to MAX server content, which can be accessed via the AVP, but resides on
the MAX Server. Refer to the Accessing Media Stored on the MAX Server section on
page 27 for details on options that are specific to MAX Server content.
When the AVP is used to play local content (a DVD or CD in its own drive), it behaves like most
consumer-level disc players. Use the hand-held remote controller to control display and playback
When used to access media on a MAX Server, use the remote controller to navigate the MAX
options via the on-screen display.
Local content playback overrides playback of MAX Server content. If you are playing media
(CD or DVD) from a MAX Server, and insert a disc into the AVP, the server-based content
will be interrupted, and the local content will automatically begin to play.
MAX-AVP Audio-Video Player
21
MAX-AVP User Interface
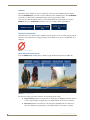
Inserting a DVD or CD
Insert the disc, label-side up, in to the loading slot on the front of the AVP. When the disc is almost fully
inserted, the player pulls it into the drive and automatically starts playback.
For CDs, the first track is played
For DVDs the disc menu is displayed
Discs must be clean and without any labels or debris that could come off during
playback.
Playback of a Local CD
For local audio CD playback, the AVP’s on-screen display indicates the track number currently playing.
Use the transport controls on the remote controller to Play, Stop and Pause playback (press Play to
resume).
Several options on the remote controller are specific for accessing and playing CDs
stored on a MAX Server, and do not apply to local CD playback, including: MAX,
RETURN and INFO. Other options are specific to DVD playback, and do not apply to
CD playback at all, including MENU, TITLE, SLOW, A-B, MARKER, MARKER
SEARCH, AUDIO, ANGLE and SUBTITLE.
Skipping Tracks
Press the SKIP/SCROLL (+ / -) buttons to skip forward and back through the tracks on the CD.
The SKIP/SCROLL (+ / -) buttons also allow you to page through large lists (such as
on the Browse or Playlist pages), as opposed to scrolling through each item in the
list.
Scanning Within Tracks
Press the Scan (+ / -) buttons to scan forward and back (cue/rewind) through the current track.
When scanning a track, the on-screen display indicates the total time of the disc and the
current playback position for the current track.
Press the Scan (+ / -) button one time to scan at 2X speed, press again to increase the scan
speed (2X, 4X, 8X or 12X).
Press Play to resume playback at the current position (indicated in the Status Bar).
Repeating Individual Tracks or the Entire CD
Press the REPEAT button to toggle through the three Repeat options that can be used with CDs. The
current Repeat Play setting is indicated by an icon in the upper-right corner of the screen (FIG. 2):
FIG. 2 Repeat Track, Repeat Disc and No repeat icons
Press REPEAT one time to repeat the current track, as indicated by the icon.
Press REPEAT again to repeat the entire CD.
Press REPEAT again to return to normal playback (No Repeat).
22
MAX-AVP Audio-Video Player
MAX-AVP User Interface
Random Play
Press the RANDOM button to play the tracks on this CD in random order. The current Random Play
setting is indicated by an icon in the upper-right corner of the screen (FIG. 3):
FIG. 3 Random Play and Normal Play icons
Press RANDOM one time to initiate randomized playback, as indicated by the icon.
Press RANDOM again to return to normal (sorted) playback.
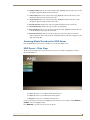
CD Playback Display Screen
Press the DISPLAY button while playing a CD to toggle the CD Playback Screen (FIG. 4).
FIG. 4 CD Playback Screen
The elements on this page include:
Track Listing: Indicates the track that is currently playing. Highlight and select this item to
enter a track number for playback (via the number buttons on the remote controller).
Artist: Indicates the Artist name associated with this CD.
Shuffle: Indicates the current playback setting (Random or Sorted).
Local CD Album: Indicates that the currently playing CD is Local.
Repeat setting: Indicates the current repeat playback setting (On or Off).
Playback Status Bars: Top bar indicates playback of the entire CD, the lower bar indicates
playback of the current track. The total playback time for this disc is displayed to the right of
the Status Bar.
MAX-AVP Audio-Video Player
23
MAX-AVP User Interface
Playback of a Local DVD
For DVD playback, the AVP’s on-screen display shows the DVD disc menu.
Use the transport controls on the remote controller to Play, Stop and Pause playback; and use
the Arrow buttons to navigate through the options on the DVD Menu. Note that you can
initiate playback either via the options on the DVD Menu or by pressing PLAY on the remote
controller.
When you stop playback, the AVP saves your place in the movie, so that when you press Play
again, it starts playing at the point that it was stopped. To clear the placeholder, so that the
movie will resume play from the beginning, press STOP again.
Several options on the remote controller are specific to accessing and playing DVDs
stored on a MAX Server, and do not apply to local DVD playback, including: MAX,
RETURN, MARKER, MARKER SEARCH and INFO.
Pause/Step
Press PAUSE one time to pause playback, press PLAY to resume.
With playback paused, press PAUSE again to manually step frame-by-frame through the
movie (press PLAY to resume normal playback).
Accessing the DVD Menu
At any time during playback, press the MENU button to stop playback and access the DVD’s menu
screen.
Note that if you go to the DVD Menu screen during playback, the AVP saves a placeholder, so that when
you resume playback, it automatically starts playing the movie at the point that it was stopped. If you
press STOP, the placeholder is removed. Once the placeholder has been removed, the next time the
movie is started it will start at the beginning.
Skipping Chapters
Press the SKIP/SCROLL (+ / -) buttons to skip forward and back through the chapters on the DVD.
The SKIP/SCROLL (+ / -) buttons also allow you to page through large lists (such as
on the Browse or Playlist pages), as opposed to scrolling through each item in the
list.
Scanning Within Chapters
Press the Scan (+ / -) buttons to scan forward and back (cue/rewind) through the current chapter.
When scanning a chapter, the on-screen display indicates the total time of the disc and the
current playback position for the current chapter.
Press the Scan (+ / -) button one time to scan at 2X speed, press again to increase the scan
speed (2X, 4X, 8X or 16X).
Press Play to resume playback at the current position (indicated in the Status Bar).
Slow Motion Playback:
Press the SLOW button during playback to play the movie in slow-motion (1/2X speed), press
again to decrease the playback speed (1/2X, 1/4X or 1/8X).
Press Play to resume normal playback.
24
MAX-AVP Audio-Video Player
MAX-AVP User Interface
Repeating Individual Chapters or the Entire Movie
Press the REPEAT button to toggle through the three Repeat options that can be used with DVDs. The
current Repeat setting is indicated by an icon in the upper-right corner of the screen (FIG. 5):
FIG. 5 Repeat DVD Chapter, Title, and No Repeat icons
Press REPEAT one time to repeat the current chapter, as indicated by the icon.
Press REPEAT again to repeat the entire movie.
Press REPEAT again to return to normal playback (no repeat).
Creating a Looped Segment (Repeat A-B)
Repeat A-B allows you to loop (repeat) a segment of the movie:
1. During playback, press A-B at the point that you want to start the loop. Note the on-screen display
indicates the starting point with the letter A (FIG. 6):
FIG. 6 Looped segment - Start Point, End Point and Normal Play (no loop) icons
2. At the point that you want to end the looped segment, press A-B again. The on-screen display
indicates the end of the loop with the letters A-B.
This causes the segment of the movie between the A and B points to begin playing in an infinite loop. To
resume normal playback, press A-B a third time. The on-screen display indicates that you have stopped
looped playback.
DVD Audio Settings
Press the AUDIO button to scroll through the audio options supported by the current DVD. Typically,
this option allows you to select from multiple languages, but this function varies depending on the nature
of the DVD playing. Press AUDIO repeatedly to scroll through any additional audio options supported
by the DVD.
You can see the different Audio options as you scroll through them on the Display screen (press
DISPLAY, then press AUDIO repeatedly to view each available audio option (FIG. 7):
FIG. 7 DVD Audio Options
Multiple/Alternate Angles
Some DVDs support multiple alternate angle views. This feature is often supported on concert
performance DVDs. When watching a DVD that has alternate angles available, the ANGLE button
allows you to select alternate angle views.
MAX-AVP Audio-Video Player
25
MAX-AVP User Interface
Subtitles
Most DVDs support subtitles in at least one language, and many feature multiple language subtitles.
Press the SUBTITLE button one time to turn on subtitles (in their default language). Press SUBTITLE
repeatedly to scroll through any additional language options supported by the DVD.
You can see the different Subtitles options as you scroll through them on the Display screen (press
DISPLAY, then press SUBTITLE repeatedly to view each available subtitle option (FIG. 8) :
FIG. 8 DVD Subtitle Language Options
The No Function Symbol
DVD functions such as alternate angles, subtitles and audio options are not necessarily supported by all
DVDs. If a selected function is not supported by the current DVD, the No Function symbol (FIG. 9) is
displayed.
FIG. 9 No Function symbol
Movie Playback Display Screen
Press the DISPLAY button while playing a DVD to toggle the Movie Playback Screen (FIG. 10).
FIG. 10 Movie Playback Screen
The elements on this page indicate all of the current DVD playback settings:
Chapter Listing: Indicates the chapter that is currently playing. Highlight and select this item
to enter a chapter number for playback (via the number buttons on the remote controller).
Title Listing: Indicates the title that is currently playing. Highlight and select this item to
enter a title number for playback (also via the number buttons on the remote controller).
26
MAX-AVP Audio-Video Player
MAX-AVP User Interface
Subtitle Setting: Indicates the current subtitle setting. Highlight and select this item to scroll
through the supported subtitle settings for this disc.
Audio Setting: Indicates the current audio setting. Highlight and select this item to scroll
through the supported audio settings for this disc.
Angle Setting: Indicates the current angle setting. Highlight and select this item to scroll
through the supported angle selections for this disc.
Disc Information: Displays title, chapter and media information for the current disc.
Media Information: Displays the type of media currently playing.
Repeat Settings: Indicates the current repeat playback setting. Highlight and select this item
to scroll through the repeat options for this disc.
Playback Status Bars: The top bar indicates playback of the entire DVD, the lower bar
indicates playback of the current track. The total playback time for this disc is displayed to the
right of the Status Bar.
Accessing Media Stored on the MAX Server
Press the MAX button on the remote controller to access the main MAX screen.
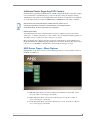
MAX Server – Main Page
The three options displayed here represent the three main areas of media search/playback oriented
functionality (FIG. 11):
FIG. 11 Main Page Options
Movie: Provides access to Movie (DVD)-related options
Music: Provides access to Music (CD)-related options
Playlist: Provides access to Playlist-related options
Use the arrow buttons on the remote to highlight options on these screens, and press either SELECT or
ENTER to select the highlighted item.
Press RETURN to go back to the previous set of options.
MAX-AVP Audio-Video Player
27
MAX-AVP User Interface
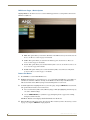
MAX Server Pages – Movie Options
Highlight Movie on the main screen to access the following options for accessing DVD content on the
MAX server (FIG. 12):
FIG. 12 Main Page - Movie Options
Title: This option allows you to browse all DVDs on the MAX server, by movie title. See the
Browse For Movies section on page 28 for details.
Genre: This option allows you to browse for DVDs by genre. See the Browse Movies by
Genre section on page 29 for details.
Cover: This option allows you to browse DVDs by their cover art. See the Browse Movies by
Cover section on page 30 for details.
Search: This option allows you to search for DVDs by Title, Actor, Director or Keyword.
Search For Movies section on page 31 for details.
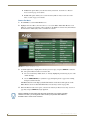
Browse For Movies
1. Press MAX to access the Main MAX Screen.
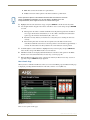
2. Highlight and select Movies, then select Browse to access the Movie Title Browse screen (FIG. 13),
to browse the entire list of Movies currently on the MAX server. Each entry in the Browse list
indicates the Title, Genre, MPAA (rating) and total running Time for each movie.
3. Scroll through the list to highlight the movie you want to play, and press SELECT to select the title,
and open the Movie Details screen for that movie.
You can sort the list by Title, Genre, MPAA (rating) or Time by highlighting and selecting any
one of the column headings.
Use the SKIP/SCROLL (+ / -) buttons to page through large lists as opposed to scrolling
through each item in the list.
The Movie Details screen displays detailed information on the movie.
4. When the Movie Details screen opens, select the Play Movie button (see Movie Details Page section
on page 33), and press SELECT to begin playback.
28
MAX-AVP Audio-Video Player
MAX-AVP User Interface
FIG. 13 Movie Title Browse screen
SELECT, ENTER or PLAY often share the same functionality. For example, with Play
selected on-screen, you would get the same results if you pressed either SELECT,
ENTER or PLAY on the remote controller.
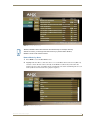
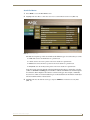
Browse Movies by Genre
1. Press MAX to access the Main MAX Screen.
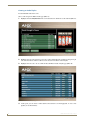
2. Highlight and select Movies, then select Genre to access the Movie Genre Select screen (FIG. 14),
to browse a list of all movie Genres currently on the MAX server. Each entry in the Genre list
indicates the Genre Name, the number of Discs included in each, and the total running time for each
Genre (if all movies in the Genre were played in sequence).
FIG. 14 Movie Genre Select screen
MAX-AVP Audio-Video Player
29
MAX-AVP User Interface
3. Scroll through the list to highlight a genre you want to browse, and press SELECT to select the
highlighted genre. This selection invokes the Movie Title Browse screen (FIG. 13), listing all
movies included in the selected genre.
You can sort the list by Genre, Discs or Time by highlighting and selecting any one of the
column headings.
Use the SKIP/SCROLL (+ / -) buttons to page through large lists (as opposed to scrolling
through each item in the list individually).
4. Scroll through the list to highlight the movie you want to play, and press SELECT to select the title,
and open the Movie Details screen for that movie.
5. When the Movie Details screen opens, select the Play Movie button (see Movie Details Page section
on page 33), and press SELECT to begin playback.
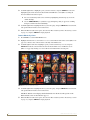
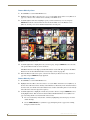
Browse Movies by Cover
1. Press MAX to access the Main MAX Screen.
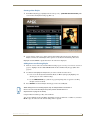
2. Highlight and select Movies, then select Cover to access the Movie Genre Select screen (FIG. 14 on
page 29), to browse a list of movie Genres currently on the MAX server.
3. Scroll through the Genre list to highlight a genre you want to browse by cover art, and press
SELECT to make the selection. This selection invokes the Movie Cover Art Browse screen
(FIG. 15 on page 30), showing cover art for all movies included in the selected genre.
FIG. 15 Movie Cover Art Browse screen
4. Scroll through the list to highlight the movie you want to play, and press SELECT to select the title,
and open the Movie Details screen for that movie.
The Movie Details screen displays detailed information on the movie. The options on the
Movie Details screen are described on page 33.
5. When the Movie Details screen opens, select the Play Movie button (see Movie Details Page section
on page 33), and press SELECT to begin playback.
30
MAX-AVP Audio-Video Player
MAX-AVP User Interface
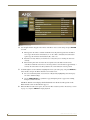
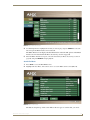
Search For Movies
1. Press MAX to access the Main MAX Screen.
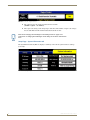
2. Highlight and select Movies, then select Search to access the Movie Search screen (FIG. 16).
FIG. 16 Movie Search screen
The buttons along the top of this screen indicate the different types of searches that you can do:
Title: This searches the DVD titles for a partial match.
Actor: Searches the Actors portion of the movie details for a partial match.
Director: Searches the Director portion of the movie details for a partial match.
Keyword: Searches the Keywords portion of the movie details for a partial match.
Note that search operations depend on the detailed information that was entered for each disc
(either via WinMAX or BulkRipper). If a DVD was added to the MAX server with incomplete
movie details, then it might not be found via certain search types. For example, a DVD that
does not have a Director’s name included as part of the detailed movie information, naturally it
will not found in a Director-based search.
3. Highlight and select the desired search type, and press SELECT to invoke the text entry field
(FIG. 17):
MAX-AVP Audio-Video Player
31
MAX-AVP User Interface
FIG. 17 Text Entry Field
4. Use the alpha-numeric keypad on the remote controller to enter a search string, and press ENTER
to search.
The keypad on the remote controller works like most cell-phone keypads: Press the button
once to type the first letter of that button (“A” on the “ABC” / #2 button). Press the button
again to type the next letter for that button (“B”), and so on.
Watch the text entry field as you enter letters to verify that you are entering the characters
correctly.
When entering more than one letter that is assigned to the same button on the remote
controller, wait until the cursor moves to the next position to enter the letters (approximately 3
seconds): the selected letter is always added to the search field at the cursors position.
5. Scroll through the search results list to highlight the movie you want to play, and press SELECT to
select the title, and open the Movie Details screen for that movie.
You can sort the list by Title, Actor, Director or Keyword by highlighting and selecting any
one of the column headings.
Use the SKIP/SCROLL (+ / -) buttons to page through large lists as opposed to scrolling
through each item in the list.
The Movie Details screen displays detailed information on the movie. The options on the
Movie Details screen are described on page 33.
6. When the Movie Details screen opens, select the Play Movie button (see Movie Details Page section
on page 33), and press SELECT to begin playback.
32
MAX-AVP Audio-Video Player
MAX-AVP User Interface
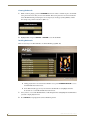
Movie Details Page
When you select a movie title in the Browse, Genre, Cover or Search Movies pages, the Movie Details
page is displayed, providing detailed information on the movie, as well as cover art (FIG. 18).
FIG. 18 Movie Details page
There are several options along the bottom of the page:
Plot: Select to display a synopsis of the movie’s plot.
Playlist Add: Select to add individual chapters from the DVD, or the entire movie to a
Playlist. Refer to the Working With Playlists section on page 41 for details.
Chapters: Select this option to select an individual chapter for playback, in the Movie Details
- Chapters page.
Bookmarks: Select this option to view and select from a listing of all Bookmarks saved for
this movie. Refer to the Working With Bookmarks section on page 33 for details.
To exit the Movie Details page, press RETURN on the remote control.
Working With Bookmarks
Use Bookmarks to mark specific points of interest within individual chapters on a DVD. Once you have
saved one or more bookmarks for a movie, you can later choose to begin playback from any saved
bookmark.
Bookmarks are only available for DVDs on the MAX server (not applicable to DVDs played
locally on the AVP).
Use the MARKER button on the remote controller to create bookmarks, and the MARKER
SEARCH button allows you to select a particular bookmark to begin playback from, as
described in the following sections:
Bookmarks are created during playback.
MAX-AVP Audio-Video Player
33
MAX-AVP User Interface
Creating Bookmarks
1. While a DVD is playing, press the MARKER button on the remote controller to place a bookmark
at the point in the movie that you want to bookmark. This action pauses the movie and invokes the
Create Bookmark dialog, indicating the movie, Chapter (#), media type (DVD_VIDEO), and the
time stamp of its position in the movie (FIG. 19):
FIG. 19 Create Bookmark dialog
2. Highlight Save, and press SELECT or ENTER to save this bookmark.
Recalling Bookmarks
There are two ways to recall bookmarks, via the Bookmarks page (FIG. 20):
FIG. 20 Movie Details - Bookmarks page
During playback of a movie that has bookmarks saved, press MARKER SEARCH to access
the Bookmarks list for this movie.
In the Movie Details page for any movie that has bookmarks saved, highlight and select
Bookmarks to access the Bookmarks list for that movie.
1. Once you have accessed the Bookmarks list, scroll through the list and highlight the bookmark that
you want to begin playback from.
2. Press SELECT to begin playback at the bookmarked position.
34
MAX-AVP Audio-Video Player
MAX-AVP User Interface
Additional Notes Regarding DVD Content
Not all functions supported by the MAX-AVP are available or allowed by all DVD content. For example,
even if a DVD shows 3 available languages, you may not be able to change the language using the
AUDIO button on the AVP’s no-screen display. When such a feature is non-selectable, it can usually be
set via the DVD’s menu (accessed via the MENU button or TITLE button on the remote controller).
DVD functions such as alternate angles, subtitles and audio options are not
necessarily supported by all DVDs. If a selected function is not supported by the
current DVD, the No Function symbol (FIG. 12) is displayed.
DVD Aspect Ratios
Some older DVDs (first and second generation discs) may be in a Widescreen aspect ratio, but not
"Anamorphic" or "Enhanced For Widescreen TVs". In these cases, the title will not display properly on a
16:9 display, since it is a widescreen movie "matted" in a 4:3 signal.
Most 16:9 displays offer a "Zoom" mode that can be used to make the movie properly fill the screen,
though this will make the DISPLAY popups unusable, since they will be off-screen. The AVP may need
to be set to 4:3 (via WinMAX) to allow the TV to zoom properly for this type of content.
MAX Server Pages – Music Options
Highlight Music on the main screen to access the following options for accessing audio/CD content on
the MAX server (FIG. 21):
FIG. 21 Main Page - Music Options
Title: This option allows you to browse all CDs on the MAX server, by CD title. See the
Browse For Music section on page 36 for details.
Genre: This option allows you to browse for CDs by genre. See the Browse Music by
Genre section on page 37 for details.
Cover: This option allows you to browse CDs by their cover art. See the Browse Music by
Cover section on page 38 for details.
MAX-AVP Audio-Video Player
35
MAX-AVP User Interface
Artist: This option allows you to browse CDs by artist name. See the Browse Music by
Artist section on page 38 for details.
Search: This option allows you to search for CDs by Title or Artist. See the Search For
Music section on page 39 for details.
Browse For Music
1. Press MAX to access the Main MAX Screen.
2. Highlight and select Music, then select Browse to access the Music Album Title Browse screen
(FIG. 22), to browse the entire list of CDs currently on the MAX server. Each entry in the Browse
list indicates the Album (title), Genre, and Artist for each CD.
FIG. 22 Music Album Title Browse screen
3. Scroll through the list to highlight the CD that you want to play, and press SELECT to select the
title, and open the Music Details screen for that CD.
You can sort the list by Album, Genre, or Artist by highlighting and selecting any one of the
column headings.
Use the SKIP/SCROLL (+ / -) buttons to page through large lists as opposed to scrolling
through each item in the list.
The Music Details screen displays detailed information on the movie. The options on the
Music Details screen are described in the Music Details Page section on page 40.
4. When the Music Details screen opens, select the Play button (see Music Details Page section on
page 40), and press SELECT to begin playback.
SELECT, ENTER or PLAY often share the same functionality. For example, with Play
selected on-screen, you would get the same results if you pressed either SELECT,
ENTER or PLAY on the remote controller.
36
MAX-AVP Audio-Video Player
MAX-AVP User Interface
Browse Music by Genre
1. Press MAX to access the Main MAX Screen.
2. Highlight and select Music, then select Genre to access the Music Genre Select screen (FIG. 23), to
browse a list of all music Genres currently on the MAX server. Each entry in the Genre list indicates
the Genre Name, the number of Discs included in each, and the total running time for each Genre (if
all CDs in the Genre were played in sequence).
FIG. 23 Music Genre Select screen
3. Scroll through the list to highlight a genre you want to browse, and press SELECT to select the
highlighted genre. This selection invokes the Music Album Title Browse screen (FIG. 22 on
page 36), listing all movies included in the selected genre.
You can sort the list by Genre, Tracks, or Time by highlighting and selecting any one of the
column headings.
Use the SKIP/SCROLL (+ / -) buttons to page through large lists as opposed to scrolling
through each item in the list.
4. Scroll through the list to highlight the CD that you want to play, and press SELECT to select the
title, and open the Music Details screen for that CD.
The Music Details screen displays detailed information on the CD. The options on the Music
Details screen are described in the Music Details Page section on page 40.
5. When the Music Details screen opens, select the Play button (see Music Details Page section on
page 40), and press SELECT to begin playback.
MAX-AVP Audio-Video Player
37
MAX-AVP User Interface
Browse Music by Cover
1. Press MAX to access the Main MAX Screen.
2. Highlight and select Music, then select Cover to access the Music Genre Select screen (FIG. 23 on
page 37), to browse a list of music Genres currently on the MAX server.
3. Scroll through the Genre list to highlight a genre you want to browse by cover art, and press
SELECT to make the selection. This selection invokes the Music Cover Art Browse screen
(FIG. 24), showing cover art for all CDs included in the selected genre.
FIG. 24 Music Cover Art Browse screen
4. Scroll through the list to highlight the CD you want to play, and press SELECT to select the title,
and open the Music Details screen for that movie.
The Music Details screen displays detailed information on the CD. The options on the Music
Details screen are described in the Music Details Page section on page 40.
5. When the Music Details screen opens, select the Play button (see Music Details Page section on
page 40), and press SELECT to begin playback.
Browse Music by Artist
1. Press MAX to access the Main MAX Screen.
2. Highlight and select Music, then select Artist to access the Music Artist Select screen (FIG. 25), to
browse a list of all music Artists currently on the MAX server. Each entry in the Artist list indicates
the Artist Name, the number of Tracks included in each, and the total running time for each Artist (if
all tracks for that artist were played in sequence).
3. Scroll through the list to highlight an Artist that you want to browse, and press SELECT to select
the highlighted Artist. This selection invokes the Music Album Title Browse screen (FIG. 22 on
page 36), listing all CDs associated with the selected artist.
You can sort the list by Artist, Tracks, or Time by highlighting and selecting any one of the
column headings.
Use the SKIP/SCROLL (+ / -) buttons to page through large lists as opposed to scrolling
through each item in the list.
38
MAX-AVP Audio-Video Player
MAX-AVP User Interface
FIG. 25 Music Artist Select screen
4. Scroll through the list to highlight the CD that you want to play, and press SELECT to select the
title, and open the Music Details screen for that CD.
The Music Details screen displays detailed information on the CD. The options on the Music
Details screen are described in the Music Details Page section on page 40.
5. When the Music Details screen opens, select the Play button (see Music Details Page section on
page 40), and press SELECT to begin playback.
Search For Music
1. Press MAX to access the Main MAX Screen.
2. Highlight and select Music, then select Search to access the Music Search screen (FIG. 26).
FIG. 26 Music Search screen
The buttons along the top of this screen indicate the two types of searches that you can do:
MAX-AVP Audio-Video Player
39
MAX-AVP User Interface
Title: This searches the CD titles for a partial match.
Artist: Searches the Artists portion of the music details for a partial match.
Search operations depend on the detailed information that was entered for each disc
(either via WinMAX or BulkRipper). If a CD was added to the MAX server with
incomplete details, then it might not be found via certain search types.
3. Highlight and select the desired search type, and press SELECT to invoke the text entry field.
4. Use the alpha-numeric keypad on the remote controller to enter a search string, and press ENTER
to search.
The keypad on the remote controller works like most cell-phone keypads: Press the button
once to type the first letter of that button (“A” on the “ABC” / #2 button). Press the button
again to type the next letter for that button (“B”), and so on.
Watch the text entry field as you enter letters to verify that you are entering the characters
correctly.
When entering more than one letter that is assigned to the same button on the remote
controller, wait until the cursor moves to the next position to enter the letters (approximately 3
seconds): the selected letter is always added to the search field at the cursors position.
5. Scroll through the search results list to highlight the CD you want to play, and press SELECT to
select the title, and open the Music Details screen for that CD.
6. The Music Details screen displays detailed information on the movie. The options on the Music
Details screen are described in the Music Details Page section on page 40.
7. When the Music Details screen opens, select the Play button (see Music Details Page section on
page 40), and press SELECT to begin playback.
Music Details Page
When you select a CD title in the Browse, Genre, Cover or Search Music pages, the Music Details page
is displayed, providing detailed information on the CD, as well as cover art (FIG. 27).
FIG. 27 Music Details page
There are two options on this page:
40
MAX-AVP Audio-Video Player
MAX-AVP User Interface
Playlist Add: Select to add individual tracks from the CD, or the entire CD to a Playlist. Refer
to the Working With Playlists section on page 41 for details.
Play: Select to initiate playback of the entire CD.
Alternatively, you can highlight an individual track in the Track list and press SELECT
to begin playback of the CD, starting with the selected track.
To exit the Music Details page, press RETURN on the remote control.
Working With Playlists
Select Playlist from the Main MAX page to display the three types of Playlist types (Audio, Video, and
Mixed) supported by MAX (FIG. 28):
FIG. 28 Main Page - Playlist Types
Audio: Contains audio items only, including entire CDs or individual tracks.
Video: Contains video items only, including entire DVDs, individual DVD chapters, and
Bookmarks.
Mixed: Includes both video and audio elements.
You can create as many Playlists as you like, and there is no limit to the number of items that can have in
each Playlist.
The process of creating and editing Playlists is identical for the three different types of Playlists. The
only difference between Audio and Video Playlists is in locating and selecting the items that you want to
add to your Playlists. Again, Mixed Playlists simply contain both audio and video items.
For the purposes of showing how to create and manage Playlists, we will use Audio Playlists as an
example in the following subsections.
MAX-AVP Audio-Video Player
41
MAX-AVP User Interface
Creating an Audio Playlist
To add individual tracks from a CD:
Select a CD and open the Music Details page (FIG. 29).
1. Highlight and select Playlist Add. This action adds selection checkboxes to the track list (FIG. 29).
FIG. 29 Music Details page - Playlist Add mode
2. Highlight and select the tracks that you want to add to the Playlist. The checkboxes along the right
side of the list indicate which tracks have been selected for inclusion on the Playlist.
3. Highlight and select Save Checked. This invokes the Music Details - Playlist page (FIG. 30):
FIG. 30 Music Details - Playlist page
4. At this point, you can choose to either add the selected tracks to an existing playlist, or create a new
playlist (as described below):
42
MAX-AVP Audio-Video Player
MAX-AVP User Interface
Creating a New Playlist
1. In the Music Playlist page, highlight and select the top entry – [CREATE NEW PLAYLIST]. This
action invokes the Playlist Details page (FIG. 31):
FIG. 31 Playlist Details page
2. Use the options on this page to Delete items from the Playlist, Reorder the items, Rename the
Playlist, or Delete the entire Playlist. These options are described in the following subsections.
Highlight and Select PLAY to playback the list in the order that is displayed.
Adding Items to an Existing Playlist
1. With one or more tracks selected in the Music Details page (see Creating a New Playlist section on
page 43), highlight and select Save Checked. This invokes the Music Playlist page (FIG. 30 on
page 42).
2. Scroll down and highlight the Playlist that you want to add the selected tracks to.
You can sort the list by Items, Run Time, Media, or MPAA (rating) by highlighting and
selecting any one of the column headings.
Use the SKIP/SCROLL (+ / -) buttons to page through large lists as opposed to scrolling
through each item in the list.
3. Press ENTER to invoke the Playlist Details page for the selected Playlist.
When adding tracks to an existing Playlist, they are always added to the bottom of
the list. You can reorder the Playlist at any time (see the Reorder Items in a
Playlist section on page 45 for details).
Using the Music Details Page to Play Selected Tracks
You can select multiple tracks in the Music Details Page (in Playlist Add mode - see FIG. 29), and select
PLAY to play the selected tracks, without adding them to a playlist.
MAX-AVP Audio-Video Player
43
MAX-AVP User Interface
Editing Playlists
Use the options along the bottom of the Playlist Details page to edit and delete Playlists:
Renaming Playlists
When a new Playlist is created (see the Creating a New Playlist section on page 43), it is given a default
name: “Playlist ##”, indicating the number of Playlists created previously. For example, if you already
have 20 Playlists saved, when you create new Playlist it will be automatically be named “Playlist 21”.
You can rename your Playlists at any time to assign more user-friendly names, as described below:
1. Select Playlist from the main MAX page, and select Mixed, Video or Audio to locate the Playlist that
you want to edit.
2. Highlight and select the Playlist that you want to edit. This invokes the Playlist Details page.
3. Highlight and select Rename from the options along the bottom of the page. This action removes the
current Playlist title from the top of this page, and places a cursor in the text field.
4. Use the alpha-numeric keypad on the remote controller to enter a new title for this Playlist,
The keypad on the remote controller works like most cell-phone keypads: Press the button
once to type the first letter of that button (“A” on the “ABC” / #2 button). Press the button
again to type the next letter for that button (“B”), and so on.
When entering more than one letter that is assigned to the same button on the remote
controller, wait until the cursor moves to the next position to enter the letters (approximately 3
seconds): the selected letter is always added to the search field at the cursors position.
When entering a space, allow the 3 second delay before entering the first character
after the space, since the space button is also the zero button.
Watch the text entry field as you enter letters to verify that you are entering the characters
correctly.
5. Press ENTER to save your changes.
The SELECT and ENTER buttons on the remote share the same functionality.
Deleting an Item From a Playlist:
1. Select Playlists from the main MAX page, and select Mixed, Video or Audio to locate the Playlist
that you want to edit.
2. Highlight and select the Playlist that you want to edit. This invokes the Playlist Details page.
3. Highlight and select Delete Item from the options along the bottom of the page. This action adds
selection checkboxes to the track list.
4. Highlight and select the track(s) that you want to delete. The checkboxes along the right side of the
list indicate which tracks have been selected for deletion.
5. Highlight and select Delete to remove the selected items.
44
MAX-AVP Audio-Video Player
MAX-AVP User Interface
Reorder Items in a Playlist
1. Select Playlists from the main MAX page, and select Mixed, Video or Audio to locate the Playlist
that you want to edit.
2. Highlight and select the Playlist that you want to edit. This invokes the Playlist Details page.
3. Highlight and select Reorder from the options along the bottom of the page.
4. Highlight an item in the Playlist that you want to move to a different place in the list, and press
SELECT on the remote controller.
5. Use the Up and Down arrow buttons on the remote controller to move the selected item to the
desired position in the list.
6. Press SELECT again to release the item and drop it into the new place in the list.
7. Repeat this process for each item in the list to specify the desired order for playback.
8. When the list is the desired order, highlight and select OK to save the Playlist in the specified order.
At any point during the process, highlight and select Cancel to return to the Playlist
Details page without saving any changes to the order of the list.
Deleting a Playlist From the System
Use the Delete option in the Playlist Details page to delete an entire Playlist from the system. Note that
deleting a Playlist does not delete the items (content) included in that Playlist from the MAX Server.
1. Select Playlists from the main MAX page, and select Mixed, Video or Audio to locate the Playlist
that you want to edit.
2. Highlight and select the Playlist that you want to delete. This invokes the Playlist Details page.
3. Highlight and select Delete from the options along the bottom of the page.
4. The system will prompt you to verify this action before the Playlist is permanently deleted
(FIG. 32):
FIG. 32 Verify deleting a Playlist
5. Highlight and select OK to proceed.
MAX-AVP Audio-Video Player
45
MAX-AVP User Interface
Recalling Playlists for Playback
Playing an Entire Playlist
1. Select Playlist from the main MAX page, and select Mixed, Video or Audio to locate the Playlist that
you want to edit.
2. Highlight and select the Playlist that you want to playback. This invokes the Playlist Details page.
3. Highlight and select Play from the options along the bottom of the page to begin playback.
Playing an Individual Item in a Playlist
1. Select Playlist from the main MAX page, and select Mixed, Video or Audio to locate the Playlist that
you want to edit.
2. Highlight and select the Playlist that you want to playback. This invokes the Playlist Details page.
3. Highlight the item that you want to play, and select PLAY to begin playback.
Playlist Playback Controls
When playing back Playlists, the DISPLAY button on the remote controller brings up the details of the
currently playing item, just as if it were in DVD or CD playback mode. The other controls work the same
as they do for DVD or CD playback, with the exception of the SKIP +/- buttons, which skip to the next
or previous item in the Playlist.
The SKIP functions for Playlists are described below:
Video Content - Skips to the next item in the Playlist.
Audio Content (Track) - Skips to the next item in the Playlist.
Audio Content (CD) - Skips to the next track on the CD.
Setup Page
The options in the MAX-AVP Setup Page allow you to specify various configuration settings and setup
options for the AVP. The Setup Page options are separated into four categories, each one represented by
a separate tab:
Settings: Use the options in this tab to configure audio/video output settings for the AVP.
Refer to the Setup Page – Settings tab section on page 47.
Tuning: Use the options in this tab to set the volume level for stereo analog outputs (Volume),
and fine-tune video output (Brightness, Contrast Saturation). Refer to the Setup Page – Tuning
tab section on page 49.
Locale: Use the options in this tab to select preferred content audio and subtitle languages,
and to set the region code for the AVP’s DVD drive. Refer to the Setup Page – Locale
tab section on page 49.
Refer to the Changing the DVD Region Code Setting section on page 15 for
instructions.
System Information: This tab provides a summary of the current system and device settings
(read-only). Refer to the Setup Page – System Information tab section on page 50.
1. To access the Setup Pages, press SETUP on the remote controller. The system prompts you to
verify that you want to open the Setup Pages:
46
MAX-AVP Audio-Video Player
MAX-AVP User Interface
FIG. 33 Entering Setup Pages
2. Highlight OK, and press SELECT to open the Setup Pages – Settings tab (default view).
Setup Page – Settings tab
The options on the Settings tab are described below (FIG. 34):
FIG. 34 Setup Page - Settings tab
Video Standard: Press SELECT to set the video standard for the display device:
NTSC (M) - default
NTSC (M) Japan
PAL (BG)
MAX-AVP Audio-Video Player
47
MAX-AVP User Interface
PAL M
PAL 60
480p59
576p50
Display Aspect Ratio: Press SELECT to set the aspect ratio for the display device:
Widescreen = 16 x 9
Standard = 4 x 3
Digital Audio: Press SELECT to set the format of audio sent via the S/PDIF digital
connection PCM or Bitstream (DD/DTS)). PCM of no decoder is present in the attached
device, Bitstream if a Dolby Digital or DTS decoder is present.
HDMI: Select whether HDMI should auto-detect the video mode from the display, or be
manually fixed to the specified video standard (default = AUTODETECT).
If HDMI is set to MANUAL, the Video Standard setting (see above) only selects modes
for HDMI (i.e., the mode selected with Video Standard will not influence the analog
outputs).
If HDMI is set to AUTODETECT, and the AVP is connected via HDMI, the Video
Standard setting is disabled.
HDMI shuts off the Composite, S-VIdeo and Component outputs.
Widescreen Formatting: Select the formatting mode for widescreen content playback on a
standard aspect ratio display.
Pan-and-Scan: fills the screen
Letterbox: retains the film’s actual aspect ratio
Some DVDs do not support widescreen formatting, in which case this option has no
effect.
Color Space: Select the colorspace for the display. The options are:
YUV-601 (Consumer component video – default)
Leave the Color Space setting on YUV-601 if you are connecting via composite or
SVideo.
YUV-709 (some professional equipment)
RGB 0-255 (some projectors and monitors)
Screen Saver Timeout (minutes): Increase/decrease screensaver timeout in increments of 1
minute by selecting the Up or Down arrow and pressing SELECT.
A setting of zero disables the screensaver.
Apply & Save Settings as Default: Apply the current settings and save them as the default. If
video settings were changed, they will be tested for 10 seconds. Confirm to save, cancel or
wait for timeout to revert to previous settings.
On exiting the Setup page, the system will prompt you to save any changes, if any
settings have been changed.
48
MAX-AVP Audio-Video Player
MAX-AVP User Interface
Setup Page – Tuning tab
Use the options in the Tuning tab (FIG. 35) to set the volume level for stereo analog outputs (Volume),
and fine-tune video output (Brightness, Contrast Saturation).
FIG. 35 Setup Page - Tuning tab
Select one of the four tabs, and use the Up/Down arrow buttons to adjust the selected setting.
Select the double arrow to make quick adjustments by pressing SELECT.
Select the single arrow to make fine adjustments by pressing SELECT.
Setup Page – Locale tab
Use the options in the Locale tab (FIG. 36) to select preferred content audio and subtitle languages, and
to set the region code for the AVP’s DVD drive.
FIG. 36 Setup Page - Locale tab
To change these settings, select the Up or Down arrow for setting that you want to change, and press
SELECT to scroll through the possible choices.
English (EN) is the default setting.
Refer to the DVD Language Codes section on page 51 for a full listing of supported languages
and their associated language codes.
Highlight and select Save as Default to save the current language preferences as the default
settings.
Use the options in the Region Control section of this page to change the DVD Region Code setting for
the DVD drive in the MAX-AVP (FIG. 37):
MAX-AVP Audio-Video Player
49
MAX-AVP User Interface
FIG. 37 Locale tab - Region Control
The current region code setting is indicated in the text field
(default = region 1 – N. America).
The region code setting can be changed up to four times. The number of region code changes
that are still allowed on this AVP is indicated beneath the text box.
Refer to the Changing the DVD Region Code Setting section on page 15 for
instructions on changing the DVD Region Code setting for the AVP’s internal DVD
drive.
Setup Page – System Information tab
The System Information tab (FIG. 38) displays a summary of the current system and device settings
(read-only):
FIG. 38 Setup Page - System Information tab
50
MAX-AVP Audio-Video Player
MAX-AVP User Interface
DVD Language Codes
The MAX-AVP supports the following languages and language codes:
DVD Language Codes
Language
Code
Language
Code
1. Abkhazian
AB
69. Lithuanian
LT
2. Afar
AA
70. Macedonian
MK
3. Afrikaans
AF
71. Malagasy
MG
4. Albanian
SQ
72. Malay
MS
5. Amharic, Ameharic
AM
73. Malayalam
ML
6. Arabic
AR
74. Maltese
MT
7. Armenian
HY
75. Maori
MI
8. Assamese
AS
76. Marathi
MR
9. Aymara
AY
77. Moldavian
MO
10. Azerbaijani
AZ
78. Mongolian
MN
11. Bashkir
BA
79. Nauru
NA
12. Basque
EU
80. Nepali
NE
13. Bengali, Bangla
BN
81. Norwegian (Norsk)
NO
14. Bhutani
DZ
82. Occitan
OC
15. Bihari
BH
83. Oriya
OR
16. Bislama
BI
84. Afan (Oromo)
OM
17. Breton
BR
85. Panjabi
PA
18. Bulgarian
BG
86. Pashto, Pushto
PS
19. Burmese
MY
87. Persian
FA
20. Byelorussian
BE
88. Polish
PL
21. Cambodian
KM
89. Portuguese
PT
22. Catalan
CA
90. Quechua
QU
23. Chinese
ZH
91. Rhaeto-Romance
RM
24. Corsican
CO
92. Romanian
RO
25. Hrvatski (Croatian)
HR
93. Russian
RU
26. Czech (Ceske)
CS
94. Samoan
SM
27. Dansk (Danish)
DA
95. Sangho
SG
28. Dutch (Nederlands)
NL
96. Sanskrit
SA
29. English
EN
97. Scots Gaelic
GD
30. Esperanto
EO
98. Serbo-Crotain
SH
31. Estonian
ET
99. Sesotho
ST
32. Faroese
FO
100. Serbian
SR
33. Fiji
FJ
101. Setswana
TN
34. Finnish
FI
102. Shona
SN
35. French
FR
103. Sindhi
SD
36. Frisian
FY
104. Singhalese
SI
37. Galician
GL
105. Siswati
SS
38. Georgian
KA
106. Slovak
SK
39. Deutsch (German)
DE
107. Slovenian
SL
40. Greek
EL
108. Somali
SO
41. Greenlandic
KL
109. Spanish (Espanol)
ES
MAX-AVP Audio-Video Player
51
MAX-AVP User Interface
DVD Language Codes (Cont.)
52
Language
Code
Language
Code
42. Guarani
GN
110. Sundanese
SU
43. Gujarati
GU
111. Swahili
SW
44. Hausa
HA
112. Svenska (Swedish)
SV
45. Hebrew
IW
113. Tagalog
TL
46. Hindi
HI
114. Tajik
TG
47. Hungarian
HU
115. Tatar
TT
48. Islenka (Icelandic)
IS
116. Tamil
TA
49. Indonesian
IN
117. Telugu
TE
50. Interlingua
IA
118. Thai
TH
51. Interlingue
IE
119. Tibetian
BO
52. Inupiak
IK
120. Tigrinya
TI
53. Irish
GA
121. Tonga
TO
54. Italian
IT
122. Tsonga
TS
55. Japanese
JA
123. Turkish
TR
56. Javanese
JW
124. Turkmen
TK
57. Kannada
KN
125. Twi
TW
58. Kashmiri
KS
126. Ukranian
UK
59. Kazakh
KK
127. Urdu
UR
60. Kinyarwanda
RW
128. Uzbek
UZ
61. Kirghiz
KY
129. Vietnamese
VI
62. Kirundi
RN
130. Volapuk
VO
63. Korean
KO
131. Welsh
CY
64. Kurdish
KU
132. Wolof
WO
65. Laothian
LO
133. Yiddish
JI
66. Latin
LA
134. Yoruba
YO
67. Latvian, Lettish
LV
135. Xhosa
XH
68. Lingala
LN
136. Zulu
ZU
MAX-AVP Audio-Video Player
MAX-AVP User Interface
MAX-AVP Audio-Video Player
53
It’s Your World - Take Control™
3000 RESEARCH DRIVE, RICHARDSON, TX 75082 USA • 800.222.0193 • 469.624.8000 • 469-624-7153 fax • 800.932.6993 technical support • www.amx.com
065-004-2964 9/06
©2006
AMX. All rights reserved. AMX and the AMX logo are registered trademarks of AMX. AMX reserves the right to alter specifications without notice at any time.