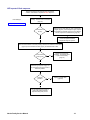
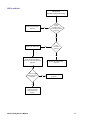
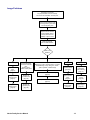
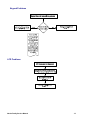
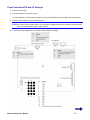
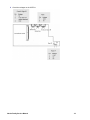
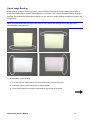
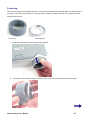
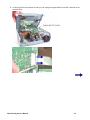
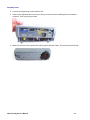
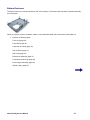
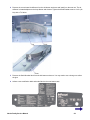
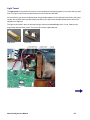
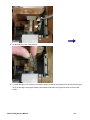
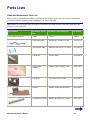
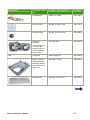
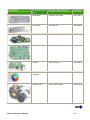
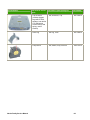
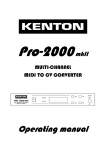
1
Nacho Family Service Manual
UPDATES
07-February-2005: Light Tunnel (315-0053-xx) added as a replaceable part in service manual.
26-October-2004: Color wheel assembly (525-0139-xx) added as a replaceable part in service manual.
The Nacho family of projectors includes the ASK Proxima C170 and the InFocus LP600.
Using the manual
The bookmarks that appear on the side
of the screen help you navigate to each
topic in the manual. You can use them
to quickly go from a troubleshooting
topic to instructions to remove a
specific part.
There is also a Table of Contents and
page references should you need to
work with a printed document.
The manual is arranged in the order
you can use to diagnose and then
repair the projector. The three main
sections of the service manual are:
Troubleshooting—In this section, you will find troubleshooting flowcharts for a variety of symptoms. The
flowcharts lead you through power and image diagnostics, as well as audio, keypad and remote issues. There are
also controller and I/O ECA diagram, and image banding adjustment instructions.
Parts Removal and Replacement—Instructions to remove and replace each FRU in the projector. We’ve also
included a removable parts hierarchy you can use to see what parts must be removed to access each FRU in the
projector. You can also refer to the Illustrated Replaceable Parts List in the Parts Lists.
Parts Lists—In this section are the illustrated replaceable parts list and the exploded view.
For specifications, firmware updates and instructions, and current field communications, see your online ASC
Resource Center.
Table of Contents
Nacho Family Service Manual ................................................................................................................. 1
Table of Contents...................................................................................................................................... 2
Troubleshooting........................................................................................................................................ 3
Power and Start-up Problems ..............................................................................................................................4
Image Problems .................................................................................................................................................12
Keypad Problems ...............................................................................................................................................13
LCD Problems ....................................................................................................................................................13
Remote Problems...............................................................................................................................................14
Check Controller ECA and I/O Voltages ............................................................................................................15
Adjust Image Banding ........................................................................................................................................17
Check the Thermal Switch .................................................................................................................................19
Check fan operation ...........................................................................................................................................20
Parts Removal and Replacement .......................................................................................................... 22
Removable Parts Hierarchy ...............................................................................................................................22
Exploded View....................................................................................................................................................23
Lamp and Lamp Door.........................................................................................................................................24
Focus ring...........................................................................................................................................................26
Front bezel .........................................................................................................................................................28
Top Enclosure ....................................................................................................................................................31
Exhaust and Intake Bezels.................................................................................................................................34
Exhaust Fan Assembly.......................................................................................................................................37
Color Wheel Assembly .......................................................................................................................................40
Controller ECA and I/O ECA ..............................................................................................................................44
Power Supply and Chassis ................................................................................................................................49
Optical Engine ....................................................................................................................................................52
Bottom Enclosure ...............................................................................................................................................55
Light Tunnel........................................................................................................................................................58
Parts Lists................................................................................................................................................ 63
Illustrated Replaceable Parts List.......................................................................................................................63
Illustrated User Replaceable Parts List ..............................................................................................................67
Labels.................................................................................................................................................................68
Nacho Family Service Manual
2
Troubleshooting
You use the Troubleshooting section to diagnose problems with the projector. In this section, you will find
troubleshooting flowcharts for a variety of symptoms. Each flowchart leads you through a series of steps that will
ultimately result in a solution. The solutions begin with the most simple and progress to the most complex.
On the left, select the section you want.
Power problems, including lamp issues, partial power up, shutdown and no power
Image problems, including no image, bad color, dim image and other picture distortions
Keypad problems
Remote problems
Audio problems
In addition to the troubleshooting trees, you will also find a controller voltage diagram.
Nacho Family Service Manual
3
Power and Start-up Problems
The projector communicates its status via an LED located on the keypad. When this status LED is green, you know
that the projector is working properly. When the status LED is solid red or flashing red, you know there are lamp,
power or startup problems. The frequency with which the status indicator blinks red indicates one of several error
codes. These error codes provide crucial information about projector malfunctions. In addition, this projector
includes an LCD message that provides you with additional information.
The power diagnosis sequence begins on the next page.
NOTE We strongly suggest that you follow the entire power diagnosis sequence, which begins on the next page.
LED Status
Projector Status
LCD Message
LED flashes
green
The projector is starting up after the Power
button was pressed, or the projector is shutting
down after the Power button was pressed.
POWER UP. WAIT…X SEC
Or
POWER DOWN. WAIT…X SEC
LED is solid
green
The projector is ready to light the lamp when the Various messages, including feedback for
Power button is pressed. Or the lamp is lit and
keypad button presses.
the projector is operating properly.
LED flashes
red once
The lamp will not strike after five tries.
LED flashes
red two times
The lamp has more than 2,000 hours of use.
Requires replacement. Projector shuts down.
LAMP WON’T STRIKE
RETRYING WAIT
REPLACE LAMP
LED flashes
Lamp failure. Projector shuts down.
red three times
LAMP FAILURE
LED flashes
red four times
A fan has failed. Projector shuts down.
FAN FAILURE SHUTDOWN 10….(counts
down; shuts down after 1)
LED flashes
red five times
The projector is overheating. Check for a
blocked vent.
LED is solid
red
Undiagnosed error. Projector shuts down.
Nacho Family Service Manual
HIGH TEMPERATURE SHUTOFF
4
Power Diagnostics, part 1
Plug the projector into a good power source
with a known good power cord.
Check the lamp door.
Check the interlock
switch.
(page 24)
No, the LED and
the Power button
did not light.
Does the LED light a
steady green and is
the Power button
illuminated?
Confirm that the
keypad flex cable is
plugged in.
(page 31)
Go to Power Diagnostics,
part 2
A solid green LED
means the projector
is either waiting for
a command or is
operating normally.
Make sure the direct
connectors on the
controller ECA are fully
engaged.
(page 47)
Solve the
problem?
Yes
A flashing green
LED means the
projector is either
attempting to light
the lamp or is
shutting down.
Confirm the unit is
good by starting
again.
Yes
Verify correct voltages at the
controller/power supply
connector.
(page 17)
Voltages OK?
No
Replace
power supply
(page 49)
Yes
Replace controller ECA
(page 44)
Confirm that unit is good
by starting again.
Replace top enclosure
(includes the keypad ECA)
(page 31)
Nacho Family Service Manual
5
Power Diagnostics, part 2
Press the Power button on the keypad.
The power cord must be plugged in and the LED
must be solid green. If not, go back to Part 1.
Does the
startup tone
sound?
No
Confirm that the speaker
cables are connected to
the keypad ECA on the
inside of the top
enclosure (page 31)
Check the LED status
Solve the
problem?
Is the LED flashing
green?
No, the LED
Is flashing red.
Go to Error Codes
on page 7.
No
Measure the resistance across
the speaker terminal.
Yes
Measure 16Ω?
Does the LED turn
solid green and the
lamp light?
No. The lamp did
not light and/or the
LED is flashing red
Yes
Go to Error Codes
on page 7.
No
Replace the top
enclosure (includes
the speakers)
(page 31)
Yes
Replace I/O ECA.
(page 48)
Run the projector long enough to
ensure that the problem is solved.
If the lamp goes out and the LED turns
red, go to Error Codes.
Nacho Family Service Manual
6
Power Diagnostics, Error Codes
Is the LED steady or
flashing?
Flashing
Steady
Red LED flashes have
approx. 2-second
intervals between
series of flashes. For
example, the LED may
flash 4 times, then
pause for 2 seconds,
then flash 4 times
again.
On
Off
An internal error occurred that
the projector cannot identify.
Diagnose the error.
(page 11)
What is the
flashing pattern?
On
Off
On
Off
1 flash
The lamp failed to strike
after five attempts.
Diagnose lamp strike
failure.
(page 8)
2 flashes
The lamp timer registers
lamp use of 2000 hours
or more.
Replace the lamp.
(page 24)
3 flashes
The projector detected an
internal error and shutdown
the lamp.
Diagnose lamp shutdown.
(page 9)
Lamp did not strike
Replace Lamp
Lamp shutoff
Retrying….wait
Repeats
Keypad LCD messages
On
Off
On
Off
Check the fans
(page 20)
5 flashes
The projector detects high
internal temperature.
Diagnose thermal
problems.
(page 10)
Fan stopped
Over Temp Condition
4 flashes
A fan failed.
High Temperature Shutdown
Nacho Family Service Manual
7
LED flashes single red
The lamp won't strike after five attempts. The status
LED flashes a repeated red single-flash sequence.
Ensure that the lamp is good.
Is the lamp
door closed?
Close the door properly
and restart diagnostics
No
LCD Message
Lamp did not strike
Yes
Open the lamp door. Check the interlock switch.
(page 24)
Retrying, wait...
Repeats
Interlock switch
good?
No
Replace the exhaust fan
assembly (includes the
interlock switch).
(page 37)
Yes
Make sure lamp connector
securely attached to lamp cable
(page 24)
Replace power
supply.
(page 49)
No
Restart the diagnostic
process.
Voltages good
at power supply/
controller
connector?
(page 15)
Yes
Yes
Problem
solved?
No
Replace color wheel
assembly.
(page 40)
Replace the controller
ECA.
(page 44)
Verify the repair by
restarting the Power
Diagnosis process.
Nacho Family Service Manual
8
LED repeats 3 flash sequence
LCD Message
The lamp was operating but shut down. Fans are
running. The status LED flashes a repeated
red three-flash sequence.
Lamp shutoff
Note
If the projector is
operated in a hot
environment,
especially at high
altitudes, the unit
may overheat and
shut down when the
thermal switch
opens. The only
solution for this is to
let the projector cool
down. The projector
should not be used
where ambient
temperatures are
over 95º F (35º C).
Reinstall the lamp,
ensuring that it is
properly seated.
Solve the
problem?
Yes
Run the projector long enough to
ensure that the problem is solved.
No
Replace the power supply.
(page 49)
Yes
Repeat the diagnostic
process to ensure that the
problem is solved.
Nacho Family Service Manual
9
LED repeats 5 flash sequence
Projector shuts down after detecting high temperature
condition. LED flashes in repeated five-flash sequence.
LCD Messages
Verify that the two exhaust fans are
operating. These fans are not sensed.
(page 20)
High temperature shutdown
Are both fans
turning?
No
Remove the top case (page 31), then check the fan
voltages (page 21). If the voltages are good, replace
the exhaust fan assembly (page 37). If the voltages
are bad, replace the controller ECA. (page 44)
Run the projector long enough to
confirm the problem issolved.
Repeat the diagnosis process.
Yes
Check the thermal switch on the lamp housing. Measure the resistance at the switch
(page 19). If the resistance is infinity (open), the thermal switch is bad.
Is the thermal
switch good?
No
Replace the exhaust fan
assembly. The thermal switch
is part of the assembly.
(page 37)
Yes
Substitute a good power supply and
run projector long enough to know if
that is the problem.
Solve the
problem?
No
Replace controller ECA.
(page 40)
Yes
Run the projector long enough to
confirm the problem issolved.
Repeat the diagnosis process.
Nacho Family Service Manual
10
LED is solid red
LED solid red.
Fans may or may not be running.
Replace the power supply.
(page 52)
No
Power
supply
voltages good?
(except lamp enable)
(page 15)
Yes
Reseat color wheel cable.
No
Is the
color wheel
spinning?
Yes
If color wheel does not spin,
replace the color wheel assembly.
(page 40)
Does the color
wheel start and the
lamp light?
Replace the controller ECA.
(page 44)
No
Replace the controller ECA.
(page 44)
Yes
To confirm that the problem
is solved, restart the
diagnosis process.
(page 5)
Nacho Family Service Manual
11
Image Problems
The image is not correct.
The projector starts and runs normally.
The menus are accessible. The lamp is lit.
Confirm that the cables and the
source signals are good. Make
sure the signal is good.
Confirm that all image
adjustments are set to the
factory defaults. Select
Factory Reset from the
Settings > Service menu.
Flash the projector
with the latest software.
What is the
problem?
No video image
Replace the I/O
ECA
(page 44)
Replace the
controller ECA
(page 44)
Replace the
optical engine
(page 48)
No computer image.
Vertical or horizontal
lines.
Sparkly picture.
Clusters of dark pixels.
Replace the
controller ECA
(page 44)
Bad or missing tint or color
Missing logo, VGA, composite video, or S-video
Distorted image, noisy, rolling, torn, frozen,
'plaid', repeated, or shifted image
Replace the color wheel assembly.
(page 40)
Replace the controller ECA.
(page 44)
Replace the
optical engine
(page 52)
Nacho Family Service Manual
Dim image
Image banding
Adjust the
horizontal or
vertical banding
(page 17)
Substitute known
good lamp
Substitute a known
good controller
ECA.
(page 44)
Replace the light
tunnel
(page 58)
Replace the
optical engine.
(page 52)
Replace the
optical engine.
(page 52)
12
Keypad Problems
LCD Problems
Nacho Family Service Manual
13
Remote Problems
44)
44)
Nacho Family Service Manual
14
Check Controller ECA and I/O Voltages
1
Remove the top case.
2
Plug the projector into a power source.
You can measure ‘non-power state’ voltages on the controller ECA when the projector is not powered up.
3
Use the remote control to power up the projector.
NOTE If you don’t have a remote control, you can plug the keypad cable into its connector on the controller
ECA, and use the power button on the keypad.
4
Use measurement equipment to check the controller ECA for voltages.
Nacho Family Service Manual
15
5
Check the voltages on the I/O ECA.
Nacho Family Service Manual
16
Adjust Image Banding
Image banding can appear on the top, bottom, right or left sides of the projected image. Banding occurs when a
portion of the picture that is normally masked appears on the screen. This occasionally happens during shipping or
handling. This model allows adjustments for banding on any side of the image. Banding examples are circled in the
images below.
NOTE If this adjustment does not resolve the issue, the issue may lie with the light tunnel. See page 58 for
information about the light tunnel.
To adjust banding, do the following.
1
Turn the projector upside down on the work surface and remove the lamp door.
2
Defeat the interlock switch with a piece of flexible plastic.
3
Power up the projector and project a plain white or gray image on the screen.
Nacho Family Service Manual
17
4
To adjust banding on the top or bottom of the image, use a T6 driver to turn the adjustment screw in the
hole shown below. Turn clockwise or counterclockwise until the top and bottom of the image are even.
5
To adjust banding on the right or left side of the image, use the T6 driver to turn the adjustment screw in
the hole shown below. Note that you must insert the driver at an angle to engage the screw head. Turn
clockwise or counterclockwise until the top and bottom of the image are even.
6
When you finish the adjustment, power down the projector, and remove the plastic from the interlock cavity.
Install the lamp door and project an image to confirm that banding is no longer present.
7
If you cannot adjust out the banding, the optical engine requires replacement (page 52).
Nacho Family Service Manual
18
Check the Thermal Switch
The thermal switch is designed to open when the temperature inside the projector gets too high. When the switch
opens, the power supply shuts down, turning the projector off.
When the projector shuts down after operating for a few minutes or when the lamp fails to strike after repeated
attempts at startup, check the thermal switch.
1
Power up the projector.
2
Let the projector run until it shuts down.
3
Remove the top enclosure (page 31).
4
Lift the side IR ECA out its mount on the exhaust fan bracket. This allows you to access the thermal switch.
5
Measure the resistance across the terminals at the thermal switch. If the resistance is infinite (Ω), replace
the exhaust fan assembly, which includes the thermal switch (page 37).
Nacho Family Service Manual
19
Check fan operation
Exhaust fans
The two exhaust fans are not three wire fans. Thus, if either or both stops working, the four-flash red LED error
code will not appear. It is more likely that the projector will overheat or will be noisier. The noise level would rise
when one exhaust fan stopped working and the other ran at high speed to compensate. The projector may not shut
down and the fan error may not appear if the single exhaust fan can keep the temperature below the critical level.
You can visually check the operation of the two exhaust fans to see if they both work properly. Check the fans if the
projector exhibits symptoms of overheating or if the red status LED indicates that a fan issue is present.
Lamp blower
You can observe the lamp blower from the side adjacent to the color wheel (see the photo above). The lamp
blower is a three-wire fan, and failure will cause the Fan Stopped message to appear. The lamp will shut off.
Nacho Family Service Manual
20
Checking fan voltages
Checking fan voltages allows you to determine whether the fan or the ECA to which it connects is faulty.
1
Remove the top enclosure (page 31).
2
Plug the projector into a power source.
3
Measure the voltage at pin one at both fans and the blower at both power down and power up states. The
voltage for both exhaust fans and the lamp blower should be ~5VDC when the lamp is off, and ~11VDC
when the lamp is on. Additionally, pin two on the lamp blower should read 1.5VDC when the blower is
good, and 3.3VDC when the blower is not working properly.
Controller ECA detail
I/O ECA detail
If the voltage on pin one is good and the fan/blower does not work, replace the part. If voltage is not
present, the controller is most likely faulty.
Nacho Family Service Manual
21
Parts Removal and Replacement
Removable Parts Hierarchy
The flow chart below shows what parts must be removed to access each FRU in the projector. The parts on the first
level (the lamp door, for example) are accessible without removing any other parts. The more levels down a part is,
the more parts you need to remove.
Nacho Family Service Manual
22
Exploded View
Nacho Family Service Manual
23
Lamp and Lamp Door
The lamp door fits over the lamp cavity on the bottom of the projector. It includes a tab that closes the interlock
switch when the door is shut.
The projection lamp consists of a metal housing, an enclosed reflector assembly and an arc tube.
CAUTION The lamp module gets very hot during operation. Allow the lamp to cool for 60 minutes before handling it.
1
Use your fingers or a small bladed screwdriver to release the locking tabs on the lamp door. Then remove
the door.
Nacho Family Service Manual
24
2
Release the locking tab on the top of the lamp power connector, then unplug the cable from its connector in
the lamp cavity.
3
Loosen the captive screw on the lamp module.
4
Release the handle from its catch, then lift the lamp out of the projector.
Assembly Note
♦
The projector will not power up if the lamp and lamp door are not installed.
Nacho Family Service Manual
25
Focus ring
The focus ring snaps onto projection lens barrel. The focus ring includes a trim ring that snaps onto the front of the
focus ring. You need to remove the focus ring only when it needs to be replaced or when you replace the optical
engine with a new one.
Focus ring
Focus ring trim
1
Grasp the ring and pull it firmly away from the projector.
2
If necessary, remove the trim ring from the focus ring. To do this, carefully pry the two pieces apart.
Nacho Family Service Manual
26
Assembly Notes
♦
If you removed the trim from the focus ring, make sure to align the parts correctly before snapping them
together. The two parts fit together only one way.
♦
Align the three pins on the lens barrel with the three slots on the inside of the focus ring, then press the
focus ring into place. Make sure it turns evenly and smoothly after installation.
Nacho Family Service Manual
27
Front bezel
The front bezel snaps onto the front of the projector. It includes the brand name. The front IR window snaps to the
front bezel.
1
Carefully place the projector on its end so that the projection lens faces upward.
2
Use a T10 Torx driver to remove the silver M3x25 Plastite screw from the recess in the front corner
opposite the projection lens.
NOTE You may need to work the screw out of the hole by using a magnetized driver.
3
Lift the end of the front bezel opposite the projection lens away from the projector. Swing the bezel outward
and remove it from the projector.
Nacho Family Service Manual
28
4
If you are replacing the front bezel with a new one, remove the front IR window and install it on the new
one.
Assembly Notes
♦
If you are installing a new front bezel, make sure to install the front IR window first.
♦
To install the front bezel, fully insert the two tabs on the end of the bezel nearest the projection lens into the
two matching holes in projector case. Make sure the bezel fits flush with the projector case.
Nacho Family Service Manual
29
♦
To install the other end of the bezel, slightly flex the bezel so that you can insert the two tabs into the
matching holes in the projector case.
♦
Install the M3x25 screw in the bottom case. Torque it 4 in-lb (.42 Nm).
Nacho Family Service Manual
30
Top Enclosure
The top enclosure covers the top half of the projector. Once you remove the top enclosure, you have access to a
number of parts inside the projector.
The top enclosure includes the keypad, the LCD/keypad ECA, the speaker and the elevator button. These parts are
not available separately. When you replace the top enclosure, adhere a new brand label to the top.
1
Remove the front bezel (page 28).
2
Carefully place the projector on its end so that the projection lens faces upward.
3
Use a T10 driver to remove the three silver M3x25 Plastite screws that fasten the bottom enclosure to the
top enclosure. The fourth screw was removed to access the front bezel.
NOTE You may need to work the screw out of the hole by using a magnetized driver.
4
Turn the projector right side up on the on work surface.
Nacho Family Service Manual
31
5
Lift the front of the top enclosure so that you can unplug the keypad cable from its ZIF connector on the
controller ECA.
Nacho Family Service Manual
32
Assembly notes
♦
Connect the keypad cable to the controller first.
♦
Insert the five alignment tabs on the rear of the top enclosure into the matching holes in the bottom
enclosure. Then swing the top closed
♦
Make sure the front of the top enclosure mates properly with the bottom. The two parts should fit flush.
Nacho Family Service Manual
33
Exhaust and Intake Bezels
The intake bezel fits on the projection lens side of the projector. The exhaust bezel fits on the opposite side,
adjacent to the exhaust fan assembly. An identical, clear IR window fits into each bezel. All three parts are
replaceable.
Intake bezel
Exhaust bezel
IR window
The bezels are not fastened to the bottom case. They secured in place when the top and bottom enclosures are
fastened together.
1
Remove the top enclosure (page 31).
2
Lift the bezel out of the bottom enclosure.
Nacho Family Service Manual
34
Assembly Notes
♦
When you replace the exhaust bezel, note how the front and rear of the bezel interlock with the bottom
case.
Nacho Family Service Manual
35
♦
The rear of the intake bezel also features a tab that fits over a boss in the bottom enclosure.
Nacho Family Service Manual
36
Exhaust Fan Assembly
The exhaust fan assembly is comprised of 60mm and 80mm exhaust fans, the front and side IR assembly, the
safety cable, and a bracket. The assembly is located on the side of the projector adjacent to the lamp. The parts
are not available separately.
3
Remove the following parts:
Front bezel (page 28)
Top enclosure (page 31)
Exhaust bezel (page 34)
4
Unplug the exhaust fan cables and the IR cable from their connectors on the controller ECA.
Nacho Family Service Manual
37
5
Unplug the safety cable from its connector on the power supply. You access the connector through a hole
in the chassis. Remove the cable from the cable guide in the metal chassis.
6
Lift the exhaust fan assembly out of the projector. There are no fasteners to remove.
Nacho Family Service Manual
38
Assembly Notes
♦
When you install the exhaust fan assembly, make sure the front and rear of the fan bracket fits properly in
the bottom enclosure.
♦
Plug the safety cable connector in first. Use a needle nosed pliers or screwdriver to ensure that the
connector fully engages.
♦
Make sure the cables route through the guide on the metal chassis.
Nacho Family Service Manual
39
Color Wheel Assembly
The color wheel assembly includes the color wheel, the color wheel ECA and the color wheel bracket. You can
remove and replace the assembly without removing the controller or the engine.
1
Remove the following parts:
Front bezel (page 28)
Top enclosure (page 31)
Nacho Family Service Manual
40
2
Unplug the color wheel ribbon cable, the front blower cable from the controller ECA. Unplug the color wheel
ECA cable from the color wheel ECA. Move the lamp blower and color wheel ECA cables out of the way.
3
Remove the M3x8 screw that fastens the cable clip and color wheel bracket to the engine casting. Note
that the clip keeps the color wheel ribbon cable in place. When you remove the screw, the color wheel
assembly will be loose.
Nacho Family Service Manual
41
4
Lift the color wheel assembly out of the projector. Take care not to scratch the glass wheel as you lift.
Assembly Notes
♦
When you install the color wheel assembly, make sure the alignment pin on the engine fits into the
matching hole in the color wheel bracket.
Nacho Family Service Manual
42
♦
Start the M3x8 screw and cable clip, then insert the ribbon cable before tightening the screw. Torque the
screw to 6 in-lbs (.67 Nm).
♦
Plug the three cables in once the color wheel assembly is secure.
Nacho Family Service Manual
43
Controller ECA and I/O ECA
The controller ECA and the I/O ECA are fastened to the top of the metal chassis. The two boards are connected
to each other with the I/O-controller cable. The controller ECA connects to the power supply via a direct
connection on the bottom of the board. Each board has its own I/O EMI shield. All five parts are replaceable.
Controller ECA
I/O ECA
I/O-controller ECA
I/O EMI shields
WARNING Be sure to take proper ESD precautions while working near the driver ECA. It can be easily damaged by static
electricity. ECAs damaged by static electricity require replacement.
1
Remove the following parts:
Focus ring (page 26)
Front bezel (page 28)
Top enclosure (page 31)
Intake bezel (page 34)
Nacho Family Service Manual
44
Controller ECA
1
Unplug the color wheel cable, the color wheel sync cable and the lamp blower cable from their connectors
on the controller ECA.
2
Unplug the I/O-controller cable from its ZIF connector on the controller ECA.
3
Use a T10 driver to remove the four M3x8 machine screws that secure the controller ECA to the chassis.
The screw locations are noted in the illustration in step 1.
Nacho Family Service Manual
45
4
Lift the controller by the two corners shown below. As you remove the controller, the controller/power
supply connector and the controller/DMD connector disengage.
5
If you are replacing the controller or the controller EMI shield, separate the shield and the controller. The
shield fastens to the controller with four jack screws.
Nacho Family Service Manual
46
Assembly Notes
♦
Note the location of the power supply and DMD connectors before installing the controller ECA. Firmly
press the controller into place. Make sure the pins on the controller match the receptacle on the power
supply.
♦
Torque the M3x8 screws to 6 in-lbs (.67 Nm).
Nacho Family Service Manual
47
I/O ECA
1
Unplug the I/O-controller cable from its ZIF connector on the I/O ECA. See step 2 above for details.
2
Unplug the two exhaust fan cables and the IR cable from the I/O ECA.
3
Use a T10 driver to remove the two M3x8 machine screws that fasten the board to the chassis.
4
If you are replacing the I/O ECA or the I/O EMI shield, separate the two parts. The shield fastens to the
board with two jack screws.
Assembly Notes
♦
When you install the I/O ECA, make sure to align the pin in the chassis with the matching hold in the ECA.
♦
Torque the two M3x8 screws to 6 in-lbs (.67 Nm).
Nacho Family Service Manual
48
Power Supply and Chassis
The power supply fastens to the metal chassis. The plastic power supply insulator fits between the chassis and
power supply. The three parts are available separately.
Power supply ECA
Chassis
Power supply insulator
Remove the power supply assembly
1
Remove the following items:
Focus ring (page 26)
Front bezel (page 28)
Top enclosure (page 31)
Controller and I/O ECAs (page 44)
2
Lift the exhaust fan assembly out of the bottom case.
3
Remove the three M3x10 screws that fasten the power supply assembly to the optical engine and to the
bottom enclosure.
Nacho Family Service Manual
49
4
Lift the chassis and power supply out of the bottom.
5
If you need to replace any of the assembly components, go the next step. Otherwise, place the assembly
aside and continue to the next procedure.
6
Remove the lamp power cable connector from its mount in the chassis. To do this, pinch the locking tabs
on the connector with one hand, then withdraw the connector with the other.
7
Use a T10 driver to remove the five M3x8 machine screws that fasten the power supply to the chassis, and
the M3x8 screw that fastens the ground cable to the chassis.
NOTE The power supply remains attached to the chassis once the screws are removed.
Nacho Family Service Manual
50
8
To separate the power supply and chassis, pinch the locking tabs on the plastic standoff located in middle
of the AC plug side of the ECA. Then lift the power supply off of the chassis.
9
If you need to replace either the chassis or the power supply insulator, remove the plastic standoff from the
chassis.
Assembly notes
♦
Make sure to fasten the power supply ground cable to the chassis.
♦
Torque all screws to 6 in-lbs (.67 Nm).
♦
Make sure that the lamp power cable connector is secure in its chassis mount.
CAUTION Do not reassemble the power supply assembly without the insulator.
Nacho Family Service Manual
51
Optical Engine
The optical engine includes all components in the light path except the lamp. Once you remove the engine, you can
remove the zoom ring and the lamp blower. These two parts and the color wheel sync cable that fastens to the
color wheel ECA are available separately.
Optical engine
1
Color wheel sync cable
Zoom ring
Lamp blower
Remove the following items:
Lamp door and lamp (page 23)
Front bezel (page 28)
Top enclosure (page 31)
Exhaust and intake bezels (page 34)
Exhaust fan assembly (page 37)
Controller ECA (page 44)
Power supply assembly (page 49)
Nacho Family Service Manual
52
2
Remove the three M3x10 Plastite screws that fasten the engine to the bottom case.
3
Lift the engine out of the enclosure.
4
If you removed the engine to access another part, put the engine aside and continue to that procedure.
Otherwise, continue to the next step.
5
To remove the zoom ring, use a small Phillips screwdriver to remove the two M1.7x5 Phillips screws that
fasten the zoom ring to the projection lens.
Nacho Family Service Manual
53
6
To remove the lamp blower, remove the two M3x30 Phillips screws with washers that fasten the blower to
the engine assembly.
7
If you are replacing the engine, unplug the color wheel sync cable from its connector on the color wheel
ECA.
Assembly Notes
♦
Torque the M1.7x5 screws that fasten the zoom ring to the lens to 2 in-lb (.2 Nm).
♦
Torque the two M3x30 screws that fasten the lamp blower to the engine to 6 in-lb (.67 Nm).
♦
Torque the three M3x8 Plastite screws that fasten the engine to the bottom case to 4 in-lb (.42 Nm).
♦
If you are replacing the engine, make to plug the color wheel sync cable in.
Nacho Family Service Manual
54
Bottom Enclosure
The bottom enclosure encloses the bottom half of the projector. The bottom case includes the elevator assembly,
the leveling foot
When you replace a bottom enclosure, adhere a new certification label and a new bottom model label to it.
1
Remove the following parts:
Focus ring (page 26)
Front bezel (page 28)
Lamp door and lamp (page 23)
Top enclosure (page 31)
Side vents (page 34)
Exhaust fan assembly (page 37)
Controller and I/O ECAs (page 44)
Power supply assembly (page 49)
Optical engine (page 52)
Nacho Family Service Manual
55
2
Remove the curved metal air deflector from the old bottom enclosure and install it on the new one. The air
deflector is located adjacent to the lamp blower and elevator. Tighten the M3x8 Plastite screw to 4 in-lb (.42
Nm) with a T10 driver.
3
Remove the Serial Number label from the old bottom enclosure. You may need to use a heat gun to soften
the glue.
4
Adhere a new certification label and model label to the new bottom case.
Nacho Family Service Manual
56
5
Adhere the old Serial Number label to the new certification label.
6
Install the parts you removed in the reverse order.
Nacho Family Service Manual
57
Light Tunnel
The light tunnel is comprised of four pieces of mirrored glass that are glued together to form a box with two open
ends. The light tunnel focuses the light between the color wheel and the DMD.
An issue with the light tunnel is indicated when image banding appears on the right and/or left sides of the image.
Usually, this means that the glue that adheres the sides of the light tunnel has deteriorated and the sides have
slipped out of alignment.
The light tunnel is held in place on the optical engine with the metal tunnel clip, which, in turn, fastens to the
engine body with two M2x3 screws. The tunnel clip is also a replaceable part.
Light tunnel
Tunnel clip
Light tunnel location
Nacho Family Service Manual
58
1
Remove the following parts:
Front bezel (page 28)
Top enclosure (page 31)
Controller ECA (page 44)
Color Wheel Assembly (page 40)
2
Use a T6 driver to remove the two M2x3 screws that fasten the tunnel clip to the engine. Then lift the clip
out of the projector with a tweezers.
Nacho Family Service Manual
59
3
Lift the light tunnel out of the projector.
4
To install the light tunnel, place it on the engine casting so that the end farthest from the color wheel meets
the lip on the edge of the engine casting. Note that the wide sides of the light tunnel are on the top and
bottom.
Nacho Family Service Manual
60
Nacho Family Service Manual
61
5
Slide the clip over the light tunnel so that two of the tabs press against the top of the tunnel and two press
against the side. The two alignment pins in the engine fit into two matching holes on the clip. Once you get
the clip in place, you must hold it down with your finger until you get the screws threaded.
6
After you reassemble the projector, confirm that the sides of the image do not show banding. If you need to
adjust the edges of the image, see the Nacho Family Service Manual.
Nacho Family Service Manual
62
Parts Lists
Illustrated Replaceable Parts List
Below is a list of replaceable parts (FRUs). It includes the part name as used in this service guide, as well as the
part name as listed in the parts pricing list database. The names often differ.
NOTE Before you order a part, make sure that you confirm the correct part number in the online parts list for the
projector you are working on.
Part Illustration
See Labels on page 68
Nacho Family Service Manual
Part name in service
guide
Part name in parts pricing list
Part number
Labels
various
various
Color wheel cable
Cbl assy,3p,1.25mm,hdr to hdr
211-0277-xx
I/O-controller cable
Cable,ffc,1mm 26p,37.5 +1/-0mm
211-0281-xx
Tunnel clip
Tunnel, LP600
315-0053-xx
Power supply
insulator
Insulator, power supply, LP600
329-0535-xx
Tunnel clip
Clip, tunnel mount, LP600
330-1060-xx
Chassis
Chassis, system ground,LP600
330-1104-xx
Controller EMI shield
Shield, high speed ECA, LP600
330-1105-xx
63
Part Illustration
Part name in service
guide
Part name in parts pricing list
Part number
I/O EMI shield
Shield ,I/O, LP600
330-1106-xx
Side IR window
Window, IR, side, LP600
340-1318-xx
Front IR window
Window, IR, front, LP600
340-1320-xx
Exhaust fan
assembly
S/A, fan bracket
505-1856-xx
Fastener kit
Nacho fastener kit
505-1860-xx
Bottom enclosure
S/A bottom, LP600
505-1862-xx
S/A bezel vent, exhaust
505-1864-xx
(Includes 60mm fan,
70mm fan, fan
bracket, front and
side IR assembly,
safety cable)
N/A
(Includes elevator
assembly, leveling
foot assembly and
rubber foot)
Exhaust bezel
Nacho Family Service Manual
64
Part Illustration
Nacho Family Service Manual
Part name in service
guide
Part name in parts pricing list
Part number
Intake bezel
S/A bezel vent, intake
505-1865-xx
Front bezel
S/A bezel trim
505-1866-xx
Power supply
Power Supply Assy Nacho
510-1842-xx
Controller ECA
ECA, Cntrllr, Nacho
510-2083-xx
I/O ECA
ECA, Nacho I/O
510-1850-xx
Color wheel
assembly
SA, colorwheel, Nacho, Service
525-0139-xx
Optical engine
Assy, engine, LP600
530-0179-xx
65
Part Illustration
Part name in service
guide
Top enclosure
Part name in parts pricing list
Part number
S/A, Enclosure, Top
505-1852-xx
Zoom ring
S/A ring, zoom
505-1863-xx
Lamp blower
S/A, blower, lamp, with wire
526-0197-xx
(Includes keypad,
keypad/LCD ECA,
speaker, heat shield,
LCD EMI shield,
elevator button and
spring, rear IR
window)
Nacho Family Service Manual
66
Illustrated User Replaceable Parts List
Below is a list of replaceable parts (URPs). It includes the part name as used in this service guide, as well as the
part name as listed in the parts pricing list database. The names often differ.
NOTE Before you order a part, make sure that you confirm the correct part number in the online parts list for the
projector you are working on.
Part Illustration
Part name in service
guide
Part name in parts pricing list
Part number
Lamp door
Shield, door lamp
330-1115-xx
Lens cap
Cap, lens, LP600
505-1853-xx
(does not include
tether)
Rubber foot
Nacho Family Service Manual
328-0190-xx
Focus ring
S/A focus ring
505-1873-xx
Focus ring trim
S/A ring, focus cosmetic
505-1876-xx
Lamp
Replacement lamp, Nacho
SP-LAMP019
67
Labels
Below is a list of labels available for this projector, as well as illustrations showing the label locations.
Part Illustration
Part name in service guide
Part number
C170 model label
LABEL,MODEL,C170
020-2220-xx
C170 top label
LABEL,TOP,C170
020-2221-xx
C170 front label
LABEL, FRONT, C170, ASKPROXIMA
020-2230-xx
C170 I/O label
LABEL, I/O, C170
020-2234-xx
C170 model label
LABEL, CERT, MODEL, C170
020-2239-xx
C170 certification label
LABEL, CERT, C170
020-2240-xx
C170 front label
LABEL, FRONT, C170
020-2241-xx
LP600 top label
LABEL, TOP, INFOCUS
020-1591-xx
LP600 certification label
LABEL, CERTIFICATION LP600
020-2159-xx
LP600 model label
LABEL, PRODUCT ID (MODEL) LP600
020-2168-xx
Nacho Family Service Manual
68