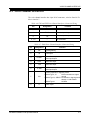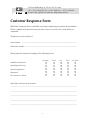
1
DV-MUX3
ADAPTIVE MULTIPLEXER FOR
VOICE, FAX AND DATA
Installation and Operation Manual
Notice
This manual contains information that is proprietary to RAD Data Communications. No part of this
publication may be reproduced in any form whatsoever without prior written approval by RAD Data
Communications.
No representation or warranties for fitness for any purpose other than what is specifically mentioned in this
manual is made either by RAD Data Communications or its agents.
For further information contact RAD Data Communications at the address below or contract your local
distributor.
RAD data communications
Headquarters
12 Hanechoshet Street
Tel Aviv 69710 Israel
Tel: 972-3-6458181
Fax: 972-3-6498250
E-mail: [email protected]
RAD data communications
US East
900 Corporate Drive
Mahwah, NJ 07430 USA
Tel: (201) 529-1100
Fax: (201) 529-5777
E-mail: [email protected]
© 1996 RAD Data Communications Ltd.
RAD data communications
US West
7711 Center Avenue #350
Huntington Beach, CA 92647 USA
Tel: (714) 879-2448
Fax: (714) 891-1764
Publication No. 416-200-11/96
Safety Warnings
The exclamation point within a triangle is intended to warn the operator or service
personnel of operation and maintenance factors relating to the product and its operating
environment which could pose a safety hazard.
Always observe standard safety precautions during installation, operation and maintenance of this product.
Only a qualified and authorized service personnel should carry out adjustment, maintenance or repairs to
this instrument. No adjustment, maintenance or repairs should be performed by either the operator or the
user.
Telecommunication Safety
The safety status of each of these ports on the DV-MUX3 is declared according to EN 41003 and is detailed
in the table below:
Safety Status
SELV
TNV
Ports
V.24, V.35, V.36, X.21, 530
FXO, FXS, E&M
SELV = Safety Extra-Low Voltage
TNV = Telecommunications Network
In order to ensure the safety of the operator, the DV-MUX3 must be connected to a reliable
protective earth and the signal ground must be connected to the chassis ground at all times.
Additional conditions concerning safety:
•
The FXO interface is suitable for direct connection to the PSTN, and does not rely
on the protective earth for safety. However, a mixed combination (e.g. FXO and
E&M together) does rely on the protective earth for safety.
•
The FXS interface is intended for connection of a telephone set or similar
equipment and is not intended for a direct connection to the PSTN.
•
The E&M interface is intended for direct connection to a PABX approved to
EN60950 and EN41003, but is not intended for direct connection to the PSTN
Regulatory Information
FCC-15 User Information
This equipment has been tested and found to comply with the limits of the Class A digital device, pursuant
to Part 15 of the FCC rules. These limits are designed to provide reasonable protection against harmful
interference when the equipment is operated in a commercial environment. This equipment generates, uses
and can radiate radio frequency energy and, if not installed and used in accordance with the instruction
manual, may cause harmful interference to the radio communications. Operation of this equipment in a
residential area is likely to cause harmful interference in which case the user will be required to correct the
interference at his own expense.
Warning per EN 55022
This is a Class A product. In a domestic environment, this product may cause radio interference, in which
case the user may be required to take adequate measures.
Warranty
This RAD product is warranted against defects in material and workmanship for a period of one year from
date of shipment. During the warranty period, RAD will, at its option, either repair or replace products
which prove to be defective. For warranty service or repair, this product must be returned to a service
facility designated by RAD. Buyer shall prepay shipping charges to RAD and RAD shall pay shipping
charges to return the product to Buyer. However, Buyer shall pay all shipping charges, duties and taxes for
products returned to RAD from another country.
Limitation of Warranty
The foregoing warranty shall not apply to defects resulting from improper or inadequate maintenance by
Buyer, Buyer-supplied firmware or interfacing, unauthorized modification or misuse, operation outside of
the environmental specifications for the product, or improper site preparation or maintenance.
Exclusive Remedies
The remedies provided herein are Buyer’s sole and exclusive remedies. RAD shall not be liable for any
direct, indirect special, incidental, or consequential damages, whether based on contract, tort, or any legal
theory.
Declaration of Conformity
Manufacturer’s Name:
RAD Data Communications Ltd.
Manufacturer’s Address:
12 Hanechoshet St.
Tel Aviv 69710
Israel
declares that the product:
Product Name:
DV-MUX3
Conforms to the following standard(s) or other normative document(s):
EMC:
Safety:
EN 55022 (1994)
Limits and methods of measurement of radio disturbance
characteristics of information technology equipment.
EN 50082-1 (1992)
Electromagnetic compatibility - Generic immunity standards
for residential, commercial and light industry.
EN 60950 (1992/93) Safety of information technology equipment, including
electrical business equipment.
Supplementary Information:
The product herewith complies with the requirements of the EMC Directive 89/336/EEC and the
Low Voltage Directive 73/23/EEC. The product was tested in a typical configuration.
Tel Aviv, November 17th, 1996
Haim Karshen
VP Quality
European Contact: RAD Data Communications GmbH, Lyoner Strasse 14, 60528 Frankfurt am Main,
Germany
TABLE OF CONTENTS
Page
CHAPTER 1.
1-1.
1-2.
1-3.
CHAPTER 2.
INTRODUCTION
FUNCTIONAL DESCRIPTION . . . . . . . . . . . . . . . . . . . . . .
Purpose and Main Features . . . . . . . . . . . . . . . . . . . . . .
Voice/Fax Channel Features . . . . . . . . . . . . . . . . . . . . . .
Data Channel Features . . . . . . . . . . . . . . . . . . . . . . . .
Main Link Characteristics . . . . . . . . . . . . . . . . . . . . . . .
Dial-up Mode . . . . . . . . . . . . . . . . . . . . . . . . . . . . . .
Bandwidth Allocation . . . . . . . . . . . . . . . . . . . . . . . . . .
User’s Interface . . . . . . . . . . . . . . . . . . . . . . . . . . . .
Downloading . . . . . . . . . . . . . . . . . . . . . . . . . . . . . .
Diagnostics . . . . . . . . . . . . . . . . . . . . . . . . . . . . . . .
General Features . . . . . . . . . . . . . . . . . . . . . . . . . . .
TYPICAL APPLICATIONS AND SYSTEM DESIGN CONSIDERATIONS
Typical Applications . . . . . . . . . . . . . . . . . . . . . . . . . .
Typical DV-MUX3 Application in an SNA Link . . . . . . . . . . .
Typical DV-MUX3 Application in an Inter-LAN Link . . . . . . . .
Other Applications . . . . . . . . . . . . . . . . . . . . . . . . .
Dial-up Mode . . . . . . . . . . . . . . . . . . . . . . . . . . . . . .
Conditions for Activation/Deactivation of a Voice Channel . . . . .
Conditions for Activation/Deactivation of the Data Channel . . . .
Conditions for Activation of Main Link . . . . . . . . . . . . . . .
Conditions for Disconnection of Main Link . . . . . . . . . . . . .
Dial-up Modem Settings . . . . . . . . . . . . . . . . . . . . . .
Control over the Main Link Modems . . . . . . . . . . . . . . . .
System Bandwidth Utilization . . . . . . . . . . . . . . . . . . . . .
System Timing Considerations . . . . . . . . . . . . . . . . . . . . .
Main Link Timing . . . . . . . . . . . . . . . . . . . . . . . . . .
Data Channel Timing . . . . . . . . . . . . . . . . . . . . . . . .
Voice Channel Timing . . . . . . . . . . . . . . . . . . . . . . .
.
.
.
.
.
.
.
.
.
.
.
.
.
.
.
.
.
.
.
.
.
.
.
.
.
.
.
.
.
.
.
.
.
.
.
.
.
.
.
.
.
.
.
.
.
.
.
.
.
.
.
.
.
.
.
.
1-1
1-1
1-2
1-3
1-3
1-4
1-4
1-5
1-5
1-5
1-6
1-7
1-7
1-7
1-8
1-8
1-8
1-8
1-9
1-9
1-10
1-10
1-11
1-11
1-13
1-13
1-13
1-13
TECHNICAL SPECIFICATIONS . . . . . . . . . . . . . . . . . . . . . . .
1-14
INSTALLATION
2-1.
2-2.
GENERAL . . . . . . . . . . . . . . . . . . . . . . . . . . . . . . . . . . .
UNPACKING . . . . . . . . . . . . . . . . . . . . . . . . . . . . . . . . .
2-1
2-2
2-3.
SITE REQUIREMENTS . . . . . .
Power . . . . . . . . . . . . .
Cable Connections . . . . . . .
Front and Rear Panel Clearance
Ambient Requirements . . . . .
.
.
.
.
.
.
.
.
.
.
.
.
.
.
.
.
.
.
.
.
.
.
.
.
.
.
.
.
.
.
.
.
.
.
.
.
.
.
.
.
.
.
.
.
.
.
.
.
.
.
.
.
.
.
.
.
.
.
.
.
.
.
.
.
.
.
.
.
.
.
.
.
.
.
.
.
.
.
.
.
.
.
.
.
.
2-2
2-2
2-2
2-2
2-2
2-4.
DV-MUX3 CONFIGURATION INFORMATION
General . . . . . . . . . . . . . . . . . . .
Opening DV-MUX3 Case . . . . . . . .
Main Board Jumpers . . . . . . . . . . . .
MODE Selection Jumper, J2 . . . . . .
SWITCH Control Jumper, J1 . . . . . .
DTR Jumper, J11 . . . . . . . . . . . .
CHASS Jumper, J10 . . . . . . . . . .
.
.
.
.
.
.
.
.
.
.
.
.
.
.
.
.
.
.
.
.
.
.
.
.
.
.
.
.
.
.
.
.
.
.
.
.
.
.
.
.
.
.
.
.
.
.
.
.
.
.
.
.
.
.
.
.
.
.
.
.
.
.
.
.
.
.
.
.
.
.
.
.
.
.
.
.
.
.
.
.
.
.
.
.
.
.
.
.
.
.
.
.
.
.
.
.
.
.
.
.
.
.
.
.
.
.
.
.
.
.
.
.
.
.
.
.
.
.
.
.
.
.
.
.
.
.
.
.
2-3
2-3
2-4
2-5
2-5
2-6
2-7
2-7
DV-MUX3 Installation and Operation Manual
.
.
.
.
.
.
.
.
.
.
.
.
.
.
.
.
.
.
.
.
.
.
.
.
.
i
TABLE OF CONTENTS (Cont’d)
Page
.
.
.
.
.
.
.
.
.
.
.
.
.
.
.
.
.
2-7
2-7
2-8
2-9
2-10
2-10
2-11
2-11
2-12
2-12
2-12
2-12
2-13
2-13
2-13
2-14
2-14
3-1.
DV-MUX3 FRONT PANEL CONTROLS AND INDICATORS . . . . . . . . .
Special Diagnostic Indications . . . . . . . . . . . . . . . . . . . . . . .
Configuration Error Indication . . . . . . . . . . . . . . . . . . . . . . .
3-1
3-2
3-3
3-2.
PREPARATION FOR OPERATION, GENERAL . . . . . . . . . . . . . . .
3-3
3-3.
OPERATING INSTRUCTIONS .
Preliminary Settings . . . . .
Turn-on . . . . . . . . . . . .
Normal Operating Indications
Monitoring Channel Activity .
Loop Activation . . . . . . . .
BERT Activation . . . . . . .
Tone Injection . . . . . . . .
Turn-off . . . . . . . . . . . .
.
.
.
.
.
.
.
.
.
3-4
3-4
3-4
3-4
3-4
3-4
3-5
3-5
3-6
4-1.
GENERAL . . . . . . . . . . . . . . . . . . . . . . . . . . . . . . . . . . .
4-1
4-2.
DESCRIPTION OF DIAGNOSTIC FUNCTIONS
General . . . . . . . . . . . . . . . . . . . .
BERT Test . . . . . . . . . . . . . . . . . .
Tone Injection . . . . . . . . . . . . . . . .
Remote Data Channel Loopback . . . . . .
Remote Voice Channel Loopback . . . . . .
Remote Main Link Loopback . . . . . . . . .
.
.
.
.
.
.
.
4-2
4-2
4-2
4-2
4-3
4-3
4-3
4-3.
TROUBLESHOOTING INSTRUCTIONS . . . . . . . . . . . . . . . . . . .
4-5
2-5.
CHAPTER 3.
CHAPTER 4.
ii
Voice Channels Module . . . . . . . . . . . . . . . .
Digitizing Rate Switch, SW6 . . . . . . . . . . . .
VOICE2 Enable Switch, SW5 . . . . . . . . . . .
Level Adjustment Switches, SW1, SW2, SW3, SW4
Voice Channel Interface Modules . . . . . . . . . . .
E&M Signaling Mode Selection . . . . . . . . . . .
2W/4W Selection, Switch SW3 . . . . . . . . . . .
Internal Settings Procedure . . . . . . . . . . . . . .
CABLE CONNECTIONS . . . . . . . . . . . . . . . . .
General . . . . . . . . . . . . . . . . . . . . . . . . .
Grounding . . . . . . . . . . . . . . . . . . . . . . .
Power Connections . . . . . . . . . . . . . . . . . .
AC Power Connection . . . . . . . . . . . . . . .
DC Power Connection . . . . . . . . . . . . . . .
Main Link Connection . . . . . . . . . . . . . . . . .
Data Channel Connections . . . . . . . . . . . . . .
Voice Channel Connections . . . . . . . . . . . . . .
.
.
.
.
.
.
.
.
.
.
.
.
.
.
.
.
.
.
.
.
.
.
.
.
.
.
.
.
.
.
.
.
.
.
.
.
.
.
.
.
.
.
.
.
.
.
.
.
.
.
.
.
.
.
.
.
.
.
.
.
.
.
.
.
.
.
.
.
.
.
.
.
.
.
.
.
.
.
.
.
.
.
.
.
.
.
.
.
.
.
.
.
.
.
.
.
.
.
.
.
.
.
.
.
.
.
.
.
.
.
.
.
.
.
.
.
.
.
.
.
.
.
.
.
.
.
.
.
.
.
.
.
.
.
.
.
.
.
.
.
.
.
.
.
.
.
.
.
.
.
.
.
.
OPERATING INSTRUCTIONS
.
.
.
.
.
.
.
.
.
.
.
.
.
.
.
.
.
.
.
.
.
.
.
.
.
.
.
.
.
.
.
.
.
.
.
.
.
.
.
.
.
.
.
.
.
.
.
.
.
.
.
.
.
.
.
.
.
.
.
.
.
.
.
.
.
.
.
.
.
.
.
.
.
.
.
.
.
.
.
.
.
.
.
.
.
.
.
.
.
.
.
.
.
.
.
.
.
.
.
.
.
.
.
.
.
.
.
.
.
.
.
.
.
.
.
.
.
.
.
.
.
.
.
.
.
.
.
.
.
.
.
.
.
.
.
.
.
.
.
.
.
.
.
.
.
.
.
.
.
.
.
.
.
.
.
.
.
.
.
.
.
.
.
.
.
.
.
.
.
.
.
.
.
.
.
.
.
.
.
.
.
.
.
.
.
.
.
.
.
.
.
.
.
.
.
.
.
.
DIAGNOSTICS
.
.
.
.
.
.
.
.
.
.
.
.
.
.
.
.
.
.
.
.
.
.
.
.
.
.
.
.
.
.
.
.
.
.
.
.
.
.
.
.
.
.
.
.
.
.
.
.
.
.
.
.
.
.
.
.
.
.
.
.
.
.
.
.
.
.
.
.
.
.
.
.
.
.
.
.
.
.
.
.
.
.
.
.
.
.
.
.
.
.
.
.
.
.
.
.
.
.
DV-MUX3 Installation and Operation Manual
TABLE OF CONTENTS (Cont’d)
Page
APPENDIX A. CONNECTION DATA
A-1.
SCOPE . . . . . . . . . . . . . . . . . . . . . . . . . . . . . . . . . . . .
A-1
A-2.
MAIN LINK AND DATA CHANNEL INTERFACES
Interface Connectors . . . . . . . . . . . . . .
X.21 Pin Allocations . . . . . . . . . . . . . .
V36/RS-449 Interface Adapter Cable . . . . .
RS-530 Interface Adapter Cable . . . . . . . .
V.35 Interface Adapter Cable . . . . . . . . .
V.24/RS-232 Interface Adapter Cable . . . . .
.
.
.
.
.
.
.
A-2
A-2
A-2
A-3
A-4
A-5
A-6
A-3.
A-4.
VOICE CHANNEL INTERFACE . . . . . . . . . . . . . . . . . . . . . . . .
DC POWER CONNECTOR . . . . . . . . . . . . . . . . . . . . . . . . . .
A-7
A-8
.
.
.
.
.
.
.
.
.
.
.
.
.
.
.
.
.
.
.
.
.
.
.
.
.
.
.
.
.
.
.
.
.
.
.
.
.
.
.
.
.
.
.
.
.
.
.
.
.
.
.
.
.
.
.
.
.
.
.
.
.
.
.
.
.
.
.
.
.
.
.
.
.
.
.
.
.
.
.
.
.
.
.
.
.
.
.
.
.
.
.
APPENDIX B. DV-MUX3 WITH MIX OPTION
B-1.
GENERAL . . . . . . . . . . . . . . . . . . . . . . . . . . . . . . . . . . .
B-1
B-2.
INTERCHANGE OF INTERFACE BOARDS . . . . . . . . . . . . . . . . .
Interface Board Interchange . . . . . . . . . . . . . . . . . . . . . . . .
B-2
B-2
APPENDIX C. RACK INSTALLATION
C-1.
C-2.
GENERAL . . . . . . . . . . . . . . . . . . . . . . . . . . . . . . . . . . .
INSTALLATION OF SINGLE DV-MUX3 UNIT . . . . . . . . . . . . . . . .
C-1
C-2
C-3.
INSTALLATION OF TWO DV-MUX3 UNITS
General . . . . . . . . . . . . . . . . . .
Preparations . . . . . . . . . . . . . . .
Fastening the Two Units . . . . . . . . .
C-3
C-3
C-3
C-4
DV-MUX3 Installation and Operation Manual
.
.
.
.
.
.
.
.
.
.
.
.
.
.
.
.
.
.
.
.
.
.
.
.
.
.
.
.
.
.
.
.
.
.
.
.
.
.
.
.
.
.
.
.
.
.
.
.
.
.
.
.
.
.
.
.
.
.
.
.
.
.
.
.
.
.
.
.
iii
LIST OF ILLUSTRATIONS
Figure
Title
Page
1-1.
1-2.
Typical DV-MUX3 Application in an SNA Link . . . . . . . . . . . . . . . . . . .
Typical DV-MUX3 Application in an Inter-LAN Link . . . . . . . . . . . . . . . .
2-1.
2-2.
2-3.
2-4.
2-5.
2-6.
2-7.
DV-MUX3, Identification of Internal Modules . . .
DV-MUX3, Identification of Main Board Jumpers .
Voice Channels Module Switches . . . . . . . .
Selection of Transmit and Receive Levels . . . .
DV-MUX3-E&M, Internal Settings . . . . . . . .
Equivalent Signaling Circuits . . . . . . . . . . .
Typical DV-MUX3 Rear Panel (AC-Powered Unit)
3-1.
DV-MUX3 Front Panel Controls and Indicators
.
.
.
.
.
.
.
.
.
.
.
.
.
.
.
.
.
.
.
.
.
.
.
.
.
.
.
.
.
.
.
.
.
.
.
.
.
.
.
.
.
.
.
.
.
.
.
.
.
.
.
.
.
.
.
.
.
.
.
.
.
.
.
.
.
.
.
.
.
.
.
.
.
.
.
.
.
.
.
.
.
.
.
.
.
.
.
.
.
.
.
.
.
.
.
.
.
.
.
.
.
.
.
.
.
.
.
.
.
.
.
.
1-7
1-9
.
.
.
.
.
.
.
2-4
2-5
2-8
2-9
2-10
2-11
2-12
. . . . . . . . . . . . . . . . . .
3-1
4-1.
4-2.
Data Channel, Remote Loopback . . . . . . . . . . . . . . . . . . . . . . . . .
Main Link Remote Loopback . . . . . . . . . . . . . . . . . . . . . . . . . . . .
4-3
4-4
B-1.
B-2.
Typical Application for DV-MUX3 with MIX Option . . . . . . . . . . . . . . . . .
Board Identification . . . . . . . . . . . . . . . . . . . . . . . . . . . . . . . . .
B-1
B-2
C-1
C-2.
C-3.
Installation of Single DV-MUX3 Unit in 19" Rack . . . . . . . . . . . . . . . . . .
Preparation of Two DV-MUX3 Units for Installation in 19" Rack . . . . . . . . . .
Attachment of Two DV-MUX3 Units Before Installation in 19" Rack . . . . . . . .
C-2
C-3
C-4
LIST OF TABLES
Table
1-1.
1-2.
iv
Title
Page
Adaptive and Non-Adaptive 1 Modes, Data Channel Bandwidth as a
Function of Voice Channel and Main Link Rates . . . . . . . . . . . . . . . . . .
Non-Adaptive 2 Mode, Data Channel Bandwidth as a Function of
Voice Channel and Main Link Rates . . . . . . . . . . . . . . . . . . . . . . . .
1-12
1-12
2-1.
2-2.
2-3.
Digitizing Rate Selection . . . . . . . . . . . . . . . . . . . . . . . . . . . . . .
Voice Channel Level Adjustment . . . . . . . . . . . . . . . . . . . . . . . . . .
Selection of E&M Signaling Mode . . . . . . . . . . . . . . . . . . . . . . . . .
2-7
2-9
2-10
3-1.
DV-MUX3 Controls and Indicators . . . . . . . . . . . . . . . . . . . . . . . . .
3-2
4-1.
Troubleshooting Chart . . . . . . . . . . . . . . . . . . . . . . . . . . . . . . .
4-5
A-1.
A-2.
A-3.
A-4.
A-5.
A-6.
A-7.
A-8.
Main Link Interface Connector, X.21 Interface . . . . . . .
V.36/RS-449 Interface Adapter Cable . . . . . . . . . . .
RS-530 Interface Adapter Cable . . . . . . . . . . . . . .
V.35 Interface Adapter Cable . . . . . . . . . . . . . . . .
V.24 Interface Adapter Cable . . . . . . . . . . . . . . . .
FXO and FXS Voice Channel Interfaces, Connector Wiring
E&M Voice Channel Interface, Connector Wiring . . . . .
DC Power Connector Wiring . . . . . . . . . . . . . . . .
A-2
A-3
A-4
A-5
A-6
A-7
A-7
A-8
.
.
.
.
.
.
.
.
.
.
.
.
.
.
.
.
.
.
.
.
.
.
.
.
.
.
.
.
.
.
.
.
.
.
.
.
.
.
.
.
.
.
.
.
.
.
.
.
.
.
.
.
.
.
.
.
.
.
.
.
.
.
.
.
.
.
.
.
.
.
.
.
.
.
.
.
.
.
.
.
.
.
.
.
.
.
.
.
.
.
.
.
.
.
.
.
DV-MUX3 Installation and Operation Manual
CHAPTER 1.
INTRODUCTION
Contents
Functional Description . . . . . . . . . . . . . . . . . . . . . . . . .
Typical Applications and System Design Considerations . . . . . . .
Technical Specifications . . . . . . . . . . . . . . . . . . . . . . . .
Page
1-1
1-7
1-14
1-1. FUNCTIONAL DESCRIPTION
Purpose and Main
Features
The DV-MUX3 is a versatile adaptive time division multiplexer (TDM) for voice,
fax, and data. The DV-MUX3 allows the multiplexing of one or two low bit rate
voice/fax channels with one synchronous data channel, for transmission through a
dial-up or leased-line modem link operating at rates in the range of 9.6 through
256 kbps. Asynchronous data can also be transmitted by using asynchronous-tosynchronous converters, or by oversampling (for oversampling, the asynchronous
data rate must not exceed 1/4 of the synchronous channel rate).
Bandwidth efficiency is obtained by very low multiplexing and link supervision
overhead. In addition, the DV-MUX3 offers three user-selectable multiplexing
modes that allow maximization of the bandwidth efficiency while taking into account the characteristics of the user equipment:
• Maximal bandwidth efficiency is achieved in the proprietary adaptive mode.
In this mode, the DV-MUX3 dynamically reassigns the link bandwidth used
by the voice channels to the data channel when both voice channels are idle.
In this mode, the data channel can serve statistical multiplexers, remote
bridges, and other equipment that tolerates changes in the link data rate.
• The other two multiplexing modes, intended for use with equipment that is
not capable of handling the varying clock rate of the adaptive mode, are
standard (non-adaptive) modes that support predetermined channel data
rates (see para. 1-2). The non-adaptive modes differ only in the supported
data rates:
° One non-adaptive mode supports the standard data rates (based on the
n × 75 bps scheme). In this mode, the data channel can serve all types of
data terminal equipment.
DV-MUX3 Installation and Operation Manual
1-1
CHAPTER 1 - INTRODUCTION
° The other non-adaptive mode provides the user with access to all the link
bandwidth that is not used by the voice channel. In this mode, the data
channel can serve data terminal equipment capable of operation in accordance with the rate of the clock signals provided by the DV-MUX3, including operation at data rates which are not necessarily based on the
n × 75 bps scheme.
Thus, the DV-MUX3 allows using a single modem link for the transmission of two
voice/fax channels, and in addition allows the transmission of a data channel.
The DV-MUX3, especially when operating in its unique adaptive multiplexing
mode, offers very high bandwidth efficiency without introducing the long, variable
link delay typical of statistical multiplexers.
Voice/Fax Channel
Features
The DV-MUX3 can be ordered with one or two voice/fax channels. To reduce bandwidth requirements yet achieve high quality voice transmission, the voice channels
process the audio signals using a standard digitizing algorithm (MPMLQ - Multipulse
Maximum Likelihood Quantization per ITU-T Rec. G.723), and adaptive echo cancellation.
The bandwidth assigned for the transmission of a voice channel is user-selectable:
4.8, 6.4, 7.2, 9.6 or 12.8 kbps. This bandwidth includes in-band signaling and synchronization overhead. When operating at a digitized voice data rate of 6.4, 7.2, 9.6
or 12.8 kbps, the end-to-end voice performance is nearly toll quality. To improve
the perceived link quality, the DV-MUX3 voice channel includes an adaptive echo
canceler that handles near-end reflections (echo delay less than 8 milliseconds)
such as reflections caused by the hybrids used for 2W/4W conversion. The echo
canceler convergence time is better than ITU-T Rec. G.165 requirements.
To maintain voice quality on bad communication links, when operating at 7.2, 9.6 or
12.8 kbps the DV-MUX3 voice channels include Hamming forward error correction
(FEC) coding that protects the critical information bits in the digitized voice data
stream. The FEC code can maintain voice quality for link error rates down to 1×10⁻³.
Each channel supports fax transmission for Group 3 fax machines in accordance
with ITU-T Rec. T.4 and T.30 at rates of 2.4, 4.8, 7.2 or 9.6 kbps (according to
voice channel rate). Each channel automatically identifies the type of signal (voice
or fax) and switches accordingly between the voice and fax modes. Therefore, the
user can follow the regular fax operating procedures.
Each voice channel has its own level adjustment switches, to provide optimal selection of receive and transmit levels.
The voice channels are available in three options:
• 2W FXO interface: two-wire 600-ohm analog interface and FXO loop-start
signaling for direct connection to PABX extension lines.
• 2W FXS interface: two-wire 600-ohm analog interface and FXS loop start
signaling for direct connection of a subscriber telephone set. The FXS interface generates locally the required line feed current and the ringing voltage.
• 2W/4W E&M interface: two-wire or four-wire analog interface and E&M
signaling. This interface supports five types of E&M signaling: RS-464
types I, II, III and V, and British Telecom SSDC5 (except the signaling battery voltage is -24V, instead of -48V).
1-2
DV-MUX3 Installation and Operation Manual
FUNCTIONAL DESCRIPTION
The FXO and FXS options are usually operated in a link, with the FXO interface
at the PABX side, and the FXS interface on the subscriber’s side. In addition, two
FXS interfaces can also be operated in a link, to provide PLAR (Private Line with
Auto-Ring) telephone service.
The E&M interface is usually used to connect trunk lines of two PABXs. In this
case, two E&M interfaces are operated in a link. The E&M interface can be also
used to connect the subscriber side to a PABX E&M trunk interface. In this case,
the E&M interface is used on the PABX side and the FXS interface on the subscriber side. The interface option can be independently selected for each voice
channel, and each channel has its own eight-pin RJ-45 connector.
Data Channel Features The DV-MUX3 data channel provides a synchronous channel. The electrical interface of the data channel is user-selectable (X.21, V.35, V.36/RS-449, RS-530, or
RS-232). The data channel is terminated in a 15-pin D-type female connector,
wired in accordance with ITU-T Rec. X.21. When a different interface is selected,
an appropriate adapter cable (available from RAD) must be inserted between the
DV-MUX3 and the cable connecting to the user’s equipment.
The data channel can operate at rates of 0.8 to 252.8 kbps, depending on the selected mode, and the main link data rate. Note that when the RS-232 interface is selected, the maximum data rate is limited by the electrical characteristics of this interface, which usually cannot work above 64 kbps.
The data channel interface is configured as a DCE, that is, it provides timing signals to the user’s equipment: the receive and transmit timing is derived from the
main link clock.
The data channel is transparent to user’s data. The control lines generated by the
data channel interface are Carrier Detect (CD) and Clear to Send (CTS). For the
RS-232 interface, the DSR line is also provided. Those lines are asserted when the
DV-MUX3 is operating normally (i.e., when the configuration is valid, the DVMUX3 is synchronized, and the channel is not being tested). For interfaces other
then RS-232, the CD line can be externally connected to the DSR line to enable operation of terminal equipment that needs DSR in active, e.g., IBM equipment.
The channel interface does not include control lines for hardware flow control,
therefore when the user’s application requires flow control, the user’s equipment
must use software flow control.
Main Link
Characteristics
The electrical interface of the main link is user-selectable (X.21, V.35, V.36/RS-449,
RS-530, or RS-232). The main link is terminated in a 15-pin D-type female connector,
wired in accordance with ITU-T Rec. X.21.
When a different interface is selected, an appropriate adapter cable (available from
RAD) must be inserted between the DV-MUX3 and the cable connecting to the
data communication equipment (e.g., the modem) serving the main link. Note that
the main link interface can be selected independently of the data channel interface,
therefore interface conversion is available on the data channel.
The DV-MUX3 can operate at main link rates of 9.6 to 256 kbps (or up to about 64
kbps, when the selected interface is RS-232). The interface is configured as a DTE,
that is, it requires clock signals for both the receive and transmit paths from the
equipment to which it is connected.
DV-MUX3 Installation and Operation Manual
1-3
CHAPTER 1 - INTRODUCTION
The following control lines are used on the main link interface:
• The RTS line, which is asserted as long as the DV-MUX3 is powered.
• The DTR and RI lines, used only in the dial-up mode.
Dial-up Mode
The dial-up mode allows the DV-MUX3 to operate over the Public Switched Telephone Network (PSTN), using dial-up modems to transmit the main link data over
standard PSTN lines.
The dial-up mode is available only when the main link interface is V.35 or RS-232.
In this mode, the DV-MUX3 asserts the DTR line of its main link interface when
payload traffic (from the voice or data channels) must be transmitted. This causes
the modem to dial a number preprogrammed by the user, and thus to set up a connection to the remote DV-MUX3. When the remote DV-MUX3 senses the assertion of the RI line in its main link interface (indication of incoming call provided
by the dial-up modem), it synchronizes to the other DV-MUX3 and starts normal
data transfer. When payload traffic stops, the DV-MUX3 switches its DTR line off,
causing the modem to disconnect the link.
Bandwidth
Allocation
Bandwidth allocation is based on the automatic identification of the main link
clock rate. After successful identification of the main link rate, the DV-MUX3 assigns the bandwidth required by the voice channels (as selected by the user), and
uses the remaining main link bandwidth (less the link management and supervision
overhead) to transmit the data channel. The overhead is 0.8 kbps for main link data
rates of 9.6 to 32 kbps, 1.6 kbps for data rates of 48 to 128 kbps, and 3.2 kbps for
data rates higher than 128 kbps.
To maximize the throughput of the data channel beyond what is available with
standard multiplexers, the DV-MUX3 has three user-selectable bandwidth allocation modes:
• Adaptive mode: the DV-MUX3 monitors the use of the voice channels and
assigns the required bandwidth on demand. Therefore, when both voice
channels are idle, their bandwidth is temporarily reassigned to the data channel. These changes are smoothly made without disrupting in any way the
flow of traffic.
The state of the voice channels is determined by the channel control signal
transmitted end-to-end:
° For a voice channel equipped with FXO interface, the channel control signal
generated by the channel indicates the reception of ringing by that channel.
The control signal received by that channel indicates the detection of a subscriber off-hook condition by the FXS interface of the voice channel located
at the other end of the link (off-hook includes pulse dialing).
° For a voice channel equipped with FXS interface, the channel control signal generated by that channel indicates the detection of an off-hook condition (including pulse dialing). The control signal received by that channel indicates either the reception of ringing by the FXO interface of the
voice channel located at the other end of the link (when the other end is
equipped with an FXO interface), or the detection of a subscriber off-hook
condition (when the other end is also equipped with an FXS interface), or
the detection of the M signal from a remote E&M interface.
1-4
DV-MUX3 Installation and Operation Manual
FUNCTIONAL DESCRIPTION
° For a voice channel equipped with E&M interface, the channel control
signal generated by that channel indicates detection of an M signal. The
control signal received by that channel (E signal) indicates the reception
of subscriber off-hook at the remote FXS module or detection of the M
signal at the remote E&M module.
• When the channel control signal at either end of the link is switched to the ac-
tive state, the DV-MUX3 immediately assigns the required bandwidth to the
voice channels, and reduces the clock rate supplied to the data channel. Note
that the DV-MUX3 always assigns the full bandwidth needed by voice channels. Therefore, for DV-MUX3 models equipped with two voice channels,
when both channels are enabled the DV-MUX3 assigns bandwidth for two
channels even if only one channel is active.
• Non-adaptive mode 1: the bandwidth required for the voice channels (as se-
lected by the user) is permanently assigned to these channels. The remaining
bandwidth, less the management and synchronization overhead, is available
to the data channel. This mode is mainly intended to allow the connection of
equipment that is capable of operating at non-standard data rates but cannot
tolerate the clock rate changes that occur routinely in the adaptive mode.
Such equipment can then use the highest available data rate, and thus achieve
the highest possible bandwidth efficiency.
• Non-adaptive mode 2: in this mode, the DV-MUX3 operates as a standard
TDM multiplexer, i.e., the bandwidth required for the voice channels is permanently assigned to these channels, and the data channel data rate is a standard data rate (see Table 1-2) that can be transmitted within the remaining
main link bandwidth. This mode reduces somewhat the bandwidth efficiency but allows the connection of data equipment designed for standard
data rates to the data channel.
User’s Interface
All the DV-MUX3 operating parameters can be selected by the user, by means of
internal jumpers and switches.
Downloading
To minimize setup time and to prevent configuration errors, the DV-MUX3 has a
master-slave configuration downloading facility. When this facility is used, all the
critical configuration parameters selected on the DV-MUX3 defined as the master
unit are downloaded through the main link to the slave DV-MUX3.
Configuration downloading is automatically performed when a link is established
between two DV-MUX3 units. This arrangement ensures the two units will always
use consistent configurations.
Diagnostics
The DV-MUX3 has comprehensive diagnostic capabilities, which include:
• Power-up self-test.
• Internal BERT (bit error rate testing) facility, allows rapid evaluation of
transmission quality without requiring external test equipment.
• Tone injection allows evaluation of voice channel quality.
• Remote test loops activated by a front-panel switch.
DV-MUX3 Installation and Operation Manual
1-5
CHAPTER 1 - INTRODUCTION
• Front panel indicators show main link synchronization status, transmit and
receive activity on any desired channel, and activation of a test loop. In addition, the front panel indicators also indicate failures in the power-up selftest, configuration errors, and fault conditions related to the main link clock
signals.
General Features
1-6
The DV-MUX3 can be ordered for AC operation (100, 115, or 230 VAC) or for
-48 VDC operation, and has very low power consumption. It is built into a compact case that can be placed on desktops or shelves. Optional rack mount adapter kits allow the installation of one or two units side-by-side, in a 19" rack. Unit
height is only 1U (1.75 in.).
DV-MUX3 Installation and Operation Manual
TYPICAL APPLICATIONS AND SYSTEM DESIGN CONSIDERATIONS
1-2. TYPICAL APPLICATIONS AND SYSTEM DESIGN CONSIDERATIONS
Typical
Applications
This section provides examples of applications that use the specific capabilities of
the DV-MUX3.
Typical DV-MUX3
Application in an SNA
Link
Figure 1-1 shows a typical application for a DV-MUX3. This application shows
how an organization can use the DV-MUX3 to connect privileged telephone subscribers located in another city, e.g., at a main branch office, to the PABX serving
the head offices. This arrangement allows those remote subscribers to use all the
features, speed, and convenience available to local subscribers of the main office
PABX without the expense of leasing a dedicated voice line or allocating a full data
channel for this purpose.
Figure 1-1. Typical DV-MUX3 Application in an SNA Link
In this example, the connection is made by sharing an already existing SNA link,
based on 19.2 kbps modems operating over a telephone line. This link is being used
to connect the IBM 3174 Cluster Controller located at the branch office to an IBM
37X5 Front End Processor located at the main offices.
The DV-MUX3 is inserted between the IBM 3174, respectively IBM 37X5, and
the corresponding modem:
• The IBM 3174 and IBM 37X5 are connected to the data channels of the two
DV-MUX3 units.
• One local subscriber line of the PABX located at the main offices is connected to the first voice channel of the DV-MUX3. This voice channel uses
an FXO interface.
DV-MUX3 Installation and Operation Manual
1-7
CHAPTER 1 - INTRODUCTION
• The second voice channel of the DV-MUX3 is used for PLAR service, and
is connected directly to the subscriber’s telephone set. This voice channel
uses an FXS interface.
• At the branch office, the two local subscriber sets are connected to the two voice
channels of the DV-MUX3. These voice channels use the FXS interface.
The first voice channel (connected at the main office to a subscriber line of
the PBX) is used for voice/fax transmission.
After the DV-MUX3 equipment is added, the data rate available to the SNA link depends on the main link rate and the selected voice bandwidth. In this example, the main
link rate is 19.2 kbps; assuming the voice channels operate at 6.4 kbps, the guaranteed
bandwidth available to the SNA link decreases to 5.6 kbps (faster modems, e.g.,
28.8 kbps modems, would of course increase the guaranteed bandwidth).
However, the main advantage of using the DV-MUX3 in this application is the
availability of an adaptive mode: by using the DV-MUX3 adaptive mode, the decrease in the bandwidth would occur only when a voice channel is actually in use,
i.e., when someone makes a call: when the voice lines are idle, the bandwidth available to the SNA link is 18.4 kbps.
NOTE
IBM communication equipment uses the DSR line as an indication of channel activity. For such applications, an appropriately wired cable must be used to connect the DSR line to the
DCD line of the DV-MUX3 data channel connector.
Note that the DSR line is supported only for the RS-232 interface.
Typical DV-MUX3
Application in an
Inter-LAN Link
Figure 1-2 shows another typical application for a DV-MUX3. In this example, the
DV-MUX3 is used to provide two telephone channels between the branch offices
and the main offices by sharing an already existing data link. This link is used by
a pair of remote Ethernet bridges or routers that interconnect the LANs serving the
main and branch offices. The DV-MUX3 is inserted between the remote bridges
and the data link, in a way similar to that shown in figure 1-1.
Other Applications
The adaptive mode of the DV-MUX3 also can be used when the available main
link bandwidth is shared with statistical multiplexers, or with any other type of
equipment that can run at the rate of the clock signals supplied to it. This issue is
further explained in the System Timing Considerations section.
Dial-up Mode
The dial-up mode (available only when the main link interface is RS-232 or V.35)
allows the use of a switched PSTN line to connect between two DV-MUX3 units,
thereby reducing the operating cost as the line is used only on demand.
The dial-up mode requires the use of the master-slave configuration. For proper
operation, the DV-MUX3 installed at the central location must be defined as the
master, and the other DV-MUX3 must be defined as the slave.
Conditions for
Activation/Deactivation
of a Voice Channel
The DV-MUX3 interprets the following conditions as a request from a voice channel for the connection of the link to the remote DV-MUX3:
• For a voice channel with FXS interface: the detection of an off-hook con-
dition at the voice channel interface.
1-8
DV-MUX3 Installation and Operation Manual
TYPICAL APPLICATIONS AND SYSTEM DESIGN CONSIDERATIONS
• For a voice channel with FXO interface: the detection of incoming ringing
at the voice channel interface.
• For a voice channel with E&M interface: the detection of an active M signal.
Figure 1-2. Typical DV-MUX3 Application in an Inter-LAN Link
The indication that a voice channel no longer needs the link to the remote DVMUX3 is derived in the following ways:
• For a voice channel with FXS interface: the detection of switching from
the off-hook to the on-hook condition. This is the normal way the communication on the voice channel is ended.
• For a voice channel with FXO interface: the stopping of the incoming ringing, but only if the remote subscriber did not gone off-hook in response to the
ringing. Note that if the remote subscriber has been off-hook, the ending of
communication is controlled only by the remote subscriber.
• For a voice channel with E&M interface: the detection of an inactive M signal.
The indication that the user’s terminal is active is derived from the state of the DTR
Conditions for
Activation/Deactivation line in the data channel interface (the terminal is assumed to be active when its
DTR line is ON).
of the Data Channel
Conditions for
Activation of Main
Link
A DV-MUX3 will activate the main link to the other DV-MUX3 upon the detection of the first valid request for connection. The link will remain connected as long
as at least one valid request is present.
• Valid connection requests originating from a voice channel can be made by
either of the master, or the slave DV-MUX3, because the DV-MUX3 dial-up
mode is designed to operate symmetrically with respect to voice channels.
DV-MUX3 Installation and Operation Manual
1-9
CHAPTER 1 - INTRODUCTION
This symmetry reflects the way voice channels are used (either side can initiate a call to the other side).
• Valid connection requests originating from the data channel can be made
only by the slave DV-MUX3, because the DV-MUX3 dial-up mode is designed to operate asymmetrically with respect to the data channel. This
means that a request for connecting the link to the other DV-MUX3 can be
made only by the slave DV-MUX3.
This asymmetry reflects the way data systems operate: the equipment at the
side of the master DV-MUX3 (Bridge, Front End Processor, etc.) is assumed
to operate continuously, so that it is always ready to accept the connection to
the remote equipment (i.e., the equipment at the slave DV-MUX3 side), but
there is no point to maintain the connection when the remote equipment has
nothing to send. This approach is particularly well suited to applications such
as shown in figure 1-1, which are clearly asymmetrical. In the application
shown in figure 1-1, the DV-MUX3 connected to the IBM 37X5 must be
configured as the master.
Conditions for
Disconnection of
Main Link
The disconnection of the main link can be initiated only by the slave DV-MUX3.
The disconnection is performed after both voice channels (on both DV-MUX3
units) are inactive and the DTR line in the slave data channel interface is OFF continuously for a period of 25 seconds.
The disconnection may also be initiated if the synchronization is lost for two seconds. This operation can also be performed by the master DV-MUX3.
Dial-up Modem
Settings
Before starting the operation, the dial-up modems serving the main link must be
configured as follows:
• Synchronous operation.
• Timing modem source:
° Modem connected to the master DV-MUX3: internal clock.
° Modem connected to the slave DV-MUX3: loopback timing (that is, its
transmit timing must be locked to the recovered receive clock).
• Error correction and compression functions disabled.
• DTR dialing mode operation (DTR option 108.1).
• Program the directory number to be dialed by each modem.
• Configure each modem for switching to the originate mode upon assertion of
the DTR line, and for switching to the answer mode upon detection of active
RI line (that is, a modem must dial the preprogrammed number when the
DTR line is asserted; if the DTR line is not asserted, the modem must answer
automatically when the RI line is asserted).
• The disconnection time following the deassertion of the DTR line must be set
to 50 msec.
NOTE
1-10
Correct clock source selection is essential for proper operation
of the DV-MUX3. If the timing is not correctly selected, the
DV-MUX3 may periodically lose synchronization.
DV-MUX3 Installation and Operation Manual
TYPICAL APPLICATIONS AND SYSTEM DESIGN CONSIDERATIONS
Control over the Main
Link Modems
The control of the dial-up modems serving the main link is made by means of the
DTR line of the DV-MUX3 main link interface. Assuming that the modems were
configured as explained above, the sequence for setting up and for disconnecting
the link between two DV-MUX3 units is as follows:
• The link is in the disconnected state when no user traffic is present. Both
DV-MUX3 units monitor the state of the RI line in their main link interface.
• When a voice channel at either the master or the slave DV-MUX3 is acti-
vated (see previous section), or the DTR line in the data channel interface of
the slave DV-MUX3 is asserted, the corresponding DV-MUX3 asserts the
DTR line in the main link interface. This causes the modem to dial the
number preprogrammed by the user.
• When the remote DV-MUX3 senses the assertion of the RI line in its main
link interface (indication of incoming call provided by the dial-up modem),
it asserts the DTR and RTS lines in its main link interface, and tries to synchronize to the other DV-MUX3.
• In case the DV-MUX3 does not synchronize within 40 seconds, it switches
the DTR line OFF. If a request for connection is still present, the DV-MUX3
returns the DTR line to ON after 100 msec. This interval is sufficient for the
modem to disconnect, and then to start a new dialing attempt.
• When the two DV-MUX3 synchronize, they assert the CD and CTS lines in
the data channel interfaces.
• Normally, the disconnection of the link is initiated by the slave DV-MUX3,
after 25 seconds during which both voice channels are inactive and the DTR
line in the slave data channel interface is OFF continuously. To disconnect,
the slave DV-MUX3 switches the DTR line in the main link interface OFF.
This causes the slave modem to go on-hook.
In case the master DV-MUX3 senses a loss of synchronization condition for
two seconds, the master DV-MUX3 switches the DTR line in the main link
interface OFF. This causes the master side modem to go on-hook.
System Bandwidth
Utilization
Tables 1-1 and 1-2 list the bandwidth available to the DV-MUX3 data channel as
a function of the number and digitizing rate of the voice channels:
• Table 1-1 provides the data channel bandwidths for the adaptive and non-adaptive 1 modes. Under Idle Voice Channels, you will find the bandwidth available,
in the adaptive mode, for the data channel when both voice channels are idle.
• Table 1-2 provides the bandwidths for the non-adaptive 2 mode (this mode
is intended for equipment limited to operation at standard data rates).
DV-MUX3 Installation and Operation Manual
1-11
CHAPTER 1 - INTRODUCTION
Table 1-1. Adaptive and Non-Adaptive 1 Modes, Data Channel Bandwidth as a
Function of Voice Channel and Main Link Rates
Data Channel Bandwidth vs. Voice Channel Digitizing Rate
Main Link
Data Rate
Idle Voice
Channels
(Adaptive
4.8 kbps 6.4 kbps 7.2 kbps 9.6 kbps 12.8 kbps 4.8 kbps 6.4 kbps 7.2 kbps 9.6 kbps 12.8 kbps mode only)
One Voice Channel
Two Voice Channels
9.6 kbps
4 kbps
2.4 kbps
1.6 kbps
–
–
–
–
–
–
–
8.8 kbps
12 kbps
6.4 kbps*
4.8 kbps
4.0 kbps
1.6 kbps
–
1.6 kbps
–
–
–
–
11.2 kbps
13.6 kbps
14.4 kbps
8.8 kbps
7.2 kbps*
6.4 kbps
4 kbps
0.8 kbps
4 kbps
0.8 kbps
–
–
–
16.8 kbps
11.2 kbps
9.6 kbps*
8.8 kbps
6.4 kbps
3.2 kbps
6.4 kbps
3.2 kbps
1.6 kbps
–
–
16 kbps
19.2 kbps
13.6 kbps
12 kbps
11.2 kbps
8.8 kbps
5.6 kbps
8.8 kbps
5.6 kbps
4 kbps
–
–
18.4 kbps
21.6 kbps
16 kbps
14.4 kbps*
13.6 kbps
11.2 kbps
8.0 kbps
11.2 kbps
8 kbps
6.4 kbps
1.6 kbps
–
20.8 kbps
24 kbps
18.4 kbps
16.8 kbps
16 kbps
13.6 kbps
10.4 kbps
13.6 kbps
10.4 kbps
8.8 kbps
4 kbps
–
23.2 kbps
26.4 kbps
20.8 kbps
19.2 kbps*
18.4 kbps
16.0 kbps*
12.8 kbps
16.0 kbps*
12.8 kbps
11.2 kbps
6.4 kbps
–
25.6 kbps*
28.8 kbps
23.2 kbps
21.6 kbps
20.8 kbps
18.4 kbps
15.2 kbps
18.4 kbps
15.2 kbps
13.6 kbps
8.8 kbps
2.4 kbps
28 kbps
32 kbps
26.4 kbps
24.8 kbps
24 kbps
21.6 kbps
18.4 kbps
21.6 kbps
18.4 kbps
16.8 kbps
12 kbps
5.6 kbps
31.2 kbps
38.4 kbps
32.8 kbps
31.2 kbps
30.4 kbps
28 kbps
24.8 kbps
28 kbps
24.8 kbps
23.2 kbps
18.4 kbps
12 kbps
37.6 kbps
48 kbps
41.6 kbps
40 kbps
39.2 kbps
36.8 kbps
33.6 kbps
36.8 kbps
33.6 kbps
32 kbps
27.2 kbps
20.8 kbps
46.4 kbps
56 kbps
49.6 kbps
48 kbps*
47.2 kbps
44.8 kbps
41.6 kbps
44.8 kbps
41.6 kbps
40 kbps
35.2 kbps
28.8 kbps
54.4 kbps
64 kbps
57.6 kbps
56 kbps*
55.2 kbps
52.8 kbps
49.6 kbps
52.8 kbps
49.6 kbps
48 kbps*
43.2 kbps
36.8 kbps
62.4 kbps
112 kbps
105.6 kbps
104 kbps
103.2 kbps 100.8 kbps
97.6 kbps
100.8 kbps
97.6 kbps
96 kbps*
91.2 kbps
84.8 kbps
110.4 kbps
128 kbps
121.6 kbps
120 kbps
119.2 kbps 116.8 kbps 113.6 kbps 116.8 kbps 113.6 kbps
112 kbps*
107.2 kbps 100.8 kbps
126.4 kbps
192 kbps
184 kbps
182.4 kbps
–
179.2 kbps 176.0 kbps 179.2 kbps
176 kbps
174.4 kbps 169.6 kbps 163.2 kbps
188.8 kbps
256 kbps
248 kbps
246.4 kbps
–
243.2 kbps 240.0 kbps 243.2 kbps
240 kbps
238.4 kbps 233.6 kbps 227.2 kbps
252.8 kbps
* In the non-adaptive 1 mode, these configurations yield standard data rates on the data channel, that can be used in addition to the
data rates available in the non-adaptive 2 mode.
Table 1-2. Non-Adaptive 2 Mode, Data Channel Bandwidth as a
Function of Voice Channel and Main Link Rates
Data Channel Bandwidth vs. Voice Channel Digitizing Rate
Main Link
Data Rate
One Voice Channel
Two Voice Channels
4.8 kbps
6.4 kbps
7.2 kbps
9.6 kbps
12.8 kbps
4.8 kbps
6.4 kbps
7.2 kbps
9.6 kbps
9.6 kbps
3.6 kbps
2.4 kbps
1.2 kbps
–
–
–
–
–
–
–
12 kbps
2.4 kbps*
4.8 kbps
3.6 kbps
1.2 kbps
–
1.2 kbps
–
–
–
–
14.4 kbps
7.2 kbps
3.6 kbps
1.2 kbps
2.4 kbps
–
2.4 kbps
–
–
–
–
16.8 kbps
9.6 kbps
3.6 kbps
2.4 kbps
4.8 kbps
2.4 kbps
4.8 kbps
2.4 kbps
1.2 kbps
–
–
19.2 kbps
9.6 kbps
4.8 kbps
2.4 kbps
7.2 kbps
4.8 kbps
7.2 kbps
4.8 kbps
3.6 kbps
–
–
21.6 kbps
14.4 kbps
4.8 kbps
2.4 kbps
9.6 kbps
7.2 kbps
9.6 kbps
7.2 kbps
3.6 kbps
1.2 kbps
–
24 kbps
14.4 kbps
7.2 kbps
4.8 kbps
9.6 kbps
9.6 kbps
9.6 kbps
9.6 kbps
1.2 kbps
2.4 kbps
–
26.4 kbps
19.2 kbps
9.6 kbps
7.2 kbps
14.4 kbps
9.6 kbps
14.4 kbps*
9.6 kbps
4.8 kbps
4.8 kbps
–
28.8 kbps
19.2 kbps
9.6 kbps
7.2 kbps
14.4 kbps
14.4 kbps
14.4 kbps*
14.4 kbps
4.8 kbps
7.2 kbps
2.4 kbps
32 kbps
19.2 kbps
7.2 kbps
9.6 kbps
19.2 kbps
7.2 kbps
19.2 kbps
7.2 kbps
4.8 kbps
9.6 kbps
4.8 kbps
38.4 kbps
19.2 kbps
7.2 kbps
9.6 kbps
19.2 kbps
7.2 kbps
19.2 kbps
7.2 kbps
4.8 kbps
9.6 kbps
4.8 kbps
48 kbps
38.4 kbps
14.4 kbps
28.8 kbps
19.2 kbps
28.8 kbps
19.2 kbps
28.8 kbps
9.6 kbps
19.2 kbps
19.2 kbps
56 kbps
38.4 kbps
28.8 kbps
19.2 kbps
38.4 kbps
28.8 kbps
38.4 kbps
28.8 kbps
14.4 kbps
19.2 kbps
19.2 kbps
64 kbps
38.4 kbps
28.8 kbps
38.4 kbps
19.2 kbps
28.8 kbps
19.2 kbps
28.8 kbps
38.4 kbps
19.2 kbps
19.2 kbps
112 kbps
96.0 kbps
38.4 kbps
72 kbps
56 kbps
38.4 kbps
56 kbps
38.4 kbps
72 kbps
56 kbps
56.0 kbps
128 kbps
112.0 kbps
38.4 kbps
112 kbps
56 kbps
38.4 kbps
56 kbps
38.4 kbps
72 kbps
56 kbps
56.0 kbps
192 kbps
128.0 kbps
64 kbps
–
128 kbps
64.0 kbps
128 kbps
64 kbps
56 kbps
112 kbps
112.0 kbps
256 kbps
192.0 kbps
64 kbps
–
128 kbps
64.0 kbps
128 kbps
64 kbps
112 kbps
128 kbps
128.0 kbps
1-12
12.8 kbps
DV-MUX3 Installation and Operation Manual
TYPICAL APPLICATIONS AND SYSTEM DESIGN CONSIDERATIONS
System Timing
Considerations
This section explains the timing modes and clock rates available for the main link
of the DV-MUX3, and for its data and voice channels.
Main Link Timing
The main link transmit and receive paths of the DV-MUX3 require external receive and transmit clock signals derived from the network clock. The transmit and
receive clock must be derived from the same source. DV-MUX3 will however tolerate phase difference and jitter between the two clocks. Therefore, when the two
DV-MUX3 units are connected through a modem link, one of the modems must be
configured for operation with its internal clock, and the other must use loopback
timing (operation on the recovered receive clock).
The main link clock signals always determine the DV-MUX3 receive and transmit
timing. Thus, the DV-MUX3 always distributes downward the system timing.
The main link rate (any standard rate in the range of 9.6 to 256 kbps) is automatically identified by actually measuring the clock frequency. The DV-MUX3 will
provide an alarm indication if the measured frequency is not close enough to one
of the supported main link rates.
Data Channel Timing
The data channel supplies receive and transmit clock signals derived from the link
clock to the attached equipment, and expects the user equipment to accept and generate data in accordance with these signals.
NOTE
Voice Channel Timing
When using the DV-MUX3 adaptive mode, it is strongly recommended to operate the equipment connected to the data
channel with independent transmit and receive clock signals.
This prevents the possibility of short error bursts occurring
when dynamic bandwidth reallocation is performed.
When it is not possible to use independent transmit and receive
clock signals, e.g., when the X.21 interface is used, and the occurrence of error bursts is undesirable, it is recommended to
use the non-adaptive mode.
The voice channel digitizing rate (4.8, 6.4, 7.2, 9.6 or 12.8 kbps) is always locked
to the main link receive clock.
DV-MUX3 Installation and Operation Manual
1-13
CHAPTER 1 - INTRODUCTION
1-3. TECHNICAL SPECIFICATIONS
General
Function
Three-channel adaptive multiplexer
Multiplexing Method
Bit-interleaved Time Division Multiplexing (TDM)
Management and Supervision
Overhead
– 0.8 kbps for main link data rates of 9.6 to 32 kbps
– 1.6 kbps for data rates of 48 to 128 kbps
– 3.2 kbps for data rates higher than 128 kbps
Main Link Characteristics
Data Rate
9.6 to 256 kbps, automatically recognized
Timing
Externally clocked
Interface
Synchronous V.24/RS-232, V.35, V.36/RS-449, RS-530, or
X.21 interface (strap selectable), configured as DTE
Connector
15-pin D-type female connector. Adapter cable for ordered
interface is supplied
Data Channel Characteristics
Data Rate
0.8 to 252.8 kbps, depending on mode and main link rate
ADAPTIVE mode
Main Link Rate - Voice Channels Rate - Overhead
if at least one voice channel is active.
Main Link Rate - Overhead if both voice channels are idle.
See detailed list of values in Table 1-1
NON-ADAPTIVE 1 mode
Main Link Rate - Voice Channel Rate - Overhead.
See detailed list of values in Table 1-1
NON-ADAPTIVE 2 mode
See detailed list of values in Table 1-2
Clocking
Receive and transmit clocks derived from the main link clock
Interface
Synchronous V.24/RS-232, V.35, V.36/RS-449, RS-530, or
X.21 (strap selectable), configured as DCE
Interface connector
15-pin D-type female connector. Adapter cable for ordered
interface is supplied
Voice Channels Characteristics
Voice Channels
One or two
Digitizing Technique
MPMLQ low bit rate digitizing technique per ITU-T
Rec. G.723 at 4.8, 6.4, 7.2, 9.6 or 12.8 kbps
Fax
In band fax support at fax rate 2.4, 4.8, 7.2 or 9.6 kbps
End-to-End Processing Delay
120 msec
Acceptable Channel Bit Error Ratio
1×10⁻³ or better
Analog Interface
(in accordance with order)
– 2-wire FXO
– 2-wire FXS
– 2-wire/4-wire E&M
1-14
DV-MUX3 Installation and Operation Manual
TECHNICAL SPECIFICATIONS
Analog Characteristics (9.6 kbps)
Nominal transmit level
+2 to -13 dBm, independently adjustable for each channel in
steps of 1 ±0.15dB
Nominal receive level
FXS, E&M
FXO
Independently adjustable for each channel in steps of 1 ±0.15dB
+2 to -13 dBm
+1 to -13 dBm
Frequency response (referred to
1020 Hz)
±0.5 dB, 300-3000 Hz
±1.1 dB, 250-3400 Hz
Signal-to-distortion @ 9.6 kbps
(ITU-T Rec. G.712, G.713,
method 2)
0 to -30 dBm0:
+3 to -45 dBm0:
Idle channel noise
Better than -70 dBm0
better than 33 dB
better than 22 dB
Adaptive Echo Canceler
Integral module echo path length
8 msec
Echo return loss enhancement
(ERLE)
>30 dB
Convergence speed
Better than ITU-T Rec. G.165
Dial pulse distortion
±4 msec max
Connector
8 pin RJ-45 connector for each channel
Fax Characteristics
Standards
Supports Group 3 fax machines complying with
ITU-Rec. T.4 and T.30
Fax Data Rates/Channel Bandwith
2.4 kbps/4.8 kbps
4.8 kbps/6.4, 7.2 kbps
7.2 kbps/9.6 kbps
9.6 kbps/12.8 kbps
all with auto-fallback
FXS Interface
EIA RS-464, loop start
Nominal impedance
600 Ω
Return loss (300 to 3400 Hz)
Better than 20 dB
Feed current
25 mA at 300 Ω loop resistance
Ringer
45Vrms (±10%), overload protected, 22Hz (±10%),
1 second ON, 3 seconds OFF
FXO Interface
Off-hook
DC impedance
EIA RS-464: loop start
150 Ω at 100 mA feed
330 Ω at 25 mA feed
AC input impedance
600 Ω
Return loss
Better than 22 dB
DV-MUX3 Installation and Operation Manual
1-15
CHAPTER 1 - INTRODUCTION
On-hook
DC resistance
More than 1 MΩ
AC impedance
20 kΩ at 20 Hz, 70 Vrms
Ring detect range
>20 Vrms, 17 to 25 Hz
Transformer isolation
3000 Vrms
E&M Interface
Signaling interface
– EIA RS-464 Type I
– Modified EIA RS-464 Type II, III, V (with -24V instead
of -48V)
– British Telecom SSDC5
Analog interface
4-wire or 2-wire interface, strap selectable
AC impedance
600 Ω
Transformer isolation
1500 Vrms
Diagnostics
Two push-buttons used for activation of remote loops and
BERT on the data channel, or tone injection on the voice
channel. Tested channel is selected by a front panel switch
Indications
– Transmit and receive data activity indicators for the link,
voice channel or data channel. The monitored channel is selected by a front panel switch
– Sync loss indication
– Test indication
– Power on indication
– Configuration error indication
– Self-test failure indication
– Incorrect main link clock rate indication
Master/slave mode available. Allows all the channel parameters selected on the master unit to be downloaded through
the main link to the slave unit
Configuration Downloading
Power
In accordance with order
DC supply voltage
-48 VDC
AC supply voltage
100, 115 or 230 VAC, ±10%, 47-63 Hz
Power consumption
15 VA
Physical Characteristics
Height
Width
Depth
Weight
4.4 cm/1.7 in
19.3 cm/7.6 in
24.0 cm/9.4 in
2.7 kg/6.0 lb
Environment
Temperature
0 to +45°C (32 to +104°F)
Humidity
Up to 90%, non-condensing
1-16
DV-MUX3 Installation and Operation Manual
CHAPTER 2.
INSTALLATION
Contents
Page
General . . . . . . . . . . . . . . .
Unpacking . . . . . . . . . . . . . .
Site Requirements . . . . . . . . . .
DV-MUX3 Configuration Information
Cable Connections . . . . . . . . .
.
.
.
.
.
.
.
.
.
.
.
.
.
.
.
.
.
.
.
.
.
.
.
.
.
.
.
.
.
.
.
.
.
.
.
.
.
.
.
.
.
.
.
.
.
.
.
.
.
.
.
.
.
.
.
.
.
.
.
.
.
.
.
.
.
.
.
.
.
.
.
.
.
.
.
.
.
.
.
.
.
.
.
.
.
2-1
2-2
2-2
2-3
2-12
2-1. GENERAL
The DV-MUX3 is delivered completely assembled. It is designed for installation
as a desk-top unit and for mounting in a 19" rack.
General installation procedures for DV-MUX3 are provided in the following paragraphs. For rack installation instructions, refer to Appendix C.
After installing the unit, refer to Chapter 3 for operating instructions.
In case a problem is encountered, refer to Chapter 4 for test and diagnostics instructions.
WARNING
DV-MUX3 Installation and Operation Manual
No internal settings, adjustment, maintenance, and repairs
may be performed by either the operator or the user; such
activities may be performed only by a skilled technician
who is aware of the hazards involved.
Always observe standard safety precautions during installation, operation, and maintenance of this product.
2-1
CHAPTER 2 - INSTALLATION
2-2. UNPACKING
A preliminary inspection of the equipment container should be made before unpacking. Evidence of damage should be noted and reported immediately.
To unpack, place the container on a clean flat surface, cut all straps, and open or remove top. Carefully take out the DV-MUX3 and all the accessories packed in the
container, and place them securely on a clean surface. Inspect the product for damage. Immediately report any damage.
2-3. SITE REQUIREMENTS
Power
AC-powered DV-MUX3 units should be installed within 1.5 m (5 feet) of an easily-accessible grounded AC mains outlet capable of furnishing the nominal supply
voltage of the DV-MUX3 ( in accordance with your order). The supply voltage is
marked on a label located on the rear panel, near the power connector.
DC-powered DV-MUX3 units require a -48 VDC source.
The DV-MUX3 does not include a power switch, and will start operating as soon
as its power cable is connected to power. Therefore, a circuit breaker located at a
convenient location, that will also serve as an on/off switch, must be included in the
circuit used to provide power to the DV-MUX3.
Cable Connections
The DV-MUX3 has two 15-pin female D-type connectors (one connector for the
data channel, and the other connector for the main link) and two RJ-45 connectors
for the two voice channels. Various adapter cables are available for interface conversion. Appendix A provides connector pin allocations, and wiring data for the
adapter cables.
Front and Rear
Panel Clearance
When the DV-MUX3 is installed in a 19" rack, allow at least 90 cm (36 inches) of
frontal clearance for operator access. Allow at least 10 cm (4 inches) clearance at
the rear of the unit for interface cable connections.
Ambient
Requirements
The ambient operating temperature of the DV-MUX3 should be 0 to 45°C (32 to
104°F), at a relative humidity of up to 90%, non-condensing.
Do not place another unit on top a DV-MUX3 unit, because this will obstruct the
free flow of cooling air around the unit,
2-2
DV-MUX3 Installation and Operation Manual
DV-MUX3 CONFIGURATION INFORMATION
2-4. DV-MUX3 CONFIGURATION INFORMATION
General
The DV-MUX3 contains several printed circuit boards, identified in figure 2-1:
•
Main board. This board contains most of the DV-MUX3 circuits.
•
Voice channels module. In accordance with your order, this module can include one or two voice channels.
•
Voice channel interface modules. Three types of voice channel interface
boards are available:
° DV-MUX3-FXO for FXO interface.
° DV-MUX3-FXS for FXS interface.
° DV-MUX3-E&M for E&M interface.
Figure 2-1 shows two interface modules installed on the voice channels module. One interface module is required for each voice channel. The appropriate
module is factory-installed in accordance with your order.
Prior to DV-MUX3 installation, the internal jumpers and switches located on these
boards must be set in accordance with your requirements, as explained below.
This paragraph provides information on the functions of the internal jumpers and
switches located on each board, and provides step-by-step instructions for making
the internal settings.
Access to the inside of the equipment is only permitted to
qualified and authorized service personnel.
Disconnect the unit from all the cables and from the power
line before removing the power cord.
Line voltage is present inside the DV-MUX3 when it is connected to power. Moreover, external fault conditions may
cause dangerous high voltages to appear on the voice chanWARNING
nel cables connected to the DV-MUX3. Observe all the appliELECTRICAL cable safety precautions, and in particular always disconnect
all the cables connected to it, and then disconnect the input
SHOCK
HAZARD
power from the DV-MUX3 before disconnecting the DVMUX3 power cord from the enclosure.
Any adjustment, maintenance, and repair of the opened instrument under voltage should be avoided as much as possible and, when inevitable, should be carried out only by a
skilled person who is aware of the hazard involved. Capacitors inside the instrument may still be charged even after the
instrument has been disconnected from its source of supply.
CAUTION
DV-MUX3 Installation and Operation Manual
The DV-MUX3 contains components sensitive to electrostatic
discharge (ESD). To prevent ESD damage, avoid touching the
internal components, and before moving jumpers, touch the
DV-MUX3 frame.
2-3
CHAPTER 2 - INSTALLATION
Opening DV-MUX3
Case
The DV-MUX3 jumpers are located on its boards. The boards are attached to the
rear panel. To reach the internal jumpers:
•
Disconnect all the cables connected to the DV-MUX3.
•
Unscrew the two large captive screws located on the rear panel.
•
Carefully pull the rear panel out. The internal boards will slide out together
with the panel. The DV-MUX3 has several tall components which barely
clear the top cover: make sure you do not damage these components.
Figure 2-1. DV-MUX3, Identification of Internal Modules
2-4
DV-MUX3 Installation and Operation Manual
DV-MUX3 CONFIGURATION INFORMATION
Main Board
Jumpers
The user-selectable jumpers located on the main board of the DV-MUX3 are identified in figure 2-2.
In addition to the jumpers identified in figure 2-2, the main board includes additional factory-set jumpers which must not be moved.
Figure 2-2. DV-MUX3, Identification of Main Board Jumpers
MODE Selection
Jumper, J2
This jumper selects the DV-MUX3 bandwidth allocation mode, and its configuration mode. The jumper has four positions:
ADAPTIV
DV-MUX3 Installation and Operation Manual
The DV-MUX3 operates as a master, and uses the adaptive bandwidth allocation mode. In this mode, the DV-MUX3 detects the
main link data rate, allocates the bandwidth configured for voice
channels, and assigns the remaining bandwidth (less the link management overhead) to the data channel. In addition, when the voice
channel is idle, the DV-MUX3 automatically reallocates its bandwidth to the data channel. The ADAPTIV mode ensures that the
2-5
CHAPTER 2 - INSTALLATION
main link bandwidth is always fully utilized, however not all
types of user equipment can support the dynamic changes in
clock rate that occur in this mode.
See Table 1-1 for the available data rates.
N/ADPT1
The DV-MUX3 operates as a master, and uses the non-adaptive 1 allocation mode. In this mode, the DV-MUX3 determines the data rate of the data channel as in the adaptive mode,
except that the bandwidth required by the voice channel is permanently allocated. This mode achieves the best utilization of
the main link bandwidth when the data channel data rate cannot be dynamically changed.
See Table 1-1 for the available data rates.
N/ADPT2
The DV-MUX3 operates as a master, and uses the non-adaptive 2 allocation mode. In this mode, the DV-MUX3 allocates
the data channel the highest standard data rate that fits within
the bandwidth left after allowing for the voice channel and link
management and supervision overhead.
See Table 1-2 for the available data rates.
SLAVE
DV-MUX3 operates as slave unit, that is, its configuration is
determined by the information downloaded through the main
link by the remote unit.
The use of a master-slave configuration expedites link setup
and reduces the chance of configuration errors, therefore
whenever feasible, set the MODE jumper of one of the DVMUX3 units operating in a link to the SLAVE position.
If you set the jumper to this position on both units operating
in a link, a configuration error indication (TEST indicator
flashing, SYNC LOSS indicator off) will be displayed after
the DV-MUX3 units synchronize.
The default setting is ADAPTIV.
NOTE
SWITCH Control
Jumper, J1
In a master-slave configuration, the allocation mode set on the
DV-MUX3 unit selected as master is downloaded to the slave
unit, and overrides the local slave setting. The master-slave
configuration is mandatory for the dial-up mode.
This jumper allows to disable the front-panel PATT and RLB push-buttons, to prevent the activation of tests and loops by unauthorized persons.
The jumper has two positions:
ENBL
The front-panel push-buttons can control the activation of tests
and loops.
DSBL
The front-panel push-buttons are disabled and do not have any
effect.
The default setting is ENBL.
2-6
DV-MUX3 Installation and Operation Manual
DV-MUX3 CONFIGURATION INFORMATION
DTR Jumper, J11
This jumper is used to enable the dial-up mode.
The dial-up mode can be enabled only when the DV-MUX3 main link interface
uses the RS-232 interface. For other interfaces, the dial-up mode is not available,
irrespective of the setting of this jumper.
The jumper has two positions:
CNTL
When the RS-232 interface is selected, the dial-up mode is enabled. In this case, the DV-MUX3 controls the state of the DTR
line in the main link interface as explained in para. 1-2.
ON
The dial-up mode is disabled, and the DTR line in the main link
interface is ON as long as the DV-MUX3 is powered.
The default setting is ON.
CHASS Jumper, J10
This jumper controls the connection between the signal ground lines to the chassis
ground line. The appropriate position must be determined by the installation manager. The jumper has two positions:
CON
signal ground connected to chassis ground.
DIS
signal ground disconnected from chassis ground.
Factory setting is CON.
Voice Channels
Module
The switches located on the voice channels module are identified in figure 2-3.
In a master-slave configuration, the digitizing rate and the
number of voice channels selected on the voice channels module of the DV-MUX3 unit selected as master are downloaded
to the slave unit.
NOTE
Digitizing Rate
Switch, SW6
This switch selects the voice channels digitizing rate. The switch has two sections,
designated S1 and S2.
Table 2-1 lists the digitizing rate selection.
Table 2-1. Digitizing Rate Selection
SW6 Section
Digitizing Rate
S1
S2
S3
0
0
0
4.8 kbps
1
0
0
6.4 kbps
0
1
0
7.2 kbps
0
0
1
9.6 kbps
0
1
1
12.8 kbps
The default setting is 6.4 kbps.
DV-MUX3 Installation and Operation Manual
2-7
CHAPTER 2 - INSTALLATION
Figure 2-3. Voice Channels Module Switches
VOICE2 Enable
Switch, SW5
On DV-MUX3 units equipped with two voice channels, this switch allows the user
to disable voice channel 2. By disabling voice channel 2, the bandwidth available
to the data channel is increased.
The switch has two positions:
•
DIS - voice channel 2 is disabled.
•
EN - voice channel 2 is enabled.
The default setting is EN.
2-8
DV-MUX3 Installation and Operation Manual
DV-MUX3 CONFIGURATION INFORMATION
Level Adjustment
Switches, SW1,
SW2, SW3, SW4
These switches are used to select the nominal input and output levels of the voice
channels:
• SW1 selects the nominal output level of the voice channel 1 receive path.
• SW2 selects the nominal input level of the voice channel 1 transmit path.
• SW3 selects the nominal output level of the voice channel 2 receive path.
• SW4 selects the nominal input level of the voice channel 2 transmit path.
NOTE
The application of an input signal at the nominal transmit level results in a 0 dBm0 digital level, that yields a far-end output signal
level equal to the far-end nominal receive level. Figure 2-4 explains how to determine the required levels.
Figure 2-4. Selection of
Transmit and Receive
Levels
The input and output levels can be set in 1-dB steps in the range of +2 dBm to
-13 dBm, according to Table 2-2. In addition, a reference table is attached to the top
of the power transformer.
Table 2-2. Voice Channel Level Adjustment
NOTE
Level (dBm)
Switch Position
+2
+1
0
-1
-2
-3
-4
-5
-6
-7
-8
-9
-10
-11
-12
-13
E
F
0
1
2
3
4
5
6
7
8
9
A
B
C
D
For the FXO interface, the maximum level is +1 dBm,therefore position E should not be selected.
Default: 0 dBm for both the transmit and receive levels.
DV-MUX3 Installation and Operation Manual
2-9
CHAPTER 2 - INSTALLATION
Voice Channel
Interface Modules
Only the DV-MUX3-E&M voice channel interface board requires internal settings
that are used to select the signaling mode and the interface type, 2W or 4W. Figure 2-5 identifies the position of these switches.
Figure 2-5. DV-MUX3-E&M, Internal Settings
E&M Signaling
Mode Selection
The DV-MUX3-E&M module supports five E&M signaling modes: RS-464 Type
I, II, III and Type V, and British Telecom SSDC5. To help you determine the appropriate signaling mode, figure 2-6 shows the equivalent signaling circuit in each
mode. The selection of the signaling mode is made by setting the two switches to
the appropriate position.
Table 2-3 lists the required settings.
Table 2-3. Selection of E&M Signaling Mode
Settings
Signaling Mode
SW2 Switch Position
SW1 Switch Position
RS-464 Type I
TYPE 1,3
TYPE 1,2,3
RS-464 Type II
2, SSDC5
TYPE 1,2,3
RS-464 Type III
TYPE 1,3
TYPE 1,2,3
RS-464 Type V
2, SSDC5
SSDC5
BT SSDC5
2, SSDC5
SSDC5
Default setting is EIA RS-464 Type II signaling.
2-10
DV-MUX3 Installation and Operation Manual
DV-MUX3 CONFIGURATION INFORMATION
Figure 2-6. Equivalent Signaling Circuits
2W/4W Selection,
Switch SW3
Switch SW3 selects the analog interface:
2W
2-wire interface
4W
4-wire interface
Default setting is 4W.
Internal Settings
Procedure
Refer to figures 2-1 through 2-6 and identify jumper and switch locations and settings. Change settings as required.
After completing the internal settings, reinstall the DV-MUX3 as follows:
DV-MUX3 Installation and Operation Manual
2-11
CHAPTER 2 - INSTALLATION
•
Insert the front side of the DV-MUX3 board into both card guides (grooves) on
the internal side of the case walls, and then carefully slide the board in. Be careful
to prevent damage to the tall components. If resistance is felt before the rear
panel touches the case, pull the board out and then repeat the procedure.
•
Fasten the rear panel by fully screwing in the two large rear panel screws.
2-5. CABLE CONNECTIONS
General
Figure 2-7 shows a typical rear panel for an AC-powered DV-MUX3 unit. The rear
panel of DC-powered units is similar, except it includes a three-pin circular DC
power connector.
The DV-MUX3 has two 15-pin D-type female connectors located on the rear
panel, one for connection to the main link, and the other for the data channel. In addition, the DV-MUX3 rear panel includes two RJ-45 connectors for the two voice
channels.
Appendix A lists the pin allocations for the various connectors, and provides information on the adapter cables available for each connector.
Figure 2-7. Typical DV-MUX3 Rear Panel (AC-Powered Unit)
Grounding
For your protection, the DV-MUX3 must always be grounded. Any interruption of
the protective (grounding) conductor (inside or outside the instrument) or disconnecting the protective earth terminal can make this instrument dangerous. Intentional interruption is prohibited.
Power Connections
The DV-MUX3 does not have an on/off switch, therefore it will start operating as
soon as power is connected.
2-12
DV-MUX3 Installation and Operation Manual
CABLE CONNECTIONS
WARNING
AC Power
Connection
BEFORE POWERING UP this instrument and before
connecting any other cable the protective earth terminals
of this instrument must be connected to the protective conductor of the power cord. The power plug shall only be inserted in a socket outlet provided with a protective earth
contact. The protective action must not be negated by use
of an extension cord (power cable) without a protective
conductor (grounding).
Make sure that only fuses with the required rated current
are used for replacement. The use of repaired fuses and
the short-circuiting of fuse holders must be avoided.
Whenever it is likely that the protection offered by fuses
has been impaired, the instrument must be made inoperative and be secured against any unintended operation.
Skip this section for DC-powered DV-MUX3 units.
CAUTION
The DV-MUX3 is available in models that differ in the rated
supply voltage (100 VAC, 115 VAC or 230 VAC).
Before first-time installation, check that the DV-MUX3 nominal supply voltage, marked on a label on its rear panel, matches
the nominal voltage available at your mains outlet.
AC power should be supplied to the DV-MUX3 through the standard power cable
terminated by a standard 3-prong plug. Connect the cable between the AC power
connector on the DV-MUX3 rear panel and a standard grounded AC outlet that
provides a nominal voltage equal to the DV-MUX3 nominal supply voltage.
DC Power
Connection
Skip this section for AC-powered DV-MUX3 units.
Connect the DC power cable to the DV-MUX3 DC power connector, and then connect the other end to the DC power source. Pay attention to correct polarity.
Main Link
Connection
DV-MUX3 main link interface is configured as a DTE interface, intended for connection to a synchronous modem that is capable of providing the clock signals that
determine DV-MUX3 main link data rate.
The main link connector is a 15-pin D-type female connector, wired in accordance
with ITU-T Rec. X.21. When a different interface is selected by means of the internal jumpers, an interface conversion adapter cable must be inserted between the
DV-MUX3 main link connector and the cable connecting to the main link modem.
The following adapter cables are available:
V.36/RS-449
Use CBL-KM-22/449 adapter cable, terminated in a 37-pin female D-type connector.
RS-530
Use CBL-KM-22/530 adapter cable, terminated in a 25-pin female D-type connector.
V.35
Use CBL-DV-MUX/V.35 adapter cable, terminated in a 34-pin
female connector.
V.24/RS-232
Use CBL-DV-MUX/232/N adapter cable, terminated in a 25-pin
female D-type connector.
DV-MUX3 Installation and Operation Manual
2-13
CHAPTER 2 - INSTALLATION
Data Channel
Connections
The DV-MUX3 data channel interface is configured as a data communication
equipment (DCE) interface, thereby allowing direct connection to data terminal
equipment (DTE).
The data channel connector is a 15-pin D-type female connector, wired in accordance with ITU-T Rec. X.21.
When a different interface is selected by means of the internal jumper, an interface
conversion adapter cable must be inserted between the DV-MUX3 and the cable
connecting the user’s equipment. The required adapter cables are the same cables
listed above for the main link connector.
Voice Channel
Connections
2-14
Each voice channel connector is terminated in an 8-pin RJ-45 connector.
DV-MUX3 Installation and Operation Manual
CHAPTER 3.
OPERATING INSTRUCTIONS
Contents
DV-MUX3 Front Panel Controls and Indicators . . . . . . . . . . . .
Preparation for Operation, General . . . . . . . . . . . . . . . . . .
Operating Instructions . . . . . . . . . . . . . . . . . . . . . . . . .
Page
3-1
3-3
3-4
3-1. DV-MUX3 FRONT PANEL CONTROLS AND INDICATORS
Table 3-1 lists the functions of the DV-MUX3 controls and indicators located on
the front panel. The Item numbers in Table 3-1 correspond to the index numbers in
figure 3-1.
Figure 3-1. DV-MUX3 Front Panel Controls and Indicators
DV-MUX3 Installation and Operation Manual
3-1
CHAPTER 3 - OPERATING INSTRUCTIONS
Table 3-1. DV-MUX3 Controls and Indicators
Item
Control or Indicator
Function
1
PWR indicator
Lights when the DV-MUX3 is powered
2
TEST indicator
Lights steadily when a BERT test, tone injection, or a remote
loop is active on the DV-MUX3.
Flashes (0.5 second on/0.5 second off) when a configuration
error occurs
3
SYNC LOSS indicator
Lights when the DV-MUX3 is not frame-synchronized
4
TD indicator
Lights to indicate the presence of data on the transmit pair of the
channel selected by means of the SELECT switch (item 6)
5
RD/ER indicator
During normal operation, lights steadily to indicate the presence
of data on the receive pair of the channel selected by means of
the SELECT switch (item 6)
During BERT testing, lights when errors are detected.
6
SELECT switch
Selects a channel for testing (by means of the PATT and RLB
push-buttons, items 7 and 8) and for monitoring (by the TD and
RD indicators, items 4 and 5):
D
Data channel
L
Main link
V
Voice channel
7
PATT push-button
Activates the transmission of a 511-bit pseudo-random test
sequence on the data channel, and the detection of errors in the
received sequence (BERT testing), or the tone injection
(1000 Hz, 0dBm0) on the voice channel(s).
This function can be disabled by an internal switch
8
RLB push-button
Controls the activation of a remote loop on the channel selected
by the SELECT switch (item 6).
This function can be disabled by an internal switch
Special Diagnostic
Indications
3-2
In addition to the basic indications listed in Table 3-1, additional fault conditions
can be indicated. The indications used for these conditions are combinations of display states based on simultaneous lighting of SYNC LOSS and the flashing of the
TEST indicator, and a specific state of the TD and RD/ERR indicators. The available indications are as follows:
TD and RD/ER
both ON
Failure in power-up self-test (EPROM checksum or the internal hardware test failed), or the voice channels module is not
installed. The DV-MUX3 should be repaired.
TD and RD/ER
both OFF
The DV-MUX3 main link interface does not receive clock signals, or the main link clock rate measured by the DV-MUX3
does not fit any of the supported rates, or the rate is outside the
allowable accuracy limits.
DV-MUX3 Installation and Operation Manual
PREPARATION FOR OPERATION, GENERAL
Configuration Error
Indication
The flashing of the TEST indicator while the SYNC LOSS indicator is off indicates a configuration error. The configuration error indication is displayed under
the following circumstances:
•
Bandwidth “overflow”: the total bandwidth assigned to the data and voice
channels, including the link synchronization and supervision overhead, exceeds the main link data rate determined by measuring the link clock signal
frequency.
•
Both DV-MUX3 units connected in a link are configured as “slaves”.
•
Both DV-MUX3 units connected in a link are configured as “masters”, and
their configurations are different.
•
AmasterDV-MUX3unitwithtwoactivevoicechannelsattemptstodownload
configuration information to a slave unit having only one voice channel.
•
The local DV-MUX3 operator has depressed the RLB push-button to activate
aremoteloopbackonachannelonwhichaloopbackhasalreadybeenactivated
by the other side.
3-2. PREPARATION FOR OPERATION, GENERAL
After being prepared for operation according to Chapter 2, the DV-MUX3 normally operates unattended.
Operator intervention is only required when the DV-MUX3 is set-up for the first
time, or must be adapted to new operational requirements that require the changing
of the internal settings.
DV-MUX3 Installation and Operation Manual
3-3
CHAPTER 3 - OPERATING INSTRUCTIONS
3-3. OPERATING INSTRUCTIONS
Preliminary Settings
Release all the push-buttons.
Turn-on
The DV-MUX3 does not have a power switch, therefore it immediately starts operating when power is applied. To apply power, connect the DV-MUX3 power cable to its rear POWER connector, then plug the other end into a grounded mains
outlet.
When power is connected, the DV-MUX3 performs self-test. During self-test, all
the indicators light for approximately 0.5 second, then change to the normal states.
The PWR indicator remains lit as long as power is available.
Normal Operating
Indications
During normal operation, all the front-panel indicators, except PWR, and possibly
TD and RD (see following section), are off.
NOTE
Upon turn-on, the SYNC LOSS alarm indicator may light up,
indicating that the other communication equipment serving the
DV-MUX3 link is not yet operating. The indicator must turn
off as soon as all the link equipment is operated.
In case the SYNC LOSS indicator lights and/or the TEST indicator flashes, refer
to Chapter 4 for troubleshooting instructions.
The TEST indicator will light steadily when a test is activated.
Monitoring Channel
Activity
To monitor traffic activity on a desired channel or on the main link, set the SELECT switch to the corresponding position.
The TD and RD/ERR indicators show the traffic activity on selected channel (their
brightness is proportional to the traffic load). If the TD and RD/ERR indicators are
off while the selected channel transmits or receives data, refer to Chapter 4 for
troubleshooting instructions.
NOTE
Loop Activation
The PATT and RLB push-buttons can be disabled by an internal switch. When disabled, the TEST indicator remains off
when a push-button is pressed.
When it is necessary to activate a test loop, set the SELECT switch to the position
corresponding to the desired channel, and then press the RLB push-button. The
TEST indicator turns on, and the TD and RD indicators show data activity on the
transmit and receive pairs of the selected channel.
The loop remains activated as long as the RLB push-button remains depressed.
Note that the activation of a main link loop interrupts the service to all the users
served by the DV-MUX3 link, whereas a channel loop interrupts only the user traffic on the selected channel.
3-4
DV-MUX3 Installation and Operation Manual
OPERATING INSTRUCTIONS
When the loop is no longer required, release the depressed push-button by pressing
it again. The TEST indicator turns off.
Refer to Chapter 4 for a description of the test loops.
BERT Activation
To activate the BERT test, set the SELECT switch to the DATA position, and then
press the PATT push-button. The TEST indicator turns on, the TD indicator must
light, and the RD/ERR indicator lights if errors are detected (ideally, the RD/ERR
indicator should remain off during the test).
1. The BERT test can be activated only on the data channel.
Pressing the PATT push-button when the SELECT switch is
set to LINK has no effect.
NOTES
2. In order to obtain meaningful results from the BERT test,
the local DV-MUX3 must receive, on the tested channel, a test
pattern similar to the transmitted pattern. This can be achieved
either by connecting a remote loop on the same channel, or by
simultaneously activating the BERT test at the remote DVMUX3 (provided the link is operating properly). Otherwise,
the DV-MUX3 will not receive the test sequence and will indicate errors.
The BERT test continues as long as the PATT push-button remains depressed.
Note that the activation of the BERT test interrupts the service to the users of the
selected channel.
When the test can be stopped, release the depressed push-button by pressing it
again. The TEST indicator turns off.
Refer to Chapter 4 for a description of the BERT test.
Tone Injection
To activate tone injection, set the SELECT switch to the VOICE position, and then
press the PATT push-button. The TEST indicator turns on.
The remote side should hear a 1000-Hz tone at the nominal channel level (0 dBm).
The RD/ERR and TD indicators continue operating as usual.
NOTES
1. The echo canceler used on the voice channels cannot perform
its function when the same tone is simultaneously transmitted and
received. Therefore, do not try to activate tone injection together
with a remote loopback, nor activate simultaneously tone injection at bosh the local and the remote DV-MUX3.
2. Tone injection is simultaneously activated on both voice
channels, therefore it interrupts the service to the users of the
two channels.
Tone injection continues as long as the PATT push-button remains depressed.
Note that tone injection interrupts the service to the users of the voice channels.
DV-MUX3 Installation and Operation Manual
3-5
CHAPTER 3 - OPERATING INSTRUCTIONS
When tone injection can be stopped, release the depressed push-button by pressing
it again. The TEST indicator turns off.
Refer to Chapter 4 for a description of the tone injection.
Turn-off
3-6
Disconnect the power cable from the mains outlet, and then from the DV-MUX3
rear power connector.
DV-MUX3 Installation and Operation Manual
CHAPTER 4.
DIAGNOSTICS
Contents
General . . . . . . . . . . . . . . . . . . . . . . . . . . . . . . . .
Description of Diagnostic Functions . . . . . . . . . . . . . . . . . .
Troubleshooting Instructions . . . . . . . . . . . . . . . . . . . . .
Page
4-1
4-2
4-5
4-1. GENERAL
Three types of diagnostic functions are available:
•
Remote loopback.
•
BERT testing (available only on the data channel).
•
Tone injection (available only on the voice channels).
The BERT, tone injection, and remote loop are initiated from the front panel PATT
and RLB push-buttons, respectively, on the channel selected by means of the SELECT switch. The operating procedures are explained in para. 3-3. For a functional
description of the test functions available on each channel, refer to para. 4-2.
The activation of the tests can be disabled by an internal switch, located on the DVMUX3 main board (figure 2-2). If troubleshooting is required and the DV-MUX3
does not respond to the PATT and RLB push-buttons, first check the position of the
switch.
When performing tests, observe the following guidelines and restrictions:
•
Activation of a channel test or loop interrupts the service to the users served
by the DV-MUX3 channel under test.
•
Activation of the main link loop interrupts the service to all the users served
by the DV-MUX3 link.
•
On any channel, only one DV-MUX3 can activate a remote loopback. If the
remote loopback has already been activated by the other DV-MUX3, the
TEST indicator starts flashing (indication of configuration error).
DV-MUX3 Installation and Operation Manual
4-1
CHAPTER 4 - DIAGNOSTICS
4-2. DESCRIPTION OF DIAGNOSTIC FUNCTIONS
General
A test or loop is activated on the channel selected by the SELECT switch by depressing the corresponding DV-MUX3 front-panel push-button. As long as any
test or loop is activated, the TEST indicator lights.
To deactivate the test or loop, press the same push-button again. If this was the only
active test or loop, the TEST indicator will turn off.
The commands for the activation/deactivation of remote loops is transmitted end-toend through the main link. Therefore, when a remote loop is activated, the DV-MUX3
TEST indicators light at both ends of the link.
BERT Test
The BERT test is available only on the data channel. This test is used to obtain a rapid
qualitative evaluation of data transmission without using external test equipment.
When the test is activated, a test signal is applied to the selected channel of the DVMUX3. The test signal, an internally-generated 29 - 1 (511) bit pseudo-random sequence, is internally connected to the input of the tested channel transmit path. The
transmitted data can either be returned to the receive path of the channel by means
of a loop somewhere along the data path (e.g., by connecting the remote channel
loop, or by a physical loopback connection), or a similar sequence can be transmitted from the other end of the data channel (either by simultaneously activating the
BERT test at the remote DV-MUX3 or by connecting a test pattern generator).
The received signal is routed to an internal test sequence evaluator. The evaluator
compares the received data, bit by bit, to the original data and detects any difference (bit error). Each detected error is indicated by flashing the RD/ERR indicator.
While the BERT test is activated, the CD and CTS lines in the local data channel
connector are set low (inactive).
Tone Injection
The test tone (1000 Hz, 0 dBm) is a digital sequence repeating at a rate of 1000 Hz
generated by the digital voice processor and sent to the remote side. The sequence
is identical to the data stream that would have been generated if a 1000 Hz signal
at a nominal level of 0 dBm were applied to the input of the voice channel being
tested. Therefore, the remote user can hear the tone in the telephone earpiece, and
can also make measurements using test equipment.
When the DV-MUX3 is equipped with a voice module with two channels, the tone
is simultaneously sent on both channels.
Since the tone is sent in only one direction (toward the remote DV-MUX3), the
other direction operates as usual.
The tone canceler suppresses the tone on the receive side of the local voice channel,
therefore any attempt to activate tone injection at both ends of the link, or to use a
remote loopback while the tone is sent, will not allow you to hear the tone.
4-2
DV-MUX3 Installation and Operation Manual
DESCRIPTION OF DIAGNOSTIC FUNCTIONS
Remote Data
Channel Loopback
During a remote data channel loop, the local channel transmit data is multiplexed
by the local DV-MUX3 and sent to the remote DV-MUX3.
At the remote DV-MUX3, the data channel is demultiplexed, the receive data is
looped back to the transmit path of the remote data channel, and then returned
through the link to the local data channel as received data.
While the loop is activated, the CD and CTS lines in the remote data channel interfaces are set low (inactive).
Figure 4-1 shows the loop connections. As long as the loop is activated and the link
connecting the two DV-MUX3 units operates properly (i.e., both the local and remote SYNC LOSS indicators remain off), the data equipment connected to the local DV-MUX3 must receive its own signals without errors, and the local RD indicator must light when the local TD indicator lights.
Figure 4-1. Data Channel, Remote Loopback
Remote Voice
Channel Loopback
The voice channel remote loopback is similar to the data channel loopback. While
the loopback is connected, the subscriber connected to the local DV-MUX3 must
receive his/her own voice clearly and loudly.
During the voice channel remote loopback, the voice channel will be disconnected
on the remote side.
Remote Main Link
Loopback
During the remote main link loopback, both the voice and data transmit data are
looped back by the remote DV-MUX3 to the receive side of the local DV-MUX3,
demultiplexed and applied to the two channels as received data.
Figure 4-2 shows the loop connections.
The indications and the response of the data channel user’s data equipment are the
same as for the data channel loopback, and that of the voice channel, the same as
for the voice channel remote loopback.
DV-MUX3 Installation and Operation Manual
4-3
CHAPTER 4 - DIAGNOSTICS
Figure 4-2. Main Link Remote Loopback
4-4
DV-MUX3 Installation and Operation Manual
TROUBLESHOOTING INSTRUCTIONS
4-3. TROUBLESHOOTING INSTRUCTIONS
In case a problem occurs, refer to Table 4-1, identify the closest description of the
trouble symptoms and perform the actions listed under “Corrective Measures” in
the order given, until the problem is corrected.
Whenever the problem appears upon first-time operation of a new link, or just after
the configuration of an existing link has been changed, before starting the troubleshooting check again all the internal settings of the local and remote DV-MUX3
units against the prescribed parameters.
Table 4-1. Troubleshooting Chart
No.
1
Symptoms
PWR
off
Probable Cause
Corrective Measures
1. No AC power
Check that both ends of the AC power cable are
properly connected, and that power is available
at the mains outlet to which the DV-MUX3 is
connected.
2. Blown fuse
Replace with fuse of proper rating
3. Defective DV-MUX3
Replace the DV-MUX3
2
TEST
SYNC LOSS
TD, RD/ERR
flashes
lights
lights
Local DV-MUX3 failed
self-test
Check whether the voice channels module is
installed.
Replace the local DV-MUX3
3
TEST
SYNC LOSS
TD, RD/ERR
flashes
lights
off
Local DV-MUX3 does
not receive valid clock
signals from the data
communication
equipment connected to
its main link connector
Check that the connection cable between the
local DV-MUX3 and the data communication
equipment connected to its main link connector
is in order.
Check that the data communication equipment is
configured to operate as a DCE and that it
supplies transmit and receive clock signals at the
correct rate to the DV-MUX3
4
TEST
SYNC LOSS
off
lights
1. Problem in the data
transmission facility
Perform troubleshooting of the data transmission
facility that connects the two DV-MUX3
2. Problem at local
DV-MUX3
Activate the local loopback on the DCE
equipment connected to the main link.
If the SYNC LOSS indicator continues to light,
replace the local DV-MUX3
3. Problem at the
remote DV-MUX3
Repeat the procedure given for probable causes
above on the remote DV-MUX3
DV-MUX3 Installation and Operation Manual
4-5
CHAPTER 4 - DIAGNOSTICS
Table 4-1. Troubleshooting Chart (Cont’d)
No.
Symptoms
5
TEST
SYNC LOSS
6
7
8
4-6
flashes
off
Probable Cause
Corrective Measures
Configuration error
Check for the following possible errors, and
correct if necessary:
– Both the local and remote DV-MUX3 are
configured as slave units.
– Both are configured as master units, and the
parameters are different.
– Both are configured as master units, and the
MODE jumper settings are different.
– Both are in remote loopback in the same
channel
SYNC LOSS lights
intermittently
Receive clock and
transmit clock are not
from the same source
If the modem on one side is set to transmit
timing, the modem on the other side must be set
to loopback timing.
TEST
off
SYNC LOSS off
The local voice channel
voice user cannot hear,
and/or cannot setup
calls.
Local data channel
operates normally
1. Incorrect selection of
voice channel interface,
or problem in the
channel connection
cables
Check that the proper interface is used: an FXO
interface must be connected to a PABX, an FXS
interface must be connected to a telephone set,
and an E&M interface must be connected to the
E&M interface of the PABX.
Check the connection cables.
2. Problem at local
DV-MUX3
Activate tone injection at the remote DV-MUX3,
and check that the test tone is heard.
Deactivate tone injection, activate the voice
channel loop, and check that a strong sidetone is
heard in the telephone set earpiece. If not,
replace the local DV-MUX3 (fault on main board,
or on interface board, is suspected)
3. Problem at remote
DV-MUX3
Repeat the procedure given above for the
remote DV-MUX3.
1. Problem on the
cables, or on the line
between the DTE and
DV-MUX3
Activate the data channel loopback and BERT
test.
If the RD/ERR indicator of the local DV-MUX3
does not light (no errors), check the cables and
the line between the DV-MUX3 and the DTE.
2. Problem at Local
DV-MUX3
If the RD/ERR indicator of the local DV-MUX3
lights during the above test, replace the local
DV-MUX3
3. Problem at the
remote DV-MUX3
Repeat the procedure given above for the
remote DV-MUX3
TEST
off
SYNC LOSS off
The local data channel
user does not receive
data.
Voice channel operates
normally
DV-MUX3 Installation and Operation Manual
APPENDIX A.
CONNECTION DATA
Contents
Scope . . . . . . . . . . . . . . . . .
Main Link and Data Channel Interfaces
Voice Channel Interface . . . . . . . .
DC Power Connector . . . . . . . . .
Page
.
.
.
.
.
.
.
.
.
.
.
.
.
.
.
.
.
.
.
.
.
.
.
.
.
.
.
.
.
.
.
.
.
.
.
.
.
.
.
.
.
.
.
.
.
.
.
.
.
.
.
.
.
.
.
.
.
.
.
.
.
.
.
.
A-1
A-2
A-7
A-8
A-1. SCOPE
This Appendix provides information on the type and pin allocation of the various DV-MUX3 interface connectors.
In addition, the Appendix provides information on adapter cables. Note that the cables offered by RAD for use
with the main link and data channels are identical, despite some slight differences in the pin functions.
In the direction field, the following conventions are used:
IN
- input to DV-MUX3
OUT - output from DV-MUX3
N.C. - Not used
DV-MUX3 Installation and Operation Manual
A-1
APPENDIX A - CONNECTION DATA
A-2. MAIN LINK AND DATA CHANNEL INTERFACES
Interface Connectors
The main link and data channel interface connectors are 15-pin D-type female
connectors.
The following tables also present the direction of the signals
in the main link and the data channel connectors.
NOTE
X.21 Pin Allocations
When the selected interface is X.21, the connector is wired in accordance with
ITU-T Rec. X.21. Connector pin allocations are listed in Table A-1.
Table A-1. Main Link Interface Connector, X.21 Interface
A-2
DB-15
Interface
Connector Pin
Direction
LINK
DATA
1
–
–
Frame ground (shield)
2
OUT
IN
TX data - A wire
3
OUT
N.C
RTS - A wire (main link only)
4
IN
OUT
RX data - A wire
5
N.C
OUT
Carrier detect - A wire (data channel
only)
6
IN
OUT
Signal timing - A wire
7
–
–
Not connected
8
–
–
Signal ground
9
OUT
IN
TX data - B wire
10
OUT
N.C
RTS - B wire (main link only)
11
IN
OUT
RX data - B wire
12
N.C
OUT
Carrier detect - B wire (data channel
only)
13
IN
OUT
Signal timing - B wire
14
–
–
Not connected
15
–
–
Not connected
Function
DV-MUX3 Installation and Operation Manual
MAIN LINK AND DATA CHANNEL INTERFACES
V36/RS-449
Interface Adapter
Cable
The V.36/RS-449 interface adapter cable, CBL-KM-22/449, is terminated on the
user’s side in a 37-pin D-type female connector, wired as listed in Table A-2.
Table A-2. V.36/RS-449 Interface Adapter Cable
DB-15
Interface
Connector
Pin
DB-37
Connector
Pin (User’s
Side)
Designation
1
1
2
Direction
Function
LINK
DATA
Shield
–
–
Frame ground (shield)
4
SD(A)
OUT
IN
TX data - A wire
3
7
RS(A)
OUT
N.C
Request to send - A wire
(main link only)
4
6
RD(A)
IN
OUT
RX data - A wire
5
13
RR(A)
N.C
OUT
Carrier detect - A wire (data channel
only)
6
5
ST(A)
IN
OUT
Transmit clock - A wire
7
8
RT(A)
IN
OUT
Receive clock - A wire
8
19
–
–
–
Signal ground
9
22
SD(B)
OUT
IN
TX data - B wire
10
25
RS(B)
OUT
N.C
Request to send - B wire
(main link only)
11
24
RD(B)
IN
OUT
RX data - B wire
12
31
RR(B)
N.C
OUT
Carrier detect - B wire (data channel
only)
13
23
ST(B)
IN
OUT
Transmit clock - B wire
14
26
RT(B)
IN
OUT
Receive clock - B wire
15
–
–
–
–
DV-MUX3 Installation and Operation Manual
Not connected
A-3
APPENDIX A - CONNECTION DATA
RS-530 Interface
Adapter Cable
The RS-530 interface adapter cable, CBL-KM-22/530, is terminated on the user
side in a 25-pin D-type female connector, wired as listed in Table A-3.
Table A-3. RS-530 Interface Adapter Cable
DB-15
Interface
Connector
Pin
DB-25
Connector
Pin (User’s
Side)
Designation
1
1
2
A-4
Direction
Function
LINK
DATA
AA
–
–
Frame ground (shield)
2
BA(A)
OUT
IN
TX data - A wire
3
4
CA(A)
OUT
N.C
Request to send - A wire
(main link only)
4
3
BB(A)
IN
OUT
RX data - A wire
5
8
CF(A)
N.C
OUT
Carrier detect - A wire (data channel
only)
6
15
DB(A)
IN
OUT
Transmit clock - A wire
7
17
DD(A)
IN
OUT
Receive clock - A wire
8
7
AB
–
–
Signal ground
9
14
BA(B)
OUT
IN
TX data - B wire
10
19
CA(B)
OUT
N.C
Request to send - B wire
(main link only)
11
16
BB(B)
IN
OUT
RX data - B wire
12
10
CF(B)
N.C
OUT
Carrier detect - B wire (data channel
only)
13
12
DB(B)
IN
OUT
Transmit clock - B wire
14
9
DD(B)
IN
OUT
Receive clock - B wire
15
–
–
–
–
Not connected
DV-MUX3 Installation and Operation Manual
MAIN LINK AND DATA CHANNEL INTERFACES
V.35 Interface
Adapter Cable
The V.35 interface adapter cable, CBL-DV-MUX/V.35, is terminated on the
user side in a 34-pin female connector, wired as listed in Table A-4.
Table A-4. V.35 Interface Adapter Cable
DB-15
Interface
Connector
Pin
DB-34
Connector
Pin (User’s
Side)
ITU-T Rec. V.35
Circuit
LINK
DATA
1
A
101
–
–
Frame ground (shield)
2
P
103
OUT
IN
TX data - A wire
3
C
105
OUT
N.C
Request to send (main link only)
4
R
104
IN
OUT
RX data - A wire
5
F
109
N.C
OUT
Carrier detect (data
channel only)
6
Y
114
IN
OUT
Transmit clock - A wire
7
V
115
IN
OUT
Receive clock - A wire
8
B
102
–
–
Signal ground
9
S
103
OUT
IN
TX data - B wire
10
H
108.1
OUT
IN
Data terminal ready
11
T
104
IN
OUT
12
J
125
IN
–
13
AA
114
IN
OUT
Transmit clock - B wire
14
X
115
IN
OUT
Receive clock - B wire
15
D
106
N.C
OUT
Clear to send (data channel only)
Direction
DV-MUX3 Installation and Operation Manual
Function
RX data - B wire
Ring indicator
A-5
APPENDIX A - CONNECTION DATA
V.24/RS-232
Interface Adapter
Cable
The V.24/RS-232 interface adapter cable, CBL-DV-MUX/232/N, is terminated on the user side in a 25-pin D-type female connector, wired as listed in
Table A-5.
Table A-5. V.24 Interface Adapter Cable
15-Pin
Connector
25-Pin
Connector
Line
Designation
112
1
1
103
2
105
V.24
A-6
Direction
Function
LINK
DATA
CHAS
–
–
Frame ground (shield)
2
TD
OUT
IN
TX data
3
4
RTS
OUT
IN
Request to send
104
4
3
RD
IN
OUT
RX data
109
5
8
CD
N.C
OUT
Carrier detect
114
6
15
TC
IN
OUT
Transmit clock
115
7
17
RC
IN
OUT
Receive clock
102
8
7
SG
–
–
Signal ground
–
11, 13, 14
–
–
–
–
Not used
108.1
10
20
DTR
OUT
IN
Data terminal ready
125
12
22
RI
IN
–
Ring indicator
106
15
5
CTS
N.C
OUT
Clear to send
107
9
6
DSR
IN
OUT
Data set ready
DV-MUX3 Installation and Operation Manual
VOICE CHANNEL INTERFACE
A-3. VOICE CHANNEL INTERFACE
The voice channel interface has 8-pin RJ-45 connectors, wired as listed in Tables A-6 and A-7.
Table A-6. FXO and FXS Voice Channel Interfaces, Connector Wiring
Pin
Designation
Function
1, 2, 3
–
4
RING
2W voice input/output
5
TIP
2W voice input/output
6, 7, 8
–
Not connected
Not connected
Table A-7. E&M Voice Channel Interface, Connector Wiring
Pin
Designation
1
SB
Signaling battery
2
M
M lead input
3
R1-OUT
4
R-IN
4-wire voice input
5
T-IN
4-wire voice input
6
T1-OUT
7
SG
8
E
DV-MUX3 Installation and Operation Manual
Function
4-wire voice output
2-wire input/output
4-wire voice output
2-wire input/output
Function depends on signaling mode:
RS-464 Type I, III
Direct connection to signal
ground
RS-464 Type V, SSDC5 Connection to signal ground
through 1.1 kΩ resistor
RS-464 Type II
SG lead
E lead output
A-7
APPENDIX A - CONNECTION DATA
A-4. DC POWER CONNECTOR
The DC power connector is a three-pin circular connector, wired in accordance
with Table A-8. Pin locations are also identified.
Table A-8. DC Power Connector Wiring
Pin
A-8
Function
1
Ground
2
Not connected
3
Negative supply line (-48 VDC)
DV-MUX3 Installation and Operation Manual
APPENDIX B.
DV-MUX3 WITH MIX OPTION
Contents
General . . . . . . . . . . . . . . . . . . . . . . . . . . . . . . . .
Interchange of Interface Boards . . . . . . . . . . . . . . . . . . . .
Page
B-1
B-2
B-1. GENERAL
Among other configurations, DV-MUX3 units can be operated in back-to-back
configurations (figure B-1). For such applications, each DV-MUX3 must include
one FXO interface and one FXS interface (this configuration is ordered under the
MIX option). DV-MUX3 units with the MIX option are delivered with the FXO interface installed on channel 1, and with the FXS interface installed on channel 2.
Therefore, it may be necessary to interchange the interface boards in one of the two
DV-MUX3 units connected in the link.
Figure B-1. Typical Application for DV-MUX3 with MIX Option
DV-MUX3 Installation and Operation Manual
B-1
APPENDIX B - DV-MUX WITH MIX OPTION
B-2. INTERCHANGE OF INTERFACE BOARDS
WARNING
Interface Board
Interchange
•
•
•
•
•
Before carrying out the following procedure, read carefully the
WARNING and CAUTION appearing on page 2-3 of this
manual.
Open DV-MUX3 case in accordance with the instructions appearing in the
Opening DV-MUX3 Case section in para. 2-4.
Refer to figure B-2 and identify the interface boards.
Release the screws fastening the two boards.
Remove the boards and interchange their positions.
Close DV-MUX3 case in accordance with the instructions appearing in the
Opening DV-MUX3 Case section in para. 2-4.
Figure B-2. Board Identification
B-2
DV-MUX3 Installation and Operation Manual
APPENDIX C.
RACK INSTALLATION
Contents
Page
General . . . . . . . . . . . . . . . . . . . . . . . . . . . . . . . .
Installation of Single DV-MUX3 Unit . . . . . . . . . . . . . . . . . .
Installation of Two DV-MUX3 Units . . . . . . . . . . . . . . . . . .
C-1
C-2
C-3
C-1. GENERAL
The DV-MUX3 can be installed in 19" racks. Unit height corresponds to 1U
(1.75"), and the width is slightly less than half of the available mounting width.
Two rack adapter kits are available; one kit provides the hardware necessary for installation of a single unit, and the other provides the hardware necessary for installation of two units, side by side.
This Appendix provides step-by-step installation instructions for each option.
WARNING
DV-MUX3 Installation and Operation Manual
Disconnect all the cables from the units, and then disconnect the units from power while performing the following
procedures.
Always observe standard safety precautions during installation, operation, and maintenance of this product.
No internal settings, adjustment, maintenance, and repairs
may be performed by either the operator or the user; such
activities may be performed only by a skilled technician
who is aware of the hazards involved.
C-1
APPENDIX C - RACK INSTALLATION
C-2. INSTALLATION OF SINGLE DV-MUX3 UNIT
The rack adapter kit includes one short bracket and one long bracket. The brackets are
fastened by means of screws to the two side walls of the case, as shown in figure C-1.
Figure C-1. Installation of Single DV-MUX3 Unit in 19" Rack
To prepare the unit for rack installation:
C-2
•
Attach the two brackets to the side walls of the unit. Each bracket is fastened
by means of two screws (with flat washers), which are inserted into the two
front holes on the side wall (nuts are already in place, on the inner side of the
wall).
•
After attaching the brackets, the unit is ready for installation in the 19" rack.
To install in the rack, fasten the brackets to the side rails of the 19" rack by
means of four screws (not included in the kit), two each side.
DV-MUX3 Installation and Operation Manual
INSTALLATION OF TWO DV-MUX3 UNITS
C-3. INSTALLATION OF TWO DV-MUX3 UNITS
General
The rack adapter kit includes two rails for attaching the two units side by side, two
short adapter brackets, and various hardware.
Preparations
Refer to figure C-2 and prepare the two DV-MUX3 units for attachment as fol-
lows:
DV-MUX3 Installation and Operation Manual
C-3
APPENDIX C - RACK INSTALLATION
Figure C-2. Preparation of Two DV-MUX3 Units for Installation in 19" Rack
•
•
•
•
•
Fastening the Two
Units
Fasten one short adapter bracket to the left-hand side wall of the unit intended
to be on the left. Use two of the four longer screws supplied in the kit, and insert flat washers.
Use the same procedure to fasten the second short adapter to the right-hand
wall of the unit intended to be on the right.
Position one of the two rails supplied in the kit on the right-hand wall of the
unit intended to be on the left, and align its holes with the holes on the wall.
Insert four short Philips screws and screw them through the rail into the holes
on the unit wall.
Use the same procedure to attach the second rail to the left-hand wall of the
unit intended to on the right. Make sure the wider rim of this rail is opposite
the short rim of the other rail, as shown in figure C-2.
Refer to figure C-3 and attach the two units as follows:
•
Position the ends of the rails attached to the two units so that the rails can slide
one into the other, and then slide the units to bring the panels in line.
•
Now insert plastic I-shaped caps between the two units, to cover the empty
spaces left at the ends of the two rails.
Figure C-3. Attachment of Two DV-MUX3 Units Before Installation in 19" Rack
The assembled units can now be fastened to the side rails of the 19" rack by means
of four screws (not included in the kit), two on each side.
C-4
DV-MUX3 Installation and Operation Manual
24 Raoul Wallenberg St., Tel Aviv 69719, Israel
Tel: +972-3-6458181, Fax: +972-3-6483331, +972-3-6498250
E-mail: [email protected], Web site: http://www.rad.com
Customer Response Form
RAD Data Communications would like your help in improving its product documentation.
Please complete and return this form by mail or by fax or send us an e-mail with your
comments.
Thank you for your assistance!
Manual Name: ______________________________________________________________
Publication Number: __________________________________________________________
Please grade the manual according to the following factors:
Installation instructions
Operating instructions
Manual organization
Illustrations
The manual as a whole
Excellent
Good
Fair
Poor
Very Poor
❒
❒
❒
❒
❒
❒
❒
❒
❒
❒
❒
❒
❒
❒
❒
❒
❒
❒
❒
❒
❒
❒
❒
❒
❒
What did you like about the manual?
___________________________________________________________________________
___________________________________________________________________________
___________________________________________________________________________
___________________________________________________________________________
___________________________________________________________________________
1
Error Report
Type of Error(s)
❒
Incompatibility with product
or Problem(s):
❒
Difficulty in understanding text
❒
Regulatory information (Safety, Compliance, Warnings, etc.)
❒
Difficulty in finding needed information
❒
Missing information
❒
Illogical flow of information
❒
Style (spelling, grammar, references, etc.)
❒
Appearance
❒
Other _________
Please list the exact page numbers with the error(s), detail the errors you found (information missing,
unclear or inadequately explained, etc.) and attach the page to your fax, if necessary.
_________________________________________________________________________________________
_________________________________________________________________________________________
_________________________________________________________________________________________
_________________________________________________________________________________________
Please add any comments or suggestions you may have.
_________________________________________________________________________________________
_________________________________________________________________________________________
_________________________________________________________________________________________
You are:
❒
Distributor
❒
End user
❒
VAR
❒
Other ________________________
Who is your distributor?
_______________________________
Your name and company: ___________________________________________________________
Job title: __________________________________________________________________________
Address: __________________________________________________________________________
Direct telephone number and extension: _______________________________________________
Fax number: ______________________________________________________________________
E-mail: _____________________________________________________________________
2