1
Acer Iconia W701
Student support guide
1
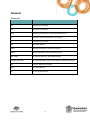
General
Acronyms
Acronym
Definition
CFT
Computers for Teachers
CFS
Computers for Students
DETE
Department of Education, Training and Employment
ICT
Information and Communications Technology
ISP
Internet Service Provider
LAN
Local Area Network
MOE4
Managed Operating Environment Version 4
NSSCF
National Secondary Schools Computer Fund
OBE / BMR
Out of Box Experience / Bare Metal Restore
Q4 Build / Q4 Image
The default operating system and software installed from factory
SEP
Symantec Endpoint Protection
WAN
Wide Area Network
ZTP
Zero Touch Provisioning
2
Table of Contents
General .............................................................................................................................................. 2
Acronyms ................................................................................................................................................... 2
Acer Iconia W701................................................................................................................................ 5
Q4 device facts ................................................................................................................................... 5
Device specifications ................................................................................................................................. 6
Device care ......................................................................................................................................... 7
General Precautions: ................................................................................................................................. 7
Carrying the Device:................................................................................................................................... 7
Screen Care: ............................................................................................................................................... 7
Take care of yourself........................................................................................................................... 8
Students are advised to: ............................................................................................................................ 8
Ergonomic Posture: ................................................................................................................................... 8
Prevent Eye Strain: .................................................................................................................................... 8
Device battery charging ...................................................................................................................... 8
Data security ...................................................................................................................................... 9
Windows Hot keys .............................................................................................................................. 9
Acer Iconia W701 Bluetooth Keyboard Hotkeys ..................................................................................... 10
Acer W701 LED indicators ....................................................................................................................... 10
Use and Features .............................................................................................................................. 12
Logging on................................................................................................................................................ 12
Unable to log on ...................................................................................................................................... 13
Connecting the Bluetooth Keyboard. ...................................................................................................... 13
Check the network connection ................................................................................................................ 16
How to connect the Q4 device to the DETE 3G network......................................................................... 17
3G Network ...................................................................................................................................
3
School wireless network .......................................................................................................................... 20
Home Network ........................................................................................................................................ 23
Software .......................................................................................................................................... 27
Power management ................................................................................................................................ 27
Virus protection ....................................................................................................................................... 31
Antivirus ................................................................................................................................................... 31
Home printer ........................................................................................................................................... 35
Computrace ............................................................................................................................................. 37
Web content filtering .............................................................................................................................. 38
Mobile and desktop devices .................................................................................................................... 40
Data redirection ....................................................................................................................................... 40
Vendor service support ..................................................................................................................... 41
Windows backup ..................................................................................................................................... 42
4
Acer Iconia W701
Q4 device facts
Below is a table of listing important facts pertaining to Q4 devices.
Q4 device
Students can be given elevated rights to the Q4 device if a parent gives permission via the
NSSCF Device Charter. By default students will have the same administration access to the Q4
devices as they would any other school equipment.
Students, while not at school, are permitted a less restrictive level of web filtering if authorised
by a parent or caregivers. If not permitted, students receive a similar level of filtering as they
would at school. Filtering is received via the web filtering client
Computrace is used to track and trace lost or stolen devices.
Symantec Endpoint Protection is used to protect the device from viruses and malware
Warranty and support calls are lodged directly to the vendor by a parent, guardian or school
staff member
3G connectivity for Q4 device is supplied by the NSSCF project with a minimum of 2.5GB
(gigabytes) of data per month until December 2015 managed via OAMPS.
5
Theft and loss of a Q4 device, that cannot be recovered, will incur a fee charged to the parent
or caregivers. For the first case a $200 fee is charged, with the full cost of replacing the device
charged each subsequent claim
Accidental Damage, non-warranty or device replacement cost will be recuperated from the
school by the NSSCF Team. Schools may wish to recoup these costs from parents but this is a
school managed process.
Q4 devices remain the property of Education Queensland
Device specifications
Brand
Acer
Model
Iconia W701
Processor
Intel Core i3-33217U (3 MB L3 cache @ 1.80ghz)
Memory
4GB DDR3 on board system memory
Storage
120GB Solid State Hard Drive
Display
11.6’ LED backlit LCD
Networking and Communications
Wireless: 802.11 a/b/g/n, Bluetooth 4.0
Ports and Interfaces
1xUSB 3.0, 1xMicro HDMI port
Battery
Integrated Li-polymer battery
6
Device care
Students are responsible for the care of their device. To ensure reliable device function, certain basic
rules must be followed. Students are responsible for the care of their device.
General Precautions:
•
No food or drink is allowed next to your device while it is in use.
•
Drinks or other liquids are not to be carried in the same bag as your device.
•
Never remove plugs or cords by tugging at the cable. Cords, cables and other devices are to be
inserted and removed carefully.
•
Students must not carry the device with the screen open – unless directed by a teacher.
•
Ensure the battery is fully charged each day.
Carrying the Device:
•
Screens must be closed prior to transporting the device.
•
Devices should always be carried within their protective sleeve.
•
Carry the minimum amount of paperwork in the same carry bag as the device to prevent pressure
on the screen.
•
Students must not carry drinks or other liquids in the same bag as the device.
Screen Care:
•
The screen can be damaged through pressure.
•
Do not poke at the screen.
•
Do not lean on the device when it is closed.
•
Do not place anything on the keyboard before closing the lid.
•
Do not place anything in the carry case that could press against the cover.
•
Clean the screen with a soft dry cloth or anti-static cloth.
7
Take care of yourself
To ensure a safe and comfortable working environment, students should consider the following points
both whilst at school and at home.
Students are advised to:
•
Take regular rest breaks.
•
Not use their device for more than 2 hours in one session.
•
Ensure there is no glare on their screen.
•
Angle the screen to ensure an ideal viewing angle.
•
Consider the ergonomics of their work area.
Ergonomic Posture:
•
Use the device on a desk.
•
Use chairs that promote good posture.
•
Try to maintain a neutral seating position where there is an angle of 90º for ankles, knees, hips and
elbows and hands in alignment with wrists.
•
Take breaks to stretch and relax tensed muscles.
Prevent Eye Strain:
•
Ensure there is no glare or reflection on the screen.
•
Ensure there is adequate lighting.
•
Position the screen for comfortable viewing.
•
Adjust screen colours and brightness to prevent eye strain.
•
Increase font sizes if having difficulty reading.
•
Relax your eyes by focussing on a distant object for a few seconds.
Further information on correct posture and device use can be found at:
http://education.qld.gov.au/health/pdfs/healthsafety/laptopuse.pdf
Device battery charging
It is the student’s responsibility to make sure their device has adequate charge before taking it to
school. Completely charging a device will ensure the battery lasts all day. Battery life can be
enhanced by managed use and recharging patterns that allow the battery to fully discharge before
8
recharging, rather than sitting on constant charge.
Data security
It is the responsibility of the student to backup all personal data. Ideally all personal data and files
should be stored on a network drive at school or on a personal USB drive.
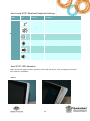
Windows Hot keys
Hotkey
Icon
Function
Decription
<
> + <F3>
Search
Ability to search the device.
<
> +<I>
Settings charm
Opens the settings charm.
<
> +<K>
Devices charm
Opens the devices charm.
<
> +<O>
Lock screen orientation
Ability to lock the device screen orientation (portrait or landscape).
<
> +<Z>
Commands within app
Shows the commands available within an application.
Display toggle
Switches display output between the display screen, external
monitor (if connected) and both.
<FN> + <E>
For further hotkeys please visit: http://windows.microsoft.com/en-AU/windows-8/newkeyboardhttp://windows.microsoft.com/en-AU/windows-8/new-keyboard-shortcuts 1TC=t1shortcuts#1TC=t1
9
Acer Iconia W701 Bluetooth Keyboard Hotkeys
Hotkey
Icon
Function
Decription
<FN> + <W>
Sleep
Puts the computer in Sleep mode.
<FN> + <Y>
Speaker toggle
Turns the speakers on and off.
<FN> + <►>
Brightness up
Increases the screen brightness.
<FN> + <◄>
Brightness down
Decreases the screen brightness.
<FN> + <▲>
Volume up
Increases the sound volume.
<FN> + <▼>
Volume down
Decreases the sound volume.
Acer W701 LED indicators
LED’s are used to signify a status, operation or issue with the device. They are designed to function
as a warning or notification.
Device
10
LED Colour
State
Decription
Blue
Steady
The computer is fully charged and plugged in.
On
briefly
The computer is fully charged and running on battery
power. After pressing the power button, the blue LED
stays lit for a few seconds before turning off.
Amber
Steady
The computer is charging and plugged in.
Amber
On
briefly
The computer is not fully charged and running on
battery power. After pressing the power button, the
amber LED stays lit for a few seconds before turning
off.
Amber
Blinking
The battery is critically low or abnormal battery
situation.
Off
N/A
The computer is off.
Blue
Keyboard
LED Colour
Blue Battery
LED
Amber
Battery LED
Amber
Battery LED
State
Decription
Steady
The Keyboard is plugged in and fully charged
Steady
The keyboard is plugged in and charging
Blinking
slowly
The keyboard is not plugged in and the battery is low
11
Amber
Battery LED
Blue
Function
LED
Blue
Function
LED
Blinking
quickly
The keyboard is not plugged in and the battery is
critically low or there is an abnormal state
Steady
The LED turns solid blue for five seconds after
turning the keyboard on
Blinking
The LED blinks after turning the keyboard off
Blue and Amber LED blinking – The keyboard is in pairing mode
Use and Features
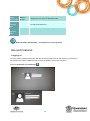
Logging on
You may need to prefix the username with the relevant domain name for the student. For example, if
the school is a member of WBB you may need to put WBB\ in front of the username.
Enter the Username and Password >
12
Unable to log on
If you are unable to login to the Q4 device ensure ‘Caps Lock’ are
not activated
Connecting the Bluetooth Keyboard.
The Bluetooth Keyboard will be paired to the device prior to delivery and once paired can be turned on
and off without needing to be paired each time. Only if the device is rebuilt may there be a need to
pair the keyboard to the device again.
Do not attempt this process if you are in close proximity (less than 10 metres) of another device that is
also pairing the keyboard. If you do so, you may inadvertently connect the keyboard from another
device.
Step
Action
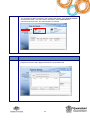
1.
Settings charm > Change PC settings
13
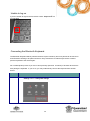
2.
Select Devices from the left menu to display the Add a Device option. Do Not
Click “Add a Device” at this point
Step
Action
3.
If the Acer Iconia W701 Bluetooth Keyboard option is already visible tap the
minus sign to the right to remove the device (it may take a moment for the
keyboard to be removed from the device list.)]
14
4.
Press and hold the Power button until both the battery and the function LEDs
on the keyboard blink repeatedly. Release the Power button. The keyboard is
now in pairing mode (The keyboard stays in pairing mode for three minutes).
Note: If the LEDs do not turn on please ensure the keyboard is fully charged before
attempting to pair again.
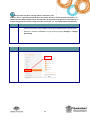
5.
Select the Acer Iconia W701 Bluetooth Keyboard once it has been recognised
by the device
15
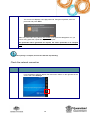
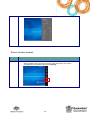
6.
The screen now displays a six-digit passcode. Using the keyboard, enter the
passcode and press Enter
Note: The passcode is only valid for one minute. If the passcode disappears or if you
enter a wrong passcode, repeat the steps above to pair.
The passcode will be generated on request, the above passcode is an example
only
Once pairing is complete, the function LED will stop blinking.
Check the network connection
Step
Action
1.
From the desktop swipe to display the main menu charms on the right side of the
screen and select Settings
16
2.
Locate Change PC settings to open the Change PC setting menu
3.
Select Wireless on the left side menu to display the Wireless devices. Confirm
the correct connection has been made.
How to connect the Q4 device to the DETE 3G network
When the device is delivered it is pre-loaded with a ‘data only’ 3G SIM card. The device’s serial
number and SIM card number are linked to the allocated student. This information is provided in
advance from Acer and is recorded in the school database and is used for configuration during the
device build. Phone calls cannot be made using the SIM card.
If the SIM cards are swapped between devices or inserted into mobile phones, it may permanently
disrupt the device’s service. If this happens, find which device the SIM should be assigned to by
contacting the school’s administration.
17
The data allowance for each device is a minimum of 2.5GB per
month until December 2015.
3G Network
Step
Action
1.
Swipe to display the main menu charms on the right side on the screen,
accessible from the desktop and select Settings
2.
Locate Change PC settings to open the Change PC setting menu
18
Step
Action
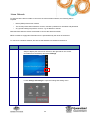
3.
Locate Wireless on the left menu and confirm the Mobile broadband option is
enabled before returning to the Settings charm section.
4.
In the Settings charm select the 3G Connect charm representing internet
connectivity.
19
5.
Once 3G is enabled, the 3G network will now appear in the connections pop up
School wireless network
Step
Action
1.
Swipe to display the main menu charms on the right side on the screen,
accessible from the desktop and select Settings
20
Step
Action
2.
Locate Change PC settings to open the Change PC setting menu
3.
Locate Wireless on the left menu and confirm the WiFi option is enabled
before retunring to the Settings charm section.
21
Step
4.
Action
In the Settings charm select the icon representing network connectivity.
5.
Check to see if it is connected by ensuring the word ‘connected’ is displayed
next to QDETA-X/IDET in the connections pop up window.
The device will automatically connect to the QDETA-X network. When changing from 3G
or a home network locate the QDETA-X option and confirm by selecting Connect
22
Home Network
To ensure that the device is able to connect to the home wireless network, the following will be
required:
•
Name (SSID) of the home network
•
The security information needed to connect, includes a password or username and password
•
Any specific settings required to connect, e.g. IP address or subnet
With this information the device will be able to connect the wireless network.
DETE is unable to supply this information as it is personalised by the owner of the device.
To connect to a wireless network, first ensure that wireless is activated on the device.
Step
Action
1.
Swipe to display the main menu charms on the right side on the screen,
accessible from the desktop and select Settings
2.
Locate Change PC settings to open the Change PC setting menu
23
Step
Action
3.
Locate Wireless on the left menu and confirm the WiFi option is enabled
before retunring to the Settings charm section.
4.
In the Settings charm select the icon representing network connectivity.
5.
Locate the home network {name} displayed in the connections pop up window.
Select Connect to join the network.
24
Step
Action
6.
To connect to the home wireless network a Password may be required
7.
Select the correct option for the network. Once the correct settings have been
entered or the settings have been confirmed windows will connect to the
network.
25
If the device is unable to connect to the home network,
contact the relevant ISP, local technician or the owner
of the network for further assistance.
26
Software
Power management
Power management settings
It is the student’s responsibility to make sure their device has adequate charge before taking it to
school.
Step
Action
1.
To access Power Management open the desktop and locate the Power Options
icon at the bottom of the screen. Select More Power Options.
2.
The Power Options screen will appear displaying a wide range of options regarding
Power Plans. Select Change plan settings to modify the relevant power plan.
27
The ‘Balanced’ setting is recommended as it provides the best performance versus
battery usage.
Step
Action
1.
Once the preferred modifications have been made select Save changes to confirm.
2.
Change advanced power settings will display a more detailed power plan and is
available from the Edit Plan Settings screen.
28
Define power buttons
Step
Action
1.
To access Power Management open the desktop and locate the Power Options
icon at the bottom of the screen. Select More Power Options.
2.
The Power Options screen will appear displaying a wide range of options regarding
Power Plans. Select Choose with the power buttons.
29
Step
2.
Action
Once the relevant modifications have been made select Save changes to confirm.
It is recommended to disable ‘Fast startup’ as a power saving option. When ‘Fast startup’ is
activated the device constantly checks for start signals which will slowly drain the battery.
30
Virus protection
All Q4 devices have SEP installed during the build and joining process. It is important to ensure that
the definition’s SEP uses to identify malicious software are kept up to date.
SEP requires little to no maintenance from the user. DETE has implemented SEP with ease of use in
mind; using a centralised management method allowing both;
Centralised update deployments while on the DETE network.
Download of updates from Symantec via an internet connection.
This ensures that SEP protection is kept up to date for device protection.
Automated virus scans are scheduled for 10pm every night, though this can only be performed if the
device is switched on.
SEP is the chosen DETE anti-virus solution. Devices with SEP removed or additional anti-virus
products may be rebuilt wiping all locally stored data.
Antivirus
Active Scan
Active scan will only scan the most commonly infected areas of the device. This can be completed
quickly and can find most threats. Full scan scans every file on the device. If a threat is still affecting
the device after an active scan, initiate a full scan.
Step
Action
1.
Locate the Symantec Endpoint Protection shield icon at the bottom of the desktop to
open the Symentec control panel.
31
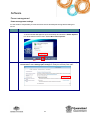
2.
The Symantec Endpoint Protection user interface will appear. Click Scan for threats
on the left side menu. Two scan options will appear, select Active Scan to
commence the virus scan. The scan will take 1-2 minutes.
Step
3.
Action
Once you initiate a scan, a new window will appear. This window will track the
progress of the scan and supply information on any threats found.
32
Once a scan is completed, and no risks are found, you can close this window.
Full Scan
Full scan will scan the entire device and may take 30-120 minutes.
Step
Action
1.
Locate the Shield icon at the bottom of the desktop to open the Symentec
control panel.
33
2.
Select Scan for threats on the left side menu. Two scan options will appear, select
Full Scan to commence the virus scan. The scan will take approximately 30-120
minutes.
Step
3.
Action
Once you initiate a scan, a new window will appear. This window will track the
progress of the scan and supply information on any threats found. Once a scan is
completed, and no risks are found, you can close this window.
34
4.
Once a scan is completed, and no risks are found, you can close this window.
Home printer
Installing
Common printer brands support sites:
Canon - http://www.canon.com.au/en-AU/Support-Services
Epson - http://tech.epson.com.au/
HP
- http://www8.hp.com/au/en/support-drivers.html
Lexmarkhttp://support.lexmark.com/index?channel=supportAndDownloads&page=home&locale=en&user
local e=EN_AU
Unlike the DETE network, which is configured to install printers automatically, home printers require
more input to setup on the Q4 device.
Before trying to install the printer, the following will be required:
•
•
•
•
Printer driver/software disk or install files
USB or serial cable to connect the printer to the Q4 device
Power cable to power the printer
Any other essential accessories
35
Each printer may have varying cables, connectors and
buttons. This is a general guide and does not contain brand or model specific information. To
obtain this information please follow the link that corresponds to the printer’s brand (above) or
search Google for the manual using the make and model, (i.e. ‘hp deskjet 3000 J310 manual’).
Step
Action
1.
Connect your device via the USB or serial cable supplied with the printer to the
Q4 device. Initiate the installation of your printer by opening Settings > Change
PC settings
Step
2.
Action
From the Devices option click on Add a device.
36
3.
Windows will automatically search for a device to add, locate the relevant
printer.
Windows will then try to automatically install the printer if the drivers are available. If
unable to install please contact the manufacturer for support. Due to the large volume of
different printer brands/models, DETE is unable to support printers that may not function with
the Q4 device.
Scanners
Scanners are installed much like printers. Please follow the ‘How to configure a home printer’ guide for
more information.
Computrace
Computrace is included as a component of the NSSCF Q4 build and is activated during the joining
process. No user input is required and the product activates automatically during the joiner process.
The installation needs to be completed once per device to activate Computrace, thereafter reporting
and security measures can be performed.
Computrace - students and parents
Computrace requires no input from the user of the device or from parents. The data collected by
Computrace will only be accessed if the device becomes lost or is stolen. Parents will be required to
complete a police report and statutory declaration for stolen devices.
37
Web content filtering
Web Filtering
DETE operate a best-practice web filtering system to protect students, schools and corporate offices
from malicious web activity and access to inappropriate websites. This works on Q4 devices when
used on or off DETE (school) networks. The filtering client is already installed on devices and allows
DETE to provide its duty of care while the device is not protected by the department’s network.
Web filtering adds additional measures to protect staff and students against:
•
•
•
•
•
Inappropriate webpages
Spyware and malware
Instant messaging
Peer-to-peer sessions
Scams and identity theft
This utilises a precautionary approach to blocking websites – blocking sites with no information about
their purpose and content within their descriptions.
Web filtering - students and parents
Students and parents will interact with web filtering only when a block page is presented. These are
displayed after the user tries to access a blocked website. The block page has been created to inform
the person trying to access the page that the site has potentially been deemed as being inappropriate
by DETE standards. This includes:
•
•
The site has not yet been approved as appropriate
The site cannot be confirmed as a permissible site
For a categorical view of what is allowed and blocked while both at school and at home please follow
this link: http://education.qld.gov.au/smartclassrooms/mis/filtering.html.
Parents or caregivers may be asked to choose between a ‘High’ or ‘Medium’ level of filtering for the
student while not connected to the DETE network. Further information is available via the link above.
It is important to know the difference between the two.
38
Please note any changes to the web filtering level settings will require the device to be
rebuilt.
Medium: The Medium level filter provides a more relaxed level of protection for students who are able
to access:
•
•
•
•
•
•
Social networking sites such as Facebook
YouTube
File download and media sharing sites such as downloads.com
Instant messaging programs like MSN Messenger
Internet Telephony sites such as Skype
Blog sites such as Blogger
High: A high level of filtering provides a more restrictive environment. Most of the above categories
are blocked to preserve internet bandwidth and ensure that the internet at a school is not hindered by
the overuse of such websites.
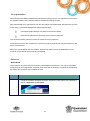
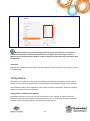
Web filtering block pages –
If you are attempting to view a blocked webpage with an address beginning ‘HTTP’ you will be
presented with the below ‘block page’.
39
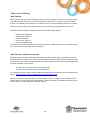
If you are attempting to view a blocked webpage with an address
beginning ‘HTTPS’ you will be presented with the below generic Internet Explorer (IE) error screen.
Mobile and desktop devices
Mobile devices in schools
Mobile device have been implemented within the MOE with mobility in mind. Groups, group policy and
scripts have been created to allow for users to utilise their mobile functionality.
Data redirection
Folder redirection
Folder redirection has been implemented to manage data across multiple devices at a school. As
users may be using different devices, it is important that the user’s data be available anywhere.
Mobile devices have different needs to desktop computers. Data needs to be accessible offsite while
the device has no connection to the school server. Folder redirection ensures that data is accessible
both at home and at school.
40
Mobile users
The mobile users group provides redirection for mobile users.
User’s drives are redirected to a physical location on the device as opposed to a location on the
school server. The device D:\ drive holds all user data and a roaming profile is used to ensure user
specific settings are available.
Student folder redirection
Folder
Standard redirection
Mobile Redirection
AppData
C:\%username%\Appdata\roaming
D:\%username%\Appdata\roaming
Contacts
C:\%username%\My
H:\Contacts
Documents\contacts
Desktop
C:\%username%\Desktop
D:\%username%\Desktop
Documents
C:\%username%\My Documents
%HOMESHARE%%HOMEPATH%
Downloads
C:\%username%\My
H:\Downlaods
Documents\Downloads
Vendor service support
Making a service call
Acer was the awarded vendor for Q4 devices. DETE has purchased devices that have a lifecycle of
four years and meet the technological requirements of students from years 9 through 12.
Students are not permitted to log calls with Acer. Calls should only be logged by
teachers, school staff, school technicians or parents.
Item
Details
Support vendor
Acer Australia
Contact number
1800 819 713
Operating hours
Phone logging: 7 am – 8 pm - Monday to Friday.
Website Logging
http://esupport.acer-apac.com/esupport/LoginFrame.htm
Operating hours
24 hours a day, 7 days a week.
Further information
•
A username and password can be requested by emailing the
NSSCF Administration Team
([email protected]).
•
To receive updates and notifications from Acer speak to your
school Principal to be added to the NSSCF Online Contact
database.
41
Information
required
The following information will be required to log a call:
Contact name (school or parent)
Contact number
Serial number (SNID)
Email address
School location (address)
Fault details
Call logging process
•
•
Attempt to identify the component or software of the device that has the fault
Refer to the Troubleshooting section of this manual to see if there is any relevant information
that can be applied to the fault and follow the instructions provided
•
If this is unsuccessful parents, guardians or school staff can log a call with Acer via the
number in the table above
Windows backup
Backup and restores
DETE has implemented a best practice backup that is designed to suit the needs of a student.
It is the responsibility of the student to backup all personal data. All personal data
should be stored on a network drive at school and/or on a personal USB drive. Data
stored on the D:\ drive is not backed up by the school or DETE.
Backup habits
Data stored on the H:\ drive is regularly backed up by the school server however students are
responsible for backing up their personal data on D:\ to an external source; such as a USB or
personal hard drive.
42