1
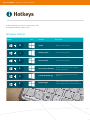
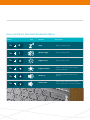
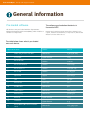
Department of Education, Training and Employment 1
National Secondary
School Computer Fund
Acer Iconia W701
Set up and support manual
Acer Iconia W701 - Set up and support manual
Set up and support manual
The device chosen for the Round Q4 of the National Secondary School
Computer Fund (NSSCF) is the Acer Iconia W701. The Iconia W701 is
the innovative touch-based Windows 8 tablet, designed to run all day
on a single battery charge and has managed 3G connectivity.
This document provides information about how
to complete some common procedures.
Icon guide
General information
Security and backup
Fixing issues
How to information
Who to contact
3
Contents
Hotkeys
6
Windows hotkeys
6
Acer Iconia W701 bluetooth keyboard hotkeys
7
General information
8
Pre-loaded software
Power management 27
Device screen
28
Stuck pixels
28
Blank screen 28
8
Cracked or broken screen
28
Loading additional software 9
Monitor is too bright or too dark
28
Elevated access
9
External storage
29
USB memory sticks and USB external hard disk drives
29
Safe removal of USB equipment
30
Reinstalling external storage
30
Technical support and warranty information 32
Warranty period
33
Accidental damage
33
Backup and restores
10
Cybersafety10
LED indicators
12
Connecting the bluetooth keyboard
14
Plugging in an external USB mouse
14
School network connections
15
How to connect to the school wireless network
15
Unable to login
15
3G Connections
16
How to connect to the DETE 3G network
16
Issues connecting to the network?
18
Home connections
20
How to connect to a home or public wireless network
20
How to install your home printer
22
Scanners 23
Antivirus
24
Symantec Endpoint Protection
24
Loading personal antivirus software
24
Active scan
25
Full scan
26
Non-warranty damage
33
Theft and loss 34
Multiple failures
34
Further information
35
Acer Iconia W701 - Set up and support manual
5
Acronyms
used in this document
CFSComputers for Students
CFTComputers for Teachers
DETEDepartment of Education, Training and Employment
ICTInformation and communications technologies
ISPInternet service provider
LANLocal Area Network
MOEManaged Operating Environment
NSSCFNational Secondary Schools Computer Fund
OBEOut of box experience
SEPSymantec Endpoint Protection
WANWide Area Network
Additional
reference material
DETE
Parents and Student guide
Acer Iconia W701 - Set up and support manual
Hotkeys
Hotkeys will help you perform common tasks with
the minimum number of key strokes.
Windows hotkeys
Hotkey
Icon
F3
Function
Description
Search
Ability to search the device
I
Settings charm
Opens the settings charm
K
Devices charm
Opens the devices charm
O
Lock screen orientation
Z
Commands within app
P
Display toggle
Ability to lock the device screen orientation
(portrait or landscape)
Shows the commands available within an
application
Switches display output between the display
screen, external monitor (if connected) and both
7
Acer Iconia W701 bluetooth keyboard hotkeys
Hotkey
Icon
Fn
W
Fn
Y
Function
Description
Sleep
Ability to search the device
Speaker toggle
Opens the settings charm
Fn
Brightness up
Opens the devices charm
Fn
Brightness down
Fn
Volume up
Fn
Volume down
Ability to lock the device screen orientation
(portrait or landscape)
Shows the commands available within an
application
Switches display output between the display
screen, external monitor (if connected) and both
Acer Iconia W701 - Set up and support manual
General information
Pre-loaded software
All devices come pre-loaded with the department’s
Managed Operating Environment (MOE), which includes a
number of components.
The software pre-loaded on the device is
licensed to DETE.
Parents and caregivers must ensure the software is not
copied, deleted or transferred, for any reason, without the
written consent of the school.
The table below shows what is pre-loaded
onto each device:
Application name
Vendor
Version
1
Office 2013 Professional Plus
Microsoft
15.0.4420.1017
2
VLC Player
Open Source
2.0.5
3
Adobe Reader
Adobe
11.0.00
4
Adobe Shockwave
Adobe
11.6.8.638
5
Adobe Flash 11
Adobe
11.4.402.287
6
Adobe AIR
Adobe
3.6.0.5970
7
Quicktime
Apple
7.72.80.56
8
Java
Sun
7.0.150
9
PDF Creator
PDF Forge
1.6.2
10
SCCM Client
Microsoft
4.0
11
Office Clipart
Microsoft
10.0.2619.0
12
PhotoStory 3
Microsoft
3.0.1115.11
13
Audacity
Open Source
2.0.3
14
IrFanView
Open Source
4.35
15
Movie Maker (Windows Essentials
2012)
Microsoft
16.4.3505.0912
9
16
Paint.net
Microsoft
3.60.0
17
Silverlight
Microsoft
5.1.10411.0
18
Symantec End-point Protection
Symantec
12.1.2015.2015
19
Microsoft App-V Client
Microsoft
4.6.1.30111
20
.net Framework
Microsoft
4.5
21
Cyber Safety Button
Australian Federal Gov
n/a
22
Blue Coat Web Filtering
Blue Coat Systems
3.4.4.3
23
Computrace
Absolute Software
8.0.932
Loading additional software
Elevated access
Students may have the ability to install additional
software onto the device (please see the Elevated access
section below) when in accordance with the school’s ICT
Policy. However, only licensed software can be installed.
The student must hold a valid licence for any software
installed and the licence must be appropriate for
installation on the device. Devices may be audited by a
school, requiring students to present a valid software
licence for any personal software installed.
Devices may have elevated permissions which would give
users the ability to complete tasks such as installing
home items including home printers, cameras and/or
licensed software. This access may allow further
permissions above and beyond those available on other
MOE-built workstations and devices. Students should not
misuse these privileges. The misuse of this access may
result in disciplinary action which includes, but is not
limited to, the withdrawal of access to services. The
school will manage the provision of elevated access and
may require a parent/caregiver to approve.
Devices need to be rebuilt for numerous reasons.
Students and parents need to be aware that any data
saved locally or software installed from home may be lost
in this process. Regular backups can reduce the
possibility of important data or student work being lost.
Acer Iconia W701 - Set up and support manual
11
General information
Backup and restores
Cybersafety
It is the student’s responsibility to backup all personal
data. All personal data should be stored on a network
drive at school and/or a personal USB drive. Data stored
on the D:\ drive is not backed up by the school or DETE.
The Department of Education, Training and Employment has
provided all devices with a Cybersafety help button,
designed to keep children and families safe online. It is an
online resource hub that provides instant 24 hour access to
cybersafety help and information. All students are
encouraged to use this should they feel uncomfortable with
any online interactions. Further information for parents/
guardian and students can be found at:
Please refer to External storage within
this document.
http://education.qld.gov.au/studentservices/behaviour/
qsaav/docs/cybersafety_brochure.pdf
Acer Iconia W701 - Set up and support manual
General information
LED indicators
LED’s are used to signify a status, operation or issue with
the device. They are designed to function as a warning or
notification.
Device
LED colour
State
Description
Blue
Steady
The device is fully
charged and plugged in
Blue
On briefly
The device is fully charged
and running on battery
power. After pressing the
power button, the blue LED
stays lit for a few seconds
before turning off
Amber
Steady
The device is charging
and plugged in
Amber
On briefly
The device is not fully
charged and running
on battery power. After
pressing the power
button, the amber LED
stays lit for a few seconds
before turning off
Amber
Blinking
The battery is critically
low or signifies an
abnormal battery
situation
Off
N/A
The computer is off
13
Keyboard
LED colour
State
Description
Blue
Battery
LED
Steady
The keyboard is plugged
in and fully charged
Amber
Battery
LED
Steady
The keyboard is plugged
in and charging
Amber
Battery
LED
Blinking
slowly
The keyboard is not
plugged in and the
battery is low
Amber
Battery
LED
Blinking
quickly
The keyboard is not
plugged in and the battery
is critically low or signifies
an abnormal state
Blue
Function
LED
Steady
The LED turns solid blue
for five seconds after
turning the keyboard on
Blue
Function
LED
Blinking
The LED blinks after
turning the keyboard off
Blue and
Amber LED
Blinking
The keyboard is
connecting to the screen
Acer Iconia W701 - Set up and support manual
General information
Connecting the bluetooth
Keyboard
The bluetooth keyboard will be connected to the device
before being issued. Once it is connected it can be turned
on and off without needing to be connected each time.
1. From the desktop swipe to display the main menu
charms on the right side of the screen and select
Settings.
2. Locate Change PC settings to open the Change PC
settings menu.
3. Select Devices from the left menu to display the
Add a Device option.
If the Acer Iconia W701 bluetooth keyboard option is
already visible, tap the minus sign to the right to
remove the device. It may take a moment for the
keyboard to be removed from the device list.
4. Press and hold the power button until both the battery
and the function LEDs on the keyboard blink repeatedly.
Release the power button. The keyboard will now be in
connection mode for three minutes. After this, the
keyboard is connected.
Plugging in an external
USB mouse
1. Locate the USB ports on the right hand side of the
device and insert the USB cable for the mouse.
Windows will now automatically install your mouse.
15
School network connections
How to connect to the school
wireless network
To ensure you are able to connect your device to the
school’s wireless network you will need:
•
your DETE username and password.
The wireless connection QDETA-X or iDET is preconfigured
on all devices and will automatically connect to it.
You can check to see if it is connected by ensuring the
word Connected is displayed next to QDETA-X/IDET in the
connections pop up window.
1. From the desktop, swipe to display the main menu
charms on the right side of the screen and select
Settings.
2. Locate Change PC settings to open the Change PC
settings menu.
3. Locate Wireless on the left menu and confirm the
Wi-Fi option is turned on.
If there are any issues connecting to the
QDETA-X or iDET network, please notify your
teacher or school technician.
Unable to login
If you are unable to login to your device ensure the
Caps Lock is not activated.
•
The Caps Lock button is located on the left hand side
of the keyboard. If Caps Lock is activated all letters
typed will be capitalised, sometimes causing a user
to inadvertently mistype their password.
Acer Iconia W701 - Set up and support manual
3G connections
How to connect to the
DETE 3G network
When the device is delivered, it is pre-loaded with a data
only 3G SIM card. The device serial number and SIM card
number is linked to the allocated student.
Phone calls cannot be made using the SIM card.
If the SIM cards are swapped between devices or inserted
into mobile phones, it may permanently disrupt the
device’s service. If this happens, contact the school.
The data allowance for each device is
2.5GB per month.
To connect to the 3G network, first ensure that 3G is
activated on the device.
1. From the desktop swipe to display the main menu
charms on the right side of the screen and select
Settings.
2. Locate Change PC settings to open the Change PC
settings menu.
3. Locate Wireless on the left menu and confirm the
Mobile broadband option is turned on before
returning to the Settings charm.
17
4. In the Settings icon select the internet connectivity
icon, which will also display the name of the network
you’re trying to connect to.
5. Once 3G is turned on, the 3G network will appear in the
Mobile Broadband connections pop up.
Acer Iconia W701 - Set up and support manual
3G connections
Issues connecting to the network?
If you are using a network and are unable to login, there
are several steps you can take to try to resolve the issue.
1. From the desktop, swipe to display the main menu
charms on the right side of the screen and select
Settings.
2. Locate Change PC settings to open the Change PC
settings menu.
3. Select Wireless on the left side menu then disconnect
from any wireless networks.
4. Now you can try to reconnect, using the steps on
page 16 or 17.
If you are still unable to connect after attempting the
above steps, see you teacher or school technician.
19
Acer Iconia W701 - Set up and support manual
Home connections
The following guides will assist you in completing
activities at home and/or on a home network.
How to connect to a home or
public wireless network
To ensure you are able to connect your device to your
home wireless network you’ll need:
•
The name of your home network, in particular the
Service Set Identifier (SSID) character
•
The security information needed to connect: a
password or a username and a password
•
Any specific settings required to connect, i.e. IP
address or subnet.
DETE is unable to supply this information as it is
personalised within your household.
To connect to a wireless network, first ensure
that wireless is activated on the device.
If the device is unable to connect to your home network,
contact the relevant ISP, local technician or the network
owner for further assistance
1. From the desktop, swipe to display the main menu
charms on the right side of the screen and select
Settings.
2. Locate Change PC settings to open the Change PC
settings menu.
3. Locate Wireless on the left menu and confirm the
Wi-Fi option in turned on before returning to the
Settings charm.
21
4. In the Settings charm, select the charm representing
network connectivity
5. Once Wi-Fi is turned on, the home network will
appear in the connections pop up, select Connect.
6. To connect to the home wireless network a
‘Password’ may be required
7. Select the correct option for the network. Once the
correct settings have been entered or the settings have
been confirmed windows will connect to the network.
Acer Iconia W701 - Set up and support manual
Home connections
How to install your home printer
Unlike the DETE network, which is configured to install
printers automatically, home printers need to be set up on
the Acer device.
Before trying to install your printer you will need to have
the following:
•
Elevated Access
•
Printer driver files
•
USB cable to connect the printer to the device
•
Power cable to power the printer
Each printer may have varying cables, connectors and buttons.
Note: This is a general guide and does not contain brand
or model specific information. To obtain this information,
please follow the link that corresponds to your printer’s
brand or search for the manual using the make and model
in Google.
Connect your device via the USB supplied with the printer,
to the Round Q4 device.
1. From the desktop, swipe to display the main menu
charms on the right side of the screen and select
Settings.
2. Locate Change PC settings to open the Change PC
settings menu.
3. From the Devices option click on Add a device.
4. Windows will automatically search for a device to add,
locate the relevant printer.
if the drivers are available, Windows will then try to
automatically install the printer. If you are unable to
install it, please contact the manufacturer for support.
Due to the large volume of different printer brands/
models, schools do not provide support for home printers
and scanners.
23
Common printer brand support sites:
Scanners
Canon
Scanners are installed much like printers. Please follow
the How to install your home printer guide for setup
instructions on page 22.
http://www.canon.com.au/en-AU/Support-
Services
Epson
http://tech.epson.com.au/
HP
http://www8.hp.com/au/en/support-drivers.html
Lexmark http://support.lexmark.com
Acer Iconia W701 - Set up and support manual
Antivirus
Symantec Endpoint Protection
Antivirus software is used to prevent, detect and remove
malware. This includes computer viruses, worms,
trojans, spyware and adware. DETE uses Symantec
Endpoint Protection (SEP) to help manage the threat of
malware on devices.
All devices are protected to help prevent
malicious software from spreading through the
DETE network.
For further information, see the link below:
http://www.symantec.com/business/products/family.
jsp?familyid=endpointsecurity
It is important to ensure any suspect files or
folders be scanned with SEP to ensure their
validity. This can be done by running the Full
Scan, see instructions below. Symantec
Endpoint Protection can scan, isolate or
destroy infected files.
How Symantec Endpoint Protection
affects students and parents
SEP requires little to no maintenance from the user. DETE
has implemented SEP using a centralised management
method. This allows the automatic deployment of new
updates and configurations while the devices are
connected to the network. SEP is also configured to
download updates directly from Symantec while not
connected to the school network.
Loading personal antivirus software
Students do not need to install antivirus software. SEP is
the chosen DETE antivirus product. This is included in the
device and DETE will maintain all licensing requirements.
25
Active scan
Active scan will only scan the most commonly infected
areas of the device. This can be completed quickly and
can find most threats. A Full scan examines every file on
the device. If a threat is still affecting the device after an
active scan, initiate a full scan.
1. Locate the Symantec Endpoint Protection shield icon
at the bottom of the desktop to open the Symantec
control panel. The Symantec Endpoint Protection
user interface will appear.
2. Click Scan for Threats on the left side menu.
3. Two scan options will appear, select Active Scan to
commence the virus scan. The scan will take one to
two minutes.
4. Once you initiate a scan, a new window will appear.
This window will track the progress of the scan and
supply information on any threats found.
5. Once a scan is completed, and no risks are found,
you can Close this window.
If a virus is detected during the scan select the
Remove Risks Now button (only accessible if a
virus is detected) to clean the system
Acer Iconia W701 - Set up and support manual
Antivirus
Full scan
A full scan will browse the entire device and may
take 30-120 minutes.
1. Locate the Symantec Endpoint Protection shield icon
at the bottom of the desktop to open the Symantec
control panel. The Symantec Endpoint Protection user
interface will appear.
2. Click Scan for Threats on the left side menu.
3. Two scan options will appear, select Full Scan to
commence the virus scan. Once you initiate a scan, a
new window will appear.
4. Once you initiate the scan, a new window will appear.
This window will track the progress of the scan and
supply information on any threats found.
5. Once the scan is completed, and no risks are found,
you can Close this window.
If a virus is detected during the scan select the Remove
Risks Now button (only accessible if a virus is detected) to
clean the system.
27
Power management
It is the student’s responsibility to ensure their device has
adequate charge before taking it to school. Battery life
can be enhanced by managed use and recharging
patterns that allow the battery to fully discharge before
recharging, rather than sitting on constant charge.
The most suitable Power Management Plan has been set
as a default on your device. If you have any questions or
concerns regarding the battery, please speak with your
school computer technician.
Acer Iconia W701 - Set up and support manual
Device screen
There are several issues that can occur on your device’s
screen during day-to-day use. In this section, you’ll find
examples of some of the issues that may occur, and
fixes for them.
Stuck pixels
If you have black or white dots that appear to be ‘stuck’
on the screen, please contact the school or the Acer
Service Centre (see contact section). Attempting to fix a
dead or stuck pixel may void your warranty.
Blank screen
A blank screen can have several causes, both software
and hardware related. It is important to make sure that
software related issues are eliminated first as this is the
most likely cause. Follow the steps below to determine
the cause of the issue.
If the device is powered on and no image is
displayed, try the following:
•
If the power button is flashing orange the device is in
sleep mode.
•
The devices have a screen off function. Hold the
key and press P to cycle through the settings.
•
Connect an external monitor to both the VGA out port
and the HDMI port. It may not display an image until
you cycle through external monitor settings. You can
do this by pressing
key and P.
If all the above do not enable the device to display an
image, contact your school to organise a technician to
inspect the device. Depending on the nature of the issue,
the device may need to be sent to the manufacturer to be
repaired or replaced.
Cracked or broken screen
If a screen has become broken or cracked it is important
to inform the school immediately. Any delay may cause
more damage to the device.
Monitor is too bright or too dark
1. Location the Fn key between the left Ctrl button and
the Windows
button .
2. Hold down the Fn key and tap the left arrow key to
make the screen darker, or the right arrow key to
make the screen brighter.
29
External storage
There are a wide range of different brands and types of
external storage equipment. This guide covers the major
types of external storage, including USB memory sticks,
USB external hard drives.
USB memory sticks and USB
external hard disk drives
1. Locate the USB port on the left side of the device. Insert
the USB memory stick or USB cable connected to the
external hard disk drive into the USB port.
Note: You may need to flip the USB stick or USB cable to
ensure it is inserted correctly. Forceful insertion may
cause damage to the device.
2. Windows will automatically install the device. A pop
up box will appear and you can choose what to do
with your removable drive.
Acer Iconia W701 - Set up and support manual
External storage
Safe removal of USB equipment
Reinstalling external storage
It is important to safely eject a USB storage device
before physically removing it. Issues can arise from the
incorrect removal of these devices causing loss or
corruption of data. Follow the steps below to safely
remove your USB equipment:
1. Remove the external storage device by gently pulling it out.
1. Hold your finger down on the USB icon with
Also check...
2. Wait 10 seconds and reinsert the external storage
device into the USB port. Windows will install the
external storage equipment automatically.
a green tick.
•
Does the external storage equipment have power (if
required)? Is it connected, is there a switch or button
located on the equipment?
•
Are all cables correctly inserted into the external
equipment?
•
Is the equipment still intact and fully operational?
Check to see if you can hear the storage equipment
functioning as most external storage still utilise
spinning components.
•
Are the ports, casings and cables intact? Broken
equipment is unlikely to function correctly.
2. A screen will display all of the devices that are
connected. Select the device you wish to eject
3. The device is no longer active in Windows and
can now be safely removed.
To gain access to the item again, simply remove and
reinsert the USB equipment.
31
Acer Iconia W701 - Set up and support manual
Technical support
and warranty information
The department has bulk purchased Acer devices that
have a lifecycle of four years and meet the technological
requirements of students from Years 9 to 12.
Students are not permitted to log calls with
Acer. Calls may only be logged by teachers,
school staff, school technicians or parents.
Technical support will be provided directly by Acer, however
where possible please contact the school in the first instance
for help and support.
Warranty-related enquiries can also be directed
to the number below.
In most cases, Acer will supply next day on-site support.
In some remote locations, the device may be required to
be returned to Acer.
Technical support
Support Vendor Contact Number Operating Hours
Acer Australia
The following information will be
required to log a call:
•
•
1800 819 713
•
7am-8pm •
•
Monday to Friday
•
Contact name (school or parent)
Contact number
Serial number (SNID)
Email address
School location (address)
Fault details
33
Warranty Period
Non-warranty damage
Bulk purchased Acer Iconia W701 devices include a
comprehensive four-year warranty. The warranty period
starts when the device is received at the school.
Non-warranty damage is where damage is not covered by
warranty and not classified as accidental damage. The
Acer warranty does not cover the device for any wilful
damage, careless damage, theft or negligence. Examples
of items not covered are:
Accidental damage
The department has negotiated an accidental damage cover
to support schools and families when a genuine accident
results in damage to a device (excesses will apply).
•
Leaving objects (such as pens) on the keyboard when
closing the hard case, and as a result the LCD display
is damaged.
•
Leaving the device unattended and as a result it was
damaged by someone or something else other than
the user or assigned owner.
•
No explanation whatsoever can be provided for how
the resulting damage occurred.
•
Repeating cases for the same device which may have
previously been termed as accidents.
Examples of accidental damage are:
•
•
•
Accidentally dropping the tablet, which results in
physical damages to it
Accidentally spilling liquid over the keyboard
Electrical surge, in the case of blackouts or storms.
Where a device is accidentally damaged, the
following costs apply:
First incident
$50
Second incident
$100
Subsequent$150
Parental costs incurred will be a school
managed process. Please contact your school
principal for further information.
Where a device is deemed non-warranty
damage, the following costs apply:
•
Minor repair, includes any one (1) component,
excluding repair or replacement of LCD screen or
motherboard: $147 excluding GST.
If two (2) or more components require replacement then this would be deemed a Major repair and will cost $399 excluding GST.
•
Major repair, including repair or replacement of LCD
screen or Mainboard: $399 excluding GST.
If both components require replacing, then the unit is deemed Beyond Economical Repair. In this instance, your school will advise of the process to follow.
Note: Where a school determines that damage has been
intentionally caused, the full cost or replacement of the
device may be charged. This is a school managed process.
Acer Iconia W701 - Set up and support manual
Technical support
and warranty information
Theft and loss
Multiple failures
If the device is stolen outside of school, the parent/
caregiver will need to report the incident to the police
and ensure they have the following documentation
when informing the school:
For NSSCF Q4 bulk purchased devices, Acer provides a
multiple failures service or ‘lemon clause’. The details of
this clause are shown below:
•
Police crime number; and
•
Statutory declaration
(usually completed with the police).
On receipt of the necessary documentation, DETE will
initiate recovery procedures via in the inbuilt theft
protection software.
•
During the warranty period, Acer will replace and
deliver, at no cost to the department, any NSSCF
Round Q4 device on the occasion of that products
third claim under warranty.
•
Replacement of the device only applies for the first
three years of the warranty period.
•
The device replaced under this program will be the
current equivalent model of the failed product. If that
failed device has been superseded the current model
will be provided. This will include the balance of the
original warranty on a pro-rata basis.
•
The replacement product will include all the
components originally ordered with the failed
product, including the department’s Managed
Operating Environment (MOE).
•
Acer will ensure the replacement device will be
received at the relevant school within five school
days, or as agreed with Acer, from the date the claim
was made to Acer.
Should a device be unrecoverable, whether lost
or stolen, the cost of replacement is as follows:
First case: $200
Subsequent cases: full replacement cost.
35
Further information
For more information about your student NSSCF device,
please contact your school.
For more information about the National Secondary
School Computer Fund please visit:
Department of Education, Employment and Workplace Relations
http://deewr.gov.au/national-secondary-school-computer-fundprovision-funding
Smart Classrooms
www.education.qld.gov.au/smartclassrooms
Digital Education Revolution
http://deewr.gov.au/digital-education-and-technology-schools
Cyber(smart:)
www.cybersmart.gov.au
eSmart
http://www.amf.org.au/toptipsforkids/
Licence
Attribution
This NSSCF Acer Iconia W701 Set up and support
Content from this guide should be attributed as:
manual is licensed by the State of Queensland
(Department of Education, Training and Employment)
under a Creative Commons Attribution (CC BY) 3.0
Australia licence.
The State of Queensland (Department of Education,
Training and Employment) National Secondary
School Computer Fund Acer Iconia W701 Set up and
support manual 2013.
CC BY Licence
Summary Statement
Images
In essence, you are free to copy, communicate and
‘restricted’ and the following terms apply:
adapt this NSSCF Acer Iconia W701 Set up and
support manual, as long as you attribute the work to
the State of Queensland (Department of Education,
Training and Employment).
All images included in this manual are identified as
You may only use this image (in its entirety and
unaltered) as an integrated part of this entire manual
or as an unaltered integrated part of an extract taken
from this manual.
To view a copy of this licence,
visit: www.creativecommons.org/licenses/
© State of Queensland (Department of Education, Training and Employment) 2013