1
HDMA-4000
User Guide
Engineered by Canopus Co., Ltd.
Notices & Warranties
Copyright Regulations
It is illegal for anyone to violate any of the rights provided by the copyright laws to
the owner of copyright, except for fair use (mainly private noncommercial use).
Also, in certain cases copying is prohibited with no exceptions. In no event shall
Canopus be liable for any direct or indirect damages whatsoever arising from the
use of captured materials.
Warranty
Your HDMA-4000 is covered by a limited warranty when you register your Canopus
product. This warranty is for a period of one year from the date of purchase from
Canopus or an authorized Canopus agent. This warranty applies only to the original
purchaser of the Canopus product and is not transferable. Canopus Co., Ltd warrants
that for this period the product will be in good working order. Should our product
fail to be in good working order, Canopus will, at its option, repair or replace it at no
additional charge, provided that the product has not been subjected to misuse,
abuse or non-Canopus authorized alterations, modifications and/or repair. Proof of
purchase is required to validate your warranty.
Canopus is not responsible for any lost profits, lost savings or other incidental or
consequential damages arising out of the use of, or inability to use, this product.
This includes damage to property and, to the extent permitted by law, damages for
personal injury. This warranty is in lieu of all other warranties of merchantability and
fitness for a particular purpose.
Cautions
Please observe the following cautions when using this product. If you have any
questions regarding the method of usage, the descriptions herein, or any other
concerns, please contact the local Canopus office or distributor.
WARNING
The following conditions indicate the potential for serious bodily injury or loss of life.
Health precautions
In rare cases, flashing lights or stimulation from the bright light of a monitor display
may trigger temporary epileptic seizures or loss of consciousness. It is believed that
even individuals whom have never experienced such symptoms may be susceptible.
If you or close relatives have experienced any of these symptoms, consult a doctor
before using this product.
Do not use in environments requiring a high degree of reliability and
safety
This product is not to be used in medical devices or life support systems. The
characteristics of this product are not suited for use with such systems.
2
Notices & Warranties
Protect against static electricity
Do not disassemble
Do not remove the cover or modify the HDMA-4000. Fire, electric shock or
malfunction may result. For internal inspection or repair, please contact your system
integrator or Canopus directly.
Do not operate at other than the specified voltage
Do not operate at other than the specified voltages of AC 100-240V. Operation at
other than the rated voltage may result in fire or malfunction.
Notices & Warranties
An electrostatic discharge may damage components of this product. Do not directly
touch any of the connectors or component surfaces.
Static electricity can be generated on clothing and on people. Before handling the
product, discharge static electricity from your body by touching a grounded metal
surface.
Do not operate with other than the specified power supply
Do not operate with other than the specified AC adapter, or with a car power supply.
Such operation may result in fire or malfunction.
Handle the AC adapter cord carefully
Do not place heavy objects on top of the cord, or place it near hot objects. Doing so
may damage the cord and result in fire, electrical shock, or malfunction. Altering the
cord, or excessively bending or pulling the cord may result in fire or electrical shock.
If the cord is damaged, please contact your local retail outlet or Canopus directly.
* Replacement of damaged parts, unless defective due to manufacturing, will be charged at actual
cost plus handling fees.
Do not use the product in a dusty or humid environment
It may cause a short-circuit or a build-up of heat, resulting in fire or electric shock.
Do not let foreign matters enter the inside of the product
If water or any foreign matter enters the inside of the product, it may cause fire or
electric shock. In the case where water or foreign matter is allowed to enter the
product, turn the power OFF and pull out the power cable from the receptacle.
Do not use the product when you hear thunder
Do not touch the product body or its plug on such occasions. It may result in electric
shock.
3
Notices & Warranties
Stop using the product when it is smoking
Do not use the product in an abnormal condition like when it is smoking or emitting
an odor.
It may result in fire or malfunction of the product. If any anomaly is found, turn OFF
the power of the product, disconnect the power cable, making sure that the product
is not smoking any more.
Do not use the product in a damaged condition
Do not drop the product nor use the product with its cover broken.
It may result in fire or malfunction of the product. In case the product is damaged,
turn OFF the power of the product and pull out the power cable from the
receptacle.
Do not touch AC adapter with wet hands
Do not disconnect or plug in the AC adapter when your hands are wet. Contact with
water may result in electric shock, fire or damage.
Do not setup in an area that becomes hot
Do not setup in an area exposed to direct sunlight or near a heating apparatus. The
heat can accumulate, causing burns, fire or damage. Also, the unit may become
deformed or change color.
CAUTION
The following conditions indicate the potential for bodily harm, damage to hardware
or loss of data.
Do not pull AC adapter cord when disconnecting from electrical
outlet
When disconnecting the AC adapter cord, pull on the plug, not the cord itself. Pulling
on the cord can damage the cord and may result in fire or electric shock.
Do not setup other than the Described method
Do not setup in a manner other than prescribed. Do not use while wrapped in cloth
or plastic. Heat can accumulate, causing burns, fire or damage.
If product will not be used for an extended period
If this product will not to be used for an extended period of time, disconnect the AC
adapter from the electrical outlet.
Do not place the product on an unstable place
Do not place the product on an unstable table or slanted surface. The product may
fall from it, resulting in injuries or malfunction of the product.
4
Notices & Warranties
Turn OFF the power when cleaning the product
Route the cables properly
Route the power cable and AV cables properly. If they catch on something, it may
result in injuries or malfunction of the product.
Precautions for use of AC adapter
The supplied AC adapter and power cord are for exclusive use of this product. Do
not operate the product with other AC adapter or in other combinations.
Lower The Volume Of The Audio Equipment
Please lower your audio equipment speaker level that is connected with the HDMA4000 when you turn the power of the HDMA-4000 ON/OFF. You may hear a loud
noise when you turn the power ON/OFF.
Notices & Warranties
When making connections with the product or cleaning the product, be sure to
disconnect the power plug beforehand. Failure to do so may result in electric shock
or malfunction of the product. When cleaning the product, do not use volatile
solvents such as thinner.
Do not cover the HDMA-4000 ventilation
Do not use the HDMA-4000 covered with a cloth or in an ill-ventilated room.
Covering the vent may cause heat inside of the product resulting in fire or product
malfunction.
5
Notices & Warranties
CE Notice
WARNING
This is a Class A product. In a domestic environment this product may cause radio
interference in which case the user may be required to take adequate measures.
FCC Notice
This equipment has been tested and found to comply with the limits for a Class A
digital device, pursuant to Part 15 of the FCC Rules. These limits are designed to
provide reasonable protection against harmful interference when the equipment is
operated in a commercial environment. This equipment generates, uses, and can
radiate radio frequency energy and, if not installed and used in accordance with the
instruction manual, may cause harmful interference to radio communications.
Operation of this equipment in a residential area is likely to cause harmful interference
in which case the user will be required to correct the interference at his own
expense.
Declaration of Conformity
According to FCC Part 15
Responsible Party Name:
Canopus Corporation
Address:
711 Charcot Avenue, San Jose, CA 95131
Telephone:
408-954-4500
Declares that product Model: HDMA-4000
Complies with Part 15 of the FCC Rules.
6
Notices & Warranties
Product Notes
Notices & Warranties
1. Unauthorized copying of a portion or the entirety of this product is prohibited.
2. The description and specifications of this product are subject to future change
without notice.
3. The description of this product has been prepared to be as complete as possible.
If the reader is aware of any questionable points, errors or omissions, please
contact Canopus.
4. The company assumes no liability for the results of practical application,
regardless of item (3) above.
5. Regardless of whether negligence occurs during usage, the company assumes
no liability, even if there is a claim, for extraordinary, incidental or derivative
loss, including the loss of profits, that arise during practical application of this
product.
6. The analysis, reverse engineering, decompiling and disassembling of the
software, hardware or manuals that accompany this product, and all other
related products including miscellaneous supplemental items, are prohibited.
7. Canopus, as written in both English and Japanese, and its logo are registered
trademarks of Canopus Co., Ltd.
8. BX35F and BX50F are trademarks or registered trademarks of OMRON Corporation.
9. Pioneer and its logo are registered tradmarks of Pioneer Corporation.
10. Microsoft and Windows are registered trademarks of Microsoft Corporation,
USA. Other product names and the like are trademarks or registered trademarks
of the respective companies.
About the Documentation
This document is the HDMA-4000 User Guide.
Information not listed in this document may be listed elsewhere.
In cases where there is a difference between a description in this document and an
actual operation method, the actual operation method takes precedence.
In this manual, the unique features of the HDMA-4000 and the common features of
the HDMA-4000 and the HDMA-4000Sync are collectively described as those of the
HDMA-4000, while the unique features of the HDMA-4000Sync are described as
those of the HDMA-4000Sync.
The Microsoft® Windows® XP operating system is referred to as "Windows XP."
This document is written for users capable of performing basic PC operations. If
there is no special description of an operation, perform that operation in the same
manner as a general PC operation.
To simplify the descriptions, the actual product may differ from the illustrations and
screenshots.
Firmware version
The descriptions of the operation in this manual are based on those of the firmware
version 2.0 or later.
7
Table of Contents
Table of Contents
Chapter 1
Introduction ...................................................................................12
Notes regarding usage ............................................................................. 12
Verify package contents ........................................................................... 12
Canopus website....................................................................................... 13
GNU General Public License .................................................................... 13
Replacement of the HDD and fan ............................................................. 13
HDMA-4000 ...................................................................................14
Overview ................................................................................................... 14
Features of the HDMA-4000/HDMA-4000Sync ....................................... 15
Features of HDMA-4000Sync ................................................................... 15
Chapter 2
HDMA-4000 Part Names ...............................................................18
HDMA-4000/HDMA-4000Sync Front Panel ............................................. 18
HDMA-4000 Rear Panel ............................................................................ 20
HDMA-4000Sync Rear Panel .................................................................... 21
Remote Controller ..................................................................................... 22
Ferrite core ................................................................................................ 23
Connecting the HDMA-4000 .........................................................24
Contents of the product CD ..........................................................26
Chapter 3
HDMA Scheduler Overview ..........................................................28
What's HDMA Scheduler? ........................................................................ 28
Installation ......................................................................................29
Installing HDMA Scheduler ...................................................................... 29
Uninstallation .................................................................................31
Uninstalling HDMA Scheduler .................................................................. 31
Using HDMA Scheduler ................................................................33
8
Table of Contents
Chapter 4
Startup and shutdown ...................................................................48
Startup ....................................................................................................... 48
Shutdown .................................................................................................. 49
WOL (Wake On LAN) ................................................................................ 50
Table of Contents
Starting HDMA Scheduler ........................................................................ 33
HDMA Scheduler Main Screen ................................................................ 34
Menu bar ................................................................................................... 35
Creating a schedule .................................................................................. 40
Exporting a schedule ................................................................................ 44
Saving a schedule ..................................................................................... 45
Loading a schedule ................................................................................... 46
Reference 1
Contents update ............................................................................52
Contents update via a network................................................................. 52
Contents update via USB .......................................................................... 55
Description of the contents update control file ....................................... 56
Description examples ............................................................................... 57
Reference 2
How to create contents .................................................................60
Output parameter settings........................................................................ 60
How to create a schedule..............................................................62
Description of schedule text ..................................................................... 62
Operation when the schedule file is invalid ............................................. 65
Examples of a schedule ............................................................................ 66
Reference 3
Serial control .................................................................................72
Command descriptions (Pioneer LD/DVD mode) .................................... 73
Command descriptions (HDMA-4000 Ver.1.X mode) ............................. 82
9
Table of Contents
Error codes ................................................................................................ 83
How to use serial control .......................................................................... 84
Managing a content file ............................................................................ 85
Reference 4
Setup using the front panel...........................................................90
Settings menu ........................................................................................... 90
Setup using Web browser ...........................................................100
Accessing the HDMA-4000 Setup page .................................................. 100
Preparation and starting the Web console ............................................. 100
HDMA-4000 Setup Page .......................................................................... 102
Updating firmware........................................................................118
How to update.......................................................................................... 118
Maintenance Mode .......................................................................119
Maintenance Mode overview .................................................................. 119
Firmware recovery ................................................................................... 121
If you have forgotten the user name or the password ........................... 123
Reference 5
Sync playback using the HDMA-4000Sync .................................126
Connecting devices ................................................................................. 126
HDMA-4000Sync settings........................................................................ 127
Contents ................................................................................................... 128
Playback ................................................................................................... 128
Available Combination of HDMA-4000Sync units for external sync ..... 129
Appendix
Hardware Specifications ..............................................................132
Remote Control ID setting ............................................................137
Connecting to a UPS ....................................................................138
10
HDMA-4000
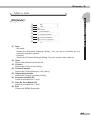
Chapter 1
This chapter describes the things to check before
setting up HDMA-4000.
- Introduction
- HDMA-4000
Chapter 1
Introduction
Notes regarding usage
IN NO EVENT SHALL CANOPUS BE LIABLE TO USER OR ANY OTHER PARTY
FOR INCIDENTIAL, CONSEQUENTIAL OR SPECIAL DAMAGES ARISING UNDER
THE USE OF THIS PRODUCT WHETHER UNDER THEORY OF CONTRACT, TORT,
INDEMNITY, PRODUCT LIABILITY OR OTHERWISE.
EXCEPT AS OTHERWISE EXPRESSLY PROVIDED HEREIN, CANOPUS MAKES NO
REPRESENTATIONS, EXTENDS NO WARRANTIES OF ANY KIND, EXPRESS OR
IMPLIED, INCLUDING THE WARRANTIES OF MARCHANTABILITY,
NON-INFRINGEMENT OR FITNESS FOR A PARTICULAR PURPOSE, AND ASSUMES
NO RESPONSIBILITY WITH RESPECT TO THE USE OF THIS PRODUCT HEREUNDER.
FURTHER, CANOPUS MAKES NO WARRANTIES OF PROPER OPERATION OF THIS
PRODUCT UNDER OTHER USAGE ENVIRONMENT THAN THAT RECOMMENDED
BY CANOPUS FOR THIS PRODUCT.
Unauthorized recording of copyrighted television programmes, compact discs,
digital versatile discs, video tapes and other materials may infringe the right of
copyright owners and be contrary to copyrights laws.
Verify package contents
Please verify that the following accompanying components are included in the
HDMA-4000 package. Product packaging is implemented with stringent quality
assurance measures.
- HDMA-4000 Unit
- AC adapter & cable
- BNC-RCA conversion connector (x3)
- Remote Controller
- AAA battery (x2)
- Ferrite core (x2)
- CD-ROM
- Manual
12
Chapter 1
Canopus website
GNU General Public License
This product utilizes the free software that uses GNU General Public License
(hereinafter “GPL”) or GNU Lesser General Public License (hereinafter “LGPL”) in a
part of the software.
Introduction
Including HDMA-4000, the latest company information is announced at our website
http://www.canopus.com. The latest drivers, utilities, product manuals, FAQs, etc.
are also available, from our website.
Replacement of the HDD and fan
While their lifespan varies according to the usage environment, the HDD and fan are
devices that must be periodically replaced. For trouble-free use of the HDMA-4000,
replace the internal HDD and fan after each year of operation. To replace these
items, contact your local retailer or the organization that installed the system.
13
Chapter 1
HDMA-4000
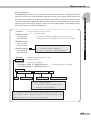
Overview
The HDMA-4000 is a device that plays HD content stored on its internal HDD or
on a network. Contents can easily be updated from a network or a memory card.
Scheduled playback and remote serial control are also supported. By using a
memory drive instead of the internal HDD, a stable playback environment with no
moving parts is available.
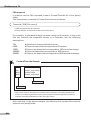
An example of the HDMA-4000 unit connection.
LAN
Contents can be updated
via a network
Video output
RS-232C
Component/DVI/
S-Video/Composite
System controller
DU-100P
Switch
Audio output
Data is updated with a USB memory device
Coaxial (digital)/
Composite (analog)
Direct Playback of the contents of an
external drive (FAT32) is supported
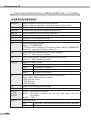
In addition to the features of the HDMA-4000, the HDMA-4000Sync has a REF IN
(External reference signal input) port, enabling playback in external sync mode and
synchronization of multiple HDMA-4000 units.
An example of synchronized playback with the HDMA-4000Sync.
Projector
RS-232C
Switch
Video output
System controller
DU-100HP
Master
HUB
HDSC1
Reference
signal
Distributor
Slave
LAN
Three-screen multi-monitor
Slave
Power amplifier
(Dolby Digital decoder)
The control signal input to the master unit will
be transmitted to slave units via LAN.
14
Speaker
(5.1 ch)
Chapter 1
Features of the HDMA-4000/HDMA-4000Sync
- Various customized systems can be established.
There are many functions that can be used for various purposes including an
auto-playback system using the scheduler, or a system from which contents can
be played by using touch-panel operations.
HDMA-4000
- Superior cost performance.
The HDMA-4000 has ample functions for an HD playback system and provides
superior cost performance.
- Provides a total solution - from editing to playback.
Capture video from a HDV camera onto the timeline of the Canopus HD. Use
the canopus HD editing system to capture and export the edited video as a
MPEG file. When the HDMA-4000 is connected via a network, the workflow from
editing to playback can be consolidated.
- Supports DVD/LD player compatible command controls
Commands compatible with the Pioneer DVD/LD player are supported. The
HDMA-4000 can replace DVD/LD players without any loss of functionality.
- Supported files
MPEG2 transport stream *
MPEG2 program stream *
* MPEG1 Audio Layer2, AAC (LPCM output) and AC3 (SPDIF output only) audio are
supported.
Features of HDMA-4000Sync
- Supports playback in external sync mode
With a BB/3-value sync signal input, the video output from the HDMA-4000Sync
can be synchronized with the reference signal.
- Supports synchronization of multiple units
With HDMA-4000 master and HDMA-4000 slave units specified on a network,
the HDMA-4000 master unit can be operated to synchronize the playback timing
of the HDMA-4000 slave unit.
15
Chapter 1
16
HDMA-4000
Chapter 2
This chapter describes the functions of the
HDMA-4000.
- HDMA-4000 Part Names
- Connecting the HDMA-4000
- Contents of the product CD
Chapter 2
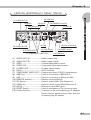
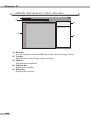
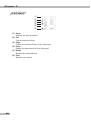
HDMA-4000 Part Names
HDMA-4000/HDMA-4000Sync Front Panel
(3) STORAGE LED
(4) LINK LED
(5) KEY LED
(2) POWER LED
(6) Infrared receiver
(1) LCD
(7) Select Key
(8) F1 Key
(10) F3 Key
(9) F2 Key
(11) MENU Key
(12) STOP Key
(13) PLAY/ENTER Key
(1) LCD ...............................Displays the current operation status and setting
menus.
(2) POWER LED .................Lights when HDMA-4000/HDMA-4000Sync operates.
- Unlit ........... Power is not on.
- Lit ............... Operating
- Blinking ...... Starting up/Shutting down
(3) STORAGE LED .............Lights up when the internal HDD is being accessed.
(4) LINK LED ......................Lights when HDMA-4000 and/or HDMA-4000Sync
is connected to a network (via a hub or other such
device).
- Unlit ........... Not connected to a network device
(Switching Hub, etc.)
- Lit ............... Connected to a network device, but
not sending/receiving data.
- Blinking ...... Connected to a network device, and
sending/receiving data.
(5) KEY LED .......................Lights when receiving a key signal from an infrared
remote controller or an external remote terminal.
(6) Infrared receiver ...........Built in infrared receiver for remote controllers.
18
Chapter 2
HDMA-4000 Part Names
(7) Select Key ....................When multiple files are registered in the current
schedule file, use the
key to play the next file.
When a file is being played repeatedly, playback
jumps to the top of the file. In the settings menu,
/
keys to select items, the
key to
press the
cancel or the key to accept the changed settings.
(8) F1 Key ...........................Depending on the channel names defined in the
schedule file, the content corresponding to KEY 1
will be played.
(9) F2 Key ...........................Depending on the channel names defined in the
schedule file, the content corresponding to KEY 2
will be played.
(10) F3 Key ...........................Depending on the channel names defined in the
schedule file, the content corresponding to KEY 3
will be played.
(11) MENU Key ....................Switches between the main screen and the setting
menus on the LCD.
(12) STOP Key .....................Stops playback. Used as the Cancel key in the setting
menus.
(13) PLAY/ENTER Key .........Starts playing the content. Used as the Enter key in
the setting menus.
19
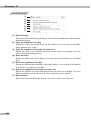
Chapter 2
HDMA-4000 Rear Panel
(8) USB Port
(1) AUDIO OUT (L)
(3) SPDIF
(6) DVI-D
(10) REMOTE terminal
(13) Theft prevention slot
(4) VIDEO OUT
(2) AUDIO OUT (R)
(5) S VIDEO OUT
(9) LAN
(11) DIP Switch
(7) COMPONENT VIDEO OUT
(1)
(2)
(3)
(4)
(5)
(6)
(7)
(8)
(9)
(10)
(11)
(12)
(13)
(15) Power terminal
(14) RESET Switch
(12) COM Port
AUDIO OUT (L)....................... Audio output (left).
AUDIO OUT (R) ...................... Audio output (right).
SPDIF ...................................... Coaxial digital audio output.
VIDEO OUT ............................ Composite video signal output.
S VIDEO OUT ......................... S-video signal output.
DVI-D ...................................... DVI-D terminal
COMPONENT VIDEO OUT .... Component video (Y/Pb/Pr) signal output.
USB Port ................................. Port for connecting a USB device.
LAN ......................................... Port for connecting an Ethernet cable.
REMOTE terminal .................. Remote control terminal.
DIP Switch .............................. Used to enable WOL (See Chapter 4).
COM Port................................ Used for serial control (See Reference 3).
Theft prevention slot ............. Slot for theft prevention devices such as wire
or cable locks.
(14) RESET Switch ........................ Used in emergencies. Do not use to reset.
(15) Power terminal ....................... Connects to the accompanying AC adapter.
Never connect anything here other than the
accompanying AC adapter.
20
Chapter 2
HDMA-4000Sync Rear Panel
(3) SPDIF
(6) DVI-D
(10) REMOTE terminal
(4) VIDEO OUT
(2) AUDIO OUT (R)
(5) S VIDEO OUT
(13) REF IN
(9) LAN
(11) DIP Switch
(7) COMPONENT VIDEO OUT
(1)
(2)
(3)
(4)
(5)
(6)
(7)
(8)
(9)
(10)
(11)
(12)
(13)
(14)
(15)
(15) Power terminal
(14) RESET Switch
HDMA-4000 Part Names
(8) USB Port
(1) AUDIO OUT (L)
(12) COM Port
AUDIO OUT (L)....................... Audio output (left).
AUDIO OUT (R) ...................... Audio output (right).
SPDIF ...................................... Coaxial digital audio output.
VIDEO OUT ............................ Composite video signal output.
S VIDEO OUT ......................... S-video signal output.
DVI-D ...................................... DVI-D terminal
COMPONENT VIDEO OUT .... Component video (Y/Pb/Pr) signal output.
USB Port ................................. Port for connecting a USB device.
LAN ......................................... Port for connecting an Ethernet cable.
REMOTE terminal .................. Remote control terminal.
DIP Switch .............................. Used to enable WOL (See Chapter 4).
COM Port................................ Used for serial control (See Reference 3).
REF IN ..................................... Reference input (BNC) port..
RESET Switch ........................ Used in emergencies. Do not use to reset.
Power terminal ....................... Connects to the accompanying AC adapter.
Never connect anything here other than the
accompanying AC adapter.
21
Chapter 2
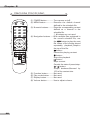
Remote Controller
(1)
(2)
(3)
(4)
(5)
(6)
(7)
22
(8)
(1) POWER button .............Turns power on/off.
(2) MENU button ...............Executes the default channel
defined in the schedule file.
(3) Numeric buttons ..........Plays the corresponding content
defined as a chennel in the
schedule file.
*, # buttons are not used.
(4) Navigation buttons ......With multiple files registered in
the current schedule file, use
button to play the next
the
file. When a file is being played
repeatedly, playback jumps to
the top of the file.
button:
Pauses the playing content.
button:
Stops the playback.
button:
Plays content.
Cancels the state of pause/stop.
/
button:
Jumps backword/forward by
1/10 of the content size.
(5) Function button............Not used.
(6) Play mode button ........Not used.
(7) Display button ..............Not used.
(8) Volume button .............Use to adjust volume.
Chapter 2
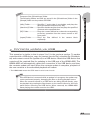
Ferrite core
Attach the ferrite core to the Ethernet and AC cable in the position shown below.
HDMA-4000 Part Names
HDMA-4000 side
23
Chapter 2
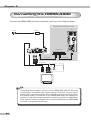
Connecting the HDMA-4000
Connect the HDMA-4000 and the peripherals, referring to the diagram below.
Required when network is used
PC
To outlet
AC Adapter
Switching hub
BNC-RCA
conversion plug
Ethernet cable
Ethernet cable
Component cable
D component cable
Audio cable
D connector
TV monitor (component input)
te
No
Connecting the AC adapter will turn on the HDMA-4000 and will also start
connecting to the network with certain settings. Therefore, connect the AC
adapter after ensuring that all the other cables are connected properly. When
the network cable is connected to the HDMA-4000 after the hardware is
turned on, it may take some time before a network connection is established.
(Even when a network connection has not been established, the HDMA-4000
is turned on and playback will start).
24
Chapter 2
te
No
te
No
For more information on network settings, see "Setup using the front panel"
or "Setup using Web browser" in Reference 4 and confirm that the HDMA4000 Setup page is displayed on the PC monitor.
Connecting the HDMA-4000
For more information on the video settings, see "Setup using the front panel"
or "Setup using Web browser" in Reference 4 and modify the settings to suit
your TV monitor.
25
Chapter 2
Contents of the product CD
- Control files
Representative control files for updating contents to be used on the HDMA4000.
- Schedule files
Schedule file samples to be used on the HDMA-4000.
- Sample movies
Movie samples that can be played on the HDMA-4000.
- HDMA Scheduler
Software to register/create/output a video file stored on a PC as schedule
contents for the HDMA-4000.
- HDMA-4000/HDMA-4000Sync firmware
Firmware used in the HDMA-4000/HDMA-4000Sync.
26
HDMA-4000
Chapter 3
How to use the HDMA Scheduler to update
the contents used for scheduled playback is
described in this chapter. (For information on
how to update the contents with serial controls,
see the Reference 1.)
- HDMA Scheduler Overview
- Installation
- Uninstallation
- Using HDMA Scheduler
* Updating contents
The HDMA-4000 supports scheduled playback
of contents and playback via serial controls.
Contents are managed separately for scheduled
playback and for serial controls.
Chapter 3
HDMA Scheduler Overview
What's HDMA Scheduler?
HDMA Scheduler is a software program that registers video files stored on your
computer as scheduled contents. You will also be able to save and export schedule
files.
Operation environment
HDMA Scheduler operation is not necessarily guaranteed even in the environments
satisfying all conditions below.
- OS
Microsoft Windows XP Home Edition/Professional Service Pack2 or later
- CPU
Intel Pentium 4 2.4GHz or higher
- Memory
256MB or larger
- Graphics
Support for resolution of higher than 1024 x 768 dot/32 bit
- Network interface
Ethernet 100BASE-TX or better (To update contents via Network)
- CD-ROM
Required for optional software installation
- USB
One free USB 1.1 port or higher (To use USB memory device)
te
No
In order to enable the file reference function of HDMA-4000, open Internet
Explorer, [Internet Option], [Connections], [LAN settings], and change the IP
address so that Internet Explorer can access the HDMA-4000 Web console.
28
Chapter 3
Installation
* Installation requires that the user be authorized as the administrator (such as the PC
administrator).
* Before starting installation close all applications running in the task tray.
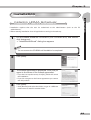
1
Installation
Installing HDMA Scheduler
Put the HDMA Scheduler CD-ROM in your CD-ROM drive, and doubleclick [setup.exe].
“InstallShield Wizard” dialog box appears
te
No
Do not remove the CD-ROM until installation is completed.
2
Click [Next].
3
The license agreement is displayed. Click [Yes] to
agree to the terms of the license agreement.
* If you don’t accept the terms, click [No], which will cancel
the installation.
* If you do not agree to the license agreement you cannot
use this product.
4
Click [Next].
* Click [Browse] and select the folder or type in a different
folder name to install in another folder.
29
Chapter 3
30
5
Click [Next].
6
Click [Next].
Installation of HDMA Scheduler starts.
7
Click [Finish].
Installation of HDMA Scheduler is completed.
Chapter 3
Uninstallation
If you don’t need to use HDMA Scheduler anymore, you can uninstall it.
* Uninstallation requires that the user be authorized as the administrator (such as a PC
administrator).
* Before starting uninstallation, close all the other applications running in the task tray.
1
Click select [Control Panel] from [Start] menu.
2
Click [Add or Remove Programs].
3
Select [HDMA Scheduler] and click [Change/Remove].
4
Click [OK].
Uninstallation starts.
5
Click [Finish].
Uninstallation
Uninstalling HDMA Scheduler
31
Chapter 3
6
32
Click [X].
Uninstallation is completed.
Chapter 3
Using HDMA Scheduler
1
From [Start] menu, select [All programs], [Canopus],
[HDMA Scheduler] and click [Scheduler]. Otherwise,
double-click the [HDMA Scheduler] icon on the
desktop.
[HDMA Scheduler] will start.
Using HDMA Scheduler
Starting HDMA Scheduler
te
No
The first time you run the HDMA Scheduler an introductory dialog will be
displayed. Click [Yes].
33
Chapter 3
HDMA Scheduler Main Screen
(1)
(2)
(4)
(3)
(5)
(1) Menu bar
You can configure/operate HDMA Scheduler. (See the pages follow).
(2) Tool bar
Displays the tools providing useful functions.
(3) Channel
Displays/Edits schedules.
(4) Calendar bar
Displays the calendar.
(5) Status bar
Displays the contents.
34
Chapter 3
Menu bar
(1)
(2)
(3)
(4)
(5)
(6)
(7)
(8)
(1) New
- Schedule
Opens the [Schedule Settings] dialog. You can set a schedule for the
currently selected channel.
- Channel
Opens the [Channel Settings] dialog. You can create a new channel.
(2) Open
Opens the selected item/channel.
(3) Content
Opens the [Content List] dialog.
(4) ContentCategory
Opens the [ContentCategory List] dialog
(5) Output the schedule
Opens the [Output schedule] dialog.
(6) Load the schedule file
Loads a schedule file (*.xml).
(7) Save As the schedule file
Saves a schedule file (*.xml).
(8) Exit
Closes the HDMA Scheduler.
Using HDMA Scheduler
[File] menu
35
Chapter 3
[Edit] menu
(1)
(2)
(3)
(4)
(5)
(6)
(1) Undo
Undoes the last operation.
(2) Cut
Cuts the selected item.
(3) Copy
Copies the selected item to the clipboard.
(4) Paste
Pastes the item stored in the clipboard.
(5) Delete
Deletes the selected item.
(6) Find
Searches a content.
36
Chapter 3
[View] menu
(6)
(7)
(8)
(9)
(10)
Using HDMA Scheduler
(1)
(2)
(3)
(4)
(5)
(1) Item
Specifies how the items are displayed (Only the title/Details).
(2) Channel
Specifies the channel width (Fixation/Variablenass).
(3) Move to today
Jumps to today’s calendar.
(4) Move to specified day
Opens the [Move To Specified Date] dialog, from which you can jump to a
specified date.
(5) Move to present time
Jumps to a specified time.
(6) Grid scale
Switches the timeline grids of the channel to the specified scale.
(7) Update in the latest information
Updates and displays the current information.
(8) Tool bar
Shows/Hides the tool bar.
(9) Status bar
Shows/Hides the status bar.
(10) Calendar bar
Shows/Hides the calendar bar.
37
Chapter 3
[Action] menu
(1)
(2)
(3)
(4)
(5)
(6)
(7)
(1) New Schedule
Opens the [Schedule Settings] dialog. You can set a schedule on the currently
selected channel.
(2) Copy the schedule of the day
Opens the [Copy the schedule of the day] dialog. You can copy a schedule
(date, channel) for a day.
(3) Copy the schedule selected by the time zone
Opens the [Copy the schedule selected by the time zone] dialog. You can
copy a schedule setting (time).
(4) Move all items
Opens the [Move All Items] dialog. You can move a schedule to a specified
time.
(5) Delete the schedule of the day
Opens the [Delete the schedule of the day] dialog. You can delete schedules
of a day by specifying a new date.
(6) Delete the schedule selected by the time zone
Opens the [Delete the schedule selected by the time zone] dialog. You can
delete schedules set in a period of time by specifying the period.
(7) New Channel
Opens the [Channel Settings] dialog. You can create a new channel.
38
Chapter 3
[Help] menu
(1)
Using HDMA Scheduler
(1) About Scheduler
Displays the HDMA Scheduler version.
39
Chapter 3
Creating a schedule
You can create a schedule using the HDMA Scheduler.
1
On a channel of the HDMA Scheduler main menu,
select a period in which you want to perform a
scheduled playback. Then select [File] menu,
[ContentCategory].
The [ContentCategory List] dialog opens.
2
Click [New].
The [ContentCategory Settings] dialog opens.
3
Fill the [Title] field and [Comment] field (if necessary),
and then click [OK].
The [ContentCategory Settings] dialog is closed.
4
A category is registered to the [ContentCategory
List] dialog.
Click [Close].
The [ContentCategory List] dialog is closed.
te
No
Repeat steps 1 to 4 for each of the number of contents you want to register.
5
40
Select [File] menu, [Content].
The [Content List] dialog opens.
Chapter 3
Select a content category created with Steps 1 to
4, and click [New].
The [Edit content] dialog opens.
7
Click [Add].
The [Open] dialog opens.
8
Select a content to register, and click [Open].
The [Open] dialog is closed.
9
Click [OK].
The [Edit content] dialog is closed.
10
The content has been registered to the list. Click
[Close].
The [Content List] dialog is closed.
Using HDMA Scheduler
6
te
No
Repeat steps 6 to 9 for each of the number of contents you want to register.
11
Select [Action] menu, [New Schedule].
The [Schedule Settings] dialog opens.
41
Chapter 3
42
12
Click [Select].
The [Content List] dialog opens.
13
Select a content to register as a schedule, and
click [OK].
The [Content List] dialog is closed.
14
The content to be played according to the schedule
will be registered in the [Schedule Settings] dialog.
Review the settings including [Start] and [End]
and click [OK].
The [Schedule Settings] dialog is closed.
15
Review the settings and click [Yes].
16
The schedule has been registered to the channel
on the HDMA Scheduler main screen.
Creating a schedule is now completed.
Chapter 3
te
No
Using HDMA Scheduler
You can assign the channel settings to the number keys [0]-[9] on the HDMA4000 Remote Controller.
To configure the channel settings, select [File] menu, [New], [Channel] and
open the [Channel Settings] dialog. Place a checkmark on [KEY] on the
[Channel Settings] dialog, select a KEY number from the pull-down menu,
and then click [OK].
43
Chapter 3
Exporting a schedule
You can export a created schedule as follows:
44
1
On a channel of the HDMA Scheduler main menu,
select a content you want to export. Then select
[File] menu, [Output the schedule].
The [Output schedule] dialog opens.
2
Click [Edit].
The [Output list] dialog opens.
3
Click [New].
The [Output Settings] dialog opens.
4
Type in the title you want to export, and specify
the destination. To export onto an HDMA-4000,
enter the destination IP address, and click [OK].
The [Output Settings] dialog is closed.
5
The destination is registered to the [Output list]
dialog. Click [Close].
The [Output list] dialog is closed.
6
Review the schedule settings and click [OK].
Exporting a schedule is now completed.
Chapter 3
Saving a schedule
You can save a created schedule file.
Select [File] menu, [Save As the schedule file].
The [Save As] dialog opens.
2
Specify the destination and the file name, and
click [Save].
Saving a schedule is now completed.
Using HDMA Scheduler
1
45
Chapter 3
Loading a schedule
You can load a saved schedule file.
46
1
Select [File] menu, [Load the schedule file].
The [Open] dialog opens.
2
Select a schedule file to load and click [Open].
Loading a schedule is now complete.
HDMA-4000
Chapter 4
This chapter provides details on how to startup/
shutdown the HDMA-4000.
- Startup and shutdown
Chapter 4
Startup and shutdown
Startup
Here is how to start up HDMA-4000.
1
Press the
controller.
POWER button on the remote
* If the remote controller has been disabled, the HDMA4000 cannot be started remotely. In this case, start it by
pressing the RESET switch on the rear panel.
The POWER LED on the HDMA-4000 unit will
blink, “Boot System” will be displayed on the
LCD and the HDMA-4000 will start.
Boot System
2
Once the HDMA-4000 has started, the POWER
LED will be on, the main menu will be displayed
on the LCD and the content will start playing.
HDMA-4000
PLAY
* The main menu displayed will differ according to the LCD
information settings.
Tip
If your remote controller does not function, it may be disabled in the HDMA4000 hardware settings, or the ID of the HDMA-4000 unit and that of the
remote controller may not match.
Press the MENU Key on the front panel to access the settings menu. Check
the Remote Control ID of the unit and modify the ID of the Remote Control
to the correct setting.
* For more information on the Remote Control ID, see “Remote Control ID
setting” in the Appendix.
48
Chapter 4
Shutdown
Here is how to close down HDMA-4000.
Press the
controller.
Startup and shutdown
1
POWER button on the remote
* If the remote control has been disabled, the HDMA-4000
cannot be shut down remotely. Press the MENU Key on
the front panel to access the settings menu and select
“Power off” in SHUTDOWN.
The POWER LED on the HDMA-4000 unit will
blink, “Shutdown...” will be displayed on the LCD
and the HDMA-4000 will shut down.
Shutdown...
te
No
Do not shut the HDMA-4000 unit down while a content or firmware update
is in progress.
te
No
Perform the shutdown procedures described above and make sure that the
POWER LED is off before disconnecting the power plug from the outlet,
otherwise the internal HDD or content files may be damaged.
49
Chapter 4
WOL (Wake On LAN)
WOL is a feature that can start the HDMA-4000 via a network when it is in a STOP
state. Shut down the HDMA-4000 with DIP switch 1 on the HDMA-4000 rear panel
set to ON, to activate the WOL (Wake on LAN) feature.
te
No
If the DIP switch is changed while the HDMA-4000 is turned off, the changed
setting will not be reflected. Start the HDMA-4000 first and then shut it down
to enable the change.
te
No
Do not change the settings of DIP switch 2 or DIP switch 3 on the HDMA4000 rear panel. These switches must remain OFF.
50
HDMA-4000
Reference 1
- Contents update
Reference 1
Contents update
The contents can be updated only by copying the Content Update Control file to a
USB memory device or to the shared folder on the HDMA-4000.
Similar to the contents update, update the schedule file by copying it in the same
manner.
* The contents are monitored separately for scheduled playback and for serial control.
Contents update via a network
To update the contents (movie files) and schedule file (Schedule.txt) stored on the
internal HDD of the HDMA-4000, the content files, schedule file and content update
control file (update.ctl) must be copied to the [content] folder (shared folder).
1
Run Internet Explorer, or Explorer, enter the IP
address (E.g.: \\192.168.0.16) in the address bar
and press the RETURN key.
* The IP address can be checked via the setting menu.
2
Open the [content] folder.
3
Copy the content file to the [content] folder.
4
Create the schedule file and copy it into the
[content] folder.
* The user name to access to the [content] folder is “HDMA4000” and the password is “hdp”.
* To play content using serial control, specify the title and
the chapter name within the folder structures.
* A sample schedule file can be found on the product CDROM, ([Schedule.txt] in the [samples] folder).
* The schedule file is not required if the contents are played
in serial control mode.
* For scheduled playback where the contents are
automatically played according to a specified date and
time, create a schedule file (Schedule.txt) with a text
editor.
52
Reference 1
5
Copy the [content] update control file (update.ctl)
to the [content] folder.
6
The content update starts.
The content playback stops and “update” is
displayed on the LCD. When the update is
complete, playback starts based on the new
schedule.
Contents update
* Copy the appropriate content update control file for your
intended purpose. When script files (such as delete.sh)
exist in the folder, copy the script file first before copying
the content update control file.
The sample data of the content update control file are on
the product CD-ROM ([content update] folder in the
[samples] folder).
- Content update control file for scheduled playback
[samples] folder - [content update] folder - [Schedule]
folder (For more information, see p.54).
- Content update control file for serial control
[samples] folder - [content update] folder - [Serial] folder
(For more information, see p.54).
update
* The HDMA-4000 enters the STOP state in serial control
mode.
53
Reference 1
te
No
When [Samba share] is set to [Enabled] on the [Local settings] of the Web
console, the [playlist] (content folder for scheduled playback) and the [serial]
(content folder for serial control) can be accessed directly in order to write/
save, without using the content update control files.
Make sure that the HDMA-4000 is stopped before updating/deleting contents
directly.
When contents are changed without using content update functions, be sure
that the HDMA-4000 recognizes that the contents have been changed. In
scheduled playback mode, press the [MENU] button on the remote control,
or switch to serial control mode once and then return to scheduled playback
mode. In serial control mode, switch to scheduled playback mode once and
then return to serial control mode (see Reference 3).
Tip
Contents of the [Schedule] folder and [Serial] folders
Samples of the update control files are stored in the [Schedule] and [Serial]
sub-folders of the [content update] folder in the [Samples] folder on the
product CD-ROM. The sample files are categorized by function and stored
in the following folders:
[backup] Folder ...................... Moves the contents that have been stored
in the HDMA-4000 to a backup folder and
downloads the new contents. The contents in
the backup folder will not be deleted.
The contents and the schedule files in the
backup folder can be restored (See the [restore]
folder section).
[backup and delete] Folder ... Moves the contents which have been stored
in the HDMA-4000 to a backup folder and
downloads the new contents. The contents in
the backup folder will be deleted.
[copy] Folder ......................... Adds new contents to the HDMA-4000 and
keeps the contents that have already been
stored. If the contents have the same name,
the files will be overwritten.
[delete] Folder ....................... Deletes the contents stored in the HDMA-4000.
The contents in the backup folder will not be
deleted.
[delete all] Folder ................... Deletes all the contents stored in the HDMA4000. The contents in the backup folder will
also be deleted.
[play] Folder ........................... Regardless of the schedule file or serial control,
plays the contents stored in the HDMA-4000
consecutively. The details of the contents can
also be viewed.
[restore] Folder ...................... Restores the contents and the schedule files
from the backup folder. The backup file contents
will be restored in chronological order, with the
most recent contents first.
54
Reference 1
Tip
[daily] Folder ................ Specifies ‘*’ as the date in a schedule, and plays the
same scheduled contents every day.
[date-time] Folder ........ Specifies the date and the time and plays the specified
contents at the specified time.
[RC] Folder ................... Plays the content defined as a channel corresponding
to the key operation from the remote control or the
front panel.
[repeat] Folder ............. Plays the files defined in the content block
repeatedly.
Contents update
Contents of the [Schedule.txt] folder
The following folders and files are stored in the [Schedule.txt] folder in the
[Sample] folder on the product CD-ROM.
Contents update via USB
This operation is similar to that in steps 3 to 5 in the previous section. To update
contents with a USB device, copy the content (movie file), schedule file (Schedule.
txt) and content control file (update.ctl) to a USB device. Attach the USB device that
contains all the required files for updating to the USB port of the HDMA-4000. The
HDMA-4000 will automatically detect the connection of the USB device and then
the contents update will start. When the contents update is complete, playback of
the new contents or the scheduled playback will restart.
* The HDMA-4000 enters the STOP state in serial control mode.
te
No
If the USB device is removed while an update is in progress, the update may
not be performed properly, damaging the files or causing playback errors.
When the contents stored on a USB device are being played directly, stop
the playback by pressing the Stop button on the remote control or the front
panel before removing the USB device. When removed, the HDMA-4000
starts playing the content stored on the HDD.
55
Reference 1
Description of the contents update control file
’#’ precedes comments. Comments can be added anywhere.
Items are delimited by a space, a tab or a comma.
Write the data type to update after “*Update” on the first line.
*Update datatype
datatype
*Schedule
Updates data for scheduled playback.
*Serial
Updates data for serial controlled playback.
*Play playlist.schedule
Plays file directly without updating.
If playlist.schedule (the schedule file name to
be used for playback) is omitted, the default file
(Schedule.txt) will be used.
*Update filename
Updates the HDMA-4000 firmware (restarts the unit once
the update has been completed).
Write the copy method after “*Copy” on the second line.
This section is required when “*Update” is “*Schedule” or “*Serial.”
*Copy copytype
Copytype
*copy
*file
*backup
*restore
*play
Copies data to the playback folder.
Copies the files specified by the “*File” command to the
playback folder.
Backs up and copies the data in the playback folder.
Restores the most recent backup (the data in the playback
folder will be erased).
Plays all the files in the playback folder, one by one.
Write the third line if necessary.
This section will be ignored, unless “*Update” is with “*Schedule” or “*Serial.”
*Delete
*Delete *backup
*File
*Script
56
Deletes the specified file.
Deletes the backup file.
Specifies the file to copy, when “*Copy” is specified as “*file.”
Executes a shell script.
Reference 1
Content update control file description sample
Contents update
# HDMA-4000 content update file
# Write the data type to update on the first line.
*Update
*Schedule
## [*Schedule | *Serial | *Play | *Update] - Write one of these.
# *Schedule - Data for scheduled playback.
# *Serial
- Data for serial controlled playback.
# *Play
- Plays file without updating.
# *Update - HDMA-4000 firmware update.
*Copy
*backup # Backs up and copies data.
## [*copy | *file | *backup | *restore] - Write one of these.
#*Delete *backup
#*Script script01, script02, script03, script04
# Executes scripts one by one.
Description examples
Restoring the most recent backup
*Update
*Copy
*Schedule
*restore
te
No
Although the use is limited, the contents of a USB device can be played
directly. When the contents stored on a USB device are being played
directly, stop the playback by pressing the Stop button on the remote control
or the front panel before removing the USB device. When the USB device is
removed, the HDMA-4000 starts playing the contents stored on the HDD.
57
Reference 1
Copying/deleting the specified files
*Update *Schedule
*Copy
*file
*file
sample1.m2t
*file
sample2.m2t
*Delete sample3.m2t
Updating serial control files
*Update
*Copy
*Serial
*copy
Playing contents directly without copying
*Update
*Play
Playing all the files for scheduled playback one by one
*Update
*Copy
58
*Schedule
*play
HDMA-4000
Reference 2
- How to create contents
- How to create a schedule
The method explained in this chapter is an
example. To create a movie that can be played
on the HDMA-4000 unit, it must be encoded with
proper settings.
If you have any difficulty with creating movies,
please consult your local retailer.
Reference 2
How to create contents
Output parameter settings
60
1
Run ProCoder 3.0.
From the [Start] menu, select [All programs],
[Canopus], [ProCoder 3], [Canopus ProCoder 3].
2
Confirm that [Source] is selected in the left field
of the window. Click [Add] and choose the clip to
convert.
3
The source clip is added to the list.
4
Click the [Target] button to open the target
selection screen.
5
Click the [Add] button.
6
In the preset selection dialog, select [System],
[MPEG/VOB file exporter (software)] or [MPEG
file exporter (hardware)] and click [OK].
Reference 2
The conversion target is added to the list.
8
Click the [Advanced] button and set the parameters.
9
Click the [Convert] button.
10
Click the [Convert] button.
The file conversion starts. The converted file will
be created in the folder specified by [Path] in
Step 8.
* Recommended values for MPEG2 format.
- [Audio Stream Type] ... [MPEG Audio layer2]
- [Interlacing] .................. [Upper / Top Field First]
- [Profile / Level]............. [MP@HL]
* The HDMA-4000 supports MP@HL, MP@H14 and
MP@ML.
- [Video Bitrate] .............. Up to 40Mbps is recommended.
- Check [Put Sequence Header on each GOP].
How to create contents
7
te
No
The content name is case sensitive.
61
Reference 2
How to create a schedule
To execute scheduled playback on the HDMA-4000, create a schedule file with a
text editor and register (copy) it to the HDMA-4000 unit.
Description of schedule text
A schedule file is a text file named "Schedule.txt." It consists of a content definition
block and a schedule definition block.
* The composition of a schedule file varies, depending on the settings.
* The file name is case sensitive.
- Content definition block
Starting with ";Contents", it describes the content name and the content files
which are included in each block.
Write the content name at the top of the line. To specify content files, add a "Tab"
at the top of the line and write the path name (the relative path from the folder
where Schedule.txt has been saved).
* Define the contents, which are specified in the schedule, here.
The content file cannot be specified directly with the content name.
- Schedule definition block
Starting with ";Schedule", it describes the channel name and its schedule. When
multiple channels (schedules) are written, the first channel will be executed
(default setting).
Write the channel name and the date of the schedule at the top of the line and
add a TAB at the top to insert the Time. (Where "*" is specified as the Date or
Time, the schedule is executed when no schedule entry matches the current
time and date). If no schedule entry matches the current date and time, the
HDMA-4000 will enter the Stop state.
Seamless playback and volume adjustment are available in the scheduled
playback.
* Seamless playback
Seamless playback is a function whereby two different files are played seamlessly. With
the HDMA-4000, files described in the same content can be played seamlessly. To enable
seamless playback, add "1" (1: ON, 0: OFF) after the content name in the content definition
block (See *1 on the next page). The files used in seamless playback have to be encoded in the
same format and have the same parameters. Files in different formats (e.g.. MPEG2 transport
stream/program stream) cannot be used for seamless playback. When the parameters of the
files are different, the second or later files may not play properly.
62
Reference 2
--- Content definition block starts
;Contents
HDMAContents0 *1 --- Content name
--- Content file (Needs a TAB at the top of the line)
movie01.m2t
--- Change lines for multiple files and write similarly.
movie02.m2t
HDMAContents1 *1
movie11.m2t
movie12.m2t
HDMAContents2 0
movie21.m2t
movie22.m2t
Flag for seamless playback
0 --- Disables seamless playback
1 or none --- Enables seamless playback
How to create a schedule
* Volume adjustment
The HDMA-4000's volume can be changed according to the schedule. To adjust the volume,
write the volume value, such as 50,50 (meaning left volume is 50, right volume is 50) at the
end of the content name in the schedule definition block (See *2 below). The volume values
can be specified in the range 0-50. When a volume value is not specified, the current volume
setting is used. Please do not specify a value out of the setting range. In the default setting,
the volume value is specified as 50,50 (0db).
;Schedule --- Schedule definition block starts
--- Channel name
Channel1
2005/01/23 --- Date of the schedule
12:00:00-12:10:00 0 HDMAContents0 --- Content playback schedule
12:10:00-13:00:00 1 HDMAContents1 *2
2005/01/24
00:00:00-23:59:59 1
Date
Playback time
HDMAContents0 30,30
Content name
Volume (Left, Right)
Flag for repeat playback
0 --- Stops when content playback ends
1 --- Repeats content playback
In the default setting, the channel appearing on the next line
after the line where ";Schedule" appears will be executed as the
default channel. (This setting can be changed.)
63
Reference 2
te
No
- The content file name and channel name have to start with letters [a-z, A-Z].
Available characters are [0-9, a-z, A-Z, |#$%&'()+-:;[]^_`{}?].
- The content file name, content name and channel name are case sensitive.
- If the content name and the repeat flags of the consecutive schedules are
the same, they are treated as a single schedule.
- Empty lines and lines starting with "#" in a schedule file will be ignored.
- The maximum length of a line in a schedule file is 1,023 bytes, including
the linefeed code.
- The time, repeat flag, content name, seamless flag and volume value have
to be delimited by a TAB.
Keys and channel names
The channel names "KEY1" to "KEY9" and "KEY0" are used as the schedule that is
executed when the relevant key is pressed on the remote control, front panel or
USB keyboard.
The channel names (KEY1 - KEY0) correspond to the following keys:
KEY1 ............. Button 1 on the remote control , F1 on the Front panel,
1 on a USB keyboard (numeric keypad).
KEY2 ............. Button 2 on the remote control , F2 on the Front panel,
2 on a USB keyboard (numeric keypad).
KEY3 ............. Button 3 on the remote control, F3 on the Front panel, 3
on a USB keyboard (numeric keypad).
KEY4 ............. Button 4 on the remote control or 4 on a USB keyboard
(numeric keypad).
KEY5 ............. Button 5 on the remote control or 5 on a USB keyboard
(numeric keypad).
KEY6 ............. Button 6 on the remote control or 6 on a USB keyboard
(numeric keypad).
KEY7 ............. Button 7 on the remote control or 7 on a USB keyboard
(numeric keypad).
KEY8 ............. Button 8 on the remote control or 8 on a USB keyboard
(numeric keypad).
KEY9 ............. Button 9 on the remote control or 9 on a USB keyboard
(numeric keypad).
KEY0 ............. Button 0 on the remote control or 0 on a USB keyboard
(numeric keypad).
64
Reference 2
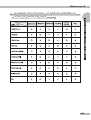
Operation when the schedule file is invalid
Error
When the file specified in the content
definition block does not exist.
When the content specified in the
schedule definition block cannot be
found in the content definition block.
When the end time is earlier than the
start time in the schedule definition
block.
When the same dates exist in a
schedule definition block.
When multiple content definition
blocks or schedule definition blocks
have the same names.
If multiple contents or channels have
the same names.
Operations
The next file will be played.
Playback will be stopped.
The schedule will be ignored.
The last schedule entry will be
executed.
Playback will be stopped.
How to create a schedule
When errors exist in the entries of a schedule file, the HDMA-4000 operates as
follows:
Playback will be stopped.
65
Reference 2
Examples of a schedule
In this section, the examples are explained in an environment where the contents
are stored as follows:
Content folder for scheduled playback
Schedule.txt
movie0.m2t
movie1.m2t
movie2.m2t
Repeating the playback of files
;Contents
HDMAContents
movie0.m2t
movie1.m2t
* When the schedule file consists of only a content definition block, the first
content will be played repeatedly.
66
Reference 2
Playing the same schedule every day
How to create a schedule
;Contents
HDMAContents0
movie0.m2t
HDMAContents1
movie1.m2t
HDMAContents2
movie2.m2t
;Schedule
Channel1
* --- Specify the wildcard character as the schedule date.
08:00:00 1 HDMAContents0 --- Plays from 08:00 to 11:59
12:00:00 1 HDMAContents1 --- Plays from 12:00 to 18:59
19:00:00 1 HDMAContents2 --- Plays from 19:00 to 20:59
--- Stops from 21:00 to 23:59
21:00:00
* When the end time is omitted, the schedule is considered as having
23:59:59 specified as the end time.
* When multiple schedules contradict each other, the last one will be used.
* When no content name appears in a schedule, the playback stops for the
duration specified in the schedule.
Schedule that runs past midnight (0:00)
To play the movie0.m2t repeatedly from 23:00 on December 31 to 01:00 on January 1
;Contents
HDMAContents0
movie0.m2t
;Schedule
Channel1
2005/12/31
23:00:00-23:59:59
2006/01/01
00:00:00-01:00:00
1
HDMAContents0
1
HDMAContents0
* The content names and the repeat flags have to be the same.
67
Reference 2
To play the movie0.m2t repeatedly from 23:00 to 1:00 (25:00) every day
;Contents
HDMAContents0
movie0.m2t
;Schedule
Channel1
*
00:00:00-01:00:00
23:00:00-23:59:59
1
1
HDMAContents0
HDMAContents0
* The content names and the repeat flags have to be the same.
Playing a different schedule on a specified date only
;Contents
HDMAContents0
movie0.m2t
HDMAContents1
movie1.m2t
HDMAContents2
movie2.m2t
;Schedule
Channel1
2006/01/15
11:00:00-12:59:59 1 HDMAContents2
*
# On a date other than the above one, the following schedule is executed
00:00:00-11:59:59 1 HDMAContents0
12:00:00-23:59:59 1 HDMAContents1
68
Reference 2
Adjusting volume
1
1
1
1
HDMAContents0 20,20
HDMAContents1 50,50
HDMAContents2
HDMAContents2 30,30
Changes volumes according to the schedule.
How to create a schedule
;Contents
HDMAContents
movie.m2t
HDMAContents0
movie0.m2t
HDMAContents1
movie1.m2t
;Schedule
Default
*
00:00:00-07:59:59
08:00:00-16:59:59
17:00:00-21:59:59
22:00:00-23:59:59
Specifying the time to shut the unit down
;Contents
HDMAContents
movie.m2t
;Schedule
Default
*
00:00:00-07:59:59
1
@poweroff
Shuts the unit down at the specified
time.
* In the example above, the unit will be turned off at 00:00:00. (When a period
of time is specified, power off will be executed at the time given on top (at
00:00:00 in the example above).
69
Reference 2
Playing the content specified by the buttons on the front panel
or the remote control
;Contents
HDMAContents
movie0.m2t
HDMAContents0
movie1.m2t
HDMAContents1
movie2.m2t
;Schedule
Default
* 1 HDMAContents
KEY1
* 1 HDMAContents0 --- Played repeatedly
KEY2
* 0 HDMAContents1 --- Returns to the default schedule when playback stops
* The schedule specified as the channel corresponding to the key is executed.
* If no channel in the schedule corresponds to a key, nothing will happen.
* If the date is not specified, the time is set to "*" and the repeat flag is set
to 0 and when the playback of the content ends, the schedule of the first
channel specified the schedule file is executed.
Seamless playback setting
;Contents
HDMAContents1
movie.m2t
movie1.m2t
movie2.m2t
HDMAContents0
movie1.m2t
movie1.m2p
1
--- Seamless enabled
0
--- Seamless disabled
* When the seamless setting is not specified, the HDMA-4000 executes
seamless playback.
70
HDMA-4000
Reference 3
- Serial control
Reference 3
Serial control
The HDMA-4000 can be controlled from a device connected to the serial port.
The HDMA-4000 has two serial command modes: Pioneer LD/DVD mode, which is
more compatible with a Pioneer CD/DVD, and HDMA-4000(Ver.1.1x) mode, which
is a traditional serial control command mode.
These modes can be changed via a Web browser’s settings page. (See Reference 4).
te
No
Synchronized playback of the HDMA-4000 is only available in the Pioneer
LD/DVD mode.
- Connection
Connect a device which has a RS-232C port to the HDMA-4000 with a serial
cable (to connect to a PC, use a cross-over cable).
- Network transmission setting
The default settings are: 9600bps, 8bits, no parity, stop bits 1. The settings can
be modified with a WEB browser (See Reference 4).
- Command
The two characters, <CR>(0x0d) are required at the end of the command line.
When the connection and the settings are done properly, R<CR> is returned. If
an error occurs, xx<CR>* is returned.
* xx Substitutes for the error number.
Multiple commands can occur on a line (Up to 25 characters).
In command controls, do not issue further commands until a response has been
received to the previous one.
When network serial control is enabled on the Web console, the HDMA-4000
can be controlled with the same commands via the network. (Connect a device
to a specified port, 12000 is the default setting, with terminal communication
software such as Telnet.)
te
No
In serial control mode, files with the extension m2p, m2t or mpg are
recognized as content files.
72
Reference 3
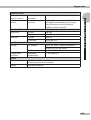
Command descriptions (Pioneer LD/DVD mode)
While the Pioneer LD/DVD mode is designed to be compliant to Pioneer, its
operations are not identical to the HDMA-4000(Ver.1.1x) mode.
Supported commands
(arg)RJ
SA
(adrs)PL
PA
ST
adrs SE
adrs SL
adrs SM
CL
FR
TM
CH
TI
arg AU
arg AD
arg KL
RM
Stops the HDD. Ignores the arguments.
Starts the HDD. (Playback is available without starting with this
command.)
Starts playback from the current position.
With an address specified, stops at the specified position.
Pauses with the video displayed.
Pauses with the video displayed. (The same as PA)
Pauses with the specified address displayed.
Starts playback from a specified address.
Sets a stop marker at a specified address.
Cancels auto play mode and the stop marker.
Uses a frame for the address mode. If the ContentFrame.idx file is
not present, this returns an error.
(See page 79 for ContentFrame.idx.)
Uses time for the address mode. If the ContentTime.idx file is not
present, this returns an error.
(See page 80 for ContentTime.idx.)
Uses a chapter for the address mode.
Uses a title for the address mode.
Audio settings (Supports mute only.)
0
Mute
Others Mute off
Audio settings (Supports mute only.)
Enables/Disables operations from the remote controller, etc.
0 Unlocked.
1 Locked.
2 Disables power OFF.
3 Disables operations from the front panel.
4 Disables power OFF and operations from the front panel.
5 Disables operations from the remote controller.
Switches to repeat mode.
Serial control
te
No
73
Reference 3
arg SK
?A
?R
?C
?Y
WW
Jumps chapters.
1 Next chapter.
2 Previous chapter.
3 Top of the current chapter.
Returns current positions.
Style: TTCCMMMMSS
TT: Title number (2 digits), CC: Chapter number (2 digits), MMMM,
SS: Time (Not supported. Always returns 0).
Returns the title number at the current position.
Style: TT Title number (2 digits).
Returns the chapter number at the current position.
Style: CC Chapter number (2 digits).
Returns the frame number of the title currently played.
Specifies the time.
Style: YYMMDDWWHHMMSS
WW<CR>
Specify this as YYMMDDWWHHMMSS<CR>
arg MS
?P
?X
?W
?S
?E
?Z
Specifies repeat mode.
0MS
Does not repeat. (Stops at the last title.)
8MS
Repeats the chapter.
16MS
Repeats the title.
24MS
Repeats all the titles.
Returns the current mode.
Style: PMM (MM Operation mode).
P04 Playing video.
P05 Paused.
P06 Stopped.
Returns the product name (HDMA-4000).
Returns the time Style: YYMMDDWWHHMMSS
Year, Month, Date, Day of Week (Mon:00 - Sun:06), Hour, Minute,
Second.
Returns the repeat mode settings.
Returns the most recent error code.
Returns the HDMA-4000 version.
* The part in brackets "( )" can be omitted. When omitted, the default value is used.
* Only PO, POFF and ?I are available in scheduled playback mode.
74
Reference 3
Unique extended commands
arg PO
(arg)POFF
CR
arg CD
?O
?L
?U
arg RX
$X
?I
Stops playback (With a blank screen).
argVO Specifies volume.
argVL VO=Equal volume on the left and right, VL=Left,
VR=Right.
argVR 0-50.
Controls mode.
0PO
Switches to play list mode.
1PO
Switches to DVD mode.
Turns the power off (99POFF will reboot the unit.)
Changes the content root folder.
Specify the relative path from the serial control content folder with
enclosing quotation marks.
The operation mode will be initialized.
Changes the drive to search for contents.
0 Internal HDD.
1 USB drive.
2 - 5 Network drives A - D.
Returns the volume settings.
Style: LLRR LL Left volume, RR Right volume.
Number of contents.
Number of sync lists. (Available to communicate/Total number.)
* For units other than the HDMA-4000Sync, this will always be
(0/0).
Advanced settings. (Write the sum of the setting values.)
1 Uses a blank screen when stopped.
2 Does not display the top of the file in SE.
4 Does not clear repeat mode in CL.
Loads advanced settings.
Returns the IP address.
Returns R when the IP address is not specified.
Serial control
SO
arg VO
arg VL
arg VR
* Only PO and POFF are available in scheduled playback mode.
te
No
When multiple commands are written on one line, if the next command is
sent before a response is returned, the next command will be executed,
ignoring commands that have not yet been executed. In this case, sending a
<CR> will abort the execution of multiple commands.
75
Reference 3
Changing serial control settings and the sync unit list
To change the HDMA-4000 operations to a specific command, create the following
settings file [psctl.conf] in the [serial] folder and reboot the HDMA-4000 unit.
* For a sample of [psctl.conf], see the [Serial contents] folder on the product’s CD-ROM.
- psctl.conf example
SYNC
stop_mode
se_mode
Lists the HDMA-4000Sync host name to synchronize. Required
to execute synchronized playback with multiple units.
0 Stops with the final image displayed.
1 Stops with a blank screen displayed.
0 When the adrsSE command is executed, stops with the first
image displayed.
1 When the adrsSE command is executed, stops with a blank
screen displayed. (Playback will not start internally.)
* In sync mode, regardless of this setting, stops with the first image
displayed.
clrm_mode
play_sm
po_every
0
1
0
1
0
1
drive_ext
0
1
cmdqi_ext
0
1
Clears repeat mode with the CL command.
Does not clear repeat mode with the CL command.
In adrsPL, does not return R until stopped.
Immediately returns R even in adrsPL.
When 0PO/1PO is the same as the current state, only returns
R.
Regardless of the current state, executes the change at 0PO/
1PO.
To use a USB, NAS Drive, use the root (/) directory.
To use a USB, NAS Drive, use the /serial directory of the
drive.
Returns the IP address to the ?I command.
An error occurs.
*When this setting’s value is not defined, it will be set to 0.
76
Reference 3
ERROR codes
Serial control
E00 ............ Communication error.
E04 ............ Unavailable function.
E06 ............ Invalid parameter.
E11 ............ Disk not present.
E12 ............ Search address cannot be found.
E15 ............ Picture stopped.
E16 ............ Control, from key/remote controller/remote serial, detected while a
command is in progress.
E99 ............ A fatal error has occurred.
R................ Communication ends properly (response to a command that does not
return values).
77
Reference 3
Controls by frame or time
When using serial control with a laserdisc, the playback starting position can be
specified by frame or timecode of the disk.
In HDMA-4000, create a ContentFrame.idx file where content frames are registered,
or a ContentTime.idx file where timecodes are registered and place these in the
[serial] folder, to enable the supported commands, FR and TM, thus enabling search
and playback in accordance with the contents’ frame or timecode.
* If the contents registered in the ContentFrame.idx or ContentTime.idx files do not exist, all serial
controls based on the frame/timecode will return errors.
- FR command
In order to use the FR command, create a ContentFrame.idx file in the [serial]
folder.
The descriptions in the ContentFrame.idx file are as follows:
Frame number [TAB] File name,0
* [TAB] represents a tab character.
* Always add the ,0 characters to the end of a file name.
For example, to play multiple contents back using serial controls, in the event
that the contents are sequential frames on a laserdisc, use the following
descriptions:
FR
1SE
1000PL
1001SE
2000PL
2501SE
2800PL
78
# Changes to frame specification mode.
# Displays 1 frame.
# Plays until frame 1000 and stops.
# Displays frame 1001.
# Plays until frame 2000 and stops.
# Displays frame 2501.
# Plays until frame 2800 and stops.
Reference 3
ContentFrame.idx Sample
file-01.m2t,0
file-01_stop.m2t,0
file-02.m2t,0
file-02_stop.m2t,0
file-03.m2t,0
file-03_stop.m2t,0
Serial control
1
1000
1001
2000
2501
2800
File name ,0
Frame number
* With serial controls, because the contents will be played in ascending
alphabetical order in accordance with the file name, frame numbers must
be assigned consistently with the ascending alphabetical order of file
names.
Also note that, in the above example, the following six content files must be
placed in the [serial] folder.
file-01.m2t
file-02.m2t
file-03.m2t
file-01_stop.m2t
file-02_stop.m2t
file-03_stop.m2t
#Content that substitutes for frames 1 to 1000.
#Content that substitutes for frames 1001 to 2000.
#Content that substitutes for frames 2501 to 2800.
#Dummy file 1 for specifying the stopping frame.
#Dummy file 2 for specifying the stopping frame.
#Dummy file 3 for specifying the stopping frame.
* For dummy files that specify the stopping frame, place MPEG2 files in the folder. (In this
example, 3 files are required.)
79
Reference 3
- TM command
In order to use the TM command, create a ContentTime.idx file in the [serial]
folder.
The descriptions contained in ContentTime.idx are as follows:
Timecode [TAB] File name,0
* [TAB] represents the tab character.
* Always add the ,0 characters at the end of a file name.
For example, to playback multiple contents using serial controls, in the event
that the contents are sequential frames on a laserdisc, use the following
descriptions:
TM
60SE
100PL
3600SE
3800PL
# Switches to time specification mode.
# Plays the frame that corresponds to 60 second.
# Plays to the frame that corresponds to 100 second and stops.
# Plays the frame that corresponds to 3600 second.
# Plays to the frame that corresponds to 3800 second and stops.
ContentTime.idx Sample
60
100
3600
3800
file2-01.m2t,0
file2-01_stop.m2t,0
file2-02.m2t,0
file2-02_stop.m2t,0
File name ,0
Timecode
* With serial controls, because the contents will be played in ascending alphabetical
order in accordance with the file name, frame numbers must be assigned consistently
with the ascending alphabetical order of the file names.
Also note that, in the above example, the following four content files must be
placed in the [serial] folder.
80
Reference 3
# Content that corresponds to 60 to 100 second.
# Content that corresponds to 3600 to 3800 second.
# Dummy file 1 for specifying the stopping position.
# Dummy file 2 for specifying the stopping position.
* For dummy files to specify the stopping position, place MPEG2 files in the folder (in this
example, two files).
Serial control
file2-01.m2t
file2-02.m2t
file2-01_stop.m2t
file2-02_stop.m2t
81
Reference 3
Command descriptions (HDMA-4000 Ver.1.X mode)
Supported commands
(adrs)PL
ST
adrs SE
adrs SL
CH
TI
arg AD
?A
?R
?C
arg MS
?P
?S
SO
arg VO
arg VL
arg VR
arg PO
82
Starts playback from the current position.
With an address specified, stops at the specified position.
Pauses with the video displayed.
Pauses with the specified address displayed.
Starts playback from a specified address.
Uses the chapter for address mode.
Uses the title for address mode.
Audio settings (Supports mute only).
Returns current positions.
Style: TTCCMMMMSS
TT Title number (2 digits), CC Chapter number (2 digits), MMMM,SS
Time.(Not supported. Always returns 0.)
Returns the title number at the current position.
Style: TT Title number (2 digits).
Returns the chapter number at the current position.
Style: CC Title number (2 digits).
Specifies repeat mode.
0MS
Does not repeat. (Stops at the last title.)
8MS
Repeats the chapter.
16MS
Repeats the title.
24MS
Repeats all the titles.
Returns the current operation mode of the player.
Style: PMM (MM Operation mode).
P04 Playing video.
P05 Paused.
P06 Stopped.
Returns the repeat mode settings.
Stops playback. (With a blank screen.)
argVO Specifies the volume.
argVL VO=Same volume on the left and right, VL=Left,
VR=Right.
argVR 0-50.
Control modes.
0PO
Switches to the scheduled playback mode. (Default)
1PO
Switches to serial control mode.
Reference 3
POFF
“dir”CR
?O
?I
Serial control
arg CD
Turns the HDMA-4000 off.
Changes the folder in which to search for contents.
Specify the relative path from the serial control content folder,
enclosed in quotation marks (“ “).
Operation mode will be initialized.
Changes the drive on which to search for contents.
0
Internal HDD.
1
USB drive.
2 - 5 Network drives A – D.
Returns the volume settings.
Style: LLRR
LL Left volume
RR Right volume
Returns the IP address.
Returns R when an IP address is not specified.
* The characters enclosed in () can be omitted. If omitted, default values are used.
* In scheduled playback mode, only P0, POFF and ?I are available.
Error codes
E00 .......... Communication error.
E04 .......... Unavailable function.
E06 .......... Invalid parameter.
E12 .......... Search address cannot be found.
E99 .......... Fatal error occurred.
R ............. Communication ends properly (response to a command that does not
return values).
83
Reference 3
How to use serial control
1
When the HDMA-4000 is set to scheduled playback mode, send a
command, 1PO, to the serial port and switch the unit to serial control
mode.
2
Send a command, CH, SE, to the content you want to play and move to it.
3
Send a command, PL, to start playback.
4
Set the repeat mode with the MS command, if necessary.
5
To return to the scheduled playback, send a 0PO command.
* Send TI2SECH3SE to move to Title 2, Chapter 3.
- The default state of serial control mode
Current position ..................Title 1, Chapter 1.
Address mode ....................Specified by title.
Repeat mode ......................Repeat disabled.
Operating mode .................Stopped.
84
Reference 3
Managing a content file
Serial control
To retain compatibility with serial control of generic DVDs/LDs, the title and chapter
are used as the address specification mode. Unlike those of DVDs/LDs, these
address values are given title and chapter numbers based on the folder construction
on the HDD.
On the HDMA-4000, all the content files should be stored in a specific folder (the
content folder for serial controlled playback). Any folder and content files can be
placed in a content folder for serial controlled playback.
Chapters correspond to the content files, while titles correspond to the folders
where multiple content files are stored. Note that the order of titles is decided by
the sorting result of the folder names and the order of chapters is decided by
the sorting result of the content file names. The maximum number for titles and
chapters is 99.
01Content.mpg
Content folder for serial
controlled playback
01Title
02Content.m2p
03Content.m2t
04Content.m2p
01Content.m2p
02Title
01Content.mpg
03Title
02Content.mpg
The details of each address mode are described on the following pages.
85
Reference 3
Title
A sub-folder or a content file in the content folder for serial controlled playback is
regarded as a title. When a sub-folder is in the content folder for serial controlled
playback, the group of content files in it is regarded as a title. The items in the
content folder for serial controlled playback are sorted and given serial numbers
starting from 1 so these can be used as title numbers.
Tip
In the following file construction, the "01Title" folder will be title 1 and if
playback is selected, "01Chapter.mpg" and "02Chapter.m2t" will be played.
Title 2 will be the "02Title.mpg" file.
01Chapter.mpg
Content folder for serial
controlled playback
02Chapter.m2t
01Title
02Title.mpg
Chapter
A content file in a title folder is regarded as a chapter. A sub-folder in a title folder
is also regarded as a chapter. The files in the title folder are sorted and given serial
numbers starting from 1 so as to use these as chapter numbers. Before specifying
an address by chapter number, make sure to set the title numbers first. When a
search is performed with a chapter number specified, the specified chapter position
of the current title will be found.
Tip
In the following file construction, Chapter 1 of Title 1 will be "01Chapter.mpg",
while Chapter 2 of Title 1 will be "01Content.mpg" and "02Content.mpg."
Note that Chapter 1 of Title 2 will be "02Title.mpg" and Chapter 2 does not
exist. (Returns E12 when searched.)
01Chapter.mpg
Content folder for serial
controlled playback
01Title
01Content.mpg
02Title.mpg
86
02Chapter
02Content.mpg
Reference 3
Seamless playback
Serial control
Seamless playback can be enabled/disabled from the Web console. When seamless
playback is enabled, all the files under the content folder will be played seamlessly.
Seamless playback is available only for sequential playback. When content is
skipped because of a command, seamless playback will not be performed.
To enable seamless playback, the files have to be encoded in the same format and
have the same parameters. When seamless playback is attempted with files that
have different parameters, the second or later files may not play properly. To play
files that are incompatible with seamless playback, use a Web browser and disable
seamless playback on the settings page.
87
Reference 3
88
HDMA-4000
Reference 4
- Setup using the front panel
- Setup using Web browser
- Updating firmware
- Maintenance Mode
Reference 4
Setup using the front panel
Settings menu
Enter the settings menu with the MENU key or the key . Choose a setting by using
the or key of the Select keys. Configure settings by using the or key.
* The system may have to be restarted for some settings to take effect.
1.VIDEO......................... Specifies the video format.
2.NETWORK.................. Configures the network settings.
3.SYSTEM ..................... Configures date/time, remote control ID and LCD
information settings.
4.CONTENTS DRIVE .... Specifies the default content settings.
5.INFORMATION .......... Displays system information.
6.SHUTDOWN .............. Shuts down or restarts the HDMA-4000.
Key operations in setting menu
Selects setting.
key
key
or
key
Adopts the setting.
ENTER key
or
key
Cancels the setting.
Cancel key
Exits the settings menu.
MENU Key
Not used.
90
Reference 4
1.VIDEO
VIDEO
1.Output
Specifies the video output format.
VIDEO
[ 1080/59.94i
]
VIDEO
[ 720/59.94p
]
VIDEO
[ 1080/50i
]
VIDEO
[ 720/50p
]
Outputs a 1080/59.94i HD signal.
Outputs a 720/59.94p HD signal.
Outputs a 1080/50i HD signal.
Setup using the front panel
MENU
1.VIDEO
Outputs a 720/50p HD signal.
VIDEO
[ 1080/59.94i(DVI) ]
Outputs a 1080/59.94i DVI signal.
VIDEO
[ 720/59.94p(DVI)
]
Outputs a 720/59.94p DVI signal.
VIDEO
[ 1080/50i(DVI)
]
VIDEO
[ 720/50p(DVI)
]
VIDEO
[ NTSC(J)
]
Outputs a 480/59.94i (NTSC for
Japan) SD signal.
VIDEO
[ NTSC(US)
]
Outputs a 480/59.94i (NTSC for
North America) SD signal.
Outputs a 1080/50i DVI signal.
Outputs a 720/50p DVI signal.
91
Reference 4
VIDEO
[ PAL
]
Outputs a 576/50i (PAL) SD signal.
Specifies the monitor aspect ratio
according to the monitor being
used.
VIDEO
2.Aspect
Aspect
[ 16:9
]
Select this when a 16:9 monitor is
used.
Aspect
[ 4:3
]
Select this when a 4:3 monitor is
used.
VIDEO
3.Display mode
Specify the display method for the
monitor at an aspect ratio of 4:3.
]
The top and bottom of the screen
is black when the content aspect
ratio is 16:9.
Display mode
[ Panscan
]
The sides of the video are trimmed
when the content aspect ratio is
16:9.
Display mode
[ Full
]
Display mode
[ Letter box
Displays the picture in full-screen
mode.
* Do not connect a TV to the component output port in DVI output modes.
* The DVI signal may not be displayed properly on some PC monitors.
* The default setting is [Video 1080/59.94i].
92
Reference 4
2.NETWORK
NETWORK
1.IP configuration
Specifies the IP address.
Specifies the IP address using DHCP.
key
Pressing the ENTER key or the
sets the IP address automatically and
returns to the parent menu.
IP configuration
[ DHCP
]
IP configuration
[ AUTOIP
]
Detects an available address on the
network and uses it.
]
Specifies the IP address manually.
key
Pressing the ENTER key or
opens the sub-menu.
IP configuration
[ Manual
Manual setting
1.IP address
Setup using the front panel
MENU
2.NETWORK
Specifies the IP address.
IP address
192.168.0.10
Manual setting
2.Subnet mask
Specifies the subnet mask.
Subnet mask
255.255.255.000
Manual setting
3.Default gateway
Specifies the default gateway.
Default gateway
192.168.0.1
IP configuration
[ None
]
Network is not used.
93
Reference 4
NETWORK
2.DNS Configuration
DNS Configuration
1.Preferred DNS
Specifies the DNS.
* When the IP address is specified by DHCP,
this setting is ignored.
Specifies the preferred DNS.
Preferred DNS
192.168.1.1
DNS Configuration
2.Alternate DNS
Alternate DNS
192.168.1.2
* The default setting is [IP configuration DHCP].
94
Specifies the alternate DNS.
Reference 4
3.SYSTEM
SYSTEM
1.Date
Specifies the date and the time.
Date
2006/02/28 11:40
Specifies the remote control ID.
SYSTEM
2.Remocon ID
* For more information on the Remote Control
ID, see "Remote Control ID setting" in the
Appendix.
Remocon ID
[ ID0
]
Remocon ID
[ ID1
]
Remocon ID
[ ID2
]
Remocon ID
[ ID3
]
Remocon ID
[ Disable
]
Sets the remote control ID to 0.
Setup using the front panel
MENU
3.SYSTEM
Sets the remote control ID to 1.
Sets the remote control ID to 2.
Sets the remote control ID to 3.
Disables remote control.
95
Reference 4
SYSTEM
3.LCD information
Specifies the information displayed
on the LCD.
LCD information
[ Player status
]
LCD information
[ IP address
]
LCD information
[ Date
]
Displays the operational status of the
HDMA-4000 on the LCD.
Displays the IP address on the LCD.
Displays the date and the time on the
LCD.
* The default setting is [Remocon ID ID0], [LCD Information Player status].
96
Reference 4
4.CONTENTS DRIVE
CONTENTS DRIVE
1.Schedule
Specifies the default content drive for
scheduled playback.
Schedule
[Internal
]
Specifies the internal drive as the
default content drive.
Schedule
[USB
]
Specifies the connected USB device
as the default content drive.
Schedule
[Network A
]
Specifies network drive A as the
default content drive.
Schedule
[Network B
]
Specifies network drive B as the
default content drive.
Schedule
[Network C
]
Specifies network drive C as the
default content drive.
Schedule
[Network D
]
Specifies network drive D as the
default content drive.
CONTENTS DRIVE
2.Serial Control
Setup using the front panel
MENU
4.CONTENTS DRIVE
Specifies the default content drive for
serial control.
Serial Control
[Internal
]
Specifies the internal drive as the
default content drive.
Serial Control
[USB
]
Specifies the connected USB device
as the default content drive.
Serial Control
[Network A
]
Specifies network drive A as the
default content drive.
Serial Control
[Network B
]
Specifies network drive B as the
default content drive.
97
Reference 4
98
Serial Control
[Network C
]
Specifies network drive C as the
default content drive.
Serial Control
[Network D
]
Specifies network drive D as the
default content drive.
Reference 4
5.INFORMATION
IP=192.168.0.16
MA=00:20:11:01:00:89
Displays the IP address.
Displays the MAC address.
Sub=255.255.255.0
G/W=192.168.0.1
Displays the subnet mask.
Displays the default gateway.
DNS1=192.168.1.1
DNS2=192.168.1.2
Displays the preferred DNS.
Displays the alternate DNS.
Operating time
7 days
Displays the duration of internal HDD
usage (dates).
System Version
1.5.0
Displays the system version.
Setup using the front panel
MENU
5.INFORMATION
6.SHUT DOWN
MENU
6.SHUTDOWN
SHUTDOWN
[ Power off
]
SHUTDOWN
[ Reboot
]
Shuts down the HDMA-4000.
Restarts the HDMA-4000.
Tip
If the MENU key is pressed and a setting has not being changed, the setting
will end. If some settings have been changed, the confirmation screen will be
displayed, asking whether or not the changed settings should be saved.
A reboot screen will be displayed for some settings.
99
Reference 4
Setup using Web browser
Accessing the HDMA-4000 Setup page
Use a computer on the same network as the HDMA-4000. Start your Web browser
and then access the Setup screen (Web page) of the HDMA-4000 you want to set up.
If the HDMA-4000 IP address is 192,168. 0. 16, enter as follows:
http://192. 168. 0. 16/
Preparation and starting the Web console
Required system
Operations are checked only with Internet Explorer 6 (IE6). Use a Windows XP PC
on which IE6 is available.
PC settings
The PC has to be on the same network as the HDMA-4000 to configure it. The
network settings of the PC also have to comply with the network environment of
the HDMA-4000.
100
DHCP
Sets the PC to acquire an IP address automatically.
Auto IP
Sets the PC to acquire an IP address automatically. On Windows
XP, if a DHCP server does not exist, an address is allocated by
AutoIP.
Manual
Specify the IP address and subnet mask, based on the network
environment being connected to.
Reference 4
Starting the Web console
* The IP address of the unit can be checked by selecting [INFORMATION] in the settings menu of
the front panel.
Password
A user ID and password are required to change settings on the Web console. The
default user name and password are as follows.
User name
admin
Password
None (not set)
The user name and password can be changed.
Setup using Web browser
To start the Web console, enter the IP address of the HDMA-4000 unit to conform
to the address bar of IE6.
101
Reference 4
HDMA-4000 Setup Page
Running the Web console opens the following screen.
Main Screen
102
Information
The firmware version and settings that are currently in effect
are displayed.
Status
Internal status and operation logs are displayed.
Local settings
Use this to change the local settings saved on the HDMA4000 unit. You can also use this to check local settings; it
displays values that have been saved locally.
Date/time
settings
Sets the system clock of the HDMA-4000.
Advanced
Settings
Use this to check the internal drive, repair errors or execute
initialization.
Restart
Restarts HDMA-4000.
Initialization
Defaults the local settings to their factory state.
Firmware Update
Updates HDMA-4000 firmware.
User name and
Password
Changes the user name and password required to modify
settings.
Software License
Displays the license information for the software used on
the HDMA-4000.
Reference 4
Information
Displays system information. For details of each item, see the relevant settings page.
Setup using Web browser
- Version
Current version
Displays the current firmware version.
- System
LCD
Displays the information shown on the LCD.
Remote Control
ID
Displays the remote control ID.
Front panel
operation
Enables/Disables operations from the front panel.
Remote control
operation
Displays the setting status of operations from the remote
controller.
Enable
automated unit
detection
Displays the status of automatic detection of a unit on the
network.
NTP server
Displays the status of the usage/setting of an NTP server.
Language
Displays the on-screen language of the HDMA-4000.
Remote logging
Displays the output setting of remote logging.
Boot mode
Displays the operation mode at start-up.
Internal drive
checking on
bootup
Displays whether the internal HDD is checked at start-up.
103
Reference 4
Internal drive
spindown time
Displays the spindown time of the internal HDD.
UPS mode
Displays the status of the usage/setting of UPS mode.
Network drive
Displays the setting of the network drives, when these are
used.
- Network
Network mode
The current network mode. Either: Obtain an IP address
automatically (DHCP); Obtain an IP address automatically
(AutoIP); or, Use the following IP address.
IP address
settings
Displays the current IP address settings.
Subnet mask
Displays the subnet mask address.
Default gateway
Displays the default gateway address.
DNS server
settings
Displays the current DNS server settings.
Preferred DNS
server
Displays the preferred DNS server address.
Alternate DNS
server
Specifies the alternate DNS server address.
DNS Domain
name
Displays the current DNS domain name.
Host name
Displays the host name.
Telnet
Displays the setting status of Telnet.
SSH
Displays the SSH settings.
Samba share
Displays the sharing status of the internal HDD.
- Schedule
104
Contents drive
Displays the default contents drive for scheduled playback.
Schedule file
Displays the schedule file name.
Initial channel
Displays the default channel name.
Reference 4
- Serial control
Displays the default content drive for serial control.
Seamless
Displays the setting status of seamless playback.
Baud rate
Displays the communication speed of the serial port.
Data bits
Displays the data bit length of the serial port.
Parity
Displays the parity setting of the serial port.
Stop bits
Displays the stop bit length of the serial port.
Flow control
Displays the status of flow control
Network serial
control
Displays the status of network serial control.
Serial controls
operation mode
Displays the current serial controls operation mode.
Playback delay
from the start
command (PL)
Displays the delay before the HDMA-4000 starts playback
after a PL command has been issued.
Setup using Web browser
Contents drive
- Playback mode setting
Cue up
Displays the setting status of the stopping position when a
file is stopped with a command, including the SE and SL
commands.
Genlock
Displays the setting status of the external sync signal.
* Displays only on the HDMA-4000Sync.
Synchronization
mode
Displays the current sync mode settings.
- Monitor
Display mode
Displays the monitor mode.
Monitor aspect
ratio
Displays the aspect ratio.
Mode for 4:3
monitor
Displays the display method for the monitor at an aspect
ratio of 4:3.
105
Reference 4
Status
The Internal status and the operation log of the HDMA-4000 are displayed.
106
Reference 4
Local settings
User name
Enter your user name. The default user name is [admin].
Password
Enter your password. No password is set in the default
setting.
Setup using Web browser
The local settings stored in the HDMA-4000 system can be changed on the Local
settings screen. User name and the password are required to change settings.
- System
LCD
Specifies the information displayed on the LCD during
operation.
Remote Control
ID
Specifies the remote control ID to which the HDMA-4000
responds. Choose [Disable] to disable the remote control.
For information on how to specify the ID of the remote
control, see the Appendix to this manual.
Front panel
operation
Enables/Disables operations from the front panel.
Remote control
operation
Enables/Disables operations (or power off only) from the
remote controller. When "power off" is disabled, shutdown
with the [POWER] button on the remote controller will be
unavailable.
Automated unit
detection
Specify whether or not the HDCS-7000 automatically
detects other units on the network. When this is [Enabled],
network traffic will increase because packets are regularly
transmitted over the network.
Automated detection is performed by SSDP.
107
Reference 4
108
NTP server
Enables/Disables time correction utilizing the NTP server.
When [Use NTP server] is checked, specify the NTP server
(server name or IP address) to be used, and the intervals at
which to apply time corrections.
Language
Specifies the language to display on the HDMA-4000.
Remote logging
Enables/Disables remote logging. When enabled, specify
the logging host (host name or IP address).
Boot mode
Choose the boot mode of the HDMA-4000 from the Schedule
or Serial control. Once the HDMA-4000 has started, the
operation mode can be changed with the command
(“argPO”) from a serial control device.
Internal drive
checking on
bootup
Disables/Enables internal drive checking at start-up of the
HDMA-4000. When enabled, it may take additional time
before the HDMA-4000 starts up.
Internal drive
spindown time
Specifies the time duration before stopping the internal
HDD when it has not been accessed. (Once the HDD has
been stopped, it may take some time to start the next
playback.)
UPS mode
Specifies the operation mode (operating duration after
power has been lost, or operating duration based on the
remaining battery) while the OMRON uninterruptible power
supply system (BX30F/BX50F) is being used. When [Battery
time] or [Battery left] is selected, the HDMA-4000 is
shutdown, based on the specified value.
When power is supplied to several HDMA-4000 units from
a UPS system, with the group name specified, the HDMA4000 units will be shut down, based on the status of the
power supply.
(Because a network is being used, a HUB has to be
connected to the UPS system.
Network drive
Specifies the network name (E.g.: \\hdma-svr\data1), user
name, and password for the network drive.
Reference 4
- Network
Specifies the method for acquiring an IP address and makes
other detailed settings. When [Use the following IP address]
is checked, [IP address], [Subnet mask], and [Default
gateway] become available to specify.
DNS server
Specifies the method for acquiring a DNS server and makes
other detailed settings. If [Use the following IP address] is
selected in [IP address], [Use the following DNS server
address] is automatically selected.
Host name
Specifies the host name.
Telnet
Enables/Disables the Telnet function.
SSH
Enables/Disables SSH.
Samba share
Specifies the sharing status of the internal HDD of the
HDMA-4000. Choose [Read only] or [Read write] to view the
[Schedule contents] or [Serial control contents] directly.
Setup using Web browser
IP address
settings
- Schedule
Contents drive
Specifies the drive where the default contents of the
scheduled playback are stored. Options are: the internal
drive, connected USB drive or network drive A-D.
Schedule file
Specifies the name of the schedule file. “Schedule.txt” is set
at the time of factory shipping.
Initial channel
Specifies the default channel name. If not specified, the first
channel defined in the schedule will be used.
- Serial control
Contents drive
Specifies the default content drive for serial control.
Seamless
Enables/Disables seamless playback in serial control
mode.
Baud rate
Specifies the communication speed of the serial port.
Data bits
Specifies the data bit length.
Parity
Specifies the parity (technique for detecting data errors).
Stop bits
Specifies the stop bit length.
Flow control
Specifies the communication speed of the serial port.
109
Reference 4
Network serial
control
Enables/Disables network serial control. When enabled,
specify the [standby port number]. When network serial
control is enabled, operational commands are available via
the network as well as via serial control.
Serial controls
operation mode
Selects the command mode of the serial controls. To enable
sync playback, select [Pioneer LD/DVD].
Playback delay
from the start
command (PL)
Specifies the delay before the HDMA-4000 starts playback
after a PL command has been issued.
- Playback mode setting
Cue up
Specifies the stopping position when a file is stopped with a
command including the SE and SL commands.
Genlock
Enables/Disables playback timing in sync with an external
signal.
* Displays only on the HDMA-4000Sync.
Synchronization
mode
Specifies the sync mode. To operate multiple HDMA-4000
units in sync, set one unit to [Sync master] and the others
to [Sync slave].
- Monitor
110
Display mode
Specifies the output mode to the TV monitor.
Monitor aspect
ratio
Specifies the monitor aspect ratio according to the monitor
to be used.
Mode for 4:3
monitor
Specifies the display style on a 4:3 monitor.
Reference 4
Date/time settings
User name
Enter your user name. The default user name is [admin].
Password
Enter your password. No password is set in the default
setting.
Year/Month/Date/
Hour/Minute/
Second
Sets the system clock of the HDMA-4000.
Synchronize to
PC clock
Check this item to synchronize it to the PCs internal clock.
When checked, the current time of the PCs internal clock is
displayed.
Setup using Web browser
Specifies the date and the time. User name and the password are required to change
settings.
111
Reference 4
Advanced Settings
Specifies the settings on the internal drive. A user name and password are required
to change these settings.
112
User name
Enter your user name. The default user name is [admin].
Password
Enter your password. No password is set in the default
setting.
Check internal
drive and repair.
Checks the internal drive of the HDMA-4000, and fixes
errors, if any are found.
Initialize internal
drive.
Initializes the internal drive of the HDMA-4000. When
initialized, all existing data will be lost.
Reference 4
Restart
User name
Enter your user name. The default user name is [admin].
Password
Enter your password. No password is set in the default
setting.
Setup using Web browser
Restarts the system. A user name and the password are required to restart the
system.
113
Reference 4
Initialization
Resets the system to the default factory state. A user name and the password are
required to change these settings.
114
User name
Enter your user name. The default user name is [admin].
Password
Enter your password. No password is set in the default
setting.
Reference 4
Firmware Update
User name
Enter your user name. The default user name is [admin].
Password
Enter your password. No password is set in the default
setting.
Current firmware
version
Displays the current firmware version.
Update file name
Specifies the path where the update file exists. Click
[Browse] to select the update file.
Disable version
check.
Firmware update program will not check the firmware
version before updating.
Setup using Web browser
Updates the HDMA-4000 firmware. A user name and the password are required to
update the firmware.
115
Reference 4
User name and Password
Changes the user name and password required to modify settings. User name and
the password are required to change settings.
116
User name
Enter the current user name.
Password
Enter the current password.
New User name
Enter the new user name to register.
New Password
Enter the new password to register.
Confirm New
Password
Re-enter the new password to register.
Reference 4
Software License
Displays the license information for the software used on the HDMA-4000.
Setup using Web browser
117
Reference 4
Updating firmware
How to update
Firmware update using a Web browser
(1) Copy the firmware archive file to a PC accessible by the HDMA-4000.
(2) Use a Web browser to access the HDMA-4000 Setup page.
(3) Select [Firmware update] and start the update.
(4) Once the update completes, the HDMA-4000 will automatically restart.
Firmware update via network or USB
(1) Copy the firmware archive file and the firmware update control file to a USB
device or to the content update folder.
* For more information on the control file, see: “Descriptions of content update control file,”
in Reference 1.
(2) Once the update completes, the HDMA-4000 will restart automatically.
Possible reasons for failed updates:
- The file is invalid.
- The version has already been applied.
te
No
Please do not play content or perform remote controller operations while the
firmware update is in progress.
Please do not turn off the HDMA-4000 while the firmware update is in
progress.
118
Reference 4
Maintenance Mode
HDMA-4000 Maintenance Mode is the recovery program that is used when the
firmware update, as described in the previous section “Updating firmware,” has
failed and HDMA-4000 no longer functions. It is also used when you forget the user
name and password that you have set in the [User name and Password] screen.
Firmware updates, in this case, are performed in a special Maintenance Mode with
a firmware binary file rather than an archive file.
Maintenance Mode
Maintenance Mode overview
Connections and Settings
(1) Use a serial cross cable to connect the HDMA-4000 to a computer featuring a
RS-232C port.
(2) Start a terminal communication program on the computer.
The communication parameters to use are as follows:
Baud rate:
115200bps
Data bit:
8 bit
Stop bits:
1
Parity:
None
Flow control:
None
te
No
While in Maintenance Mode, do not perform operations other than the ones
described in this section. Doing so may disable any further firmware update
operations.
119
Reference 4
Starting HDMA-4000 in Maintenance Mode
With the power connected, press and hold down the reset switch. After a few
seconds, [Maintenance Mode] will be displayed on the HDMA-4000 LCD. After a
few seconds from the time [Maintenance mode] is displayed, [POLARIS login:] will
be displayed on the terminal program’s screen.
(1) Then enter as follows:
POLARIS login: root
Password: polaris
* Nothing is displayed on the screen even when you are entering the password.
(2) The following text appears on the terminal program’s screen:
Busybox v1.01(2006.04.26-10:53+0000)Built-in shell(ash)
Enter ‘help‘ for a list of built-in commands.
[root@polaris /home]#
* If the user name or the password is invalid, the screen shown in STEP 1 will reappear.
120
Reference 4
Firmware recovery
When DHCP is unavailable, specify the IP address.
* In this example, IP address is set to 192. 168. 0. 16.
* If DHCP is available, the IP address will be allocated by DHCP.
(1) To set the IP address, enter the following:
[root@polaris /home]# ifconfig
eth0
192.168.0.16
(2) To review the IP address, enter the following:
Maintenance Mode
IP address settings
[root@polaris /home]# ifconfig
Firmware download
Download the firmware, via a Web server, an FTP server or a USB device: to be
used in Maintenance Mode.
In this example, 192. 168. 0. 2 is the FTP server address where the firmware archive
file is stored.
(1) To specify the address from which to download the firmware, enter the
following:
[root@polaris /home]# cd /tmp
[root@polaris /tmp]# wget ftp://192.168.0.2/maintenance.tgz
To update the firmware from a firmware archive file stored on a USB device,
enter the following:
[root@polaris /home]# cd /tmp
[root@polaris /tmp]# mount -t vfat /dev/sda1 /mnt
[root@polaris /tmp]# cp /mnt/maintenance.tgz .
121
Reference 4
Firmware recovery
Recovers the firmware.
(1) To recover the firmware, enter the following:
[root@polaris /tmp]# tar zxvf
[root@polaris /tmp]# ./up
maintenance.tgz
* Do not perform any operations until [root@POLARIS /tmp]# is displayed again.
Restart HDMA-4000
Restarts HDMA-4000.
(1) To restart HDMA-4000, enter the following:
[root@polaris /tmp]# reboot
Firmware Update
Re-update the firmware using the standard method.
122
Reference 4
If you have forgotten the user name or
the password
(1) To initialize the HDMA-4000, enter the following:
[root@polaris /home]# setdef
Maintenance Mode
If you have forgotten the user name or the password, you can initialize the HDMA4000. Once the HDMA-4000 is initialized, the user name will be [admin] with no
password set. Once the HDMA-4000 is initialized, start it up in the normal operation
mode.
123
Reference 4
124
HDMA-4000
Reference 5
- Sync playback using the HDMA-4000Sync
Reference 5
Sync playback using the HDMA-4000Sync
By executing sync playback using multiple HDMA-4000Sync units, playback on a
giant screen, which consists of multiple monitors, or 3D video where videos for
the right and left eyes are played in sync, will be available. The following diagram
shows an example of sync playback, using three HDMA-4000Sync units.
Connecting devices
An example of synchronized playback with the HDMA-4000Sync.
Projector
RS-232C
Switch
Video output
System controller
DU-100HP
Master
HUB
HDSC1
Reference
signal
Distributor
Slave
LAN
Three-screen multi-monitor
Slave
Power amplifier
(Dolby Digital decoder)
The control signal input to the master unit will
be transmitted to slave units via LAN.
Speaker
(5.1 ch)
Note 1: Set one of the three HDMA-4000Sync units as the master and the others
as slaves.
* For instructions on how to set master and slave modes, see: “HDMA-4000Sync
settings,” on the next page.
Note 2: Connect three HDMA-4000Sync units to a HUB with LAN cables.
Note 3: Connect the master to a serial controller with an RS-232C cable.
Note 4: Connect one PC to the HUB.
* This PC is used to display a Web browser to set up units. It is not necessary to keep
it connected once setting up has been completed.
Note 5: Connect external reference signal cables to the 3 HDMA-4000Sync units
for synchronization.
* The output signal from the HDSC1, Grass Valley converter, is recommended as an
external reference signal.
For details, see the section entitled “External sync input” in the HDMA-4000Sync
table in the Appendix.
126
Reference 5
te
No
Sync playback using the HDMA-4000Sync
Before turning the HDMA-4000Sync on, input the reference signal properly.
External sync will not be done properly if the input of the reference signal
stops or the settings of the reference signal are changed during operation.
te
No
All the HDMA-4000Sync units being used for sync playback must be
connected through a single HUB. If the HDMA-4000Sync units are connected
to a HUB in a cascading manner, synchronization may be faulty.
HDMA-4000Sync settings
* To simplify this explanation, consider that an IP address has been specified for all three HDMA4000Sync units and the PC, and that the setup screen is available via a Web browser. (For
instructions on how to specify an IP address for HDMA-4000Sync units, see Reference 4.)
Setup via a Web browser
Set up the three HDMA-4000Sync units as follows, using a Web browser.
(For items displayed in the Web browser, see Reference 4.)
* Items not described below will be set to their default values.
1
Open the HDMA-4000 Setup page, Local settings page and select [1.
System settings][Boot mode] and [Serial controls].
2
Select [2. Network settings] and enter the [Host name].
3
Select [4. Serial control settings][Content drive] and [Internal drive].
Then select [Serial control operation mode], [Pioneer LD/DVD].
4
Select [5. Playback mode settings][External sync operation], [Enable].
In the [Multiple units sync mode], select [Master] for the master unit and
[Sync slave] for the slave unit. Leave [Playback start packet multicast
address] and [Playback start packet port] at default values and click the
[Settings] button.
* In this example, the host name of the master unit is [host1] and the host names of the
slave units are [host2] and [host3] respectovely.
127
Reference 5
Sync unit list
Place a [psctl.conf] file in the [serial] folder on the master unit, containing a list of
HDMA-4000Sync units to synchronize. In this example, use the host names that
were used in the previous section and edit the file as follows:
* If the [psctl.conf] is also used for settings other than specifying the sync units list, place a [psctl.
conf] file with the same contents in the [serial] folders on the slave units.
* For settings other than the list of sync units in the psctl.conf file, see the section entitled: “Changing
serial control settings and the sync unit list” in Reference 3.
Contents
The playback contents must be placed in the [serial] folders of all three HDMA4000Sync units.
* To use the “FR” command, setting files named “ContentFrame.idx,” which describe the same
frame constructions, are required on all three HDMA-4000Sync units. To use the “TM” command,
similar setting files named “ContentTime.idx” are required on all three HDMA-4000Sync units.
* For more information on the “ContentFrame.idx” and “ContentTime.idx” files, see the section
entitled “Controls by frame or time” in Reference 3.
* If the “psctl.conf” file is changed, reboot the HDMA-4000 unit to update the settings.
te
No
The contents stored in the three units do not have to be exactly the same,
but the following must be the same: titles, chapters, length of contents, and
selectable by commands.
Playback
Plays contents using a serial controller connected to the master unit.
128
Reference 5
Available Combination of HDMA-4000Sync
units for external sync
Sync playback using the HDMA-4000Sync
129
Reference 5
130
HDMA-4000
Appendix
Appendix
Hardware Specifications
HDMA-4000
Network interface
Format
100Base-TX, 1000Base-T
Ethernet/IEEE802.3 frame format
Auto negotiation supported
Full-duplex supported
Connector
RJ45 modular jack x1
Video output
480/59.94i
SD signal
(NTSC)
Connector
Composite output connecter x1
576/50i
Component output BNC connector x3
(PAL)
Y/C output S connector x1
(Matched load impedance: 75 Ohm)
1080/59.94i
HD signal
1080/50i
Connector
Component output BNC connector x3
720/59.94p
(Matched load impedance: 75 Ohm)
720/50p
1080/59.94i (DVI)
Digital signal
1080/50i (DVI)
Connector
DVI-D connector x1
720/59.94p (DVI)
720/50p (DVI)
Audio output
Analog audio
Format
Stereo line output (unbalanced)
output
Connector
Left channel pin-jack x1 (white)
Right channel pin-jack x1 (red)
Max. output level 2Vrms @RL=10k Ohm
Load impedance
10k Ohm or higher recommended
Digital audio
Format
S/PDIF coaxial
output
Connector
Pin-jack x1 (black)
Output level
0.5V @RL=75 Ohm
Load impedance
75 Ohm
132
Appendix
Generic I/O
Serial port
USB port
Specification
Voltage
Temperature
condition
Others
Dimensions
Weight
Wireless remote
controller
Remote control
terminal
Infrared receiver x1
Format
Connector
Format
Connector
EIA-232
D-SUB 9 pin (male) x1
USB 2.0
USB type A x1
AC adapter
Input: AC 100V - 240V (50Hz/60Hz)
Output: DC 12V 3A (max)
Input: DC 12V 2.9A (max)
5 - 40 degrees C
Unit
Operating
temperature
Mini-jack for remote control x1
Switched automatically by inserting
plug (Exclusive use with Infrared
wireless remote control)
Hardware Specifications
Remote control
Infrared wireless
remote control
Wired remote
control
W 215.5 x D 246.4 x H 44 mm
(Projecting parts not included)
2kg approximately
133
Appendix
HDMA-4000Sync
Network interface
Format
100Base-TX, 1000Base-T
Ethernet/IEEE802.3 frame format
Auto negotiation supported
Full-duplex supported
Connector
RJ45 modular jack x1
Video output
SD signal
480/59.94i
(NTSC)
Connector
Composite output connecter x1
576/50i
Component output BNC connector x3
(PAL)
Y/C output S connector x1
(Matched load impedance: 75 Ohm)
HD signal
1080/59.94i
1080/50i
Connector
Component output BNC connector x3
720/59.94p
(Matched load impedance: 75 Ohm)
720/50p
Digital signal
1080/59.94i (DVI)
*Phases during the sync operation are not locked.
1080/50i (DVI)
720/59.94p (DVI)
Connector
DVI-D connector x1
720/50p (DVI)
Audio output
Analog audio
Format
Stereo line output (unbalanced)
output
Connector
Left channel pin-jack x1 (white)
Right channel pin-jack x1 (red)
Max. output level 2Vrms @RL=10k Ohm
Load impedance
10k Ohm or higher recommended
Digital audio
Format
S/PDIF coaxial
output
Connector
Pin-jack x1 (black)
Output level
0.5V @RL=75 Ohm
Load impedance
75 Ohm
External sync input
Black Burst
NTSC(59.94i)PAL(50i)
Format
* Not synchronized when 3 value Sync
1080/59.94i,1080/50i,720/59.94p,720/
the output format and
50p
frame rate are different.
Connector
Lock range
134
BNC connector ×1
±30ppm
Appendix
Generic I/O
Serial port
USB port
Storage
Installed device
Recording time
Suggested time for
HDD replacement
Specification
Voltage
Temperature
condition
Others
Dimensions
Weight
Fan
Wireless remote
controller
Remote control
terminal
Infrared receiver x1
Format
Connector
Format
Connector
EIA-232
D-SUB 9 pin (male) x1
USB 2.0
USB type A x1
Mini-jack for remote control x1
Switched automatically by inserting
plug (Exclusive use with Infrared
wireless remote control)
2.5 inch, 80 GB
Approximately 6 hours for HD content (25Mbps)
While the lifespan of an HDD varies according to its usage
environment, HDDs are devices that deteriorate over time.
When used in an environment with an ambient temperature
of 25 degrees C, problems, such as writing errors, may occur
within the first 20,000 hours of use. Running the HDD for
more than 30,000 hours will degrade the head or motor,
causing the HDD to fail. Considering the purpose of this
device, the recommended replacement time for HDDs is after
about 8,000 hours of use. (Please note that these time values
are rough indications. They do not guarantee HDD
durability.)
AC adapter
Unit
Operating
temperature
Hardware Specifications
Remote control
Infrared wireless
remote control
Wired remote
control
Input: AC 100V - 240V (50Hz/60Hz)
Output: DC 12V 3A (max)
Input: DC 12V 2.9A (max)
5 - 40 degrees C
W 215.5 x D 246.4 x H 44 mm
(Projecting parts not included)
2kg approximately
4cm×1
135
Appendix
HDMA-4000/HDMA-4000Sync unit
Required space for installation
420
Required space
Depth
246.4
Required space for installation
270
Width
215.5
44
8
100 Required space
Height
(mm)
AC adapter
1800
1200
50
100
136
26
Appendix
Remote Control ID setting
ON
OFF
1
2
3
4
1
2
3
4
1
2
3
4
1
2
3
4
1
2
3
4
Available to change by the button operations.
(Factory default: All switches are off.)
ON
OFF
ID fixed to 0 (Set only SW1 to ON)
ON
OFF
ID fixed to 1 (Set only SW2 to ON)
ON
OFF
ID fixed to 2 (Set only SW3 to ON)
Remote Control ID setting
You can assign the remote control ID numbers (0 to 3) to your remote controller.
The DIP switches can be found under the battery lid of the remote controller.
ON
OFF
ID fixed to 3 (Set only SW4 to ON)
To assign the ID number, use the numeric buttons (0 to 3) and the
button. The
default remote control ID is set to 0. In this example, the procedure to assign the
remote control ID to 2 is explained.
(1) With
on the remote controller held down, press the
button for longer than a second.
te
No
No signal, such as sound or message, appears when the ID number is
changed.
137
Appendix
Connecting to a UPS
1. Supported UPS
OMRON BX35F/BX50F
2. Operations
Run a Web browser, select [Local settings][UPS mode] and [Battery running
time] or [Remaining battery], then the UPS unit will shut down within one minute
of the HDMA-4000/HDMA-4000Sync shutting down.
3. Other
Proper operation is not guaranteed when the unit is connected via a USB-HUB.
138