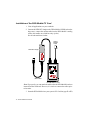
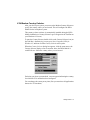
1
DIVA Mobile PC Card
User’s Guide
206-153-02
Second Edition (February 1998)
206-153-02
DIVA is a trademark of Eicon Technology Corporation.
IBM and PC AT are registered trademarks of International Business Machines Corporation.
UltraPort is a registered trademark of TDK Systems, Inc. Hayes is a registered trademark of Hayes
Microcomputer Products, Inc. MNP is a registered trademark of Microcom Corp. PCMCIA is a registered
trademark of Personal Computer Memory Card International Association. Windows is a registered trademark
of Microsoft Corp. All other trademarks are registered by their respective companies.
Changes are periodically made to the information herein; these changes will be incorporated into new editions
of the publication. Eicon Technology may make improvements and/or changes in the products and/or
programs described in this publication at any time.
A Product Comment Form is provided at the back of this publication. If the form has been removed, address
your comments to the attention of Technical Publications at the address below or by telephone (514-7455500), fax (514-745-5588) or electronic mail ([email protected]). Eicon Technology may use or distribute
whatever information you supply in any way it believes appropriate without incurring any obligations to you.
Copyright©1997-1998 Eicon Technology Corporation. All rights reserved, including those to reproduce this
publication or parts thereof in any form without permission in writing from Eicon Technology Corporation.
Eicon Technology Corporation
Attention: Corporate Publications
9800 Cavendish Blvd.
Montreal, Quebec, Canada H4M 2V9
E-mail: [email protected]
Fax: (514) 745-5588
Tel: (514) 745-5500
DIVA Mobile
Model Number: 800-241
Contents
Getting Started
5
Introduction.................................................................................. 6
Packaging..................................................................................... 7
Requirements ............................................................................... 8
Installation ................................................................................... 9
Installation of the DIVA Mobile PC Card ........................... 10
Software Installation under Windows 95............................. 11
Software Installation under Windows 95 OEM Software
Release 2 (OSR2) ............................................................ 12
Using the ISDN Setup Wizard ............................................. 13
V.34 Modem Country Selector............................................. 15
Checking the configured components.................................. 16
Connecting to the ISDN / analog Network.......................... 16
Changing SPIDs and ISDN Numbers.................................. 17
Removing............................................................................. 17
Applications
19
Introduction................................................................................ 20
Common Windows 95 Applications.......................................... 21
Voice Functions ......................................................................... 22
UltraPort® (V.34 Modem) ........................................................ 22
Solving Problems
Readme Files ............................................................................. 26
DIVA Mobile not detected ........................................................ 26
Start Up Problems...................................................................... 27
Hot Swapping (Modem Removal) Problems............................. 30
Troubleshooting ......................................................................... 31
25
Commands, Codes, and Protocols
33
AT Commands and Result Codes .............................................. 34
Error Correction Commands............................................... 35
Caller ID Commands........................................................... 36
S-Register Summary ............................................................ 36
Result Codes ........................................................................ 37
ISDN Protocols .......................................................................... 40
Technical and Regulatory Information
Technical Specifications ............................................................ 42
International Regulatory Information ........................................ 44
Declaration of Conformity .................................................. 44
Regulatory Information for Canada .................................... 46
Regulatory Information for Europe ..................................... 48
Limited Warranty....................................................................... 49
41
Chapter 1
Getting Started
Introduction
DIVA Mobile is the ideal hardware platform for high-speed connectivity
under almost any condition. With an ISDN BRI port, a V.34 modem port, and
the ability to transmit analog data via ISDN, it provides the best possible dialup access from just about any location. And with full Plug & Play support,
DIVA Mobile is easy to install and easy to use.
This guide shows you how to install DIVA Mobile PC Card and the DIVA for
Windows 95 software. As soon as you complete the installation, you will be
able to use your favorite data, fax, or voice messaging software. (For
instructions on using DIVA Mobile with specific applications, consult the
documentation provided with the application software.)
Several appendices follow the installation and operating instructions. They
include technical information about DIVA Mobile.
6
DIVA Mobile User’s Guide
Packaging
Before installing the DIVA Mobile verify the contents of your package. Your
package should include the following:
•
a DIVA Mobile PC Card
•
an ISDN RJ 45 cable
•
an ISDN dongle for connecting the RJ 45 cable to the DIVA Mobile
•
a modem RJ 11 cable
•
this manual
• DIVA for Windows 95 software (three 3.5” disks)
For European users, the package also includes:
•
an RVS-COM Lite CD-ROM
•
teleadapters for the analog connection, depending on the country
Getting Started
7
Requirements
To use DIVA Mobile, you need the following:
•
An 80386, 80486, Pentium, or compatible notebook
•
A type II or III PC Card (also called PCMCIA) slot
•
Windows 95
•
At least 4 MB of free hard disk space
•
At least 8 MB of RAM
•
A 3.5 inch disk drive (to install the DIVA Mobile support software)
If you want to make modem connections, you will need access to a regular
telephone jack.
If you want to make ISDN connections, you will need access to a Basic Rate
Interface line.
8
DIVA Mobile User’s Guide
Installation
If you have installed a former version (only 1.0 or 1.1), or a former beta
version of DIVA for Windows 95, or if you use a former version of the
Microsoft ISDN Accelerator Pack, you may encounter conflicts due to
different versions. To avoid such conflicts, follow these steps before you
install the DIVA for Windows 95 software for the DIVA Mobile PC Card.
1 Close all applications. From the Control Panel start the System applet.
2 Go to the “Device Manager” tab and select “Network adapters”.
3 Remove the following two components:
“EICON ISDN Adapter”
“EICON WAN Miniport”
4 Click “OK”.
5 When you are asked to restart your computer, click “No”.
6 Run the DIVADEL.BAT program. Put the setup disk of DIVA for
Windows 95 into your disk drive and enter the following path:
“A:\DIVADEL.BAT”.
7 When prompted, click “OK” and restart your PC.
Note: To un-install versions later than 1.1, refer to the online help.
The steps in the following section show you how to install the DIVA Mobile
PC Card and DIVA for Windows 95 software. During the software setup, the
Windows 95 Setup Wizard will appear; follow the on screen instructions to
select and configure the ISDN options you need.
Note: The installation program may require access to Windows 95 *.cab
files; make sure these files are available either from the Windows 95 CD or
on your hard disk drive. Just enter the path to the files. You should also read
your Notebook documentation and the readme file on the DIVA for
Windows 95 - Setup disk.
Getting Started
9
Installation of the DIVA Mobile PC Card
1 Close all applications on your notebook.
2 Connect the ISDN S/T dongle to the DIVA Mobile’s ISDN socket (the
larger one); connect the modem cable into the DIVA Mobile’s analog
socket (the smaller one which has only 4 poles).
See the schema below for that:
Analog
Modem
Cable
ISDN S/T Dongle
ISDN Cable
DIVA Mobile PC Card
Note: If you prefer, you can attach the cables after the DIVA Mobile has been
inserted into the Notebook. However, it is easier to connect the cables prior
to insertion.
3 Insert the DIVA Mobile into your system’s PC Card slot (type II or III).
10
DIVA Mobile User’s Guide
Software Installation under Windows 95
Note: If you are using Windows 95 OEM Software Release 2 (OSR2) please
refer to the section “Software Installation under Windows 95 OEM Software
Release 2 (OSR2)” on page 12.
Note: After you have inserted the DIVA Mobile into your notebook,
Windows 95 detects the new hardware and recognizes it as EICON DIVA
Mobile.
1 From the Install New Hardware dialog box, select “Driver from disk
provided by hardware manufacturer.” Click OK.
2 Insert the DIVA for Windows 95 - Setup Disk. Enter the following path
(where A is your floppy drive letter):
A:\
3 Click OK. If this is the first time you are installing a modem on your
notebook, the Location Information dialog box will appear. The dialog
box asks you to enter information about your location (country code,
regional code, ...) Follow the instructions displayed on the screen.
When finished click OK.
4 Windows 95 will automatically detect the EICON DIVA Mobile V.34
modem and install the necessary software.
5 Windows 95 will automatically detect the DIVA Mobile ISDN adapter
and start installing the necessary software. When prompted, follow the
instructions displayed on the screen; when the Setup Wizard appears
go to the section “Using the ISDN Setup Wizard” on page 13 of this
guide and continue.
6 The Setup Wizard will copy all necessary files to your system. When
finished, it will prompt you to reboot your system.
Getting Started
11
Software Installation under Windows 95 OEM Software
Release 2 (OSR2)
After you have inserted the DIVA Mobile into your notebook, Windows 95
detects the new hardware and recognizes it as EICON DIVA Mobile.
1 Windows 95 prompts you to install a Standard PCMCIA Card Modem.
Click Next.
2 Windows 95 prompts again for the Standard PCMCIA Card Modem.
Select Other Location (this allows you to enter the path to the DIVA
for Windows 95 installation files; otherwise the DIVA Mobile would
be installed as Standard PCMCIA Modem).
3 Insert the DIVA for Windows 95 - Setup Disk.
4 Enter the following path (where A is your floppy drive letter) in the
Select Other Location dialog box:
A:\
5 Click OK, then in the dialog box that follows, click Finish. You will
be prompted to insert the disk (even if you have already entered the
correct disk and path in steps 3 and 4).
6 Click OK. The Copying Files dialog box appears.
7 In the Copying Files dialog box enter the path to the installation files
and click OK.
8 Windows 95 automatically detects the EICON DIVA Mobile ISDNV.34 combo adapter.
9 Windows 95 automatically detects the EICON DIVA Mobile ISDN
V.30 modem and installs the modem software.
10 If this is the first time you are installing a modem on your notebook,
the Location Information dialog box will appear. The dialog box
prompts you to enter information about your location (country code,
regional code, ...). Follow the on screen instructions. When finished
click OK.
12
DIVA Mobile User’s Guide
11 Windows 95 automatically detects the DIVA Mobile ISDN adapter and
starts to install the software for the ISDN adapter. Follow the
instructions displayed on the screen; when the DIVA for Windows 95
Setup Wizard appears go to the section “Using the ISDN Setup
Wizard” below, and continue.
12 The Setup Wizard will copy all necessary files to your system. When
finished, it will prompt you to reboot your system.
Using the ISDN Setup Wizard
The DIVA for Windows 95 Setup Wizard helps you to quickly and easily
configure your software for ISDN transmissions. The Setup Wizard runs
automatically when you first install DIVA for Windows 95. After DIVA
Mobile has been installed, you can use it to change your installation and setup
options.
When you install DIVA for Windows 95 for the first time, you have the option
of performing either an Express setup or a Custom setup.
Express Setup
The Express setup requires only basic information. It sets up your DIVA
Mobile with a working ISDN configuration which is suitable for most
applications.
Custom Setup
The Custom setup provides access to all configuration screens. This enables
you to fine-tune your configuration for your particular needs. You can select
different virtual ISDN modems as well as the CAPI 2.0. The Setup Wizard
will prompt you to install the different components one after the other.
Select either the Express or the Custom Setup and follow the on screen
instructions.
Note: If you have a pre-installed ISDN line or have already ordered your
ISDN line, you will need information from your telephone company or
corporate system administrator about the type of ISDN telephone switching
equipment that you are connected to.
Getting Started
13
The following table lists the ISDN components currently available with the
DIVA Mobile:
Option
Function
Supports
Eicon ISDN
channel 0 and 1
Channels of the WAN
Miniport driver for connections via the Windows 95
Dial-Up Network with
channel bundling
Remote access to company networks,
Internet, MSN, CompuServe and multilink PPP (MLPPP). This option is
automatically installed.
RNA Modem
Logic modem for connec- Remote access to company networks,
tions via the Windows 95 Internet, MSN, CompuServe, special
Dial-Up Network
cases
X.75 Modem
Logic modem for access to ISDN mailboxes, NetMeeting
ISDN mailboxes with X.75
V.120 Modem
Logic modem for access to Special case (some ISDN mailboxes)
ISDN mailboxes with
and CompuServe ISDN
V.120
ISDN Port
All Win 3.x based applications such as
Virtual COM-Port for
AOL.
applications directly
accessing the COM Port via
AT commands
CAPI 2.0
Common ISDN API 2.0: ISDN-applications (RVS-COM etc.)
ISDN programming interface used by many ISDN
applications
The Setup Wizard allows you to enter a separate ISDN number for each
preconfigured ISDN modem. These numbers can be, for example, an MSN
with a DSS1 connection or the extension after a PBX.
Note: In addition to requiring a listing of the ISDN phone numbers,
switchtypes in the US and Canada may require a SPID number for each
phone number. Your telephone service provider can provide this information.
If you are traveling and need to use a different ISDN line, you may need to
reselect the Switchtype, ISDN phone numbers, and (in North America only)
SPID numbers. If you want to change any of the setup parameters in the
future, simply restart the setup wizard by clicking Start on the Windows 95
Taskbar, go to Programs/DIVA for Windows 95 and select Setup Wizard.
Online Help is available for all parameters.
14
DIVA Mobile User’s Guide
V.34 Modem Country Selector
After you reboot your system, you must use the Modem Country Selector to
specify the country where you are located. This will configure the DIVA
Mobile for the local phone system.
This country selector software is automatically installed during the DIVA
Mobile installation (a Country Selector Logo will appear in the Task Bar on
your Windows 95 screen).
To start the Country Selector, double-click on the Country Selector icon (on
the Task Bar). Alternatively you can go to Start, Programs, DIVA for
Windows 95, and then click the Country Selector menu option.
When the Country Selector dialog box appears, click the menu arrow; the
Country Selector displays a list of countries where the DIVA Mobile is
certified for use. Select the country where you are located.
Each time you reboot your notebook, a screen appears indicating the country
for which the V.34 modem has been configured.
You can change the country at any time (first you must close all applications
that use the V.34 modem).
Getting Started
15
Checking the configured components
After you reboot your computer you can check which modems are installed.
1 From the Taskbar choose Start, Settings, Control Panel and doubleclick on System.
2 Select the Device-Manager and double-click on Modem. The EICON
DIVA Mobile V.34 modem for voice, fax and analog data is listed, as
well as any other modems you have installed
Connecting to the ISDN / analog Network
The following procedure shows you how to connect the DIVA Mobile to the
available transmission network (ISDN or analog telephone lines):
1 Connect the supplied ISDN RJ 45 cable to the ISDN S/T dongle and
to the ISDN wall jack.
16
DIVA Mobile User’s Guide
North American users only. If you are using the S/T version of DIVA
Mobile, you must install an NT1 between the ISDN wall jack and the
card (connect the DIVA Mobile to the NT1, and the NT1 to the ISDN
wall jack). You can obtain an NT1 from your Eicon Technology
supplier or from a third party.
2 And/Or connect the modem’s RJ 11 cable to an analog wall jack either
directly (North America only) or via a corresponding teleadapter.
Changing SPIDs and ISDN Numbers
To enter or modify your ISDN telephone number and/or SPID (Service
Profile Identifiers) follow these steps:
1 Click Start on the Windows 95 Taskbar. Go to Programs/DIVA for
Windows 95 and select Setup Wizard.
2 Follow the Setup Wizard instructions, adjusting the ISDN numbers as
necessary. Note that SPIDs are used only in North America (if
required).
3 You must Shutdown and reboot your system for the new settings to
take effect.
Removing
Note: If you want to remove the DIVA Mobile and the DIVA Mobile
Windows 95 drivers, you must use the Device Manager. You can only remove
the DIVA Mobile software if the DIVA Mobile PC Card is inserted in your
Notebook.
1 From Taskbar select Start, Settings and then Control Panel.
2 Double-click the System icon in the Control Panel window.
3 Select the Device Manager tab.
4 Double-click the Multifunction adapter entry; (if not found, doubleclick the Modem entry).
5 Select the DIVA Mobile ISDN-V.34 combo card and click Remove.
Getting Started
17
6 Click OK to close the Device Manager tab.
7 You can now remove the DIVA Mobile from the notebook.
8 Restart your Computer.
18
DIVA Mobile User’s Guide
Chapter 2
Applications
Introduction
You can use the DIVA Mobile for the following tasks:
•
Sending and receiving electronic mail or faxes
•
Accessing other Internet resources, such as newsgroups and the
World Wide Web
•
Accessing private commercial services, such as CompuServe forums
•
Logging on to a corporate network to transfer files and use LANbased electronic mail
•
Connecting to a host computer to perform client/server transactions
Once configured, the DIVA Mobile can be used by all your communications
applications. Occasionally some additional setup may be required.
For information on how to use the application software, consult its
documentation.
Note: For analog applications (data, fax, voice) always select the V.34
modem (regardless of whether transmission is via an analog or an ISDN line).
If your DIVA Mobile PC Card is connected to the analog network via a PBX,
complete the following steps to enable the DIVA Mobile to dial out.
1 From the Taskbar go to Start and select Settings, Control Panel and
double-click System.
2 Select the Device Manager tab, double-click Modem and select the
EICON DIVA Mobile V.34 Modem.
3 Click Properties.
4 Click the Settings tab and deactivate the option “Wait for dial tone”.
5 Click OK.
20
DIVA Mobile User’s Guide
Common Windows 95 Applications
DIVA Mobile provides ISDN support for many common Windows 95
applications, such as:
•
Microsoft Internet Explorer
•
Dial-Up Networking
•
Microsoft Fax
•
Microsoft Exchange Client (sending and receiving electronic mail)
• Microsoft NetMeeting
For information on setting up these Windows 95 applications, consult the
DIVA for Windows 95 online help (to access online help click Start on the
Taskbar, and go to Programs/DIVA for Windows 95; select Support for 3rd
party products).
Applications
21
Voice Functions
DIVA Mobile provides the necessary hardware to support voice applications.
When combined with voice software, and a built-in soundsystem, it allows
your PC to function as a digital answering machine supporting voice mail,
remote message retrieval, and more.
The specific features available to you depend on the voice application
software that you purchase, but features typically include: recording a
greeting, listening to (retrieving) messages, remote message retrieval, and
multiple voice mail boxes.
UltraPort® (V.34 Modem)
UltraPort technology can double the throughput capabilities of
DIVA Mobile. When the computer-to-modem (DTE) speed is set to 115,200
in your communication program, UltraPort automatically transmits at up to
230,400 bps with average 8:1 compression (using LAPM and V.42bis).
However, overall throughput is limited by phone line quality and the
performance capabilities of the remote modem.
If you are repeatedly disconnected, or see numerous file transmission errors
(excessive errors can abort a file transfer), your computer may not be fast
enough to handle the incoming data. Disconnect and disable the UltraPort.
1 Go to Start and select Settings, Control Panel and double-click System.
2 Select the Device Manager Tab, double-click Modem and select the
EICON DIVA Mobile V.34 Modem.
3 Click Properties.
4 Select the Connections Tab, and click Advanced...
5 In the field Extra Settings enter the command AT*TJ0 and click OK.
22
DIVA Mobile User’s Guide
UltraPort will remain off until you:
•
re-enable it by entering AT*TJ1
•
reset the modem by entering AT&F
• remove and reinsert DIVA Mobile.
Note: TAPI-applications do not require you to enter the AT commands
directly in the application.
Applications
23
24
DIVA Mobile User’s Guide
Chapter 3
Solving Problems
Readme Files
Before attempting to troubleshoot a problem with your DIVA Mobile, read
the Readme file on the DIVA for Windows 95 setup disk. This will assure
you are kept up to date on all known problems.
DIVA Mobile not detected
After inserting DIVA Mobile into your PC Card slot, Windows 95 does not
detect the adapter.
This could be due to the fact that the Card and Socket Services on your
notebook (which are installed by default with Windows 95) are either not
installed or incorrectly installed. Check the installation of the Card and
Socket Services in the Device Manager:
1 From the Taskbar go to Start, Settings, Control Panel and double-click
System.
2 Select the Device Manager tab.
3 Double-click PCMCIA socket.
4 Select the PCMCIA controller and click Properties.
If the controller is not ready for operation or marked with a yellow
exclamation mark the services are not correctly installed. Check your
Windows 95 installation or ask the supplier of your notebook.
26
DIVA Mobile User’s Guide
Start Up Problems
With a few notebooks the Plug&Play installation of DIVA Mobile may result
in resource conflicts or malfunctioning. This might be due to the Plug&Play
hardware and software of the devices, or an improper installation of other
hardware or software components.
The DIVA for Windows 95 software does not influence the assignment of
system resources. These problems can only be solved by the user.
1 Deinstall DIVA Mobile.
2 Deinstall all hardware components which are not used anymore.
3 Reinstall DIVA Mobile.
If the problem is not solved, you must modify the configuration manually.
See the following examples:
Incomplete installation because of resource conflicts
DIVA Mobile has been successfully installed and detected, but the software
installation stops (after installation of Eicon DIVA Mobile V.34 Modem)
without any error messages.
In most cases this results from the wrong assignment of resources by the
system. For example, resources already in use are assigned rather than ones
that are available.
1 From the Taskbar go to Start, Settings, Control Panel and double-click
System.
2 On the Device Manager tab double-click Multifunction adapter. The
Eicon DIVA Mobile ISDN-V.34 combo card is listed; a yellow
exclamation mark indicates it is not correctly installed.
3 Click Eicon DIVA Mobile ISDN-V.34 combo card and select
Properties. A dialog box appears that shows you a conflict of
resources.
4 Modify the resources manually on the Resources tab.
As soon as the resource conflict is solved, the installation restarts
automatically.
Solving Problems
27
Malfunctioning due to a covered resource conflict
The DIVA Mobile hardware and software is installed, but after rebooting the
PC the DIVA Mobile does not function.
This usually occurs when a malfunctioning driver uses resources without
signaling the system.
To solve this problem modify the resources assigned to the DIVA Mobile.
1 From the Taskbar go to Start, Settings, Control Panel and double-click
System.
2 On the Device Manager tab double-click Multifunction adapter.
3 Select the Eicon DIVA Mobile ISDN-V.34 combo card and click
Properties.
4 Modify the resources manually on the Resources tab.
Malfunctioning due to “unfavorable” resource assignment
The DIVA Mobile hardware and software is installed, but after rebooting the
PC or removing and reinserting DIVA Mobile, the system freezes for about
1 to 2 minutes (then functions normally).
The reason of this error is still under investigation. You can solve it by
modifying the DIVA Mobile resources which have been assigned to the COM
Port.
1 From the Taskbar go to Start, Settings, Control Panel and double-click
System.
2 On the Device Manager tab double-click Multifunction adapter.
3 Select Eicon DIVA Mobile ISDN-V.34 combo card and click
Properties.
4 Modify the I/O range manually on the Resources tab.
28
DIVA Mobile User’s Guide
System crash on 32-Bit-CardBus Controller PCs (from Windows 95
OSR2)
DIVA Mobile has been successfully installed and detected, but after the first
installation step (installation of the multifunction adapter) the PC freezes or
shows a black or blue screen.
This problem is usually caused by a combination of two factors: a shared
interrupt and a PC hardware (BIOS) error. It may also occur if the Card and
Socket Service drivers are old or not correct.
Two devices can share an interrupt only if there are no free interrupts
available.
To solve the problem, deinstall all unused hardware components (e. g. an
infrared port). Assign the DIVA Mobile an exclusive interrupt. Reinstall the
DIVA Mobile.
The original error can only be solved by the supplier/producer of your
notebook (BIOS Update, current drivers).
Solving Problems
29
Hot Swapping (Modem Removal) Problems
In general, you can remove and reinsert DIVA Mobile while the PC is on.
Some applications, however, do not support “hot swapping”; problems may
occur if you remove the DIVA Mobile while the PC is on.
Note: Before removing DIVA Mobile close all applications which are using
the adapter.
In order to correctly remove DIVA Mobile during operation follow these
steps:
1 Click the PC Card icon on the Taskbar next to the Windows 95 clock.
The PC Card (PCMCIA) Properties dialog box opens; it displays a list
of PCMCIA devices (in the Socket Status tab).
2 Select Eicon DIVA Mobile ISDN-V.34 combo card from the list of
PCMCIA devices.
3 Click Stop. The following message will appear:
“You may safely remove this device”.
4 Click OK. You can now remove the device.
If DIVA Mobile is not immediately detected after reinserting it into the PC
Card slot, reboot your system.
30
DIVA Mobile User’s Guide
Troubleshooting
The DIVA for Windows 95 driver includes a debugging tool called
DITRACE. Refer to the online help chapter Debugging for more information
on DITRACE. The online help is accessed by clicking Start on the Taskbar,
going to Programs/DIVA for Windows 95, and selecting DIVA for
Windows 95 help.
Solving Problems
31
32
DIVA Mobile User’s Guide
Appendix
Commands,
Codes, and
Protocols
AT Commands and Result Codes
Note: The AT commands for the V.34 modem are standard modem
commands which are realised via the hardware of DIVA Mobile.
Factory default settings are stored in permanent memory. Italicized n or x
denotes options to be supplied by user or software.
34
Command
Function
Default
A
Go off-hook and attempt to answer a call.
—
Bn
Modulation Standard for 0 - 1200 bps
B1
Dn
Dial telephone number
—
En
Turn off command echo
E1
Hn
On/off-hook
—
In
Identification commands
—
Mn
Speaker control
M1
Nn
Automode detection off/on
N1
On
On-line and retrain control
—
P
Pulse dial
—
Qn
Result codes enable/disable
Q0
Sn=x
Set register n to decimal value x
—
Sn?
Get decimal value in register n
—
T
Tone (DTMF) dial
—
Vn
Result codes format: verbose/terse
V1
Wn
Extended result code format n
W0
Xn
Result code reporting options
X4
Yn
Long space disconnect
Y0
Zn
Recall stored profile n
—
&Cn
Carrier detect control
&C1
&Dn
DTR options
&D2
&Fn
Return all settings to factory default n
—
&Gn
Guard tone disable/enable
&G0
&Kn
Flow control settings
&K3
&P0
Set pps pulse dial with 39%/61% make/break
&P0
&Qn
Connection mode
&Q5
&Rn
CTS control options
&R1
DIVA Mobile User’s Guide
Command
Function
Default
&Sn
DSR control options
&S0
&Tn
Diagnostic test control
&T5
&V
Display current configurations
—
&Wn
Save current profile in memory
—
&Yn
Recall stored profile on power up
&Y0
&Zn=x
Store dial string n (to 34) to location x (0 - 3).
—
%En
Control line quality monitor and auto retrain.
%E2
%L
Return received line signal level.
—
%Q
Report the line signal quality.
—
\Kn
Controls break handling.
\K5
\Nn
Mode selection.
\N3
\Vn
Connect message format control.
\V0
+MS
Select modulation.
—
Error Correction Commands
Italicized n or x denotes options to be supplied by user or software.
Command
Function
Default
%Cn
Enable/disable data compression.
%C3
\An
Set maximum block size
\A1
\Bn
Send break of n x 100 ms.
—
)Mn
Cellular power level
)M0
*Hn
MNP 10 link negotiation selection
H0
-Kn
Enable/disable MNP 10 extended services
-K0
-Qn
Fall back to V.22 bis/V.22
-Q1
-SEC=n
Enable/Disable MNP10-EC
-SEC=0
@Mn
Select initial transmit level
@M0
:En
Enable/disable the compromise equalizer
:E1
Commands, Codes, and Protocols
35
Caller ID Commands
Italicized n or x denotes options to be supplied by user or software.
Command
Function
Default
#CID=n
Enable/disable Caller ID and format
#CID=n
S-Register Summary
Default values are in decimal format.
36
Register
Function
Default
S0
Rings to Auto-Answer
0
S1
Ring Counter
0
S2
Escape Character
43
S3
Carriage Return Character
13
S4
Line Feed Character
10
S5
Backspace Character
8
S6
Wait Time for Dial Tone
2
S7
Wait Time for Carrier
50
S8
Pause Time for Dial Delay Modifier
2
S9
Carrier Detect Response Time
6
S10
Carrier Loss Disconnect Time
14
S11
DTMF Tone Duration
95
S12
Escape Prompt Delay
50
S14
General Bit Mapped Options Status
138 (8Ah)
S16
Test Mode Bit Mapped Options Status (&T)
0
S18
Test Timer
0
S19
AutoSync Options
0
S20
AutoSync HDLC Address or BSC Sync Character
0
S21
V.24/General Bit Mapped Options Status
52 (34h)
S22
Speaker/Results Bit Mapped Options Status
117 (75h)
S23
General Bit Mapped Options Status
62 (36h)
S24
Sleep Inactivity Timer
10
S25
Delay to DTR Off
5
S26
RTS-to-CTS Delay
1
DIVA Mobile User’s Guide
Register
Function
Default
S27
General Bit Mapped Options Status
73 (49h)
S28
General Bit-Mapped Options Status
0
S30
Disconnect Inactivity Timer
0
S31
General Bit-Mapped Options Status
194
S32
XON Character
17 (11h)
S33
XOFF Character
19 (13h)
S36
LAPM Failure Control
7
S37
Line Connection Speed
0
S38
Delay Before Forced Hangup
20
S39
Flow Control Bit Mapped Options Status
3
S40
General Bit-Mapped Options Status
104 (68h)
S41
General Bit-Mapped Options Status
195
S46
Data Compression Control
138
S48
V.42 Negotiation Control
7
S82
LAPM Break Control
128(40h)
S86
Call Failure Reason Code
-
S91
PSTN Transmit Attenuation Level
10
S92
Fax Transmit Attenuation Level
10
S95
Result Code Messages Control
0
S201
Cellular Transmit Level
58
Result Codes
Code
Long Form
Meaning
0
OK
Command executed OK
1
CONNECT
Connection at 0 to 300 bps
2
RING
Ringing detected
3
NO CARRIER
Carrier lost or not detected
4
ERROR
Improper command or checksum
5
CONNECT 1200
Connection at 1200 bps
6
NO DIALTONE
No dial tone detected
7
BUSY
Busy signal detected
8
NO ANSWER
Period of silence not detected
Commands, Codes, and Protocols
37
Code
38
Long Form
Meaning
9
CONNECT 0600
Connection at 600 bps
10
CONNECT 2400
Connection at 2400 bps
11
CONNECT 4800
Connection at 4800 bps
12
CONNECT 9600
Connection at 9600 bps
13
CONNECT 7200
Connection at 7200 bps
14
CONNECT 12000
Connection at 12,000 bps
15
CONNECT 14400
Connection at 14,400 bps
16
CONNECT 19200
Connection at 19,200 bps
17
CONNECT 38400
Connection at 38,400 bps
18
CONNECT 57600
Connection at 57,600 bps
19
CONNECT 115200
Connection at 115,200 bps
33
FAX
Fax connection established
35
DATA
Data connection established in fax mode
40
CARRIER 300
0-300 bps data rate detected
46
CARRIER 1200
1200 bps data rate detected
47
CARRIER 2400
2400 bps data rate detected
48
CARRIER 4800
4800 bps data rate detected
49
CARRIER 7200
7200 bps data rate detected
50
CARRIER 9600
9600 bps data rate detected
51
CARRIER 12000
12,000 bps data rate detected
52
CARRIER 14400
14,400 bps data rate detected
53
CARRIER 16800
16,800 bps data rate detected
54
CARRIER 19200
19,200 bps data rate detected
55
CARRIER 21600
21,600 bps data rate detected
56
CARRIER 24000
24,000 bps data rate detected
57
CARRIER 26400
26,400 bps data rate detected
58
CARRIER 28800
28,000 bps data rate detected
59
CONNECT 16800
Connection at 16,800 bps
61
CONNECT 21600
Connection at 21,600 bps
62
CONNECT 24000
Connection at 24,000 bps
63
CONNECT 26400
Connection at 26,400 bps
64
CONNECT 28800
Connection at 28,800 bps
66
COMPRESSION: CLASS 5
Connection using MNP Class 5 compression
DIVA Mobile User’s Guide
Code
Long Form
Meaning
67
COMPRESSION: V.42 bis
Connection using V.42 bis compression
69
COMPRESSION: NONE
Connection without compression
76
PROTOCOL: NONE
Connection without error correction
77
PROTOCOL: LAPM
Connection in V.42 LAPM error correction mode
80
PROTOCOL: ALT
Connection in MNP error correction mode
81
PROTOCOL: ALT-CELLULAR
Connection in MNP 10 error correction mode with
power level adjustment enabled
102
DIGITAL LINE
Over-current condition during attempted call or answer.
Modem aborted call and is in “safe” state.
Commands, Codes, and Protocols
39
ISDN Protocols
40
Region
Protocol
Australia
national
Belgium
DSS1 and national
Europe
DSS1
France
DSS1 and national
Germany
DSS1 and 1TR6
(1TR6 only behind a
PBX)
Japan
national
North America
national NI1 and
AT&T 5ESS
Sweden
national
DIVA Mobile User’s Guide
Back Matter
Technical and
Regulatory
Information
Technical Specifications
Technical Data
•
•
•
•
•
•
UART Rates: 300 to 115,200 bps
Signal Output: -10±1 dBm
Receiver Range: -10 dBm to -43 dBm
PCMCIA Rel. 2.1 Type II (68 Pin)
Non-volatile memory for four 35-digit phone numbers
Digital line/PBX over-voltage protection
External Interface
• ISDN RJ 45 cable
• ISDN dongle for connecting the RJ 45 cable to the DIVA Mobile
• Modem RJ 11 cable
ISDN Performance
• ISDN Basic Rate Interface (up to 2 bearer channels @ 64 kbps each and one
data channel @ 16 kbps each)
V.34 Modem Data Performance
•
•
•
•
•
•
Asynchronous, full-duplex
Hayes-compatible AT command set with EIA-578 fax extensions
Automatic dialing and answering
Serial DTE-to-modem port rates up to 250,000 bps when utilizing UltraportTM
Automatic rate translation
Full-duplex asynchronous modem operating modes: CCITT V.34, V.32 bis, V.32, V.22 bis,
V.22, V.23, V.21, Bell 212A, 103J, and Rockwell V.FC, supporting transmission speeds
from 300 to 33,600 bps
V.34 Modem Fax Performance
• Class 1, Group 3, half-duplex synchronous fax modes: CCITT V.17, V.29, V.27ter, and
V.21, supporting transmission speeds from 300 to 14,400 bps
• Fax classifications EIA 578, Class 1
V.34 Modem Voice Performance
• Caller ID
• Voice answering machine
• Play or record messages
Remote message retrieval
• Multiple voice mailbox capability
Special Features
•
•
•
•
MNP 2 to 4 error correction
CCITT· V.42· LAP-M· error correction
MNP 5 data compression
CCITT V.42 bis· data compression
Typical Power Requirements
•
•
•
•
ISDN with S/T interface: 181 mA @ +5 V
Modem: 196 mA @ +5 V
Modem over ISDN: 275 mA @ +5 V
Auto sleep mode: 48.2 mA @ +5 V
Environmental Requirements
• Operating temperature: 15°C to 55°C
• Operating humidity: 10 to 85% (non-condensing)
• Barometric operating pressure: 86 to 106 kPascals
International Regulatory Information
Regulatory Information for the USA
FCC Warning
Declaration of Conformity
We:
Eicon Technology Inc.
2155 Chenault Drive
Suite 503
Carrollton, Texas
USA 75006
1-800-80-EICON
(972) 417-5515
Fax: (972) 417-5610
Declare under our sole legal responsibility that the product listed below to which this
declaration relates, are in conformity with Part 15 of the FCC Rules. Operation is subject to
the following two conditions:
(1) This device may not cause harmful interference, and
(2) this device must accept any interference received, including interference that may cause
undesired operation.
FCC Part 15 Notice
The Eicon Technology DIVA Mobile PC Card is classified by the Federal Communications
Commission (FCC) as Class B computing device. However, the inclusion of certain options
changes the rating of some configurations to Class A. To determine which classification
applies to your equipment, examine all FCC registration labels located on the underside of
your equipment. If any one of the labels carries a Class A rating, your entire system is
considered to be a Class A computing device. If all labels carry the Class B rating, your system
is considered a Class B computing device.
Class B
This equipment generates and uses radio-frequency energy and, if not installed and used
properly, that is, in strict accordance with the manufacturer's instructions, may cause
interference to radio and television reception. It has been type tested and found to comply with
the limits for a Class B computing device in accordance with the specifications of Part 15 of
FCC Rules, which are designed to provide reasonable protection against such interference in
a residential installation. However, there is no guarantee that interference will not occur in a
particular installation. If this equipment does cause interference to radio or television
reception, which can be determined by turning the equipment off and on, the user is
encouraged to try to correct the interference by one or more of the following measures:
•
•
•
•
Reorient the receiving antenna
Relocate the computer with respect to the receiver
Move the computer away from the receiver
Plug the computer into a different outlet so that computer and receiver are on different branch circuits.
If necessary, the user should consult the dealer or an experienced radio/television technician
for additional suggestions. Any changes made by the user not approved by Eicon Technology
can void the user's authority to operate the equipment. The user may find the following booklet
prepared by the Federal Communications Commission helpful: How to Identify and Resolve
Radio-TV Interference Problems, available from the U.S. Government Printing Office,
Washington, DC 20402, Stock No. 004-000-00345-4.
FCC Part 68 Notice Modem Requirements
This equipment operates in compliance with Part 68 of the FCC Rules. In accordance with this
regulation, the following requirements should be observed:
Type of Service. Your Eicon Technology DIVA Mobile PC Card is designed to be used on
standard device telephone lines. The modem connects to the telephone line by means of a
standard jack called the USOC RJ-11C. Connection to a telephone-company-provided coin
service (central-office-implemented systems) is prohibited. Connection to party-line service
is subject to state tariffs.
Telephone Company Procedures. The goal of the telephone company is to provide you with
the best service it can. To this end, the company may need to occasionally make changes in its
equipment, operations, or procedures. If these changes might affect your service or the
operation of your equipment, the telephone company will give you notice, in writing, to allow
you to make any changes necessary to maintain uninterrupted service.
If you have any questions about your telephone line, such as how many pieces of equipment
you can connect to it, the telephone company will provide this information. In certain
circumstances, the telephone company may request information concerning the equipment
you have connected to your telephone line. If they do, provide the FCC registration number
and the ringer equivalence number (REN) of the equipment connected to your line; this
information is listed on the equipment label. The sum of all the REN’s on your telephone line
should be less than five to ensure proper service from the telephone company.
ISDN Interface
Facility Interface code: 02IS5
Digital Reg.code: XD
Service order code: 6.0F
The Telephone Consumer Protection Act of 1991 makes it unlawful for any person to use a
computer or other electronic device to send any message via a telephone facsimile machine
unless such message clearly contains, in a margin at the top or bottom of each transmitted page
or on the first page of the transmission, the date and time it is sent and an identification of the
business, other entity, or individual sending the message and the telephone number of the
sending machine or such business, other entity, or individual.
To program this information into your facsimile, refer to the instructions in your facsimile
software manual.
If Problems Arise
If your telephone equipment is not operating properly, immediately remove it from the
telephone line, as it may harm the telephone network. If the telephone company notes a
problem, it may temporarily discontinue service. When practical, it will notify you in advance
of this disconnection. If advance notice is not feasible, you will be notified as soon as possible.
When you are notified, you will be given the opportunity to correct the problem and informed
of your right to file a complaint with the FCC.
If repairs are needed on your DIVA Mobile PC Card they should be performed by Eicon
Technology. For information, contact Eicon Technology at the address or phone number listed
for the Customer Service Hotline listed in the Warranty section of this manual.
Installation
The Eicon Technology products provide all the connections necessary for proper operation.
Connection to the telephone network should be made with standard RJ-11C modular cords
that connect to the jacks or the product. Please see the instructions in the installation section
for your system.
Regulatory Information for Canada
NOTICE: The Industry Canada label identifies certified equipment. This certification means
that the equipment meets certain telecommunications network protective, operational and
safety requirements. Industry Canada does not guarantee the equipment will operate to the
user’s satisfaction.
Before installing this equipment, users should ensure that it is permissible to be connected to
the facilities of the local telecommunications company. The equipment must also be installed
using an acceptable method of connection. In some cases, the company’s inside wiring
associated with a single line individual service may be extended by means of certified
connector assembly (telephone extension cord). The customer should be aware that
compliance with the above conditions may not prevent degradation of service in some
situations.
Repairs to certified equipment should be made by an authorized Canadian maintenance facility
designated by the supplier. Any repairs or alterations made by the user to this equipment, or
equipment malfunctions, may give the telecommunications company cause to request the user
disconnect the equipment.
For their own protection, users should ensure that any electrical ground connections of the
power utility, telephone lines and internal metallic water pipe system are connected together.
This precaution is particularly important in rural areas.
CAUTION: Users should not attempt to make such connections themselves, but should
contact the appropriate electric inspection authority, or electrician, as appropriate. This digital
apparatus does not exceed the Class B limits for radio noise emissions from digital apparatus
set out in the Radio Interference Regulations of the Canadian Department of Communications.
Le présent appareil numérique n’émet pas de bruits radioélectriques dépassant les limites
applicables aux appareils numériques de la classe B prescrites dans le Réglement sur le
brouillage radioélectrique édicté par le ministére des Communications du Canada.
Canadian Modem Requirements
The Industry Canada label identifies certified equipment. This certification means that the
equipment meets certain telecommunications network protective, operational, and safety
requirements. The Industry Canada does not guarantee the equipment will operate to the user's
satisfaction.
Before installing this equipment, users should ensure that it is permissible to be connected to
the facilities of the local telecommunications company. The equipment must also be installed
using an acceptable method of connection. In some cases, the company's inside wiring
associated with a single-line individual service may be extended by means of a certified
connector assembly (telephone extension cord). The customer should be aware that
compliance with the above conditions may not prevent degradation of service in some
situations.
Repairs to certified equipment should be made by a representative designated by the supplier.
Any repairs or alterations made by the user to this equipment, or equipment malfunctions, may
give the telecommunications company cause to request that the user disconnect the equipment.
Users should ensure for their own protection that the electrical ground connections of the
power utility, telephone lines and internal metallic water pipe system, if present, are connected
together. This precaution may be particularly important in rural areas Caution: Users should
not attempt to make connections themselves, but should contact the appropriate electric
inspection authority, or electrician, as appropriate.
NOTICE: The Ringer Equivalence Number (REN) assigned to each terminal device
provides an indication of the maximum number of terminals allowed to be connected to a
telephone interface. The termination on an interface may consist of any combination of
devices subject only to the requirement that the sum of the Ringer Equivalence Number of all
the devices does not exceed 5.
The REN for the Diva Mobile PC Card is 0.4
The authorized maintenance facility in Canada is:
Eicon Technology Corporation
9800 Cavendish
Montreal, Quebec
Canada H4M 2V9
Regulatory Information for Europe
This equipment displays the CE 168 mark to show that it has been tested and found to fully
comply with the Terminal Equipment, EMC and Low Voltage Directives (91/263/EEC,
89/336/EEC and 72/23/EEC, as amended by Directive 93/68/EEC).
Notice regarding the use of the analog modem in the Federal Republic of Germany
The analog modem has been approved by the responsible agency of the Federal Republic of
Germany, BAPT, as only terminal equipment. Thus, it may be used as the only analog terminal
equipment at an analog circuit switched connection. The connection of the analog modem of
the DIVA Mobile PC Card is only allowed via the F coded socket of the telephone socket, so
you have to unplug your telephone in order to plug the modem teleadapter in. If you use the
N coded socket for your modem, the functionality of your telephone may not be guaranteed.
Limited Warranty
Eicon Technology Corporation warrants to the original purchaser of this Eicon Technology Product
that it is to be in good working order for a period of five (5) years from the date of purchase
from Eicon Technology or an authorized Eicon Technology dealer. Should this Product, in
Eicon Technology’s opinion, fail to be in good working order at any time during this five year
warranty period, Eicon Technology will, at its option, repair or replace this Product at no
additional charge except as set forth below. Repair parts and replacement Products will be
furnished on an exchange basis and will be either reconditioned or new. All replaced parts and
Products become property of Eicon Technology. This Limited Warranty does not include
service to repair damage to the Product resulting from accident, disaster, misuse, abuse, or
non-authorized alterations, modifications, and/or repairs.
Products requiring Limited Warranty service during the warranty period should be delivered
to Eicon Technology with proof of purchase. If the delivery is by mail, you agree to insure the
Product or assume the risk of loss or damage in transit. You also agree to prepay shipping
charges to Eicon Technology and to use the original shipping container or equivalent.
EICON TECHNOLOGY HEREBY DISCLAIMS ALL OTHER EXPRESSED AND
IMPLIED WARRANTIES FOR THIS PRODUCT INCLUDING, BUT NOT LIMITED TO,
THE WARRANTIES OF MERCHANTABILITY AND FITNESS FOR A PARTICULAR
PURPOSE. Some jurisdictions do not allow the exclusion of implied warranties, so the above
limitations may not apply to you.
IN NO EVENT WILL EICON TECHNOLOGY BE LIABLE IN ANY WAY TO THE USER
FOR DAMAGES, INCLUDING ANY LOST PROFITS, LOST SAVINGS, OR OTHER
INCIDENTAL OR CONSEQUENTIAL DAMAGES ARISING OUT OF THE USE OF, OR
INABILITY TO USE, SUCH PRODUCT. Some jurisdictions do not allow the exclusion or
limitation of incidental or consequential damages for consumer products, so the above
limitations or exclusions may not apply to you.
THIS WARRANTY GIVES YOU SPECIFIC LEGAL RIGHTS, AND YOU MAY ALSO
HAVE OTHER RIGHTS WHICH MAY VARY FROM ONE JURISDICTION TO
ANOTHER.
This Limited Warranty applies to hardware products only.
Product Comment Form
DIVA Mobile PC Card
User’s Guide
206-153-02
We value your comments. Please use the tables below to rate this product.
Name
Title
Company
Address
DIVA Mobile PC Card
Poor
➀ ➁ ➂ ➃ ➄ ➅ ➆ ➇ ➈ ➉
Excellent
Difficult
➀ ➁ ➂ ➃ ➄ ➅ ➆ ➇ ➈ ➉
Easy
Performance
Poor
➀ ➁ ➂ ➃ ➄ ➅ ➆ ➇ ➈ ➉
Excellent
Workmanship
Poor
➀ ➁ ➂ ➃ ➄ ➅ ➆ ➇ ➈ ➉
Excellent
Packaging
Configuration
User’s Guide
Accuracy
Organization
Readability
Presentation
Low
➀ ➁ ➂ ➃ ➄ ➅ ➆ ➇ ➈ ➉
High
Confusing
➀ ➁ ➂ ➃ ➄ ➅ ➆ ➇ ➈ ➉
Clear
Difficult
➀ ➁ ➂ ➃ ➄ ➅ ➆ ➇ ➈ ➉
Easy
Poor
➀ ➁ ➂ ➃ ➄ ➅ ➆ ➇ ➈ ➉
Excellent
Please return this form to: Eicon Technology Corporation
Attention: Corporate Publications
9800 Cavendish Blvd.
Montreal, Quebec, Canada H4M 2V9
E-mail: [email protected]
Fax: (514) 745-5588
Tel: (514) 745-5500
Printed in Canada