1
z
0
C
I.LJ
Z
DENON
a:
w
(J
w
a:
c(J
M
:E
I
(.)
a:
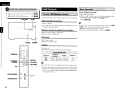
Owner's Manual
...
G)
....=
ca
Manuel de l'Utilisateur
Q)
0
0
(I)
·C
't:J
-ca
(I)
"i)
't:J
Q)
-..
"i)
:E :E
c c= c=
3: ca ca
..(I)
...
ca .-.-.... =ca
=
c ::J =
ca
:E
Manual del usuario
I'
RCD-M37
->W C
CD RECEIVER
ENGLISH
FRANCAIS
ESPANOL
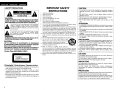
o SAFETY PRECAUTIONS
A
~
~LECTR~C
~.LECT.R~C
RISK OF
SHOCK
DO NOT O=P--"E=N,-----------,
OPEN
_---=cD=O
A
A.
~
CAUTION:
REDUCETHE
TO REDUCE
THE RISK OF ELECTRIC SHOCK, DO NOT REMOVE
COVER (OR BACK). NO USER-SERVICEABLE PARTS INSIDE.
REFER SERVICING TO QUALIFIED SERVICE PERSONNEL.
A
ill.
A
The lightning flash with arrowhead symbol, within an equilateral
triangle, is intended to alert the user to the presence of
uninsulated "dangerous voltage" within the product's enclosure
that may be of sufficient magnitude to constitute a risk of electric
persons,
shock to persons.
The exclamation point within an equilateral triangle is intended
to alert the user to the presence of important operating
and maintenance (servicing) instructions in the literature
appliance,
accompanying the appliance.
WARNING:
SHOCK, DO NOT
TO REDUCE THE RISK OF FIRE OR ELECTRIC SHOCK.
EXPOSE THIS APPLIANCE TO RAIN OR MOISTURE.
IMPOTANT SAFETY
INSTRUCTIONS
1.
2.
2.
3.
4.
5.
6.
7.Z
8.
9.
10.
11.
12.
CAUTION:
USE OF CONTROLS OR ADJUSTMENTS OR PERFORMANCE
OF PROCEDURES OTHER THAN THOSE SPECIFIED HEREIN MAY
RESULT IN HAZARDOUS RADIATION EXPOSURE.
THIS PRODUCT SHOULD NOT BE ADJUSTED OR REPAIRED BY
ANYONE EXCEPT PROPERLY QUALIFIED SERVICE PERSONNEL.
o Laser Class (IEC 60825-1:2001)
CAUTION:
these instructions.
instructions.
Read these
Keep these
these instructions.
Keep
Heed all warnings.
Heed
Follow all instructions.
Do not use this apparatus' near water.
Clean only with dry cloth.
Do not block any ventilation openings.
Install in accordance with the manufacturer's instructions.
Do not install near any heat sources such as radiators, heat registers, stoves,
or other apparatus (including amplifiers) that produce heat.
Do not defeat the safety purpose of the polarized or grounding-type plug. A
polarized plug has two blades with one wider than the other. A grounding
type plug has two blades and a third grounding prong. The wide blade or the
third prong are provided for your safety. If the provided plug does not In
fit into
your outlet, consult an electrician for replacement of the obsolete outlet.
Protect the power cord from being walked on or pinched particularly at
plugs, convenience receptacles, and the point where they exit from the
apparatus.
Only use attachments/accessories specified by the manufacturer.
Use only with the cart, stand, tripod, bracket, or table
specified by the manufacturer, or sold with the apparatus. ~
When a cart is used, use caution when moving the cart!
~
apparatus combination to avoid injury from tip-over.
..,
Unplug this apparatus during lightning storms or when
l~ ~
unused for long periods of time.
~-
t&)
tI)
.1
13.
14. Refer all
servicing to qualified service personnel.
Servicing is required when the apparatus has been damaged in any way,
such as power-supply cord or plug is damaged, liquid has been spilled or
objects have fallen into the apparatus, the apparatus has been exposed to
rain or moisture, does not operate normally, or has been dropped.
15. Batteries shall not be exposed to excessive heat such as sunshine, fire or
the like.
• The
The ventilation
ventilation should not be
be impeded
impeded by
by covering the
the ventilation
ventilation
openings
openings with
with items,
items, such as
as newspapers,
newspapers, tablecloths, curtains,
curtains,
etc.
etc.
• No
No naked
naked flame
flame sources, such
such as
as lighted
lighted candles, should
should be
be
placed on the unit.
• Observe and follow local
local regulations regarding battery disposal.
• Do not expose the unit to dripping
dripping or splashing fluids.
• Do not place objects filled with liquids, such as vases, on the
unit.
ATTENTION:
• La ventilation ne doit pas etre genee en recouvrant les ouvertures
de la ventilation avec des objets tels que journaux, rideaux, tissus,
etc.
• Aucune flamme
flam me nue, par exemple une bougie, ne doit etre placee
sur I'appareil.
• Veillez respecter les lois en vigueur lorsque vous jetez les piles
usagees.
• L:appareil ne doit pas etre expose I'eau ou I'humidite.
• Ne pas poser d'objet contenant du liquide,
Iiquide, par exemple un vase,
sur I'appareil.
a
a
a
PRECAUCI6N:
• La ventilaci6n no debe quedar obstruida por haberse cubierto las
aperturas con objetos como peri6dicos, manteles, cortinas, etc.
• No debe colocarse sobre el aparato ninguna fuente inflamable sin
protecci6n, como velas encendidas.
• A la hora de deshacerse de las pilas, respete la normativa para el
cuidado del medio ambiente.
• No exponer el aparato al goteo 0 salpicaduras cuando se utilice.
• No colocar sobre el aparato objetos lIenos de Ifquido,
Hquido, como
jarros.
CAUTION:
To completely disconnect this product from the mains, disconnect
the plug from the wall socket outlet.
The mains plug is used to completely interrupt the power supply to
the unit and must be within easy access by the user.
PRECAUTION:
o Copyrights I Oroits
Droits d'auteur I Oerechos
Derechos de Autor
• It is prohibited by law to reproduce, broadcast, rent or play discs in
public without the consent of the copyright holder.
• La reproduction, la diffusion, la location, Ie prt3t
pret ou la lecture
publique de ces disques sont interdits sans Ie consentement du
detenteur des droits d'auteur.
• De acuerdo con las leyes esta prohibido reproducir, emitir, alquilar
o interpretar discos en publico sin la autorizaci6n del propietario de
los derechos de autor.
I
Pour deconnecter completement ce produit du courant secteur,
debranchez la prise de la prise murale.
La prise secteur est utilisee pour couper completement
I'alimentation de I'appareil et I'utilisateur doit pouvoir y acceder
facilement.
PRECAUCI6N:
Para desconectar completamente este producto de la alimentaci6n
electrica, desconecte el enchufe del enchufe de la pared.
EI enchufe de la alimentaci6n electrica se utiliza para interrumpir por
completo el suministro de alimentaci6n elEktrica
electrica a la unidad y debe
de encontrarse en un lugar al que el usuario tenga facil acceso.
ESPANOL FRANCAIS
ENGLISH
FCC Infonnation (For US customers)
1. PRODUCT
This product complies with Part 15 of the FCC Rules. Operation is subject to the following two conditions: (1) this
product may not cause harmful interference. and (2) this product must accept any interference received. including
interference that may cause undesired operation.
NOnCE: DO NOT MODIFY THIS PRODUCT
2. IMPORTANT NOTICE:
This product. when installed as indicated in the instructions contained in this manual. meets FCC requirements.
Modification not expressly approved by DENON may void your authority. granted by the FCC. to use the product.
3. NOTE
This product has been tested and found to comply with the limits for a Class B digital device. pursuant to Part 15
of the FCC Rules. These limits are designed to provide reasonable protection against harmful interference in a
residential installation.
This product generates. uses and can radiate radio frequency energy and. if not installed and used in accordance
with the instructions.
instructions, may cause harmful interference to radio communications. However. there is no guarantee
that interference will not occur in a particular installation. If this product does cause harmful interference to radio or
ON. the user is encouraged to try to
television reception.
reception, which can be determined by turning the product OFF and ON,
correct the interference by one or more of the following measures:
• Reorient or relocate the receiving antenna.
• Increase the separation between the equipment and receiver.
• Connect the product into an outlet on a circuit different from that to which the receiver is connected.
• Consult the local retailer authorized to distribute this type of product or an experienced radiofTY
radiofTV technician for
help.
This Class B digital apparatus complies with Canadian ICES-003.
Cet appareil numerique de la c1asse
ciasse Best conforme ilia
la norme NMB-003 du Canada.
a
nIT
ENGLISH
FRANCAIS
ESPANOL
oCI NOTE ON USE I OBSERVATIONS RELATIVES A L'UTILISATION I NOTAS
SOBRE ELUSO
EL USO
,,4\'4,
~
:fii1!!J
~
~.
~~J~,ll>f.'"
~~~tr.
~
~~( ~
"J11.~1
.>"'-A.
•
~~.•dMt,t:~m{tt.
"""'''.
/900
)(
• Do not let foreign objects into the unit.
• Ne pas laisser des objets etrangers dans
I'appareil.
I'apparei!.
and dust.
• No deje
deie objetos extranos
eXlranos dentro del
• Proteger I'appareil contre I'humidite,
"humidite, I'eau
equipo.
at
et la poussiere.
• Mantenga el equipo libre de humedad, I~-----------------1I
agua y paiva.
polva.
• Keep the unit free from moisture.
moisture, water,
• Avoid high temperatures.
Allow for
lor sufficient heat dispersion when
installed in a rack.
• Eviter des temperatures elevees.
Tenir
Tanir compte d'une dispersion de chaleur
maleur
suffisante lars
lors de I'installation sur une
etagare.
etagere.
• Evite altas temperaturas.
Permite la suficiente dispersi6n
dispersion del calor
cuando est
astaa instalado en la consola.
~
~
~qd9
~~
• Do not let insecticides,
insecticides. benzene,
benzene. and
thinner come in contact with
wnh the unit.
•
Ne
pas
mettre
en
contact
des
insecticides,
If - - - - - - - - - - - - - - - - - - 1I •• Unplug the power cord when not using the
du benzane
benzene et un diluant avec I'apparei!.
I'appareil.
unit for
lor long periods of
01 time.
Debrandler Ie cordon d'alimentation • No permita el contacto de insecticidas,
• Debrancher
el
equipo.
gasolina
y
diluyentes
con
lorsque I'appareil n'est pas utilise pendant
de longues periodes.
• Desconecte el cordOn
eord6n de energia cuando
par mucho
mucha tiempo.
no utilice el equipo por
~
• Handle the power cord
eord carefully.
carelully.
Hold the plug when unplugging the cord.
• Manipuler Ie cordon d'alimentation avec
precaution.
Tenir la prise lars
lors du debranchement du
cordon.
• Maneje el cordOn
cord6n de energra
energfa con cuidado.
Sostenga el enchufe
enchule cuando desconecte
deseonecte el
cordOn
cord6n de energia.
•
•
•
ill
*... (For apparatuses with ventilation holes)
Do not obstruct the ventilation holes.
Ne pas obstruer les trcus
trous d'aeration.
No obstruya los orificios de ventilaci6n.
~
• Never disassemble or modify the unit in
anyway.
• Ne jamais demanter
demonter au
ou modifier I'appareil
d'une maniere ou d'une autre.
• Nunca desarme 0 modifique
modilique el equipo de
ninguna manera.
..
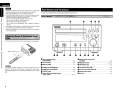
ao Contents
Getting Started
Accessories······················································· .. ····················· .. ······ 2
Accessories······················································································
Cautions on Handling
.. ····
·
·.. ··
·· ..··············2
·
2
Handling········
Cautions on Installation
···· .. ··
·.. ··· .. ·.. ··· .. ··
·.. · ··· .. 2
Installation·································································
Main Features·
·.. ······
··
·
·· ·.. ··
·· .. · ·.. ····· 2
Features·················································································
Discs··································································
.. ·····························2
Discs·································································································2
Discs usable on the RCD-M37
· ·
·
.. 2
Holding
.
Holding Discs
Discs·················································································3
········· ·····························3
Discs·····································..
.. ········ .. ··················
Loading Discs················
Cautions on Loading Discs ···....····....·· ·.. ···
·· .. ·.. · · ·
· ·.. ···
·· ....····· .. ·3
Cautions on Handling .. ··
· .. ·3
·.. ····
·
···
·· ..··· ·· .. ···
Cautions on Storing Discs· ··· .. · · · ·..··.. · ··
·
·· .. ·.. ·· .. ·3
·············
Cleaning Discs
·· .. · · · ·.. ·· .. ·.. ·
·· .. ·· .. ·3
About the Remote Control Unit
3
····.. ·
.. ··· .. ·3
Inserting the Batteries·
···
·
·· ..········
4
Operating Range of the Remote Control Unit
·
·4
Part Names and Functions·····························································4
Functions ·
··
· ·
·· .. ·· .. ·.. ··-4
.. ······ 4
Front Panel .. ··· ·
· ···
··
·..····....··· .. ···.. ·.. · ·
·..···········4
Display
5
·.. ·.. · ·
·
· ·.. ·.. ··
·
···
·5
5
Rear Panel
·
·· ·
··· .. ·.. ··· .. ·· ·.. ·
·· .. ·· .. ·····5
··.. ·· ..··.. · · ··
·..·· ..·· ·· .. ·6
· ·
Remote Control Unit .. ·
Connections
Preparetions
Preparations···············.. ·········
·· .. ··....······························
·· ·
·
·· .. ·· .. ·8
·· .. ······ ·.. ··········
Cables Used for Connections
Using the AM Loop Antenna
Assembling the AM Loop Antenna
·.. ·
Connections
Speaker Connectiona
·
·
·
·
·8
8
8
·8
8
·8
··
·
·
·· .. ·····9
··· .. ·· .. ·· ..···.... ·········9
Connecting the Speaker Cables
·
·
Control Dock for iPod
Connecting the Recordlng
Recording Components
CD Recorder / MD Recorder /Tape deck
Connections to Other Devices
Devices..·
Terminals : ·
Antenna Terminals:..
USB Port
Cord
Connecting the Power Cord·
Once Connections are Completed
·.. 9
·
Components
Connecting the Playback ComPQnents
Turning the Power On
Setting the Timer
Playback
·
··
·· · ·
·.. ··· .. ·
·
·
·.. 10
·
···· .. ··
Preparations .. ·············
Turning the Power On
Loading Discs
······
··
·..···
··· .. ·
·..··· .. ·
·.. · ·
13
···13
·13
13
· ··.. ····
· ··· ·.. ·
· ·..· 13
···
Operations Possible During Playback
·
13
Master Volume·
·
· ·
Adjusting the MasterVolume···
···
·
13
Input Source Switching
~
13
·
·13
Adjusting the Tone·······
Tone········
13
·.. 13
Turning the Sound Off Temporarily (Muting)
·
Switching the Display's Brightness
13
·
·13
Listening with Headphones
·
13
·13
CD Playback
14
Playing CDs .. ·
·
···· .. ·.. ···· ·····
···· ....··· · ·· · ·..····.. ·
·14
··
Playing Repeatedly <Repeat Playback>
·
·.. ·14
Playing Random Order <Random Playback>
14
Playing Tracks in the Desired Order <Program playback>
15
··
····· .. ··
··· .. ·
· 15
Switching the Display··· .......... ···
····
·········
·.. ·.. ·.. ····
·15
Playback of MP3 and
WMA Files
:
15
andWMA
About the MP3 and
WMA Formats That Can be Played
15
andWMA
Files
Playing MP3 andWMA Files·
·
16
Playback
TUNER Playback·
······
· ·· .. ·.. ··· ··· .. ·· .. ··
·
·.. 17
Tuning in Broadcast Stations .. ·
· 17
Automatically Presetting FM Stations (Auto Preset)
17
·
·17
Presetting FM/AM Stations Manually
·
· 17
Listening to Preset Stations
18
Naming the Currently Tuned in Broadcast Station
·
·.. 18
iPod@
··· .. ···· ····
·
·········
··
·.. 18
iPod® Playback·········
Playback·············································································
Preparations
Preparations················································································· 18
18
Listening to Audio
19
Disconnecting the iPod
·.. ·
· ·
··
·19
·..
· ·
· 19
Playing a Portable Audio
·
Connecting a Portable Player
·
·
·
19
Playing the Portable Player
·
·
·
··
· · 19
Playback· .. ·...... ··········
········ .. · ······· ···· .. · ·· .. ·· .. ·· ··· · ······
.. ·
USB Playback····
·· .. ···
20
Playable USB Memory Formats
20
Basic Operation··········
20
Operation .. ············
·
·
···· ....····....··
Timer Playback.. ···.. ·.. ·····
·· ..·..·..····· .. ·
···
Timer .. ·············
Setting the Timer············
Sleep Timer Playback······
· ·.. ····....··
···· .. ·· .. ··
·.. ··
·.. ·.. ··
22
22
.. 23
Other Functions
Convenient Functions
·.. ·· .. ·
·····
····· .. ·.. ·· .. ·
Auto Power On .. ·.. ······
Auto Function Selector Function
··
Memory .. ·
··· · ·
Last Function Memory··
Resetting the Microprocessor .. ···· ··· .. ·
Filter·........·····
Using an Optimizing Filter
····· .. · ·
··
·.. ··· .. · · · · ···
··.. ·
·
·
·
· ··
· ·.. · ·
··
·· .. ··· .. ·
···.. ·
24
24
24
·24
24
24
·24
··24
Troubleshooting
Specifications
10
10
· 10
· 10
······· 10
11
········· ···11
· 11
·
11
11
Setup
Current11me
Setting the Current
Time (24-Hour Display) ....·....··..........·.......... 12
1
ENGLISH
Getting Started
n
o
::>
::>
CD
~
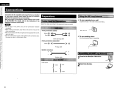
Thank you for purchasing this DENON product. To ensure proper
operation, please read this owner's manual carefully before using the
product.
After reading them, be sure to keep them for future reference.
o'
::>
III
(fl
(/l
~
C
c:
'tl
"t>
'tl
or
.
-<
IT
n
""
(fl
CD
:;
S'
..
'"
::>"
CD
::!
3
~
Accessories
Check
Cheel< that the following parts are supplied with the product.
CD Remote control (RC-1097)
(RC-l097)
® R03/AAA batteries
® Power cord (Cord length: Approx. 6.6 ft / 2 m)
@
CD AM loop antenna
® FM indoor antenna
® Owner's manual
1
2
1
1
1
1
1
1
(j) Warranty (for North America model only)
® Service station list
CD
Q
::>"
~
®
@
~
~
::>
~
o'
::>
III
:;t
o
®
Cautions on Handling
Main Features
• Before turning
tuming the power switch on
Check once again that all connections are correct and that there are
no problems with the connection cables.
1. High quality amplifl8r
amplifier stressing sound quality
Equippd with 30 W + 30 W (6 O/ohms) high quality amplifier
circuits.
• Power is supplied to some of the circqitry
circu.itry even when the unit is
set to the standby mode. When traveling or leaving home for long
periods of time, be sure to unplug the power cord from the power
outlet.
2. Tone control and SOB control
Separate bass and treble tone controls for adjusting the tone to your
tastes and Super Dynamic Bass (SOB) circuit for producing powerful
bass sound even when the volume is low.
Source direct position provided for turning off the SDB and tone
control circuitry to make the response flat.
• Sufficiently ventilate the place of installation
If the unit is left in a room full of the smoke from cigarettes, etc., for
long periods of time, the surface of the optical pickup could get dirty,
in which case it will not be able to read the signals properly.
• About condensation
If there is a major difference in temperature between the inside of
the unit and the surroundings, condensation (dew) may form on
the operating parts inside the unit, causing the unit not to operate
properly.
If this happens, let the unit sit for an hour or two with the power
turned off and wait until there is little difference in temperature
before using the unit.
• Cautions
cautions on using mobile phones
Using a mobile phone near this unit may result in noise. If so, move
the mobile phone away from this unit when it is in use.
• Moving the unit
Turn off the power and unplug the power cord from the power
outlet.
Next, disconnect the connection cables to other system units before
moving the unit.
C
IT
ii"
III
::>"
o
2
S'
'"
• Note that the illustrations in these instructions may differ from the
actual unit for explanation purposes.
(fl
'tl
~.
..o'
::!>
n
3. CO
CD player for digital sound
Compact body integrating a CD section in addition to the FM/AM
tuner and amplifier, allowing playback of CD-R/RW discs.
4. Playback of MP3 and WMA files
Supports playback of discs and USB memory devices on which MP3
and WMA files are recorded. The track name and artist name of the
currently playing track can be displayed on the set's display.
The characters that can be displayed "Switching the Display"
(Gf"page
(~page 16)
5. Low standby power consumption
Designed with considerations on the environment, with the power
consumption when the power is in standby kept down to about 0.3 W.
Discs
o
e Music COs
Discs marked with the logotype below can be played in this unit.
::>
CO·R/CO-RW
e CO·R/CO·RW
Cautions on Installation
III
Note:
For proper heat dispersal.
dispersal, do not install this unit in a confined
space, such as a bookcase or similar enclosure.
space.
~
....
* ...
I*
Note
1IIIIIIIIIIIIIUIIIIIIIIIIIIIOIIIIIIIOli ~
!J
I*- I
1000 f.-----.
1IIIIIIIIIIIIIIIIIIIIUIIIIIIOllllillOII
[d • IIUOIIIIIIIIIIIIIIOIIIIIIIIIII ~~ *
•• 00
(i)1llII
01111 •.
*
~II
1000
'000
1111111111111111111111111111101111111111
0000
0
1111111111111111111110111111101111111011
1
•
2
?'
~
111101111111111111110111110011
Wall
%
~
fi
WU')IW
Discs with special shapes (heart-shaped discs, octagonal discs, etc.)
cannot be played. Do not attempt to play them, as doing so can
damage the product.
o• Some discs and some recording
~
formats may not be playable.
~
o Non-finalized
discs cannot be
•
discs cannot be
__:::_
played.
_ _
o•
~I~~:~nalized
~
-.;:.;:~
* What is finalization?
>£)
•
"OOTr 00: 00" is displayed if a disc that cannot be played is loaded,
loaded.
o• "OOTr 00: 00" is displayed if the disc is loaded upside-down or if no
disc is loaded.
ENGLISH
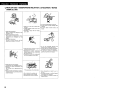
'Cleaning Discs
o•
I@(,ii.
whlr'lIDo not push the disc tray in by hand when the power is turned off.
Doing so could damage the set.
• If there are fingerprints or dirt on discs, wipe them off before using
the disc. Fingerprints and dirt can impair sound quality and cause
interruptions in playback.
• Use a commercially available disc cleaning set or a soft cloth to clean
discs.
-::=
---
Finalization is the process that
makes recorded CD-R/CD-RW discs playable on compatible
players.
~
Do not touch the signal surface.
II>
~
l:
Only load one disc at a time. Loading two or more discs can damage
the unit or scratch the discs.
o• Do not use cracked or warped discs or discs that have been repaired
with adhesive, etc.
o• Do not use discs on which the sticky part of cellophane tape or labels
is exposed or on which there are traces of where labels have been
removed. Such discs can get caught inside the player and damage
it.
"
""C
iii
-<
c:r
'"
n
",.
Do not wipe with a circular
motion.
Gently wipe the disc from the
inside towards the outside.
.~[.u.
Whl['lI-
Set the disc with the labeled side facing up.
Make sure the disc tray is fully open when inserting the disc.
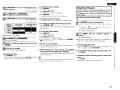
o• Place the discs flatly, 12 cm discs in the outer tray guide (Figure 1),
1). 8
cm discs in the inner tray guide (Figure 2).
o•
o•
Figure 1
I
Figure 2
,..Figure
o•
•
•
•
o•
Place 8 cm discs in the inner tray guide without using an adapter.
Do not get fingerprints, oil or dirt on discs.
Take special care not to scratch discs when removing them from
their cases.
Do not bend or heat discs.
Do not enlarge the hole at the center.
Do not write on the labeled (printed) surface with ball-point pens,
pencils, etc., or stick new labels on discs.
Water droplets may form on discs if they are moved suddenly from a
cold place (outdoors for example) to a warm place, but do not try to
dry them off using a hairdryer, etc.
• Be sure to remove discs after using them.
dust,
• Be sure to store discs in their cases to protect them from dust.
scratches, warping, etc.
• Do not store discs in the following places:
1. Places exposed to direct sunlight for long periods of time
2. Dusty or humid places
3. Places exposed to heat from heating appliances, etc.
':;'"
::I
~
:l"
l- Cautions on Handlingo•
(j)
«l
Do not use record spray, antistatic agents, or benzene, thinner or other
solvents,
solvents.
o•
"
'o'"~"
"
(j)
o•
I HolCliDi]lIiW~.·
n
o
'-"i
3'
~
~
:l"
~
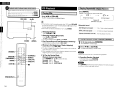
About the Remote Control Unit
."
C
"
o'
"'"
~
::;l
CD Slide
the rear lid in the
direction of the arrow and
remove it.
@
CV
Load the two batteries properly
as indicated by the marks in the
battery compartment.
o
l:
c:r
iii
II>
:l"
o
~
:;'
«l
~
(j)
"::;;n'"
n'
~
0'
"
II>
@ Put the rear cover back on.
3
....
ENGLISH
.~[
·d...•
• Replace the batteries with new ones if the set does not operate even
when the remote control unit is operated close to the unit.
• The supplied batteries are only for verifying operation.
• When inserting the batteries,
direction.
batteries. be sure to do so in the proper direction,
following the "$"
"Ei)" and "e"
"6" marks in the battery compartment.
• To prevent damage or leakage of battery fluid:
• Do not use a new battery together with an old one.
• Do not use two different types of batteries.
• Do not attempt to charge dry batteries.
short-circuit. disassemble, heat or dispose of batteries in
• Do not short-circuit,
flames.
• If the battery fluid should leak, carefully wipe the fluid off the inside
of the battery compartment and insert new batteries.
• Remove the batteries from the remote control unit if it will not be in
use for long periods
periods..
n
o
=
.."
'=
~
c)'
cl"
=
:l
:l
:l
1II>
1>
C/l
~
C
'tl
""
.,n
iii"
<
0-
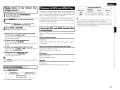
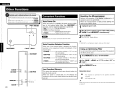
Part Names and Functions
For buttons not explained here, see the page indicated in parentheses ( ).
IDENONI
IOENONI
~I
""
C/l
~
I~
:i'
'"...
'3'-"l
... '
(1'\
~
~
~
!?
~
~
I
PORTABlE IN
1
SOURC£
o RECEIVER RC(
1----·1----1----1--- - - - - - - - - -
lo07
---~~
Approx. 23 feet / 7 m
_11>
_ _1
o
PHONES
~
..,c
=
~
g' i
=l
... _
Point the remote control unit at the remote sensor when operating it.
!
C
0-
if
~
o
g. I
o Power operation button
C/l
•
indicator.. ···· .. ·
Power indicator······
•
USB port (USB) .. ·
(ON/STANDBY)
~
'tl
'"
[
n
::;;
o'
~
·d,n.
.~['lI.
The set may function improperly or the remote control unit may not
operate if the remote control sensor is exposed to direct sunlight,
sunlight.
strong artificial light from an inverter type fluorescent lamp or infrared
light.
·· ..·····....···· .. ·
·.. ··
·· .. ·
· .. ··· .. ····..···· ·.. ·.. ·
···
··· · ·.. ·..
· ·.. ·· ·· ··
·
o
o Portable jack (PORTABLE IN)
o Headphones jack (PHONES)
·
(13)
o Master
volume control knob
(VOLUME)
(13)
«il
4Dl MENU/SET button
· (11)
0)
• SDBITONE button
•
SOURCE button
·
o Revers-skip/Forward-skip buttons
·
·
·
· ..
(19)
•~ Play/Pause button (~III)
411
4Il Disc tray open/close button (~)
•Gil Remote control sensor
(14,17)
(12,
(12,22)
22)
(13)
.
(13)
(13)
(13)
.
41
• BAND/Stop button (BAND/.)
• Display
(~-,+~)
4
.
· ·
·.. ·
·
·· ·.. ·
·
·
· (14,17)
(14, 17)
··
·.. ·.. (14)
(13)
..
(4)
tray· ........ ·.......... · · ···
· ·.. ·· ·.. ··· ·.. ·· .. ·
·· (3)
4D Disc tray···················································································
ENGLISH
mTh
a n e l ' > ' <:;f~~ :1
Panel
I1 II Rear P
.,
f_~""",i!Pa;",o,·IW-=.··i'r....;,'
f~'litiY'
-~-~-'·---~-----. ---~------ .------------~---------------.--~--.------------~---------------.--~--- .-----------~-----------------.
.-----------~-----------------. -----~--t
-----~--~
~Ni§~i~iJ~:~.~-l{,~~~-~.~W:~-~-J:,,~i?:~Si~:9-~~~L~~~~~~ ~? 1.~~D ~~~l.~~;~~~}WJ.,
~~N~~~i~iJR~2.-~{,~~K~itW~~-f~~"~i?~~~ir~-~~~-~~~~~~~~~~~£?
~;~l-~~;)~~l~;,
,
",
'
I"'"
••••••••••••,,
•••••••••••••••••••••••••••••••••••••••••••••••••••••••••••••••••••••••••••
••••••••••••
'
:::::: I::::
I::::
I::::
I::::
UH:
HHE
US::
:H::
H:::
S::::
S::::
H:::
Hi::
:HU
H:::
1
HE:: HHE :U:: H::: UH: UH: HE:: HE:: :E::: ::::: :E::: :HU I:::: HUE HE::!
I
•••• •
••••••••••••••••••••••••••••••
I ••••••••••••••••••••••••••••••••••••,.,
t ••••••••••••••••••
"'"
• • • • • • • • • • • • • • • • ,,"
I
Cl
2
:;
••••• '
••••• '
'"~
o
I•
••
••
••
••
••
••
••
••
••
••
••
••
••
••
••
••
•
••••
••
••
••
••
••
••
••
••
••
••
••
••
••
••
• • • •1
•,•
. ,•••••••••
••, • ••
••
••
••
••
••
••
••
••
•
••••
••
••
••
••
••
••
••
, •
•• • • • • • •
••
••
••
•••
I •
• ••••
• ,
:,
:!:::::
::::: ::::: ::::: :::::
:::::
:::::
:::::
:::::
::::: :::::
::::: :::::
::::: :::::
::::: :::::
::::: ::::::
::::::
HE::
HE::
HE::
::=::
:::::
HE::
HE::
::E::
:::::
l:::::
,"'" ::::: ::::: ::::: ::::: ::::: ::::: ::::: ::::: ::::: ::::: ::::: ::::: ::::: ::::: ::::::,
......
'-.!_.!!__
__
•.. : ..:!!..
! __
__ ...... _
__
__ _._•.. .:!!!__
••
__._._._._.__
••_._._._.__
..
__ !!!'. __._._.!!__
__._._ __
'
'' • • • • • • • • • • • , • • •
"'"
' ••••••••••••••••••••••••••••••••••••••••••••••••••••••••••••••••••••••
I""
UH: H::: :::::
::!_.!!~~~
~~~~~
~~~~
~~~~'_
"
t ••••••••• :
I ••••••••••••••••••••••••••••••••••••••••••••••••••••••••••• 1
~~~~~_.~~
~~~~!
~~'.
_:::!!._~~~~~
!~~
~~!!~
~~._._.
!!::~
~~~~~
~!!~~_
!!!~~
!~::~
~~~~~
<I>
(Jl
!!!!~J
~:::!J
~
··1
o
. . Intonnation
Infonnation display
Various information is displayed here, depending
on the operation mode.
,
e
G Reception mode indicator
o TOTAL indicator
=
.,""
l.---
r:r
"'"'"
(Jl
(the pause indicator) lights when a disc is
pausing.
pausing.
• . SOB, TONE indicator
.
ACIN
-<
f)~: (the play indicator) lights when a disc is
playing.
II:
=
c:
'0
=
=
.(13)
, .113)
'£",
~ ~ ~ ~ ~ ~I~I ~ ~= ~ ~ ~ ~ ~ ~ ~ ~ ~ ~ ~ ~ ~ ~ ~I] ~
SPEAKERS
IMPEDANCE
6·16Q
to
:;.
..,'"
=
3
i
~
~--
S?
(17)
;J'
~
t'
Lights when the total number of tracks and total
time of the CD are displayed.
o Play mode indicator
8 Timer indicator ..
o
fit e:Flashes
.:Flashes when
received.
"~
o'
"
(14)
.
(23)
remote control signals are
<I>
o
~
. . Monaural audio connector
(MONO
OUT) .. ,.. ,
, . . . . . . . . . ··(9)
(9)
(MONOOUTI
f) Speakers tenninals·
tenninals····
• . AC inlet (AC IN)
.
INI· ·
c:
r:r
"
(9)
··········(9)
.,
eG FM/AM antenna tenninals
o DOCK CONTROL jack . .
I g-
(11)
······(11)
'
K:.
(10)
··(10)
C/l
....., (10)
o AUX1/AUX2
Analog audio connectors·
connectors··
I
co
"a
U
LL
....... ······(10)
C:;'
~
o'
"
<I>
5
ENGLISH
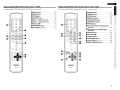
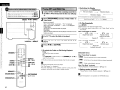
Buttons Operable for All Functions (CD, TUNER, iPod and USB)
Buttons Operable When the Function is Set to "CD"
The buttons listed at .."Buttons
Buttons Operable for All Functions" can also be used.
(')
o DIMMER button
::l
::l
<1l
•
o
~
o'
DIMMER SLEEP
oep
o
::l
II>
en
•8 SDB/TONE button
"
"
a-
iii"
<
ll>
"
~
(J)
en
<1l
~
!!
I
;3~ II
....c:~
.."
.·0·······...
::l
~
+1
f}
I!,
I
I
:,.':
:VOl.UMEI
SD8/TDNE
§g. II
::r
"
.
II 0
I
•
II
:~:
\~
F()I[JF:
FeiOF:
I
/c\\
:,"1n(
,
MENU}
©
o
8
:
4
0
0
Q
0
5
0::
0i
Oi•
:
7
8
9:
:
0
:0
lidO
I III
.
lO
iO
:
I PRO, /DIRECT RANDOM'
"pur
:0
0=
OJ
I
V
IIE::)Q
e
o
1,
6 ¢;--g
8
o....
O
SET
eel----:~9~Cj)
::9 Cj)
11
ROS
RD~
o
~
0 0
@0-0
0
II
g. i
~
6
(15)
.:
~~-a
!6--6:
DENON
DENON
RC-1097
RC·1097
f,W1F
0
(14)
(15)
o REPEAT button
I
I'
II ~ !6::(:~;:t+SOUR"
(14)
o CD ~/Il button························
.. ···········
button··················· .. ·······
.. ··· .. ···· (14)
0:j
0 (·CLfAR;
.....Q
Q
(15)
PROG/DIRECT button
button·········· .. ·· .. ····· (16)
eo FOLDER MODE button····················
8• TIME/DISPLAY button
(15)
eo CLEAR/DEL button
(15)
.
C~t~'
OEL
(14)
•
e• SOURCE button
6:
+10:
+10.
~II
::r
o
i:0
:O
o Number buttons
•8 RANDOM button
:--1···---·2------3--~I
_N·n4
The DAB/RDS button cannot be used.
UN
SlEEP
00
.-_
.... _-_ ..2 _--------,
,1
3
(12)
---.:J
~
$? ,
[~
]I",'\;[~
(13)
(23)
!
II>
(13)
(13)
(12)
D
~.
(13)
e• MENU/SET button
(12)
o ON/STANDBY button .
(13)
e
.. ··....· · ················
.. ·
(23)
o SLEEP button·······
button·······················..
8• MUTE button
(13)
e
(12)
o CLOCK button .. ·· ·
o ,
o o,
o o
o
~
Master volume control buttons
IVOLUMEI
(VOLUME)···············································
I
--w
+-1
I
II
$
~
(14)
4D> Fast-reversing/Fast-forwarding buttons
1
.... ~) ....·······························..
(....
.... ·······························.. ····· .. (14)
•
Reverse-skip/Forward-skip buttons
1
························(14)
(...... ~) .. ······ ...... ···.. ·.. ·....
··························(14)
4&
(14)
• Stop button I_I·
(_).
.
4t Cursor buttons I(Ll.
Ll. 'V <l C>
1» I
(16)
ENGLISH
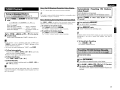
Buttons Operable When the Function is Set to "TUNER"
Buttons Operable When the Function is Set to "iPod';
"iPod'~ "USB"
The buttons listed at "Buttons Operable for All Functions" can also be used.
The buttons listed at "Buttons Operable for All Functions" can also be used.
00
oo
4
1110
I
II
77
o
°0 0i
0 Oi
0i
°O .... .QJQJ
5
6
88
+10
99
:
I
OJj
(18)
o Number buttons······
buttons
•
SOURCE button
(17)
•
RANDOM button
(21)
•
button·············································
TUNER button····
.. ······ .. ···· .. ·· .. ····· ············ (17)
CLEAR/DEL button
(18)
•
SOURCE button
(20)
e
o Tuning +.+, - buttons ITU+.
(17)
ITU+, TU-I·
ICH+, CH-I······
CH-I
·..····· .. (17)
o Channel +, - buttons ICH+.
• Stop button 1.1·
I.)· .. ···································
·
·
· · · .. (17)
o ENTER/MEMO button ........···· .. ··········· .. ··· (17)
'··i·····--i------j--~
'··i·····--i------j--~
o
o
o
o
o Number buttons
buttons··
:
i
:
00
+-+!-~EJ
nil:
8
-
~e-S}II
CSe:p6
•
(21)
REPEAT button····
button· .. ·
1~,~)
11+lII,
~I""""""""'"
(21)
I~,~)···················································(21)
button·..
4D USB ~/Il button········
.. ······ .. ·······
.. Stop button
II
II c::::> ~::W:H-f----Cit
:.-
(21)
1.1··..
1.1 ·····
·
~ iPod ~/Il button
.•
C"l
o
"
'""
(19)
o Fast-reversing/Fast-forwarding buttons
· · ..·..
· ··············(21)
·
··(21)
1~.~1 .. ·························
o Reverse-skip/Forward-skip buttons
-;~. ~i,
TUNER
e MENU/SET button
o FOLDER MODE button .. ·
button
· .. ······· (19)
o TIME/DISPLAY button··········
.. ··· .. ···
\7<11»
o Cursor buttons Ie. \7<11>1·········
.. ·· .. ··..··....· (17)
CLEAR I
DEL
(21)
(20)
(21)
(19)
button
41l ENTER/MEMO button······
·..··· .. ·.. ·· .. ··· .. ··· (19)
Gl Cursor buttons Ie. \7 <I I>I
1» .. ······ ..···.. ·· .. ··....· (19)
button· .. ····· .. ·······
· .. · (18)
~ REMOTE/BROWSE button··
~~.
I ~
~
I ~.
~_.
,Ii -;
I
I
~
~
."
<:
"~
VOLUME
8
~
,f----S'
8
"0"
3
o'
0
rt
I
f.
K-
DENON
DENON
RC·l097
AC-l097
U
7
ENGLISH
C'l
~
5'
'"~
Connections
III
iCo
C/l
~
C
'tl
'tl
0;
<
cr
...
III
n
C/l
~
'".
..
5'
Connections for all compatible audio signal formats are described
in this owner's manual. Please select the types of connections
suited for the equipment you are connecting.
With some types of connections, certain settings must be made
on the RCD·M37,
RCD-M37. For details, refer to the instructions for the
respective connection items below.
·N·..•
-N·n4
• Do not plug in the power cord until all connections have been
completed.
• When making connections, also refer to the owner's manual of the
other components.
• Be sure to connect the left and right channels properly (left with left,
right with right).
• Do not bundle power supply cords together with connection cables.
Doing so can result in humming or noise.
'~(i~jil:g' ihe~M LQOpAntenna:;l~t~F,i!l\"'
Preparations
o To use suspended on a wall
Suspend directly on the wall without assembling.
Select the cables according to the equipment being connected.
Nail, tack, etc.
Analog connections (stereo)
(White)
(Red)
0€@)
a
0
~<i
~~
3'
o To use standing alone
Use the procedure below to assemble.
Stereo pin-plug cable
::r
-4
~
Analog connections (subwoofer)
~
(Black) (i
~
~
::r
~
cj[):::------=::DIP
c£J:
:::t::JIP
;r
~
Pin-plug cable
:::l
~
0'
1
r
)~iiiiiiiiiiiiiii(
Speaker connections
:::l
III
+
+
:;t
o
c
cr
iD
III
::r
Speaker cable
o
.~
+
+
1 Bend
in the direction of the arrow.
~
5'
'"
'"..2.n'"
(J)
C/l
'tl
Audio signal:
~
~
::!>
n
Output
Output
tI
~
o'
"'"
:::l
III
Input
8
1
I
Input
r
Output
2
Insert into the hole.
~
-f)
ENGLISH
I Connecting the Speaker Cables
Speaker Connections
Subwoofer
with built-in
amplifier
(J
I
Speaker SC·M37
SC-M37 (Supplied)
IRI
.1
iN,na
I U'n-
Check the left (L) and right (R) channels and the + (red) and - (black)
terminals on the set and the speakers to be used and interconnect
the cables to the same polarities.
1
Peel otT about 10 mm of the sheathing at
the tip of the cable, twist the core wire and
terminate it.
2
Thrn
Thm the speaker terminal counterclockwise
to loosen it.
~~
~1)V
ILl
3
ct...>
I
II
4\
Insert the speaker cable's core wire into
int~ the ~
base of the speaker terminal.
r
_..Jh
Thm the speaker terminal counterclockwise _~
. to tighten it.
~
4
When using a banana
banana,plug
plug
G)
• Use speakers with an impedance of 6 to 16 O/ohms. The protection
circuit may be activated if speakers with an impedance other than
specified are used.
• Connect the speaker cables in a way that they do not stick out of the
speaker terminals. The protection circuit may be activated if the core
wires touch the rear panel or screws or if the + and - sides touch.
• Never touch the speaker terminals while the power is on. Doing so
could cause electric shock.
Protector circuit
Ir -
.~
,~
'~",
"
l.C
~
III
~
'"
•
I
I
The protection circuit will be activated in the following cases:
• When the speaker cable's core wires are touching the rear
panel or screws or when the speaker cable's + and - sides are
touching
• When the surrounding temperature is extremely high
• When the internal temperature rises due to extended use with a
high output
If this happens, unplug the power cord, then check the connections
of the speaker cables and input cables. If the set's temperature
is extremely high, wait for it to cool off and improve surrounding
ventilation. After doing this, plug the power cord back in.
If the protection circuit is activated though there are no problems
in ventilation around the set or in connections, the set could be
damaged. Turn off the power, then contact a DENON servicing and
inquiry outlet.
Tighten the speaker terminal firmly before inserting the banana
plug.
I
Ul
'"
~
c:
~
i
~
l g
,
C">
'"
~
co
I
·
;:t
:;'
l.C
~
:r
'-"i
3
~
r--
SJ:r
I
'c:"
II
"
n
I
I
f
~
.,.,
~.
IL..::~
~~
I :;;
I g
I
f
I g
•
l.C
Ul
'0
co
£:
~.
c'
"'"
9
ENGLISH
GJ
~.
.g
'!2
Connecting the Playback
Components
Connecting the Recording
Components
III
~
'"
::l.
I
Control Dock for iPod
Use a DENON Control Dock for iPod (ASD-1 R or ASD-3N/3W, sold
separately) to connect the set with an iPod.
CD Recorder I MD Recorder I Tape deck
CD recorder I
MD recorder I
Tape deck
iPod
r.t>
'C"
AUDIO
IN
Ll
A
R
OUT
L
L
R
ee ee
."cr
~~
""
~~
'g
"
'":;.
'-"i
3'
II~
Antenna Terminals
II
AM/FM
The AM and FM reception sensitivity depends on the place the antenna
is set and the direction in which it is set. Set it so that reception is
best.
- -A
U
D IO
AUDIO
---
'C
"iii
-<
Connections to Other Devices
FM indoor antenna
(Supplied)
II AM loop antenna
~J
A~~JP ISuppliedl
(Supplied)
Black
White
~
o
:;.
~
~
"~
§
iii
~
o
"iiicr
5'"
~.
~
.g'
'~"
~
~'
,
• When using a Control Dock for iPod, the Control Dock for iPod must
be set. For details, refer to the operating instructions of the Control
Dock for iPod .
• To use an iPod, see "iPod® Playback" Io::w'page
((W'page 18).
10
Note to CATV system installer:
This reminder is provided to call the CATV system installer's
attention to Article 820-40 of the NEC which provides guidelines
for proper grounding and, in particular, specifies that the cable
ground shall be connected to the grounding system of the building,
as close to the point of cable entry as practical.
mmmD
o Connecting the AM loop antenna
1 Push the lever.
2 Insert the conductor.
3 Return the lever.
-N·n.
~.
~
IOENONn
IDENONl··
~:-,
[~[~ .; . .s:'
~
~
m·I • •
Connecting the Power Cord
I IIbC:;.,o;;,;n~n~e;:,;;ct~i;.;.;n~g:..;t~h~e..;.P...;;o..;.w.;..;e;.;:.r~C;...;o~r~d~~~~
........~~
USB Port
u~
o
Make sure the AM loop antenna lead terminals do not touch metal
parts of the panel.
o• Do not connect two FM antennas simultaneously.
o•
ON/STAICI8V
en·n.
u'na
• It is not possible to connect and use a computer via the RCD-M3Ts
o
USB port using a USB cable.
o• For details about USB memory devices, see "Playable USB Memory
Formats" (Gf'page 20).
c;
?
;!)
~
ft
::l
ACIN
c::::=::J
c::::=:J
Power cord (Supplied)
loJl.~~
loJ~~
C::)
To household power outlet
G:) r I
~~~~~~~~~~~~~
(AC 120V, 60 Hz)
I
(j)
m
2'
c:
'""
<-
cr
!;
"
.~rtlFW
-No••
o•
-
Only use the supplied power cord.
o• Be sure the power cord is unplugged from the power outlet before
:;
g;
connecting or disconnecting it to the AC IN.
Once Connections are
Completed
I Turning the Power On
(Gf'page 13)
II
(/)
-0
(l)
a
;;
;'i
6
::J
'"
11
ENGLISH
Cl
~::;;
Setup
Setu
J::J
~
II
'"
~
'"
0.
•
(")
o
Button located on both the main unit and the remote control
)0
unit
• BUnON
HunaN
Button only on the main unit
)0
• <BUnON>
<HUnaN>
Button only on the remote control unit
)0
• [BUTION]
[HunaN]
::>
::>
'ng."
I
~
I
I
"'0
Q;j
Symbols used to indicate buttons in this manual
...... ~
'",..
n
----,
C/l
I
':;'"
'".or..
'-"l
:4
~
I
:?
I
r~F1~,~
f~F1~-T
or
')l
c;'
::>
:l
o'
::>
1'.....-..-..'.----,
.-.J
-.J
...
L
3'
0 0:
L..--.-.i
r
I' --
ON/STANDBY <PHONES>
V>
SOURCE <VOLUME>
I
MENU/SET
l1
k)
~
@
!
1.----,1
--i
:;l
[DIMMER] -
o
"in
C"
0
:;'
66-~
10
0 01
U ()
'"
1
V>
or
o
,~
I C)(-,
S
0
()0
(I
;
SOURCE
----1--!-E:5"..
SOURCE~
.
'~;;."
;:!.
c'
::>
ON/STANDBY
[VOLUME.T]
I
,
""w.",
SDB/TONE
MENU/SET
(~)j
[<1
:@::~II
···············11
II P'p'
12
[MUTE]
[ENTER/MEMO]
[CLOCK] ---;'1";"'1---'
I I
II
to standby
Press ON/STANDBY to turn
tum the power on.
Press MENU/SET or [CLOCK]
Press again to turn off display.
display.
2 Press [CLOCK].
Press MENU/SET for over 1 second to set the manual
3 time setting mode.
I
I
or [<]
4
[<l [» to set the "hours".
4
Press
The current time is displayed.
Press
for over 1 second to set the manual
time setting mode.
I
The "hours" display flashes.
TINE
THlE Ad.)
Ad) -Br,i12i
'>1'112; 00
I
Use~, ~ or
to set the "hours".
ITINE
5
6
7
I
.....
II
II ((~))
(0)
II (0~j G-++-+H:5"
-lbr'
!I!I ~~~:/
~.II
*~:/
:G)-~
[CD~III]~
[CD~III]~
1
Ad.)
Ad) AMIA:AA
AI'11 (1: 00
Press MENU/SET or [ENTERlMEMO).
[ENTER/MEMr-0~)_'
The
The "minutes"
"minutes" display
display flashes.
flashes.
--,
I
,....,--=------,-.,
, I
T
I ME Ad.)
A I-[1A
TINE
Ad) Ar'll
ANI0~00
I
Use~, ~ or [<]
[<l l»
[» to set the ''minutes''.
151
~
11=:g~g)= lCS'c::;iH-~.
.
·~
fr,
o Checking the current time when the power is set
[Example] Setting the current time to 10: 15 am
ITIME
ITINE Ad.)
Ad) AMlO:
ANI0:1d
(>
0'
0 0()
(>
I~;o
Ul
'C
Press [CLOCK]
[CLOCK]
performed, the
When pressed again or if a different operation is performed.
normal display reappears.
<~> <~1I1> SDB/TONE
I---,,~--~-j
I,
'<
C"
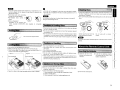
o Checking the current time when the power is on
Setting the Current Time
(12-Hour Display)
t>]
[<l t>]
Press MENU/SET or [ENTER/MEMO).
The current time is set.
set, and the normal display reappears.
• Displaying the time when the power is set to standby consumes
electricity. To reduce electric consumption, turn the time display off.
• When the function is set to iPod.
iPod, the current time cannot be set.
ENGLISH
C'
~
Playback
"'~'
.,
;l
Preparations
ihlt:Pow."On'>,
,"~'~'~"'''''
." . •'.1' ," • • , "
f.
;, '
-,'"
(')
.. SOB'
SOB
BASS
.<~i:~·~Mast.r:.yQlum
I,·,.Adi...
Adi~~nIJ"·
Ma~rVolum.•." ";~
. ~ .~'
'I
Press ON/STANDBY.
t:
• The power turns on,
on. Press again to set the power to standby.
• Power indicator
·········Red
Standby···,·,·················..
Standby··································Red
Power on
.. ·.. ·.. ·.... ··
·
··Green
on································Green
set· .,
·Orange
Orange
When the timer is set
Either turn
tum <VOLUME> or press [VOLUME!fl.
f].
::l
::l
'"
o
;1
Adjusts the bass sound.
TREBlE .
,tRE~:
'i_eT,;
_S.~~.
..' .-l;,; ...
_k~"-·('"
Adjusts the treble sound.
sound .
-:'GdB
[Variable range] :':1OdB -
::l
V>
',+1'8l(8
,t,'-..,s
(fl
"<:
;t;e.a
~
Turns SDB,
SOB, bass and treble off.
off.
Settings made upon purchase:
.SOB··········
·OFF
•.TREBLE
TREBLE
0 dB
• SOB·· ........·
OFF
·OdB
• BASS
0 dB
• S. DIRECT .. ·········OFF
·OFF
[Variable range]
V9l.l1• •~.;jj.ltf.t'E.!'W
V~!j;~UJ.MEMAX
Cl.o•
o
Switches Super Dynamic Bass on and off.
[Variable range] ~18dB
-:11dB -
.,::,':
The volume level is displayed.
WhlltU.
"0..
[Selectable modes]
Operations Possible During
Playback
i
• Power continues to be supplied to some of the circuitry even when
the power is in the standby mode. When leaving home for long
periods of time or when traveling, either press ON/STANDBY to turn
off the power, or unplug the power cord from the power outlet.
• Be sure to stop playback before turning the power off.
II ~~
~~~'.id~:'Svvitc:hing. '
.,,;~': ...
~" ..
~
,,-
Press SOURCE to select the input source.
source•
r---
C
L
o Completely turning
tuming off the power
Unplug the power cord from the wall outlet.
CD
CO
---
USB
TUNER
--
AUXl
AUX1
(AUX1/Dock)l
(AUX1/0ock)
--PORTABLE IN ---
AUX2
I 9
~
.:.-J
* Note that the time setting is cleared when the power cord is * "AUX1/Dock" is displayed when a Control Dock for
connected to "AUX1 ':
unplugged from the outlet.
* The settings made for the various functions may be cleared if the * "PORTABLE IN" is only displayed when connected.
I -1 Select the item to be adjusted with SDBITONE.
1
"'_t
.......
In the stop mode, press <~>
<~> to open the disc
disc tray.
* "Loading discs" lGrpage
page 3).
(G"
IL-A_d..;;j;..u_st_in....;g;;..t_h_e_T_o_n_e__....,.._......~ __
[SOB
---+-
BASS
To cancel, press [MUTE] again.
(The mute mode is also canceled when the <VOLUME> control is
turned or a [VOLUME!
f] is pressed.)
[VOLUME"']
1~
.........
]
.
Switching' the Display's
Di,',s,.p~lau's.Brigh.tness::.c.:;.,
$witchjrl~l:tl,le
,Brightn~t·~ I; ' ,
Press [DIMMER].
Press [DIMMER].
[
[
100 %
-
J
70 %
100%-- 70%
3).
S.DIRECT -
o To close the disc tray
<~/lI>,
<~III>,
[CD
~/lI]
~1I1] or
SOURCE
is
pressed.
iN,j··
u'pw
Do not place any foreign objects in the disc tray. Doing so could
damage it.
TREBLE
[About the display]
When the SDB
SOB is on
"SDB"
"SOB" is displayed.
When BASS orTREBLE is set to something other than 0 dB
............................................... "TONE" is displayed.
Press <~> again.
* The disc tray also closes when
2
Display the mode you want to adjust, then use ~,
~ and [<l
[<] t>
[>]l to turn
tum on or off
ofT and to adjust the
tone.
* If no operation is performed for 5 seconds, the adjustment is
retained and the normal display reappears.
I
~
'1
2
iPod is
power cord is left unplugged from a power outlet for an extended
period of time.
~...~_a_d_i_n_g_.9_-·..,;iSC&~_2_;...::_:r_·:~_~_:~_':_,.r;_·;...~{
~,
OFF
* The
i
I
i
I Listening with Headphorles:.
·,;~;:~,:1.~·',1
tt~~c:lphone.S.
"('. .
.•
,
:T
g
:!'.
~
I~
40%
40%
display's brightness switches each time the button is
pressed.
'
rt
I
__JJ
--
~
,_.'
J
Plug the headphones (sold separately) into the <PHONES>.
* The sound from the speakers is automatically cut off.
Whl[tl• •
iNti••
Be careful not to set the volume too high when using headphones.
13
I t.
I g'
~
ENGLISH
II
Cl
'g".
'""
•
Symbols used to indicate buttons in this manual
Button located on both the main unit and the remote control
unit
»
• BUTTON
Button only on the main unit
»
• <BUTTON>
Button only on the remote control unit
»
• [BUTTON]
~
III
::l
'"
a.
n
o
'~"
o'
'""
(fl
IJl
;:'"
~
"
I
(J)
...... ~
i
...... __
:.5?
....~.J
~
---~
-~~
!
~
':3"
'".
~
-i
3'
~
SOURCE
<BANDnI>
.."
c:
o Stopping Playback
,· ..t .. •••• .......... ••• ..
o:l
'"
!O a a!
[NUMBER] ~ a a 6 i
:a 6 Q'i
:;l
o
c:
r:r
[RANDOM]
: l"
SOURCE~'~'~'
"'~"
[CD
n'
[CLEAR/DEL]
I I
~
\
'"
~
('of \
t)
o \.)
(),jG,IQ
E' 0
Ol~)·J(V
Q G:;-" 8
'M'
[TIME/DISPLAY] -!-4)'
~0 0 0
DENON
14
:1
[REPEAn
r [
~]
~/lI] 116:·~·g·
r-I [_] ~
c::p
..
o'
:l
Single-track repeat
AII·track
All-track repeat
Repeat off
(indicator turns off)
[Selectable items]
C-"), (Single-track repeat)
c;.":>1
: Only 1 track is played repeatedly.
C-")ALL (All-track repeat)
(..":>ALL
: All tracks are played repeatedly.
Repeat off (indicator turns off)
: Normal playback resumes.
*
Press <~/l1>
<~/lb or [CD ~/lI).
~/l1].
The ""II"
.. " is displayed.
To resume playback, press <~II>
<~Ib or [CD ~/lI).
~/l1].
o Fast-Forwarding and Fast-Reversing (searching)
IPlaying Random Order
<Random Playback>
1 In the stop mode, press [RANDOM].
or [CD
.
2 Press
In the stop mode, press
The" RANDOM" indicator lights.
Press <~1I1>
<~/l1> or
~1I1]
~/lIJ.
The tracks start playing in random order.
times the button is pressed.
lll.1UT
IJl
c:.")~LL
C.~~LL
--
* When pressed once in the return direction, playback returns to the U'lJW
'N·n4
beginning of the currently playing track.
IIIII'lIlIGlollVd'
teL..arg'I["
O
[PROG/DIRECn ~r':"'~'
c:.")
c.~ 1
o Stopping Playback Temporarily
During playback, press~.~.
press ~. ~.
;l
<0
• If the function is set to something other than "CD';
"CD': press [CD ~/lI]
to switch the function to "CD" and start playback ((Eirpage
GT' page 24 "Auto
Function Selector Function").
Function")'
• The function can also be switched to "CD" using SOURCE.
* The disc is skipped the number of tracks equal to the number of
:l
Playback in the respective repeat mode starts.
.
o Moving to the Beginning ofTracks
of Tracks (skipping)
~
~.
.~""'
II
Press [REPEAH
[REPEAn.
I
During playback, press and hold in [~. ~).
:r
~
indicator lights and playback begins.
Press <BAND/II>
<BAND".> or [_).
1~
o
"~"
_~,
,
<ftep8at PI.yback>
Playback>
Press <~/l1>
<~1I1> or [CD ~/lI].
~/lIJ.
<~/l1>
_~t
.
]
b
--t-.o.J
i
;:l.
co
o'"
~I' Playing·'CDs.
PI~ying'CDs."
The
5
I Playing Repeatedly <Re~~~
CD Playback
o To Play the DesiredTrack
(Remote Control Unit Only)
Press [NUMBER] (0 - 9, +10) to select the track.
[Example] :Track
: Track 4 : [4]
[Example] : Track 12 : [+10],
[+10). [2]
[Example] : Track 20 : [+10],
[+10). [+10],
[+10). [0]
Random play cannot be set or canceled during playback.
o Canceling Random Playback
In the stop mode, press [RANDOM).
The
The""RANDOM"
RANDOM" indicator turns off.
'~[.li.
'N·n4
When [REPEAn pressed during random playback, the tracks are played
in a different random order after this turn.
ENGLISH
in the Desired Order
Playing Tracks in'
<Program playback>
<PrOg:~m
File format
format
Up"to 25
25 tracl<s
tracks can
can be programmed.
programmed.
Up'to
In the stop mode, press [PROG/DIRECn.
1
2 Use [NUMBER] (0 - 9, +10) to select the traks.
The "PGM"
"PGM" indicator
indicator lights.
lights.
The
Use
to select the traks.
* [Example) ToPress
program tracks 3, 12, 7. to play in that order:
[PROG/OIRECn. [3). [+10). [2). [7).
Press
3
Playable MP3/WMA file
file
Playback of MP3 and WMA Files
There
There are
are many
many music
music distribution
distribution sites on
on the
the Internet allowing you
you
to download music
music files
files in MP3 or WMA
WMA (Windows Media®
Media® Audio)
format. The music (files)
format
(files) downloaded from
from such sites can be
be stored on
on
CD-R or CD-RW
CD-RW discs and played
played on
on the
the RCD-M37.
"Windows Media" and "Windows"
"Windows" are registered trademarks or
or
trademarks in the United States and other
other countries of Microsoft
Corporation of the United States.
[PROG/OIRECn [3). [+10). [2). [7].
Press <~/l1> or [CD ~/lI].
Playback starts in the programmed order.
o Checking the order of the programmed tracks
In the stop mode, press ~ or ~.
The track numbers are displayed in the programmed order each
time the button is pressed.
o To clear the last track programmed
[CLEAR/DEll
In the stop mode, press [CLEAR/DEL]
The last track programmed is cleared each time the button is
pressed.
o To clear one programmed track at a time
In the stop mode, use ~ or ~ to select the track to be
[CLEAR/OEll
cleared, then press [CLEAR/DEL]
o Clearing the all programmed track
[PROG/OIRECn.
In the stop mode, press [PROG/OIRECn
The "PGM" indicator turns off.
Sampling
Sampling
frequency
Bit rate
(;)
<!>
Extension
Extension
MP3
MP3
32,
32, 44.1,
44.1, 48 kHz
kHz 32 - 320
320 kbps
.MP3
.MP3
WMA
32, 44.1,
44.1, 48 kHz 64 - 160 kbps
WMA
WMA
'"Ul
'"
;:+
CD
0.
(]
o
;,
t'-
"
• Be sure to give files the
the extension ':MP3" or '.WM!':'.
'.WMf'(. Files with any
other extensions or with no extensions cannot be played.
• Recordings you have made should only be used for your personal
enjoyment
enjoyment, and as per copyright laws may not be used in other ways
without permission of the copyright holder.
'""
o
:l
"
<J>
Ul
::i
.§
I
About the MP3 and WMA Formats
Fonnats That
Can be Played
CD-R and CD-RW discs created in the format described below can be
played.
Ul
:'"z.
oE
Writing software format
<;
--;
3'
IS09660 level 1
* When written in other formats, it may not be possible to play the
~
g
disc properly.
§
~
Maximum number of plavable
playable files and folders
~
o'
Total number of folders + files: 512
Maximum number of files in a folder: 255
S;
::i
g
File format
cr
'is'
MPEG-1 Audio Layer-3
'"o"..
WMA (Windows Media Audio)
When [REPEAn is pressed, the tracks are played repeatedly in the
programmed order.
::t
:;
g
~
Tag data
(/)
'"£;'""
ID3-Tag (Ver.1
(Ver.l x)
META-Tag (Compatible with title, artist and album names)
(;.
~
o'
Switching the Display
"
<J>
Press [TIME/DISPLAy].
Elapsed time of
_
_ _ Remaining time of
currently playing track
currently playing track
Remaining time for
all remaining tracks
* The display switches each time the button is pressed.
15
ENGLISH
Gl
l1>
~.
::
10
(fl
!
I
.Svmbois
'IndIcate ~n.in
•
Symbols ulect
used to
toJndicate
~ons in th,,-.nual
thiS joan';al
I
Button located on both the main unit and the remote control
BUTION
unit
•» BUTTON
Button only on the main unit
..
» <BUTTON>
<BUTION>
Button only on the remote control unit
..
» [BUTTON]
[BUTION]
I
gI
l1>
Q.
,
I
("')
o
::
a;
SOURCE <"/II>
<~1I1> <BAND/II>
~
tl
11
o'
::
II>
(fl
(f)
~c:~
'0
."
I
[
,:I
_ _I,
......
~
~.~
I
~
MENU/SET
MENU~ET
File name display
~
~
"TI
Use ~, ~ or [<J l>] to select the file to be
played.
played.
4 Use
Press <~/l1>
<~1I1> or [CD ~/lI].
~1I1].
(..JOC;
co
J
C
::
()
···r·..
'--l"-----r-"·"-r-",
,··;; .. -_ .. · j....
I
liO
::0
0
--J
I
0:1'
0:
II
:
[NUMBER] ~
6 6 6 i'
II'
':6
0' • i,
': 6 6 ,..Q.:
c-!.o
:tQ.
. __ Q.. J C!
Cl I;
LQ.~.Q.!
I I
....,
[R
J]
.~_~ [REPEA
E7':_~
EPEAn
~!dS
[TU -. TU +]
SOURCE ~II
[Ttl
II ~ ~B.-~!II
.--or-----.,.,-·
[TUNER]~to
[T UNER]~:66;---11
or--.....
~
~.~
II! ~ .....-------.
[CD "/II]
[CH .:..
~1I1] ~
9=> .
-. CH +]
f'.
r---.
"
[-]
\~,')
... _....)
~
o
i
<:
a-
m
II>
I
::-
o
o
oji
I
.10.
.10
I
D
.......
,
~
"0
!
l1>
£;
n'
~
o·
::
AI'UI
..6.r--11
II
(fl
I
4>---:---11
.
C! 8
I ,OG)
'
II>
MENU/SET
I
'" ().
~~. .--""'"
~~~.;I.11
~:.
~lll
FOLDER
[FOLDER MODE]
c0
III'~
ME'lU/
DENON
16
Title/artist display
Title/album display
[ENTER/MEMO]
J
•
'**' The characters that can be displayed are as follows:
A to Z a to z 0
a to 9 i\fI ' ((l) •* + , - ./. /::= (space)
I
o To Play Repeatedly
Press [REPEAn
Playback starts in the respective repeat mode.
The selectable repeat modes differ in the "Folder Mode" and the
"Disc Mode':
'**'
uFolder Mode"
Moden is selected:
When "Folder
r
Singl~?
1 FLO
L
::::C
L.
Ck
k repeat
-
c..J
~~
FLO
Repeat of all the
tracks in the folder
FLO _------.J
•
I
When "Disc Mode" is selected:
~
J
L::
1
Single-track 1repeat
-
~~~LL
c..J=:J
LL
All-track repeat
Repeat off
(indicator turns off)
o To switch the Folder or File During Playback
- Folder
Use [.:6.
It:. \7]
'\7] to select the folder.
-File
Use
Use~,
...... ~ to select the file.
file, or use [NUMBER] (0 - 9, +10) to
select the file number.
'**' The file numbers are set automatically when the disc is loaded.
[Selectable items]
When "Folder Mode"
Moden is selected:
:
~~1f1:!1
~~RD : Only the selected track is played repeatedly.
'Cl<'jfIJ)
~jflJ)
: All the files in the selected folder are played repeatedly.
'5:f!D'
·fLO :: Folder mode playback resumes.
Copyright-protected files cannot be played.
(The "Not Support" is displayed.)
Note that depending on the software used for burning and other
conditions.
conditions, some files may not play or display correctly.
uDisc Mode"
Moden is selected:
When "Disc
"Playing Repeatedly <Repeat playbacb"
playback>" (Gf'page
(@"page 14)
o Setting random playback
"Playing Random Order <Random playbacb"
playback>" (@"page
(&page 14)
r··
o :~b
..::~~ [6.
<1 t>]
g,
:~:L::'-~"""'[.6. Y'
\7 <l
[TIME/DISPLAy] ----+4)'
,'re;' 0 !$j
~ 0:)
I
-
Repeat off
5
o
::to
::
to select the folder to be played.
[
'---.J
l1>
<1l
II>
[About the display)
display]
"FLO" is displayed.
When "Folder Mode" is selected
"FLO" is not displayed.
When "Disc Mode" is selected
Folder Mode: .
All the files in the selected folder are played.
Disc Mode :
After the selected folder and files are played.
played, all the files in all the
folders are played.
Use [~
5'
:i"
...:r::-
10
<0
g'
2
Press [FOLDER MODE] and select "Folder
''Folder Mode" or
"Disc Mode".
3 Use [.6. \7] to select the folder to
4:>
<1l
33'
Load a CD-R or CD-RW disc containing music files in
the MP3 or WMA format into the disc tray (~page
(l3f'page
3).
-i
' - - - - - - - - - - - I - ...J
;:;
~
-I
::1
1
lCo:::~::J
lC~:::~::J
(fl
(f)
l1>
~
the Display
I PIa-fl.iS. MPS:~~}Fi":'!~:\~"~~~~~r' ~ .1 o Switching
During playback.
[TIME/DISPLAY].
playback, press [TIME/DISPLAy].
•
II
P
rogrammed playback is not possible with MP3/WMA discs.
Programmed
ENGLISH
About the FM Broadcast Reception Status Display
TUNER Playback
The .. ST"
ST'" indicator lights when receiving stereo broadcasts.
The"
,il
til
Tuning in'
in:8rQ.~~sjStations
8~.~:~sJS~ations
't!'~~:;' :y,~ ',":,5*,,;( ,
,
,);
&
Connect the antenna~bef6rehand(~page
antenntbefotehand
(~page 10).
,,"
.
,>,.,
1
•
' ' ;'"
''
Press [TUNER] or <BAND/II> to select the reception
band.
CFMAUTO-FMMONO [About the display)
When FM AUTO is selected····
When FM MONO is selected
When AM is selected
2
AM~
"AUTO" is displayed.
"MONO" is displayed.
The reception mode is not
displayed.
Use <~-, +~> or [TU -, TU +] to select the
reception band.
When a station is received, the "TUNED" indication will light.
•
- If the function is set to something other than "TUNER", press
[TUNER] to switch the function to "TUNER" (a"page
(G"'page 24 "Auto
Function Selector Function").
Function")'
- The function can also be switched to "TUNER" using SOURCE.
o To Tune Automatically
*
Press and hold in <~-, +~> or [TU -, TU +] to automatically
search and tune in broadcast stations.
Stations whose signal is weak cannot be tuned in.
o To Stop Auto Tuning
Press <~-, +~> or [TU -, TU +].
o To Tune Manually
The reception frequency switches each time <~-, +~> or
[TU -, TU +] is pressed.
•
A humming sound may be heard when using a TV nearby while
receiving AM programs. If this happens, move the system as far from
the TV as possible.
If the signal is weak and stable stereo reception is not possible,
possible. select
"FM MONO" to receive in monaural.
About Switching the Tuning Mode and Preset Mode
Use <I~/-, +~> to perform the tuning and preset channel
operations. Switch to the mode to be operated before operating.
o To switch to the preset mode
Press <+~> while pressing <BAND/II>.
The" PRESET"
PRESET'" indicator flashes for about 5 seconds.
o To switch to the tuning mode
Press <~/-> while pressing <BAND/II>.
The "TUNING" indicator flashes for about 5 seconds.
Cl
Automatically Presetting FM Stations
(Auto Preset)
8"
'
::
to
~
Up to 40 stations can be preset.
Auto preset is not possible with AM broadcast stations.
'"
;:l
'c".
Press [TUNER] to select "FM AUTO" or "FM
MONO".
1
2 Press and hold in MENU/SET.
3 Press MENU/SET again.
("l
o
::l
;;;
g
o
::>
<r.
The "AUTO PRESET" is displayed.
(j)
~
l::
."
"Search" flashes and auto presetting starts.
I
(j)
Broadcast stations whose antenna signal are weak cannot be preset
automatically. If you wish to preset such stations,
stations. tune them in
manually.
o To Cancel Auto Presetting
1 Thne in the station.
'Ii
'X
",
~
;;
I
3
~
o
I :;.
~
I
'"
I l::-n
~
"
~
I o'~
2'
I ~y;
presetti~FMI AMStiilioJii;Mirrualr
lJp'"to 4rrsiat~ns (t'ota('to;~M~~~d":FM)~;l~'" ''«. .• 1
'!
s·
ID
L:..
Press <BAND/II> or [.].
The" Search" indicator turns off.
"
'"
::!
jd.i"i"";'-';
"l'
I
i;~
''''is.
I l::oC"g
""'"o'"'
".
2 Press [ENTER/MEMOl
Use <...../-,
[CH -, CH +] or [<]1>] to select
number, then press [ENTER/MEMOl _
3 the
The smallest non-registered preset number flashes.
+~>,
The preset number, reception band and reception frequency are
displayed.
17
~
5'
I
ID
to
>--
I ~
I '"
~
I
I
I·
L~
ENGLISH
Cl
It
::
&
•
Symbols used to indicate buttons in this manual
Button located on both the main unit and the remote control
unit
• BUTTON
Button only on the main unit
» <BUTTON>
Button only on the remote control unit
• [BUTTON]
:;
(")
I Listening to Preset Stations
~
Use <~/-,
<...../-, +~>,
+~>, [CH -, CH +] or [NUMBER] (0 - 9,
+10) to select the preset number.
<I~-. +~> after switching to the preset mode
*'* Operate <~-.
iPod® Playback
With the RCD-M37, you can listen to musIc on an iPod.
IPod. It
is
IS also possible to operate the iPod
IPod from the main unit or
remote control unit.
unit
((jf'page 17).
(ll::W'page
o
~
'"
g'"
<1_-,
CJl
~
+E>__::Nl~/SET
*'* The iPod may only be used to copy or play contents that are not
Naming the CurrentlyTuned in Broadcast
Station
C
"C
I
copyrighted or contents for which copying or playback is legally
permitted for your private use as an individual. Be sure to comply
with applicable copyright legislation.
Names of up to 8 characters can be input.
'-'~"'~')
...CJl
f~,....---
g
.0
~
~
::i
:;
~
ON/STANDBY
o
;-
rO....O....o'i
1'S"'0-"'0-1
o
:J
'"
i
c
i6 0G...
O.!:
::0
,.£7'
[6.. _.6.J
:Q...
O.: ~
G-++- [CLEAR/DEL]
r::
iii
'"o:J"
:
g
'""
0
SO URCE ----f+€=)
(Jl
"C
.10:
ou
r.. -CH-.----7:jj:-~
tp..Q'
'g",
n
II
[CH-. CH+]
Use [~
set.
to select the character, then press [[>] to
I
A to ZZ a to z 0 to 9 /I" '' (()) •* + ,,-- . / = (space)
I
[<1 t>]I to move the cursor.
*'* Press [<11>
Use this to correct input characters.
5
Press [ENTER/MEMO].
Naming mode is finished.
CD Call
out the preset name to be changed, then press MENU/SET
three times.
Q)
CV Perform steps 3, 4 and 5 at "Naming the Currently Tuned In
Broadcast Station':
[CLEAR/DEL] to delete the characters.
Press [CLEAR/DELI
iii
*'
18
1 Set the iPod on the DENON Control Dock for iPod.
2 Press SOURCE to select "AUXI/Dock".
Set the iPod on the DENON Control Dock for iPod.
(@"'See
(~See
the Control Dock for iPod's operating instructions.)
Press
to select "AUXI/Dock".
to select the display
The mode switches each time the button is pressed.
mode]
[Selectable model
o Changing the Broadcast Station Name
~
§"
~
Press
mode.
*'* Characters that can be input.
[NUMBER] -JO
06a 6G
~6
II.,
,:
:;l
o
Press [<l [>].
I Preparations
[<J
[REMOTE/BROWSE]
3
mode.
3 Press
Use [.6. V]
"7] to select the character, then press [[>] to
4 set.
I
The name input mode is set.
~,
g.
three times.
Operate within 5 seconds.
.,
:J
for the preset number to
The "STATION NAME" is displayed.
@TI- ON/STANDBY
®t+-
;r
Press
be named.
Press
SOURCE
~
[NUMBER] (0 - 9, +10) for the preset number to
1 Press
be named.
2*'* Press MENU/SET three times.
Display location
I Browse mode I I Remote mode I
Main unit display
X
x
0
0*
Remote
control unit
(RCD-M37)
0
0
iPod
X
X
0
Playable
files
Audio file
Video file
Active
buttons
0
iPod display
* :Video may not be output, depending on the combination of ASD1Rand iPod.
ENGLISH
To Switch the Display
"k~Jngrto Audio
Use [~ \7] to select the item, then press [ENTER/
MEMO] or [[>] to select the music file to be played.
1
2 Press [iPod
During playback, press [TIME/DISPLAY]
The display switches each time the button is pressed.
Title name
[ ____
[
~/II].
Playing a Portable Audio
_
- If the function is set to something other than "AUX1/Dock'; press
[iPod ~/lil to switch the function to "AUX1/Dock" and start playback.
(!2F'page 24 "Auto Function Selector Function")
- The function can also be switched to "AUX1/Dock" using SOURCE.
Remote control and iPod button relations
Your portable audio
audiO player can be connected to the RCDM37's portable Jack
jack to play tracks on the portable audio
audiO
player.
_----JJ I
Player
~ Connecting a Portable Player'
A
lb
=:e.
Album
title
Playback starts.
•
Artist name
I Disconnecting the iPod
1
2
~II
~,~
~,~
~,~
<l,l>,t:::.,'l
Click Wheel
ENTER/MEMO
Select
Switch the shuffle function
MENU
Display the menu or return to the
previous menu.
-d'u.~r.u.
- DENON will accept no responsibility whatsoever for any loss of iPod
data.
- Depending on the type of iPod and the software version, some
functions may not operate.
:2
:;
U
a
i3
I
Remove the iPod from the Control Dock for iPod.
o
<n
ro
::+
::;
~
I~I
e(3,....--......
"'::r
rl
'-"i
3'
~
Portable
HEADPHONE
l
:?
~
;!'
:;
@~~
::,
0'
::
'"
Select an item.
Switch the repeat function
6.
(,0
Press ON/STANDBY to set the standby mode.
Fast-reverse the track/
Fast-forward the track.
REPEAT
RANDOM
~
;
Play the track from the beginning/
Play the next track.
Switch between the browse
mode and the remote mode.
if!
'"
"** Play/Pause in remote mode
REMOTE!
BROWSE
MENU/SET
'II
Play the track.
Enter the selection or plays the
track.
'n
Cl
IOENONI
ID~ROt'll
Operation on the RCD·M37
iPod ~!l1
Cl
'"
::t
Connect the RCD-M37 and portable audio player using a separately
sold mini-stereo audio cable.
....
;:;
'"
0-
iO
5'"
:a
~.
Play(ng the Portable
portable Player
1
(J)
'0
Press SOURCE to select "PORTABLE IN".
~
n'
~
0'
2*
::J
Play the portable audio player.
'"
The Portable Audio are output.
Also read the portable audio player's operating instructions,
instructions.
-dthU'I!W
When using the portable player's headphones jack, set the volume on
the portable player to an appropriate level.
19
ENGLISH
G'l
':".;.
'"~
••
::l
Symbols used to indicate
indicate buttons in
in this
this manual
manual
Symbols
located on
on both
both the main
main unit and the remote
remote control
Button located
BUnON
unit
unit
•• BUTTON
Button only
only on
on the main unit
unit
• <BUTTON>
<BUnON>
only on
on the remote control unit
[BunON]
Button only
• [BUTTON)
"::l.
'"
0..
~
o
::l
::l
'~"
~.~
......
~
o'
::l
'"
en
;:'"
"C
I
I,
- ----t-t.".."."JJ
ll_.._.
..en
~
:;'
'":T
.
-t
3'
~
'00
:
'0
0:
J
.
._J···········
..
,-i~
i~
SOURCE
~
<BANDnI>
<BAND/II>
on
"
(-, '"- ....
.'-',
.. ----_ .... -- .......
10····(5···<51
6 6!.,
,
.!6
0'
~
--JO
io
10
:::;i
[NUMBER] ---+dO
11"
o
"
0"
;;;
'"o::l'
:;'
,
.en
"C
~
•
n'
[_] _
~
o'
::l
'"
II
"""-"""-,
JIIIl"""'WIl
c:f::J
e:p .,.
I Ii'"
f:.'1
\1",-,,')
I
.
[USB ~III]
~/lI]
,-. . ,"';')
f_'
\..J'
'''oJ
,
'
IIII~1"6' k5i~
I I
'~
\...
[TIMEJDISPLAYl
[TIME/DISPLAY]
I
(1
" ~ (-)
!~,i-:-r.+:;-:[.6. \7]
(;;;.
C
'--'
(i)
.:.J .V.
:'1:
()
u
~
C
~ c;
r,\.. r-..:(." "J
20
"-.::
Maximum number of files in a folder: 255
Maximum number of folders: 255
File Format
M PEG-1 Audio Layer-3
MPEG-1
WMA (Windows Media Audio)
File fonnat
1...
C=:
b
---++5"
'5l
Maximum number of playable files and folders
.:
.~.
[FOLDER MODE]
the top drive can be selected.
0.:
.: : : :-:.: '
---
7'
I
Set the USB port to be used.
Playback
Playback starts
starts automatically.
'**' When
a USB
USB memory device is connected,
connected. playback starts
automatically when the operation below is performed.
• Switch the
the function to "USB" using SOURCE.
• Press [USB ~III).
~/lI].
"FAT16" or "FAT32"
'**' If the USB memory device is divided into multiple partitions,
partitions. only
MP31WMA file
Playable MP3IWMA
,,~,~~.
"--
USB-Compatible File Systems
6 oi
°0,..
0i
6.1
[o._..
[0.... Q.1
6.1 0
[RANDOM]
p ...., iI [REPEAn
[REPEAn
[R~~~~~J
k~--~-,
SOURCE ----!-l.E::51CS··cS'f-;[.... ~]
I ,[~.~]
c',:25::es;L~'
••.....u;;rr.
_----n!IT' I
,. ~
S
Files stored on USB
USB memory devices created in the formats below
can be played.
x)
ID3-Tag (Ver.1 xl
META-Tag (Compatible with title,
title. artist and album names)
r-,'
::l
~
I
USB, Memory
Memory Formats
I.I Playable USB
Tag Data
--
::l'
~
'"
<~1I1>
<~/l1>
IBasic Operation,
Operation .
USB Playback
MP3
WMA
Sampling
frequency
Bit rate
Extension
32, 44.1, 48 kHz 32 - 320 kbps
.mp3
32, 44.1, 48 kHz
,wma
.wma
64 - 192 kbps
Only music files that are not copyright-protected can be played on this
set.
Contents downloaded from pay sites on the Internet are copyright
protected. Also, files encoded in WMA format when ripped from a
CD, etc., on a computer may be copyright protected, depending on
the computer's settings.
*'*'
• If the function is set to something other than"
USB '; press [USB
than "USB
~1I11
~/lI] to switch the function to "USB" and start playback.
((W'page
(Grpage 24 "Auto Function Selector Function")
• The function can also be switched to "USB" using SOURCE.
o To Switch the "Folder Mode" or "Memory Mode" g·u_kl,n8
Press [FOLDER MODE].
(About
[About the display]
When" Folder Mode" is selected· .. · "FLO" is displayed.
When" Memory Mode" is selected
"FLO" is not displayed.
Folder Mode:
All the files in the selected folder are played.
Memory Mode:
After the selected folder and files are played, all the files in all the
folders are played.
~
C)
<1>
2
<5
- DENON will take no responsibility whatsoever for any loss or damage
to data on USB memory devices when using the USB memory
device connected to the RCD-M37.
- USB memory devices will not work via a USB hub.
- DENON does not guarantee that all USB memory devices will
operate or be suppled power. When using a USB connection type
portable hard disk of the type for which power can be supplied by
connecting an AC adapter, we recommend using the AC adapter.
~
'"; l
'"
Q.
n
o
g
::;.
'"
o'
"'"'
o To Switch the Folder or File During Playback
- Folder
Use [.t,.
[.<:::,. \7]
'i7] to select the folder.
-File
file, or use
Use ....., ~ to select the file.
to select the file number.
(f)
~
i
[NUMBER] (0
~
9, +10)
- 9.
o Stopping Playback
Press
<BAND/II> or [.].
o Stopping Playback Temporarily
*
Press <~1I1> or [USB ~1I1].
The "II" is displayed.
To resume playback, press <~1I1> or [USB ~1I1].
I
I
,
~
::r
I .."
~
,
o Playing Repeatedly (Memory mode only)
'<"""to
(REPEAT].
[REPEAT].
o
'"
o Playing Random Order (Memory mode only)
I u>
~
I,
In the stop mode.
mode, press [RANDOM].
o Switching the Display
File name display
---
Title/artist display
Title/album display
J
••--•
"
~
-g
* The characters that can be displayed are as follows:
A to Z a to z 0 to 9 A
:;!
0
I ~
I ~
I g,
I ~
I
During playback.
playback, press [TIME/DISPLAY].
I
~
~
I
playback, press and hold in (~,
[~, ~].
During playback.
[
[
-
i
i 3'
o Fast-Forwarding and Fast-Reversing (searching)
Press
"
'0
'"0
I
I
i
(')
~
I, o'
~
* +.-./
+,-./ = (space)
' ()
()•
''""
21
ENGLISH
Cl
':;;"::
'"~
'"::\
'"0.
("'l
Setting the Timer
II
•
o
Use ~, ~ or [<J r>]
l>] to select the function to be
played.
Symbols used to indicate buttons in this manual
played.
4 Use
C
Button located on both the main unit and the remote control
~
BUTTON
unit
• BUnON
Button only on the main unit
~
• <BUnON>
<BUTTON>
Button only on the remote control unit
~
• [BUnON]
[BUTTON]
:l
::l
'~"
o'
::l
"
CD
D
USB
AUXl ~
(AUX1/Dock)
AUX2=-AUX=-2
_
TUNER
---+-
---+-
'
IE< ~t[,~
IE:
~,:'[.::., ,
U>
~
. . .hI~j
,.g.h
"
c;
-<
<:r
'"
"'"
C'\
:..Q..
f~
g
~
."
C
~
I~
.....,
~. ~
ON/STANDBY
C
VOLUME
5*' '
:;0
e
fr
[SLEEP]
.~
rr= p ~
Setting the Timer
• Everyday timer playback
Playback starts (the power turns on) and stops (the power
turns off) at the set times each day.
~
~
.5
1*'*' Press MENU/SET.
Press
Use ~, ~ or [<J r>]
l>] to select the timer play
mode.
Use
2 mode.
*
ONCE -.... EVERYDAY r
r , - - - - - - - - - - ,,
"1": Once timer, "E" : Everyday timer
'C
3
"
~
:6·C5·~
'¢mm"11
(ej)
)"OM'\.
:f;\ .
II
II
.....
ii .0..-4t,····-·_····'11
,~
[-]
VOLUME
M'~
22
I ,I I I I I I I /
I
I
I
I
I
I
I /
The broadcast station for the selected preset number is
set.
7
Use ~, ~ or [<J r>]
l>] to set the "hours" for the
I
"
II
timer start time.
I..
..
8
The" hours" for the timer start time are set.
I
E
t
"/
011
UN -AN12+00
-nn,: :::~.:H·i
Press MENU/SET or [ENTER/MEMO].
[ENTERlMEMO].
Use ~, ~ or
timer start time.
Use
or [<J r>]
l>] to set the "minutes" for the
9 timer
I
, I
start time.
to set the "minutes" for the
,
I I
E
Press MENU/SET or [ENTER/MEMO].
[ENTERlMEMO].
The timer play mode is set.
I
E"P02:
EfF'C12= F.:EG
F:EG UANEjNRNE+
) iii' i
, i
,
nr"i
OU
ANl e~(1fi
f1N1.0-=-00
1OPress MENU/SET or [ENTERlMEMO].
The
The""minutes"
minutes" for the timer start time are set.
...~/
MENU/SET
'\
"
-EI')EF:\![)Riy!-E
'...I EF.: '.,.'0 A'.,.'-
[Only when the "TUNER" function is selected]
l>] to select the preset
~, ~ or [<J r>]
number.
I '\
I
-Q) Use
-CD
-@
-(1) Press MENU/SET or [ENTERlMEMO].
Playback starts (the power turns on) and stops (the power
turns off) once only at the set times.
Cil
";,
6
• Once timer playback
Operate within 5 seconds.
ON/STANDBY
Press MENU/SET or [ENTERlMEMO].
The function to be played is set.
If the function is set to anything other than the tuner, the setting
display shown in step 7 is displayed.
The "TIMER" is displayed.
~
····1
:
MENU/SET <BANDt'll>
<BAND/II>
~
[ENTER/MEMO]
'<9 '(1:" 0*-[<11>]
11 Use
or [<J r>]
l>] to set the "hours" for the
timer stop time.
I,
I
Use ~, ~ or
timer stop time.
to set the "hours" for the
,
I
[E
12
press MENU/SET or [ENTERlMEMO].
[ENTER/MEMO].
The" hours" for the timer stop time are set.
/
on·--f1r'l1.
2-1-00
nFF-AM12+00
ENGLISH
13use ......, ~ or [<l t>] to set the "minutes" for the
timer stop time.
I
,,
o
<D
I I
OFF A1'112·t-(lO
II
E
CV
To check the timer settings
14
®
15use ......, ~ or [<l t>] to tum timer playback on.
o To change the timer settings
press MENU/SET or [ENTERlMEMO].
The "minutes" for the timer stop time are set.
I
1 OFF/E_ON
I
Dis la
CoffJE_off
CoolE_on
CofflE_on
CoolE_off
o To change the setting while setting the timer
Adjust the volume for when the timer starts using
17VOLUME.
o If there is a power failure
18
o When
Set the power to standby.
(~page
22). Repeat
The time setting and the timer settings are cleared. Reset the
current time, then reset the timer.
performing a timer setting with DENON
control dock for iPod (ASD·3N or ASD-3W)
o Canceling the timer
Press MENU/SET twice.
At step 15 under "Setting the Timer': use~, ~ or [<11>] to
turn off the timer on/off indicator and turn off "
<9 ':
0.
n
o
::s
::s
<1>
;l
The "TIMER" is displayed.
WPress~, ~or[<1I>].
The "EVERYDAY" or "ONCE" is displayed.
® While "EVERYDAY" or "ONCE" is displayed. press <BAND/II> or
[_] for at least 2 seconds.
The timer playback standby mode is set.
'"
:4
"
1 Select and play the desired function.
CD Press MENU/SET.
The timer setting is set.
":.;::l:
"";::
Use this function to automatically switch.
switch; tl1e
tile power to the
standby mode after· a specific amount of time (minutes).
The sleep timer can be set to up to 90 minutes, in steps
of, 10mjnutes.
10 minutes.
.'
.. ' J + •. .
o To clear the timer settings
Press MENU/SET or [ENTER/MEMO].
Cl
)
Repeat the procedure under "Setting the Timer" (&page 22).
Press <BAND/II> or [_].
Return to step 2 under "Setting the Timer"
the procedure.
* When turned on, " <9" lights.
16
Sleep Timer Playback
Press MENU/SET.
The "TIMER" is displayed.
Press~, ~ or [<11>].
The "EVERYDAY" or "ONCE" is displayed.
Press MENU/SET
MENU/SET
The display switches each time the button is pressed.
Pause the track you want to play, and keep the power on for DENON
control dock for iPod.
§'
v;
Press [SLEEP] and select the setting time.
2r
90 ---- 80 ---- 70 ---- 60 ---- 50 ---- 40 ---- 30
L-
OFF
10
20
l
CIl
"'
;:
.----J
"0
("SLEEP" indicator turns off)
The "SLEEP" indicator flashes.
Press [SLEEP]
3 flashing.
while the "SLEEP" indicator is
The set time is displayed.
* After about 5 seconds, the set returns to as it was before the
sleep timer was set, and the "SLEEP" indicator lights.
o Canceling the sleep timer
Either press [SLEEP] at step 2 under "Sleep Timer Playback" until
"OFF" is displayed, or press ON/STANDBY.
o To change the setting while the sleep timer is set
Press [SLEEP].
:;!
o
c
o Checking the time remaining until the sleep timer
v
(;'
'"o
::r
starts
When the function is set to iPod, the timer cannot be set. To set the
timer, first switch to a function other than iPod.
Press [SLEEP].
Return to step 2 under "Sleep Timer Playback':
I.
I
o
~.
::>
<0
l;;I
I
"C
~
(';'
[
~
<;
L~ __
23
ENGLISH
Ci
~
Other Functions
;>
::.
••
Symbols used to indicate buttons in this manual
r
Button located on both the main unit and the remote control
~
unit
• BUTTON
Button only on the main unit
~• <BUTTON>
[BUTTON]
Button only on the remote control unit
~ [BUTTON)
":::
~
Q
if.
(jl
;
<~>
~/il
MENU/SET
t~
"'0
0;-
-.::
<:r:
><
(jl
"":;::<
'.0
~
Convenient Functions
Resetting the Microprocessor
Auto Power On
Perform this procedure if the display is abnormal or if
operations cannot be performed.
When the microprocessor is reset, all the settings are
reset to their default values.
When the power is in standby, the power turns on when
any of the buttons below other than ON/STANDBY is
operated, and the respective operation is performed.
• <~>
The disc tray opens.
• ~/Il for the different functions
....................................... Playback of that source starts.
[TUNER]
• [TUNER)
Playback of the tuner starts.
-N·n-
WI'row
f~
f~""'----I"""I~
3
:!;
<I~/-.+~I
<~/-,+~>>
ON/STANDBY
.,
Auto Function Selector Function
CD starts playing.
• [USB ~/lI).
The function switches to "USB" and the
~/lIl················The
,:i;
;.
g
• [iPod ~/lI)
~/lI]
,.c
• [TUNER)
[TUNER]
'"
USB starts playing.
The function switches to "AUX1/00ck"
·..·The
"AUX1 /Dock"
and the iPod starts playing.
· The functions switches to "TUNER" and
the band last set is tuned in.
;.
::
~/lI] !!11 6
[]!!J
GID
~[USB~/lI]
~[USB~/lI]
Jr....~i i
MENUI
~
~/lI]
MENU/SET
I I
[iPod
MENU/SET~"':'---.:l.?
.•.. _~[iPOd~/lI]
:@
0~[<ll>]
24
II :~um·~rr~t>l
~·········I
I
!!
Using an Optimizing Filter
An optimizing filter suited for the properties of the speakers
(SC-M37) can be used.
1 Press MENU/SET to select "SP OPTIMISE".
+/~>
Use <...../-,
or [<] C>] to select "ON" or
2 "OFF".
3 Press MENU/SET to set.
[<l
Last Function Memory
[TUNER]~
[CD
[CLOCK]
#~
If "AM12:00" is not flashed in step 3, start over from step 1.
pressed, the function
When one of the buttons below is pressed.
switches to the respective function and playback of that
source starts.
~/lI] ......·..··......·..· The function switches to "CD" and the
• [CD ~/lI)·
~,
@++- ON/STANDBY
@-H-
the power cord into a power outlet while pressing
2 Plug
<...../-> and <MENU/SET> simultaneously.
3 Press [CLOCK].
The "AM12:00" display flashes.
flashes
The Auto Power On function cannot be used with iPods.
-<
1 Unplug the power cord.
This stores the settings as they were directly before the
standby mode was set.
When the power is turned back on, the settings are
restored to as they were directly before the standby mode
was set.
[Selectable items)
items]
ON
(SC-M37
: The response is optimized for the speakers (SC-M37,
OFF
: The response is flat.
flat
supplied)
supplied).
#
iPod, the set cannot be switched between
When the function is set to iPod.
. on and off.
ENGLISH
G)
'~" .
Troubleshooting
..5
If a problem should arise, first check the following:
1. Are the connections correct?
2. Is the set being operated as described in the owner's manual?
3. Are the other components operating properly?
proper1y?
If this unit does not operate properly, check the items listed in the table below. Should the problem persist,
there may be a malfunction.
In this case, disconnect the power immediately and contact your store of purchase.
(General]
[General]
'~
~ "I',··;'''i
' "'\
·;~.,Cause
.e., '"' . -;~
.
.'.:';';'
" I;l~'
'i~'..
....
',,"
+""~''''''''~:!f~1::;~J~:~f
~,~
\,.",
.....:'
..
;-i:~''''':-1,
24
Set does not
operate properly
properly.
Display not lit
and sound not
produced when
power switch set
to on.
• External noise or interference is • Reset the microprocessor.
causing the set to malfunction.
• Power cord not plugged in •• Check
Check the connections on
securely.
the set's rear panel and the
connection of the power plug to
the power outlet.
Display lit but
sound not
produced.
• Device you want to play and set • Select an appropriate input
input source do not match.
source.
• Volume control set to minimum. • Turn volume up to suitable level.
• Switch off MUTING.
• MUTING is on.
Display is off.
off,
•·The
The Dimmer setting is set to • Set to something other than
"OFF':
"OFF':
13
Power turns off
suddenly and
power indicator
flashes red.
• Protection circuit activated due • Turn off the power, wait for the
to rise of internal temperature.
set to fully cool down, then turn
the power back on.
• Place the set in a well-ventilated
place,
place.
• Core wires of two speakers are • First unplug the power cord,
touching each other or a core
then twist the core wires tightly
wire is sticking out of the terminal
or terminate the speaker cables,
and touching the set's rear panel,
then reconnect.
activating the protection circuit
circuit.
• Turn off the power and contact a
• Set is damaged.
DENON service center.
9
11
~
cause
Cause
~ptom
Set does not work • Batteries are worn.
properly when
• You are operating outside of the
remote control
specified range.
unit operated.
• Obstacle between main unit and
remote control unit.
• The batteries are not inserted in
the proper direction, as indicated
by the polarity marks in the
battery compartment.
• The set's remote control sensor
is exposed to strong light (direct
sunlight, inverter type fluorescent
bulb light, etc.).
"
,Countermeasure
CounterrneasU.re
Pqe.
Page;
• Replace with new batteries.
• Operate within the specified
range.
• Remove the obstacle.
3
4
• Insert the batteries in the
proper direction, following the
polarity marks in the battery
compartment
compartment.
• Move the set to a place in which
the remote control sensor will
not be exposed to strong light.
3
[CD]
13
13
13
9
9
--
.,~
'C"o
(Remote
[Remote Control Unit]
Symptom
"OOTr 00: 00"
is shown on the
display even
though a CD is
loaded.
Cause
cause
• The disc Is
is not properly loaded.
Countermeasure
CountennMsunr
..
.'0.
• Reload the disc.
K-
4
r+
4
I [
en
.........
,' ..... ".;,:
'
3
'~"
:i'
.'"::r..
'-";
~. i
K-i~
o I
I
, §
~
Disc is not played • The disc is dirty or scratched.
when CD ~/Il
button is pressed.
• Wipe the dirt off the disc or
replace the disc.
3
A specific part
of a disc is not
played.
• Wipe the dirt off the disc or
replace the disc.
3
• The disc is dirty or scratched.
A CD-R or CD-RW • The disc has not been finalized. • Finalize the disc then play it.
disc cannot be
• The recording conditions are bad • Use a properly recorded disc.
played.
or the quality of the disc itself it
poor.
MP3 andWMA
files cannot be
played.
r-;-
I g
• The file formats, extensions or • Create discs with file formats,
settings made when disc was
extensions or settings compatible
created are not compatible with
with the RCD-M37
RCD-M37.
RCD-M37.
the RCD-M37
o'
~
2
15
25
II
I
I
!
ENGLISH
Cl
(Tuner]
<ll
2.
J5
~
'";:::\
"
Q.
()
o
"
'"~
:>
o'
:>
'"
Symptom
Continuous noise
is heard when
receiving FM
programs.
Countenneasure
Cause
• Antenna cable is not properly • Connect the antenna cable
connected.
properly.
• Connect an outdoor antenna.
Page
Hissing or
continuous noise
is heard when
receiving AM
programs.
• This may be noise from a TV or • Turn off the TV.
interference from a radio station. • Change the position and direction
of the AM loop antenna.
10
10
-
~
."
t:
:>
~
o'
"'"
Symptom
When a USB
memory device
is connected,
"USB" is not
displayed
Files on a USB
memory device
cannot be played.
26
• Power amplifer
Rated output:
o Tuner section
30W + 30W (6 O/ohms, 1 kHzTH.O 10 %1
FM: 87.5 MHz - 107.9 MHz
FM: 1.5 ~V/75 O/ohms
35 dB (1 kHz)
AM: 520 kHz - 1710 kHz
AM: 20 ~V
o CD section
,..
Cause
Countenneasure
• Device you want to play and set • Select an appropriate input
input source do not match.
source.
• Cable is not properly connected. • Reconnect.
• Control Dock for iPod's AC • Plug the Control Dock for iPod's
adapter is not connected to
AC adapter into a power outlet.
power outlet.
Page
18
10
-
Playback frequency response:
Wow & flutter:
Sampling frequency:
o Clock/Timer section
Clock method:
Timer:
Power supply:
Power consumption:
Countenneasure
Cause
• The set cannot recognize a USB • Check the connection.
memory device.
device.
·A USB memory device not • Connect a USB memory device
conforming to mass storage class
conforming to mass storage
or MTP standards is connected.
class or MTP standards.
·A USB memory device that • This is not a malfunction. DENON
the set cannot recognize is
does not guarantee that all USB
memory devices will operate or
connected.
receive power.
• USB memory device is connected • Connect the USB memory device
directly to the USB port.
via USB hub.
• USB memory device is in format • Set the format to FAT16 or
other than FAT16 or FAT32.
FAT32. For details, refer to the
USB memory device's operating
instructions.
• USB memory device is divided • When divided into multiple
partitions, only files stored in the
into multiple partitions.
top partition can be played.
• Files are stored in a non- • Record the files in a compatible
compatible format.
format.
• You are attempting to playa file • Files that are copyright protected
that is copyright protected.
cannot be played on this set.
2 Hz - 20 kHz
Below measurable limits (± 0.001 %1
44.1 kHz
Crystal oscillator (Within 1 - 2 minutes per monthI
Everyday/Once timer: One system each
Sleep timer: 90 minutes, maximum
o General
(USB]
o
;.
o Audio section
Reception frequency range:
Receiving sensitivity:
FM stereo separation:
(iPod]
Symptom
iPod cannot be
played.
Specifications
Page
PlIge
11
-
-
Maximum extemal
external dimensions:
Weight:
AC 120V, 60 Hz
65W
Approx. 03 W (standbyl
210 (W) x 115 (HI x 308.510)
308.5 (0) mm (8-17/64" x 4-33/64" x 12-9/64")
(9 Ibs 7 oz)
4.3 kg 19
o Remote control unit (RC-1097)
Remote control method:
Power supply:
Maximum extemal dimensions:
Weight:
IR pulse method
R03/AAA Type (two batteries)
batteriesl
491W)
49 (W) x 220 (H) x 24 (0) mm (1-59/64" x 8-21/32" x 15/16")
110 g IApprox.
(Approx. 3 oz)linciuding
ozl (including batteries)
batteriesl
*'*' For purposes of improvement.
improvement, specifications and design are subject to change without notice.
-
-
-
20
20
z
DENON
§
c~
L&J ;:
z~
08
www.denon.com
o
Q>
c:
o
c:
(0
';::
meL
u~
c: c:
UU
c:
oE .-
o.u
>~
c:
._
",.c
o
o?\;g
::;:;::::
I~
Uo
00
.- N
g'ro
",0
-0
c:0
00
O&M Holdings Inc.
Oenon Brand Company, 5411 100280000
Printed In China
z
0
a:
W
<t
Z
I.LI
Q.
W
en
~
SPEAKER
0
DENON
CO
~
Q)
c
..en
..
:?1
co
c
Owner's Manual
~
0
C')
~
..
c
Manuale delle istruzioni
G)
~
.. ..
Manual del usuario
Q)
G)
C')
"C
~
G)
G)
"C
Q)
~
~
~
Q)
"C
~
C')
:~
C
co
co
en
..=.=
~
C')
c
.-cc
.-en>
OJ
~
..=.=
co
en
...
..
c c c ..c
co co co Q)
:?1 :?1 :?1 0
~
Q)
C
cQ)
."C
Q)
Gebruiksaanwijzing
0
.... .-N 0
CO
c
..-en .... .N
CO
Manuel de l'Utilisateur
-cco ::J.-..-.... .-en en
en - -co co
.t::
~
c
Bedienungsanleitung
OJ
Bruksanvisning
I'
M
en
(.)
I
:E
SC-M37
ENGLISH
DEUTSCH
FRANCAIS ITALIANO
ESPANOL
o SAFETY PRECAUTIONS
A
~
~LECTR~C
RISK OF
SHOCK
DO NOTOPEN
o For Europe model
A.
.A.
CAUTION:
TO REDUCE THE RISK OF ELECTRIC SHOCK,
SHOCK. DO NOT REMOVE
COVER (OR BACK). NO USER-SERVICEABLE PARTS INSIDE.
REFER SERVICING TO QUALIFIED SERVICE PERSONNEL.
A
A
NEDERLANDS SVENSKA
The lightning flash with arrowhead symbol, within an equilateral
triangle, is intended to alert the user to the presence of
uninsulated "dangerous voltage" within the product's enclosure
that may be of sufficient magnitude to constitute a risk of electric
shock to persons.
The exclamation point within an equilateral triangle is intended
to alert the user to the presence of important operating
and maintenance (servicingl
(servicing) instructions in the literature
accompanying the appliance.
WARNING:
SHOCK. DO NOT
TO REDUCETHE RISK OF FIRE OR ELECTRIC SHOCK,
EXPOSE THIS APPLIANCE TO RAIN OR MOISTURE.
• DECLARATION OF CONFORMITY
• DECLARACION
DECLARACI6N DE CONFORMIDAD
We declare under our sole responsibility that this product, to which this
declaration relates, is in conformity with the following standards:
EN55013 and EN55020.
Following the provisions of 2004/108/EC Directive.
Declaramos bajo nuestra exclusiva responsabilidad que este producto al
que hace referencia
forme con los siguientes
referenda esta declaraci6n.
declaraci6n, esta con
conforme
estandares:
EN55013 y EN55020.
Siguiendo las provisiones de las Directivas 2004/108/EC.
• OBEREINSTIMMUNGSERKLARUNG
Wir erklaren unter unserer Verantwortung, da~
daB dieses Produkt, auf das sich
diese Erklarung bezieht, den folgenden Standards entspricht:
EN55013 und EN55020.
2004/l08/EC
Entspricht den Verordnungen der Direktive 2004/108/EC.
• EENVORMIGHEIDSVERKLARING
Wij verklaren uitsluitend op onze verantwoordelijkheid dat dit produkt.
produkt,
waarop deze verklaring betrekking heeft, in overeenstemming is met de
volgende normen:
EN55013 en EN55020.
Volgens de bepalingen van de Richtlijnen 2004/108/EC.
• DECLARATION DE CONFORMITE
Nous declarons sous notre seule responsabilite que I'appareil, auquel se
refere cette
cene declaration, est conforme aux standards suivants:
EN55013 et EN55020.
D'apres les dispositions de la Directive 2004/108/EC
2004/108/EC.
• OVERENSSTAMMELSESINTYG
• DICHIARAZIONE 01 CONFORMITA
Dichiariamo con piena responsabilita che questo prodotto,
prodono, al quale la nostra
dichiarazione si riferisce, e con
forme aile seguenti normative:
conforme
EN55013 e EN55020.
In conformita con Ie condizioni delle direttive
direnive 2004/108/EC.
2004/l08/EC.
produkt, vilken
vii ken detta
dena intyg
Harmed intygas he It pa eget ansvar an
att denna produkt.
f61jande standarder:
avser, uppfyller foljande
EN55013 och EN55020.
Enligt stadgarna i direktiv 2004/108/EC
2004/l08/EC
DENON Europe
Division of D&M Germany GmbH
An der Landwehr 19, Nettetal,
Nenetal,
D-41334 Germany
A NOTE ABOUT RECYCLING:
NOTA RELATIVA AL RICICLAGGIO:
This product's packaging materials are recyclable and can be reused. Please dispose of any materials
in accordance with the local recycling regulations.
When discarding the unit, comply with local rules or regulations.
Batteries
Baneries should never be thrown away or incinerated but disposed of in accordance with the local
regulations concerning chemical waste.
Tnis
This product and the accessories, packed together constitute the applicable product according to the
WEEE directive except baneries.
batteries.
I materiali di imballaggio di questo prodotto
prodono sono riutilizzabili e riciclabili. Smaltire i materiali conformemente aile
normative locali sui riciclaggio.
Per smaltire I'unita, osservare la normativa in vigore nelluogo di utilizzo.
Non gettare
genare Ie batterie,
banerie, ne incenerirle, ma smaltirle conformemente alia normativa locale sui rifiuti chimici.
prodono e gli accessori inclusi nell'imballaggio sono applicabili alia direttiva
direniva RAEE, ad eccezione delle
Questo prodotto
batterie.
banerie.
HINWEIS ZUM RECYCLING:
)t
-
Das Verpackungsmaterial dieses Produktes ist fUr zum Recyceln geeignet und kann wieder verwendet werden. Bitte
Bine
entsorgen Sie aile Materialien entsprechend der ortlichen
6rtlichen Recycling-Vorschriften.
6rtlichen Vorschriften und Bestimmungen.
Beachten Sie bei der Entsorgung des Gerates die ortlichen
Die Batterien
Banerien durfen
dOrfen nicht in den Hausmull
HausmOl1 geworfen oder verbrannt werden; bitte
bine geben Sie die Batterien
Banerien gema~
gemaB
6rtlichen Bestimmungen an den Sammelstellen oder Sondermullplatzen
SondermOliplatzen abo
ortlichen
Dieses Produkt zusammen mit den Zubeh6rteilen
Zubehorteilen ist das geltende Produkt der WEEE-Direktive, davon ausgenommen
sind die Banerien.
Batterien.
UNE REMARQUE CONCERNANT LE RECYCLAGE:
Les materiaux d'emballage de ce produit sont recyclables et peuvent etre reutilises. Veuillez disposer de tout materiau
conformement aux reglements de recylage locaux.
Lorsque vous mettez
menez cet appareil au rebut, respectez les lois ou reglementations locales.
Les piles ne doivent jamais etre jetees ou incinerees, mais mises au rebut conformement aux reglements locaux
concernant les dechets chimiques.
Ce produit et les accessoires emballes ensemble sont des produits conformes a la directive DEEE sauf pour les piles.
ACERCA DEL RECICLAJE:
Los materiales de embalaje de este producto son reciclables y se pueden volver a utilizar. Disponga de estos materiales
siguiendo los reglamentos de reciclaje de su localidad.
Cuando se deshaga de la unidad, cumpla con las reglas 0 reglamentos locales.
pi las nunca deberan tirarse ni incinerarse. Debera disponer de elias siguiendo los reglamentos de su localidad
Las pilas
relacionados con los desperdicios quimicos.
Este producto junto con los accesorios empaquetados es el producto aplicable a la directiva RAEE excepto pilas.
EEN AANTEKENING WAT BETREFT HET RECYCLEREN:
Het inpakmateriaal van dit product is recycleerbaar en kan opnieuw gebruikt worden. Er wordt verzocht om zich van elk
afvalmateriaal te ontdoen volgens de plaatselijke voorschriften.
Voig voor het wegdoen van de speier de voorschriften voor de verwijdering van wit- en bruingoed op.
Banerijen mogen nooit worden weggegooid of verbrand, maar moeten volgens de plaatselijke voorschriften betreffende
Batterijen
chemisch afval worden verwijderd.
banerijen is de richtlijn voor afgedankte elektrische en
Op dit product en de meegeleverde accessoires, m.u.v. de batterijen
elektronische apparaten IWEEEI van toepassing.
EN KOMMENTAR OM ATERVINNING:
Produktens emballage ar atervinningsbart och kan ateranvandas. Kassera det enligt lokala atervinningsbestammelser.
g6ra det i overensstammelse
6verensstammelse med lokala regler och bestammelser.
Nar du kasserar enheten ska du gora
Batterier
Banerier far absolut inte kastas i soporna eller brannas. Kassera dem enligt lokala bestammelser for
f6r kemiskt avfal!.
avfall.
tillbeh6r som levereras med den ar de som uppfyller gallande WEEE-direktiv, med undantag av
Denna apparat och de tillbehOr
banerierna.
batterierna.
I
SVENSKA
NEDERLANDS
ESPANOL
ITALIANO
FRANCAIS
DEUTSCH
ENGLISH
o NOTE ON USE / HINWEISE ZUM GEBRAUCH / OBSERVATIONS RELATIVES A L'UTILISATION / NOTE SULL'USO /
NOTAS SOBRE EL
usa / ALVORENS TE GEBRUIKEN / OBSERVERA
~
.,v.~~.
~ ~ """,l"'"
-~~
~~~
'
~)r;o
~
><
, /1@ •..
<J~""
··'~::~.-"'ik- ~. ". ~;~:;?~~.
•
•
•
•
Do not let foreign objects into the set.
Keine fremden Gegenstande in das Gerat kommen lassen.
Ne pas laisser des objets etrangers dans I'appareil.
E' importante che nessun oggetto e inserito all'interno
dell'unita.
• No deje objetos extranos
extra nos dentro del equipo.
• Laat geen vreemde voerwerpen
voorwerpen in dit apparaat vallen.
• Se till att
an frammande f6remal inte Hanger in i apparaten.
'"
• Keep the apparatus free from moisture, water, and dust
• Avoid high temperatures.
• Halten Sie das Gerat von Feuchtigkeit, Wasser und Staub
Allow for sufficient heat dispersion when installed in a rack
fern.
• Vermeiden Sie
Sis hohe Temperaturen.
• Proteger I'appareil contre I'humidit€,
I'humidite, I'eau et la poussiere.
Beachten Sie,
Sis, dass eine ausreichende Beluftung gewahrleistet • Tenete I'unlta lantana
lontana dall'umidita, dall'acqua e dalla
wird, wenn das Gerat auf ein Regal gestellt wird
polvere.
• Eviter des temperatures elevees.
• Mantenga el equipo libre de humedad, agua y palvQ
paiva
Tenir compte d'une dispersion de chaleur suffisante lors de • Laat geen vochtigheid.
vochtigheid, water of stof in
In het apparaat
I'installation sur une stagere.
stagers.
binnendringen.
• Evitate di espone
espane I'unita a temperature elevate.
• Utsan inte apparaten for fukt, vatten och damm.
Assicuratevi che vi sia un'adeguata dispersione
_
dispersions del calore
quando installate I'unita in un mobile per componenti audio. f-----------~---------------1
installate. I'unita in. un mobile per companenti audio. I
I
• EvilS
EVlte altas temperaturas
Permite
~
Permits la suflciente
suficiente dispersion del calor cuando esta
instalado en la con sola.
hogs temperaturen.
~
• Vermijd hoge
Zorg vacr
\\,
voer een degelijk hitteafvoer indien het apparaat op
~~,
een rek wordt geplaatst.
geplaat5t.
~
• Do not let insecticides, benzene, and thinner come In
• Undvlk
Undvik hoga temperaturer
contact with the apparatus.
Se till att det finns m6jlighet
mojlighet till god varmeavledning vid • Unplug the power cord when not using the apparatus for • Lassen Sie das Gerat nicht mit lnsektiziden, Benzin oder
long periods of time
montering i ett rack
VerdOnnungsmitteln in BerOhrung
Beruhrung kommen.
• Wenn das Gerst
Gerat langere Zeit nicht verwendet werden soli,
• Ne pas mettre en contact des insecticides, du benzene et
trennen Sie das Netzkabel yom Netzstecker.
un diluant avec l' apparei!.
• Debrancher Ie cordon d'alimentation lorsque l'appareil
I'appareil n'est • Assicuratevvi che I'unita non venga in
In contatto con
pas utilise pendant de longues periodes,
periodes.
insetticidi, benzolo
benzoic 0 solventi.
• Disinnestate il fila di alimentazianequando
alimentazionequando avete l'intenzione
• No permita el contacto de insecticidas, gasolina y diluyentes
di non usare il fila
filo di alimentazione per un lungo periodo di
con el equipo.
tempo.
• Laat geen insektenverdelgende middelen, benzine of
• Desconecte el cordon de energfa cuando no utilice el equipo
verfverdunner met dit apparaat in kontakt komen.
par mucho tiempo.
• Se till att inte insektsmedel pa spraybruk, bensen och
• Neem altijd het netsnoer uit het stopkontakt wanneer het
thinner kommer i kontakt med apparatens h6lje.
apparaat gedurende een lange periode niet wordt gebruikt.
• Koppla ur nstkabeln
nMkabeln am
om apparaten inte kommer att
an anvandas
i lanQ
lano tid.
• Handle the power cord carefully.
qU~nd.O
~
~
R"
~
Hold the plug when unplugging the cord,
cord.
• Gehen Sie vorsichtig mit dem Netzkabel um.
Halten Sie das Kabel am Stecker, wenn Sie den Stecker
herausziehen.
• Manipuler Ie cordon d'alimentation avec precaution.
Tenir la prise lars du debranchement du cordon
cordon.
• Manneggiate il fila
filo di alimentazione can cura
Agite per la spina quando scollegate il cava
cavo dalla presa
• Maneje el cordon
cord6n de energfa can
con cuidado.
Sostenga el enchufe cuando desconecte el cordon de
energla.
• Hanteer het netsnaer
netsnoer voorzichtig.
Houd het snoer bij de stekker vast wanneer deze moet
worden aan- of losgekoppeld.
• Hantera nstkabeln
natkabeln varsamt.
Hall i kabeln nar den kopplas fran el-unage1.
el-uttaget.
~II
,~~
.
,
0:
~
<1~:')
<1.
a:c:>
* (For apparatuses with
•
•
•
•
•
•
•
~
~
ventilation holes)
Do not obstruct the ventilation holes.
Die BeiOhungs6ffnungen
BelOhungsoffnungen dOnen nicht verdeckt werden.
Ne pas obstruer les trous d'aeration.
Non coprite i fori di ventilazione.
No obsHuya los orificios de ventilacion.
ventilaci6n.
De ventilatieopeningen mogen niet worden beblokkeerd.
Tapp inte till ventilationsoppningarna.
~
~
• Never disassemble or modify the apparatus in any way.
• Versuchen Sie niemals das Gerst
Gerat auseinander zu nehmen
oder auf jegliche Art zu verandem,
verandem.
• Ne jamais demonter ou modifier I'appareil
rappareil d'une maniere ou
d'une autre.
• Non smontate mai, ne modificate I'unita in nessun modo.
• Nunca desarme 0 modifique el equipo de ninguna manera.
• Nodt dit apparaat demonteren of op andere wijze
modifieren.
• Ta inte isar apparaten och fors6k
forsok inte bygga om den.
CAUTION:
• The ventilation should not be impeded by covering the ventilation openings with items,
such as newspapers, tablecloths, curtains, etc.
No naked flame sources, such as lighted candles,
candles. should be placed on the apparatus.
Attention should be drawn to the environmental aspects battery disposal
disposal.
Do not expose the set to dripping or splashing fluids.
No objects filled with liquids, such as vases, shall be placed on the apparatus.
•
•
•
•
ACHTUNG:
• Die BelOhung sollte
so lite auf keinen Fall durch das Abdecken der BelOftungsaffnungen
BelOftungsoffnungen durch
Gegenstande wie beispielsweise Zeitungen, TischtOcher, Vorhange o.
0 A.
A behindert
werden.
• Auf dem GerM sollten keinerlei direkte Feuerquellen wie beispielsweise angezOndete
Kerzen aufgestellt werden.
• Bitte beachten Sie bei der Entsorgung der Batterien die geltenden Umweltbestimmungen
• Das Gerat sollte keiner tropfenden
Hopfenden oder spritzenden FIOssigkeit ausgesetzt werden.
• Auf dem Gerat
GerM sollten keinerlei mit FIOssigkeit gefUllten
gefOllten Behalter wie beispielsweise Vasen
aufgestellt werden.
ATTENTION:
• La ventilation ne doit
dOlt pas etre
eHe genee en recouvrant les ouvertures de la ventilation avec des
objets tels que journaux, rideaux, tissus, etc.
stc.
• Aucune flam me nue, par exemple
example une bougie, ne doit etre placee sur I'appareil.
I'apparei!.
• Veillez a respecter I'environnement lorsque vous jetez les piles usagees.
usagees
• L.:appareil
Lappareil ne doit pas etre expose a I'eau au I'humidite.
• Aucun objet conten ant du liquide, par exemple un vase, ne doit etre plaCe
place sur I'appareil.
I'apparei!.
a
PRECAUZIONI:
• Le aperture di ventilazione non devono essere osHuite coprendole con
can oggetti, quali
giomali, tovaglie, tende e cosl
COS! via.
• Non posizionate sull'unita fiamme libere, come ad esempio Ie candele accese.
access.
• Prestate attenzione agli aspeni
as petti legati alia tutela dell'ambiente quando si smaltisce la
batterie.
• L.:apparecchiatura
Lapparecchiatura non deve essere esposta a gocciolii 0 spruzzi.
• Non posizionate sull'apparecchiatura nessun oggetto contenente liquidi, come ad esempio
I vas!.
vasl.
PRECAUCI6N:
• La ventilaci6n no debe quedar obstruida por haberse cubierto las aperturas can objetos
como peri6dicos, manteles, cortinas, etc.
• No debe colocarse sobre el aparato ninguna fuente inflamable sin protecci6n, como velas
encendidas.
• A la hera
hora de deshacerse de las pilas, respete la normativa para el cuidado del medio
ambiente.
• No exponendra el apar8to
aparato al goteo 0 salpicaduras cuando se utilice.
• No se colocaran
calocaran sobre el aparato objetos Ilenos de Ifquido, como jarros.
WAARSCHUWING:
• De ventilatie mag niet worden belemmerd door de ventilatieopeningen af te dekken met
bijvoorbeeld kranten, een tafelkleed, gordijnen, enz.
• Plaats geen open vlammen, bijvoorbeeld een brandende kaars, op het apparaat
apparaat.
• Houd u steeds aan de milieuvoorschrihen wanneer u gebruikte batterijen wegdoet.
• Stel het apparaat niet bloot aan druppels of spatten.
• Plaats geen voorwerpen gevuld met water, bijvoorbeeld een vaas, op het apparaat.
OBSERVERA:
• Ventilationen bar
bor inte farhindras
forhindras genom att tacka far
for ventilationsoppningarna med f6remal
foremal
sasom tidningar, bordsdukar, gardiner osv.
lnga blottade brandkallor, sasom tanda ljus, bar
bor placeras pa apparaten.
Tank pa milj6aspektema nar du bortskaffar baneri
batteri
Apparaten far inte utsattas for vatska.
Inga objekt med vatskor,sasom vaser, far
far placeras pa apparaten.
•
•
•
•
II
ENGLISH
I
Contents
Before Using
IGetting Started
I
1
1
Accessories
·
Before Using
Cautions on Installation....
Acoustic Sponge......
How to Install
Cleaning
Other Cautions ·
Accessories
Connections .. ·
..
IRemoving the Speaker Net
···
·
··
·
·
Check that the following parts are attached in addition to the main
unit:
··3
·
·.. ·
·.·.·
·.. ·
·
·
3
I
4
I
Q) Owner's Manual..................
Q) Service station list..
@ Speaker cable (Approx. 9.8 ft / 3 m) .
@) Foam plug
® Anti-slip pads (8 pcs
®
[Front]
[Rear]
Note that the illustrations in this instructions may differ from the actual
set for explanation purposes.
1
Cautions on Installation
Thank you for purchasing this DENON product. To ensure proper
operation, please read this owner's manual carefully before using the
product.
After reading them, be sure to keep them for future reference.
..· .. ·1
..· .. ·2
.. 2
·2
.. .. ·2
IConnections
ISPecifications
Getting Started
/ 1sheet) . .
..
1
1
. 2
2
. .1
The quality of the sound produced from the speaker is affected by the
size and type of the room, as well as by the method of installation.
Consider the points listed below before instal!ing the speaker.
• If the bass sound is overemphasized when the speakers are installed
directly on the floor, set them on concrete blocks or other hard
stands.
• Note that placing the speaker on the same stand or shelf as a record
player may result in howling.
• Also note that if there is a magnet or any device generating magnetic
force nearby, interaction between this device and the speakers can
cause the colors on the TV to become blotchy.
.';!j.'jh'iikti
• Fasten the speaker cables to the wall, etc., to avoid catching them on
your hands or feet and causing the unit to fall.
• Be sure to check for safety after installing the speakers. Afterwards,
perform safety inspections at regular intervals to make sure there at
the speakers will fall.
DENON will accept no responsibility for damages or accidents
caused by inappropriate choice of the place of installation or improper
installation procedures.
ENGLISH
Acoustic Sponge
How to Install
When installing on a desktop or in the corner of your room, the bass
may emphasized,
emphasized. Insert sound foam plug in the bass-reflex duct at the
back of the SC-M37
SC-M37.
You can adjust the bass sound with the amount of sound foam plug
you insert.
II Cleaning
Attach four of the included anti-slip pads to the bottom of the unit as
shown on the diagram below.
[Bottom]
~
",(1
G
o
Anti-slip pad(
Acti-,,,,
• Use a wiping cloth and wipe lightly to remove dirt from the cabinet
panel.
and operation panel,
* When using chemically treated cloths, follow the precautions that
have been written for them,
them.
• Do not use benzene, thinners, or other organic solvents or insecticides
color.
on the main unit since they may cause a change in quality or color,
IOther Cautions
Foam
Foam plug
o
o
5
<1l
~
§'
;;;
::xJ
• Raising the amplifier's volume excessively and playing with distorted
sound could damage the amplifier and speakers,
speakers. Enjoy the sound at
a reasonable volume level.
• When moving the unit, note that applying strong force to the surface
speaker.
of the speaker through the saran net could damage the speaker,
~
I
<1l
::l
<5
~.
'"
~
:::r
<1l
(fj
v
ro
['"
2
~
(fj
o
v
<1l
0>
£;
n'
:':;
0'
::l
'"
I(tt1'ur·u,
C'Hlm·]~·
• Do not insert the foam plug too deep,
deep. The foam plug could fall in and
inside.
get stuck inside,
• If the foam plug cannot be removed or falls inside, stop using the
unit immediately and consult your store of purchase or your nearest
repair and inquiry center,
center.
2
ENGLISH
Connections
Cl
~.:>
<C
Connections
When connecting, be sure to read the amplifier's owner's manual
carefully and connect properly.
• Connect the input terminals on the rear panel of the speaker with the
speaker output terminals on the amplifier, using the speaker cables
(Supplied).
• Connect the speaker for the left channel to the "L" terminal on the
amplifier, the speaker for the right channel to the "R" terminal on the
amplifier, making sure to check the polarities ("+" and "-").
• There are various types of speaker output terminals on amplifiers.
Check your amplifier's owner's manual.
manual .
•'1f41'''[']~'
·Miiit.]~.
'Jl
-g
~
;:;
• Be sure to turn the amplifier's power off before connecting the
speakers to the amplifier.
• If the polarities are inverted, the phase may be off and the sound
may have no bass component, making it seem unnatural. Be sure to
connect the polarities properly.
~
o'
:J
I
Use the included speaker cable to connect the input terminals on the
back of the speakers to the amplifier's speaker output terminals.
"-" side
terminal: Black
"+" side terminal: Red
Connect to amplifier's
"+" side: Plain core
Connect to amplifier's
"-" side: Striped core
1
Twist firmly the wires by hand so
that they do not stick out and cause
short-circuits.
2
Loosen the terminal by turning to the left and insert
the speaker cable through the hole in the speaker
terminal.
3
Tighten the terminal by turning to the right and check
that the core wire is not protruding from the hole.
or.
Sheath
a
r'~r·~ it
•
Once connections are completed, pull gently on the speaker cables to
check that they are securely connected.
connected.
• ·Miii[.]~.
'1f4"lteN'
Do not let the core wires of two speaker cables touch each other.
Doing so will short-circuit the amplifier circuitry and damage the
amplifier.
3
Removing the Speaker Net
•
•
•
The net on the front of the speakers can be removed.
To remove, grasp both sides of the net and pull forward.
To mount, line up the projecting pieces in the four corners of the
speaker net with the holes in the four corners of the cabinet and
press in.
ENGLISH
I
Specifications
Type:
Frequency range:
Input impedance:
Max. input:
Sensitivity:
Crossover frequency:
Speakers:
Maximum external dimensions:
Weight:
~
2-way . 2-speakers
Low-leakage-flux, Reflex box
45 Hz - 40 kHz
6010hms
60W
60 W (I Eel. 120W
120 W (PEAK)
86 dB (1 W· 1 m)
3 kHz
12 em
cm (4-3/4") cone bass-mid xl
2.5 em
cm (1 ") soft dome high range x 1
145 (W) x 233 (H) x 234 (D) mm
(5-45/64" x 9-11/64" x 9-7/32")
3.8 kg (8 Ibs 6 oz)
:;
G
"*
;;:
For improvement purposes, specifications and design are subject to change without notice.
I
4
DENON
www.denon.com
O&M Holdings Inc.
Oenon Brand Company, 5411 10061 0070
Printed ,n China
DENON
Accessories
Headphones and Control Dock for iPod®
AH-D7000
AH-D5000
IReal Wood I
IRealWoodJ
Ove~EarHeadphones
Ove~EarHeadphones
• Newly-developed driver unit
• Superior headphone housing for high sound quality
• Micro-fiber diaphragm
• High-purity 7N-OFC cables
• Neu entwickelter Treibereinheit
• Klanglich optimiertes Kopfhbrergehause
• Spezielle Mikrofaser-Membran mit 50 mm
Neodym-Magneten
• Ais Leiter wird hochreines Kupfer (7N-OFC) eingesetzt
• Diaphragme nouvellement developpee
• Oreillettes de conception superieure,
assurant une excellente qualite sonore
• Membrane micro-fibre
• Le Cable utilise est de type 7N-OFC
~
AH-D2000
Ove~EarHeadphones
AH-NC732
I Black I ISilveri
Noise Canceling Headphones
• Micro-fiber diaphragm
• Light-weight magnesium frame
• Reduce outside noise over 90%
• Foldable construction for easy carrying
• Spezielle Mikrofaser-Membran mit 50 mm
Neodym-Magneten
• Extrem leichte Magnesium-BOgel
• Reduziert AuBengerausche um mehr als 90 %
• Zum einfachen Transport zusammenklappbar
a
• Reduit les sons exterieurs plus de 90 %
• Structure pliable facile a transporter
• Membrane micro-fibre
• Armature legere, en magnesium
AH-D1001
AH-D501
[BlackJISilverl
IBlackllSilverJ
On-Ear Headphones
On-Ear Headphones
• Micro-fiber diaphragm
• 1.3m High quality OFC cabling
• Housing reversal mechanism
allowing one-eared monitoring
• Earpad in an elaborately sewn synthetic leather
with a pleasant touch
• Mikrofaser-Membran
mit 40 mm Neodym-Magneten
• 1.3m Signalkabel aus sauerstofffreiem Kupfer
(OFC)
• Die drehbare aufhangung der Hbrergehause
ermbglichen ein schnelles einseitiges Abhbren,
z.B. im DJ-Einsatz
• Ohrpolster aus kunstvoll genahtem Leder
fUr angenehmen Hautkontakt
• Membrane micro-fibre
• Cable OFC de haute qualite (1.3m)
• Mecanisme d'arceau reversible permettant I'ecoute du
son sur une Oreille pour une ecoute de contrale type OJ
• Les coussinets des ecouteurs en cuir synthetique cousu
offre un contact agreable
AH - 0301
I
Black
AH-P372
I [Silver I
On-Ear Headphones
!BlackllWhitel
Portable Headphones
• Housing reversal mechanism
allowing one-eared monitoring
• Large (035mm), powerful driver unit
• Collapsible structure for easy stowing
• Short 0.5 meter cable and 0.8 meter
extension cable included for portable devices
• Die drehbare aufhangung der Hbrergehause
ermbglichen ein schnelles einseitiges Abhbren,
z.B. im DJ-Einsatz
• GroBer (035mm) leistungsstarker Treiber
• Mecanisme d'arceau reversible permettant
I'ecoute du son sur une Oreille pour une
ecoute de contraIe type OJ
• Grande taille du transducteur
pour un son puissant (035mm)
I
• Zum einfachen Verstauen zusammenklappbar
• Kurzes 0,5-Meter-Kabel und 0,8-Meter-Verlangerungskabel
fUr trag bare Gerate im Lieferumfang enthalten
• Structure telescopique pour une mise en place facile
• Un cable court de O,5m et un cable de rallonge de
0,8 fournis pour les appareils portables
AH-C751
AH -C551
!BlackJ [sliVer]
[Black I l§ilveiJ
In-Ear Headphones
In-Ear Headphones
• Aluminum housing
• Aluminum Connector Cover
• Aluminum housing
• Short 0.5 rneter cable and 0.8 meter extension
cable included for portable devices
• Aluminiumgehause
• Vergoldeter Klinken-Stecker mit
Aluminiumgehiiuse
~• • •~-1
._--------( .
• Aluminiumgehause
• Kurzes 0,5-Meter-Kabel und 0,8-Meter-Verlangerungskabel
fUr tragbare Gerate im Lieferumfang enthalten
• Embouts aluminium
• Manchon aluminium
• Ernbouts aluminium
• Un cable court de 0,5m et un cable de rallonge
de 0,8 fournis pour les appareils portables
AH-C452
[Blackl [WhitellSilverJ
AH-C351IB'ackJlli'!iliiJ
In-Ear Headphones
In-Ear Headphones
• Gold plated connector
• 0.5m High quality OFC cabling
• Ergonomic desing
for a comfortble fit in the ear
• 0.7m High quality OFC cabling
• Vergold Klinken-Stecker
• 0,5m Signalkabel aus sauerstofffreiem Kupfer (OFC)
• Ergonomisches Design
fUr bequemen Sitz im Ohr
• 0,7m Signalkabel aus
sauerstofffreiem Kupfer (OFC)
• Connecteur plaque or
• Cable OFC de haute qualite (0.5m)
• Un concept ergonomique qui
s'fadapte parfaitement toute
morphologie d'foreille
• Cable OFC de haute qualite (0.7m)
a
AH -C252
ASD-11 R
[Black II White J
!BlackllWhiteJ
In-Ear Headphones
Control Dock for iPod
• Rubber-coated housing prevents slipping
and provides a supple texture
• 1.3m High quality OFC cabling
• Enjoy photos and videos from your iPod
• Enjoy music from your iPod with high quality sound
• Erleben Sie Fotos und Videos von Ihrem iPod
• Horen Sie Musik mit Ihrem iPod
in bester Klangqualitat
• Die gummierte Oberflache verhindert ein
Verrutschen und bietet eine geschmeidige Struktur
• 1.3m Signalkabel aus sauerstofffreiem Kupfer (OFC)
• Savourez aussi les photos et les videos
• Lecture avec commande et contr61e de votre iPod
• Le revetement en caoutchouc evite les glissements
et offre une grande souplesse
• Cable OFC de haute qualM (1 .3m)
ASD-3W
ASD-3N
http://www.denon.com/asd-11r/
IBlackJ[Whitel
I Black I [Whitel
Control Dock for iPod
• Plays Music File from PC wirelessly f:NMA, MC non DRM, MP3, WAVE, FLAC)
• Plays Internet Radio wirelessly (MP3, WMA)
'1)
'1)
'1) Wireless function is ASD-3W only
• Wiedergabe von Musik vorn PC
'1)
• Internet-Radio mit UnterstOtzung fUr MP3- und WMA-Radiostationen
'1)
'1) Erfordert Netzwerk mit Internet-Zugang, W-LAN-Funktion nur bei der ASD-3W
• Accede et lit les fichiers musicaux d'un Pc en Wifi
'1)
(Accede aux radios internet en Wifi
'1)
• Interface utilisateur Graphique (Jacquette d'album, Multi langue pour les Meta data et I'interface graphique)
'1) Fonction Wifi disponible seulement sur I'ASD-3W
http://blog.denon.com/asd-3/
'Design and specifications are subject to change without notice.
'iPod is a trademark of Apple Inc., registered in the U.S. and other countries.
56560508
www.denon.com
Denon Brand Company
DENON SERVICE NETWORK I D&BtM~
Please consult the outlet where the equipment was purchased.
Bitte wenden Sie sich an den Handler, bei dem Sie das Produkt gekauft haben.
SVP veuillez consulter votre revendeur.
Neemt u alstublieft contact op met het verkooppuntwaar u de apparatuur heeft gekocht.
Por favor consulte en el establecimiento donde compr6 el equipo.
Viinligen ta kontakt med butiken dar du kopt utrustningen.
Rivolgetevi al rivenditore che vi ha venduto I'apparecchio.
Contacte a loja onde comprou 0 equipamento.
• il~f,Jl.A~lIlY-Jilnll.~ 0
• iitaJf$JiJflltJ~;ct;;mt(-Jil1HT~iiJ 0
Australia
Audio Products Group Pty Ltd. 67 O'Riordan Street Alexandria NSW 2015, PO Box 150, Mascot NSW 1460 Australia
Tel: 1300 134400 Fax: +61 2 95780159
Austria
Digital-Professional-Audio Vertriebsges.m.b.H .. Seeb6ckgasse 59, A-1160 Wien Tel: 01-480-1006 Fax: 01-485-7679
Transtel-Sabima PVBA Duboisstraat 48. B-2060 Antwerpen. Belgium Tel: 03-237-3607
Belgium
D&M CANADA INC. 5-505 Apple Creek Blvd .. Markham. Ontario. L3R 5Bl Tel: 905-475-4085 Fax: 905-475-4159
Canada
£t!,if~~ifi(o]jj'J~(J:fflj)"fjllJH}j'iJ J:ffljmitfflj9='~887·J::l*jf*~6010~
China
£t!,i.li:(021 )64372299 ffl1U021 )64339973 1!lII!liii: 200020 ~;;t~FHlH~·;t;M~: 021-62949285
EUROSTAR OSTRAVA s.r.o. areal Vodni stavby Praha, budova A2 Dobronicka 635,14800 Praha 4 Czech Rep.
Czech republic
Tel: 261-112-901 Fax: 261-112-904
Hifi Klubben NS Dali Aile 1, 9610 Noerager, Denmark Tel: 45-96 72 10 00 Fax: 45-9672 10 14
Denmark
Soundata Oy Hameentie 157 5th floor 00560 Helsinki Finland Tel: +358-(0)9-47693300 Fax: +358-(0)9-47693310
Finland
DENON FRANCE A division of D&M France SAS Tour Ventose, 2 rue des Bourets. 92156 Suresnes Cedex, France
France
Tel:+33(0)1-41-383230 Fax: +33(0)1-41-380110
DENON DEUTSCHLAND A division of D&M Germany GmbH An der Landwehr 19. D-41334 Nettetal, Germany
Germany
Tel: +49(0)2157-1208-0 Fax: +49(0)2157-1208-15
KINOTECHNIKI LTD. 14, PYRGOU STR. 16675. GLYFADA ATHENS Tel: +302109601071 Fax: +302109601072
Greece
D&M Sales and Marketing (H.K.) Ltd. Unit 501. Ocean Centre. Harbour City. 5 Canton Road. Tsimshatsui, Kowloon. Hong Kong
Hong Kong
Tel: 852-2516-5864 Fax: 852-2516-5940
WJ!!!jf1~~f:9nll.JJHIH~5t'flljHItl]£fflj#ep{,'5jf501~ f!~: 852-2516-5864 f$Jj;: 852-2516-5940
A.I.DA Audio Kft. 1112 Budapest Olt u. 37. Hungary Tel: 01-248-2030 Fax: 01-248-2039
Hungary
Einar Farestveit & co hf.. Borgartun 28. P.Box 5440. 125 Reykjavik. Tel: +354 5207900 Fax: +3545207910
Iceland
PROFX SERVICE CENTRE Advanced Audio Solutions (Bangalore)Pvt. Ltd.
India
No 53, K.H.Road, Opp .Big Bazaar, Bangalore - 560 027, India Tel: 08032970853 Fax: 0802211 2043
PT Autoaccindo Jaya. Cideng Barat NO.7 Jakarta, Indonesia Tel: +62-21-633-2730 Fax: +62-21-632-2886
Indonesia
Newpan Ltd. 14 Rosansky st. Rishon Lezion 75706. Israel. Tel: +972-3-953-5900 Fax: +972-3-961-6193
Israel
Audiodelta S.r.1.19 Via Pietro Calvi 20129 Milano Italy Tel: 39-02-5411-6008/39-02-5412-8253 Fax: 39-02-5412-0258
Italy
D&M Sales and Marketing Korea Ltd. Chung Jin B/D .. 10F. 53-5. Wonhyoro 3 Ga. Yongsan-Gu, Seoul, 140-719. Korea
Korea
Tel: 02-715-9041 Fax: 02-715-9040
Wo Kee Hong Trading Sdn Bhd. 2nd Floor, (Left Wing), Bangunan Infinite Centre. Lot 1. Jalan 13/6, 46200 Petaling Jaya.
Malaysia
Selangor Darul Ehsan, Malaysia Tel: 03-7954-8088 Fax: 03-7954-7088
Labrador, SA de C.v. Callejon del Naranjo 35. Naucalpan. 53560. Edo. Mex.. Mexico Tel: 52-5359-5161 Fax: 52-5357-1775
Mexico
Penhold BV Poppenbouwing 58. NL-4191 NZ Geldermalsen, Netherland Tel: 31-345-588080 Fax: 31-345-588085
Netherlands
Avalon-Pacific Marketing Limited. 15C Vestey Drive, Mt Wellington. Auckland. New Zealand.
New Zealand
PO Box 11 631 Ellerslie, Auckland, New Zealand Tel: +64-9-573-5933 Fax: +64-9-573-3720
Hi-Fi Klubben Marcus Thranes gate 4-6.0473 Oslo. Norway Tel: +47 22 80 63 10 Fax: +4722806329
Norway
Lotteworld Audio Video Systems Incorporated CET Building Mezzannine Floor NO.4 Mindanao Avenue. Barangay
Philippines
Bahay Toro. Project 8, Quezon City, Philippines. Tel: +632-929-5334 Fax: +632-929-1343
HORN DISTRIBUTION SA Ulica Kurantow 34 02-873 Warszawa Poland Tel: +4822331 5533 Fax: +4822331 5500
Poland
r
Videoacustica Qta. Do Paizinho-Armazem 5-Estrada
De Circunvala<;:ao-Apart. 3127 1303 Lisboa Codex
Portugal
Tel: +351214241770 Fax: +351 21418809J
ALL (E&E) Service Center Pte Ltd. Machtech Industrial Building. #06-04. No.2. Kallang Pudding Road, Singapore 349307
Singapore
Tel: 6747-8274 Fax: 6748-9007
BIS AUDIO s.r.o. Dobronivska cesta 1642/696001 Zvolen Tel:045-5400 703 Fax:045-5400 704
Slovakia
Mandarin Distributors SA 10 Thora Cresc~nt, Wynberg Ext.3 Sandton. P.O.Box 5137. Johannesburg Republic of South
South Africa
Africa Tel: 27-11-444-8445 Fax: 27-11-444-8363
Gaplasa SAAV. Ing. Conde de Torroja. 25, 28022 Madrid Tel: 91-746-00-45 Fax: 91-329-44-57
Spain
Hi-Fi Klubben G6teborg Skanegatan 25, 41252 G6teborg Tel:031 3351010 Fax:031 3351019
Sweden
DKB household AG, Abteilung Elektronik. Eggbuhlstrasse 28. CH-8052 Zurich. Switzerland
Switzerland
Tel: 01-306-1626 Fax: 01-306-1690
D&M Sales and Marketing Taiwan Ltd. 6F-2 N0148, Songjiang Rd., Taipei City 10458. Taiwan R.O.C.
Taiwan R.O.C.
Tel: 02-2522-1308 Fax: 02-2100-1175
Mahajak Development Co.. Ltd. 46 Mahajak Building, Sukhumvit Soi 3 (Nana-Nua) Klongtoey. Wattana, Bangkok
Thailand
Thailand. 10110 Tel: 66-2-256-0020 Fax: 66-2-253-1696
Ertekin electronik tic. ve san. a.s. Galipdede Caddesi No.: 113 Kuledibi-Karak6y /Istanbul. Turkey
Turkey
Tel: +90(212)293-9515 Fax: +90(212)249-3512
U.A.E.
VV & SONS L.L.C. Street No-ll/B. Road NO-128. Shed No-39 AI Khabisi. Deira. Dubai, UAE
Tel: +971-4-266-2435. 268-4575 Fax: +971-4-266-2052
Mirs Ltd. Osipova str. 37/0ffice 1, 65012 Odessa. Ukraine
Ukraine
Tel: +380(482)305530 Fax: +380(482)305555
DENON UK A division of D&M Audiovisual Ltd. Moorbridge House, Padbury Oaks, 579 Bath Road,
United
Longford. Middlesex. UB7 OEH. United Kingdom Tel: +44(0)1753-680568 Fax: +44(0)1753-689697
Kingdom & Eire
DENON ELECTRONICS (USA), LLC (a D&M Holdings Company)
U.S.A.
100 Corporate Drive. Mahwah, NJ 07430-2041 Tel: 800-497-8921 Fax: 888-544-8434
Anh Duy Manufacturing - Trading Co.. Ltd. 170 Ung Van Kheim St., Ward 25. Blinh Thanh Dist.• HCMC, Vietnam
Vietnam
Tel: +8488983424 Fax: +8488983425
• If there is no service center in your local area. please contact one of our overseas service centers, listed above, for follow-up service consultation.
• 1st kein Service-Center in Ihrer Nahe, setzen Sie sich bitte miteinem der hier aufgelisteten Adressen in Verbindung.
• Si il n'y a pas destation technique proche de chez vous. veuillez contacter nos I' un de noscentres techniques, listes ci dessous. pour toutes demandes techniques.
• Ais er geen servicecenter bij uin de buurt is. neem dan contact op een een van onze bovengenoemdeservicecenters voar ondersteuning.
• Si no hay un servicio tecnico en su zona, por favor contacte con uno de los servicios tecnicos centrales, indicados abajo. para realizar un seguimiento de su consult.
• Om det inte finns mlgon auktoriserad Oenon-verkstad dar du bar, kontakta en av vara internationella servicecentra (se ovan).
• Se non ci sono dei centri assistenza autorizzati nella vostra zona. potete fare riferimento agli altri centri assistenza autorizzati. vedi elenco sopra. per qualsiasi
consultazione tecnica.
• Caso nao exista um centro de assistencia tecnica na sua area. consulte um dos centros acima apresentados
• ~D::5'!!tlt!!jjft~§IUfi9=',L" ~11t..t.~I'JTJlJ*0:i5]w5'~mH~9=',L,~~ml&m~m$1l:
• ::5~lt!!~~.~~ • • • ~..t.~ffi~Rfi~.~~.~~.~~m.~.w.o
•
•
•
•
•
•
•
•
0
DENON
www.denon.com
Oenon Brand Company, O&M Holdings Inc.
0005150921908 &I 709
ijlX~J4~
DENON SERVICE NETWORK /I ijl!f~UM~
•
•
•
•
•
•
•
•
Please consult the outlet where the equipment was purchased.
Bitte wenden Sie sich an den Hindler, bei dem Sie das Produkt gekauft haben.
votre revendeur.
SVP veuillez consulter vO.tre
Neemt u alstublieft contact op met het verkooppuntwaar u de apparatuur heeft gekocht.
por favor consulte en el establecimiento donde compr6 el equipo.
Por
Vinligen ta kontakt med butiken dir du kopt utrustningen.
Rivolgetevi al rivenditore che vi ha venduto I'apparecchio.
Contacte a loja onde comprou 0 equipamento.
·.ioJif]l.A~lItr-Jil8~.I'J·
• .jo]~.A~.lY-Jjfnl.1S.J •
• .(D]f.
1. tmJl:ll.;~fJl~jllj~T.~o
.1oJ~JiJiJ;j:ll;~fJtlY-JiIHT.PJ.
Audio Products Group Pty Ltd. 67 O'Riordan Street Alexandria NSW 2015, PO Box 150, Mascot NSW 1460
Australia Tel: 1300134400 Fax: +61295780159
Digital-Professional-Audio Vertriebsges.m.b.H., Seebiickgasse
Seebockgasse 59, A-1160 Wien
Austria
Tel: 01-480-1006 Fax: 01-485-7679
Neotechnostyle MOSKOVSKAJA STR.20, ROOM 1,220007 Minsk Tel: +375 17
172286986
Belarus
228 69 86
Belgium
Transtel-Sabima P.v.B.A. Duboisstraat 48, B-2060 Antwerpen, Belgium Tel: 03-237-3607
5, 10143 Strmec Samoborski Tel: +38591330958
+38591 330958 Fax: +38591330990
+38591 330990
Bosnia Herzegowina Audiolab centar d.o.o. Mlinska 5,10143
Bulgaria
Sofia Audio Centre 8 Angel Kanchev St., 1000 Sofia Tel: +35929806213 Fax: +35929806212
Canada
D&M CANADA INC. 5-505 Apple Creek Blvd., Markham, Ontario, L3R 5Bl
Tel: 905-475-4085 Fax: 905-475-4159
ltI~rxfi!l~p~fiJ'l
EtI-j§'fl:fi!3-j§'p~m~ CtlfiJ)
C.t.~) fHIH~i'i]
fH~0~ J:lfiJm1lIfiJ't'~887.jihj(ffi:;J;:m6010~
J:~mlft~<P~887~jk~*J1l:6010~
China
1tIi!!i:
Etlit: (021) 64372299 fli'J{·:
W~: (021) 64339973 "'~!.1iU:
iIl~*Jii: 200020 ~:ft~pnIHH!.It\l:
~ft~f'n~*tA\~: 021-62949285
Audiolab centar d.o.o. Mlinska 5, 10143 Strmec Samoborski Tel: +38591
+385 91 33 0 958 Fax: +385 91 33 0 990
Croatia
MODESTOU SOUND&VISION PLC LTD 2, Salaminos Avenue, 1045 Nicosia Tel: +35799623014
CYPRUS
635,14800
EUROSTAR OSTRAVA s.r.o. areal Vodni stavby Praha, budova A2 Dobronicka 635,148
00 Praha 4 Czech Rep.
Czech republic
Tel: 261-112-901 Fax: 261-112-904
1, 9610 NOERAGER Tel: +4587432157 Fax: +4587432140
AUDIONORD DISTRIBUTION DALI ALLE I,
Denmark
Sperco Impex Ltd. Ehitajate tee 122,13517 Tallinn Tel: +372 6509810 Fax: +372 6509811
Estonia
Soundata Oy Hameentie 157 5th floor 00560 Helsinki Finland
Rnland
Finland
Tel: +358-(019-47693300 Fax: +358-(0)9-47693310
DENON FRANCE A division of D&M France SAS Tour Ventose, 2 rue des Bourets, 92156 Suresnes Cedex,
France
France Tel:+33(011-41-383230
Tel:+3310} 1-41-383230 Fax: +33(0)1-41-380110
DENON DEUTSCHLAND A division of D&M Germany GmbH An der Landwehr 19, D-41334 Nettetal, Germany
Germany
Tel: +49(012157-1208-0
+491012157-1208-0 Fax: +49(0)2157-1208-15
+49{O)2157-1208-15
KINOTECHNIKI LTD. 14, PYRGOU STR. 16675, GLYFADA ATHENS
Greece
Tel: +302109601071 Fax: +302109601072
IH.K.) Ltd. Unit 501, Ocean Centre, Harbour City, 5 Canton Road, Tsimshatsui,
Hong Kong
D&M Sales and Marketing (H.K.)
Kowloon, Hong Kong Tel: 852-2516-5864
852-2518-5864 Fax: 852-2516-5940
852-2518-5940
i!l'1!!l11.lli;;l<i:!>Pll.lJ'iW:iH5ljJl#J1!!lJ1l(!i#<P,C,,5fj501
:¥: 1{~15
ii~i5:: 852-2516-5864 fn!:
1lJ1i: 852-2516-5940
1!l'ii:h.1IR~fj>P.lJ.lll'f*Jll5l#llmiiJi!(lm14"'t'{,,5f1501 ~
A.I.DA Audio Kft. 1112 Budapest Olt u. 37. Hungary Tel: 01-248-2030 Fax: 01-248-2039
Hungary
Einar Farestveit & co hf.,
Iceland
hf.. Borgartun 28, P.Box 5440,125 Reykjavik. Tel: +3545207900 Fax: +354 5207910
PROFX SERVICE CENTRE Advanced Audio Solutions (Bangalore)Pvt. Ltd. No 53, K.H.Road, Opp .Big
India
Bazaar, Bangalore - 560 027, India Tel: 080 3297 0853 Fax: 0802211 2043
Indonesia
PT Autoaccindo Jaya. Cideng Barat No.7
NO.7 Jakarta, Indonesia Tel: +62-21-633-2730 Fax: +62-21-632-2886
Israel
Newpan Ltd. 14 Rosansky st. Rishon Lezion 75706, Israel. Tel: +972-3-953-5900 Fax: +972-3-961-6193
Italy
Audiodelta S.r.1. 19 Via Pietro Calvi 20129 Milano Italy
Tel: 39-02-541
H3008 / 39-02-5412-8253 Fax: 39-02-5412-0258
39-02-5411-6008/39-02-5412-8253
Samat Electronics Ltd 88, Karasai Batyr St, 050012 Almaty
Kazachstan
Tel: +73272 718304 Fax: +73272 581945718438
Korea
D&M Sales and Marketing Korea Ltd. Chung Jin B/O.,
B/D., 10F, 53-5, Wonhyoro 3 Ga, Yongsan-Gu, Seoul, 140719, Korea Tel: 02-715-9041 Fax: 02-715-9040
Sperco Impex Ltd. Ehitajate tee 122,
13517 Tallinn Tel: +372 6509810 Fax: +372 6509811
Latvia
122,13517
OGMIOS ASTRA PREKYBA UAB Graiciuno street I,
LITHUANIA
1, VILNIUS LT-02241
Tel: +370-5 - 2649260 Fax: +370-5 - 2649261
21a,
D.T. KODI ul. Cedomir Kantargiev 21
a, 1000 Skopje Tel: + 389 2 3133 104
Macedonia
Wo Kee Hong Trading Sdn Bhd. 2nd Floor, (Left Wing), Bangunan Infinite Centre, Lot I,
Malaysia
1, Jalan 13/6, 46200
Petaling Jaya, Selangor Darul Ehsan, Malaysia Tel: 03-7954-8088 Fax: 03-7954-7088
Malta
General Technologies Ltd. 174 Mdina Road, 9018 Qormi Tel: +35627472747
Australia
Labrador, SA de C.V. Callejon del Naranjo 35,Naucalpan,
35, 'Naucalpan, 53560, Edo. Mex., Mexico
Tel: 52-5359-5161 Fax: 52-5357-1775
Mandolina SRL Techomarket Bul. Mircea eel
cel Batrin 6, 2022 Chisinau
Moldova
Tel: +373
22 241033 Fax: +373
22 226009
+37322241033
+37322226009
Audiolab centar d.o.o. Mlinska 5,10143 Strmec Samoborski Tel: +38591 330958 Fax: +38591330990
Montenegro
+212 22 66 6768 Fax: +212 22 354277
35 42 77
Ines Marokko KM 11,5 BD Chefchaouni, 20250 Casablanca Tel: +21222666768
Morocco
Penhold B.Y.
BV Poppenbouwing 58, NL-4191 NZ Geldermalsen, Netherland
Netherlands
Tel: 31-345-588
080 Fax: 31-345-588
085
31-345-588080
31-345-588085
Avalon-Pacific Marketing Limited. 15C Vestey Drive, Mt Wellington, Auckland, New Zealand. PO Box 11
New Zealand
631 Ellerslie, Auckland, New Zealand Tel: +64-9-573-5933 Fax: +64-9-573-3720
AUDIONORD DISTRIBUTION DALI
9610 NOERAGER Tel: +4781500090 Fax: +4722806305
OALI ALLE I,
1,9610
Norway
Lotteworld Audio Video Systems Incorporated CET
CEl Building Mezzannine Floor No.4 Mindanao Avenue,
Philippines
Barangay Bahay Toro, Project 8, Quezon City, Philippines. Tel: +632-929-5334 Fax: +632-929-1343
HORN DISTRIBUTION SA Ulica Kurantow 34,02-873 Warszawa Poland
Poland
Tel: +4822331 5533 Fax: +48
22 331 5500
+4822331
Videoacustica Qta. Do Paizinho-Armazem 5-Estrada De Circunvalac;ao-Apart.'3127
Circunvala,ao-Apart.-3127 1303 Lisboa Codex
Portugal
Tel: +351214241770 Fax: +351214188093
LOTUS TELECOM SRL 39 Mehadia St., 6, 060541 Bucharest Tel: +40-21-2202440 Fax: +40-744-501516
Romania
BMF Limited Novoalekseevskaya Street 19 Building 2 Office 55,129626 Moscow
Russia
Tel: +7495647-0275 Fax: +81 336632567
Audiolab centar d.o.o. Mlinska 5,10143
5, 10143 Strmec Samoborski Tel: +38591330958
+38591 330 95B Fax: +38591330990
+38591 330990
Serbia
Building, #06-04, No.2, Kallang Pudding Road,
ALL (E&E) Service Center Pte Ltd. Machtech Industrial 8uilding,
Singapore
6747-6274 Fax: 6748-9007
Singapore 349307 Tel: 6747-8274
BIS AUDIO s.r.o. Dobronivska cesta 1642/696001 Zvolen Tel: 045-5400 703 Fax: 045-5400704
Slovakia
Digital-Professional Audio Seebiickgasse
Seebockgasse 59, 1160 Wien Tel: +43 1 4801006 Fax: +43 1 4857679
Slovenia
Crescent, Wynberg Ext.3 Sandton, P.O.Box 5137, Johannesburg
Mandarin Distributors SA 10 Thora Crescent.
South Africa
Republic of South Africa Tel: 27-11-444-8445 Fax: 27-11-444-8363
Gaplasa SAAV. Ing. Conde de Torroja, 25, 28022 Madrid Tel: 91-746-00-45 Fax: 91-329-44-57
Spain
Hi-Fi Klubben Giiteborg
Goteborg Skanegatan 25, 41252 Giiteborg
Goteborg Tel: 0313351010 Fax: 0313351019
Sweden
DKB Household Switzerland AG Eggbuhlstrasse
EggbOhlstrasse 28, 8052 Zurich
ZOrich Tel: +41 13061615 Fax: +41-044-3061690
DK8
Switzerland
D&M Sales and Marketing Taiwan Ltd. 6F-2 N0148, Songjiang Rd., Taipei City 10458, Taiwan R.O.C.
R.O.C,
Taiwan R.O,C.
Tel: 02-2522-1308 Fax: 02-2100-1175
Mahajak Development Co., Ltd. 46 Mahajak Building, Sukhumvit Soi 3 INana-Nual Klongtoey, Wattana,
Thailand
68-2-256-0020 Fax: 66-2-253-1696
68-2-253-1696
Bangkok Thailand. 10110 Tel: 66-2-256-0020
Ertekin Elektronik Tic. ve San. A.~
A.$ Galipdede Cd. No.: 83 Kuledibi - Karakiiy,
Karakoy, Istanbul, Turkey
Turkey
Tel: +902122939515 Fax: +902122493512
V.Y. & SONS L.L.C. Street No-ll/B, Road NO-128, Shed No-39 AI Khabisi, Deira, Dubai, U.A.E
V.v.
U.A.E.
Tel: +971-4-266-2435,
+971-4-268-2435, 268-4575 Fax: +971-4-266-2052
+971-4-268-2052
Ukraine
Mirs Ltd. Osipova str. 37/0ffice I,
(4821305555
1, 65012 Odessa, Ukraine Tel: +3801482)
+380 (482) 305530 Fax: +380
+38014821305555
81 Eire DENON UK A division of D&M Audiovisual Ltd. Moorbridge House, Padbury Oaks, 579 Bath Road, Longford,
United Kingdom 8<
Middlesex, UB7 OEH, United Kingdom Tel: +44(0)1753-680568
+44{O)1753-680568 Fax: +44(0)1753-689697
DENON ELECTRONICS (USA),
(USAI, LLC (a D&M Holdings Companyl 100 Corporate Drive, Mahwah, NJ 07430-2041
U.S.A.
Tel: 800-497-8921 Fax: 888-544-8434
Anh Duy Manufacturing - Trading Co., Ltd. 170 Ung Van Kheim St., Ward 25, Blinh Thanh Dist., HCMC, Vietnam
Vietnam
Tel: +8488983424 Fax: +84 8
B 898
89B 3425
Mexico
* If there is no service center in your
vour local area, please contact one of our overseas service centers, listed above, for follow-up service consultation.
** 1st kein Service~Center
Service-Center in Ihrer Nahe, setzen Sie sich bitte miteinem der hier aufgelisteten Adressen in Verbindung.
n'v a pas destation technique proche de chez vous, veuillez contacter nos I' un de noscentres techniques, listes
lisMs ci dessous, pour toutes
* Si il n'y
demandes techniques.
* Als
Ais er geen servicecenter bij uin de buurt is, neem dan contact op een een van onze bovengenoemdeservicecenters veor
voor ondersteuning.
hav un servicio
s8rvicio tecnico en su zona, por favor contacte con
can uno de los sarvicios
servicios tecnicos centrales, indicados abajo, para realizar un seguimiento
seguimiemo
* Si no hay
de su consult.
* Om det inte finns n~gon auktoriserad Denon-verkstad dar du bor, kontakta en av vllra
v~ra internationella servicecentra (se ovan).
non ci sona
sono dei centri assistenza autorizzati nella vostra zona, potete fare riferimento agli
a91i altri centri assistenza autorizzati, vedi elenco sopra,
* Se nan
per qualsiasi consultazione'tecnica.
consultazione·tecnica.
urn centro de assist6ncia
assist~ncia tecnica na sua area, consulte urn dos centros acirna
acima apresentados.
* Caso nao exista um
* izD'6'UJt!!M1jl\\ij~l'Il'H"
!lIl:t''ltlt!!MI!\\HU1'itp,C'' l\lJifJ:~ffiliU:$:01lJIIi~fij~l'Illfl'L,1i'lf!]1!HJiij~l'Illjl:a
m!ltJ:'l<!ff~J*~6]lfjjjlfH~Hitp,C'~~1'<M~fJl.Jl· •
* '6'~Ji!!.Jtij~*tp'L',
:l'i§~j(.IIl*tp,C'. ifj'JIUU.Jj;PJi9JJiJ<1(]il9~~fij~*tp'L',
i#JlV;;..tJ£Hf~J~lnl'l'J~*IIiJ"""C'. 1;J,11l!~l\T<ij~*~JiiJ.
1;.(1l!i!t~IIi.*~iJ;).
DENON
www.denon.com
Denon Brand Company, D&M Holdings Inc.
5431 10032 0050
CQE1A226S
DENON®
LIMITED WARRANTY
(USA / CANADA)
PAGE
2
3
4
USA (ENGLISH)
CANADA (ENGLISH)
CANADA (FRENCH)
USA
DENON ELECTRONICS (USA), LLC
(a D&M Holdings Company)
100 Corporate Drive
Mahwah, NJ 07430-2041
(800) 497-8921
(888) 544-8434 Fax
DENON REGIONAL SUPER SERVICE CENTERS (Repair only-No parts orders please)
PYRAMID AUDIO
UNITED RADIO SERVICE
AUDIO SERVICES
305 E. Braker Lane
Austin, TX 78753-2746
(512) 458-8292
(512) 453-4542 Fax
5717 Enterprise Parkway
E. Syracuse, NY 13057-2905
(800) 634-8606
(315) 446-8505 Fax
544 Central Dr., Suite 101
Virginia Beach, VA 23454-5245
(757) 498-8277
(757) 498-9554 Fax
INNER SOUND
--NORMAN'S ELECTRONICS
1416 S.E. Morrison Street
Portland, OR 97214-2646
(503) 238-1955
(503) 238-1787 Fax
3653 Clairmont Road
Atlanta, GA 30341-4907
(770) 451-5057
(770) 455-8337 Fax
---
---
---
----------SERVICE WIDE TECHNOLOGIES
ELECTRONICE EXPRESS
2239 Curtiss Street
Downers Grove, IL 60515-4010
(630) 969-7333
(630) 969-7330 Fax
----GOLD CROWN ELECTRONICS
Victoria Business Park
129 E. Savarona Way
Carson, CA 90746-1406
(310) 538-8282
(310) 538-8281 Fax
---
---
1809 E. Fabyan Parkway
West Chicago, IL 60185
(630) 208-4600
(630) 208-4601 Fax
CANADA
D&M CANADA INC.
5-505 Apple Creek Boulevard
Markham Ontario, L3R 5B1
(905) 475-4085
(905) 475-4159 Fax
WARRANTY (HOME)
0005150944 804
CQE1A224U
1
I
DEN 0 N®
~"'''''~'''III''''''''I'''''''ltll:''''''II'I''''''IIII''''''IIl''''''11~11"""'llIh""""IIlI'''''''III''''''''IIIIo''''''IIII'''''''II''''''''1111··. .·,'111.....·"11..·. .·.1111'....·..111.·. .·'1111.·. .·.'11..·. .·.1111.....'1111.....'1111'.....,'111..... ,"11'......1111.......'111'.....,'11'.......111.......'111.......
Th"w_.~lloooo"_oolym .. illA
t
t
;
~
~
LIMITED WARRANTY
Length of Non-Transferable Warranty
This warranty on your DENON product which is distributed and warranted by DENON ELECTRONICS (USA). LLC remains in effect for the following periods from
the date of the original consumer purchase from an AUTHORIZED DENON ELECTRONICS (USA), LLC DEALER.
~~
&
I
""1.
t
i
i
,
,
;
i
;
I·
;
i,
t
f
~
,
i·
~
t
t
;
._:
•
~
•
&
~
;
,
~_.'_
,
•
,
4
,Pod" a trademark of Apple Inc., reg'stered ,n the U.S. and other countnes.
What is Covered
Except as specified below. this Warranty covers all defects in material and workmanship in this product occurring during the above warranty periods. The following are
not covered by the Warranty: (I) Any product which is not distributed in the U.S.A. by DENON ELECTRONICS (USA). LLC. (2) Any product which is not purchased in
the U.S.A. from an authorized DENON dealer, unless the product is purchased through the U.S.A. Military Exchange Service where the Warranty will be One (I) year for
all products listed above except in the case of Cartridges. Accessories and Remote Controller which will remain at 90 days. (Note: AUTHORIZED DENON DEALERS
can be identified by DENON AUTHORIZED DEALER sticker displayed in the stores. If you are uncertain as to whether a dealer is a DENON AUTHORIZED DEALER,
please contact DENON as listed below). (3) Any product on which the serial number has been defaced, modified or removed. (4) Damaged deterioration or malfunction
resulting from: a) Accident, act of nature, abuse, misuse, neglect, unauthorized product repair, opening of or modification or failure to follow instructions supplied with
the product. b) Repair or attempted repair by anyone not authorized by DENON. c) Any shipment of the product (claim must be presented to carrier), (5) Items subject to
wear from normal usage (tape heads, cartridges. stylus, battery, etc.), (6) Periodic check-ups which do not disclose any defect. (7) Use of the product outside the U.S.A.
(8) Damaged magnetic tape or CDIDVD discs. (9) Use in industrial, commercial, and/or professional applications, (10) Any installation or removal charges resulting from
product failure.
;
What We Will Pay For
If during the applicable warranty period from the date of original consumer purchase your DENON product is found to be defective by DENON, DENON will
repair, or at its option, replace with new, used or equivalent model, such defective product without charge for parts or labor.
!
be transported for warranty service;
;
;
t.
,
'
;
~
•
t.·
,
;
~_~_.
4
4
'
1 How to Obtain Warranty Performance
;
,
If your unit ever needs service, it may be taken or shipped to any authorized DENON service station or DENON ELECTRONICS (if you are uncertain as to
i
1 whether a service station is DENON authorized, please contact DENON as listed below.) In all other cases. the following procedures apply whenever your unit must !
:
,
;
;
._~ ,'
;
~
;
:i _~ '.-_:.
,
4
;
i
THIS WARRANTY IS VALID IN THE U.SA ONLY.
,
THIS WARRANTY IS EXPRESSLY MADE IN LIEU OF ALL OTHER WARRANTIES. EXPRESSED OR IMPLIED. INCLUDING WITHOUT LIMITATION,
WARRANTIES OF MERCHANTABILITY AND FITNESS FOR A PARTICULAR PURPOSE.
.
;
;
t.
,
OUR LIABILITY IS LIMITED TO THE REPAIR OR REPLACEMENT, AT OUR OPTION, OF ANY DEFECTIVE PRODUCT AND SHALL IN NO EVENT
INCLUDE INCIDENTAL OR CONSEQUENTIAL COMMERCIAL OR PROPERTY DAMAGES OF ANY KIND. WE ARE NOT RESPONSIBLE FOR
PRODUCTS LOST, STOLEN AND/OR DAMAGED DURING SHIPPING.
;
~.'
SOME STATES DO NOT ALLOW LIMITATIONS ON HOW LONG AN IMPLIED WARRANTY LASTS AND/OR DO NOT ALLOW THE EXCLUSION OF
INCIDENTAL OR CONSEQUENTIAL DAMAGES, SO THE ABOVE LIMITATIONS AND EXCLUSIONS MAY NOT APPLY TO YOU.
~,'
,
;
This warranty gives you specific legal rights, but you may also have other rights which vary from state to state, This Warranty may not be altered other than in a
writing signed by an officer of Denon Electronics USA, LLC.
~
;
;;
DENON ELECTRONICS (USA). LLC
(a D&M Holdings Company)
100 Corporate Drive
Mahwah, NJ 07430-2041
(800) 497-8921
www.usa.denon.com
t
~
If your product does not require service. but you have questions regarding its operation, please contact our Technical Services Department as listed below.
t
•
;
·
~
•.. lIl'.~.""' ......
2
._~~~
a. You are responsible for transporting your unit or arranging for its transportation,
b. If shipment of your unit is required;
You must pay the initial shipping charges, but we will pay the return shipping charges if the repairs are covered by the Warranty.
c. WHEN RETURNING YOUR UNIT FOR WARRANTY SERVICE, A COPY OF THE ORIGINAL SALES SLIP MUST BE ATTACHED.
d. You should include the foIlowing: your name, address, daytime telephone number. model and serial number of the product and a description of the problem.
In the case of a CD or DVD Player, please enclose ONE (I) disc that the unit has failed with for test reasons. It will be returned with the unit.
,,.I··...·.llll··....III..•. . .·.lllh·....,llIll.....,111........1111.......111......""1.......,'111.......111':......111........1111.·. . .
;
,
.0_'"
f
~
~
"
4
;
~
·,I.I'·....,.....·...·...I"·....·'IIII.·. . .'III'.·.....1111.......11110.......""......1111.......',.,......"111.....'111'........1...•....llll......,t/tl.....
·'IIlI'~·...II.·....
~.,ItII'~"IIII"""'IIII"""'I'I:""'III"""""IIl""""I"'''''''1~1o''''''ltll'''''''ltI" ......t1''''''''''IlI'''''''I''''''''''III''''''''IIII'''''...111......'"1.......'1........,'111.......1111.......1111.......11,..·. . . ·.'III··. . .·.'"..·. . .·..
' 1··...·.IIII··. . .·.IIII•·. . .·,tlll•·...·1I11" .....,'11'......'1111......""1•
ThtS warranty wtll be honored only 10 ~
•
~
DENON®
i
I
t
t
t:___
•
I
l
LIMITED WARRANTY
Length of Non-Transferable Warranty
This warranty on your DENON product which is distributed and warranted by D&M CANADA INC. remains in effect for the following periods from the date of the
original consumer purchase from an AUTHORIZED D&M CANADA INC. DEALER.
~~
I
;
;
l.
,
;
,i
;
;•
4
;
4
•
i
,
;
l
t
,~_S ?
,
i
•
;
•
..
i
,
i
•
~
t
4
,Pod 's a U,dem.,k of Apple Inc.• reg,stered ,n the U.S. and other countnes.
What is Covered
Except as specified below, this Warranty covers all defects in material and workmanship in this product occurring during the above warranty periods. The
following are not covered by the Warranty: (I) Any product which is not distributed in Canada by D&M CANADA INC. (2) Any product which is not purchased in
Canada from an authorized DENON dealer. (Note: AUTHORIZED DENON DEALERS can be identified by DENON AUTHORIZED DEALER sticker displayed in
the stores. If you are uncertain as to whether a dealer is a DENON AUTHORIZED DEALER, please contact D&M CANADA INC. as listed below). (3) Any product
on which the serial number has been defaced, modified or removed. (4) Damaged deterioration or malfunction resulting from: a) Accident, act of nature, abuse,
misuse, neglect, unauthorized product repair, opening of or modification or failure to follow instructions supplied with the product. b) Repair or attempted repair by
anyone not authorized by DENON. c) Any shipment of the product (claim must be presented to carrier). (5) Items subject to wear from normal usage (tape heads,
cartridges, stylus, battery, etc.). (6) Periodic check-ups which do not disclose any defect. (7) Use of the product outside Canada. (8) Damaged magnetic tape or CD/
DVD discs. (9) Use in industrial, commercial, and/or professional applications. (10) Any installation or removal charges resulting from product failure.
~
What We Will Pay For
If during the applicable warranty period from the date of original consumer purchase your DENON product is found to be defective by DENON, DENON will
repair, or at its option, replace with new, ·used or equivalent model, such defective product without charge for parts or labor.
•
How to Obtain Warranty Performance
If your unit ever needs service, it may be taken or shipped to any authorized DENON service station or D&M CANADA INC. (if you are uncertain as to whether
a service station is DENON authorized, please contact D&M CANADA INC. as listed below.) In all other cases, the following procedures apply whenever your unit
must be transported for warranty service;
t
"
~
,
t_:
•
,
i
a. You are responsible for transporting your unit or arranging for its transportation.
b. If shipment of your unit is required;
You must pay the initial shipping charges, but we will pay the return shipping charges if the repairs are covered by the Warranty.
c. WHEN RETURNING YOUR UNIT FOR WARRANTY SERVICE, A COPY OF THE ORIGINAL SALES SLIP MUST BE ATTACHED.
d. You should include the following: your name, address, daytime telephone number, model and serial number of the product and a description of the problem.
In the case of a CD or DVD Player, please enclose ONE (I) disc that the unit has failed with for test reasons. It will be returned with the unit.
~ THI:Sy::::~:o:: :~:u:~:~::u~;~:ave questions regarding its operation, please contact our Technical Services Department as listed below.
~
t
•
;
'
•
~_: .
,
I
,
t.
;
..
;
,
~
•
~,~.
,
•
~
•
~
•
•
;
THIS WARRANTY IS EXPRESSLY MADE IN LIEU OF ALL OTHER WARRANTIES, EXPRESSED OR IMPLIED, INCLUDING WITHOUT LIMITATION,
WARRANTIES OF MERCHANTABILITY AND FITNESS FOR A PARTICULAR PURPOSE.
,
l
:
OUR LIABILITY IS LIMITED TO THE REPAIR OR REPLACEMENT, AT OUR OPTION, OF ANY DEFECTIVE PRODUCT AND SHALL IN NO EVENT
INCLUDE INCIDENTAL OR CONSEQUENTIAL COMMERCIAL OR PROPERTY DAMAGES OF ANY KIND. WE ARE NOT RESPONSIBLE FOR
PRODUCTS LOST, STOLEN AND/OR DAMAGED DURING SHIPPING.
•
2~·
SOME PROVINCES DO NOT ALLOW LIMITATIONS ON HOW LONG AN IMPLIED WARRANTY LASTS AND/OR DO NOT ALLOW THE EXCLUSION OF
INCIDENTAL OR CONSEQUENTIAL DAMAGES, SO THE ABOVE LIMITATIONS AND EXCLUSIONS MAY NOT APPLY TO YOU.
This warranty gives you specific legal rights, but you may also have other rights which vary from province to province. This Warranty may not be altered other than
,
,
-
~
i
~_:
t:.:__
in a writing signed by an officer of D&M Canada Inc.
4
,
;
;
1111
'111'
111'
'1111
'11110
1111
,'111
,1111
~_~._
~
5-505 Apple Creek Boulevard
Markham, Ontario
L3R 5B1
(905) 475-4085
www.denon.ca
l
11'
,
;-
D&M CANADA INC.
'1111
,
,
•
.••111
l.
'1110
'"1
'1"
'111
'"1
1111
"1
1111
111"
,
~
t
'11I"
·""I.·
·.IIII.·
·',"..•
IIIIo·
·.II ·
'NI.·
·,'III.·
·,1111··
•..11'·
·,,'11··
t
1'·. .
3
I
DEN 0 N$
t
GARANTIE L 1 M I T E E i
i
~·"tII'''''-'''''''''·'''''''''-''IIl''''-'''I'''~''III''''''''''''''''''IlIII''''''IHI~'''1111...............,"I.......·.I.I'. . .·..III'.....·'lllto......·.llll............'·. . .·..III·. . .-~Il'·~·....•. . . ·,IIIl.·~·.III.......'ll...........IUI'·~·'IIII'·. . .·,IIII'. . .·'I.I......•1111......1111.......111'........'111.........1111.
~~"'=ho""~q"''"~
;
Duree du garantie non-transferable
~
La garantie de vOIre produit DENON, distribue et garanti par D&M CANADA INC. prend effet 11 partir de la date d'acbat du consommateur original aupres d'un
revendeur official D&M CANADA INC. pendant les periodes suivantes.
,
,;f
Categorie de produit
,
.;
~
-
;
;
i
;
·;
·
.!
"
~
~
+
i
-
Apple et ,Pod sont des ma,ques comme'coa'es d'lpple Inc.. deposees aux Etats-Un" et dans d aut'es pays,
i_:_'
.~
;+~._,'
,
;
Cette garantie couvre tous les defauts de materiel ou de fabrication du produit, 11 I'exception de ceux indiques ci-apres qui conforrment selon les termes durant la periode
de la garantie. Ne sont pas couverts par la garantie: (I) Tout produit qui n'est pas distribue au Canada par D&M CANADA INC. (2) Tout produit qui n'a pas ete achete au
Canada aupres d'un revendeur officiel DENON (Note: On peut identifier les revendeurs officiels DENON par leur auto-collant "REVENDEUR OFFICIEL DENON" affiche
dans leur magasin. Si vous doutez qu'un revendeur soit officiellement reconnu, contactez D&M CANADA INC. 11 I'adresse ci-dessous.) (3) Tout produit dont Ie numero
de serie a ete efface, modifie ou enleve. (4) Dommages dus 11 la deterioration ou 11 un fonctionnement defectueux 11 la suite de: a) accident, acte de la nature, abus, utilisation
impr~pred' n~~ligence, reparatilon,au moyen d'un prodDUEitNnOONn au)tOrise, debadle, mododi~c(alti~'lemPloi cdontr~ire a~; ins~ctions fournies)a(vSe)cArtlePlroduit, b).'de~~mionou
. c tout envOI u pr Ult a ICC amatlOn O1t etre plCsentce au transporteur ,
1C es sUJets" etcnoratlon
tentative e lcparatlOn par que qu un non reconnu par
par I'usage (tetes de magnetophone, cellules phono, pointes de lecture phono, piles, etc.). (6) verification periodique qui ne revele aucun defaut. (7) Utilisation du produit
hors du Canada. (8) Bandes magnetiques, disques CD ou DVD endommages. (9) UtiJisation commerciale, industrielle ou professionnelle. (10) Toutes charges d' instaJlation
ou de deplacement resultant d'un defaut du produit.
~
Notre paiement
•
;
=.'
Si votre produit DENON est reconnu defectueux par DENON durant la periode d'application de la garantie apres la date d'achat du consommateur, DENON
reparera ou, 11 son choix, remplacera avec un modele neuf, usage ou equivalent ce produit defectueux sans frais de pieces ni de main d'reuvre.
~
~_~
,
_
Execution de la garantie
I,
~
z
.:,
,
;
_
i
,
;
~
i
~
•
~
~:
,
~.:.
~
Si votre produit necessite service, il peut etre envoye 11 tout atelier de service officiel DENON ou chez D&M CANADA INC. (Si vous doutez que I' atelier de
service soit officiellement reconnu, contactez D&M CANADA INC. 11 I'adresse ci·dessous). Dans tous les autres cas, les procedures suivantes s'appliquent si votre
article doit eire transporte pour un service sous garantie.
,
:
a, Vous etes responsable du transport de votre article ou vous devez vous arranger vous-meme pour son transport.
b. Si votre article doit etrl! envoye, vous devez payer les frais d'envoi initiaux, mais nous payerons les frais de retour si la garantie couvre les reparations.
c. LORSQUE VOUS RENVOYEZ VOTRE ARTICLE POUR UN SERVICE SOUS GARANTIE, VOUS DEVEZ JOINDRE UNE COPIE DE LA FACTURE D'
•
-
d.
~~u~~~v~~~n~~~~ement
vos nom, adresse, numero de telephone de jour, numeros de modele et de serie du produit et une description du probleme.
Dans Ie cas d'un lecteur CD ou DVD,joindre un disque que I'appareit n'a pu lire pour test. II vous sera retoume avec I'article.
~
t
•
,
~.~,
CETIE GARANTIE EST VALABLE SEULMENT AU CANADA.
~
Si votre produit ne requiert aucun service mais que vous avez des questions quant 11 son fonctionnement, contactez notre departementtechnique dont l' adresse figure ci-dessous.
CETrE GARANTIE EST EXPRESSEMENT FAITE EN LIEU ET PLACE DE TOUTES LES AUTRES GARANTIES EXPRIMEES OU SOUS-ENTENDUES' Y
COMPRIS, SANS SE LIMITER A CELLES-CI, LES GARANITES MARCHANDES ET SPECIFIQUES POUR UN USAGE PARTICULIER.
;
..
•
NafRE RESPONSABILITE SE LIMITE A LA REPARATION OU AU REMPLACEMENT, A NafRE CHOIX, DE TOUT PRODUIT DEFECTUEUX ET N'
INCLUT EN AUCUN CAS DES DOMMAGES FORTUITS, COMMERCIAUX INDIRECTS NI MATERIELS D' AUCUNE SORTE. NOUS NOUS SOMMES PAS
RESPONSABLES POUR LA PERTE DE LES PRODUITS ET/OU LES MARCHANDISES ENDOMMAGEES PENDANT LE TRNASPORT DES BIENS.
,
-
,
;
CERTAINES PROVINCES NE PERMETrENT PAS DE LIMITES QUANT A LA DUREE D'UNE GARANITE SOUS-ENTENDUE ET/OU NE PERMETIENT
PAS L'EXCLUSION DE DOMMAGES FORTUITS. LES LIMITATIONS ET EXCLUSIONS MENTIONNEES PLUS HAUT PEUVENT NE PAS S'APPLIQUER
A VafRE CAS.
,
.
;
!
Cette garantie vous donne des droits legaux specifiques, mais it se pourrait que vous ayez d'autres droits qui varient d'une province 11 l'autre. La garantie ne peut
eire modifi6e que par un document signe par un gestionnaire autorise de D&M Canada
r,'
;
~
i
~
•t.
t
;
,
.........................,
...,. 1
'
,.11
5-505 Apple Creek Boulevard
Markham, Ontario
L3R 5B1
(905) 475-4085
www.denon.ca
~
~
~
t
~
4t_-.~
D&M CANADA INC.
t
4
~
;
•
;
;
i
;
•
•
;
~_'.~,
~
;
;
~
~.~ .......-.
I
'
ll~
•
,.~