1
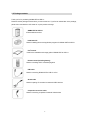
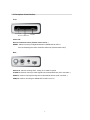
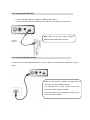
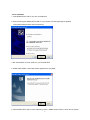
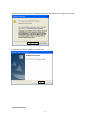
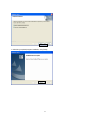
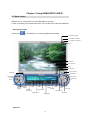
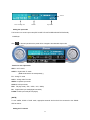
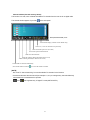
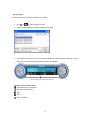
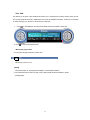
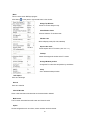
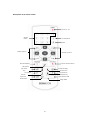
SIGMA HDTV5 USB V1
User’s Manual
Version 1.0
Notice
This device has been approved by FCC for a home appliance
and is suitable for all residential areas.
1
Contents
Chapter 1. Before getting started
1-1.
System requirements
1-2.
Package contents
1-3.
Description of each function
Chapter 2. Installation
2-1. Before installing the SIGMA HDTV5 USB V1
2-2. Connecting the USB cable
2-3. Connecting the antenna cable
2-4. Connecting the other devices (VCR, Camcorder etc)
2-5. Installing the Driver and Program
Chapter 3. Using SIGMA HDTV5 USB V1
3-1. Basic function
-
Running the program
-
Setting the input mode
-
Setting the TV channel
3-2. Capture function
-
Saving the still image
-
Saving the video
3-3. Other functiosns
-
Reservation function
-
File play mode
- Time-Shift
- Menu
[Appendix ] Remote control
2
Chapter 1. Before getting started
1-1. System requirements
System configurations
To use SIGMA HDTV USB V1, the following configurations are needed.
Operating system
- Windows XP (Service pack1 or higher)
* Periphrals
- HDD (Ultra DMA 66 or higher)
- Desktop PCs or laptops built-in USB 2.0 port (PCI or PCMCIA USB 2.0 card)
- CD-ROM Drive
- MS compatible mouse
- SoundBlaster compatible sound card
Recommendations
- CPU Intel Pentium-IV 1.5GB or higher
- MEMORY 256MB or higher
- Graphics card: nVIDIA GeForce4 (except for GeForce4 Ti) and ATi Radeon 7500 or higher
Note: Grpahics card should support DxVA.
3
1-2. Package contents
Thank you for for purchasing SIGMA HDTV5 USB V1.
Please check the package contents when you remove the box. If you find an omitted item in the package,
please visit a near dealer or A/S center for a quick product exchange.
SIGMA HDTV5 USB V1
ATSC broadcast receiver
Installation CD
Used for installing drivers and application programs for SIGMA HDTV5 USB V1
User’manual
Used for the installation and usage guide of SIGMA HDTV5 USB V1
Remote contral (Including battery)
Used for controlling HDTV broadcast programs
USB cable
Used for connecting SIGMA HDTV5 USB V1 to PC
Sound cable
Used for inputting L/R sounds from external VIDEO devices
Composite conversion cable
Used for connecting composite of external Video devices
4
1-3. Description of each function
Front
Power LED
READY
Remote control sensor
Power LED
Receiver of Remote control ( Remote control sensor .)
READY : Status of receiving the digital broadcasts of SIGMA HDTV5 USB V1.
If the broadcast signal is weak, the READY will be ON. (Normal status is OFF)
Back
Antenna In: Used for receiving HDTV, Analog TV or Cable TV signals
S-VIDEO In: Used for receiving S-Video signals from the external devices (VCR, camcorder...)
AUDIO In: Used for receiving audio signals from the external devices (VCR, camcorder...)
USB port: Used for connecting the SIGMA HDTV5 USB V1 to a PC
5
Chapter 2. Installation
2-1. Before installing the SIGMA HDTV5 USB V1
We recommend you to refer to the following checkpoints for your system.
1. SIGMA HDTV5 USB V1 has been designed to work with a USB 2.0 supported PC.
Therefore we suggest you to check your main-board of the PC whether it supports the USB 2.0 high
speed bandwidth or not. If your PC does not support USB2.0, you need to buy a PCI USB2.0 add-in card
for USB 2.0 interface.
2. Make sure that you have plugged into the right USB 2.0 port of your PC.
Your motherboard may have several USB ports for 1.1 and 2.0.
Normally USB ports can not be distinguished.
3. Make sure that your PC has a DXVA supported graphics card.
Without this acceleration technology, HDTV broadcasts are not worked correctly because its decoding
process requires a huge processing power. Generally NVIDIA Geforce MX440 and ATI Redeon 7200
are the minimum requirement therefore you need to have higher spec. of the graphics card at least.
4. Make sure that your OS(operating system) is MS Windows XP(service pack 1 or higher)
SIGMA HDTV5 USB V1 is suitable for Microsoft Windows XP OS, service pack 1 or higher. Lower OS
versions such as Windows98, Windows2000 and Windows ME may cause a serious system conflict.
6
2-2. Connecting the USB cable
1. Connect the USB cable to the USB port of SIGMA HDTV5 USB V1
2. Connect the other side of the USB cable to the USB port of your system as drawn below.
Note: Make sure that your system supports
Connecting
USB cable
USB2.0 interface before the connection
2-3. Connecting the antenna cable
To receive the over-the-air digital broadcasts, connect an indoor or outdoor antenna (UHF)cable as drawn
below.
Make sure that you are in a digital TV reception area to
receive the over-the-air digital TV signals.
It is important that you need to have a good UHF
antenna for a better digital TV reception.
Clear QAM support may be different according to your
local DTV service providers
7
2-4. Connecting other devices (VCR, Camcorder etc.)
. Video connection
1. Connect S-Video output (black) of an external video device to S-Video input of SIGMA HDTV5 USB
V1 with the S-Video cable.
2. Connect Composite output of an external video device to Composite input of SIGMA HDTV5 USB
V1 with the composite conversion cable.
. Audio connection
1. Connect SIGMA HDTV5 USB V1 to an external Video device with the sound cable as drawn below
.
S-Video
Cable
Composite
Conversion
Cable
Video Input
(Yellow)
Sound Cable
Audio Input (White)
Audio Input
(Red)
Composite
Cable (Yellow)
Video Output
(Yellow)
S-Video Output
Audio output (White/Red)
[Note]
Make sure that you shoud select one connection only from S-VIDEO or Composite.
2-5. Installing the Driver and Program
8
. Driver Installation
1. Insert SIGMA HDTV5 USB V1 into your CD-ROM drive.
2. When connecting the SIGMA HDTV5 USB V1 to your system, the following dialog box appears.
“Found New Hardware wizard” then click [Cancel]”
3. Run ‘SETUP.EXE’ in ‘Driver’ folder of in your CD-ROM drive.
4. SIGMA HDTV USB V1 driver setup window appears then click [Next].
5. While SIGMA HDTV USB V1 driver files being copied, “SIGMA HDTV5 USB V1 driver has not passed
9
Windows Logo testing to verify its compatibility with Wndows XP” appears then click [Contiue Anyway].
.
6. After being completed installation, click the [Finish].
. Program installation
10
1. Run ‘SETUP.EXE’ in your CD-ROM Drive.
2. SMPlayer Setup window appears then click [Next].
3. Installation directory appears then click [Next].
If you want to change the Installation directory, click “Searching” to set your directory
4. SMPlayer Setup window appears then select a type of broadcast reception.
5. After being copied, you are requested to select functions then click [Next].
11
6. After being completed program installation, click [Finish].
12
Chapter 3. Using SIGMA HDTV5 USB V1
3-1. Basic funtion
SMPlayer is a TV viewing tool for your favorable digital TV programs.
In case of connecting to an external video device, you can also enjoy a video in the SMPlayer
Running the program
Double-click ‘[
]’ in the Windows, a TV window appears as drawn below.
TV Windows upper
TV Windows minimize
TV Windows maximize
Quit
Minimize
Pop-up menu
Help
Previous file
Move forward
Volume up
Save Movie
Next channel
Volume
down
Play/ Pause
Next file
Mute
Previous
Channel
Close
Channel
Skin
EPG
Setup
Stop
Caption
window
File open
Keypad
Change
Change Audio
Quit
program
input mode
TimeShift
Multi Screen
Still Capture
. Status bar
13
Volume
Time/recording time
Channel
Input mode
Setting the input mode
This function is to set an input mode (HDTV/CADTV/TV/CATV/VIDEO/SVHS/FILE/DV/DVHS)
in SMPlayer.
Click ‘[
]‘ in the main panel then the panel will be changed to the selectable input mode.
. Details for each input mode
HDTV: HDTV mode
CADTV: Digital cable TV mode.
(QAM mode needs to be set seperately.)
TV: Analog TV mode
CATV: Analog cable TV mode
VIDEO: Composite input mode
SVHS: S-VHS input mode
FILE: File play mode (*.TRP, *.MPG, *.AVI, *.WMV).
DV : Digital Video input mode(digital camcorder)
D-VHS: D-VHS input mode (D-VHS player)
[NOTE]
To use VIDEO, SVHS or DVHS mode, appropriate external device should be connected to the SIGMA
HDTV5 USB V1.
Setting the TV channel
14
Channel window (Channel memory/ delete)
This function is to scan, save or delete all available TV channels from the over the air or digital cable.
The channel window appears if you click [
] in the main panel.
QAM (64QAM/256QAM ) mode
Virtual channel display (available verual channels only)
If this is on, it scans TV channels more specifically.
Select an antenna input source (Air/cable)
Switch to the preferred channel mode
Delete all scanned channels.
Delete the watching channel (the channel on the screen)
Add the watching channel (the channel on the screen)
Scan available TV channels automatically
(The scanned channel is marked [
] in front of the number of channel.
[NOTE]
. Run “Auto TV channel searching” to scan all available TV channels for the first time.
. Virtual channel means the sub-channel (for example: 9-1, 9-2) to manage every channels effectively
transmitted from a broadcast service provider
.[
] and [
] are supported only in Digital TV mode (HDTV/CADTV).
.
15
3-2. Capture function
Saving the still image
This function is to save a motion video into a still image
. How to save the still image
Click [
]’ in the panel, the screen is saved as a file
(When the file is saved, the file name is shown on the screen)
.
Saving the video
This function is to save a video into a motion video file
How to save the video
Click [ ]’to save and [ ]’to stop.
The recording status is displayed
16
3-3. Other functions
Reservation function
This function is to reserve or record a TV program as pre-scheduled.
Click ‘[
]’ on the tray bar then select the ‘Reserve’as drawn below.
.
Schedule window appears. Select “Add,” “Modify,” “Delete” or “Delete All” in the reservation list.
[NOTE]
. To record a TV program while watching, “Recording” should be marked in “Add.”
17
File play mode
This mode is to play a video file that saved in your system
1. Click [ ]’or [
2.
]’to find a video file you want.
“Open” window appears then choose a file and click [Open].
3. The video file will be loaded in the TV window automatically. While playing the video file, you can
easily control it by using buttons(play,pause,file open) and slide bar.
You can drag the play position of the video file.
. Functions of the control buttons
[ ] : Play the previously captured file.
[ ] : Play the next captured file.
[ ] : Play.
[ ] : Stop
[ ] : Open the file list
18
Time -Shift
This allows you to pause a live broadcast and return to it or moments and continue exactly where you left
off. The live broadcast is saved in HDD space as much as its available free space. Therefore, you are able
to watch and enjoy your favorite TV show like your VCR tape.
1. Click [
]’in the SMPlayer, and then the timeshift process is marked in white color. .
2. Click [ ]’to stop the timeshift function.
Moving the play position
You can move the play position by mouse click.
Click the play position to move.
[NOTE]
. Time-Shift function is only supported in Digital TV mode (HDTV/CADTV)
. If the Time-shift function does not work, check if DxVA mode has been enabled in ‘Option
Æ Configuration.’
19
Menu
This is a menu set for SMPlayer program.
Click ‘Menu [
] ‘in the panel or right mouse button in the window..
Always Top Window
Set the TV screen always on top.
Show Window frame
Show or hides the TV window frame
Window ratio
Select a display mode (full, wide, standard)
Aspect ratio mode
Set the aspect ratio of TV screen (16:9 / 4:3 / 1:1)
Desktop
Watch the background window as the TV screen.
Arrange Window position
Arrange the TV screen size and position by resolutions.
Sleep
Set or release the sleep function
Still capture
Save as a still image.
Record
Save as a video file
Channel Window
Show or hide the Channel window that can be memorized or deleted.
Multi Screen
The TV screen is devided into multi screen and shows in serial.
Option
Set the configuration such as volume, screen resolution and sub-channel.
20
Save configuration
Show the configuration to save video or still image.
Remocon option
Remote control icon should be activated on the tray.
OSD configuration
Set the color or size of OSD.
OSD stands for On Screen Display.
File control
Whenever pressing Hot key(Ctrt+L/R), the play position is moved as set in the menu.
(This function can be used in File mode only.)
Subtitle
Set a subtile supported by a video file.
Deinterlace mode
Remove image ghost or noise in a fast action scene.
SNR
Show the DTV singal strength.
Closed caption
Show closed caption on the screen
Previous channel
Move to the previous channel.
Favorite channel
Show your favorite channels.
Bookmark
Play a saved video file as album or file unit
Set the priority
Set the priority of SMPlayer program.
21
Help
Online help guide of SMPlayer program.
About
Show the version, manufacturer and program info.
Exit program
Quit the SMPlayer program.
Appendix. Remote Control
Replacing batteries
- Use a 3 V lithium battery for the replacement. Basically, the battery is provided when you purchase SIGMA
HDTV5 USB V1.
1. Pull down the battery tray of the remote control.
2. Insert a 3V lithium battery into the tray as drawn below.
3. Push the battery tray back into the remote control then fix it sounded“clicking”.
[NOTE]
You can check whether it is worked or not by pressing the buttons of the remote control.
The red lamp on the remote control will be on if the battery is inserted correctly.
22
Descriptions of the remote control
.
Power on / off
Numeric
buttons
Virtual channel
Mute
Volumn Up/Down
Channel Up/ Down
Favorite channel selection
Previous channel
EPG funtion
Record still image
Paly/ Pause
Stop
Previous file
Next file
Record movie
Forward slowly
Rewind slowly
Aspect ratio
Input selection mode
Zoom funtion
Sleep Timer
23