1
SHARR
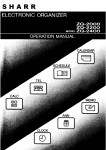
Congratulations on purchasing the IQ-7000 Electronic Organizer. Please
read this operation manual carefully to familiarise yourself with all the
features of the Organizer and to ensure years of reliable operation. Also,
make it a point to keep this operation manual on hand for reference.
Before using this Organizer, make sure to remove the insulation band
which covers the battery contacts and prevents battery depletion (refer to
Page 9). The Organizer cannot be turned on until this insulation band is
removed.
The information provided in this manual is subject to change without
notice.
l
NOTICE
l
l
SHARP strongly recommends that separate permanent written records be kept of all
important data. Data may be lost or altered in virtually any electronic memory product
under certain circumstances. Therefore, Sharp assumes no responsibility for data lost
or otherwise rendered unusable whether as a result of improper use, repairs, defects,
battery replacement, use after the specified battery life has expired, or any other cause.
SHARP assumes no responsibility, directly or indirectly, for financial losses or claims
from third persons resulting from the use of this product and all of its functions, such
as stolen credit card numbers, the loss of or alteration of stored data, etc.
lntroductlon
Features of the Organizer
Local time zone clock function (HOME time)
Displays current date and time. + PAGE 36
-
International clock function (WORLD time)
Displays current date, time, and the difference in time between the city in question and
HOME time for 212 cities around the world. 4 PAGE 45
Schedule
function
Allows you to store important dates and events. tmportant dates wilt also be flagged on
the calendar to remind you to check them. A schedule alarm can be set to remind you in
advance of a scheduled time. + PAGE 50
Calendar
function
Contains a calendar, which extends from the year 1901 to 2099. Important dates on your
monthly calendar will be flagged, so you can check what has been scheduled for any
designated day or week. Pressing a single key then gives you your weekly, and then daily,
calendar + PAGE 70
Telephone book function
Three telephone lists allow you to list business and private numbers separately. Phone
numbers can be recalled in alphabetical order using the sequential search function, or
directly recalled by entering. --f PAGE 87
Memo function
Allows you to note important details, such as timetables. Also stores price lists, etc., and
can perform calculations with the stored data. + PAGE 98
Calculator
Contains a lo-digit calculator with memory. The calculator also features a paperless
printer which displays all the steps of a given calculation, allowing you to scroll up and
down the process. + PAGE 114
Secret function
Protects personal information. A password is required to see the information you mark as
secret. + PAGE 132
User dictionary
Stores frequently used words or sentences, enabling their easy input in any mode.
+ PAGE143
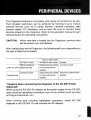
Peripheral devices
Using the optional IC cards, you can convert the Organizer into a variety of specialty
computers easily and instantly. Additional interfaces with printers, cassette recorders, and
data transfer cables make the Organizer as powerful as you want it to be. --f PAGE 157
3
Contents
Contents
BEFORE USE ..................................................................
Inputting and recalling data.. ..........................................................
QUICK GUIDE .................................................................
Command centre ...........................................................................
Setting the date and local time (HOME time). ................................
Schedule function ..........................................................................
Calendar function.. .........................................................................
Telephone directory function ..........................................................
Connecting the IC cards ................................................................
9
10
12
12
13
16
17
19
21
GETTING STARTED .......................................................
22
Parts included ................................................................................
Display symbols.. ...........................................................................
Key notations .................................................................................
Turning the power on and off.. .......................................................
Contrast adjustment.. .....................................................................
Turning the “beep” on and off ........................................................
The operational guide ....................................................................
22
24
25
26
27
27
28
BASIC ENTRY PROGRAMMES .....................................
29
Inputting characters .......................................................................
Making corrections .........................................................................
Alternating between the 8-line and 4-line displays.. .......................
29
32
35
USING THE STANDARD AND WORLD CLOCKS.. ....... 36
Displaying the standard or world time.. ..........................................
Setting the standard clock ..............................................................
Selecting a city for the HOME time.. .........................................
Setting the HOME time for the built-in clock.. ...........................
Changing the standard city ............................................................
Checking the times in cities around the world ................................
Looking up the time for other cities on the world clock.. ...........
36
37
37
40
44
45
47
USING THE SCHEDULE FUNCTION .............................
50
Inputting data in the SCHEDULE mode.. .......................................
50
4
Inputting items from the CALENDAR mode.. ............................
Inputting items from the SCHEDULE mode.. ............................
Scheduling items without times.. ...............................................
Recalling scheduled data.. .............................................................
Recalling today’s agenda.. ........................................................
Recalling scheduled items from the CALENDAR mode.. .........
Recalling scheduled items from the SCHEDULE mode ...........
Recalling only scheduled dates (i.e., engagements only) .........
Recalling scheduled items from the SCHEDULE mode
by entering the date numerically.. .............................................
Recalling scheduled items using the first letter(s)
of the item .................................................................................
Recalling scheduled items with a keyword search.. ..................
Editing scheduled data.. .................................................................
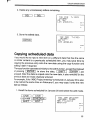
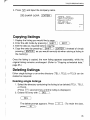
Copying scheduled data ................................................................
Deleting scheduled data ................................................................
Deleting one agenda item at a time ..........................................
Deleting the agenda for an entire month ...................................
Deleting the agenda for an entire week or day.. .......................
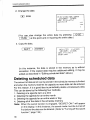
Deleting all of the data in the schedule memory.. .....................
USING THE CALENDAR FUNCTION .............................
Displaying and changing the monthly calendar .............................
Changing the month with(v or(. ........................................
Recalling a date with the numerical keys.. ................................
Recalling a month by designating the year and month.. ...........
Looking at the agenda in the CALENDAR mode.. .........................
50
53
56
57
57
57
59
59
60
61
62
64
65
66
67
67
68
68
70
70
71
72
74
75
USING T H E ANNIVERSARY FUNCTION.. .....................
79
Inputting anniversaries.. .................................................................
Specifying the date (month and day) ........................................
Designating anniversaries by their positions
relative to months and weeks ...................................................
Recalling anniversaries.. ................................................................
Editing, adding, or deleting anniversaries.. ....................................
Editing an anniversary entry .....................................................
Adding an anniversary entry.. ...................................................
Deleting anniversary entries .....................................................
79
79
81
82
83
83
84
85
5
Contents
USING THE TELEPHONE DIRECTORY.. ........ a.. ........... 87
Designating the file names .............................................................
Entering listings.. ............................................................................
Recalling listings ............................................................................
Recalling a listing with a sequential search ..............................
Recalling a listing with a direct search.. ....................................
Recalling a listing with a keyword search.. ...............................
Editing listings.. ..............................................................................
Copying listings.. ............................................................................
Deleting listings.. ............................................................................
Deleting single listings ..............................................................
Deleting entire directories (TEL1 , TEL2, or TEL3). ...................
USING THE MEMO FUNCTION ......................................
Inputting memos ............................................................................
Recalling m e m o s ...........................................................................
Recalling memos with a sequential search. ..............................
Recalling memos with a direct search ......................................
Recalling memos with a keyword search ..................................
Correcting memos.. ........................................................................
Copying m e m o s .............................................................................
Deleting memos.. ...........................................................................
Deleting single memos.. ............................................................
Deleting entire memos.. ............................................................
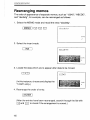
Rearranging m e m o s ......................................................................
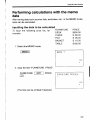
Performing calculations with the memo data .................................
Inputting the data to be calculated.. ..........................................
Summing memo data.. ..............................................................
87
88
91
92
92
93
94
95
95
95
96
98
98
99
100
101
102
102
103
104
104
105
106
107
107
109
USING THE ORGANIZER AS A CALCULATOR.. ........ .114
Using the Organizer in the CALC mode.. .......................................
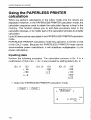
Using the PAPERLESS PRINTER calculation.. .............................
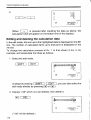
Inputting data.. ..........................................................................
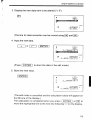
Editing and deleting the calculation data.. ................................
Adding new data for calculation ................................................
Application ................................................................................
When the error message appears .................................................
6
114
1 16
116
118
120
121
124
USING THE ALARM FUNCTION ...................................
. 125
Setting the alarm to ring .................................................................
Setting the schedule alarm .......................................................
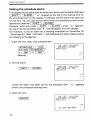
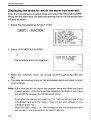
Displaying the times for which the alarm has been set.. ...........
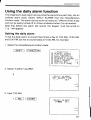
Using the daily alarm function.. ......................................................
Setting the daily alarm .....................................................
........
Deleting the daily alarm settings.. .............................................
USING THE SECRET FUNCTION ..................................
Inputting a password.. ....................................................................
Coding data as secret data ............................................................
Coding previously input data as secret data.. ...........................
Coding new data as secret data ...............................................
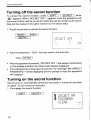
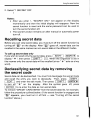
Turning off the secret function .......................................................
Turning on the secret function .......................................................
Recalling secret data .....................................................................
Declassifying secret data by removing the secret code.. ...............
Deleting and changing the password.. ...........................................
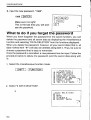
What to do if you forget the password ...........................................
125
126
128
129
129
131
132
132
133
133
135
136
136
137
137
138
140
USING THE MISCELLANEOUS FUNCTIONS............... 142
Checking the memory capacity.. ....................................................
Using the user dictionary ...............................................................
Storing data in the user dictionary ............................................
Recalling data in the user dictionary.. .......................................
Editing the items in the user dictionary.. ...................................
Deleting the items from the user dictionary.. .............................
Setting the miscellaneous “DATE FORMAT” and
“CALENDAR FORMAT” functions .................................................
Setting “DATE FORMAT” .........................................................
Setting “CALENDAR FORMAT” ...............................................
142
143
144
145
147
148
149
149
151
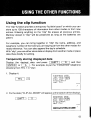
USING THE OTHER FUNCTIONS ..................................
153
Using the clip function.. ..................................................................
Temporarily storing displayed data.. .........................................
Temporarily storing data during editing.. ...................................
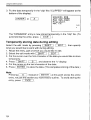
Recalling data you have temporarily stored.. ............................
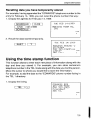
Using the time stamp function.. ......................................................
153
153
154
155
155
7
PERIPHERAL DEVICES .................................................
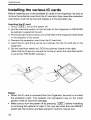
Installing the various IC cards.. ......................................................
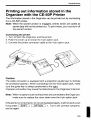
Printing out information stored in the Organizer with the
CE-50P Printer ...............................................................................
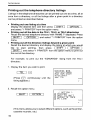
Printing out the telephone directory listings ..............................
Printing out items from the schedule agendas ..........................
Printing out the memos.. ...........................................................
Printing out calendar items, anniversaries, and items
from the user dictionary ............................................................
Data communications between two Organizers .............................
Transferring data from Organizer to Organizer.. .......................
Verifying data ............................................................................
Receiving data ..........................................................................
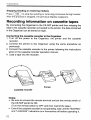
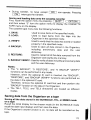
Recording information on cassette tapes.. .....................................
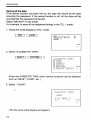
Saving data from the Organizer on a tape ................................
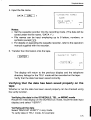
Verifying that the data has been saved properly on the tape ....
Loading data from the tape back into the Organizer.. ...............
PC LINK transfer ............................................................................
APPENDICES .........................................
157
158
159
160
161
162
163
164
165
168
169
172
173
175
177
180
. ........................ 183
Caring for your Organizer ..............................................................
When trouble occurs ......................................................................
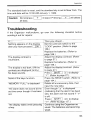
Troubleshooting .............................................................................
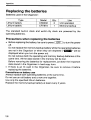
Replacing the batteries ..................................................................
Precautions when replacing the batteries .................................
Operating batteries ...................................................................
Memory backup battery ............................................................
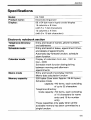
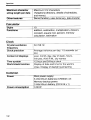
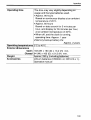
Specifications.. ...............................................................................
183
184
185
186
186
187
189
191
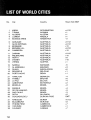
LIST OF WORLD CITIES . . . . . . . . . . . . . . . . . . . . . . . . . . . . . . . . . ..‘............ 194
a
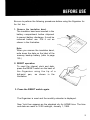
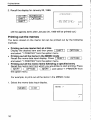
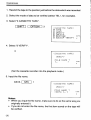
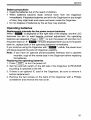
Be sure to perform the following procedures before using the Organizer for
the first time :
1. Remove the insulation band.
The insulation band was inserted in the
battery compartment before shipment
to prevent battery discharge. It must be
removed before use. Pull it out as
shown in the illustration.
Note:
When you remove the insulation band,
write down the date on the label of the
memory backup battery (refer to page
189.)
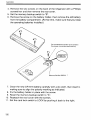
2. RESET operation
To reset the internal clock and data,
press the RESET switch on the back of
the Organizer using the tip of a
ball-point pen, as shown in the
illustration.
3. Press the RESET switch again.
The Organizer is reset and the monthly calendar is displayed.
New York then appears as the standard city for HOME time. The time
and date are reset to 12:00 midnight, January 1, 1989.
9
Before use
Inputting and recalling data
0
In this manual, notations such as a(1
r e and
i n s t@?l
r u c t i o n s
press those keys.
Also, illustrations such as:
t o
describe what will be displayed after pressing the keys the
manual tells you to press.
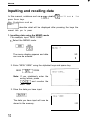
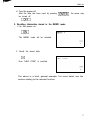
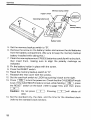
1. Inputting data using the MEMO mode
For example, input “NEW YORK”.
1. Select the MEMO mode.
The memo display appears and data
can now be entered.
CAPS
E
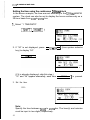
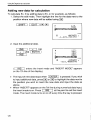
2. Enter “NEW YORK” using the alphabet keys and space key.
NEW [I
YORK
Note: If you mistakenly enter the
wrong letters, press
[I and re-enter the
entire item.
:
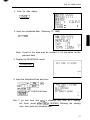
3. Store the data you have input.
The data you have input will now be
stored in the memory.
IO
CAPS
Before use
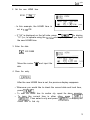
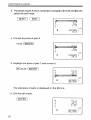
4. Turn the power off.
After the data has been input by pressing [I
be turned off.
r--cm-j
, the power may
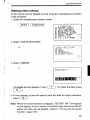
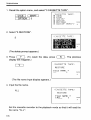
2. Recalling information stored in the MEMO mode
1. Turn the power on.
I
The MEMO mode will be selected.
2. Recall the stored data.
El
Now “NEW YORK” is recalled.
The above is a brief, general example. For more detail, see the
section relating to the relevant function.
11
Command centre
The top two rows of keys are the Command Centre. Just press the key
that’s labelled with the function you need. There are seven functions built
in:
1.
2.
3.
4.
5.
6.
7.
Calendar:
Schedule:
Telephone:
Memo:
Calculator:
World Time:
Home Time:
monthly, weekly, and daily versions
appointments and deadlines
names, telephone numbers, addresses
open memory, can calculate memo data
features paperless printer with What If
date and time for over 200 cities
date and time in your home city
You can store information in the SCHEDULE, TEL, and MEMO modes.
You can retrieve information from the CALENDAR (showing items from
Schedule), SCHEDULE, TEL, and MEMO modes. And you may update
anytime. The Card key gives you different software, depending on which
IC card you use (IC cards are optional).
Moving around the Organizer’s display screen is quick and easy. m and
L2_1 show you new displays. a, I,, m, and m move you around on
the current display.
The Organizer is packed with other valuable features. An alarm enclosed
within the Organizer beeps to alert you to upcoming appointments or for
any other reason you choose, and can display a message. The Secret
function protects personal information. The choice of two character sizes
allows you to emphasize some entries at the expense of others. And of
course, the Organizer may be connected to other devices, like printers,
cassette recorders, and computers.
12
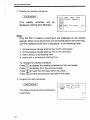
Chick guide
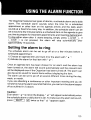
Setting the date and local time (HOME
time)
If you set the standard clock to your local time, you can look up the current
date and time whenever you wish. In addition, it keeps track of the monthly
calendar and the weekly and daily schedules, and keeps track of the time.
Setting the standard city
For example, set “NEW YORK” to be the standard city and December 12,
1988,1:30PM to be the HOME time:
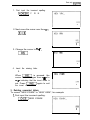
1. Recall the standard clock setting display.
Set the standard city and HOME
time.
! TIME/DATE cAps
l(;IT’-f
t
Note: First set the standard city and then set the HOME time.
Otherwise, if you set the HOME time first, it will be based on the
city previously set.
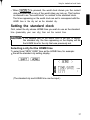
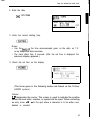
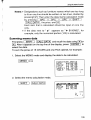
2. Select “2 CITY”.
2
Now, the standard city selection display appears.
13
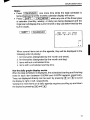
Quick guide
The countries in which the cities are located are arranged in alphabetical
order. If you press (UI, for example, the cities in countries beginning
with the letter “U” (U.S.A., etc.) will be displayed. Each time you press
m, the next three cities will appear on the display. Each time m is
pressed, the previous three cities appear on the display. If the keys are
pressed continuously, the city list will change continuously in forward or
reverse order.
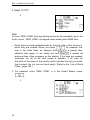
3. Recall the display containing “NEW YORK”.
upJ...lq
2
2 is the number that appears next
to New York.
l
After “NEW YORK” is selected the previous display reappears.
When and where daylight saving time applies, press I-1
121 to put “0” before the names of cities.“;<:“appears before
the time of summer time or daylight saving time (DST). If you press
these keys a second time, “0” disappears.
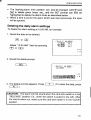
Setting your local time as HOME time for the built-in clock
1. Enter “1 TIME/DATE”.
After the previously set HOME time appears on the display, the new
HOME time can be input.
14
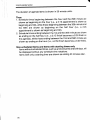
Quick
guide
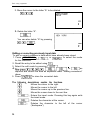
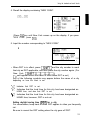
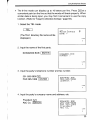
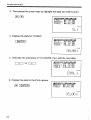
2. Set the new HOME time.
0130 IPM)*
l
l
In this example, the HOME time is
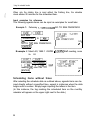
set at 1:30 PM.
If “24” is displayed on the left side, press 1 121)24
1 to display
“12” (i.e., to operate using the 1%hour clocksystem) before you input
the new HOME time.
3. Enter the date.
!XJ
12121988
Move the cursor “m” and input the
date.
4. Store the entry.
After the new HOME time is set, the previous display reappears.
l
l
l
Whenever you would like to check the current date and local time,
press PE].
To reset the HOME time for another city, repeat the above procedure.
To learn the current time in other cities, press -1
[I.Then select a city and press [WoRLDI to display the
current time in that city.
15
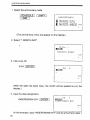
Quick guide
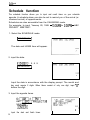
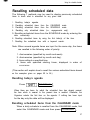
Schedule function
The schedule function allows you to input and recall items on your schedule
agenda. A schedule alarm can also be set to remind you of the arrival (or
imminent arrival) of appointments.
Schedules are also accessible from the CALENDAR mode.
For example, to input “January 20, 1989 - 10:OOAM to 2:OOPM - ABC
PROJECT MEETING”:
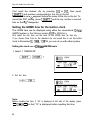
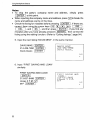
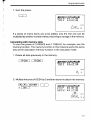
1. Select the SCHEDULE mode.
1SCHEDULE ]
The date and HOME time will appear.
2. input the date.
-1
0
1 2 0 1 9 8 9
1SCHEDULE ]
Input the date in accordance with the display prompt. The month and
day each require 2 digits. When these consist of only one digit, input “0”
before the digit.
3. Input the agenda items.
101212[PMj
ABC m PROJECTM
MEETING
pN7m-j
Input the start and finish times.
16
CAPS
r
Quick
l
l
guide
When “CAPS” appears on the display, capital letters are input, and
when not, small letters are input. Pressing -1 alternates
between capital and small letters.
To enter the date, either press m and input the date directly
or press L1] or m until the desired date appears on the display.
When these keys are pressed continuously, the date will change
continuously, forward and reverse.
Once the items are in the schedule agenda, they are displayed along with
the date.
l
l
l
If you add another agenda item to a day on which previous items
have been input, the Organizer sorts the items into their order of
occurrence.
To edit an agenda, press [m IEDIT] so that the cursor
flashes, then move the cursor over the letter(s) by pressing I)I,
m, Fj, or m and correct them.
To delete an entry, display the entry and press -1. The
delete prompt appears. Press r]. (To retain the data, press
I.1
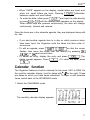
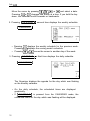
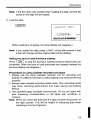
Calendar function
The Organizer features a built-in calendar for the years 1901 to 2099. On
the monthly calendar display, look for dates with ‘I. ” to the right. These
are dates on which you have items scheduled. To input or edit schedule
items, switch back to the SCHEDULE mode.
1. Select the CALENDAR mode.
1 CALENDAR ]
The monthly calendar display appears.
17
Quick auide
Move the cursor by pressing m, m, @, or m and select a date.
Pressing m or m changes one month at a time. If you hold the key
down, the calendar scrolls forwards or backwards.
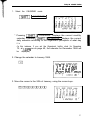
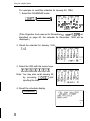
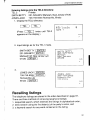
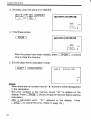
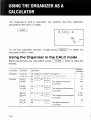
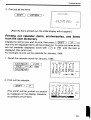
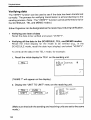
2. Pressing 1CALENDAR 1a second time displays the weekly schedule.
1 CALENDAR 1
l
l
Pressing m displays the weekly schedule for the previous week.
Pressing a displays the coming week’s schedule.
Pressing (ror m moves the cursor to another day of the week.
3. Pressing [ CALENDAR J a third time displays the daily schedule.
1 CALENDAR 1
The Organizer displays the agenda for the day which was flashing
on the monthly calendar.
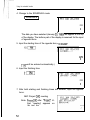
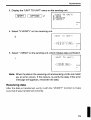
l
l
18
On the daily schedule, the scheduled times are displayed
graphically.
If [ SCHEDULE 1 is pressed from the CALENDAR mode, the
scheduled items for the day which was flashing will be displayed.
Quick guide
If you press -1
1 CALENDAR I, the current date (according
to the built-in clock) will be displayed.
When items are scheduled in the morning, ” n ” appears at that day’s
upper right on the monthly calendar, and for appointments after noon
it appears at the lower right of the date.
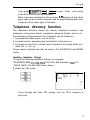
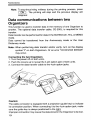
Telephone directory function
The telephone directory stores the names, telephone numbers, and
addresses of business clients, companies, personal friends, and so on.
The telephone listings stored in the Organizer can be looked up
1. by sequential order search, one at a time,
2. by direct search, specifying the first letter(s) of the word, or
3. by keyword search for a certain word included in the listing which you
would like to look up.
These search methods can also be used in the SCHEDULE and MEMO
modes.
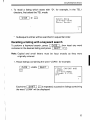
Inputting telephone listings
To input the following telephone listings, for example,
“EDWARDS BOB 201-265-5600 FAX 265-l 869 President, AbC Co.”
“DAVIS MIKE 214-456-7890 Davis Assoc.”
1. Select the TEL mode.
Cycle through the three TEL groups until the TEL1 directory is
displayed.
19
Quick guide
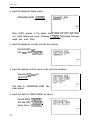
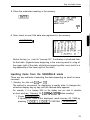
2. Input the telephone listing name.
EDWARDS BOB [I
When “CAPS” appears on the display, capital letters are input, and when
not, small letters are input. Pressing -1 alternates between
capital and small letters.
3. Input the telephone number and the fax number.
201-529-8200 a
FAX 265- 1869 -ENTER)
4. Input the address and the name of the person’s employer.
President m AbC Co.
[ENTER]
The date for “EDWARDS BOB” has
been stored.
5. Input the data for “DAVIS MIKE” as above.
DAVIS MIKE -1
214-456-7890 (-1
Davis Assoc. 1-1
20
Quick guide
Looking up a telephone listing
If you press m when “NAME ?,, appears on the display, the telephone
listings will appear one at a time in alphabetical order. If you press m, the
listings will be referenced in reverse order. The listing can also be looked
up directly using the first letter of the listing by inputting D m, for example,
to find a listing beginning with the letter “D” (direct search). You can also
perform a keyword search by inputting aword (or string of letters) contained
in the listing, such as “AbC”, and then pressing I]m. The listing
containing that word or string of letters will be displayed.
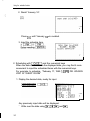
1. Recall the listing for “DAVIS”, for example.
Gl
pi&&CAPS
E
l
l
To edit a listing, press -1 -1 and the cursor will
flash. Then move the cursor by pressing ()I, 111, F[, or Jrl to the
position you would like to edit and input the new data.
To delete a listing from a directory, recall the data you would like to
delete, and press -1. The delete prompt appears. Press
Iv/. (To retain the data, press VI .)
Connecting the IC cards
Various special applications and functions are possible by connecting
optional IC cards to the Organizer. (Refer to the operation manual of the
relevant optional IC card for details.)
21
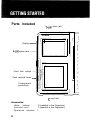
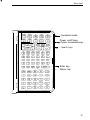
Parts included
1 Spin option jack
Display ---~
r
SHARP
4-pin option jack :-
Card lock switch ---Card removal lever -~~L
Transparent
guide keys
~~~
I
IC card slot
Accessories:
Lithium
batteries:
3 (installed in the Organizer)
Protection card:
1 (inserted in the Organizer)
Operation manual: 1
22
Getting started
~ Command centre
~~ ~~ Power on/off keys
~~~--~ Cursor movement keys
- --- Search keys
~~- Enter key
-- - Return key
23
Getting staded
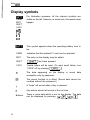
Display symbols
m
CARD
EDIT
SHIFT
CAPS
For illustration purposes, all the relevant symbols are
visible on the left. However, in actual use, this would never
happen.
*[sl
JQ
ts
c*
This symbol appears when the operating battery level is
low.
CARD
Indicates that the optional IC card can be operated.
EDIT
The entry on the display may be edited.
SHIFT
-1 has been pressed.
CAPS
Capital letters will be input. (To input small letters, turn
“CAPS” off by pressing [CAPS] .)
The data appearing on the display is secret data
accessible only by password.
The secret function is in effect. (Secret data cannot be
recalled without the password.)
A “beep” will sound when a key is pressed.
Any alarms stored will sound at the set time.
There is more data which is not on the display. The data
can be displayed by pressing m, mq II] orl)l.
24
Getting
started
Key notations
This manual uses the following notations for key operations and functions.
Key
CALENDAR
0
m
Notation
1 CALENDAR ]
m0r-mJ
A or
lysiim)sHlFTll
Note
Keys with only one function always
appear in the manual with the function
enclosed in a box.
Keys with multiple functions appear in
the manual with only the contextually
Alphabetical keys with multiple
functions appear sometimes as
unboxed letters and sometimes as
the boxed function name, as per
context.
Numerical keys and alphabetical keys
with single function are notated only
with unboxed numbers and letters.
Distinguishing between “0” and “0”
Zero is indicated as “0” on the display and also in this manual when it may
be confused with the letter “0”.
The m key
1. This key performs the specific functions indicated in blue.
Example:
Pressing m and then m causes a “beep” to
sound every time a key is pressed.
2. This key also enters the other functions described below.
Keyword search: m Iv[or [I m (See pages 62,
93 and 102.)
Copy function: [sHlFT[ -( S e e rIages 65,95 and 103.)
Setting the time: ISHlFT
(See page 37.)
’ qg
Selecting a world city: I,
,
,RLDJ (See page 45.)
Setting the current date: m
(
lDAR] (See page 72.)
/ - - m m - j - >ULEI (See page 57.)
Note: Numerical keys and alphabetical keys are left unboxed, except
when necessary, in this manual.
25
Getting started
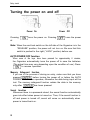
Turning the power on and off
Power On
Power Off
Pressing I/turns the power on. Pressing FJ turns the power
Off.
Note: When the card lock switch on the left side of the Organizer is in the
“RELEASE” position, the power will not turn on. Be sure that this
switch is pushed to the right (“LOCK” position) before use.
AUTO POWER OFF function
When none of the keys have been pressed for approximately 6 minutes,
the Organizer automatically turns the power off to save the batteries.
(The actual time may vary depending upon the condition of use.) Press
/-DKj to resume operation.
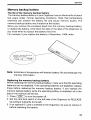
Memory Safeguard function
If you are in the process of storing an entry, make sure that you have
pressed [w] before turning the power off or before the AUTO
POWER OFF function operates, otherwise the data being input will be
lost. The memory safeguard function retains the data in the memory
only after I-1 has been pressed.
Secret function
Whenever there is a password stored, the secret function automatically
goes into effect when power is turned on. Thus, if the secret function is
off and power is turned off, secret will come on automatically when
power is turned back on.
26
Getting started
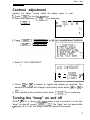
Contrast adjustment
Adjusting the display contrast makes the display easier to read.
1. Press -1 to turn the power on.
2. Press any mode key ( ITELI, for example).
pEi-1
ffip,ET'EL
1 :fi
CAPS
t
4. Select “2 LCD CONTRAST”.
2
/LCD1
1 - DAIX CAPS
v - LIGHT *
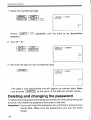
5. Press m or m to darken or lighten the display as required. The
amount of contrast will change continuously when either m or m is
held.
6. After adjusting the contrast, press either I]
or a mode key.
Turning the “beep” on and off
While “J ” is lit, a “beep” will sound when a key is pressed. To turn the
“beep” on and off, press m m. The “beep” will not sound after
” k ” goes off. To turn the “beep” back on, repeat the process.
27
Getting started
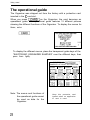
The operational guide
The Organizer was shipped out from the factory with a protection card
inserted in the IC card slot.
When you press -1 on the Organizer, the card becomes an
operational guide. The operational guide features 12 different pictures
showing the different functions of the Organizer. To display the menus for
these, enter:
To display the different menus, place the transparent guide keys of the
“ELECTRONIC ORGANIZER SAMPLES” over the different keys, then
press them lightly.
_~--~~~
ELECTRONIC ORGANIZErI
SAMPLES OF BUILT-IN FUNCTION 1
MONTHLY
CALENDAR
W E E K L Y DAILY
SCHEDULE
SCHEDULE
APPOINTMENT
Bi_r#_I@Jg
PBHOOO
AE%ss
%f
~?fv
mm@@
Note: The menus and functions of
the operational guide cannot
be used as data for the
Organizer.
28
Keep this protection card
loaded when no application
IC card is used.
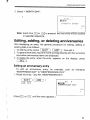
You can enter and correct information in 3 modes: SCHEDULE, TEL, and
MEMO.
To practice inputting characters and numbers, select the MEMO mode, for
example, and input the characters as follows:
The power will turn on and the
MEMO mode will be selected.
The display indicates that the
Organizer is in 8-line display mode.
Note: The display alternates between normal and enlarged displays
every time I]] 408 LINES ] are pressed. (See page
35.)
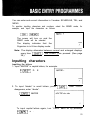
Inputting characters
Inputting the letters
1. Input “ABCDE” in capital letters, for example.
A B C D
I]
E
2. To input “abcde” in small letters, press -1. After “CAPS”
disappears, enter “abcde”.
I]ABCDE
To input capital letters again, turn “CAPS” back on by pressing
I]
a g a i n .
29
Basic entrv Droarammes
Inputting non-English characters
1. Input “A” and “ii”, for example.
2. Input “e” and “6”.
12345
1 r
* “c” marks, etc., are input as symbols. “iitl and “9 can also be input
as symbols.
Inputting numbers
1. Input “12345”, for example.
[m] 12345
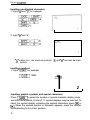
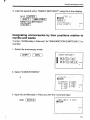
Inputting graphic symbols and special characters
Press -1 to select the symbol or special character display mode,
and input the symbols. A total of 17 symbol displays may be selected. To
select the symbol display containing the desired characters, press m or
m. When the desired symbol or character appears, press the number
corresponding to its symbol position.
30
Basic entry programmes
1. Select the symbol display moae.
pscE-j~I
10 symbols will be displayed.
2. Switch to the next set of symbols.
Each time m is pressed, a new
set of 10 symbols will appear in
sequence.
3. Input “?“.
FIlElO
7
Press -1 assuming “?”
appears next to the number zero.
r
Note: If you press m when the last set of symbols is displayed, the
initial symbol display reappears. When you press m, the
previous set of symbols reappears. The initial symbol display is
thus determined by your previous choice. Frequently used
symbols and characters can thus be set so that they appear in
the initial symbol display.
Note: To exit the symbol input mode, press -1.
31
Basic entrv oroarammes
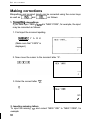
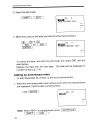
Making corrections
Misspellings and incorrect inputs can be corrected using the cursor keys
as well as I]
and -1 as follows:
1. Correctting misspellings
If you have input “NEW YARK” for “NEW YORK”, for example, the input
may be corrected as follows:
1. First input the incorrect spelling.
N E W
-1
Y A R K
(Make sure that “CAPS” is
displayed.)
2. Now move the cursor to the incorrect letter “A”.
3. Enter the correct letter “0”.
CAPS
E
2. Inserting missing letters
To input the missing “0” and correct “NEW YRK” to “NEW YORK”, for
example:
32
Basic entry programmes
1. First input the incorrect spelling.
N E W
[q
Y
R
K
2. Next move the cursor over the “R”.
mlxl
NE14
YEK
CAPS
r
l-----l
3. Change the cursor to ” 4 ‘I.
j7m-J
4. Insert the missing letter.
0
When I]is pressed, the
cursor mark changes from “a” to
” t ” indicating that the insert mode is
set. Press I]again to exit
the insert mode.
I
t-4El.l
‘-~‘IXK
/
3. Deleting unwanted letters
To correct “NEW YOARK” to “NEW YORK”, for example:
1. First input the incorrect spelling.
[q NEW YOARK
t-jE[.J
‘{I:I~~RK-
CAPS
E
l-----l
33
Basic entry programmes
2. Move the cursor to the letter “A” to be deleted.
DDD
tjE1.J
‘,-‘~:~fiRl<
CAPS
c
3. Delete the letter “A”.
IDELl
bjEl.1
You can also delete “A” by pressing
~~(---%--I.
‘f~:f?K
CAPS
E
r-
Editing or correcting previously input data
To edit or correct mistakes in data which have already been stored
1. Press 1SCHEDULE 1, -1, or 1-1 to select the mode
for the correction.
2. Recall the entry to be edited using FJ.
3. Select the edit mode by pressing 1-1
-1.
4. Nowpressm,r?n,l,I,lrl,
[INS), I,
or -1 as
required and correct the data as explained under “Making corrections”
above.
5. Press 1-1 to store the corrected data.
The following descriptions explain the functions.
Moves the cursor to the right.
Moves the cursor to the left.
Moves the cursor up to the previous line.
Moves the cursor down to the next line.
Enters the insert mode. Pressing this key again exits
the insert mode.
Deletes the character at the cursor.
Deletes the character to the left of the cursor
(“backspace”).
34
Basic entry programmes
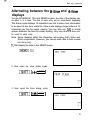
Alternating between the 8-line and 4-line
displays
For the SCHEDULE, TEL and MEMO modes, the size of the display can
be either 8 or 4 lines. The size of each entry will be remembered separately.
The 8-line mode displays 16 characters per line to allow more information
to be seen at one time, while the 4-line mode displays larger letters at 12
characters per line for easier viewing. You can also use a to create
spaces between the lines for easier reading. Only one size at a time can
be used for each entry.
Note: Some displays within the Organizer will employ both 4-line and
8-line components. However, you cannot enter data in both modes
simultaneously.
1. First display the data in the MEMO mode.
2. Now select the 4-line display mode.
-1 [ 4+8 LINES 1
3. Next, select the 8-line display mode.
-1 14+8 LINES 1
35
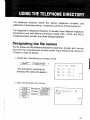
I
The Organizer features a built-in clock which allows the Organizer to do
the following:
1. To display the monthly calendar, and the weekly and daily schedules in
the CALENDAR mode.
2. To keep track of the items scheduled on the agenda for the current day
in the SCHEDULE mode (automatic tracking.)
3. To sound the alarm at pre-set times. (There are two alarms, a schedule
alarm and a daily alarm.)
4. To keep track of not only the local time (HOME time), but the
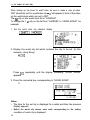
corresponding times in 212 cities all over the world.
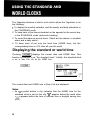
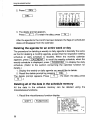
Displaying the standard or world time
Pressing -1 displays the current date and HOME time. This
function is referred to as “the standard clock.” Initially, the standard clock
is set to New York city as the HOME time.
The current date and HOME time in New York are displayed.
Notes:
l
36
An “H” symbol before a city indicates that the HOME time for the
standard clock is set for this city. “w” appears before the world cities.
“<z” appears before the time of summer time or daylight saving time
(DST).
Using the standard and world clocks
l
When -1 is pressed, the world clock shows you the current
date and local time in any of the world cities you look up. This function
is referred to as “the world clock” in contrast to the standard clock.
The times appearing on the world clock are set to correspond with the
HOME time in the city set as the standard city.
Setting the standard clock
First, select the city whose HOME time you wish to use as the standard
time (presumably your own city), then set the current time.
)CAUTION:
If the standard time for the built-in clock is set prior to setting)
the standard city, the time appearing on the display will be
the HOME time for the city that was previously set.
Selecting a city for the HOME time
To select local “NEW YORK” time as the HOME time, for example:
1. Recall the standard city setting display:
I
(The standard city and HOME time can be input.)
37
!
Using
I
2. Select “2 CITY”.
the
I
standard and world clocks
2
Note:
As local “NEW YORK” time was factory preset as the standard city for the
built-in clock, “NEW YORK” will appear when setting the HOME time.
l
World cities are listed alphabetically by the first initial of the country in
which they are located. When you press VI, for example, the
cities in the United States are displayed. Each timem is pressed, three
additional cities appear on the display and each timea is pressed, the
previous three cities re-appear on the display. If the keys are pressed
continuously, the city list will scroll forward or backward. If you press the
first letter of the name of the country which includes the city you would
like to select, the city can be found easily. (Refer to the “List of World
Cities,” page 194.)
3. For example, since “NEW YORK” is in the United States, press
I.
U
1-I. A. EMIF:fiTES
38
Using the standard and world clocks
4. Recall the display containing “NEW YORK”.
(Press m key until New York comes up on the display. If you pass
“NEW YORK” press m.)
5. Input the number corresponding to “NEW YORK”.
2
l
When DST is in effect, press I]
and the city number to mark
that city as DST-applicable, and then press the city number again. (For
New York, 1-1 121 11.)
(“0” will appear before the name of cities when DST is set.)
Any of the following symbols may appear before the name of a city
depending on how the clock is set.
Indicates that DST is set.
Indicates that the local time for this city has been designated as
HOME time, and also that DST is set.
” )“: Indicates that the local time for this city has been designated as
HOME time; however, DST is not set.
“0”:
“D”:
Setting daylight saving time (ET) for a city
For convenience, keep track of when DST applies to cities you frequently
visit.
Be sure to cancel the DST setting when the city goes off DST.
39
Using the standard and world clocks
First recall the desired city by pressing m or I, then press
1-1 and number corresponding to the city on the list.
When DST is set, “0” appears before the name of the city on the list. To
cancel the DST setting, press -1 and the city number a second
time so that ” 0” disappears.
Setting the HOME time for the built-in clock
The HOME time can be displayed using either the conventional 12-hour
AM/PM system or the 24-hour system (0:OO to 2359 hrs.).
First select the city, then set the clock to the HOME time for that city.
If you choose New York as the standard city and would like to set the built-in
clock to December 12,1988,1:30
PM, you can do so with either system.
Setting the clock on a 12-hour AM/PM basis
1. Select “1 TIME/DATE”.
2. Set the time.
Note:
Before inputting the time, if “24” is displayed at left side of the display, press
[
12+24
1so that “12” is displayed before inputting the time.
40
Using the standard and world clocks
3. Input the date.
/XJ 12121988
Input the day and month in 2 digits and the year in 4 digits. For single
digit months or days, input “0” before the single digit.
Note:
The Organizer is initially set to receive this input in the order of month,
day, and year. However, this order can be changed to day, month, and
year. (Refer to “Date Format,” page 149.)
4. Enter the correct starting time.
Notes:
l
Use the beep of the time announcements given on the radio, on T.V.,
or by telephone time services.
l
The clock starts from 0 seconds. (After the set time is displayed, the
previous display appears.)
5. Check the set time on the display.
When the time is set with 12-hour basis, noon and midnight changes
are displayed as below.
1159AM + 12:OOPM (noon) + 1259PM 3 1 :OOPM +
1159PM + 12:OOAM (midnight) + 12:59AM + 1 :OOAM + 11:59AM
41
I
Usmg the standard and world clocks
Setting the time using the continuous 24-hour clock
In the above example, the time was set according to the 12-hour AM/PM
system. The clock can also be set to display the hours continuously on a
24-hour basis from 0:OO to 2359 hrs.
1. Select “1 TIME/DATE”.
r-miy [11
2. If “24” is not displayed, press 1
key) to display “24”.
12+24
(If it is already displayed, skip this step.)
“12” and “24” appear alternately, each time (
] (time system selector
12024
] is pressed.
3. Set the time.
1330
Note:
Specify the time between 0O:OO to 23:59 hrs. The hour(s) and minutes
must be input in two digits, respectively.
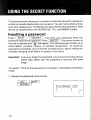
42
Using the standard and world clocks
4. Enter the date.
m 12121988
5. Enter the correct starting time.
Notes:
l
Use the beepof the time announcements given on the radio, on T.V.,
or by telephone time services.
l
The clock starts from 0 seconds. (After the set time is displayed, the
previous display appears.)
6. Check the set time on the display.
(The times given in the following section are based on the 12-hour
AM/PM system.)
Cursor:
0 ” designates the cursor. The cursor is used to indicate the position
where the next letter, number, or symbol will be input. When correcting
an entry, move ” n ” to the spot where a character is to be written over,
deleted or inserted.
43
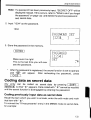
Using the standard and world clocks
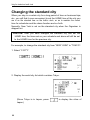
Changing the standard city
When you stay in a certain city for a long period of time on business trips,
etc., you will find it more convenient to set the HOME time of the city you
are in as the standard time on the built-in clock, so as to maintain the correct
time for schedules and the alarm function and so forth.
Normally, New York is set as the standard city when the Organizer is
shipped out.
CAUTION: After you have changed the standard city and set the
HOME time, the times set on your schedule and alarm will still be set
to the HOME time for the previous city.
For example, to change the standard city from “NEW YORK” to “TOKYO”:
1. Select “2 CITY”.
2. Display the world city list which contains Tokyo.
J
CAPS
(Since Tokyo is in Japan, press r\ to display the cities of
Japan.)
44
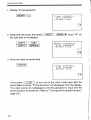
Using the standard and world clocks
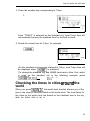
3. Press the number key corresponding to Tokyo.
2
I
Once “TOKYO” is selected as the standard city, local Tokyo time will
automatically become the standard time for the built-in clock.
4. Check the current time for Tokyo, for example.
(As the standard city has been changed to Tokyo, local Tokyo time will
be displayed when vl
is pressed.)
(To change the standard city and HOME time back to New York, which
is used as the standard city in the following example, press
ly3mw-j
[HOMEI 2lJm . . . Iv_ 2 . )
Checking the times in cities arouncl the
world
When you press mj , the world clock function informs you of the
time in the cities of the world listed on the world clock. The local times for
the cities on the world clock are based on the standard time in the city
which the built-in clock is set to.
45
Using
the standard and world clocks
When looking up the times for world cities, be sure to make a note of when
DST should be set for a particular city. ” 0 “will appear in front of the cities
on the world clock which are set to DST.
The 1 st city on the world clock list is “LONDON”.
To change the 1 st city on the list from “LONDON” to “HONG KONG”, for
example:
1. Set the world clock city selection display.
piwil pi&mm-l
cl FRANKFURT
2. Display the world city list which contains the city to be set. (In this
example, Hong Kong.)
HEI
Press m repeatedly until the display containing “HONG KONG”
appears.
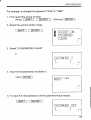
3. Press the numerical key corresponding to “HONG KONG”.
2
Notes:
l
l
The time for the set city is displayed for a while and then the previous
display appears.
Before the world city names, each mark corresponding to the setting
condition of each city is displayed.
46
Using the standard and world clocks
0: Indicates that DST applies.
D: Indicates that the time for this city has been designated as world time,
and also that DST applies.
): Indicates that the time for this city has been designated as world time,
and also that DST does not apply.
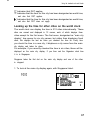
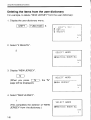
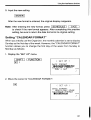
Looking up the time for other cities on the world clock
The world clock can display the time in 212 cities internationally. These
cities are named and displayed in 72 menus, each of which displays three
cities except for the first menu. The first menu, designated as “main city
display”, has space for six city names; but rather than displaying fixed
cities, this displays the last six cities you checked the time for. Every time
you check the time in a new city, it displaces a city name from the main
city display and takes its place.
For example, if you recently checked the time in six cities, these will be
displayed on the main city display. If you then ask the Organizer what time
it is in Singapore:
Singapore takes the first slot on the main city display and one of the cities
is dropped.
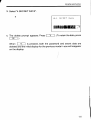
1. To look at the main city display again, with Singapore listed:
SE3
I:IIORLD > m
0 <DAKAR
SENEGAL
ff FREETOWN
S I ERRf2 LEONE
q s I NGAPORE
SINGAPORE
CAPS
J
47
Using the standard and world clocks
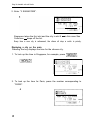
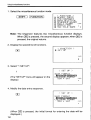
2. Enter “3 SINGAPORE”.
Singapore takes the first slot and the city in slot 6 - in this case San
Francisco - drops off the list.
Every time a new city is referenced, the others all drop a notch in priority.
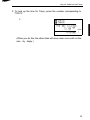
Displaying a city on the main
Pressing the key displays the time for the chosen city.
1. To look up the time in Singapore, for example, press -1.
2. To look up the time for Paris, press the number corresponding to
“PARIS”.
4
48
Using the standard and world clocks
3. To look up the time for Tokyo, press the number corresponding to
“TOKYO”.
5
(When you do this, the other cities will move down one notch on the
main city display.)
49
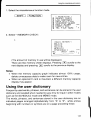
You can enter important future appointments as well as important dates in
the past into the Organizer’s schedule function. These dates are marked
with tags on the Organizer’s calendar display so you can always tell what’s
coming up that month at a glance. In addition, you can set an alarm to
sound just before any agenda item to alert you beforehand to upcoming
dates and appointments. (Refer to “Setting the schedule alarm,” page1 26.)
Inputting data in the SCHEDULE mode
The date of an agenda can be selected using three different methods.
1. By selecting the desired date in the CALENDAR mode.
2. By selecting the desired date in the SCHEDULE mode.
3. By recalling the desired date directly.
Once the date has been selected, actual entry of the agenda is the same
for all three methods. For completeness, a full example is shown for all
three methods of searching the date.
Notes: * Multiple items may be scheduled on the same date.
If other items have been scheduled previously for a given date,
simply input the new item on the agenda following these.
* The 84ine display mode displays 16 characters per line. You can
use a to create spaces between the lines for easier reading.
Inputting items from the CALENDAR mode
To enter an item from the CALENDAR mode, such as, “January 20, 1989
1O:OOAM - 2:OOPM ABC PROJECT MEETING”
50
Using the schedule function
1. Select the CALENDAR mode.
(j 1 CALENDAR 1
* Pressing [m 1 CALENDAR 1displays the current monthly
calendar. Pressing I-1 [ SCHEDULE 1displays the current
daily schedule according to the Organizer’s perception of what day
it is.
(In this instance, if you set the Organizer’s built-in clock for December
12, at 1:30PM as on page 40, the calendar for December 1988 will
be displayed.)
2. Change the calendar to January 1989.
.s M T 1-l T F S
.I
2 3
Y 5
6
I
El 3 Ill I I 12 13 vi
I5 I 6 I I IEI 19 20 2 I
22 23 21-1 25 26 21 2B CAP.3
3. Move the cursor to the 20th of January, using the cursor keys.
51
Using the schedule function
4. Change to the SCHEDULE mode.
1 SCHEDULE 1
CAPS
r
The date you have selected (January 20,1989) will appear at the top
of the display. The bottom part of the display is reserved for the input
of agenda items.
5. Input the starting time of the agenda item, “1O:OOAM”.
CAPS
E
(“:OO” will be entered automatically.)
6. Input the finishing time.
2~1
CAPS
c
7. After both starting and finishing times are entered, input the agenda
items.
ABC Project m meeting
Note: Pressa after "Project" SO
that “meeting” appears on
the next line.
52
Using the schedule function
8. Store the scheduled meeting in the memory.
CAPS
E
9. Now, check to see if the data was registered in the memory.
1 CALENDAR 1
Notice the tag ( n ) next to “January 20”. It indicates a scheduled item
for that date. (Agenda items beginning in the morning result in a tag at
the upper right of the date, while those beginning after noon result in a
tag appearing at the lower right of the date.)
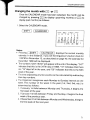
Inputting items from the SCHEDULE mode
There are two methods of selecting the date depending on which is more
convenient.
1. Selecting the date with m and IAl
This method is convenient for displaying a nearby date. It changes the
schedule display day by day until the desired date appears.
For example, if it is January 20th on the display and you wish to schedule
an item such as, “January 16, 3:OOPM - 5:OOPM Sales meeting”
1. Press 1SCHEDULE I.
If January 20, 1989 is not displayed, recall January 20, 1989 by
pressing [m I[01201989 [ SCHEDULE 1.
53
/‘,
8
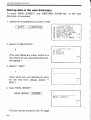
Using the schedule function
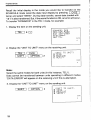
2. Recall “January 16”.
Press m until “January 16” is recalled.
3. Input the schedule item.
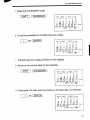
2. Scheduling with IJand the numerical keys
When the date is not close to the displayed date, you may find it more
convenient to input the scheduled items with the numerical keys.
For example, to schedule, “February 17, 1989 1:30PM DR. WILSON
VISIT AT GUEST ROOM”
1. Display the desired date, ready for input.
Any previously input date will be displayed.
* Write over the date using I,[T, Fl, and [‘).
54
Using the schedule function
2. Clear the date display.
)I
MMi’DDi’it::i”i’Y.~~~~~
MONTH : _
IMY
ypg :: CAPS
r
3. Input the scheduled date. (February 17, 1989)
Note: A part of the date may be omitted if it is the same as the
previous date.
4. Display the SCHEDULE mode.
( SCHEDULE 1
5. Input the scheduled time and item.
Note: If you don’t know what ttme a scheduled item, such as a meeting,
will finish, press either[rlor (ENTER) following the starting
time, then input the schedule item.
55
Using the schedule function
When only the starting time is input without the finishing time, the schedule
clock allows 30 minutes for the scheduled item.
Input examples for reference
The following agenda items can be input as examples for recall later.
Example 1: February 7,1989
1O:OOAM GO TO SAN FRANCISCO
pZFlp5CE--(
02071989
[ SCHEDULE ) 10 IEl
GO TO m SAN FRANCISCO
[TRTm-J
Example 2: March 20, 1989 1 :OOPM - 5:00PM,
CAPS
I
Staff meeting, room
No. 101
meeting a room No. 101
[ENTER]
CAPS
E
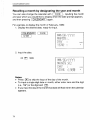
Scheduling items without times
After selecting the schedule date as outlined above, agenda items can be
input directly without a specified time, except in instances when the data
begins with a number. Simply begin inputting the letters in the item.
(In this instance, the tag marking the scheduled item on the monthly
calendar will appear on the upper right next to the date.)
56
Using the schedule function
Recalling scheduled data
The following 7 methods may be used to display previously scheduled
items to check what is scheduled for any given date.
1. Recalling
today’s agenda.
Recalling scheduled items from the CALENDAR mode.
Recalling scheduled items from the SCHEDULE mode.
Recalling only scheduled dates (i.e., engagements only).
Recalling scheduled items from the SCHEDULE mode by entering the
date numerically.
6. Recalling scheduled items by using the first letter(s) of the item.
7. Recalling the scheduled item with a keyword search.
2.
3.
4.
5.
Note: When several agenda items are input for the same day, the items
are recalled in the following order of priority:
1. Anniversaries (specified by month and week).
2. Anniversaries (specified by month and day).
3. Items without a specified time.
4. Items with specified starting times, displayed in order of
occurrence.
(This section will explain how to recall the various scheduled items based
on the examples given on pages 50 to 56.)
Recalling today’s agenda
Press -SHIFT]
[ SCHEDULE ].
When there are items for which the scheduled time has already passed,
the item which is nearest to the present time is recalled. Otherwise, the
Organizer selects the first item on the agenda. If nothing has been input
for the day only the date will be displayed.
Recalling scheduled items from the CALENDAR mode
When a daily schedule is recalled from the CALENDAR mode, first
select the CALENDAR mode and then press 1SCHEDULE 1.
57
Using the schedule function
For example, to recall the schedule for January 20, 1989:
1. Select the CALENDAR mode.
I
)I ( CALENDAR 1
I 2
'i
5 6 1 B 3
I I 12 13 1'1 I5 I6
IEI 19 20 2 I 22 23
25 26 21 28 29 30
C3YlI 19 1
3
ill
II
21-1 c*ps
3 I E
m
(If the Organizer clock was set for December 12,1988 at 1:30PM as
described on page 40, the calendar for December, 1988 will be
displayed.)
2. Recall the calendar for January, 1989.
3. Select the 20th with the cursor keys.
IrlIrlI)II)II)II)Im
Note: You may also recall January 20
by pressing (1 and
inputting the date.
4. Recall the schedule display.
1SCHEDULE j
58
Using the schedule function
Recalling scheduled items from the SCHEDULE mode
To recall the schedule directly from the SCHEDULE mode in forward or
reverse direction, first set the SCHEDULE mode and then press m (to
recall the next day and future days) or IAl (to recall the last and previous
days) as required.
For example, to recall the schedule for December 12, 1988:
1. Set the SCHEDULE mode.
(If the Organizer clock was set on
December 12, 1988 at 1:30PM as
described on page 40, the calendar
for December 12, 1988 will be
displayed.)
2. Recall the schedule for the next day.
L.53
The agenda for the next day will be
displayed. When there are several
items scheduled on the same day,
the item which is scheduled to occur
next will appear.
TIJE DEiI: lz;.,
1’388
CAPS
E
E
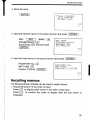
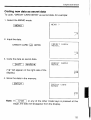
Recalling only scheduled dates (i.e., engagements only)
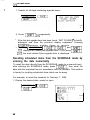
Recall the date input display and press [q
m repeatedly so that
the days on which there are items on the agenda are searched for starting
with the day appearing on the display.
59
Ustng
the schedule function
,
1. Search for all days containing agenda items.
2. Press 11 m repeatedly.
l
l
After the last agenda item has been found, “NOT FOUND !” is briefly
displayed and then the previous display reappears. Pressing
1/\1 , references agenda items in reverse.
1-1
Pressing [ SCHEDULE 1 I=/ -1 and wj
(VI displays the oldest past agenda item. If you press i-1
IA( , the most distant future agenda item is displayed.
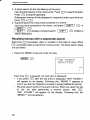
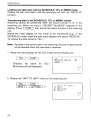
Recalling scheduled items from the SCHEDULE mode by
entering the date numerically
To recall the date directly from the SCHEDULE mode by numerical input,
after entering the SCHEDULE mode, press I-1, then enter the
date with the numerical keys in accordance with the prompts. This method
is handy for recalling scheduled items which are far away.
For example, to recall the schedule for February 7, 1989:
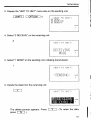
1. Display the desired date, ready for input.
1 SCHEDULE ) I=)
(1
60
Using the schedule function
2. Input the date.
02071989
3. Recall the agenda for that date.
1 SCHEDULE 1
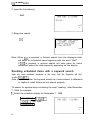
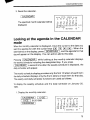
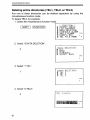
Recalling scheduled items using the first letter(s) of the
item
Input the first letter(s) of the schedule item you would like to recall on the
display and then press m to display it.
Note: Be sure to enter the first letter(s) exactly as they were entered. A
difference in capital or small letters will not search properly.
For example, to recall the “Staff’‘-related items scheduled after December
1 2 , 1988:
1. Select the SCHEDULE mode.
61
Usmg the schedule lunction
2. Input the first letter(s).
Staff
3. Begin the search.
Note: When m is pressed, a forward search from the displayed date
will begin for scheduled items beginning with the word “Staff”.
If IAl is pressed, a reverse search will take place for items
scheduled before the date presently appearing on the display.
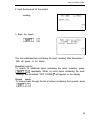
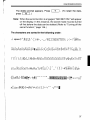
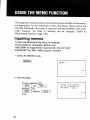
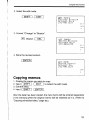
Recalling scheduled items with a keyword search
Input any word contained anywhere in the entry, and the Organizer will find
it with -1
FJ.
Note: Be sure to enter the keyword exactly as it was entered. A difference
in capital or small letters will not search properly.
To search for agenda items containing the word “meeting”, after December
1, 1988, for example:
1. Select the schedule display for December 1, 1988.
1 SCHEDULE 1 -1
-1 12011988
1 SCHEDULE 1
62
/Tl)l
Using the schedule function
2. Input the keyword for the search.
meeting
3. Begin the search.
The first scheduled item containing the word “meeting” after December 1,
1988 will appear on the display.
Repeated search:
To search for additional items containing the word “meeting”, press
-1 m repeatedly. When no more items containing the word
“meeting” are scheduled, “NOT FOUND !‘I will appear on the display.
Reverse search:
To browse back through the list of entries containing the keyword, press
r-sim-jm.
63
Using the schedule function
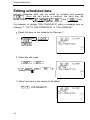
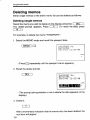
Editing scheduled data
Previously scheduled data may be edited by recalling and pressing
-1
I]. Once the edit mode is entered, the data may be
edited directly using 1)1 111 PI m I]
and I]etc.
For example, to change “SAN FRANCISCO” within a schedule item on
February 7, “GO TO SAN FRANCISCO” to “LOS ANGELES”:
1. Recall this item on the schedule for February 7.
[ SCHEDULE 1 (1
IT-02071989
pTEFq
2. Select the edit mode.
change it to “W.
3. Move the cursor to the section to be edited.
64