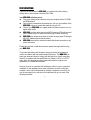
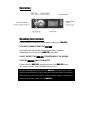
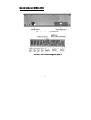
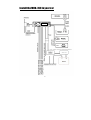
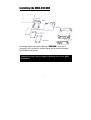
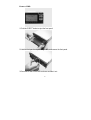
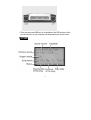
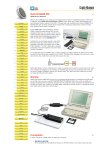
1
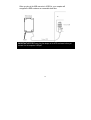
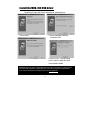
MP3 Car Stereo System
MHD-350
User Manual
1
Introduction
Thank you for purchasing the MHD-350, your entire music library during
driving, with no need to pack a suitcase full of CDs!
Your MHD-350 will allow you to:
Copy your existing music collection using any computer with a CD-ROM
and USB support.
Carry photos, presentations, documents etc. with you, the harddisc of the
MHD-350 is seen as a removable hard drive by your PC.
Think of your MHD-350 as a superb jukebox that also functions as a car
digital audio studio!
MHD-350 provides audio source from MP3 format and FM radio channel
(with 6 memory keys for channel and fuzzy logic channel searching).
MHD-350 also accepts audio input from other sources (from CD-changer,
MD, DAT, walkman and sound processor)
MHD-350 comes with a sub-woofer output that allows connection to any
active sub-woofer.
Please take the time to read this instruction manual thoroughly before using
your MHD-350.
This product generates radio frequency energy and must be installed and
used in accordance with the manufacturers instructions. The MHD-350 has
been type tested and found to comply with the limits for a class B computing
device in accordance with the specifications in Subpart J of Part 15 of FCC
rules, which are designed to provide reasonable protection against such
interference in a residential installation.
However, there is no guarantee that interference will not occur in a particular
installation. If this equipment does cause interference to radio or television
reception, which can be determined by turning the equipment on and off, the
user is encouraged to try and correct the interference by one or more of the
following measures:
2
Reorient the receiving antenna
Relocate this equipment with respect to the receiver
Move this equipment away from the receiver
If necessary, the user should consult the dealer or an experienced
radio/television technician for help.
Precautions
1. Be sure that only the supplied power supply/charger is used.
2. Do not open the top or bottom covers of the unit, this will void the
warranty.
3. Do not install MHD-350 in places where it may be exposed to extremes
of heat and cold, dusty and damp environments.
Cleaning: Do not use hard cloths, paint thinner, alcohol or other volatile
solvents. These may damage the external surfaces of your MHD-350’s
components or remove indicator characters.
Yamakawa will accept no responsibility for any damages (including consequential
or incidental) incurred by the customer or any third party as a result of loss or
impairment of the data stored on MHD-350, regardless of whether such loss could
have been or actually foreseen by Yamakawa.
3
Operation
Handling Instructions
Please read all the instructions carefully before handling your MHD-350.
BE CAREFUL WHEN STORING THE MHD-350
Avoid places with high humidity, strong magnetic fields, or extreme
temperatures when you store your MHD-350 or hard drive.
DO NOT SUBJECT THE MHD-350 TO SEVERE IMPACT OR JARRING
KEEP THE MHD-350 AWAY FROM WATER
If water enters the MHD-350, damage may result. If the MHD-350 comes
into contact with water, wipe immediately with a dry cloth.
COPYRIGHT INFORMATION: Please note that the MHD-350 is to be used only as a car audio
studio for authorized content only. Copying, downloading and transferring music or any other files
without permission from the artist or holder of copyright is expressly forbidden. Yamakawa and it’s
4
resellers will not be liable for unlawful use of the MHD-350.
Back Side of MHD-350
5
Install the MHD-350 in your car
6
Installing the MHD-350 HDD
Above figure shows the exploded drawing of MHD-350. If you have to
change the HDD, you have to read the chapter and be careful to complete
the installation step by step.
Limited Warranty does not apply to damage that occurs HDD
installation.
7
Remove HDD
1.Push the “EJECT” button to eject the front panel.
2.Hold the front panel and push to right side, and remove the front panel.
3.Press the left side of the HDD enclosure and take it out.
8
4.There are power and USB port on the backside of the HDD enclosure. Now,
you can connect it to your computer and download all your favorite music!
Display
9
Play Modes (Program)
The MHD-350 supports various play modes, such as repeat, repeat all,
random, random all, directory only and continuous. As the “Program” button
is pressed, the play modes seen below cycle on the LCD.
• 1 time “Repeat”
• 2 times “Rep.All”
• 3 times “Random”
• 4 times “Ran.All”
MHD-350 will repeat the
current song until “Program”
button is pressed.
MHD-350 will repeat all the
songs of current directory
being played.
MHD-350 will play songs
from the current directory at
random.
MHD-350 will randomly play
any song in any directory.
MHD-350 will play all the
songs in the current directory
until the last song of this
directory, then MHD-350 will
get into “Standby” mode.
• 6 times “Continuous” Or by not pressing “Program” as default the
screen shows nothing. The MHD-350 will play
all the songs one by one until the last one on the
hard drive is reached.
• 5 times “Dir.Only”
Keypad lock – Press “Program” and hold on a moment
If you have to keep MHD-350 operating mode without any changing, you
can press “program” and hold on a moment until MHD-350 show “keypad
locked” on the display, keypad is locked. In the same way, you can unlock
the keypad with the same method.
10
Equalizer Features (EQ)
EQ Press [EQ] one short press and the screen will show "EQ" flash.
Press [UP] and [DOWN] to adjust EQ mode.
Sequence of EQ mode are Rock, Pop, Jazz, Classic and User.
Audio Settings (MENU)
Balance Press [MENU] the screen will show "Bal:".
Press [UP] and [DOWN] to adjust the balance of left and right speaker.
LCD lvl Press [MENU] twice times and the screen will show "LCD: turns off".
Press [UP] and [DOWN] to adjust the LCD back light display.
Turns off
The LCD back light will turn off automatic in 6 seconds
after touching.
Always on The LCD back light will always light.
Always off The LCD back light will be turn off.
Fader Press [MENU] three times and the screen will show “Fader:”
Press [UP] and [DOWN] to adjust the balance of front and rear speaker.
When EQ mode is “User” …..User can define the equalizer (bass and
treble) manually under this mode.
Bas Press [UP] and [DOWN] to adjust the bass.
Tre Press [UP] and [DOWN] to adjust the treble.
11
Playing MP3 Music (SELECT)
Users can easily access the MP3 music files stored in your MHD-350. The
first time you use your MHD-350 it will automatically detect any songs
contained inside the hard drive (this may take a few moments).
Basic Controls
Press
Press
Press
Press
Press
Press
Press
Press
Press
[PLAY]
[PLAY](again)
[STOP]
[FF]
[FF](press and hold)
[FR]
[FR](press and hold)
[UP]
[DOWN]
to play the song in current directory.
to pause the currently playing song.
to stop the current song in current directory.
to play the next song in current directory.
to quickly go through current song.
to play the last song in current directory.
to quickly go backward through the current song.
to adjust the volume up to 30 (max).
to adjust the volume down to 0 (min).
"SELECT" is the main key to enter the browsing mode. Pressing browse and
the up / down arrow keys enables you to scroll up or down through the song /
directory names. When the desired directory has been found, it can be
entered by pressing the FF button, and then the songs can be selected in the
same way with the up / down arrows. To play a particular song, select it and
press the play button. While in "SELECT" mode, pressing "SELECT" again
will exit the Browsing mode and show you the current song being played.
Press
[SELECT]
shows current songs / directories within the
current HD location.
Press
[UP]
scrolls upwards through the list
Press
[DOWN]
scrolls downward through the list
Press
[FF]
enter selected Directory
Press
[FR]
move up one directory level (to max.of root directory)
Press
[PLAY]
play selected song
12
Stop/Standby/Radio/Ex-audio mode
Press “Stop” to stop the current song in current directory.
“Standby” function
To put the MHD-350 in sleep mode, press the "Stop" key for over two
seconds. To resume normal operation, press the "Stop" key for over two
seconds again.
Press “Stop” again to FM radio mode.
To put the MHD-350 in FM radio mode,
press the “Stop” key again. You can
setup the channel which you want by
[UP] or [DOWN]. You can press “Hot key”
to FM radio mode, too. The channel will be taken down in MHD-350 when
you select another channel.
Press “Stop” twice to Ex-audio mode.
To put the MHD-350 in Ex-audio mode, press the “Stop” key twice. You can
connect external audio source (such as CD/MD/car stereo). Press “Stop”
again the MHD-350 will be back to MP3 stop mode.
Connection & Installation
Connecting the HDD enclosure of MHD-350 to your computer
IMPORTANT NOTICE! During installation, it is recommended that the HDD enclosure be directly
connected only to your computers “USB” port, not via other ports or devices.
IMPORTANT: Before connecting the HDD enclosure of MHD-350 to your
computer make sure that the HDD enclosure is plugged power certainly.
13
When you plug in the USB connector to USB Port, your computer will
recognize the HDD enclosure as a removable hard drive.
IMPORTANT NOTICE! Please plug the adapter to the HDD enclosure before you
connect it to the computer USB port.
14
Install the MHD-350 USB driver
1.Install driver floppy disk, Run A:/setup.exe to install the driver
2.Press “Next”
3. Select destination directory
and press “Next”
4.Press “Next”
5.Press “Finish”. Try plug/unplug
once or twice to make sure drive
is successful installed.
Important! Windows 2000 & Windows ME Supported by Microsoft default driver Windows 98 &
Windows 98 SE Supported by USB Storage driver. Mac OS 9.0 Supported by Apple default
driver, Mac OS 8.6 Download supplement driver from www.apple.com
15
Troubleshooting
Problem
How to change the
HDD disk drive of
MHD-350?
When the HDD
enclosure is plugged
into the computer via
the USB no new hard
drive appears.
Hard Drive is making
strange clicking noises
and unit is not working
Solution
1.First, you have to format a 2.5” hard drive disk
for fat32 file format.
2.Copy your MP3 files to your hard drive disk.
3.Take out the hard drive disk enclosure from
MHD-350 and exchange the hard drive disk.
1.Check the connection between the unit and the
computer. Ensure the USB cable is fully inserted
into both the HDD enclosure and your computer.
2.Right click with your mouse on the “My
Computer” icon and choose: “Properties”, then
go to the “Device Manager”. Go to the “Universal
Serial Bus controller” and remove all the drivers
in the USB controllers by clicking the remove
button. Restart your computer without the HDD
enclosure plugged in. After the computer has
loaded all the USB drivers reinstall the
MHD-350’s USB drivers and reboot your
computer. Plug the MHD-350 USB cable into
the computer. You should now see the hard
drive appear under “My Computer”.
3.If the problem still persists try connecting the
HDD enclosure with a different computer and
see if the problem has been fixed.
This problem happens when the hard drive has
received a severe shock. Contact technical
support immediately for further assistance.
16
Technical Specifications – Hardware
LCD DISPLAY
MEMORY
DIMENSIONS
Audio Amplifier
INTERFACE
OPERATING
SYSTEMS
POWER
D/A CONVERTER
THD
FREQUENCY
RESPONSE
RADIO
Liquid Crystal Display (LCD) Screen
Graphic mode LCD ( 128 X 64 ) with EL backlight
RAM:
Built-in 8 MB buffer
MEDIA: 2.5 inch EIDE/Ultra DMA IDE
HARD DRIVE (optional)
Outer case size: 150mm(D) x 181mm(W) x
55mm(H)
50W B class (Min) X 4 channel (RL,RR,FL,FR)
PC: Mini USB (Universal Serial BUS) Port
(transfer rate 800KB/sec)
HDD: EIDE
Windows 95/98/ME/2000/XP
Macintosh Computer Mac O/S 9 and above.
Car DC:11-14V
Adapter AC:
Input: 110/220V, 50/60Hz - DC Output: 5.0V 1.5A
18 bit
Better than 0.01%
20Hz - 20 kHz
FM fuzzy logic auto turning radio with 6 memory for
radio stations
All specifications are subject to change without notice.
Bios Updates
The MHD-350 is capable of using flash bios updates. These updates can be
used to add features and functionality to the player in the future. The bios
update process is very easy and will take approximately one minute.
1. Check www.yamakawa.de for a new bios update file, click to download if
found (Please make sure the version is the newest or not).
17
2. Unzip the bios file; save the .BIN file inside to any location on your
computer’s drive.
3. Turn the MHD-350 on and connect the USB cable.
4. Copy the .BIN file over to your MHD-350’s root directory (do NOT place it
inside a folder).
5. Unplug the USB cable and turn the MHD-350 off.
6. Hold the “PROGRAM” button then turn the player on, an update menu will
load.
7. Release the "PROGRAM" button then tap “PLAY” - “PLAY” - “BROWSE”
to update the bios.
Limited Warranty
MHD-350 is warranted to be free from failures due to defects in material and workmanship
for one year from the date of original purchase as evidenced by a copy of the purchase
receipt. During the warranty period, Yamakawa (at sole discretion) will repair or replace at
no charge, a product which, in its opinion, is found to be defective.
If the failed product has been modified in any way without the consent of Yamakawa or if the
failure is the result of misuse, abuse, or misapplication, Yamakawa has no obligation to
repair or replace the failed product.
Except as expressly provided above, the hardware and accompanying written materials
(including the users guide) are provided ‘as is’ without warranty of any kind including the
implied warranties of merchantability and fitness for a particular purpose. This specifically
does not warrant the operation of the hardware and Yamakawa will not be liable for any
direct, indirect, consequential or incidental damages arising out of the use or inability to use
such product even if Yamakawa has been advised of the possibility of such damages.
WARRANTY FOR HARD DRIVE: Yamakawa and its resellers will not be liable or responsible to any
damage caused to your hard drive due to misuse, shock damage or any other problem caused to
18
your hard drive due to its use in MHD-350.