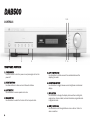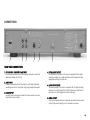
1
DAB500
Digital Radio Tuner
Owner’s Manual
DAB500
INTRODUCTION
Congratulations on purchasing this Digital Radio Tuner from Cambridge
Audio. It is the result of an extensive Research and Development program
undertaken to identify the circuitry and components fundamental to our
highly regarded and critically acclaimed products.
This new DAB radio is an advanced digital product capable of receiving and
decoding the abundance of digital radio broadcasts available.
This unit takes advantage of the very latest, third-generation DAB chipset:
the highly integrated Frontier Silicon FS2020 module, which embraces the
FS1010 single-chip DAB/Audio processor. The unit is based on the META
processor design and Ensigma DAB IP licensed from Imagination
Technologies.
This is coupled to a high performance 24-bit/192kHz, WM8716 digital to
analogue converter, with built-in 128fs oversampling, from respected
manufacturer Wolfson Microelectronics.
Our aim in realising the DAB500 was to bring into the home digital radio's
beautifully clear reception, remarkable ease-of-use and superior text
information.
Interconnects are something that shouldn't be overlooked. Please do not
compromise your system's performance by using poor quality cables. A
system is only as strong as its weakest link. Your dealer can supply quality
Cambridge Audio cables, either digital or analogue, that will ensure the
DAB500 performs to its full potential.
Please do read and retain this guide as it contains important safety and
operational information.
Now we invite you to sit back, relax and enjoy!
2
CONTENTS
Introduction ......................................................................................................2
Safety Precautions ...........................................................................................3
Controls.............................................................................................................4
Connections......................................................................................................5
Setting Up .........................................................................................................6
Using your DAB500..........................................................................................7
Improving your Reception................................................................................9
An Overview of Digital Audio Broadcasting (DAB)........................................10
Specification...................................................................................................10
Limited Warranty............................................................................................11
SAFETY PRECAUTIONS
For your own safety please read the following instructions carefully before
attempting to connect this unit to the mains.
• Check that the rear of your unit indicates the correct supply voltage.
• If your mains supply voltage is different, consult your dealer.
This unit is designed to operate only on the supply voltage and type that is
indicated on the rear panel of the unit. Connecting to other power sources
may damage the unit.
This equipment must be switched off when not in use and must not be used
unless correctly earthed. To reduce the risk of electric shock, do not remove
the unit’s cover (or back). There are no user serviceable parts inside. Refer
servicing to qualified service personnel. If the power cord is fitted with a
moulded mains plug the unit must not be used if the plastic fuse carrier is
not in place. Should you lose the fuse carrier the correct part must be
reordered from your Cambridge Audio dealer.
The lightning flash with the arrowhead symbol within an
equilateral triangle is intended to alert the user to the presence
of uninsulated ‘dangerous voltage’ within the product’s
enclosure that may be of sufficient magnitude to constitute a
risk of electric shock to persons.
The exclamation point within an equilateral triangle is intended
to alert the user to the presence of important operating and
maintenance instructions in the service literature relevant to
this appliance.
This product complies with European Low Voltage
(73/23/EEC)
and
Electromagnetic
Compatibility
(89/336/EEC) Directives when used according to this
instruction manual. For continued compliance only
Cambridge Audio accessories should be used with this
product and servicing must be referred to qualified service
personnel.
PLUG FITTING INSTRUCTIONS (UK ONLY)
The cord supplied with this appliance is factory fitted with a 13A mains plug
fitted with a 3A fuse inside. If it is necessary to change the fuse, it is
important that a 3A one is used. If the plug needs to be changed because
it is not suitable for your socket, or becomes damaged, it should be cut off
and an appropriate plug fitted following the wiring instructions below. The
plug must then be disposed of safely, as insertion into a 13A socket is likely
to cause an electrical hazard. Should it be necessary to fit a 3-pin BS mains
plug to the power cord the wires should be fitted as shown in this diagram.
The colours of the wires in the mains lead of this appliance may not
correspond with the coloured markings identifying the terminals in your
plug. Connect them as follows:• The wire which is coloured BLUE must
be connected to the terminal which is
marked with the letter ‘N’ or coloured
BLACK.
• The wire which is coloured BROWN
must be connected to the terminal which
is marked with the letter ‘L’ or coloured
RED
• The wire which is coloured
GREEN/YELLOW must be connected to
the terminal which is marked with the
letter ‘E’ or coloured GREEN.
NOTE: If your model does not have an earth wire, then disregard this
instruction.
If a 13 Amp (BS 1363) plug is used, a 3 Amp fuse must be fitted, or if any
other type of plug is used a 3 Amp or 5 Amp fuse must be fitted, either in
the plug or adaptor, or on the distribution board.
3
DAB500
5 4
CONTROLS
1
2
3
7
6
8
FRONT PANEL CONTROLS
1. POWER SWITCH
Press this button to turn the power on and press again to turn the
power off.
5. AUTO TUNE BUTTON
Use this button to Initiate a search for available stations after
adjusting the aerial.
2. PRESET BUTTONS
Use these buttons to store and recall favourite stations.
6. BRIGHTNESS BUTTON
Use this button to toggle between normal brightness and dimmed
display.
3. SHIFT BUTTON
Use this button to access presets six to ten.
4. MENU BUTTON
Use this button to select the function of the tune/enter dial.
7. INFO BUTTON
Use this button to change the display to show either scrolling text,
program type, time and date, technical information, signal data rate
or signal error rate.
8. TUNE / ENTER DIAL
Use this dial to scroll through stations or menu items. Push in to
make a selection.
4
CONNECTIONS
1
2
3
4
5
6
REAR PANEL CONNECTIONS
1. NCT (NATURAL CONTOUR TECHNOLOGY)
Use this switch to select either a flat frequency response or one of two
subtle tone settings; LO or LO/HI.
2. TUNER INPUT
Connect the conventional ‘left’ and ‘right’ (L and R) Audio Outputs of
an existing tuner to the ‘Tuner Input’ using a high quality interconnect.
3. AUDIO OUTPUT
Use high quality interconnect cables from these sockets to any line
level input on your amplifier.
4. OPTICAL SPDIF OUTPUT
Use this socket to connect to the input of a separate DAC or digital
recording machine. Use a high quality fibre optic interconnect cable
designed specifically for audio use.
5. PHONO SPDIF OUTPUT
This coaxial output is for input to a separate DAC or digital recording
machine. Use a high quality 75 ohm BNC interconnect cable for this
connection (not one designed for normal audio use).
6. AERIAL SOCKET
Connect the supplied aerial or a separately purchased outdoor aerial
to this F-type socket making sure it is screwed on securely.
5
DAB500
SETTING UP
This section provides information on connecting your DAB500 to other hi-fi
equipment and connecting an aerial. All components must be switched off
when connecting the DAB500.
CONNECTING TO DIGITAL DEVICES
CONNECTING TO AN AMPLIFIER
The DAB500 is equipped to provide a high quality digital audio output for
connection to digital loudspeakers, amplifiers and other digital devices
such as a MiniDisc or CD Recorder featuring the appropriate SPDIF digital
input connector.
The signal from your DAB500 must be passed to an amplifier, which then
feeds loudspeakers to create sound.
Connect the SPDIF sockets on the DAB500 to the "Digital-in" socket on your
digital device using a high quality digital cable.
Connect a high quality interconnect cable to the DAB500's "Output" sockets
on the rear panel of the DAB500 - white/black to the "L" output and the red
to the "R" output.
Connect either the optical or phono connection NOT both.
CONNECTING YOUR AERIAL
Connect the other end of the cable to your amplifier's "Tuner" inputs, again
making sure the white/black plug goes to the "L" input and the red to the
"R" input.
You need to connect either the supplied indoor aerial or other aerial to
receive radio broadcasts.
CONNECTING AN ADDITIONAL TUNER OR AUXILIARY SOURCE
Locate the aerial socket on the rear panel of the DAB500. Insert the aerial
into the socket.
TUNER
INPUT
AUDIO
OUTPUT
The auxiliary device signal will now be passed through the analogue outputs
to your amplifier when your DAB500 is switched off.
TUNER
INPUT
AUDIO
OUTPUT
Model: DAB300 Digital Tuner
Power Rating: 220-240V AC 50Hz
Max Power Consumption: 10W
OPTICAL
Using a high quality interconnect cable, connect the "L" sockets to the
white/black plugs and the "R" sockets to the red plugs.
PHONO
Locate the "Input" sockets on the rear panel of the DAB500 and the
"Output" sockets on the auxiliary device.
If using the indoor aerial, attach the main run horizontally to a wall and
extend the arms vertically, forming a sideways figure T (see diagram below).
Please see the section later in the manual, "Improving Your Reception", if
you find reception is poor or no stations are found.
AERIAL
INPUT
You can connect your old FM/AM tuner, or another auxiliary source, to your
amplifier through the DAB500 to reduce connections to your amplifier.
OPTICAL
PHONO
AERIAL
INPUT
SPDIF OUTPUT
POWER AC
www.cambridgeaudio.com
Fix to a wall in a
vertical direction
ONCE YOU HAVE MADE THE CONNECTIONS PLUG THE POWER CORD INTO
AN APPROPRIATE POWER SOCKET.
6
USING YOUR DAB500
TURNING THE TUNER ON AND OFF
PRIMARY AND SECONDARY SERVICES
Make sure all the relevant connections, as described earlier have been
made. As a precaution, make sure the amplifier volume is turned down low.
Some selected stations have a primary and secondary broadcast, for
example BBC Radio 4 broadcasts cricket commentary on analogue Long
Wave, whilst simultaneously maintaining its normal programming on FM. If
a secondary service is available, the display will show a dotted arrow
pointing to the right sitting next to station name.
Press the "Power" button on the front panel.
TUNING
When first switched on, the DAB500 will automatically scan for all available
stations (unless your aerial is not connected properly or DAB reception is
weak or unavailable in your area). The display says 'now tuning…' when this
takes place. There are two types of auto tune:
To select the secondary service, turn the tune/enter dial to the right. When
the secondary service is displayed press the tune/enter dial.
CHANGING THE DISPLAY MODE
Rapid - this scans frequencies in the UK channel allocation. This should
take approximately 45 seconds.
The DAB500 has various display modes which lets you view the additional
text data that accompanies digital broadcasts. To access the various data
channels press the "Info" button as indicated below:
Full - scans the full range of digital frequencies in Band III. This may take
several minutes.
Default mode - Presents scrolling text service offered by the particular station.
To undertake a rapid scan, press the "Auto Tune" button for roughly two
seconds. For a full scan press the "Auto Tune" button for longer than two
seconds. If you have pressed “Auto Tune” by mistake press a third time to
cancel the operation.
If no stations are found after the auto tuning process, "no stations found"
will be shown on the display. If this occurs check the connections and
positioning of the aerial or with your local radio stations for coverage
information (see later in this manual for more details).
SELECTING A SERVICE
One of the key advantages of digital tuners is the simplicity of tuning.
Rotate the large tune/enter dial on the front panel to scroll through the
available stations. To select a broadcast simply press the tune/enter dial.
Press once - Gives the Program Type, which describes the genre of station.
Press again - Displays the name of the multiplex on which current service is
found. See the section 'An overview of Digital Audio Broadcasting (DAB)'
later in this manual for further information.
Press again - Shows the time and date.
Press again - Displays technical information, such as the channel label and
centre frequency.
Press again - Displays the audio signal data rate (in kilobytes per second)
and mode (stereo or mono).
Press again - Shows the signal error rate, where zero is perfect. The number
increases as the signal deteriorates.
Press again - Returns to scrolling text service.
7
DAB500
THE "MENU" BUTTON
BRIGHTNESS
Press the "Menu" button once to enter menu mode. Use the tune/enter dial
to scan through the various menu options and push to select the
assortment of services.
Press the brightness button to dim the display. Press again to restore the
default setting.
STATION ORDER - This offers three different configurations for the station
order:
SIGNAL STRENGTH
Favourite station - When selected the ten most popular stations,
defined by average listening time, are displayed first.
Alphanumeric - Displays the list of available stations alphabetically and
numerically.
Active station - Lists active stations. The validity of a service is checked
during scanning, manual tuning, tuning to a different ensemble. There is
also an option in the station order menu called 'prune station'. This will
remove any stations that have been stored in the tuner memory, but no
longer broadcast. Select this by pressing the tune/enter dial.
MANUAL TUNE - Turn the tune/enter dial to move up and down frequencies,
then press to select.
DRC VALUE - DYNAMIC RANGE COMPRESSION - There are three settings.
Scroll through and press the tune/enter dial to select. A figure "1" delivers
maximum dynamic compression, while zero means there is no compression
across the dynamic range.
SW VERSION - Displays software version.
8
Pressing the tune/enter dial while a station is playing will show the quality
of the signal being received.
PRESETS - STORING AND USING
To store a preset a station select the desired broadcast with the tune/enter
dial. To select simply press the tune/enter dial. Once the station is selected,
hold down the required preset button for two seconds. "Preset (number)
saved" will be shown on the display and the station will now be stored under
this preset. To select presets six to ten press the shift button and within two
seconds press the required preset button.
CNT (NATURAL CONTOUR TECHNOLOHY) SWITCH
Due to gratuitous use of audio signal processing by many broadcasters a
DAB radio may sound rather thin and undynamic compared to other
sources such as a CD player. Two subtle EQ settings are available to
alleviate this problem. The LO setting adds warmth to the sound and the
LO/HI setting adds both warmth and sparkle.
IMPROVING YOUR RECEPTION
If you experience no reception at all or the sound breaks up when listening
to some stations then there are a few things you can try to improve
reception.
FIND THE BEST POSITION FOR YOUR AERIAL
While listening to a radio station, press (without turning) the Tune/Enter dial
once and the display will change to show a bargraph. You can either move
the supplied wire aerial or rotate an outdoor aerial so that the bargraph
gives the highest reading. There are 16 segments, the fifth is marked and
indicates the minimum level required for clear reception. Anything below
this will sound broken and garbled. As you can see from the sample display
below, BBC Radio 4 has 14 segments showing so reception will be clear.
BBC Radio 4
TRY AN EXISTING FM OR TV OUTDOOR AERIAL
If you get poor reception with the supplied wire aerial then you may find that
an existing FM radio or TV aerial will work with your DAB tuner. Although
these aerials are not built to work at DAB radio frequencies they may still
work well enough. You will need an adaptor to change the FM/TV aerial plug
into an F-Type plug.
IF YOU STILL HAVE POOR RECEPTION
If neither the wire aerial or any existing aerial work then please contact your
local aerial installer or visit the web sites below.
www.blake-a
aerials.co.uk
www.maxview.ltd.uk
www.antiference.co.uk
After you have optimised the aerial position for the station you are listening
to, check the signal strength of other stations to make sure you have
sufficient level for them. If not, try moving the aerial to a position that works
for all the stations you can receive.
9
DAB500
AN OVERVIEW OF DIGITAL AUDIO
BROADCASTING (DAB)
SPECIFICATIONS
Sample Rate
48kHz
This section gives a brief overview of digital radio, or DAB as it is also
known, along with some useful addresses if you require further information.
Frequency Range
VHF (174MHz to 240MHz) Band 3
The Cambridge Audio DAB500 lets you receive and listen to the abundance
of digital radio broadcasts available. DAB uses digital signals rather than
traditional analogue transmissions, providing clear, high quality reception.
Sensitivity
-96dBm
Signal to Noise
105dB typical
Digital radio is broadcast as groups of data called multiplexes. Each
multiplex contains a number of stations, transmitted at a set frequency,
which the DAB500 decodes. The DAB500 can receive multiplexes
broadcast on Band III DAB frequencies. The number of multiplexes and
radio stations you receive will vary depending on your location. With DAB,
radio stations have labels for identification. Instead of needing to know a
particular frequency to listen to your favourite broadcast you can simply
select the station name.
DAB also enables broadcasters to transmit additional data with the audio,
which takes in other audio channels, text and in the future, perhaps
computer data and images. Additional data, such as text containing
programme or multiplex information, is shown on the DAB500’s display.
Frequency Response
20-20kHz+0.1,-0.3dB (NCT at FLAT)
Distortion
<0.005%, 1kHz, 2vrms o/p
Stereo Separation
>60dB, 20Hz- 20kHz
Input Voltage
220-240V AC~50Hz
Maximum Power Consumption
10W
Standby Power Consumption
7W
Dimensions(mm)
80(h)x430(w)x285(d)
Weight
3.5kg
USEFUL ADDRESSES
Digital Radio Development Bureau
The Radio Centre
77 Shaftesbury Avenue
London W1D 5DU
Telephone: 020 7306 2630
10
BBC Digital Radio
Room 5661
Broadcasting House
Portland Place
London W1A 1AA
E-mail: [email protected]
E-mail: [email protected]
Website: www.drdb.org
Website: www.bbc.co.uk/digitalradio
LIMITED WARRANTY
Cambridge Audio warrants this product to be free from defects in materials
and workmanship (subject to the terms set forth below). Cambridge Audio
will repair or replace (at Cambridge Audio's option) this product or any
defective parts in this product. Warranty periods may vary from country to
country. If in doubt consult your dealer and ensure that you retain proof of
purchase.
To obtain warranty service, please contact the Cambridge Audio authorised
dealer from which you purchased this product. If your dealer is not equipped
to perform the repair of your Cambridge Audio product, it can be returned
by your dealer to Cambridge Audio or an authorised Cambridge Audio
service agent. You will need to ship this product in either its original
packaging or packaging affording an equal degree of protection.
NOT BE LIABLE FOR ANY INCIDENTAL OR CONSEQUENTIAL DAMAGES FOR
BREACH OF ANY EXPRESS OR IMPLIED WARRANTY IN THIS PRODUCT.
EXCEPT TO THE EXTENT PROHIBITED BY LAW, THIS WARRANTY IS
EXCLUSIVE AND IN LIEU OF ALL OTHER EXPRESS AND IMPLIED
WARRANTIES WHATSOEVER INCLUDING, BUT NOT LIMITED TO, THE
WARRANTY OF MERCHANTABILITY AND FITNESS FOR A PRACTICAL
PURPOSE.
Some countries and US states do not allow the exclusion or limitation of
incidental or consequential damages or implied warranties so the above
exclusions may not apply to you. This Warranty gives you specific legal
rights, and you may have other statutory rights, which vary from state to
state or country to country.
Proof of purchase in the form of a bill of sale or receipted invoice, which is
evidence that this product is within the warranty period, must be presented
to obtain warranty service.
This Warranty is invalid if (a) the factory-applied serial number has been
altered or removed from this product or (b) this product was not purchased
from a Cambridge Audio authorised dealer. You may call Cambridge Audio
or your local country Cambridge Audio distributor to confirm that you have
an unaltered serial number and/or you purchased from a Cambridge Audio
authorised dealer.
This Warranty does not cover cosmetic damage or damage due to acts of
God, accident, misuse, abuse, negligence, commercial use, or modification
of, or to any part of, the product. This Warranty does not cover damage due
to improper operation, maintenance or installation, or attempted repair by
anyone other than Cambridge Audio or a Cambridge Audio dealer, or
authorised service agent which is authorised to do Cambridge Audio
warranty work. Any unauthorised repairs will void this Warranty. This
Warranty does not cover products sold AS IS or WITH ALL FAULTS.
REPAIRS OR REPLACEMENTS AS PROVIDED UNDER THIS WARRANTY ARE
THE EXCLUSIVE REMEDY OF THE CONSUMER. CAMBRIDGE AUDIO SHALL
11
audio.co.uk
For the latest information on Cambridge Audio products visit us at www.cambridge-a
Made from recyclable material
Part No. AP13739/1