1
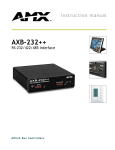
instruction manual
AXB-EM232
Enhanced Master RS-232 Controller
A x c e s s C e n t ra l C o n t r o l l e r s
AMX Limited Warranty and Disclaimer
AMX Corporation warrants its products to be free of defects in material and workmanship under normal use for
three (3) years from the date of purchase from AMX Corporation, with the following exceptions:
•
Electroluminescent and LCD Control Panels are warranted for three (3) years, except for the display and touch
overlay components that are warranted for a period of one (1) year.
•
Disk drive mechanisms, pan/tilt heads, power supplies, MX Series products, and KC Series products are
warranted for a period of one (1) year.
•
Unless otherwise specified, OEM and custom products are warranted for a period of one (1) year.
•
Software is warranted for a period of ninety (90) days.
•
Batteries and incandescent lamps are not covered under the warranty.
This warranty extends only to products purchased directly from AMX Corporation or an Authorized AMX Dealer.
AMX Corporation is not liable for any damages caused by its products or for the failure of its products to perform.
This includes any lost profits, lost savings, incidental damages, or consequential damages. AMX Corporation is not
liable for any claim made by a third party or by an AMX Dealer for a third party.
This limitation of liability applies whether damages are sought, or a claim is made, under this warranty or as a tort
claim (including negligence and strict product liability), a contract claim, or any other claim. This limitation of
liability cannot be waived or amended by any person. This limitation of liability will be effective even if AMX
Corporation or an authorized representative of AMX Corporation has been advised of the possibility of any such
damages. This limitation of liability, however, will not apply to claims for personal injury.
Some states do not allow a limitation of how long an implied warranty last. Some states do not allow the limitation or
exclusion of incidental or consequential damages for consumer products. In such states, the limitation or exclusion of
the Limited Warranty may not apply. This Limited Warranty gives the owner specific legal rights. The owner may
also have other rights that vary from state to state. The owner is advised to consult applicable state laws for full
determination of rights.
EXCEPT AS EXPRESSLY SET FORTH IN THIS WARRANTY, AMX CORPORATION MAKES NO
OTHER WARRANTIES, EXPRESSED OR IMPLIED, INCLUDING ANY IMPLIED WARRANTIES OF
MERCHANTABILITY OR FITNESS FOR A PARTICULAR PURPOSE. AMX CORPORATION
EXPRESSLY DISCLAIMS ALL WARRANTIES NOT STATED IN THIS LIMITED WARRANTY. ANY
IMPLIED WARRANTIES THAT MAY BE IMPOSED BY LAW ARE LIMITED TO THE TERMS OF THIS
LIMITED WARRANTY.
Table of Contents
Table of Contents
Product Information .................................................................................................1
Product Information ........................................................................................................... 1
Specifications .................................................................................................................... 2
Installation ......................................................................................................................... 3
Setting the internal jumpers ..................................................................................................... 3
Setting DIP switches ................................................................................................................ 3
Wiring Devices to the AXB-EM232.................................................................................... 4
Preparing captive wires............................................................................................................ 4
Using AXlink............................................................................................................................. 4
Using Ports 1 and 2 for RS-232 data communication .............................................................. 5
Using Port 1 for RS-422 communication.................................................................................. 6
Using Port 1 for RS-485 data communication.......................................................................... 6
Using the 12 VDC power supply .............................................................................................. 6
RS-232 male program connector ............................................................................................. 7
Replacing the Lithium Batteries......................................................................................... 7
Mounting the AXB-232 In an Equipment Rack.................................................................. 8
Programming ............................................................................................................9
Send_Commands.............................................................................................................. 9
Send_Strings................................................................................................................... 10
Xmodem timing commands............................................................................................. 10
AXB-EM232 Enhanced Master RS-232 Controller
i
Table of Contents
ii
AXB-EM232 Enhanced Master RS-232 Controller
Product Information
Product Information
Product Information
The AXB-EM232 Enhanced Master RS-232 Controller (FIG. 1) is an AXlink bus device that
functions like an AMX Master Card in a single compact enclosure. It is fully compatible with the
Axcess Control System and can be used either as a stand-alone device or with other AMX bus
devices. The AXB-EM232 runs complete Axcess programs, and controls other AXlink components
and two devices using RS-232 as a control protocol. It can also control devices using RS-422 and
RS-485 protocols.
RS-232
Program port
RS-232/422
DIP switches
(1 and 2)
TX1
RS-232
AXlink
TX2
RS-232 / 422
TX2/RX2 LEDs
Port 2
(RS-232 only)
RS-232 / 422
Port 1
(RS-232/422/485)
AXP
2
PWR
AXM
GND
485EN
TX1
RX
RX
TX
TX
GND
RX2
V
TX2
CTS2
RTS2
RS-232
ON
1
RX1
GND
PROGRAM
PROGRAM
RX1
AXlink
Status LED
TX1/RX1 LEDs
RS-232 Program
DIP switch
AXlink
AXlink
connector
RX2
12VDC
PWR
Power
supply
connector
(2-pin)
FIG. 1 AXB-EM232 Front and rear panel components
AXB-EM232 Enhanced Master RS-232 Controller
1
Product Information
Specifications
The following table lists the specifications for the AXB-EM232.
AXB-EM232 Product Specifications
Power
12 VDC, 160 mA
Asynchronous data communication • Baud rates: 300, 600, 1200, 2400, 4800, 9600, 19200, or 38400
• Data bits: 7 or 8
• Stop bits: 1 or 2
• Parity: None, Odd, Even, Mark, or Space
Memory
64 KB battery protected memory, expandable to 256 KB
Front Panel Components:
AXlink status LED
Green LED lights to indicate AXlink communication as status as follows:
• One blink per second : Power is active and AXlink communication is
functioning.
• Two blinks per second: Devices specified in the master program do not
match the specified devices found.
• Three blinks per second: Indicates an AXlink communication error.
• Full-on indicates the following conditions:
There is no AXlink control or activity, but power is on.
The Axcess program is not loaded.
RS-232 Program connector
This DB-9 RS-232 connector is used for AMX programming tools, such
as Axcess and IRLIB.
RS-232 Program DIP switch
The 8-position DIP switch configures the communication parameters for
the Program port.
TX1 and RX1 LEDs
The red LEDs indicate that the AXB-EM232 is receiving (RX) or transmitting (TX) RS-232, RS-422, or RS-485 data. RX1 and TX1 correspond to
Port 1 on the rear panel (See Rear Panel Components for a description
of Port 1).
RS-232/422 1 and 2 DIP
Switches
The two 8-position DIP switches configure the communication parameters for the Ports 1 and 2 (See Rear Panel Components for a description
of Ports 1 and 2).
TX2 and RX2 LEDs
The red LEDs indicate that the AXB-EM232 is receiving (RX) or transmitting (TX) RS-232 data. RX2 and TX2 correspond to Port 2 (See Rear
Panel Components for a description of Port 2).
Rear Panel Components:
Ports 1 and 2
There are two serial connectors: Port 2 is a 6-wire RS-232 captive-wire
connector; Port 1 is an 8-wire RS-232/422 captive wire connector.
AXlink connector
The AXlink connector is a 4-wire, captive-wire connector for data and
power.
Power supply connector
The PWR connector is a 2-wire, captive-wire connector for the 12 VDC
power supply.
Enclosure
Non-glare, high-impact black plastic
Dimensions (HWD)
1.5" x 5.6" x 6.5" (3.8 cm x 14.1 cm x 16.4 cm)
Weight
1.1 lbs (501.7 g)
Mounting options
Rack mounting with the optional AC-RK Accessory Rack Kit
Optional Accessories:
Power Supply
• PSN2.8 (FG423-05)
• PSN6.5 Domestic (FG423-41), International (FG423-43)
Mounting Hardware
2
AC-RK Accessory Rack Kit (FG515)
AXB-EM232 Enhanced Master RS-232 Controller
Product Information
Installation
Setting the internal jumpers
Some RS-232 devices require that the bus be terminated at 100 ohms. Follow these steps if your
device requires this termination.
1. Discharge the static electricity from your body.
2. Unplug the two-pin power connector.
3. Remove the two screws on the front panel.
4. Remove the front panel, and slide the circuit board out of the enclosure.
5. Remove the jumper on pin trio E1 from pins 2-3 and place it on pins 1-2 (FIG. 2).
100
12
E1
3
12
3
12
3 HI Z
FIG. 2 Communication jumpers
6. Replace the board in the enclosure. Then, replace the front panel, refasten the two screws, and
plug in the two-wire power connector.
Setting DIP switches
Configure the device and programming communication ports' baud rate, data bits, stop bits, and
parity. Use the eight-position DIP switches on the front panel to set the communications
parameters.
!
RS-232 PROGRAM DIP switch - Use the eight-position RS-232 Program DIP switch to
set the communications parameters for the PROGRAM port.
!
RS-232/422 DIP switches - Use the two eight-position RS232/422 DIP switches to set
communications parameters for controlling the RS-232, RS-422, or RS-485 devices.
!
·Set Switch 1 to configure the parameters for Port 1 (RS-232/422/485).
!
Set Switch 2 to configure the parameters for Port 2 (RS-232 only).
AXB-EM232 Enhanced Master RS-232 Controller
3
Product Information
Refer to the following table when setting the DIP switches.
Communication Parameters DIP Switch Settings
Switch
1
2
3
Function Stop Bits Data Bits
Setting
Value
Off
Off
2 bits
7 bits
On
On
1 bit
8 bits
4
5
6
Off
Off
Off
On
Off
Off
Off
On
On
Off
On
On
On
Off
On
On
Parity
Off
Unused
Unused
Unused
Unused
Mark
Even
Off
On
Off
Off
On
Off
On
9,600
On
Odd
On
On
4,800
Off
Off
Off
2,400
Off
On
Off
1,200
On
Off
Off
600
On
On
Off
300
Off
Off
8
Baud Rates
Off
On
7
On
On
19,200
On
None
On
On
38,400
Wiring Devices to the AXB-EM232
The AXB-EM232 has captive-wire connectors on the rear panel (FIG. 1) for AXlink, RS-232, RS232, RS-422, and 12 VDC power.
Preparing captive wires
1. Strip 0.25 inch of wire insulation off all wires.
2. Insert each wire into the appropriate opening on the connector according to the wiring
diagrams and connector types described in this section.
Do not tighten the screws excessively; doing so may strip the threads and damage the
connector.
Using AXlink
Connect the AXlink wiring to the connector on the AXB-EM232, as shown in FIG. 3.
AXlink
PWR
PWR
AXP
AXP
AXM
AXM
GND
GND
Device
FIG. 3 AXlink wiring
4
AXB-EM232 Enhanced Master RS-232 Controller
Product Information
Using Ports 1 and 2 for RS-232 data communication
1. Connect the RS-232 wiring to Port 1, as shown in FIG. 4.
GND
GND
RX1
TX
TX1
RX
Device
RS232/422 485EN
Port 1 RX1RX1+
not used
TX1TX1+
FIG. 4 RS-232 Port 1 wiring
2. Connect the RS-232 wiring to Port 2, as shown in FIG. 5.
RS232
Port 2
GND
GND
RX2
TX
TX2
RX
CTS2
Device
not used
RTS2
FIG. 5 RS-232 Port 2 wiring
3. Configure the AXB-EM232 for hardware handshaking (request to send, clear to send) by
connecting the RS-232 wiring to Port 2, as shown in FIG. 6.
RS232
Port 2
GND
GND
RX2
TX
TX2
RX
CTS2
RTS
RTS2
CTS
Device
FIG. 6 RS-232 Port 2 wiring for hardware handshaking
AXB-EM232 Enhanced Master RS-232 Controller
5
Product Information
Using Port 1 for RS-422 communication
Wire the AXB-EM232 for communicating via RS-422 by connecting the RS-422 wiring to Port 1,
as shown in FIG. 7. RS-422 communication is available only through Port 1.
GND
RX1
TX1
RS232/422 485EN
Port 1 RX1-
TX-
RX1+
TX+
TX1-
RX-
TX1+
RX+
Device
FIG. 7 RS-422 Port 1 wiring
Using Port 1 for RS-485 data communication
To wire the AXB-EM232 for communicating via RS-485, connect the RS-485 wiring to Port 1, as
shown in FIG. 8. RS-485 communication is available only through Port 1. You must ground the
485EN pin.
GND
GND
RX1
TX1
RS232/422 485EN
Port 1 RX1-
-
RX1+
+
Device
TX1TX1+
FIG. 8 RS-485 Port 1 wiring
Using the 12 VDC power supply
Connect the optional 12 VDC power supply to the two-wire power connector to apply power, as
shown in FIG. 9.
PWR
+
+12 VDC
-
GND
Power supply
FIG. 9 12 VDC Power connector wiring
6
AXB-EM232 Enhanced Master RS-232 Controller
Product Information
RS-232 male program connector
Use either an AMX RS-232 cable (FG 10-726 ) for a DB-25 connector or AMX Programming
cable (FG10-727) for a DB-9 port to connect your PC to the AXB-EM232 and download the
Axcess program. Do not use a null modem cable.
Program Connector and Pinouts
Pin 1
Pin 9
Pin
Signal
2
RXD
3
TXD
4
+12 VDC
5
GND
7
+12 VDC
Only an AMX Programming cable or equivalent is to be used due to the voltage on
pins 4 and 7. Failure to do so could damage the com port on a PC.
Replacing the Lithium Batteries
The AXB-EM232's two lithium batteries each have a life of approximately 5 years to protect its
memory. When DC power is on, the batteries are not used. When you install the AXB-EM232,
record for future reference the date the batteries should be replaced. When you replace the batteries
(FIG. 10), remove one battery at a time to avoid losing the program in memory.
All data in the AXB-EM232 memory will be lost if you are not timely in replacing the
batteries.
Before removing the batteries, contact your AMX dealer and verify that they have a current copy of
your program. This will avoid any inadvertent loss of data and prevent an unnecessary service
outage..
FIG. 10 Lithium battery and socket
There is a danger of explosion if you replace the bat-teries incorrectly. Replace
batteries with the same or equivalent type recommended by the manufacturer.
Dispose of used batteries according to the manufacturer's instructions. Never
recharge, dis-assemble, or heat the battery above 212°F (100°C). Never solder
directly to the battery or expose the contents of the battery to water.
1. Discharge the static electricity from your body.
2. Unplug the 2-pin power connector and any other connectors.
3. Remove the two screws on the front panel.
4. Remove the front panel, and slide the circuit board out of the enclosure.
AXB-EM232 Enhanced Master RS-232 Controller
7
Product Information
5. Carefully slide one battery out of its socket, and insert the new battery.
6. Plug the 2-pin power connector in to reapply power. Wait one minute; then, remove the power
connector again.
7. Carefully slide the other battery out of its socket, and insert the new battery.
8. Plug in the 2-pin power connector.
9. Slide the circuit board back into the enclosure.
10. Replace the front panel and refasten the two screws.
11. Reconnect any connectors you removed.
Mounting the AXB-232 In an Equipment Rack
To rack-mount the AXB-EM232 using an (optional) AC-RK Accessory Rack Kit:
1. Remove any/all connectors from the rear panel.
2. Remove the two screws on the front panel, and remove the front panel and the space bracket
behind the panel.
3. Use a blade or other sharp object to remove the rubber feet on the bottom of the AXB-EM232
enclosure.
4. Place the unit in the appropriate opening in the AC-RK.
5. Place the front panel of the AXB-EM232 on the front of the rack over the unit, and secure.
8
AXB-EM232 Enhanced Master RS-232 Controller
Programming
Programming
Use the NetLinx Studio software program to create and edit an Axcess Control program for the
AXB-EM232:
!
The AXB-EM232 occupies address 0.
!
Port 1 is AXlink Device 1, and Port 2 is AXlink Device 2.
!
To communicate directly with the AXB-EM232, use Terminal Emulation mode.
!
To display a list of the commands in the Terminal Emulation mode, type help or ? and
press ENTER.
!
For online help while in Axcess, press F6.
Program the AXB-EM232 as you would the AXC-EM Enhanced Master Card.
Send_Commands
The following table lists the Send_Commands for the AXB-EM232.
Send_Commands
'RXON'
Enables the card to send incoming received characters to the Master. This command is automatically sent by the Master when a 'CREATE_BUFFER' command is executed.
'RXOFF'
The card will not pass on received characters to the Master (default).
'RXCLR'
Any characters in the receive buffer waiting to be sent to Master will be cleared.
'TXCLR'
Any characters waiting in the transmit out buffer will be cleared and transmission will stop.
'B9MON'
Enables a special 9 data bits with 1 stop bit mode, which overrides the DIP
switch settings for number of data, stop, and parity bits. The baud rate is locked
on at the current DIP switch setting on issuance of this command.
'B9MOFF'
Sets data bits mode to normal with DIP switch setting (default).
'HSOFF'
Disables hardware handshaking (default). (Device 2 only)
'HSON'
Enables hardware handshaking. (Device 2 only)
'XOFF'
Disables software handshaking (default).
'XON'
Enables hardware handshaking.
'CHARD
<time in 100 microsecond
increments 0-255>'
Sets delay between all transmitted characters to that specified.
Example:
'CHARD-10'
Sets 1 ms delay between all transmitted characters.
'CHARDM
<time in millisecond
increments 0-255>'
Sets delay between all transmitted characters to that specified.
'CTSPSH'
Enables PUSHes and RELEASEs and status on Device 2 channel 255 for CTS
hardware handshake input. If CTS is high, then channel is on.
Example:
'CHARDM10'
Sets 10 ms delay between all transmitted characters.
AXB-EM232 Enhanced Master RS-232 Controller
9
Programming
Send_Strings
This device also has some special Send_String escape sequences. If any of the three-character
combinations in the following table are found anywhere within a Send_String program instruction,
they will be treated as a command and not the literal characters.
Send_String sequences
"27,17,<time in 100 microsecond increments 1-255>" Sends a break character of the specified length of
time.
"27,18,1"
Sets the 9 data bit to 1 for all subsequent characters
to be transmitted. Used with the 'B9MON' command.
"27,18,0"
Clears the 9 data bit to 0 for all subsequent characters to be transmitted. Used with the 'B9MON' command.
"27,19,<time in 1 millisecond increments 1-255>"
Inserts a delay before the next character to be
transmitted.
"27,20,0"
Unasserts RTS hardware handshake output high
(Device 2).
"27,20,1"
Asserts RTS hardware handshake output low
(Device 2).
Xmodem timing commands
The following table lists the AXB-EM232 Xmodem timing commands. Xmodem timeouts and
retries exist to accommodate potential Ethernet delays and for consistency among and within
products.
Xmodem timing commands
'TIMEOUT XX'
Xmodem timeouts - via the Program Port (default = 10 sec.)
SEND_COMMAND SERIAL, 'XMTO XX' Over AXlink; where XX is from one to 50 seconds in 1-second
increments.
'RETRY XX'
Xmodem retries - via the Program Port (default = 5).
SEND_COMMAND SERIAL, 'XMRT XX' Over AXlink; where XX is from one to 10 in increments of one.
Any of the above will change timing for Axcess code download as well as firmware upgrades.
10
AXB-EM232 Enhanced Master RS-232 Controller
Programming
AXB-EM232 Enhanced Master RS-232 Controller
11
brussels • dallas • los angeles • mexico city • philadelphia • shanghai • singapore • tampa • toronto* • york
3000 research drive, richardson, TX 75082 USA • 469.624.8000 • 800.222.0193 • fax 469.624.7153 • technical support 800.932.6993
032-004-1013 10/03 ©2003 AMX Corporation. All rights reserved. AMX, the AMX logo, the building icon, the home icon, and the light bulb icon are all trademarks of AMX Corporation.
AMX reserves the right to alter specifications without notice at any time. *In Canada doing business as Panja Inc.
AMX reserves the right to alter specifications without notice at any time.