1
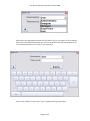
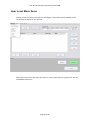
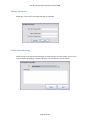
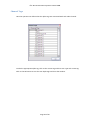
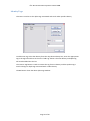
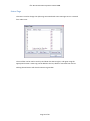
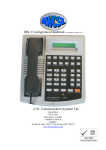
DRC-ops User Guide
© A.W Communication Systems Limited 2008
Contents
Contents .................................................................................................................................................. 3
Introduction ............................................................................................................................................ 5
About DRCops ..................................................................................................................................... 5
User Interface ..................................................................................................................................... 5
Running the Software ............................................................................................................................. 6
Starting the DRCops for the first time .................................................................................................... 6
Screen layout .......................................................................................................................................... 9
Main Control Functions......................................................................................................................... 10
Channel buttons ............................................................................................................................ 10
Channel Off ................................................................................................................................... 10
Monitor ......................................................................................................................................... 10
Select ............................................................................................................................................. 11
Transmit ........................................................................................................................................ 11
Switching between Monitor and Select ........................................................................................ 12
Setting the channel to OFF............................................................................................................ 12
Function Indicators ....................................................................................................................... 12
Voted Site Information ................................................................................................................. 13
Channel Functions................................................................................................................................. 13
Single Channel Select Mode.......................................................................................................... 13
Multi Channel Select Mode........................................................................................................... 13
Talk through .................................................................................................................................. 14
Squelch Defeat .............................................................................................................................. 14
Connect ......................................................................................................................................... 14
PTT Button ............................................................................................................................................ 15
Telephone Button ................................................................................................................................. 15
Loudspeaker Button .............................................................................................................................. 15
Off Button ............................................................................................................................................. 15
Facilities Button .................................................................................................................................... 16
Auto Site Mode ............................................................................................................................. 16
Locking to a Site ............................................................................................................................ 17
Exit Button..................................................................................................................................... 17
Selcall Button ........................................................................................................................................ 18
Call Button..................................................................................................................................... 19
Page Button................................................................................................................................... 19
Interrogate Button ........................................................................................................................ 19
Reset Button ................................................................................................................................. 19
Clear Button .................................................................................................................................. 19
Exit Button..................................................................................................................................... 19
Volume Button ...................................................................................................................................... 20
Playback Button .................................................................................................................................... 21
Using the Selcall Stack........................................................................................................................... 23
Time .............................................................................................................................................. 23
Ident .............................................................................................................................................. 23
Name ............................................................................................................................................. 23
Text ............................................................................................................................................... 23
Channel ......................................................................................................................................... 24
Site ................................................................................................................................................ 24
Page 3 of 34
© A.W Communication Systems Limited 2008
Calling a Radio from the Stack .............................................................................................................. 24
Call Button..................................................................................................................................... 24
Reset Button ................................................................................................................................. 24
Clear Button .................................................................................................................................. 25
Retain Button ................................................................................................................................ 25
Current Call Box .................................................................................................................................... 25
Main Screen Exit Button ....................................................................................................................... 25
Menu Line Items ................................................................................................................................... 26
Current User .................................................................................................................................. 26
Identity List.................................................................................................................................... 26
Log Off ........................................................................................................................................... 26
Help ............................................................................................................................................... 26
Exit................................................................................................................................................. 26
User Level Menu Items ......................................................................................................................... 27
Change Password .............................................................................................................................. 28
Send Instant Message ....................................................................................................................... 28
Channel Tags ..................................................................................................................................... 29
Site Tags ............................................................................................................................................ 30
Identity Tags ...................................................................................................................................... 31
Status Tags ........................................................................................................................................ 32
User List............................................................................................................................................. 33
Settings.............................................................................................................................................. 34
Page 4 of 34
© A.W Communication Systems Limited 2008
Introduction
About DRCops
DRCops is a screen based operator console providing a more flexible control of A.W.
Communications Digital Switch the DS-32 than the conventional desktop based operators
unit.
The system still requires the desktop operators unit, which is used as the audio interface
between the DS-32 switch and the PC running the DRCops software.
DRCops is configured to run on a PC, which uses the Microsoft operating system Windows
XP or Windows Vista.
The DS32 Switch is a digital radio communications switch capable of connecting multiple
radio operator positions to multiple radio base stations, the switch will support up to 32
individual ports (either operator or channel) in it’s standard form, but with the addition of a
second shelf will support up to 64 ports.
The standard desk top control unit the DRC-32 can only visibly show up to seven channels on
it’s display and therefore the presentation to operating personnel is limited by the capacity
of the display. DRCops software allows operating personnel to be presented with multiple
channel presentations giving much greater detail than the two-line display of the standard
operators unit.
User Interface
DRCops has been designed to use the extensive features of the Windows operating system
and the familiar user environment of the Windows, Icon, Menu and Pointer (WIMP) system.
Any user familiar with Windows will immediately feel at ease with DRCops and it’s various
components.
The system has several levels of user access, a standard user level with access to the main
components of the control system, and supervisor and manager levels of access, which
allows control of some system parameters.
Page 5 of 34
© A.W Communication Systems Limited 2008
Running the Software
Once the software has been installed correctly, the installation routine will create a path to
the DRCops program in the Program files path of your computer.
The program can be run from the start menu or alternatively a shortcut can be placed on the
users desktop to allow quick access to the program.
Starting the DRCops for the first time
Start DRCops from one of the two methods listed above. On initial start up a splash screen is
displayed giving copyright details for the program.
The main DRCops screen and a user log on window then replace the splash screen.
To log on select the appropriate user name from the drop down menu.
Page 6 of 34
© A.W Communication Systems Limited 2008
Next type in the appropriate password for the level of Log on you require. If the computer
does not have a keyboard attached then click on the down arrow and this will open up an
on-screen keyboard for you to enter in your password.
Click on the “Submit” or the “Enter” key to complete the log in procedure.
Page 7 of 34
© A.W Communication Systems Limited 2008
If the password has been entered correctly the Log on window should disappear and you will
be presented with the DRCops main screen. If the password is entered incorrectly you will
be given a verification error and asked to input the user name and password again.
Page 8 of 34
© A.W Communication Systems Limited 2008
Screen layout
Once your user name and password have been accepted you will be presented with the
DRCops main screen with the appropriate level of access.
You will note from the display that the screen is split into several sections, each pertaining to
a relevant function.
This screen is the normal presentation of DRCops and it will allow full control of the DS-32
switch through the DRC-32 operator unit.
You will notice that the menu item in the top left hand corner of the screen indicates the
level at which you are logged on to the system.
Page 9 of 34
© A.W Communication Systems Limited 2008
Main Control Functions
The main screen has functions available to both supervisors and general users.
Channel buttons
The radio channel buttons are located in the allocated radio channels box; a user can preselect the radio channels they require available to them for their normal operating duties. A
user can change the channels available at any time.
The channel button uses a colour and also indicators to show at a glance the status of each
individual radio channel.
Please note that due to the many different variations available for the channel buttons and
other properties of the operator screen, the layout on your screen may differ slightly to
those shown
Channel Off
With the channel button in the greyed out state the channel is available to the operator but
they have not selected it to monitor or transmit. The operator will not hear any audio
present on the channel.
Monitor
By clicking the channel button once, the channel is now available to the operator to monitor
the audio present. The operator cannot transmit on this channel. A yellow band across the
bottom of the button (or a solid yellow colour to the button) indicates that the channel is in
the monitor mode.
Page 10 of 34
© A.W Communication Systems Limited 2008
A light green band indicates that the channel is in the monitor mode and also that incoming
audio is present on the channel.
Select
Clicking on the channel button a second time will place it into the select mode, in this mode
an operator can receive audio from the channel and can also transmit out on the channel.
An orange band across the bottom of the channel button indicates that the channel is
selected by the operator.
A dark green band across the bottom of the channel button indicates that the channel is
selected and that incoming audio is being received on the channel.
Transmit
A red bar across the bottom of the channel button indicates that the operator has selected
the channel and also that he is transmitting on the channel.
Page 11 of 34
© A.W Communication Systems Limited 2008
Switching between Monitor and Select
If an operator wishes to toggle between monitor and select modes on a channel, all they
have to do is click upon the channel button and the coloured band will indicate the new
state.
Note that if single channel select mode has been set up in the configuration, when an
operator selects a second channel by clicking on the channel button, any channel previously
selected will revert to the monitor state.
Setting the channel to OFF
If the operator wishes to turn the audio for a particular channel off, they will need to set the
channel to the monitor mode and then click and hold down the channel button for two
seconds. The coloured bar at the bottom of the channel button will then revert to grey,
indicating that the channel is available but all audio is muted.
Function Indicators
Each channel button has several function indicators, which can show the status of the
channel attributes.
The indicators show the following information: T/T
Indicates that the channel has talk through enabled
SQL
Indicates that the channel has the squelch defeat enabled
SEL
Indicates that another operator has the channel selected
Con
Indicates that the channel is cross-connected (patch)
Page 12 of 34
© A.W Communication Systems Limited 2008
Voted Site Information
On some systems the site selected as the one receiving the strongest signal by the
system will be indicated in a text message at the bottom of the channel buttons. This text
will be updated each time the voter determines that a new site is receiving a stronger signal
than the original site. The text on the display reflecting these updates.
Channel Functions
Within the function button area of the main window are some Channel function buttons.
These allow the operator to set radio channel facilities.
An operator can only change the functions of a channel that is in the select mode; channels
that are OFF or in the monitor mode cannot have their functions adjusted.
There are two modes of operation for the channel functions one for single channel select
mode and a second for multi channel select mode.
Single Channel Select Mode
When the software is running in single channel select mode as set in the “Set Up” screen,
clicking on the channel function button will automatically set or reset the facility on the
channel that is selected. If no channels are selected then the function buttons do not have
any effect.
Multi Channel Select Mode
If the single channel select mode has not been activated and the operator is able to select
multiple channels, a slightly different mode of operation is required for the function buttons.
Again the functions can only be set on channels that are selected.
Page 13 of 34
© A.W Communication Systems Limited 2008
To set a function on a selected channel, the operator clicks on the function button, the
button background colour changes to red to indicate that the function is active, the operator
next needs to click on the channel button on which he wishes to apply the function.
The same process is used to remove a function from a channel.
Talk through
The talk through button is used to set the radio channel into the talk through. When the
facility is set the T/T indicator on the channel button shows red.
The function can be set or re-set by the talk through button. It should be noted that if
another operator selects the talk through function on a channel then the indicator will be
shown on all operator positions that have that channel available for use (monitor or
selected).
Squelch Defeat
The Squelch defeat button is used to set and reset the radio channels mute facility
depending on how the facility is programmed at the base station (carrier squelch defeat or
CTCSS defeat). Again when this facility is set the SQL indicator on the channel button is
illuminated in red.
If another operator on the system selects the Squelch defeat option on a channel, then the
indicator will be shown at all operator positions where the channel is in use.
Connect
The connect facility allows an operator to connect incoming audio from one radio channel to
outgoing audio of another radio channel. This facility is also known as channel patch.
Up to 12 radio channels can be connected together at any one time, with incoming audio
from one channel being connected to the outgoing audio of all other channels in the connect
group.
Channels can be removed from a connect group one at a time using the connect button, or
the connect can be cleared down in its entirety by use of the “Clear Connect” button in the
“Connected Channels
Page 14 of 34
© A.W Communication Systems Limited 2008
PTT Button
The Push to talk or PTT button is located at the lower part of the Allocated Radio Channels
box and allows the operator to transmit on a channel by clicking and holding down the
mouse button when the cursor is over the button. Releasing the mouse button will release
the transmit button.
The PTT button can also be activated by use of the keyboard space bar or the transmit
button on the DRC-32 controller or a footswitch connected to the DRC-32 controller.
The transmit function will only be activated on channels that are selected and as an
indication that they are in transmit mode the colour bar at the bottom of each channel
button that is selected will indicate red as will the PTT button.
Telephone Button
The Telephone button is used to change the operators headset over from the radio system
to a telephone instrument connected to the common headset port of the DRC-32 controller.
The button will change colour to indicate that the headset is biased towards the telephone
system.
Loudspeaker Button
The Loudspeaker of the DRC-32 controller can be muted from the Loudspeaker button
located on the screen. When clicked the button changes from green to red indicating that
the loudspeaker is muted. The muting of the loudspeaker does not affect the audio heard in
the operators’ headset.
Off Button
This button is used to quickly turn off any channels that are in the monitor state, it will not
affect channels that are selected. This feature can be used to turn off multiple channel s
whereas the press and hold method described above will only turn off a single channel at a
time.
Page 15 of 34
© A.W Communication Systems Limited 2008
Facilities Button
Pressing the facilities button opens up the facilities window in the central area of the sceen.
Within the Facilities screen the user can manually select a radio site for the channel that is
selected and lock the transmissions to this site.
Auto Site Mode
Click on the auto Site button and the radio system will operate in “Circulating Site” mode,
scanning around all the available sites on the channel when a Selcall message is initiated to a
radio. The TX Site Select box will indicate that the system is in auto site for the channel when
this mode is selected.
Page 16 of 34
© A.W Communication Systems Limited 2008
Locking to a Site
If the user wishes to “Lock” the radio system to a specific radio site, then they click on the
appropriate site name in the site list window and then click on the “Lock TX Site” button.
The Site name will then be highlighted and the TX Site Select box will indicate that the
system is in manual select mode.
Note that there is a timer operating in manual select mode and the system will revert back
to Auto site mode when this timer expires.
Exit Button
Clicking on the Exit button will remove the facilities window from the operators screen.
Page 17 of 34
© A.W Communication Systems Limited 2008
Selcall Button
Clicking on the Selcall button will open up the Selcall signalling window in the centre of the
operators screen.
From this screen the operator can make an individual Selcall to a specific radio. Using the
keypad the operator keys in the users identity digits, these are displayed in the identity
window, once the correct numbers are input the operator can either select a specific site by
clicking on the site name in the TX Site window and then initiate the call or he can go straight
to initiating the call in auto site mode.
To clear an incorrectly entered digit, click on the left arrow button or press the clear button
to clear all of the entry.
Page 18 of 34
© A.W Communication Systems Limited 2008
Call Button
This is used to initiate a call to the number entered from the keypad. This will open the
loudspeaker in the individual radio allowing him to hear messages from the operator.
Page Button
This is used to send a Page sequence to the specific radio identity entered from the keypad.
Interrogate Button
This is used to send an interrogate sequence to the radio, If a response is received then a
small window will open up giving the details of the radio’s status.
Reset Button
This is used to send a reset command to the radio and to mute his loudspeaker.
Clear Button
This is used to clear the Selcall display of any digits that may have been entered, it does not
send any messages to the individual radio.
Exit Button
This button is used to remove the Selcall window from the operators screen and returns the
display back to it’s normal state.
Page 19 of 34
© A.W Communication Systems Limited 2008
Volume Button
Clicking on the Volume Button will open up the volume setting window in the central area of
the operators screen.
From here the operator can set the volumes independently for the headset, handset and
loudspeaker that are connected to the DRC-32 control unit. A numerical indicator
underneath each volume control shows the current level the volumes are set at.
The operator can change the volume levels by sliding the appropriate slider up and down to
get the necessary level of received audio.
Again the Exit button is used to remove the volume control window from the operators
screen and return the display to normal operation.
Page 20 of 34
© A.W Communication Systems Limited 2008
Playback Button
Clicking the playback button will open up the instant replay recorder window in the centre
area of the operators screen.
The playback window shows a black box with a graphical representation of the recorded
speech. This box is calibrated in minutes back from the current system time. Within the box
is a white cursor which can be scrolled from left to right across the screen to select the
sample of recording at the time that the user wishes to listen to.
A small box to the right of the time graticule shows the time in minutes that the curser is set
to relative to the current time of the system.
If the operator wishes to listen to a section of recorder audio, they slide the cursor to the
appropriate location and then click on the “Play” button.
To stop the playback the operator clicks on the “Stop” button.
Page 21 of 34
© A.W Communication Systems Limited 2008
Buttons are provided to step the palyback point backwards or forwards in 10 second and 60
second steps.
The instant replay recorder will record all audio presented to the operator either from radio
or from telephone as well as the operators microphone audio. When in playback mode the
audio being played back will also be recorded at the current time.
Once again pressing the Exit button will remove the playback screen from the operators
display and return the screen to the standard setting.
Page 22 of 34
© A.W Communication Systems Limited 2008
Using the Selcall Stack
On the Operators main screen, the centre area is normally occupied by the main Selcall
stack.
The stack consists of columns of data showing incoming calls from radio devices. For each
radio unit that has initiated a call into the system the following information is displayed:-
Time
The time that the call was received by the system
Ident
The individual radio identity of the radio initiating the call into the system.
Name
The alpha-tag name associated to the radio identity and configured within the system
Text
The Alpha-tag associated with the status message sent from the radio.
Page 23 of 34
© A.W Communication Systems Limited 2008
Channel
The radio channel on which the call was received.
Site
The radio site on which the call was received.
Calls are placed on the stack in chronological order with the oldest call being at the top of
the stack. If a radio sends in an alarm message this is automatically placed at the top of the
stack and the background to the call details is highlighted in red.
Calling a Radio from the Stack
To initiate a call to a radio which is currently stored in the stack, the operator simply clicks
on the line of the stack containing the individual call. The call is then removed from the stack
and placed in the current call box of the operators screen.
If the system is set to automatically call from the stack, then a Selcall “Call” message will
automatically be generated as soon as the call details are placed in the active call box.
If the system is set to just remove the call from the call stack, the operator will need to press
a further button to carry on with the call.
Call Button
This will initiate a Selcall call command to the radio alerting the radio user and enabling the
radio loudspeaker.
Reset Button
This will initiate a reset message to the radio detailed in the current call box and will close
down the radio loudspeaker.
Page 24 of 34
© A.W Communication Systems Limited 2008
Clear Button
This will clear the call details from the current call box and will not initiate any Selcall
messaging.
Retain Button
This will take the call details from the current call box and place the details back into the
stack so that the operator can deal with the call at a later time. Calls placed back into the
stack are highlighted in yellow to indicate that they are retained calls.
Current Call Box
This box holds the details of the call currently being handled by the operator. It also can
show the status of the radio indicating to the operator that a call request to the radio has
been successful or has failed.
Where circulating site Selcall is used with a voting system the Current call box can also show
on which sites the system is trying to establish a call with the radio.
Main Screen Exit Button
This button is used to close down the DRCops application and to revert to the computers
normal operating system. A dialogue box will pop on the screen if this button is clicked
asking the operator for confirmation that they wish to exit from DRCops.
Page 25 of 34
© A.W Communication Systems Limited 2008
Menu Line Items
Current User
The first menu line item is the level of user that is currently logged on to DRCops. Clicking on
this item will enable the user level menu items.
Identity List
Clicking on the Identity list menu item will produce a pop up window on the operators
screen showing the identities of radios and the alpha-tags associated with those identities.
This list can be updated from the current user menu level given the appropriate level of
access.
Log Off
Clicking on this menu line item will allow the operator to log off from DRCops and re-log on
at a different level of access. A dialogue box is presented to the operator after clicking this
button asking them if they are sure that they want to log off from DRCops.
Help
The help menu item accesses the DRCops help file and also the about screen giving details of
the current version of software in use.
Exit
This menu item is used to exit from DRCops and return to the computer operating system, a
dialogue box is presented to the operator asking them to confirm that they wish to exit from
DRCops.
Page 26 of 34
© A.W Communication Systems Limited 2008
User Level Menu Items
Clicking on the user level menu line item will display a list of menu items available to the
current level of log on for the operator.
Where the current user does not have access to certain items these are greyed out and are
unavailable to that user.
Page 27 of 34
© A.W Communication Systems Limited 2008
Change Password
Allows the current user to change their log on password
Send Instant Message
Allows a user to send short text messages to other operators on the system, the user can
elect to send a message to a specific operator or to all operators on the system.
Page 28 of 34
© A.W Communication Systems Limited 2008
Channel Tags
Here the operator can define what the alpha tags are associated with each radio channel.
To edit the appropriate alpha tag, click on the current tag and then over type with a new tag.
Click on the OK button to save the new alpha tags and close the window.
Page 29 of 34
© A.W Communication Systems Limited 2008
Site Tags
This item is used to change or set the alpha tags for the radio sites used on each channel in a
multi site voting system.
To edit the site alpha tags click on the appropriate channel and site cell and then type in a
new alpha tag.
The scroll buttons can be used to access hidden areas of the matrix.
Click on the OK button to save the new alpha tags and close the window.
Page 30 of 34
© A.W Communication Systems Limited 2008
Identity Tags
This item is used to set the alpha tags associated with each radios specific identity.
To add a new tag, select the identity from the drop down identity box, enter the appropriate
tag in the tag box and then click on the “Add Tag” button. The new identity and alpha tag
will now be added into the list.
The remove Tag button is used to remove the tag from an identity and the Update tag is
used to change an alpha tag associated with a radio identity.
The OK button closes the Ident alpha tags window.
Page 31 of 34
© A.W Communication Systems Limited 2008
Status Tags
This item is used to change the alpha tags associated with status messages sent or received
from radio units.
The scroll bar can be used to scroll up and down the Status tag list, and again using the
appropriate button a status tag can be added to the list, edited or removed from the list.
Clicking the OK button will close the Status Tag window.
Page 32 of 34
© A.W Communication Systems Limited 2008
User List
This item opens the current user list for the system.
From this screen new users can be added to the system, a level of access allocated to them
and passwords set by the use of the Add User button.
Existing users can have their access level updated as necessary using the update button.
Users can be removed from the system by the use of the Remove user button.
Clicking the OK button will close the User management window.
Page 33 of 34
© A.W Communication Systems Limited 2008
Settings
This menu item gives a user access to the system settings for DRCops.
Some of the items on this screen will not be available to all users where their access level is
not high enough.
Where a user does not have access to certain elements these functions are greyed out.
Some of these parameters are system specific and should only be adjusted by a competent
person with overall knowledge of the complete system. Incorrect changes may affect the
operation of the whole radio system.
Page 34 of 34
© A.W Communication Systems Limited 2008
Page 35 of 34