1
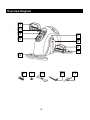
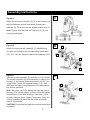
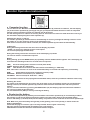
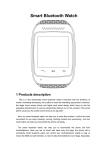
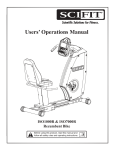
BCG
Assembly Instructions
MINI BIKE
F1BC4018
Please keep this instruction manual for future reference
Adult Assembly required:
Keep all parts out of the reach of children
Customer Service: (888) 922-2336, 8:00am to 5:00pm, Central Standard Time
Monday thru Friday
(Made in China)
Table of Contents
• Table of Contents ……………….page 1
• Warnings …………………………page 2
• Overview Diagram ………………page 3
• Parts List …………………………page 4
• Assembly Instructions …………..page 5
• Monitor Operation Instructions …page 6
• Care and Maintenance ………….page 7
1
Warnings
•Read this manual before assembling or using this product.
Check product for loose or broken parts before each use.
•Discontinue use when any missing, broken, and loose parts are found.
•The maximum weight limit of this mini bike is 220LB.
•Position the Mini Bike on a clear leveled ground.
•Keep children and pets away from the machine at all times.
•Do not store your Mini Bike outside or where exposed to moisture or
extreme temperatures.
•Only one person at a time should use this Bike.
•Consult your physician prior to starting any training. Warm up before
exercise.
•If the user experiences dizziness, nausea, chest pain, or any other
abnormal symptoms, STOP the workout at once. Consult a physician
immediately.
•For home use only.
• This product is intended for consumer (non-institutional) use only.
2
Overview Diagram
7
13
6
1
5
12
2
3
4
8
9
10
3
11
14
Parts List
NO
DESCRIPTION
Qty
1
Housing
1
2
Pedal (right)
1
3
Foot (rear)
1
4
Foot(front)
1
5
Rotary knob
1
6
Monitor operation
1
7
Pedal(left)
1
8
Hexagon socket head bolts
4
9
Plain washer
4
10
Open-ended spanner
1
11
Allen key
1
12
Crank arm(right)
1
13
Crank arm(left)
1
14
Plug-in connector cable
1
15
LCD display screen
1
16
Mode button
1
4
Assembly Instructions
A
Figure A:
Attach the front and rear feet (3), (4) to the housing (1)
with the hexagon socket head bolts (8) and plain
washers (9). To do this use the supplied Allen key(11).
Note: Ensure that the front and rear feet (3), (4) are
correctly positioned.
Figure B:
B
7
Attach the right and left pedals(2), (7) (identified by
R= right and L=left) to the corresponding crank arms
(12), (13). Use the supplied open-ended spanner (10) .
13
12
2
Figure C:
Take the monitor operation (6) carefully out of the holder.
The monitor operation (6) is connected by a cable to the
housing (1) and can be pulled a maximum of 3.94ᲆout
of the holder. Insert the supplied battery (1.5V, AAA,
LR03)into the battery compartment on the underside of
the monitor operation.
Note: Make sure you fit the battery the right way round
(polarity). The correct polarity is shown inside the battery
compartment. Check that the plug-in connector (14) is
correctly inserted. Insert it again if necessary. Place the
monitor operation (6) back into the holder and lightly
press it into position.
CAUTION! Ensure that the cable does not become kinked
or trapped.
5
C
6
14
Monitor Operation Instructions
MILE
15
16
● Computer function
You can also use the Mini Bike trainer with the monitor operation (6) switched off. However, the LCD display
(15) of the monitor operation (6) (see Fig D) can give you helpful information about the results of completed
training sessions and tells you how your training may be improved.
The arm and leg trainer is a device in accuracy class C. This means no claims are made about the accuracy of
the information displayed by the monitor operation (6).
Switching the device on and off:
The monitor operation (6) switches itself on automatically as soon as you begin the training session or move
the pedals (2), (7). The values are shown in the LCD display (15).
If the device is not moved for about 3 minutes, the monitor operation (6) will switch off automatically.
LCD display:
During the training session the first line of the LCD display (15) shows
-“STOP”, as soon as the training session is interrupted.
-the current speed( approximate value).
During the training session the second line of the LCD display (15) shows
-the various modes in an automatic sequence
Modes:
During training, press the MODE button (16) repeatedly until the SCAN indicator appears. The LCD display (15)
now shows the following modes for 6 seconds each in sequence:
Previous training time in minutes: seconds (0:00 -99:59)
TIME
SPEED: Speed in mph (0.0- 999.9 mile)
ODO:
Total distance covered since the last insertion of the battery (0 – 9999 mile)
Note: This value is reset to 0 as soon as the exhausted battery is removed and replaced by a new battery.
RPM:
Pedal rotation measured in revolutions / minute (0 -999)
DISTANCE: Distance covered miles (0.0 – 99.99 mile)
CALORIES: Calories used (0.00 -99.9/ 100.1 – 999.9)
The calculation is based on the preprogrammed standard values, which are provided as indicative values only.
Resetting the values:
The values in the LCD displays (5) are zero only at the start of your first training session. For all subsequent
training sessions, the monitor operation (6) continues from the values achieved at the end of the previous
session.
You can reset the indicators by pressing the MODE button (16) and keeping it pressed until all the indicators
are once more visible at the same time.
The rest total distance (ODO) is reset by removing the battery.
● Replacing the battery
Take the monitor operation (6) carefully out of the holder. The monitor operation (6) is connected by a cable to
the housing (1) and can be pulled a maximum of 3.94 ft out of the holder. Remove the exhausted battery.
Insert a new battery (1.5V AAA, LR03) into the battery compartment on the underside of the monitor operation(6).
Note: Make sure you fit the battery the right way round (polarity). The correct polarity is shown inside the
battery compartment.
Check that the plug-in connector (14) is correctly inserted. Insert it again if necessary.
Place the monitor operation holder and lightly press it into position.
CAUTION! Ensure that the cable does not become kinked or trapped.
6
Care And Maintenance
•
•
Avoid dropping the mini bike and components.
Do not use or store in wet or humid conditions.
Wipe clean with a soft dry cloth.
Use light sewing machine oil to lubricate the piston when they start to have
noise or screech.
Ensure batteries are inserted into the mini-Bike correctly, with + and –
terminals are aligned correctly. Keep battery compartment clean each time
batteries are replaced.
Alkaline batteries can be safely disposed of with household waste. Do not
dispose of in a fire because they may explode. Rechargeable batteries should
be recycled.
Workout Guide
Using the Mini Bike
● Bringing into use
The Mini Bike trainer can be used for exercising your arm and leg muscles. Read all the health and safety
advice carefully.
● Warming up
In order to avoid the risk of injuries, you should always warm up and relax your muscles before doing any exercise.
● Setting the resistance
Turn the rotary knob (5) in the + direction to increase the resistance.
Turn the rotary knob (5) in the – direction to decrease the resistance.
E
● Training
Excercising your leg muscles( Fig E):
□
Place the device on the floor. Ensure that the supporting
surface is level, flat and non-slip.
□
Place a chair in front of the device.
□
Sit on the chair.
□
Insert your feet into the straps on the pedals (2), (7).
□
Change the distance between the device and the chair
if you find that the distance is too small or too large.
□
Your foot movements should be smooth and regular.
F
Exercising your arm muscles( Fig F):
□
Place the device on a table. Ensure that the table top is level,
flat and non-slip.
□
Place a chair in front of the device.
□
Sit on the chair.
□
Insert your hands into the straps on the pedals (2), (7) or grasp
the pedals.
□
Change the distance between the device and the chair if you find that the distance is too small or too large.
□
Move the pedals (2), (7) smoothly and regularly.
7