1
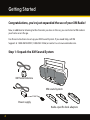
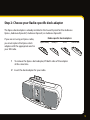
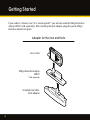
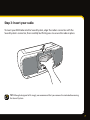
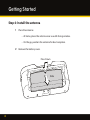
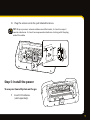
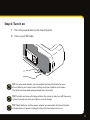
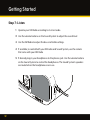
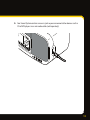
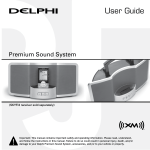
XM Sound System
User Guide
About XM
XM is America’s number one satellite radio company. Broadcasting live daily from studios
in Washington, DC, New York City, Chicago, the Country Music Hall of Fame in Nashville,
Toronto and Montreal, XM’s lineup includes more than 170 digital channels of choice from
coast to coast: commercial-free music, premier sports, news, talk radio, comedy, children’s
and entertainment programming; and the most advanced traffic and weather information.
XM is the leader in satellite-delivered entertainment and data services for the automobile
market through partnerships with General Motors, Honda, Hyundai, Nissan, Porsche,
Subaru, Suzuki and Toyota. XM’s industry-leading products are available at consumer
electronics retailers nationwide. For more information about XM hardware, programming
and partnerships, please visit http://www.xmradio.com/.
2
Table of Contents
Getting Started . . . . . . . . . . . . . . . . . . . . . . . . . . . . . . . . . . . 4
Step 1: Unpack the XM Sound System. . . . . . . . . . . . . 4
Step 2: Choose your Radio-specific dock adapter . . .5
Step 3: Insert your radio. . . . . . . . . . . . . . . . . . . . . . . . . 7
Step 4: Install the antenna. . . . . . . . . . . . . . . . . . . . . . . 8
Step 5: Install the power. . . . . . . . . . . . . . . . . . . . . . . . . 9
Step 6: Turn it on. . . . . . . . . . . . . . . . . . . . . . . . . . . . . . .11
Step 7: Listen . . . . . . . . . . . . . . . . . . . . . . . . . . . . . . . . . 12
Taking Care of Your XM Sound System . . . . . . . . . . . . . . 14
Troubleshooting . . . . . . . . . . . . . . . . . . . . . . . . . . . . . . . . . 15
Technical information. . . . . . . . . . . . . . . . . . . . . . . . . . . . 16
FCC and IC Statement. . . . . . . . . . . . . . . . . . . . . . . . . . . . 17
Warranty . . . . . . . . . . . . . . . . . . . . . . . . . . . . . . . . . . . . . . . 18
3
Getting Started
Congratulations, you’ve just expanded the use of your XM Radio!
Now, in addition to listening to the channels you love in the car, you can listen to XM radio in
your home or on the go.
Use these instructions to set up your XM Sound System. If you need help, call XM
Support at 1-800-XM-RADIO (1-800-967-2346) or contact us at www.xmradio.com.
Step 1: Unpack the XM Sound System
XM home antenna
XM sound system
Power supply
Radio-specific dock adapters
4
Step 2: Choose your Radio-specific dock adapter
The Xpress dock adapter is already installed in the Sound System for the Audiovox
Xpress, Audiovox XpressEZ, Audiovox XpressR, or Audiovox XpressRC.
If you are not using an Xpress radio,
you must replace the Xpress dock
adapter with the appropriate one for
your XM radio.
1
Radio-specific dock adapters
Xpress family
RoadyXT
SKYFi3
inno & Helix
To remove the Xpress dock adapter, lift both sides of the adapter
at the same time.
2 Insert the dock adapter for your radio.
5
Getting Started
If your radio is a Pioneer inno™ or a Samsung Helix™, you will also need the XM2go Boombox
Adapter XMPA1 (sold separately). After installing the dock adapter, plug the special XM2go
Boombox Adapter into place.
Adapter for the inno and Helix
inno / Helix
XM2go Boombox Adapter
XMPA1
*Sold separately
Included inno/Helix
Dock Adapter
6
Step 3: Insert your radio
To insert your XM Radio into the Sound System, align the radio’s connector with the
Sound System’s connector, then carefully but firmly press to secure the radio in place.
TIP! Although designed to fit snugly, we recommend that you remove the radio before moving the Sound System.
7
Getting Started
Step 4: Install the antenna
1
Place the antenna:
• At home, place the antenna near a south-facing window.
• On the go, position the antenna for best reception.
2 Remove the battery cover.
Press Down
Slide
8
3 Plug the antenna into the jack labeled Antenna.
TIP! Wrap any excess antenna cable around the hooks, it is best to wrap it
counter clockwise. It is best to warp counter clockwise starting with the plug
end of the cable.
Step 5: Install the power
To use your Sound System on the go:
1
Insert 8 C batteries
(sold separately).
9
Getting Started
2 Replace battery cover.
Slide
TIP! When the battery life is getting low the power LED will blink and your XM Radio may not play music. TIP! It is not recommended to retain batteries in the Sound System for
an extended length of time. Remove batteries when not in use.
1
Plug the AC power adapter into the jack labeled 12V DC on the Sound System.
2 Plug the other end into any 110-120V power source
10
Step 6: Turn it on
1
2 Turn on your XM Radio.
Press the power button on the Sound System.
TIP! For some radio models, you can enable the Auto-ON feature for ease
of use. Refer to your radio’s menu settings and User Guide for instructions.
The Helix and inno need to be powered down manually.
TIP! The Helix and inno will charge while in the sound system, turn off the sound
system if you do not want your Helix or inno to charge.
TIP! If both batteries and the power adapter are connected, the Sound System
will operate on AC power. Unplug the Sound System when not in use.
11
Getting Started
Step 7: Listen
1 Operate your XM Radio according to its User Guide.
2 Use the volume buttons on the Sound System to adjust the sound level
3 Use the XM Radio to adjust the bass and treble settings.
4 If available, to control both your XM radio and Sound System, use the remote that came with your XM Radio
5 If desired, plug in your headphones to the phones jack. Use the volume buttons on the Sound System to control the headphones. The Sound System’s speakers are muted when the headphones are in use.
12
6 Your Sound System contains an aux in jack so you can connect other devices such as CD or MP3 players via a mini audio cable (sold separately).
13
Taking Care of Your Sound System
Placement
Do not place the Sound System or XM radio near heat sources or in direct sunlight. Do not
place the Sound System on an inclined or unstable surface, in areas of excessive dust, or
areas prone to mechanical shock. Do not block the speakers or ventilation ports.
Because the speakers contain powerful magnets, keep credit cards, mechanical watches,
and other devices that might be affected away from the Sound System.
Cleaning
DANGER! Unplug the AC power adapter and/or remove the batteries during
the cleaning to avoid any electrical shock hazard.
Clean the hard surfaces of the Sound System with a soft cloth slightly moistened with a
mild detergent solution.
Clean the soft surfaces of the speakers with a dry lint brush.
Do not use any type of abrasive pad, scouring powder, or solvent, such as alcohol or
benzene.
14
Troubleshooting
If this happens
Try this
My XM radio is not receiving a signal.
Use the “antenna aiming” feature on the XM
radio and move the antenna to another location.
My XM radio will not turn on.
Check whether the power cord is plugged into
the wall.
Ensure batteries are fresh and inserted
correctly.
If applicable, make sure Auto-ON is enabled.
I only receive XM channels 0 and 1.
Make sure your radio is activated. Contact XM
at www.xmradio.com or 1-800-XM-RADIO.
The radio and Sound System are on and
receiving a signal but I can’t hear anything.
Remove the radio from the Sound System and
re-insert it, then turn the power on.
Unplug any headphones.
Check the volume control.
Make sure “MUTE” is not set on the remote if used.
If the power LED is blinking change the
batteries.
I hear noise or interference.
Move away from any cordless telephones or
electrical appliances or other devices that may
cause interference.
My remote doesn’t work.
Make sure that the IR sensors are not ob
structed.
It may be time to replace the battery in the
remote.
15
Technical Information
Dimensions
XM Sound System
Adapter
Weight
XM Audio System
Adapter
Inputs and Outputs
XM antenna input
Aux In
Headphone output
Power
DC
Battery (sold separately)
Temperature
Operating
Storage
Audio
Power Frequency response
Suitable Receivers (sold separately)
Audiovox Xpress
Audiovox XpressR
Delphi RoadyXT® Pioneer inno™ (with XM2go Boombox Adapter)
16
405mm(W) X 147mm(H) X 184mm(D)
16 in(W) X 5.78 in(H) X 7.24 in (D)
49mm(W) X 78mm(H) X 35mm(D)
1.92 in (W) X 3.07 in(H) X 1.37 in(D)
3.345 Kg
0.142 Kg
7.375 lbs
0.3125 lbs
1SMB connector
3.5mm diameter mini stereo jack
3.5 mm diameter mini stereo jack
Normal 12V (6-16V), positive polarity, (+ inner conductor),
8 C cell alkaline or rechargeable
-25°C ~ 70°C
-40°C ~ 70°C
-13°F ~ 158°F
-40°F ~ 158°F
Maximum 5W RMS per channel at 1% THD at DC12V power supply (power output is
reduced when the power supply is less
than 12V.)
100Hz ~ 20KHz @ +/- 3dB
Audiovox XpressEZ
Audiovox XpressRC
Delphi SKYFi3®
Samsung Helix™ (with XM2go Boombox Adapter)
FCC and IC Statement
FCC and IC Statement
The user is cautioned that changes or modifications not expressly approved by XM Satellite Radio Inc. can void
the user’s authority to operate this device.
This device has been designed to operate with the antenna provided in the original packaging. Use of antenna
other than the antenna provided will result in improper operation, and is strictly prohibited per regulations of
Industry Canada.
This device complies with Part 15 of the FCC Rules and is certified to Industry Canada’s RSS-210 specification:
1. This device may not cause harmful interference.
2. This device must accept any interference received, including interference that may cause undesired operation.
This equipment has been tested and found to comply with the limits for a Class B digital device, pursuant to
Part 15 of the FCC Rules and Industry Canada RSS-210. These limits are designed to provide reasonable
protection against harmful interference in a residential installation.
This equipment generates, uses, and can radiate radio frequency energy and, if not installed and used in
accordance with the installation instructions, may cause harmful interference to radio communications.
However, there is no guarantee that interference will not occur in a particular installation. If this equipment
does cause harmful interference to radio or television reception, which can be determined by turning the
equipment
off and on, the user is encouraged to try to correct the interference by one or more of the following measures:
• Reorient or relocate the receiving antenna of the affected receiver.
• Increase the separation between the XM equipment and the affected receiver.
• Connect the XM equipment into an outlet on a circuit different from that to which the affected receiver is connected.
• Consult the dealer or an experienced radio/TV technician for help.
WARNING! The FCC and FAA have not certified this Satellite Radio Receiver for use in any aircraft (neither
portable nor permanent installation). Therefore, XM Satellite Radio cannot support this type of application or
installation.
17
Warranty
12 Month Limited Warranty
AUDIOVOX ELECTRONICS CORPORATION (the Company) warrants to the original retail purchaser of this product that should under normal use and conditions, be proven defective in
material or workmanship within 12 months from the date of original purchase, such defect(s)
will be repaired or replaced with new or reconditioned product (at the Company’s option)
without charge for parts and repair labor.
To obtain repair or replacement within the terms of this Warranty, the product is to be delivered with proof of warranty coverage (e.g. dated bill of sale), specification of defect(s), transportation prepaid, to an approved warranty station or the Company at the address shown on
the next page.
This Warranty does not extend to the elimination of externally generated static or noise, damage to speakers from extended play at excessive volumes, malfunction of satellite transmissions, repeater signal or receiver unit.
This Warranty does not apply to any product in the opinion of the Company that has been
damaged through alteration,improper installation, mishandling, misuse, neglect, accident, or
by removal or defacement of the factory serial number/bar code label(s).
THE EXTENT OF THE COMPANY’S LIABILITY UNDER THIS WARRANTY IS LIMITED TO THE REPAIR
OR REPLACEMENT PROVIDED ABOVE AND, IN NO EVENT, SHALL THE COMPANY’S LIABILITY
EXCEED THE PURCHASE PRICE PAID BY PURCHASER FOR THE PRODUCT.
18
This Warranty is in lieu of all other express warranties or liabilities. ANY IMPLIED WARRANTIES, INCLUDING ANY IMPLIED WARRANTY OF MERCHANTABILITY, SHALL BE LIMITED TO
THE DURATION OF THIS WRITTEN WARRANTY. ANY ACTION FOR BREACH OF ANY WARRANTY HEREUNDER MUST BE BROUGHT WITHIN 24 MONTHS FROM DATE OF ORIGINAL
PURCHASE. IN NO CASE SHALL THE COMPANY BE LIABLE FOR ANY CONSEQUENTIAL OR
INCIDENTAL DAMAGES FOR BREACH OF THIS OR ANY OTHER WARRANTY. No person or
representative is authorized to assume for the Company any liability other than expressed
herein in connection with the sale of this product.
Some states do not allow limitations on how long an implied warranty lasts or the exclusion
or limitation of incidental or consequential damage so the above limitations or exclusions
may not apply to you. This Warranty gives you specific legal rights and you may also have
other rights which vary from state to state.
U.S.A. : AUDIOVOX ELECTRONICS CORPORATION, 150 MARCUS BLVD., HAUPPAUGE, NEW
YORK 11788 1-800-645-4994
CANADA : CALL 1-800-645-4994 FOR LOCATION OF WARRANTY STATION SERVING YOUR
AREA
19
XMBB1