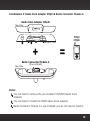
1
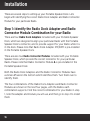
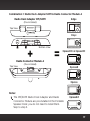
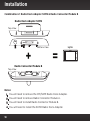
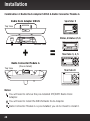
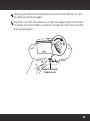
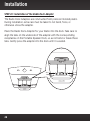
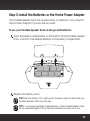
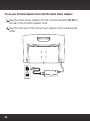
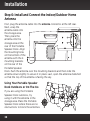
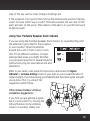
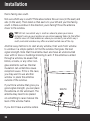
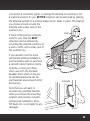
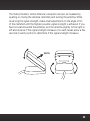
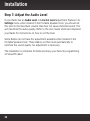
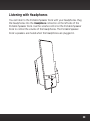
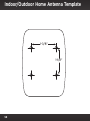
If you experience problems with the operation
or performance of your SiriusXM product,
DO NOT RETURN THIS PRODUCT
TO YOUR RETAILER.
Call SiriusXM Listener Care at 1-866-635-2349
and speak to one of our service representatives.
Table of Contents
Introduction . . . . . . . . . . . . . . . . . . . . . . . . . . . . . . . . . . . . . . . . . . . . . . . . . 5
Safety and Care Information. . . . . . . . . . . . . . . . . . . . . . . . . . . . . . . . . . . . . . . . . . . . . . . . 7
What’s in the Box? . . . . . . . . . . . . . . . . . . . . . . . . . . . . . . . . . . . . . . . . . . . . . . . . . . . . . . . . 9
Portable Speaker Dock Controls and Connections . . . . . . . . . . . . . . . . . . . . . . . . . . . 10
Remote Control Functions . . . . . . . . . . . . . . . . . . . . . . . . . . . . . . . . . . . . . . . . . . . . . . . . 12
Remote Control Battery Replacement. . . . . . . . . . . . . . . . . . . . . . . . . . . . . . . . . . . . . . 13
Installation . . . . . . . . . . . . . . . . . . . . . . . . . . . . . . . . . . . . . . . . . . . . . . . . . .15
Step 1: Identify the Radio Dock Adapter and Radio Connector Module
Combination for your Radio . . . . . . . . . . . . . . . . . . . . . . . . . . . . . . . . . . . . . . . . . . . . . 16
Step 2: Install the Radio Connector Module and Radio Dock Adapter . . . . . . . . . . 21
Step 3: Install the Batteries or the Home Power Adapter. . . . . . . . . . . . . . . . . . . . . . 27
Step 4: Insert the Radio into the Portable Speaker Dock. . . . . . . . . . . . . . . . . . . . . . 29
Step 5: Turn the Portable Speaker Dock and Radio On . . . . . . . . . . . . . . . . . . . . . . . 29
Step 6: Install and Connect the Indoor/Outdoor Home Antenna. . . . . . . . . . . . . . . 30
Step 7: Adjust the Audio Level. . . . . . . . . . . . . . . . . . . . . . . . . . . . . . . . . . . . . . . . . . . . . 36
Using Your Portable Speaker Dock . . . . . . . . . . . . . . . . . . . . . . . . . . . . . 37
Adjusting the Volume. . . . . . . . . . . . . . . . . . . . . . . . . . . . . . . . . . . . . . . . . . . . . . . . . . . . . 38
Listening with Headphones. . . . . . . . . . . . . . . . . . . . . . . . . . . . . . . . . . . . . . . . . . . . . . . . 39
Playing Other Devices Through Your Portable Speaker Dock. . . . . . . . . . . . . . . . . 40
Troubleshooting . . . . . . . . . . . . . . . . . . . . . . . . . . . . . . . . . . . . . . . . . . . . . 41
Product Specifications. . . . . . . . . . . . . . . . . . . . . . . . . . . . . . . . . . . . . . . . 45
Copyrights and Trademarks. . . . . . . . . . . . . . . . . . . . . . . . . . . . . . . . . . . . 48
Environmental Information . . . . . . . . . . . . . . . . . . . . . . . . . . . . . . . . . . . . 49
Indoor/Outdoor Home Antenna Template. . . . . . . . . . . . . . . . . . . . . . . . 50
SiriusXM 90-Day Limited Warranty. . . . . . . . . . . . . . . . . . . . . . . . . . . . . .51
3
4
Introduction
5
Introduction
Thank you for purchasing the SiriusXM Portable Speaker Dock for
Sirius, XM, and SiriusXM Dock & Play Radios and XMp3 Radios.
The SiriusXM Portable Speaker Dock lets you enjoy your favorite
programming at home or at the office, the patio, park, or anywhere in
between.
• Compatible with these Sirius Radios: Sportster 5, Starmate 3, 4, 5,
and 8, and Stratus 4, 5, and 6.
• Compatible with these XM Radios: Onyx, Xpress RCi, XpressRC,
XpressR, Xpress, XpressEZ, XMp3i®, and Pioneer XMp3.
• Compatible with these SiriusXM Radios: Lynx and Edge.
• Dynamic sound indoors and out: Crisp highs and solid bass from
component tweeters and wide range mid/bass speakers.
• Easy and convenient portability: Take satellite radio to go with a
built-in Indoor/Outdoor Home Antenna cradle and cable storage. 8
C size alkaline batteries required for portable use (sold separately).
• Built-in Headphone and Aux In connectors: Listen privately using the
Headphone connector. Play MP3 players, CDs or other audio devices
via the Aux In connector (Aux In Cable sold separately).
And for the latest information about this and other SiriusXM products and
accessories, visit www.siriusxm.com/accessories.
Please read this entire User Guide before installing your Portable Speaker
Dock!
6
Safety and Care Information
IMPORTANT! Always read and understand all the instructions to avoid
injury to yourself and/or damage to your device. Sirius XM Radio Inc.
disclaims all responsibility for damage from data loss due to breakdown,
repair, or other causes.
• Do not expose to extreme temperatures above 140°F (60°C) or
below -4°F (-20°C).
• Do not expose to moisture. Do not use device near or in water. Do
not touch the device with wet hands.
• Do not let any foreign matter spill into device.
• Do not store in dusty areas.
• Do not expose to chemicals such as benzene and thinners. Do not
use liquid or aerosol cleaners. Clean with a soft damp cloth only.
• Do not expose to direct sunlight for a prolonged period of time, and
do not expose to fire, flame, or other heat sources.
• Do not try to disassemble and/or repair device yourself.
• Do not drop your device or subject it to severe impact.
• Do not place heavy objects on device.
• Do not subject device to excessive pressure.
• This product contains chemicals known to the State of California to
cause cancer and birth defects or other reproductive harm.
7
Introduction
WARNING!
• Opening the case may result in electric shock.
• Make sure that you insert the Home Power Adapter’s plug all the way
into the outlet.
• Insert the Radio into the Portable Speaker Dock only when the
Portable Speaker Dock is off.
Cleaning
DANGER! Unplug the Home Power Adapter and/or remove the batteries
during cleaning to avoid any electrical shock hazard.
Clean the hard surfaces of the Portable Speaker Dock with optical-grade
microchamois or microfiber cloth. Clean the soft surfaces of the speakers
with a dry lint brush.
• Do not use paper products to clean the Portable Speaker Dock.
Paper products may feel soft to the touch but they are too rough for
the top surface of the Portable Speaker Dock where the buttons and
volume controls are located.
• Do not use any type of abrasive pad or scouring powder to clean
the Portable Speaker Dock. Doing so will scratch the finish and may
damage the controls.
• Do not use solvents such as alcohol or benzene, or any product that
has alcohol in it (such as Windex®), to clean the Portable Speaker
Dock.
8
What’s in the Box?
power
volume
Radio Dock Adapters
aux in
XM/SXM1 (Pre-installed)
SXM2
SiriusXM BB2 Portable Speaker Dock
XMp3
SIRIUS
Radio Connector Module A
(Pre-installed)
Radio Connector Module B
mute
select
band/
fav
memo/
info
menu
display
Indoor/Outdoor
Home Antenna
Home Power Adapter
Power Cord
Remote Control
9
Introduction
Portable Speaker Dock Controls and Connections
Front View
power
aux in
volume
Radio Dock Connector
Connector for your Radio.
(Interchangeable for different
model Radios.)
Radio Dock Adapter
Provides alignment and
support for your Radio.
(Interchangeable for
different model Radios.)
Volume/Mute Control
Sliding a finger in a circular motion
on the volume control increases or
decreases the volume level. Pressing
twice mutes the audio and a circle of
blue lights will flash while muted.
Top View
Volume Level
Lights
Lights indicate
volume level.
Power Button
Pressing and holding until the
Power On light is on turns the
power On. Pressing and holding
again turns the power Off.
power
volume
aux in
Power On/Low Battery Light
The light is steady blue when
the Portable Speaker Dock is
powered on; the light blinks
Aux In Button
Aux In Light
when the batteries are nearly
Pressing and holding until the Aux In When on, Portable
discharged.
light is on switches audio output to Speaker Dock is set
Aux In input. Pressing and holding
to Aux In input.
again switches to satellite radio.
10
Rear View
Antenna Storage
Storage area for the
Indoor/Outdoor Home Antenna.
antenna
14V DC
Antenna Connection
Connection for the
Indoor/Outdoor Home
Antenna.
Antenna Cable Storage
Storage area for the
Indoor/Outdoor Home
Antenna cable.
14V DC Power Connection
Connection for the
Home Power Adapter.
Battery Compartment
Requires 8 C size alkaline
batteries (sold separately).
Side View
Bottom View
Aux In
Connection for
audio from an
external device.
aux in
Headphones
Connection for
headphones.
Radio Connector Module Lock
Locks and unlocks the
Radio Connector Module.
11
Introduction
Remote Control Functions
The functions of the Remote Control are dependent upon the Radio you
are using. Please consult the User Guide which accompanied your Radio for
specific features.
Power Button
Turns Radio on and off.
Select Button
Press to confirm selection of
highlighted items in a menu
or list; for Sirius radios, when
not in a menu or list, press
first before entering the
channel number, to directly
tune to a channel.
Pause and Replay Buttons
Pause, rewind, and replay
live radio.
Band/Fav Button
Press and release to switch
between the favorite channel
preset banks.
Memo/Info Button
Press and release to save
artists and songs on Sirius
Radios.
Menu Button
Access advanced features
and configuration options.
Number Buttons
Select your favorite channels,
or enter a channel number.
Display Button
Customize the way you view
content on the display.
12
Mute Button
Silences the audio.
mute
select
band/
fav
menu
display
memo/
info
Left and Right Buttons
Press and release to
search for channels by
category.
Up and Down Buttons
Press to preview and
tune channels through
the channel lineup; also
scroll through lists and
highlight menu options.
+ and – Buttons
Increase or decrease the
audio volume.
FM Presets Button
Press to access and
cycle through FM
presets. This button has
no function when the
Radio is in the Portable
Speaker Dock.
Jump Button
Directly access traffic
and weather of the 20
most congested cities;
access the previous
channel or a favorite
channel.
Remote Control Battery Replacement
To install the Remote Control battery, turn the Remote Control over and
locate and open the battery cover near the bottom edge. While holding
the battery at an angle, place the
Insert Battery
battery in the compartment with the
“+” Side Up
Remove
+ side of the battery facing up. Then
Cover
press the battery down and into the
battery compartment. Replace the
+
cover.
13
14
Installation
15
Installation
There are several steps to setting up your Portable Speaker Dock. Let’s
begin with identifying the correct Radio Dock Adapter and Radio Connector
Module for your particular Radio.
Step 1: Identify the Radio Dock Adapter and Radio
Connector Module Combination for your Radio
There are four Radio Dock Adapters included with your Portable Speaker
Dock, which are designed to align your particular Radio with the Portable
Speaker Dock’s connector, and to provide support for your Radio while it is
in the dock. Please note that Radio Dock Adapter XM/SXM1 is pre-installed
in the Portable Speaker Dock.
There are also two Radio Connector Modules included with your Portable
Speaker Dock, which provide the correct connector for your particular
Radio. Please note that Radio Connector Module A is pre-installed in the
Portable Speaker Dock.
Both the Radio Dock Adapters and the Radio Connector Modules have
a sticker affixed on the bottom which identifies them. Turn them over to
identify them.
The four combinations of the Radio Dock Adapters and Radio Connector
Modules are shown on the next four pages, with the Radios each
combination supports. Find the correct combination for your Radio in step
1, note the adapter and module you will use, and then go to step 2 to install
them.
16
Combination 1: Radio Dock Adapter SXM1 & Radio Connector Module A
Radio Dock Adapter XM/SXM1
Edge
(Pre-Installed)
menu
fm
1
2
3
4
5
6
7
8
9
0
#
Top View
jump
Onyx
XM
SXM1
menu
XM/SXM1
FM
jump
+
Bottom View
Radio Connector Module A
Top View
=
1
2
3
4
5
6
7
8
9
0
direct
XpressRCi & XpressRC
(Pre-installed)
XpressR
Xpress
lay s ea rc h
disp
men u
Notes:
1. The XM/SXM1 Radio Dock Adapter and Radio
Connector Module are pre-installed in the Portable
Speaker Dock; you do not need to install them.
Skip to step 3.
mem .
ju mp
1
2
3
4
5
6
7
8
9
r.
pr e. d i
0
XpressEZ
17
Installation
Combination 2: Radio Dock Adapter SXM2 & Radio Connector Module B
Radio Dock Adapter SXM2
Top View
SXM2
SXM2
Bottom View
+
=
Radio Connector Module B
Top View
Notes:
1. You will need to remove the XM/SXM1 Radio Dock Adapter.
2. You will need to remove Radio Connector Module A.
3. You will need to install Radio Connector Module B.
4. You will need to install the SXM2 Radio Dock Adapter.
18
Lynx
Combination 3: Radio Dock Adapter XMp3i & Radio Connector Module A
Radio Dock Adapter XMp3i
Top View
XMp3
XMp3
XMp3i
XMP3
Bottom View
+
=
Radio Connector Module A
Top View
(Pre-installed)
Notes:
1. You will need to remove the pre-installed XM/SXM1 Radio Dock
Adapter.
2. You will need to install the XMp3i Radio Dock Adapter.
3. Radio Connector Module A is pre-installed; you do not need to install it.
19
Installation
Combination 4: Radio Dock Adapter SIRIUS & Radio Connector Module A
Radio Dock Adapter SIRIUS
Sportster 5
Top View
SIRIUS
Stratus, & Stratus 4, 5, 6
SIRIUS
Bottom View
+
=
sel
menu
jump
Starmate 3, 4, 5
Radio Connector Module A
Top View
(Pre-installed)
Starmate 8
menu
FM
jump
1
2
3
4
5
6
7
8
9
0
direct
Notes:
1. You will need to remove the pre-installed XM/SXM1 Radio Dock
Adapter.
2. You will need to install the SIRIUS Radio Dock Adapter.
3. Radio Connector Module A is pre-installed; you do not need to install it.
20
Step 2: Install the Radio Connector Module and Radio
Dock Adapter
In this step, you will install the Radio Connector Module, if necessary, and
Radio Dock Adapter, according to the combination for your Radio which you
determined from the previous step.
• Combination 1: Skip this step. The adapter and module are already
installed in the Portable Speaker Dock.
• Combination 2: You will remove the pre-installed adapter, remove
the pre-installed module, install Radio Connector Module B, and install
Radio Dock Adapter SXM2.
• Combination 3 & 4: You will remove the pre-installed adapter, and
install the Radio Dock Adapter for your Radio. Skip step 2B.
21
Installation
STEP 2A: Removal of the Radio Dock Adapter
The Radio Dock Adapters are constructed from precision molded plastic.
During removal, extra care must be taken to not bend, force, or otherwise
stress the adapter.
Remove the Radio Dock Adapter from the Portable Speaker Dock by
placing a coin, or your fingernail, into the slot at the back of the adapter,
and pulling it up.
power
22
volume
aux in
STEP 2B: Removal and Installation of the Radio Connector Module
This step applies only to Combination 2. For all other combinations, skip
ahead to step 2C on page 26.
a. Turn the Portable Speaker Dock upside down, and locate the Radio
Connector Module Lock.
b. While grasping the Portable Speaker Dock as shown, place a small coin
into the center slot on the lock and turn the lock counterclockwise to
unlock the Radio Connector Module.
Coin
Radio Connector
Module Lock
23
Installation
c. Turn the Portable Speaker Dock upright. Place a finger in each of the
finger recesses in the Radio Connector Module, grasp, and gently pull
the module straight up and out of the Portable Speaker Dock.
Finger Recess
Finger Recess
Radio Connector Module Top View
d. Insert the Radio Connector Module B into the dock as shown.
power
24
volume
aux in
e. Keeping your hand on the module to prevent it from falling out, turn
the dock upside down again.
f. Place the coin into the center slot on the lock again, and turn the lock
clockwise to lock the Radio Connector Module into the dock. Turn the
dock upright again.
Coin
Radio Connector
Module Lock
25
Installation
STEP 2C: Installation of the Radio Dock Adapter
The Radio Dock Adapters are constructed from precision molded plastic.
During installation, extra care must be taken to not bend, force, or
otherwise stress the adapter.
Place the Radio Dock Adapter for your Radio into the dock. Take care to
align the tabs on the underside of the adapter with the corresponding
receptacles on the Portable Speaker Dock, so as not bend or break these
tabs. Gently press the adapter into the dock until it is seated.
power
26
volume
aux in
Step 3: Install the Batteries or the Home Power Adapter
The Portable Speaker Dock can operate either on batteries or by using the
Home Power Adapter if you are near an outlet.
To use your Portable Speaker Dock on-the-go with batteries:
1. Open the battery compartment on the bottom of the Portable Speaker
Dock. Insert 8 C size alkaline batteries in the battery compartment.
2. Replace the battery cover.
TIP! When the battery life is getting low the power light will blink and your
Portable Speaker Dock may not play.
TIP! It is not recommended to keep batteries in the Portable Speaker Dock
for an extended length of time. Remove the batteries when not in use.
27
To use your Portable Speaker Dock with the Home Power Adapter:
1. Plug the Home Power Adapter into the connector labeled 14V DC at
the rear of the Portable Speaker Dock.
2. Plug the other end of the Home Power Adapter into a standard wall
outlet.
antenna
28
14V DC
Step 4: Insert the Radio into the Portable Speaker Dock
1. Be sure the Portable
Speaker Dock is powered
off.
power
volume
aux in
2. Align the Radio with the
Radio Dock Adapter.
3. Once aligned, gently press
the Radio down, so that
it slides down the back of
the Radio Dock Adapter
and onto the connector,
and is fully seated in the
Portable Speaker Dock.
Step 5: Turn the Portable Speaker Dock and Radio On
1. Press and hold the Power button on the top of the Portable Speaker
Dock until the Power On light is on.
2. If your Radio did not automatically power on, press the Power button
on your Radio.
power
volume
aux in
29
Installation
Step 6: Install and Connect the Indoor/Outdoor Home
Antenna
First, plug the antenna cable into the antenna connector at the left rear.
Next, wrap the
antenna cable into
the storage area.
Then, place the
antenna into the
storage area at the
rear of the Portable
Speaker Dock. Align
the mounting holes
on the bottom of the
antenna with the 4
mounting brackets
on the rear of the
Portable Speaker
Dock. Push the antenna over the mounting brackets and then slide the
antenna down slightly to secure it in place. Last, open the antenna clamshell
so that the top of the antenna is facing the sky.
Using Your Portable Speaker
Dock Outdoors or On-The-Go
If you are using the Portable
Speaker Dock outdoors, try
using it with the antenna in the
storage area. Place the Portable
Speaker Dock where there are no
obstructions to block the antenna’s
30
S
view of the sky, such as trees, bridges, buildings, etc.
If the reception is not good, then remove the antenna and position it facing
south. Not sure which way is south? Think about where the sun rises (in the
east) and sets (in the west). Then stand so that east is to your left and you’ll
be facing south.
Using Your Portable Speaker Dock Indoors
If you are using the Portable Speaker Dock indoors try experimenting with
the antenna to get a feel for the reception
in your location. Move the antenna
around the room or from room to room.
Aim it from different windows. In major
metropolitan areas, you might find that
you get great reception in several locations
without worrying too much about aim and
placement.
Refer to your radio’s User Guide for instructions, and access the Signal
Indicator or Antenna Aiming screen of your radio to see a visual indication of
signal strength. If you’re receiving good Satellite and Terrestrial signal strength,
you’re done. If not, try some of the
suggestions which follow.
Other Indoor/Outdoor Antenna
Installation Suggestions:
If you find you are getting a signal,
but it’s inconsistent, try moving the
Indoor/Outdoor Home Antenna
closer to a window, ideally one
S
31
Installation
that is facing due south.
Not sure which way is south? Think about where the sun rises (in the east) and
sets (in the west). Then stand so that east is to your left and you’ll be facing
south. Is there a window in the direction you’re facing? Move the antenna
closer to the window.
TIP! Still not sure which way is south or where to place your Home
Antenna? Look up your location on an online mapping Web site that offers
satellite views of street addresses where you can easily see which way is
south, and what window may offer an unobstructed view of the sky.
Another easy method is to start at any window, then work from window
to window in a simple pattern to find the window that gives the best
signal strength. Note that the antenna must also have an unobstructed
view with no trees or buildings blocking its aim. If the antenna is aimed
through a window, be aware that
blinds, screens, or any other nonglass elements such as thermal
insulation can sometimes cause
reception issues. If this is the case,
you may want to use another
window or place the antenna
outside of the window.
If you find a window that gives you
good signal strength, you can place
the antenna on the windowsill. The
antenna may need to be placed
on something to raise it above the
level of the window frame.
If you don’t have a window where
32
SOUTH
you receive a consistent signal, or placing the antenna in a window is not
a practical solution for you, BETTER reception can be achieved by placing
the antenna outside on a window ledge, porch, table, or patio. The location
you choose should provide the
antenna with a clear view of the
southern sky.
SOFFIT
If none of the previous solutions
work for you, then the BEST
reception can be achieved by
mounting the antenna outdoors on
a wall or soffit, with a clear view of
the southern sky.
If you decide to do this more
permanent antenna installation,
you’ll probably want to purchase
a second Indoor/Outdoor Home
Antenna, so that you’ll have
one to use with the Portable
Speaker Dock when on-the-go.
An additional antenna can be
purchased at www.siriusxm.com/
accessories.
Note that you will want to
consider any potential hazards
when you choose the mounting
location, and possibly consider
professional installation. Sirius
XM Radio Inc. is not liable for any
damages.
SOUTH
OUTDOORS
SOUTH
33
Installation
To mount the antenna, you will need four
screws (sold separately) with a 1/4” head
(e.g., a #4 screw), and that are suitable for
the material onto which you are affixing the
antenna, (e.g., wood, metal, etc.). The screws
should be spaced 1-3/8” apart horizontally
and 1-1/8” vertically. Refer to the “Indoor/
Outdoor Home Antenna Template” on page
50.
1-3/8 in
1-1/8 in
Once you have found a suitable location for
the antenna, route the antenna cable to the
Portable Speaker Dock. Be sure you avoid
any obstructions that could crimp, kink, or twist the cable. Use protective
grommets wherever rough openings are encountered. If the antenna is
installed outdoors, route the cable from the antenna location to the interior
of the home, working the cable through the basement, under a window sill,
etc., and make adjustments to take up cable slack as necessary.
TIP! If your Indoor/Outdoor Home Antenna’s cable isn’t long enough, visit
sirius.com/accessories, or xmradio.com, and consider a 50 ft. Indoor/
Outdoor Home Antenna Extension Cable or a Wireless Home Signal
Repeater.
If the signal is good for either Satellite or Terrestrial (or both), and you
are hearing the audio from the radio, the antenna installation is complete.
(Refer to your radio’s User Guide for instructions on how to access the Signal
Indicator or Antenna Aiming screen.)
If the signal reception is low, or intermittent, try another location for the
antenna. Verify that the antenna is pointed south, and that the antenna’s
view of the sky is not blocked by a tree, a building, a bridge, or anything else.
Adjust until you are receiving a good signal.
34
The Indoor/Outdoor Home Antenna’s reception can also be tweaked by
opening or closing the antenna clamshell, and turning the antenna. While
observing the signal strength, make small adjustments to the angle of tilt
of the clamshell until the highest possible signal strength is achieved. If you
have not wall-mounted the antenna, turn the antenna slightly to the right or
left and observe if the signal strength increases. For each tweak, allow a few
seconds in each position to determine if the signal strength increases.
SOUTH
35
Installation
Step 7: Adjust the Audio Level
If your Radio has an Audio Level or Line Out Level adjustment feature in its
Settings menu, when docked in the Portable Speaker Dock, you should set
this level to the maximum volume that does not cause distorted sound. This
will maximize the audio quality. Refer to the User Guide which accompanied
your Radio for instructions on how to set the level.
Some Radios do not have this adjustment available when docked in the
Portable Speaker Dock. These Radios set their level automatically to
optimize the sound quality. No adjustment is necessary.
The installation is complete. Sit back and enjoy your favorite programming
on SiriusXM radio!
36
Using Your Portable Speaker Dock
37
Using Your Portable Speaker Dock
Adjusting the Volume
The volume of the Portable Speaker Dock is adjusted by dragging your
finger clockwise and counterclockwise around the volume control. As you
adjust the volume, an inner circle of blue lights will light to confirm you are
adjusting the volume. The outer circle of blue lights indicates the volume
level.
power
volume
aux in
The audio can be muted by pressing the volume control twice. The outer
circle of blue lights will blink to indicate the Radio is muted. Press twice
again to un-mute the Radio.
38
Listening with Headphones
You can listen to the Portable Speaker Dock with your headphones. Plug
the headphones into the Headphone connector on the left side of the
Portable Speaker Dock. Use the volume control on the Portable Speaker
Dock to control the volume of the headphones. The Portable Speaker
Dock’s speakers are muted when the headphones are plugged in.
aux in
39
Using Your Portable Speaker Dock
Playing Other Devices Through Your Portable Speaker
Dock
The Portable Speaker Dock also has an Aux In connector on the left side for
connecting MP3 players, CD players, or other audio devices using an Aux In
Cable (sold separately). When you plug a device into the Aux In connector,
press and hold the Aux In button on the top of the Portable Speaker Dock
until the Aux In light is on, to switch from radio mode to Aux In mode.
power
aux in
40
volume
aux in
Troubleshooting
41
Troubleshooting
Your Portable Speaker Dock has been designed and built to be trouble-free,
but if you experience a problem, try this:
• Check that all connections are firm and secure.
• Make sure you have connected the Portable Speaker Dock as described
in this User Guide. Verify that the power receptacle is working.
If you see this on the screen:
Try this:
Acquiring Signal
•Aim the antenna south. Not sure which way is
south? Think about where the sun rises (in the
east) and sets (in the west). Then stand so that
east is to your left and you’ll be facing south.
•If you are in a building, is there a window in the
direction you’re facing? Place the antenna in the
window. Refer to page 31.
No Antenna
Check Antenna
Check Satellite Antenna
•Make sure that the Indoor/Outdoor Home
Antenna cable is firmly and securely plugged
into the Portable Speaker Dock. Make sure the
cable is not bent or broken.
•The Radio is not completely seated into the
Portable Speaker Dock. Re-seat the Radio into
the Portable Speaker Dock.
No Satellite Signal
No Satellite Radio Signal
•Move the antenna to a south-facing window.
Not sure which way is south? Think about where
the sun rises (in the east) and sets (in the west).
Then stand so that east is to your left and
you’ll be facing south. Is there a window in the
direction you’re facing?
•You may need to find a better location for the
antenna. Refer to “Step 6: Install and Connect the
Indoor/Outdoor Home Antenna” on page 30.
42
If this happens:
Try this:
Portable Speaker Dock does
not function as described in this
User Guide
•Reset the Portable Speaker Dock by unplugging
the Home Power Adapter and removing the
batteries. Wait one minute, then install the
batteries and connect the Home Power Adapter.
Portable Speaker Dock is not
responding to any button
presses
When I dock my Radio in the
Portable Speaker Dock, nothing
seems to happen
•Verify that the Radio Connector Module for your
Radio (A or B) has been properly installed. Refer
to “Step 2: Install the Radio Connector Module
and Radio Dock Adapter” on page 21.
I hear noise or interference
•Move the Portable Speaker Dock away from any
cordless telephones, electrical appliances, or
other devices that may cause interference.
Portable Speaker Dock does not
turn on
•The Home Power Adapter is not connected, or
the power outlet into which it is plugged is not
working. Check that the Home Power Adapter
is connected to the Portable Speaker Dock.
Try plugging the Home Power Adapter into a
different outlet.
•Batteries are not installed, are installed incorrectly,
or are bad. Install new alkaline batteries, if
necessary, observing the correct polarity.
Portable Speaker Dock will not
operate on batteries
•When the Home Power Adapter is connected
to the Portable Speaker Dock, the battery
operation is disabled. Disconnect the Home
Power Adapter.
•If the power light is blinking, this indicates that
the batteries need to be replaced. Install new
alkaline batteries, observing the correct polarity.
43
Troubleshooting
If this happens:
Try this:
No sound from the Portable
Speaker Dock speakers
•The volume level is too low. Increase the volume
by sweeping your finger in a clockwise direction
on the Volume control.
•Headphones are connected to the Portable
Speaker Dock. Disconnect the headphones.
•An audio device is connected to the Aux In
connection and is not producing sound. Press
and hold the Aux In button to select audio
output from the Radio.
•Make sure that the Radio is not muted. Press
the Mute button on the Remote Control.
The minimum volume level
is too loud or the maximum
volume is too quiet
•Increase the Audio Level or Line Out Level of
your Radio until the sound quality improves.
Refer to the User Guide which accompanied
your Radio for instructions.
I only receive channel 184 on my
Sirius Radio
I only receive channel 0 and 1 on
my XM Radio
•Make sure your Radio is subscribed to the
SiriusXM service.
•Before you subscribe, be sure to read our
SiriusXM Customer Agreement for complete
terms, available at www.siriusxm.com.
Then go to www.siriusxm.com/activatenow to
access or set up an online account, subscribe
to the service, and activate your Radio, or call
1-866-635-2349.
My Radio’s Remote Control
doesn’t work
•Make sure that the sensors which receive
the signal from the Remote Control are not
obstructed. These are located on the front
panel of the Portable Speaker Dock.
•It may be time to replace the battery in the
Remote Control. Refer to “Remote Control
Battery Replacement” on page 13.
44
Product Specifications
45
Product Specifications
System
Power Requirements
Operating
Power
Frequency Response 14V DC, or 8 C size alkaline batteries
-13°F ~ 158°F (-25°C ~ 70°C)
15W RMS per channel (max)
60 Hz – 20KHz
Portable Speaker Dock
Dimensions Weight
Aux-In Connector Antenna Connector
Headphones Connector
13.75 in (Width) x 7 in (Height) x
3.75 in (Depth)
(350 mm (Width) x 178 mm (Height) x
95 mm (Depth))
3.9 lbs (1.78 kg) without batteries
1/8 in (3.5 mm) Female
SMB Male
1/8 in (3.5 mm) Female
Home Power Adapter
Input
Output
100-240V AC, 50-60Hz, 1 A
14V DC, 3 A
Indoor/Outdoor Home Antenna
Type
Connector
Cable Length
SiriusXM Indoor/Outdoor
SMB female, right angle
21 ft (6.4 m)
Remote Control
Dimensions: Weight:
Battery:
46
1.6 in (Width) x 4.1 in (Height) x
0.7 in (Depth)
41 mm (Width) x 105 mm (Height) x
18 mm (Depth)
1.3 oz (37 g)
CR2032 (3V)
FCC Statement
The user is cautioned that changes or modifications not expressly approved by Sirius
XM Radio Inc. can void the user’s authority to operate this device.
This device complies with Part 15 of the FCC Rules. Operation is subject to the
following two conditions:
1. This device may not cause harmful interference.
2. This device must accept any interference received, including interference
that may cause undesired operation.
This equipment has been tested and found to comply with the limits for a Class B
digital device, pursuant to Part 15 of the FCC Rules. These limits are designed to
provide reasonable protection against harmful interference in a residential installation.
This equipment generates, uses, and can radiate radio frequency energy and, if not
installed and used in accordance with the installation instructions, may cause harmful
interference to radio communications. However, there is no guarantee that interference
will not occur in a particular installation. If this equipment does cause harmful
interference to radio or television reception, which can be determined by turning the
equipment off and on, the user is encouraged to try to correct the interference by one
or more of the following measures:
• Reorient or relocate the receiving antenna of the affected receiver.
• Increase the separation between the SiriusXM equipment and the affected
receiver.
• Connect the SiriusXM equipment into an outlet on a circuit different from that
to which the affected receiver is connected.
• Consult the dealer or an experienced radio/TV technician for help.
WARNING! The FCC and FAA have not certified Satellite Radio Receiver use in any
aircraft (neither portable nor permanent installation). Therefore, Sirius XM Radio Inc.
cannot support this type of application or installation.
47
Copyrights and Trademarks
©2012 Sirius XM Radio Inc. Sirius, XM and all related marks and logos are
trademarks of Sirius XM Radio Inc. Visit www.siriusxm.com/channellineup
for updates. All programming subject to change or preemption. All other
marks and logos are the property of their respective owners. All rights
reserved.
It is prohibited to, and you agree that you will not, copy, decompile,
disassemble, reverse engineer, hack, manipulate, or otherwise access and/or
make available any technology incorporated in this product. Your use of the
SiriusXM audio services is governed by the applicable customer agreement.
Our satellite service is available only to those at least 18 and older in the 48
contiguous USA and DC. Our Sirius satellite service is also available in PR
(with coverage limitations). Our Internet radio service is available throughout
our satellite service area and in AK and HI. Certain channels are not available
on our Internet radio service, including MLB® play-by-play.
This product contains chemicals known to the State of California to cause
cancer and birth defects or other reproductive harm.
48
Environmental Information
Follow local guidelines for waste disposal when discarding packaging and
electronic appliances.
Perchlorate Material - special handling may apply. See www.dtsc.ca.gov/
hazardouswaste/perchlorate (Applicable to California, U.S.A.)
49
Indoor/Outdoor Home Antenna Template
1-3/8”
1-1/8”
50
SiriusXM 90-Day Limited Warranty
What This Warranty Covers
This warranty covers defects in material and workmanship for 90 days from the date of purchase
by the original retail purchaser only. Sirius XM Radio Inc., at its sole option, will repair or replace the
product with a new or reconditioned product without charge for parts and labor. Products replaced
under this warranty become the property of SiriusXM. Replacement products are warranted to be
free from defects for 30 days or the remainder of the original warranty, whichever is longer.
What This Warranty Does Not Cover
This warranty does not cover: products sold as used, as is, reconditioned or refurbished; software
stored on internal or removable memory; non-rechargeable batteries, surface preparation cleaners,
adhesive pads, fasteners, and ear-buds; costs incurred for installation, removal or reinstallation of
the product; correction of installation problems, such as elimination of externally generated static
or noise and antenna placement and aiming; defects or damage caused by alteration, improper
installation or removal, use of third party accessories, mishandling, misuse, neglect, accident, power
surges or acts of nature.
How to Obtain Warranty Service
To obtain warranty service, please call SiriusXM Listener Care at 1-866-635-2349. You will be required
to provide proof of purchase and a description of the defect. You must prepay the cost of shipping
the product to an approved service center.
LIMITATIONS OF LIABILITY
THE LIABILITY OF SIRIUSXM UNDER THIS WARRANTY IS LIMITED TO REPAIR OR REPLACEMENT
AS PROVIDED ABOVE AND, IN NO EVENT, SHALL THE LIABILITY EXCEED THE PURCHASE PRICE
PAID FOR THE PRODUCT. ANY IMPLIED WARRANTIES, INCLUDING ANY IMPLIED WARRANTY
OF MERCHANTABILITY OR FITNESS FOR A PARTICULAR PURPOSE, SHALL BE LIMITED TO
THE DURATION OF THIS WRITTEN WARRANTY. ANY ACTION FOR BREACH OF WARRANTY,
INCLUDING BREACH OF ANY IMPLIED WARRANTY OF MERCHANTABILITY, MUST BE BROUGHT
WITHIN 48 MONTHS FROM THE DATE OF ORIGINAL PURCHASE. IN NO CASE SHALL SIRIUSXM
BE LIABLE FOR ANY CONSEQUENTIAL OR INCIDENTAL DAMAGES FOR BREACH OF THIS OR
ANY OTHER WARRANTY, EXPRESS OR IMPLIED. SOME STATES DO NOT ALLOW LIMITATIONS ON
HOW LONG AN IMPLIED WARRANTY LASTS OR THE EXCLUSION OR LIMITATION OF INCIDENTAL
OR CONSEQUENTIAL DAMAGES, SO THE ABOVE LIMITATIONS OR EXCLUSIONS MAY NOT APPLY
TO YOU. This warranty gives you specific legal rights and you may also have other rights, which vary
from state to state.
Sirius XM Radio Inc.
1221 Avenue of the Americas
New York, NY 10020
1.866.635.2349
© 2012 Sirius XM Radio Inc.
SXABB2 SiriusXM Portable Speaker Dock 120104a
siriusxm.com