1
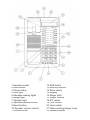
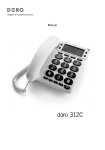
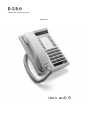
������ �� �������� �����
Manual
doro aub 6
STORE
1 Handset socket
2 Mute button
3 Pause button
4 Mute light
5 Message waiting lights
6 Ringer light
7 Speaker light
8 Speaker/headset button
9 Recall button
10 Speaker volume control
11 Redial button
12 Shift button
13 Memory buttons
14 Store button
15 Display
16 Ringer pitch
17 Ringer volume
18 E/T switch
19 Time button
20 Hook switch
21 Wall mounting hanger hook
22 Headset socket
English
Installation
Connection
1. Connect the curly cord to the handset and to the socket marked Handset
located on the left side of the telephone.
2. Carefully remove the battery cover from the underside of the telephone and
install 3 x AAA alkaline batteries observing correct polarity.
3. Connect the line cord to the telephone and network wall socket.
4. A click will be heard when the modular plug is correctly in place.
5. Lift the handset and listen for the dial tone. Your telephone is now
operational.
Making a call
1. Lift the handset, dial tone will be heard.
2. Dial the telephone number required.
3. Replace the handset to terminate the call.
Connection of a headset
A headset can be connected to the socket on the left side of the telephone marked
Headset.
Simply press the Speaker/Headset button to access an incoming call or dial tone,
press again to terminate the call.
While a headset is connected the Hands Free function will NOT operate.
IMPORTANT!
The AUB 6 MW is designed to operate with DORO original headsets. Other
manufacturer headsets may be used, although the function and sound quality cannot be
guaranteed.
Any damage occurring due to incompatible or non Doro headsets being installed, will not be
covered under the telephones guarantee.
Making a call using either Hands Free or Headset
1. Press Speaker/Headset. Dial tone will be heard and the speaker light will
illuminate.
2. Dial the telephone number required.
3. Press Speaker/Headset again to terminate the call.
www.doro.com
3
English
Installation
Volume Control
The hands free speaker volume/headset earpiece volume may be adjusted during
a call using the Volume control located on the right side of the unit.
To adjust the volume slide the switch to HI to increase the volume, or to LO to
decrease the volume.
Hearing Aid Compatible
This telephone is hearing aid compatible. Select the T mode on your hearing
aid to enable this feature.
Redial Button
If the number dialled is engaged or if you wish to redial the last number dialled
(up to a maximum of 32 digits), lift the handset (or press the Monitor/Headset
button) and press the LNR/II button.
Mute Button
The handset, hands free & headset microphone can be disabled during a call by
pressing the Mute button, the Mute light will illuminate.
Press the Mute button once more to reactivate the microphone.
Recall
Access to additional network services can be gained by using the Recall button,
select either TBR/ETH recall using the switch located at the top of the unit.
Press the Recall button followed by the extension number to transfer calls when
connected to a PBX (TBR and ETH).
Please contact your network operator for more information.
Ringer volume
The ringer volume can be adjusted (OFF/LO/HI) using the switch located at the
top of the unit.
Ringer pitch
The ringer pitch can be customised (LO/MID/HI) using the switch located at the
top of the unit.
4
www.doro.com
Installation
English
Memory
This telephone can store 30 (2 x15) numbers in memory buttons located above the
numeric keypad, using the Shift button allows each memory to store 2 telephone
numbers per location.
Once a number has been stored in a memory location, you need only to press one
or two buttons to make the call.
Storing Memories
1. Lift the handset or press speaker/headset.
2. Dial tone will be heard (from this point ignore anything you hear in the
earpiece).
3. Using a blunt instrument press and release the STORE button, then select
a location by pressing the corresponding direct memory button.
4. Alternatively, using a blunt instrument press and release the STORE button,
press the Shift button followed by the corresponding direct memory button.
5. Enter the number to be stored (up to 16 digits). Press STORE again.
6. Replace the handset or press speaker/headset again.
To insert a pause in the dialling sequence simply press the Pause button.
In case of a number change, store the new number in the location of the old one following the
above procedure
Dialling Memories
1. Lift the handset or press speaker/headset.
2. Dial tone will be heard.
3. Dial the desired number by pressing either the corresponding memory button,
or alternatively press the shift button followed by the corresponding memory
button.
www.doro.com
5
English
Other
Message Waiting Indicator
Many PBX systems use a function called Message Waiting. The telephone can
show if a call was received in you absence by flashing the Message Waiting
Indicator in standby mode. This function operates differently depending on the
PBX in question. Please contact the system controller for more information.
Message waiting
You can select between two types of Message Waiting systems: Neon (80-100V
/LED voltage line reversal).
The message waiting switch is located to the left of the keypad under the number
card.
Setting the Clock
1.
2.
3.
4.
5.
6.
7.
8.
Using a blunt instrument press the Store button.
Using a blunt instrument press the Time button.
Enter the month (01 Jan, 02 Feb) using the numeric keypad.
Enter the date again using the numeric keypad.
Press * to select AM or # to select PM.
Enter the hours (12 hour format) using the numeric keypad.
Enter the minutes using the numeric keypad.
Using a blunt instrument press the Store button again.
Wall mounting
The telephone can be wall mounted using the optional wall bracket TWB223,
which then fits into the two slots located on the underside of the telephone.
NOTE!
When the telephone is wall mounted the hanger hook must be pulled out and rotated 180 degrees to
create the hook rest required for the handset.
6
www.doro.com
Other
English
Troubleshooting
Check that the telephone cord is undamaged and properly plugged in.
Disconnect any additional equipment that may be connected. If the problem is
resolved, the fault is with the other equipment.
Test the equipment on a known working line. If the product works then the
fault is with the line.
UK
If you cannot resolve the fault using the troubleshooting section, technical
support is available on the Premium Rate Number: 0906 302 0114.
Calls cost 50 pence per minute (prices correct at the time of going to
press), and is operational between 9AM - 5PM Monday-Friday excluding Bank
Holidays. Alternatively,
E-mail on: [email protected]
You can contact us in writing: Consumer Support Group, Doro UK Ltd.,
22 Walkers Road, North Moons Moat, Redditch, Worcestershire, B98 9HE,
(regarding any Spares or Technical query), or
Telephoning (Spares only): 01527 584377
Web site: www.doro-uk.com
Guarantee
This product is guaranteed for a period of 10 years from the date of purchase.
Proof of purchase is required for any service or support required during the
guarantee period.
This guarantee shall not apply to a fault caused by an accident or any similar
incident or damage, liquid ingress, negligence, abnormal usage or any other
circumstances on the purchaser’s part. Furthermore, this guarantee shall not
apply to a fault caused by a thunderstorm or any other voltage fluctuations.
This guarantee does not in any way affect your statutory rights. (As a matter of
precaution, we recommend disconnecting the telephone during a thunderstorm.)
www.doro.com
7
English
Version 1.1