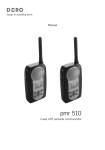
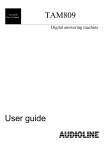
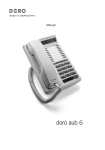
1
Manual
doro bm35
1
12
11
10
2
3
4
5
6
English
9
8
7
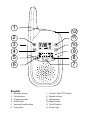
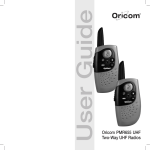
1
Headset socket
7
Push to Talk (PTT) button
2
Torch button
8
Monitor button
3
Charging socket
9
Microphone
4
Button lock
10 Menu button
5
Volume/Scroll buttons
11 On/Off button
6
Call button
12 Torch Light
English
Area of use
The handset is intended for both indoor and outdoor use, it is NOT resistant to rain, water,
rough or other careless treatment.
In ideal conditions ie: line of sight with no obstructions between handset/s and monitor, the
range can be up to 3 km.
Batteries
1. Remove the belt clip by lifting the small locating tab and pushing the clip upwards.
2. Before removing the battery cover release the locking clasp at the base of the handset.
3. Insert the rechargeable battery pack ensuring correct battery polarity is observed.
4. Refit the battery cover and belt clip. Charge the handset for 24 hours before use.
Please note!
The rechargeable battery pack has been installed the handset must be charged for 24 hours before use.
Charging bm35 (using adapter)
Connect the mains adapter to the socket on the left of the handset and an electrical wall socket.
Charging bm35+1 (with charging stand)
Connect the mains adapter to the socket on the rear of the charging stand and to an electrical
wall socket. Place the handset in the charger with the buttons facing out.
Battery indicator and charging
The symbol | in the display indicates when the batteries require charging. The indicator has
three segments which disappear as the battery charge decreases, and will flash when the battery
is running low. Charge the equipment as soon as possible when the indicator flashes!
The battery indicator will stop flashing when charging is complete (approximately 14 hours/
initially 24 hours). Fully-charged batteries will last for approximately 30 hours in standby or 2
hours operational time. These times apply at normal room temperature.
Please note!
Never charge ordinary (non-rechargeable) batteries in the handset, since this will ruin the equipment. The
guarantee does not cover this type of damage. The equipment must be charged initially for 24 hours before use
during which time the handset cannot be used. The recharging system used in this model may result in it becoming
warm. This is normal and will not damage the equipment.
Important!
Although the baby monitor offers a practical solution in looking after a child it
cannot replace a parent or guardian.
Make sure the equipment is always out of reach, never place the unit in the
child’s bed or playpen.
To avoid acoustic feedback by not placing the handset and baby monitor close
to one another.
Radio signals can be blocked if the equipment is used in areas with high
sources of interference from other electronic equipment.
Regardless of the selected channel or transfer code, you may experience ‘radio
chatter’ from other PMR units within the operating range.
www.doro.com
3
English
Belt clip
A belt clip is included and fitted to the back of the handset. The belt clip enables the handset
to be attached to a belt, waistband or similar. You can remove the belt clip by lifting the small
locating tab and pushing the clip upwards..
Important!
Please note when programming all references to press = to press and then immediately release the button.
Switching the Handset on/off
Press and hold 1 for a few seconds to turn the handset on or off.
To communicate
1. Make sure that all handsets (and monitor unit) are set to the same channel and transfer code.
See below.
2. Press and hold PTT (Push To Talk) to speak.
Please note!
If you are unable to communicate it may be because different channels or transfer codes have been selected, the
battery is running low or the units are too far apart.
Channel selection
All UHF/CB radio equipment share the available designated channels. If the chosen channel
is in use select an alternate channel, the selected channel number will be displayed in standby
mode. Please refer to the frequency/channel allocation table on page 8.
1. Press w. The current selected channel flashes.
2. Select the desired channel using v/V.
3. Press PTT.
Transfer code selection
There are 38 transfer codes available which can be used to filter out unwanted signals.
However, your conversation may still be overheard irrespective of which code is used. To enable
communication between handsets (as well as monitor to handset), the same transfer code must
be used on all units. In order to communicate with equipment that cannot select a code, enter
code 0.
1. Press w repeatedly until the small digits in the top right hand corner of the display flash.
2. Scroll to the desired transfer code using v/V.
3. Press PTT to confirm.
Scanning
You can scan all available channels to locate any signals being transmitted. Once a signal has
been located the display will show the channel number, and a signal will be heard for a few
seconds.
You can press PTT to stop at the located channel.
Please note: while searching battery consumption will be significantly higher than normal.
1. Press w and { at the same time. The unit will start searching.
2. To stop scanning press w.
4
www.doro.com
English
Monitor function
The monitor function can be used in weak signal areas to locate any other signal being
transmitted.
1. Press and hold
for at least five seconds.
2. To stop monitoring press PTT.
Cordless baby monitor/ Voice control (VOX)
This function is practical for use as a baby monitor, i.e. put one handset close to the baby (but
out of reach) and carry the other one with you. You can then hear when the sound exceeds the set
level of sound sensitivity.
Remember to reduce the volume on the unit that is placed close to the baby.
This handset can be used without having to press the PTT button to transmit. By setting the
correct level, the handset can automatically determine when you are speaking.
Test different settings until the sensitivity selected is acceptable. Please note that however accurate
your setting there is always a small risk that increased noise from the surroundings may activate
the transmitter, this may result in the initial word being unclear. The transmitter will shut off two
seconds after you have finished speaking.
VOX will be displayed while the function is active. If the handset transmits by itself the sensitivity
is set too high and will need to be adjusted. Press w to be able to temporarily interrupt and
change the setting.
1. Press w repeatedly until VOX is displayed.
2. Scroll to the desired setting using v/V (OF =off, 1=least sensitive....3=most sensitive).
3. Press PTT to confirm.
Call melody
You can select different call melodies (OF =off).
1. Press w repeatedly until CA is displayed.
2. Scroll to the desired melody (1 -5) using v/V.
3. Press PTT to confirm.
Termination (Roger) tone
If selected a beep tone will be heard when you release the PTT button. This can be used as a
reminder to the other person that you have finished talking and are waiting for a response.
1. Press w repeatedly until ro is displayed.
2. Scroll to the desired setting using v/V (OF =off, On =on).
3. Press PTT to confirm.
Key tone
If selected a tone will be heard when the handset buttons are pressed, this can be switched on or off.
1. Press w repeatedly until to is displayed.
2. Scroll to the desired setting using v/V (OF =off, On =on).
3. Press PTT to confirm.
www.doro.com
5
English
Searching two channels
You can enter a different channel for simultaneous listening while using the selected
operating channel.
1. Press w repeatedly until DCM is displayed.
2. Scroll to the desired setting using v/V (OF =off). Press w.
3. Scroll to the desired transfer code using v/V. Press w.
4. Press PTT to confirm.
Key lock
This function locks buttons w and v/V to prevent unintentional usage.
1. To activate the key lock press N until the display shows the key symbol.
2. To deactivate the key lock press and hold N until the key symbol disappears.
Timer
1. Press w until 0 00 00 is displayed.
2. Press { to start the timer.
3. You can display a split time by pressing { . Press { again to revert to the ongoing
timer.
4. Press { to stop the timer.
5. Press } to reset the timer.
6. Press w until the display returns to the standby mode.
6
www.doro.com
English
UK
If you cannot resolve the fault using the faultfinder section, technical support is available
on the Premium Rate Number: 0906 302 0114.
Calls cost 50 pence per minute (prices correct at the time of going to press), and is
operational between 9AM - 5PM Monday-Friday excluding Bank Holidays. Alternatively,
E-mail on: [email protected]
You can contact us in writing: Consumer Support Group, Doro UK Ltd., 22 Walkers
Road, North Moons Moat, Redditch, Worcestershire, B98 9HE, (regarding any Spares or
Technical query), or
Telephoning (Spares only): 01527 584377
Web site: www.doro-uk.com
Guarantee
This product is guaranteed for a period of 12 months from the date of purchase. Proof
of purchase is required for any service or support required during the guarantee period.
This guarantee shall not apply to a fault caused by an accident or a similar incident or
damage, liquid ingress, negligence, abnormal usage, not reasonably maintained or any
other circumstances on the purchaser’s part. Furthermore, this guarantee shall not apply
to a fault caused by a thunderstorm or any other voltage fluctuations.
This guarantee does not in any way affect your statutory rights. (As a matter of
precaution, we recommend disconnecting the telephone during a thunderstorm.)
Australia and New Zeeland
AUSTRALIA
DORO Australia Pty Ltd
PO Box 6760
Baulkham Hills BC NSW 2153
Australia
Consumer Support
Ph:
Ph: 1300 885 023
Fax: (02) 8853-8489
Email: [email protected]
Web site: www.doro.com.au
The product complies with AS/NZS 4365.
NEW ZEALAND
Atlas Gentech (NZ) Limited
Private Bag 14927
Panmure
Auckland
New Zealand
Consumer Support
Ph: 0900-500-25 (Toll Call)
Fax: (09) 574-2722
Email: [email protected]
N13 Z109
�����������������������������������������������
www.doro.com
�������� ����
������������������� ��������
��������
����
���������������������������
��������
���
�� ������������������������
7
The product complies with AS/NZS 4365.
N13 Z109
English
�����������������������������������������������
��������
����
������������������� ��������
������������������� ��������
������������������� ��������
������������������� ��������
���� �������������� ��������
������������������� ��������
������������������� ��������
������������������� ��������
� ������������������ ��������
�� ���������������� ��������
�� ���������������� ��������
�� ���������������� ��������
�� ���������������� ��������
�� ���������������� ��������
��������
����
���������������������������
���������������������������
���������������������������
���������������������������
���������������������������
���������������������������
���������������������������
���� ����������������������
���������������������������
���������������������������
���������������������������
���������������������������
���������������������������
���������������������������
��������
���
�� ������������������������
�� ������������������������
��������������������������
��������������������������
��������������������������
���� ���������������������
����� ��������������������
���� ���������������������
��������������������������
��������������������������
�� ������������������������
�� ������������������������
�
�
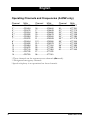
* These channels are the repeater access channels (�� mode).
** Designated emergency channels.
! Speech telephony is not permitted on these channels.
8
www.doro.com
English
Version 1.0