1
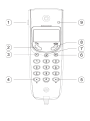
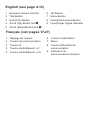
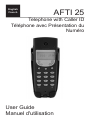
English French AFTI 25 Telephone with Caller ID Téléphone avec Présentation du Numéro User Guide Manuel d'utilisation English (see page 4-13) 1 Earpiece Volume Control 6 OK Button 2 Talk Button 7 Menu Button 3 Recall (R) Button 8 Delete/Disconnect Button 4 Scroll (Up) Button and * 9 Line/Ringer Signal Indicator 5 Scroll (Down)Button and # Français (voir pages 17-27) 1 Réglage du volume 6 Touche conrmation 2 Touche de communication 7 Menu 3 Touche R 8 4 Touche de délement et * Touche effacer/n de communication 5 Touche de délement et # 9 Indicateur de communication/sonnerie English Installation Batteries To ensure the display, memories, Caller ID, clock and other functions operate, three good quality AAA 1.5V alkaline batteries must be installed. When the batteries are running low, the symbol will be visible in the display. Replace the batteries as soon as possible! The battery compartment is located on the back of the handset. 1. Ensure the telephone line cord is disconnected from the telephone network wall socket. 2. Remove the battery cover. 3. Install the batteries ensuring correct battery polarity is observed. 4. Replace the battery cover. Connection Once the batteries have been installed. 1. Connect the telephone line cord to the telephone network wall socket. 2. A click will be heard when the modular plug is correctly in place. 3. Press o and listen for the dial tone. Your telephone is now operational 4. Press l to terminate the call. 5. To set the time and date please refer to page 12. Wall Mounting 1. Secure two screws, vertically positioned 100 mm apart. 2. Position the wall mount bracket on top of the screws and slide it downward into place. The telephone can now be placed in the wall socket after terminating the call using l. 4 www.doro.com Operation English Making a Call 1. Enter the required telephone number. Mistakes can be erased using l. 2. Press o , and the displayed number will be dialled. 3. Press l to terminate the call. Receiving a Call 1. Wait for the handset to ring, remove the handset from the wall bracket. 2. Press o to answer the call. 3. Press l to terminate the call. Volume Control The earpiece volume may be adjusted (low, medium and high) during a call using located on the side of the handset. Timer Approximately 5 seconds after dialling, a timer will be shown on the display. The timer helps you keep track of how long the call lasts. Mute Button The handset microphone can be disabled during a call. 1. Press w repeatedly until MUTE ? is displayed. Press 0. 2. The display will show UNMUTE ? and z will flash so long as the function is active. 3. Press 0 again to re-activate the microphone. www.doro.com 5 English Menu Menu Description The telephone has a menu system with display texts, controlled by the following buttons: W Access and scroll through the main menus v /V Used to scroll through some submenus. 0 Confirms selected option. l Delete/Correct, and to select standby mode. The menu system will automatically time out after several seconds if no buttons are pressed. The menu contains the following main headings: PHONEBOOK (VIP) Allows telephone numbers stored in the phone book to dialled or deleted CALLER ID Displays a list of the most recently received numbers. REDIAL Displays a list of the most recently dialled numbers. STORE Allows numbers/names to be stored in the phone book. SETTINGS Set date/time, ringer signal and the text language 6 www.doro.com Caller Identication English Explanation of Caller ID Caller ID allows you to see who is calling before you answer a call, and see who has called in your absence. If a name is attached to the telephone number and stored in the phone book, the name will be shown while the phone is ringing. Received calls are stored chronologically. The call log will store up to 30 telephone numbers. When the log is full, the oldest number will be deleted automatically, as the new call is logged. IMPORTANT! In order for numbers to be shown, the Caller ID service must be provided by your network operator and a current subscription in place. Contact your operator for more information. Retrieving and Dialling Incoming Numbers. 1. Press w repeatedly until CALLER ID ? is displayed. Press 0. 2. Scroll to the required telephone number using v /V 3. Press 0 to dial the number or l l to return to standby mode. Erasing Numbers 1. Press W repeatedly until CALLER ID ? is displayed. Press 0 2. Scroll to the required telephone number using v /V 3. Press l. The display will show CLEAR ? 4. Press 0 to confirm. Erasing all numbers 1. Press W repeatedly until CALLER ID ? is displayed. Press 0 2. Scroll to any telephone number using v /V . 3. Press and hold l until CLEAR ALL ? is displayed 4. Press 0 to confirm. www.doro.com 7 English Caller Identication Transferring Numbers to the Phone Book 1. Press W repeatedly until CALLER ID ? is displayed. Press. 0 2. Scroll to the desired telephone number using v /V. 3. Press w. STORE ?will be displayed. Press 0. 4. For name registration please refer to page 10. Messages Besides showing telephone numbers, the display may also show a number of messages: NUM. UNKNOWN It is an International call or a call from a PBX (no information received) NUM. BLOCKED The call comes from a blocked number or a PBX. 5 Message indication (sent from your network operator). Several calls have been received from this particular phone number. This number has not been detected before. Redial The five most recently dialled numbers can easily be redialled. 1. Press w repeatedly until REDIAL ? is displayed. Press 0. 2. Scroll to the desired telephone number using v /V. 3. Press 0 to dial the displayed number or l to return to standby mode.. 8 www.doro.com English Phone Book Using the Phone Book The phone book will store 10 telephone numbers (20 digits maximum) and names (13 characters maximum), this allows the stored number to be dialled using fewer button presses than if dialled manually. The phonebook is stored according to position (01-10). Letters Each number key has been allocated certain letters. Button Letters/symbols 1.......................................... [Space character] . , ? ! - " ` ( ) 1 2.......................................... A B C 2 3.......................................... D E F 3 4.......................................... G H I 4 5.......................................... J K L 5 6.......................................... M N O 6 7.......................................... P Q R S 7 8.......................................... T U V 8 9.......................................... W X Y Z 9 0.......................................... 0 * .......................................... Delete/move back #.......................................... Move forward Dialling Numbers from the Phone Book 1. Press w repeatedly until VIP ? is displayed. Press 0. 2. Scroll to the required telephone number using v /V. 3. Press o , to dial the displayed number. www.doro.com 9 English Phone Book Storing Phone Numbers and Names 1. Press w repeatedly until STORE ? is displayed. Press 0. 2. Enter the telephone number, including the area code. Use l to delete entries or make changes. 3. Press 0. 4. Enter a name by pressing the corresponding number button until the required letter is displayed, please refer to the table on the previous page. Press l to delete or make changes. Once the first letter has been entered wait a second or two and repeat this procedure until all you have entered the entire name required 5. Press 0. 6. Enter memory position ( 0 - 9 ). 7. Press 0 to confirm. Please note! If the next letter is not on the same button, you can immediately press the button containing the required letter, without waiting. If you need to change the phone number, store the new number in the same location as the old one. Erasing Phone Numbers/Names 1. Press w repeatedly until VIP ? is displayed. Press 0. 2. Memory location 01 is displayed. 3. Scroll to the desired location using v /V. 4. Press l. CLEAR ? will be displayed 5. Press 0 to confirm. 10 www.doro.com Settings English Language The display messages can be shown in the following languages: English, Spanish and French. 1. Press w repeatedly until SETTINGS ? is displayed. Press 0. 2. Scroll to the desired setting using v /V. Press 0. 3. Press l to return to standby mode. Ring Tone There are three choices of ring tone. 1. Press w repeatedly until SETTINGS ? is displayed. Press 0. 2. Press w repeatedly until is displayed. 3. Scroll to required setting using v /V. Press 0. 4. Press l to return to standby mode. Ringer Volume The ringer volume can be set to either off, low, medium and high. When the ringer is switched off, will be displayed. 1. Press w repeatedly until SETTINGS ? is displayed. Press 0. 2. Press w repeatedly until is displayed. 3. Scroll to the desired setting using v /V (X=off, =low, =medium and high). Press 0. 4. Press l to return to standby mode. www.doro.com 11 English Settings Setting the Time and Date 1. 2. 3. 4. 5. 6. 7. Press w repeatedly until SETTINGS ? is displayed. Press 0. Press w repeatedly until SET CLOCK ? is displayed. Scroll to the correct date is displayed using using v /V. Press 0. Scroll until the correct month is displayed using v /V. Press 0. Scroll until the correct hour is displayed using v /V. Press 0. Scroll until the correct minute is displayed using v /V Press 0. Press l to return to standby mode. Recall Access to additional network services can be gained by using the recall button R , * and # keys. Contact your network operator for more information. Press the recall button R followed by the extension number to when connected to a PBX (TBR only) 12 www.doro.com Other English Troubleshooting Telephone does not work - Check that the telephone cord is undamaged and properly plugged in. - Disconnect any additional equipment that may be connected. If the problem is resolved, the fault is with the other equipment. - Test the equipment on a known working line (e. g. at a neighbour’s). If the product works then the fault is with the line. No number is shown when a call is received - In order for this feature to function, you must subscribe to the Caller Identification service from your network provider. - If a message shows on the display, the call may be an international call (no data received), or from a private or blocked number. - It may not be possible to receive CID information if the phone operates in a PBX system. If the telephone still does not work, contact the place of purchase for service. Don’t forget the receipt or copy of the invoice. Technical Support If you cannot resolve the fault using the faultfinder section, technical support is available on the Premium Rate Number: 0906 302 0114. Calls cost 50 pence per minute (prices correct at the time of going to press), and is operational between 9AM - 5PM Monday-Friday excluding Bank Holidays. Alternatively, E-mail on: [email protected] You can contact us in writing: Consumer Support Group, Doro UK Ltd., 22 Walkers Road, North Moons Moat, Redditch, Worcestershire, B98 9HE, (regarding any Spares or Technical query), or Telephoning (Spares only): 01527 584377 Web site: www.doro-uk.com www.doro.com 13 English Other Guarantee UK This product is guaranteed for a period of 12 months from the date of purchase. Proof of purchase is required for any service or support required during the guarantee period. This guarantee shall not apply to a fault caused by an accident or a similar incident or damage, liquid ingress, negligence, abnormal usage or any other circumstances on the purchaser’s part. Furthermore, this guarantee shall not apply to a fault caused by a thunderstorm or any other voltage fluctuations. This guarantee does not in any way affect your statutory rights. (As a matter of precaution, we recommend disconnecting the telephone during a thunderstorm.) Guarantee (Australia and New Zealand) This product is guaranteed for a period of 12 months from the date of purchase. Should you experience difficulties with the product, please contact us for assistance. If the product is then found to be faulty you will be asked to return it directly to us with a copy of the purchase receipt. This guarantee shall not apply to a fault caused by an accident or a similar incident or damage, liquid ingress negligence, abnormal usage or any other circumstances on the purchaser’s part. Furthermore, this guarantee shall not apply to a fault caused by a thunderstorm or lightning, excessive or any other voltage fluctuations or faults on the telephone line. (As a matter of precaution, we recommend disconnecting the telephone during a thunderstorm). This guarantee does not affect your statutory rights. 14 www.doro.com English Other Australia and New Zealand If you believe this product is malfunctioning, please refer to the relevant section and/or consult the troubleshooting guide in this manual to ensure that you have followed the instructions carefully. As an alternative you can visit our web site for FAQ’s or send an e-mail for a prompt reply. AUSTRALIA DORO Australia Pty Ltd Limited PO Box 6760 Baulkham Hills BC NSW 2153 Australia NEW ZEALAND Atlas Gentech (NZ) Consumer Support Ph: (02) 8853 8444 Call) Fax: (02) 8853-8489 Email: [email protected] [email protected] Web site: www.doro.com.au Consumer Support Ph: 0900 50-025 (Toll www.doro.com Private Bag 14927 Panmure Auckland New Zealand Fax: (09) 574-2722 Email: 15 English Other REN (RN for New Zealand) The REN (Ringer Equivalence Number) or (RN) is of significance only if you wish to connect more than 1 telephone to your telephone line. A standard telephone line has a maximum REN capacity of 3 (RN of 5). It is possible to connect 3 devices with a REN of 1 (RN of 1) with no degradation to the product’s performance. Exceeding this limit may cause the volume of the ringer in any phone to decrease or not ring at all. Notes for operation in New Zealand ALL PRODUCTS The grant of a Telepermit for any item of terminal equipment indicates only that Telecom has accepted that the item complies with the minimum conditions for connection to its network. It indicates no endorsement of the product by Telecom, nor does it provide any sort of warranty. Above all, it provides no assurance that any item will work correctly in all respects with another item of Telepermitted equipment of a different make or model, nor does it imply that any product is compatible with all of Telecom’s network services. This equipment shall not be set to make automatic calls to the Telecom “111“ Emergency Service. This equipment may not provide for the effective hand-over of a call to another device connected to the same line. This equipment should not be used under any circumstances that may constitute a nuisance to other Telecom Customers. CND PRODUCTS If a charge for local calls is unacceptable, the “DIAL“ button should NOT be used for local calls. Only the 7 digits of the local number should be dialled from your telephone. DO NOT dial the area code digit or the “0“ prefix. 16 www.doro.com Français Installation Raccordement 1. 2. 3. 4. 5. Installez les piles. Voir paragraphe suivant. Branchez le câble téléphonique à la prise de téléphone murale. Appuyez sur o : vous devez entendre la tonalité. Appuyez sur l pour terminer la communication. Reglez l’heure/la date selon la description à la page 25. Piles Pour que la présentation des numéros, la mémoire, l’horloge etc. puissent fonctionner, l’appareil a besoin de trois piles 1,5V du type AAA. Le symbole s’allume lorsque les piles doivent être changées. Changez-les le plus vite possible ! Utilisez uniquement des piles de haute qualité. 1. Débranchez l’appareil. 2. Enlevez la trappe du compartiment de piles. 3. Insérez les piles selon les marques du pôle positif et négatif. 4. Remettez la trappe en place. Installation murale 1. Montez deux vis espacées verticalement de 100 mm. 2. Insérez les têtes des vis dans les trous du support murale, et poussez-le vers le bas pour le mettre en place. 3. Vous pouvez ainsi mettre le téléphone dans le support murale après avoir terminé la communication avec l. www.doro.com 17 Français Utilisation Appeler 1. Composez le numéro de votre correspondant sur le clavier. En cas d’erreur, effacez avec la touche l. 2. Appuyez sur o , pour appeler votre correspondant. 3. Terminez la communication avec l. Reception d’appel 1. Pour prendre la communication, appuyez sur o . 2. Terminez la communication avec l. Réglage du volume Utilisez la touche pour ajuster le volume d’écoute du combiné pendant une communication (située sur le côté du combiné). Chronomètre Un chronomètre de la durée des communications s’affiche juste après le début de la communication. Ce chronomètre vous permet de connaître la durée de la communication. Touche secret Le micro peut être coupé en cours de communication. UNMUTE ? est affiché et z clignote tant que la fonction est active. 1. Une communication de l’extérieur est en cours. 2. Appuyez plusieurs fois sur w. MUTE ? s’affiche. Appuyez sur 0. 3. Appuyez sur 0 pour réactiver le micro. 18 www.doro.com Français Menu Description du menu. Le téléphone possède un menu déroulant simple et convivial. Le téléphone revient automatiquement en mode repos si aucune action n'est réalisée dans un délai bref. Vous gérez le menu à l’aide des touches suivantes: W Donne accès au système de menus et vous permet de faire défiler les menus principaux. v /V Faire défiler certains sous-menus. 0 Passer à l’étape suivante et/ou confirmer un choix. l Effacer/corriger ou passer au mode repos. Le menu consiste en les groupes principaux suivants: REPERTOIRE (VIP) vous permet d’appeler ou effacer les noms et numéros dans le répertoire. PRESENTATION DU NUMÉRO DE L’APPELANT (CALLER ID), liste des derniers numéros reçus. PRESENTATION DU NUMÉRO DE L’APPELANT (CALLER ID), liste des derniers numéros reçus. ENREGISTRER (STORE) vous permet d’enregistrer les noms et numéros dans le répertoire. SELECTIONS vous permet de régler l’heure et date, sélectionner la mélodie de sonnerie et de choisir la langue utilisée par l’afficheur. www.doro.com 19 Français Présentation du Numéro l’Appelant Présentation du Numéro de l’Appelant La Présentation du Numéro de l’Appelant vous permet de voir qui vous appelle avant de répondre, et de vérifier qui vous a appelé en votre absence. Les numéros entrants sont enregistrés par ordre chronologique, l’ordre est affiché à gauche. Le journal enregistre jusqu’à 30 numéros de téléphone. Lorsque le journal atteint sa capacité maximum, les numéros les plus anciens sont remplacés automatiquement au fur et à mesure par de nouveaux appels. Remarque! Pour que la Présentation du Numéro puisse fonctionner il faut s’abonner à ce service auprès de votre opérateur. Rappel automatique à partir du JAP. 1. Appuyez plusieurs fois sur w. CALLER ID? s’affiche. Appuyez sur 0. 2. Appuyez sur v /V pour faire défiler les numéros enregistrés. 3. Appuyez sur 0 pour appeler ou appuyez sur l l pour retourner au mode libre. Effacer un numéro de téléphone du répertoire 1. Atteignez le numéro voulu selon l’instruction en dessus. 2. Appuyez sur l. CLEAR ? s’affiche. 3. Validez le réglage avec 0. Effacer tous les numéros 1. Atteignez la position voulue selon l’instruction en dessus. 2. Appuyez sur l jusqu’à ce que CLEAR ALL s’affiche. 3. Validez le réglage avec 0. 20 www.doro.com Français Présentation du numéro de l’Appelant Transférer un numéro en mémoire 1. Atteignez la position voulue selon l’instruction en dessus. 2. Appuyez sur w. STORE ? s’affiche. Appuyez sur 0. 3. L’enregistrement d’un nom se fait de la même manière que dans le répertoire, veuillez voir la page 23. Messages En plus des numéros de téléphone, des messages peuvent être affichés: NUM. UNKNOWN Aucune information reçue, par exemple lors d’un appel de l’étranger. NUM. BLOCKED 5 Numéro secret. Peut également venir d’un autocommutateur. Le voyant lumineux rouge clignote doublement si vous avez reçu un message sur votre messagerie vocale sur le réseau. L’écran peut aussi afficher un message texte, qui varie selon les opérateurs ("Message en attente ","3125",etc.) Appel répété du même numéro. Numéro enregistré pour la première fois. Touche Bis Vous pouvez aisément rappeler les cinq derniers numéros que vous avez composés. 1. Appuyez plusieurs fois sur w. REDIAL? s’affiche. Appuyez sur 0. 2. Appuyez sur v /V pour faire défiler les numéros composés. 3. Appuyez sur 0 pour appeler ou appuyez sur l pour retourner au mode repos. www.doro.com 21 Français Répertoire Emplois du répertoire Vous pouvez enregistrer les noms et les numéros de téléphone de vos principaux correspondants dans le répertoire. Si vous êtes abonné au service de présentation du numéro, le nom du correspondant sera affiché lors de son appel (concerne les numéros enregistrés en mémoire). Le répertoire peut contenir jusqu’à 10 noms et numéros de téléphone. Le répertoire est classé en ordre de position (01-10). Chaque nom peut contenir jusqu’à 13 signes et le numéro de téléphone jusqu’à 20 chiffres. Lettres Plusieurs lettres sont indiquées sur chaque touche. Touche Lettres/signes 1.......................................... [Espace] . , ? ! - " ` ( ) 1 2.......................................... A B C 2 3.......................................... D E F 3 4.......................................... G H I 4 5.......................................... J K L 5 6.......................................... M N O 6 7.......................................... P Q R S 7 8.......................................... T U V 8 9.......................................... W X Y Z 9 0.......................................... 0 * .......................................... Effacer/reculer #.......................................... Avancer Appeler un nom/numéro dans le répertoire 1. Appuyez plusieurs fois sur w. VIP ? s’affiche. Appuyez sur 0. 2. Sélectionnez le numéro/nom désiré avec v /V. 3. Appuyez sur o , pour appeler votre correspondant. 22 www.doro.com Français Répertoire Enregistrez un numéro de téléphone et un nom dans le répertoire 1. Appuyez plusieurs fois sur w. STORE ? s’affiche. Appuyez sur 0. 2. Composez le numéro de téléphone avec indicatif. Effacez ou corrigez avec l. 3. Appuyez sur 0. 4. Entrez le nom. Appuyez sur la touche correspondante (une ou plusieurs fois) pour enregistrer la première lettre dans la mémoire. (Voyez le tableau sur la page précédente). 5. Appuyez sur 0. 6. Choisissez une des plages de mise en mémoire ( 0 - 9 ). La plage numéro 10 correspond à la touche 0. 7. Validez le réglage avec 0. Remarque! Si la lettre suivante ne se trouve pas sur la même touche, vous pouvez directement appuyer sur la touche de la prochaine lettre, sinon attendez 2 secondes que le curseur se mette sur la position suivante. En cas de changement de numéro, remplacez l‘ancien par le nouveau. Effacer un numéro de téléphone/nom 1. Appuyez plusieurs fois sur w. VIP ? s’affiche. 2. Appuyez sur 0, la position 01 s’affiche. 3. Sélectionnez le numéro/nom désiré avec v /V. 4. Appuyez sur l. CLEAR ? s’affiche. 5. Validez le réglage avec 0. www.doro.com 23 Français Réglages Langues Les Messages-texte peuvent être présentés dans les langues suivantes: français, espagnol et anglais. 1. Appuyez plusieurs fois sur w. SETTINGS ? s’affiche. Appuyez sur 0. 2. Atteignez le réglage voulu. Appuyez sur 0. 3. Appuyez sur l pour retourner au mode repos. Mélodie de sonnerie La mélodie peut être réglée en plusieurs positions différentes. 1. Appuyez plusieurs fois sur w. SETTINGS ? s’affiche. Appuyez sur 0. 2. Appuyez plusieurs fois sur w. s’affiche. 3. Atteignez le réglage voulu. Appuyez sur 0. 4. Appuyez sur l pour retourner au mode repos. Volume de sonnerie Le volume de sonnerie peut être réglé en plusieurs positions différentes. s’affiche lorsque le volume de sonnerie est réglé en silence. 1. Appuyez plusieurs fois sur w. SETTINGS ? s’affiche. Appuyez sur 0. 2. Appuyez plusieurs fois sur w. s’affiche. 3. Atteignez le réglage voulu (X=silence, =bas, =moyen et [ = haut). Appuyez sur 0. 4. Appuyez sur l pour retourner au mode libre. 24 www.doro.com Français Réglages Régler l’heure et la date 1. Appuyez plusieurs fois sur w. SETTINGS ? s’affiche. Appuyez sur 0. 2. Appuyez plusieurs fois sur w. SET CLOCK s’affiche. 3. Sélectionnez le jour actuel. Appuyez sur 0. 4. Répétez l’étape 3. pour régler le mois, l’heure et la minute. 5. Appuyez sur l pour retourner au mode repos. Autocommutateurs / Opérateurs Cet appareil peut être installé derrière la plupart des autocommutateurs. Il peut également vous donner accès à des services additionnels proposés par des opérateurs. Les touches *, # et R vous permettront d’accéder à ces fonctions ou services complémentaires. Pour toute information, adressez-vous directement au fabricant du PABX ou à votre opérateur. www.doro.com 25 Français Autres Dépannage Vérifiez que le câble téléphonique est en bon état et qu’il est branché correctement. Débranchez tout autre matériel, rallonges et téléphones. Si l’appareil fonctionne alors normalement, la panne est due au matériel additionnel. Testez le matériel sur une autre ligne téléphonique (celle d’un voisin, etc.). Si le matériel fonctionne sur cette ligne, cela signifie que votre propre ligne téléphonique est défectueuse. Signalez la panne à votre opérateur. Au cas où les mesures sus-mentionnées n’ont pas d’effet, veuillez contacter votre revendeur. Garantie et S.A.V. Cet appareil est garanti un an à partir de sa date d’achat, la facture faisant foi. La réparation dans le cadre de cette garantie sera effectuée gratuitement, pièces et main d’oeuvre. La garantie est valable pour un usage normal de l’appareil tel qu’il est défini dans la notice d’utilisation. Les fournitures utilisées avec l’appareil ne sont pas couvertes par la garantie. Sont exclues de cette garantie les détériorations dues à une cause étrangère à l’appareil. En particulier la garantie ne s’appliquera pas si l’appareil a été endommagé à la suite d’un choc ou d’une chute, d’une fausse manoeuvre, d’un branchement non conforme aux instructions mentionnées dans la notice ou aux prescriptions de l’ART (-Autorité de Régulation des Télécommunications), de l’effet de la foudre, de surtensions électriques ou électrostatiques, d’une protection insuffisante contre l’humidité, la chaleur ou le gel. En cas de panne, adressez-vous au S.A.V. de votre revendeur ou installateur. 26 www.doro.com Français Autres Pour la France En tout état de cause, la garantie légale pour vices cachés s’appliquera conformément aux articles 1641 et suivants du Code Civil. Si vous avez des soucis d’utilisation, contactez notre Service d ‘Assistance Téléphonique au 08 92 68 90 18 ( N° Audiotel - 0,34 Euros/mn )). www.doro.com 27 www.doro.com