1
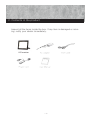
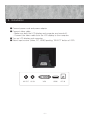
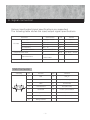
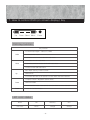
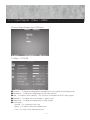
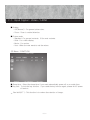
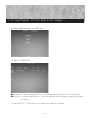
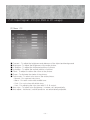
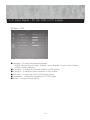
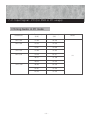
9.7” LED MONITOR
Contents
1. Safety instruction
2
2. Contents in the products
3
3. Safety tips
4
4. Installation
5
5. Product Specification
6
6. Signal connection
7
7. How to control OSD (On screen display) key
8
1) Input signal : Video, HDMI
2) Input signal : PC (for DVR or PC usage)
8. FAQ
9
12
16
-1-
1. Safety Instructions
Thank you for purchasing our security LCD monitor.
For the best performance of our product, please take a few minutes to
read the user’s manual and follow relevant guides and directions.
■ Please read the instructions carefully, and keep it for later use.
■ Please comply with all warnings and instruction signs marked on the product.
■ Always keep the product under normal temperature and humidity, avoiding
heavy moisture and high temperature.
■ Keep the product stable conditions at any time, otherwise the product may fail,
causing serious loss and damage.
■ Do not install this product without any proper ventilation system, and keep the
product away from all heat sources, humid and dusty surroundings.
■ When cleaning, cut off the electrical supply at any times, and keep away from any
liquid sources. Use damp rag to clean product when necessary instead of liquid
or aerosol detergent
■ Do not crash and convulse the product when move it because the product as
glasswork is easily scratched.
■ Do not attempt to repair the product by yourself or remove the casting, if may
expose you to electronic shock hazard. Please contact a dealer near you for the
service.
-2-
2. Contents in the product
Inspect all the items inside the box. If any item is damaged or missing, notify your dealer immediately.
LED monitor
-3-
3. Safety Tips
■ Place the monitor on a flat and stable surface
■ Ensure that the power to the monitor, the computer, and other connected devices
should be off before making any connections.
■ Plug the DC cord of the AC adapter to the 12V power connector of the monitor.
■ Plug power cord to the AC adapter, and plug the other side to the power socket.
■ Please use the enclosed power cord and connect to the standard power outlet of
your country.
■ For viewing clarify, you can tilt the LCD forward or backward.
■ Ensure the LCD will not fall or be damaged.
■ Do not tilt the LCD beyond the allowed angles forward up to 5 degrees or
backward up to 25 degrees.
-4-
4. Installation
■ Connect power cord and power adaptor
■ Connect video cable
- Make sure both the LCD display and computer are turned off.
- Connect the video cable from the LCD display to the computer.
■ Turn on LCD display and computer.
■ Select input source (video, PC, HDMI) pushing ‘SELECT’ button of OSD.
AV OUT
AV IN
VGA
-5-
HDMI
DC IN
5. Product Specification
Features
Specification
Model
9.7inch
LCD
9.7″LED monitor(4:3)
Resolution
1024 x 768@60Hz
Viewing angle
178/178 (degree)
Brightness
200 cd/㎡
Contrast
600:1
Input signals
PC (RGB), Video (BNC),
HDMI
Output signal
Video(BNC)
Power
DC 12V 2A
Size (WxHxD)
235mm x 195mm x
320mm
Weight (set)
1.7Kgs
Weight (Packed)
2.5 Kgs
※ Technical details may be subject change without further notice.
-6-
6. Signal connection
Various input/output signal specifications are supported.
The following table shows the input/output signal specifications.
Parameter
PC input
Specification
Unit
Input signal
Analogue R,G,B
Input level
0.7
Vp-p
H-Frequency
31 ~ 80
KHz
V-Frequency
60 ~ 75
Hz
Max, input resolution
1280 x 1024@75Hz
Composite video input
1
HDMI input
480P/576P/720P
Input Resolution
Remark
Separate
Vp-p
75Ω
Pal / NTSC / Secam
With HDCP
1080I/1080P
1
Composite video output
Vp-p
VGA Connector
VGA plug
Pin
Function
Pin
Function
1
Red
9
VGA_5V
2
Green
10
Synchronization grounded
3
Blue
11
Unconnected
4
Unconnected
12
SDA (DDC Data)
5
Grounded
13
Horizon synchronization
6
Red grounded
14
Vertical synchronization
7
Green grounded
15
SCL (DDC clock)
8
Blue grounded
-7-
7. How to control OSD (on screen display) Key
Up
Down Select Menu
Power
OSD Key function
Key function
To choose input signal : Video, PC, HDMI
Select
To enter the sub-menu
To view the next function in the OSD main menu
To activate the OSD main menu
Menu
To view the previous function in the OSD main menu
To exit from the OSD main menu
Auto adjust (hot key) in the PC mode
Up
OSD item UP
To increase the value of the specific function which has been selected
To adjust contrast / Brightness (Direct menu)
Down
OSD item DOWN
To decrease the value of the specific function which has been selected
Power
To turn on / off the monitor
LED color status
Mode
ON
Stand by
OFF
LED color
Green
Orange
Orange
-8-
7-1. Input Signal : Video / HDMI
(Choose‘Select’button from OSD key)
(1) Menu : PICTURE
■
■
■
■
■
■
Contrast : To adjust the brightness and darkness of the object and backgrounds
Brightness : To adjust the brightness of the entire picture.
Hue : To adjust colors naturally. This function is activated at NTSC video signal.
Saturation : To adjust colors to deeper or lighter color
Sharpness : To adjust the sharpness of video image.
Color temp
- Normal : For a general color tone
- Warm : For warm colors with reddish tone
- Cool : For cool colors with bluish tone.
-9-
7-1. Input Signal : Video / HDMI
■ Scaling
- 4:3 (Normal ) : For general picture size.
- Zoom : Zoom in vertical direction.
■ Picture mode
- Standard : For general contents. If fits most contents.
- Vivid : For a clear display.
- Movie : For movies.
- User : When the user wants to set the values.
(2) Menu : FUNCTION
■ Sleep timer : Select the sleep timer if you want automatically power off on a certain time.
■ Key lock : To lock the key function. If you need the key function again, please do AC power
off and on.
** Pixel shift(9.7″ ) : This function is to reduce the retention of image.
- 10 -
7-1. Input Signal : Video / HDMI
(3) Menu : OSD
■ Language : To select the preferred language.
- English, German, French, Italian, Spanish, Czech, Swedish, Finnish, Polish, Russian,
Turkish,Korean, Japanese
■ H-position : To adjust the horizontal position of OSD window.
■ V-position : To adjust the vertical position of OSD window.
■ OSD timer : To adjust the time of OSD window display.
■ Transparent : To adjust the transparency of OSD window.
■ Recall : To recall the initial setting.
- 11 -
7-2. Input Signal : PC (for DVR or PC usage)
(Choose‘Select’button from OSD key)
(1) Menu : FUNCTION
■ Sleep timer : Select the sleep timer if you want automatically power off on a certain time.
■ Key lock : To lock the key function. If you need the key function again, please do AC power
off and on.
** Pixel shift( 9.7″ ) : This function is to reduce the retention of image.
- 12 -
7-2. Input Signal : PC (for DVR or PC usage)
(2) Menu : PC
■
■
■
■
■
■
■
Contrast : To adjust the brightness and darkness of the object and backgrounds
Brightness : To adjust the brightness of the entire picture.
H-position : To adjust the horizontal position of picture.
V-position : To adjust the vertical position of picture.
Clock : To adjust to reduce the noise on the picture.
Phase : To eliminate the shake of the picture.
Color mode : To select color tone of the entire picture.
- Normal : For a general color tone.
- Warm : For warm colors with reddish tone.
- Cool : For cool colors with bluish tone.
- User : For adjusting the color tone with R. G. B control.
■ Auto color : To adjust color (brightness / contrast, etc) automatically.
■ Auto adjust : Horizontal / vertical positions are automatically adjusted.
- 13 -
7-2. Input Signal : PC (for DVR or PC usage)
(3) Menu : OSD
■ Language : To select the preferred language.
- English, German, French, Italian, Spanish, Czech, Swedish, Finnish, Polish, Russian,
Turkish, Korean, Japanese
■ H-position : To adjust the horizontal position of OSD window.
■ V-position : To adjust the vertical position of OSD window.
■ OSD timer : To adjust the time of OSD window display.
■ Transparent : To adjust the transparency of OSD window.
■ Recall : To recall the initial setting.
- 14 -
7-2. Input Signal : PC (for DVR or PC usage)
※Timing Guide in PC mode
Resolution
H-Frequency
(kHz)
V-Frequency
(Hz)
640 x 480
31.469
59.940
640 x 480
37.500
75.000
37.861
72.809
720 x 400
31.469
70.087
800 x 600
37.879
60.317
48.077
72.188
46.875
75.000
48.363
60.004
56.467
70.069
60.023
75.029
Mode
PC
1024 x 768
- 15 -
8. FAQ
Symptioms
No power light
Solutions
- Make sure AC power cord is securely connected to the LCD Adapter.
- Make sure that the monitor power is turned on.
No signal
- Check the signal source : Video, HDMI, PC
- You can push the‘SELECT’button of the OSD key to choose suitable
signal input.
Monitor in Power saving mode
- Check if the VGA signal cable is properly connected and check if
the plug pin was damaged.
- Check if the computer is changed to power saving mode, press any
key
Too bright or dark
- Adjust the brightness.
- Adjust the contrast.
Fuzzy image
- Presss the“ UP”(Auto adjust in PC mode) key
- Do adjust the values in the menu
Image not in the middle
- Presss the“ UP”(Auto adjust in PC mode) key
- Adjust horizontal / vertical position
- Check whether signal timing is within the specified limits.
Abnormal color
- Check whether VGA (Video, HDMI) cable is properly connected.
- Adjust the color in the menu.
- 16 -