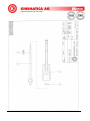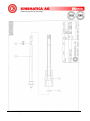
1
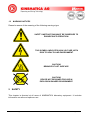
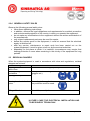
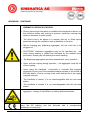
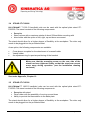
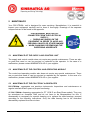
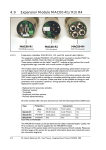
Instruction Manual for POLYTRON® System PT 1300 D Voltage 90 – 260 V, 50/60 Hz Make sure the power supply is correct and corresponds with the technical data plate on the instrument This is a quality product of: Luzernerstrasse 147a CH-6014 Lucerne Fax: Switzerland Tel.: +41-41-259 65 65 +41-41-259 65 75 E-mail:[email protected] INDEX: 1 1.1 1.2 1.3 2 2.1 2.2 2.3 2.4 3 3.1 3.2 3.3 3.4 4 4.1 4.2 4.3 5 5.1 5.2 5.3 5.4 5.5 PAGE: INTRODUCTION ......................................................................................................................................... 3 OPERATING INSTRUCTIONS ................................................................................................................ 3 ORGANISATIONAL MATTERS .............................................................................................................. 5 WARNING NOTICES ............................................................................................................................... 6 SAFETY ...................................................................................................................................................... 6 SUMMARY ............................................................................................................................................... 7 SAFETY CONCEPT ................................................................................................................................. 7 RESIDUAL DANGERS .......................................................................................................................... 10 WARNINGS............................................................................................................................................ 11 USE ........................................................................................................................................................... 13 DESCRIPTION ........................................................................................................................................... 13 POLYTRON-AGGREGATES ................................................................................................................... 13 OPTION STAND ST-P00/200..................................................................................................................... 15 TECHNICAL SPECIFICATIONS .................................................................................................................. 16 INSTALLATION ........................................................................................................................................ 17 UNPACK ................................................................................................................................................ 17 COUPLING/DECOUPLING OF THE HOMOGENIZING AGGREGATE ................................................ 17 WORKING WITH THE PT 1300 D .......................................................................................................... 18 MAINTENACE .......................................................................................................................................... 22 MAINTENACE OF THE SUPPLY AND CONTROL UNIT ...................................................................... 22 MAINTENACE OF THE CONTROL AND OPERATING MODULE ....................................................... 22 MAINTENACE OF THE POLYTRON-AGGREGATES ............................................................................ 22 DISASSEMBLY INSTRUCTIONS ......................................................................................................... 23 ASSEMBLY INSTRUCTIONS ......................................................................................................................... 23 6 TROUBLE SHOOTING ............................................................................................................................. 24 7 general accessories ................................................................................................................................ 25 8 Guarantee ................................................................................................................................................. 25 1 Appendix ..................................................................................................Fehler! Textmarke nicht definiert. 1.1 1.2 LEGEND TO THE DRAWING OF PT1300D AND ST-P00/200 ................... FEHLER! TEXTMARKE NICHT DEFINIERT. LEGEND TO THE DRAWINGS OF PT-DA 05/2EC.., 07/2EC.., 12/2EC.., 12/2 .. ECFEHLER! TEXTMARKE NICHT DEFINIERT. 2 2.1 2.2 2.3 2.4 2.5 2.6 3 3.1 Appendix: control with rs-232-interface ............................................................................................... 31 SYSTEM DESCRIPTION........................................................................ FEHLER! TEXTMARKE NICHT DEFINIERT. HOST INTERFACE .............................................................................. FEHLER! TEXTMARKE NICHT DEFINIERT. COMMUNICATING RULES ..................................................................... FEHLER! TEXTMARKE NICHT DEFINIERT. DIFFERENCE BETWEEN SET RPM AND CURRENT RPM (*) ....................... FEHLER! TEXTMARKE NICHT DEFINIERT. ERROR TREATMENT............................................................................ FEHLER! TEXTMARKE NICHT DEFINIERT. COMMAND SAMPLES .......................................................................... FEHLER! TEXTMARKE NICHT DEFINIERT. Appendix: control with MODBUS-interface ..........................................Fehler! Textmarke nicht definiert. IMPLEMENTATION ..................................................................................................................................... 34 OI PT 1300 D English / Edition 3.0 / 23.10.2009 Page 2 of 37 1 INTRODUCTION This chapter gives information on the structure of this document. It will assist you in making use of it and show how to find the required information quickly. 1.1 OPERATING INSTRUCTIONS PLEASE READ THESE OPERATING INSTRUCTIONS BEFORE SWITCHING ON OR OPERATING THE EQUIPMENT. THEY DESCRIBE THE USE OF THE POLYTRON PT 1300 D, ITS INSTALLATION AND MAINTENANCE AND THE APPROPRIATE REPLACEMENT PARTS AND ACCESSORIES. THEY WILL HELP YOU AVOID ERRONEOUS USE AND SUBSEQUENT DAMAGE. ALTHOUGH POLYTRON UNITS ARE DESIGNED FOR EASE OF SERVICE, THIS DOES NOT RELEASE YOU FROM THE OBLIGATION TO INSPECT YOUR EQUIPMENT CAREFULLY AND TO CLEAN IT THOROUGHLY. KINEMATICA AG is a specialist manufacturer of machines and equipment for dispersion and mixing technology. An important objective of these operating instructions is to fully inform you, the user, about the correct and safe use of our equipment. In order to achieve this, it is essential that you should carefully study chapter 2, “Safety”, and follow the instructions in this book. OI PT 1300 D English / Edition 3.0 / 23.10.2009 Page 3 of 37 1.1.1 RANGE OF VALIDITY The information in these operating instructions relates to the POLYTRON® identified as follows: Manufacturer: Brand name: Product name: KINEMATICA AG, CH-6014 Luzern POLYTRON® POLYTRON® PT 1300 D & POLYTRON® PT 1300 D RS232 Artikelnummer Bezeichnung 11010030 PT 1300 D, MODBUS (with EU-Plug) 11010031 PT 1300 D, MODBUS (with CH-Plug) 11010039 PT 1300 D, MODBUS (with UK-Plug) 11010032 PT 1300 D, MODBUS (with EU-Plug, customer-specific) Dispersing Aggregates (choice) 11030004 PT-DA 03/2EC-E050 11030012 PT-DA 05/2EC-E085 11030009 PT-DA 05/2EC-E068 11030031 PT-DA 07/2EC-E107 11030024 PT-DA 07/2EC-E092 11030030 PT-DA 07/2SYN-E082 11030062 PT-DA 12/2EC-E123 11030042 PT-DA 12/2EC-E157 11030266 PT-DA 12/2MEC-E157 11030060 PT-DA 12/2WEC-E157 Stands 11040012 ST-P01/200 – Hinge Stand 11040011 11040013 ST-P12/600 – Metal plate Stand specifically for the PT1300D ST-P15/320 – Plate Stand ATTENTION: The new Unit is not exchangeable with the old one. The new unit has a new designed supply module. OI PT 1300 D English / Edition 3.0 / 23.10.2009 Page 4 of 37 1.1.2 TARGET AUDIENCE These operating instructions are intended for all authorised users of our machines/equipment. We distinguish different user roles, taking account of the different demands placed on the user by the activity to be carried out. You will find the definitions of user roles with the demands on the user in chapter 2, “Safety”. You can fulfil one or more of these roles, provided that you meet the corresponding demands. 1.2 ORGANISATIONAL MATTERS If you are unable to find the answer to any question in the operating instructions, please contact the equipment manufacturer directly. 1.2.1 LOCATION OF THE OPERATING INSTRUCTIONS The operating instructions can only be of use to you if you always have them at hand. They should therefore always be kept at the place where the equipment is used. 1.2.2 MANUFACTURER CONTACT ADDRESS KINEMATICA AG Luzernerstrasse 147a CH-6014 Lucerne TEL: +41 41 259 65 65 FAX: +41 41 259 65 75 e-mail: [email protected] OI PT 1300 D English / Edition 3.0 / 23.10.2009 Page 5 of 37 1.3 WARNING NOTICES Please be aware of the meaning of the following warning signs: SAFETY INSTRUCTIONS MUST BE OBSERVED TO ENSURE SAFE OPERATION. THIS SYMBOL INDICATES HIGH VOLTAGE, WITH RISK TO HEALTH AND ENVIRONMENT. CAUTION! BEWARE OF HOT SURFACE. CAUTION! DEVICE NOT DESIGNED FOR USE IN EXPLOSION DANGER ENVIRONMENT. 2 SAFETY This chapter is directed at all users of KINEMATICA laboratory equipment. It includes information on safe and optimum use. OI PT 1300 D English / Edition 3.0 / 23.10.2009 Page 6 of 37 2.1 SUMMARY Any incorrect use of the installed equipment can be dangerous. Inadequately trained users can cause material damage and personal injury. This chapter informs you about the safety concept and the requirements for safe and optimum use of the equipment. All those authorised to operate, service and repair the equipment are required to study chapter 2, “Safety”. 2.2 SAFETY CONCEPT The safety concept sets down the entitlement to use the equipment and the responsibilities of the individual users. The machines and equipment are designed and constructed according to the state of the art and the recognised safety rules. 2.2.1 INTENDED USE OF THE EQUIPMENT The equipment is designed and constructed for the following use: Dispersion and homogenisation of pumpable fluid products in accordance with the technical specifications (see point 3.2) and compatibility with the materials coming into contact with the products. If you use the equipment for any purpose other than those listed, the manufacturer cannot be held liable for any resulting damage. 2.2.2 IMPROPER USE Any use other than the “intended use” without the written approval of the manufacturer or any operation outside the technical limits of use is improper use. 2.2.3 USER ROLES To guarantee safety, we place requirements on the users of the equipment that must be met without fail. Only persons meeting the requirements are authorised to work with the equipment. We describe all those who work with the equipment as users. Since the requirements of these users are very much dependent on their activity, we distinguish the following user roles. OI PT 1300 D English / Edition 3.0 / 23.10.2009 Page 7 of 37 Contract partner: The manufacturer can impose legal obligations on the contract partner when the equipment is purchased. The contract partner is obliged to ensure that the equipment is properly used. Operating company: The operating company ensures that the equipment is properly used and authorises persons who are entitled to work with the equipment in any one of the defined user roles. They are under the obligation to instruct the users. Note: Contract partner and operating company can be the same person. Service technician: The service technician is an employee of the operating company and looks after the equipment in special operating mode(s). He is a specialist with mechanical, electrical and electronic professional training. The service technician undertakes commissioning, decommissioning service and repair of the equipment. He must be appropriately trained to be able to carry out the service work required. Operator: The operator turns the equipment on and off. In the event of an alarm signal he informs the service technician. OI PT 1300 D English / Edition 3.0 / 23.10.2009 Page 8 of 37 2.2.4 DANGER AREA System/equipment The system danger area includes the whole system/equipment including the connecting lead and controls. Proximity danger area This refers to all areas within a defined distance of the equipment. User danger area This danger area includes all persons working with the equipment. 2.2.5 AREAS OF RESPONSIBILITY In order that the system/equipment can be used safely and without risk, the users in various roles bear the responsibility for particular danger areas. Contract partner: The contract partner bears the responsibility for the “proximity danger area”. Operating company: The operating company bears the responsibility for the “user danger area”. Only those users may be authorised to operate the system/equipment who fulfil all requirements of the user roles concerned. In doing so, attention must be paid to the following points: It is to be ensured that all users of the system/equipment have fully read and understood chapter 2, “Safety” and act accordingly in a safety-conscious manner. It is to be ensured that no unauthorised person carries out work with the system/equipment. It is to be ensured that users are informed of the possible risks and dangers connected with the system/equipment. It is to be ensured that those being trained or engaged in general training are under the permanent supervision of a trained and authorised person. Service technician: The service technician bears the responsibility for the “system/equipment danger area”. He ensures that the system/equipment is at all times free from technical faults, safe and functions correctly. OI PT 1300 D English / Edition 3.0 / 23.10.2009 Page 9 of 37 2.2.6 GENERAL SAFETY RULES Observe the following general safety rules: follow these operating instructions, in addition, observe the legal obligations and requirements for accident prevention and environmental protection of the country in which you operate the equipment, do not make any modifications to the equipment without the written authorisation of the manufacturer, only original replacement parts may be used for repairs, before any service work on the equipment, it must be ensured that the electrical supply is switched off, after any service, maintenance or repair work has been carried out on the system/equipment, it must be given a test run by the service technician. depending on the place at which it is installed, circumstances may require that hearing protection is worn when remaining in the vicinity of the equipment for long periods. 2.3 RESIDUAL DANGERS When the system/equipment is used in accordance with rules and regulations, residual dangers are minimal. Residual danger Countermeasures Tripping over feed or These should be laid appropriately. return lines Breakage of glass Wear protective clothing containers (goggles etc.). Spitting of the product Hearing loss due to loud noise. According to the application ear protection must be used. Tilting of the device Use stable, non-slip base IN EVERY CASE THE ELECTRICAL INSTALLATION HAS TO BE DONE BY TECHNICIAN! OI PT 1300 D English / Edition 3.0 / 23.10.2009 Page 10 of 37 2.4 WARNINGS Ensure that the rated voltage of the equipment matches the supply. Before changing any dispersing aggregate, the line cord has to be plugged out IT IS IMPORTANT THAT THE MAINS SUPPLY WHERE THE DEVICE IS PLUGGED IN COMPLIES WITH THE INFORMATION ON THE TYPE LABEL AND THE INTERNATIONAL STANDARDS FOR POWER SUPPLIES. IF NOT, SUCCESSFUL OPERATION CANNOT BE GUARANTEED In the event that hazardous chemicals or materials that endanger health can influence the surroundings or use of the equipment, appropriate countermeasures must be taken. At long term use the aggregate and the coupling may get hot – danger of skin burn. The equipment may not be operated in explosive areas It is not allowed to work with fluids, which are highly inflammable. It is not allowed to mix materials which can cause strong exothermal reactions WARNINGS: TO BE CONTINUED ON NEXT PAGE OI PT 1300 D English / Edition 3.0 / 23.10.2009 Page 11 of 37 WARNINGS: CONTINUED THE DEVICE MAY ONLY BE KINEMATICA SERVICE STATIONS. Ensure that enough free space is available at the backside of device, so that effective airflow and cooling is assured. Insufficient cooling may lead to a decrease of power output. The device has to be placed in a manner that dirt or fluids cannot penetrate through the ventilation slots at backside of the drive. Before changing any dispersing aggregate, the line cord has to be plugged out POLYTRON dispersion aggregates may not be operated dry – the lower sleeve bearing is cooled and lubricated by the medium being processed. Running dry will destroy the sleeve bearing. The dispersing aggregates should be cleaned after every operation. Never pull the coupling during operation – the aggregate could fall out of the coupling. Never place the handheld horizontally or vertically with engaged aggregate. By non-use of the handheld always provided in the recess at the base station. Fluid is running in the motor and the life of the engine is greatly reduced. The handheld of version 2 is not interchangeable with the new base station. The handheld of version 3 is not interchangeable with the old base station. When the line cord is plugged, never touch the saw teeth of the aggregate – danger of injuries due to rotating shafts and blades OPENED BY AUTHORISED KINEMATICA AG products comply with all the usual CE directives, carry the CE marking and are delivered with a corresponding declaration of conformity. OI PT 1300 D English / Edition 3.0 / 23.10.2009 Page 12 of 37 3 USE POLYTRON PT 1300 D handheld units are specially designed for the dispersing, homogenizing, suspending, emulsifying, decomposing and mixing of organic and inorganic sample material in small quantities. 3.1 DESCRIPTION The POLYTRON PT 1300 D consists of a microprocessor-controlled supply and control module and a high-performance low-voltage drive with a control and operating module including an LED display as well as a selection of three different homogenizing aggregates. A hinged stand, a plate stand and a metal plate stand are also available as an option. For a ready-to-use system you need: Control module (Handheld) Supply module (Base station) A dispersing aggregate A mains connection according to the type label 3.2 POLYTRON-AGGREGATES Dispersing units (choice) Shaft length, mm Stator/Rotor Ø, mm Processing volume Notes Temperature Pressure Materials Cleaning Product requirements PT-DA 03/2EC-E50 PT-DA 05/2EC-E68 PT-DA 05/2EC-E85 PT-DA 07/2SYN-E082 PT-DA 07/2EC-E092 50 2.2/3.5 68 5.5/3 85 5.5/3 82 7.8/5 92 7.8/5 approx. 0.05 – 2 ml - Ca. Ca. Ca. Ca. 0.1 – 3 ml 0.1 – 3 ml 0.5 – 10 ml 0.5 – 10 ml Synthetik up to about 90 °C processing temperature not pressurised stainless steel 1.4435 (316L) and PTFE compound can be sterilised by all the usual methods, e.g. autoclave The product to be dispersed must be pumpable and fluid and must not contain any solid particles that might destroy the attachment. OI PT 1300 D English / Edition 3.0 / 23.10.2009 Page 13 of 37 Dispersing units (choice) Shaft length, mm Stator/Rotor Ø, mm Processing volume Notes Temperature Pressure Materials Cleaning Product requirements 3.3 PT-DA 07/2EC-E107 PT-DA 12/2EC-E123 107 7.8/5 123 12/9 PT-DA PT-DA PT-DA 12/2EC-E157 12/2MEC-E157 12/2WEC-E157 123 12/9 123 12/9 123 12/9 Ca. 0.5 – 10 ml - Ca. Ca. Ca. Ca. 3 – 250 ml 3 – 250 ml 3 – 250 ml 3 – 250 ml Knife Rotor W-Geometry up to about 90 °C processing temperature not pressurised stainless steel 1.4435 (316L) and PTFE compound can be sterilised by all the usual methods, e.g. autoclave The product to be dispersed must be pumpable and fluid and must not contain any solid particles that might destroy the attachment. STAND ST-P01/200 POLYTRON PT 1300 D handhelds can be supplemented with the joint stand STP01/200. The stand consists of the following components: Baseplate Pivotable articulated arm with the possibility of right, left, up, down movement Motor mounting with adjustable pitch up to approx. 15° The stand should allow for a higher degree of flexibility at the workplace. The drive only needs to be plugged into the provided socket. Make sure that the dive cable is attached to the cable holder on the arm so that it can not enter into the working area. Make sure that the mounting screw on the rear side of the stand has been tightened firmly so that the stand arm cannot move away during operation. (see the installation drawing enclosed) See under Appendix, Chapter 10 OI PT 1300 D English / Edition 3.0 / 23.10.2009 Page 14 of 37 3.4 STAND ST-P12/600 POLYTRON P T 1300 D handheld units can be used with the optinal plate stand ST- P00/200. The stand consists of the following components: Baseplate Stand column with a maximum stroke of about 550mmMotor mounting with drive holder with the option of left, right, up and down movement The stand should allow for a higher degree of flexibility at the workplace. The drive only needs to be plugged into the provided socket. As an option, the following components are available: Cross sleeve complete for the attachment of a vessel holder Vessel holder An adjustment ring for precise positioning of the handset Make sure that the mounting screw on the rear side of the stand has been tightened firmly so that the stand arm cannot move away during operation. (see the installation drawing enclosed) See under Appendix, Chapter 10 3.5 STAND ST-P15/320 POLYTRON PT 1300 D handheld units can be used with the optinal plate stand ST- P15/320. The stand consists of the following components: Baseplate with stand Drive holder with the possibility of moving up and down Ability to provide the base station to the base plate The stand should allow for a higher degree of flexibility at the workplace. The drive only needs to be plugged into the provided socket. OI PT 1300 D English / Edition 3.0 / 23.10.2009 Page 15 of 37 Make sure that the mounting screw on the rear side of the stand has been tightened firmly so that the stand arm cannot move away during operation. (see the installation drawing enclosed) 3.6 TECHNICAL SPECIFICATIONS POLYTRON PT 1300 D motor type supply voltage fuse supply frequency input power output power max. speed direction of rotation ambient temperature relative humidity standards protection type max. period of continuous operation Noise emission ON/OFF Switch Current consumption Interface weight (drive only) Brushless DC-motor, electronically commuted 90-260VAC 2.5 A T (Passive) 50/60 Hz 100 W 50 W 2'000 to ca. 30'000 rpm infinitely adjustable clockwise, seen from above 0 – 40°C Max. rel. 95% EMV: certified by IEC/EN 61000-6-1 / 61000-6-3 / 61326-1 Safety: certified by IEC/EN 61010-2-51 & 61010-1 IP 20 100% 70 dB (A) with full rotational speed with aggregate PT-DA12/2EC-E157 in H2O separate at control- and operating module max. 0.5 A at 230 V max. 1 A at 100-120 V Standard MODBUS, Optional RS 232 control module 1033 g / operating module 568 g OI PT 1300 D English / Edition 3.0 / 23.10.2009 Page 16 of 37 4 INSTALLATION 4.1 UNPACK Open the dispatch box and check that the contents agrees with the delivery note. CHECK ALL PARTS FOR POSSIBLE TRANSPORT DAMAGE. INFORM US OR YOUR DEALER IMMEDIATELY ABOUT ANY DISAGREEMENT OR FAULT. IF POSSIBLE SEND US DIGITAL PHOTOS BY EMAIL TO [email protected] 4.2 COUPLING/DECOUPLING OF THE HOMOGENIZING AGGREGATE All POLYTRON PT 1300 D handheld units are equipped with quick-coupling. Dispersing aggregates with diameters of 3, 5, 7 and 12 mm are available for the PT 1300 D drive unit. All aggregates are connected to the drive in exactly the same manner. For assembly, while at a standstill, the coupling ring is pushed in the direction of the drive and the coupling part of the aggregate is pushed completely into that of the drive. The coupling ring snaps forwards again if the connection has been made properly (see the enclosed assembly sketch). BEFORE STARTING WORK, MAKE SURE THAT AGGREGATE IS CONNECTED PROPERLY WITH DRIVE. AN INCORRECT CONNECTION CAN DAMAGE COUPLING PARTS OF THE DRIVE OR HOMOGENIZING VESSEL. OI PT 1300 D English / Edition 3.0 / 23.10.2009 THE THE THE THE Page 17 of 37 To remove the aggregate from the drive, push the retaining ring of the coupling upward and/or in the direction of the drive. At the same time, the aggregate is to be carefully pulled downward in the axial direction so that the homogenizing aggregate is not tilted in the coupling housing (see the enclosed assembly sketch). WITH PUSHING UP OF THE COUPLING RING, THE AGGREGATE CAN UNINTENTIONALLY FALL OUT OF THE COUPLING. FOR THIS REASON, ALWAYS HOLD IT WITH ONE HAND. THE SAW-TEETH OF THE STATOR ARE GROUND TO BE SHARP. THERE IS THE DANGER OF INJURY WITH IMPROPER HANDLING. 4.3 WORKING WITH THE PT 1300 D Connect your corresponding homogenising aggregate. Along with the drive unit, you also have the control in your hand. Firstly check for a proper connection of the supply and control module and the drive unit, then switch on the main switch on the supply and control module (green light). When you turn on, the display shows the selected firmware version for example C01 POLYTRON -DISPERSING AGGREGATES MAY NOT BE USED IN THE DRY STATE – THE LOWER SLIDE BEARING ARE COOLED AND LUBRICATED BY THE LIQUID PHASE OF THE PROCESSES MEDIUM. Guide the connected aggregate into the medium to be processed. The optimal submersion depth of the aggregate is approx. 2/3 below the liquid surface and 1/3 above the vessel bottom. By submerging at an angle of approx. 15°, the degree of effectiveness can additionally be improved. OI PT 1300 D English / Edition 3.0 / 23.10.2009 Page 18 of 37 THE MAXIMUM SUBMERSION DEPTH IS BENEATH THE UPPER SCAVENGING HOLE OF THE STATOR TUBE. Switch on the control and operating module by using the ON/OFF switch. The unit now runs at the lowest rotational speed of 2000 rpm. Once the ON / OFF button is pressed the fan runs. This is required so that the motor is cooled in a continuous operation. WHEN THE LINE CORD IS PLUGED, NEVER TOUCH THE SAW TEETH OF THE AGGREGATE – DANGER OF INJURIESDUE TO ROTATING SHAFTS AND BLADES After done work the handheld is turned off with the ON / OFF button. The unit stops and the display shown OFF. The fan runs about 1 minute, then it stops automatically. OI PT 1300 D English / Edition 3.0 / 23.10.2009 Page 19 of 37 4.4 FUNCTIONAL DESCRIPTION OF THE KEY ON/OFF UP DOWN MEMO With the ON/OFF switch, turn on the control and operating module as soon as the main switch has been turned on at the supply and control module. The rotational speed will be 2’000 rpm if the PT 1300 D has meanwhile been switched off by means of the main switch, otherwise the control and operating module uses the last set rotational speed. With the ON/OFF switch, turn the control and operating module off again. The fan runs about 1 minute and then it stops automatically. If the control and operating module has not bees used for a longer period of time, you should additionally switch off the main switch on the basis station. With the UP key, you can increase the rotational speed of the control and operating module in 100 rpm steps. The speed range is from 2’000 to 30’000 rpm. The rotational speed increases quicker when you press the switch. With the DOWN switch, you can decrease the rotational speed of the control and operating module in 100 rpm steps. The speed range is from 2’000 to 30’000 rpm. The rotational speed decreases quicker when you press the switch. By continually pressing the MEMO switch (approx. 1 sec.), you can store the current rotational speed. Storage of the rotational speed is confirmed by flashing (3 times) of the display. A stored rotational speed can be loaded by shortly pressing the MEMO switch (approx. 1 sec.) The maximum rotational speed depends on the size of the dispersing aggregate, the type of product and viscosity. With deviations from the programmed rotational speed, e.g. by means of a strong rise in viscosity, the digital display flashes, which means that the preset rotational speed will not be reached any longer. With overloading of the drive, it is switched off by means of a thermal fuse. OI PT 1300 D English / Edition 3.0 / 23.10.2009 Page 20 of 37 4.5 ERROR MESSAGE 4.5.1 DRIVE OVERLOAD The maximum rotational speed depends on the size of the dispersing aggregate, the type of product and viscosity. With deviations from the programmed rotational speed, e.g. by means of a strong rise in viscosity, the digital display will flash alternately between the speed and the message "OL", which means that the preset rotational speed will not be reached any longer. Once the device reaches the speed the message "OL" disappears. This message cannot be acknowledged. 4.5.2 THERMAL OVERLOAD PROTECTION If the heat sink temperature of the motor rises above 80°C, the internally installed thermal idicator interrupts the output current circuit. On the display appears the message “HOT” and you can hear an acoustic signal. To acknowledge the fault, you have to set OFF the main switch. The operating module continues to function, the motor, however is no longer driven until the heat sink has cooled down to below 50°C. The unit must be restarted after that. 4.5.3 BLOCKING PROTECTION Is the aggregate blocked for example to a solid material, the output current circuit interrupts. On the display appears the message “BLC” and you can hear an acoustic signal. To acknowledge the fault, you have to set OFF the main switch. Removing the solid from the aggregate. The unit must be restarted after that. 4.5.4 HALLSENSOR The motor is equipped with 3 Hallsensors. The function of the hallsensors is to detect the speed of the motor. Is a hallsensor defective, on the display appears the message “HAL” and you can hear an acoustic signal. To acknowledge the fault, you have to set OFF the main switch. The unit must be restarted after that. If the fault can not be resetted the unit must be sended to KINEMATICA AG for repair. 4.5.5 INTERFACE The hardware from the PT 1300 D is equipped by default with two Interfaces. USB interface with a standard type B connector and an RS232 interface with a 9 pin D-sub connector.The standard protocol is MODBUS. Interface could be controlled and regulated via PC. Profiles with rpm defaults could be fully automated. More details about the MODBUS control you can find in the appendix 11. OI PT 1300 D English / Edition 3.0 / 23.10.2009 Page 21 of 37 5 MAINTENACE Your POLYTRON unit is designed for ease servicing. Nevertheless, it is essential to inspect your equipment carefully and to clean it thoroughly. Drawings of the separate components are to be found in the appendix. THE EQUIPMENT MUST BE DISCONNECTED FROM THE ELECTRICAL SUPPLY: DURING ANY WORK ON THE EQUIPMENT, IN ORDER TO AVOID ANY PERSONAL INJURY OR OTHER DAMAGE WHEN CHANGING OR REMOVING THE DISPERSING AGGREGATE 5.1 MAINTENACE OF THE SUPPLY AND CONTROL UNIT The supply and control module does not require any special maintenance. There are also no parts that need or can be serviced or replaced by the operator. In the case of a malfunction, please contact KINEMATICA AG or your supplier. 5.2 MAINTENACE OF THE CONTROL AND OPERATING MODULE The control and operating module also does not require any special maintenance. There are no parts that need or can be serviced or replaced by the operator. In the case of a malfunction, please contact KINEMATICA AG or your supplier. 5.3 MAINTENACE OF THE POLYTRON-AGGREGATES POLYTRON - aggregates are precision instruments. Inspections and maintenance at regular intervals ensure years of proper functioning. All POLYTRON dispersing aggregates for PT 1300 D are EasyClean models. They can be autoclaved as complete units and do not have to be disassembled for this. If disassembly is necessary for special cleaning or to replace the slide bearings, proceed according to the following instructions. Only the slide bearing has to be controlled alternatively replaced from time to time. OI PT 1300 D English / Edition 3.0 / 23.10.2009 Page 22 of 37 5.4 DISASSEMBLY INSTRUCTIONS PT-DA 03/2ECE050 PT-DA 05/2ECE068 – 085 PT-DA 07/2ECE82 – 107 PT-DA 12/2EC-E123 – 157 With the universal tool supplied, carefully knock the rotor and attached shaft out in the direction of the coupling and then draw them out in the same direction. With this attachment you receive an additional tool. Use one tool to hold the shaft and the other to turn the rotor anticlockwise and withdraw it. You can then withdraw the shaft from its tube. The lower sleeve bearing is slit and can be Using the tool, the sleeve bearing can be opened and pulled over the shaft. The upper pushed out in the direction of the bearing can be pulled off in the direction of the coupling. rotor. Replace defective parts. Bearings should only Replace defective parts. be replaced in pairs. Reassemble in the reverse order. Use the shaft to press the sleeve bearing into the stator tube from the coupling side. Screw on the rotor and tighten gently. After every disassembly, and especially after changing the bearings, a functional test should be carried out in water. 5.5 ASSEMBLY INSTRUCTIONS After exchanging the slide bearings, the disassembly procedure is to be carried out in the reverse sequence. THE SHAFT MUST BE PUSHED INTO THE STATOR TUBE UP TO THE STOPPER. WITH THE PT-DA 12/2EC-E157, DO NOT INSTALL THE ROTOR ONTOTHE SHAFTWITH FORCE. ALSO SEE THE ENCLOSED SKETCHES IN THE APPENDIX OI PT 1300 D English / Edition 3.0 / 23.10.2009 Page 23 of 37 6 TROUBLE SHOOTING PROBLEM REASON Unusual noises Drive stops Damaged drive bearings Damaged aggregate ball bearings /sleeves Rotor/stator interference Inadequate ventilation Thermal overload with the message “HO” Error message “HAL” Drive is blocked with error message “BLC” Error message “SUP” Vibrations Drive does not start Bent shaft Worn bearing(s) Defective coupling Defective internal control Drive is blocked with error message “BLC” Main switch is ON but system is not active Power supply not connected OI PT 1300 D English / Edition 3.0 / 23.10.2009 CORRECTIVE MEASURES Change ball bearings. Trace & replace defective parts (shaft, bearings) Change ball bearings / sleeves Trace and replace defective parts (shaft, bearings) Check if ventilation slots are clear. Cool down the device & restart Check manner of use & ventilation. Cool down the device & restart. Motor Hall sensors are defective. Contact authorised KINEMATICA service centre or directly to KINEMATICA AG Check the aggregate for solid particles which may be blocking the rotor, remove the particles, turn off the drive and restart operation. If the motor is defective contact authorised KINEMATICA service centre or directly to KINEMATICA AG The internal Voltage is outer range. Contact authorised KINEMATICA service centre or directly to KINEMATICA AG Replace shaft Replace bearing(s) Trace and replace defective parts Contact authorised KINEMATICA service centre or directly to KINEMATICA AG Check the aggregate for solid particles which may be blocking the rotor, remove the particles, turn off the drive and restart operation. Check that supply cables are well plugged. Page 24 of 37 7 GENERAL ACCESSORIES A comprehensive overview of the various accessories and tools can be found in the current price list. The homogenizing vessels specially developed by KINEMATICA are especially recommendable. Thanks to the extraordinarily good flow geometry, they help you to save time and can significantly improve the process. 8 GUARANTEE KINEMATICA AG hereby guarantees malfunction-free operation of this unit that they have produced for a period of 12 months with regard to material and production flaws. KINEMATICA AG hereby ensures repair of the unit free of charge and/or replacement of the sent-in defective parts free of charge, if an extensive inspection results in that this dealt with a production or material flaw. The guarantee does not include parts, which are subject to normal wear, or when someone other than an employee of KINEMATICA AG or authorized representatives has carried out modifications to the unit or if the damage is caused by non-compliance with the operating instructions, carelessness, accident, improper use or an incorrect electrical voltage. KINEMATICA AG reserves the right to carry out technical changes of the units, without having to do this with previously delivered units. In the case of technical problems, with the need for spare parts or in the case that consultations is desired, please contact our regional appointed agent or use directly: KINEMATICA AG Luzernerstr. 147a CH-6014 Lucerne Switzerland Tel. Fax e-mail: +41-41-259 65 65 +41-41-259 65 75 [email protected] POLYTRON is a registrered trademark of the KINEMATICA AG Luzern. OI PT 1300 D English / Edition 3.0 / 23.10.2009 Page 25 of 37 9 GUARANTEE The symbol of the crossed refuse container signifies that the product in the European Union to must be supplied to separate collection. Labeled products must not be disposed with household waste, rather must be left at a collection point for recycling electrical and electronic equipment. Recycling helps to reduce the consumption of raw materials and to protect the environment. 10 APPENDIX 10.1 LEGEND TO THE DRAWINGS OF PT-DA 05/2EC, 07/2EC, 12/2EC, 12/2 Z MEC Positionen PT-DA 05/2 EC.. Drawing-No. BA.004-001-3 PT-DA 07/2 EC.. Drawing-No. BA.004-002-3 PT-DA 12/2 EC.. Drawing-No. BA.004-003-3 PT-DA 12/2 .. EC.. Drawing-No. 1.012-0195-3 1 2 3 4 Slide disc Slide disc Stator tube OI PT 1300 D English / Edition 3.0 / 23.10.2009 Drive shaft Slide bearing Rotor Rotor Page 26 of 37 OI PT 1300 D English / Edition 3.0 / 23.10.2009 Page 27 of 37 OI PT 1300 D English / Edition 3.0 / 23.10.2009 Page 28 of 37 OI PT 1300 D English / Edition 3.0 / 23.10.2009 Page 29 of 37 OI PT 1300 D English / Edition 3.0 / 23.10.2009 Page 30 of 37 10.2 LEGEND FOR THE STAND ST-P01/200 1. 2. 3. 4. 5. 6. 7. 8. Base plate Mounting screw swivel arm arm Handheld holder Base Station centering Arm Fixation Arm Fixation OI PT 1300 D English / Edition 3.0 / 23.10.2009 Page 31 of 37 10.3 LEGEND FOR THE STAND ST-P12/600 1. Base plate 2. Column 3. Cross sleeve completely 4. Handheld 5. Drive holder complete 6. 7. 8. adjustment ring (as an Option) 9. Vessel holder complete (as an Option) 10. Cross sleeve completely (as an Option) OI PT 1300 D English / Edition 3.0 / 23.10.2009 Page 32 of 37 10.4 LEGEND FOR THE STAND ST-P15/320 1. 2. 3. 4. Stand plate Fixation screw Drive holder Base Station centering OI PT 1300 D English / Edition 3.0 / 23.10.2009 Page 33 of 37 11 APPENDIX This chapter regards only units wit MODBUS Protocol respectively unitsw with following item number Item number 11010030 11010031 11010039 Description PT 1300 D MODBUS (with CH-Connector) PT 1300 D MODBUS (with EU- Connector) PT 1300 D MODBUS (with UK- Connector) 11.1 IMPLEMENTATION 11.1.1 SLAVE-ADDRESS The PT1300D has the fix address 0x01. The Broadcast-Address (0x00) is supported to, but only with the command 0x06, as by the Broadcast-Addressing only no replay acceptable is. 11.1.2 READ HOLDING REGISTER More than one Register can be read out with one instuction codeUm mit dem PT3100DProgramm kompatibel zu sein, wurde die Abfrage von mehreren Registern mit einer Abfrage implementiert. Instruction code Registeraddress Remarks 0x03 0..15 only Register 0..10 busy, Rest are writing with 0x0000 11.1.3 WRITE SINGLE REGISTER In the PT1300D is a write single register integrated. Instruction code Registeraddress Remarks 0x06 -- 0..2 OI PT 1300 D English / Edition 3.0 / 23.10.2009 Page 34 of 37 11.2 REGISTER MAPPING The following mapping is integrated. Register Registeraddress R/W StartCmd SetSpeed StopCmd ActSpeed ActTemp ActCrt DevState PowerIn 0 1 2 3 4 5 6 7 R/W R/W R/W R R R R R Torque 8 R PowerOut 9 SupplyVolt 10 FWVersion 11 R R R Remarks Only value 1 allowed, Motor on Set rotation speed, range 10..300 [100rpm] Only value 0 allowed, Motor off Actual speed, range 10..300 [100rpm] Internal temperature [0.1°C] Motor current [mA], average see sheet Input power [0.1 W] Current average x measured voltage Torque [0.1 mNm] Based on the current value and the torque constant of 7.48mNm / A Output power [0.1 W], torque x actual speed Supply voltage [0.1V] Firmware-Version 10000..32767 effective: 10100 11.3 DEVICE STATUS For the Register Address 6 (DevState) to apply the following Bit-Definition: DevStateBlocked 0x0001 DevStateOverTemp 0x0004 DevStateNoRPM 0x0008 DevStateSupplyErr 0x0020 DevStateUnspecErr DevStateRemote 0x0040 0x0080 DevStateRunNormal DevStateOverLoad 0x0100 0x0800 Motor blocked, to reset the fault the unit must be set OFF. The unit must be restarted. Unit to hot (limit 70.0°C), to reset the fault the unit must be set OFF. The unit must be restarted. Hallsensor fault to reset the fault the unit must be set OFF. The unit must be restarted. Supply voltage out of limit of 22.0 .. 27.5V, to reset the fault the unit must be set OFF. The unit must be restarted. Reserve Unit is controlled via interface, keypad is inactive To reset, the unit must be set OFF. The unit must be restarted. Motor has actual speed Temporary overload, Motor has no set speed while the load is to high (margin: -500rpm) OI PT 1300 D English / Edition 3.0 / 23.10.2009 Page 35 of 37 11.4 MODBUS EXCEPTIONS 1 Illegal Function, only 0x03 and 0x06 are legal functions, all other are illegal 2 Illegal Data Address, command 0x03 and Register-Address higher 15, command 0x06 and writing of a Register-Address higher 2 3 Illegal Data Value – does not exist on the PT1300D Remark: if more than 8 Byte recieved, is this a invalid communication. The communication is ignored, without reply. 4 Occur the command 0x06, cause are illegal values, see register-definition 11.5 INTERFACE PARAMETER Interface parameters: 9600 baud 8 Datenbit 2 Stopbit kein Parity The RTU-Transmission-Mode is implemented. Other modes and Interface-Parameter are not supported. Message from Master have a maximum lenght of 8 Byte, if not so the message is ignored. OI PT 1300 D English / Edition 3.0 / 23.10.2009 Page 36 of 37 11.6 PRECAUTIONS NEVER RUNNING THE PT 1300 D UNATTENDED. IF THE CONNECTION TO THE PC IS INTERRUPTED THE UNIT CONTINUES TO WORK. THE PLUG OF HANDHELD MAY NEVER BE STUCK OR BE INSERTED UNDER TENSION. BEFORE PLUGGING OR UNPLUGGING THE HANDHELD, ALWAYS SWITCH OFF THE MAIN SWITCH. IN AUTOMATIC MODE NEVER HANDLE ON THE UNIT BECAUSE OF INJURY. AUTOMATIC OPERATION OF THE UNIT IS SHOWN ALTERNATE ON THE DISPLAY. EXTERNAL INTERFERENCE CAN NEVER START-RUN AUTOMATICALLY THE MACHINE. OI PT 1300 D English / Edition 3.0 / 23.10.2009 Page 37 of 37