1
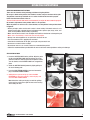
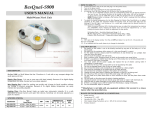
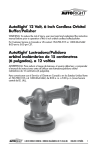
Velocity Waxer
™
Cordless 18 Volt, 10” Orbital Automatic
Wax Feeding Cordless Polisher
WARNING: To reduce the risk of injury, user must read and understand the instruction manual before using Velocity Waxer™
For Customer Service in Canada or US call:
763-780-5115 or 1-800-264-5442 8:00 am to 5:00 pm CST.
VELOCITY WAXER™ P/N C800669
1
TABLE OF CONTENTS
IMPORTANT SAFEGUARDS
General Safety Rules........................................................................................................................................................................2
Work Area........................................................................................................................................................................................2
Personal Safety................................................................................................................................................................................2
Tool Use and Care............................................................................................................................................................................2
Service.............................................................................................................................................................................................3
Environmentally Safe Disposal of Your Batteries............................................................................................................................3
Battery Safety Rules........................................................................................................................................................................3
Batteries and Battery Charger.........................................................................................................................................................3
Charging the Battery........................................................................................................................................................................3
Specifications of the AC/DC Charger Adapter..................................................................................................................................3
SPECIFICATIONS FOR THE VELOCITY WAXER™
Kit Contents......................................................................................................................................................................................4
Parts Listing for the Velocity Waxer™............................................................................................................................................4
OPERATING INSTRUCTIONS
Operation Warnings/Instructions.....................................................................................................................................................5
Application of Wax...........................................................................................................................................................................5
Polishing..........................................................................................................................................................................................6
Clean Up...........................................................................................................................................................................................6
Care of Bonnet and Pad...................................................................................................................................................................7
Polisher Maintenance/Storage.........................................................................................................................................................7
Car Care Tips...................................................................................................................................................................................7
Troubleshooting...............................................................................................................................................................................7
WARRANTY..............................................................................................................................................................................................8
IMPORTANT SAFEGUARDS
GENERAL SAFETY RULES
READ AND UNDERSTAND BEFORE USING
!WARNING! Read and understand the user manual instructions. Failure
to follow all instructions listed below may result in electric shock, fire
and/or serious personal injury.
WORK AREA
1.Keep your work area clean and well lit. Cluttered benches and dark
areas invite accidents.
2.Do not use power tools in explosive atmospheres, such as in the
presence of flammable liquids, gases or dust. Power tools create
sparks, which may ignite the dust and fumes.
3.Keep bystanders, children and visitors away while operating a
power tool. Distractions can cause you to lose control.
PERSONAL SAFETY
1.Stay alert, watch what you are doing, and use common sense when
operating a power tool. Do not use tool while tired or under the
influence of drugs, alcohol or medication. A moment of inattention
while operating power tools may result in serious personal injury.
2.Dress properly. Do not wear loose clothing or jewelry. Keep your
hair, clothing and gloves away from moving parts. Loose clothes,
jewelry, or long hair can be caught in moving parts.
3.Avoid accidental starting. Be sure switch is in the OFF position
before inserting battery pack. Carrying tools with your finger on the
switch invites accidents.
4.Use safety equipment. Always wear eye protection. Dust mask,
non-skid safety shoes, hardhat or hearing protection must be used
for appropriate conditions.
TOOL USE AND CARE
VELOCITY WAXER™ P/N C800669
1.Use clamps or other practical ways to secure and support the work
piece to a stable platform. Holding the work by hand or against your
body is unstable and may lead to loss of control.
2.Do not force tool. Use the correct tool for your application. The correct tool will do the job better and safer at the rate for which it is
designed.
3.Do not use tool if switch does not turn on or off. A tool that cannot
be controlled with the switch is dangerous and must be repaired.
4.Disconnect battery pack from tool or place the switch in the locked
or off position before starting of the tool to ensure no accidental
starting.
5.Store idle tools out of reach of children and other untrained persons.
Tools are dangerous in the hand of untrained users.
6. When battery pack is not in use, keep it away from other metal
objects like: paper clips, coins, keys, nails, screws, or other small
metal objects that can make a connections from one terminal to
another. Shorting the battery terminals together may cause sparks,
burns or a fire.
7. Check for misalignment or binding of moving parts, breakage of
parts, and any other conditions that may affect the tool’s operation.
If damaged, have the tool serviced before using. Many accidents
are caused by poorly maintained tools.
8. Use only accessories that are recommend by the manufactured for
your model. Accessories that may be suitable for one tool may create a risk of injury when used on another tool.
2
IMPORTANT SAFEGUARDS
SERVICE
1.Tool service must be performed only by qualified repair personnel.
Service or maintenance performed by unqualified personnel may
result in a risk of injury.
2.Accessories must be rated for at least the speed recommended on
the tool warning label. Wheels and other accessories running over
rated speed can fly apart and cause injury.
Important!: Do not operate the polisher until you have inspected each
part. If any part is missing or damaged, do not use it. Return the polisher to the place of purchase. See WARRANTY.
ENVIRONMENTALLY SAFE DISPOSAL OF YOUR BATTERIES
! WARNING ! If any of your batteries break or crack, they may or may
not leak, do not attempt to recharge and use it, dispose of it immediately and replace it with a new one.
Never try to repair a battery. Batteries used in the tool contain a toxic
material called Cadmium.
! WARNING ! Batteries contain toxic materials and must be disposed
in a specific manners so there is no contamination of the environment.
Before you can dispose of any worn or damaged batteries, contact
your local Environmental Protection Agency (EPA) for instructions and
information pertaining to Nickel-Cadmium Batteries.
BATTERY SAFETY RULES
Follow these simple rules to avoid injury and risk of fire, electrical
shock, and explosion.
• Do not attempt to open any battery.
• Do not put the batteries in the regular trash.
• Do not incinerate any battery.
• If a leak appears, the released electrodes are corrosive, wash your
hands and do not get the material in your eyes or mouth.
• Dispose your batteries to a certified disposal center.
• The battery pack not in use shall be far from other metal objects
such as paper clips, coins, keys, nails, screws or other small metal
objects that may connect one terminal. The short of the one terminal may cause sparks, burn and even a fire.
• The battery pack of the polisher can only be charged by the
charger supplied in this kit, other types may burst causing fire or
other danger.
• Only battery pack supplied in this kit can be used for the polisher.
Other types may cause fire or other dangers.
• Make sure the switch is in off position before inserting the battery
pack into the polisher to avoid damages caused by accidental starting.
• Carrying tools with your finger on the switch invites accident.
• Ensure battery is disposed of safely as instructed by the manufacturer.
• Don’t store battery pack in a container with other metal objects
such as nails, coins, etc.
• Don’t short the battery pack; a battery short can cause a large current flow, overheating, possible burn and even a fire.
• Don’t expose battery pack to water or rain.
• Don’t carry battery pack in a pocket containing any metal objects.
• Don’t store the battery pack in locations where the temperature
may reach or exceed 50°C (182°F).
• Don’t incinerate the battery pack even if it is severely damaged or
is completely worn out.
• If batteries leak, avoid contact with the liquid. Should contact occur,
wash immediately with soap and water.
• The polisher should always be off before inserting or removing the
battery pack.
VELOCITY WAXER™ P/N C800669
BATTERIES AND BATTERY CHARGER
• Unplug your battery charger when you are not charging your
batteries.
• If your battery pack is hot, let it cool before recharging.
• Do not charge batteries in direct sunlight.
• Keep your battery charger clean, do not allow materials in the cavity of the charger, and while UNPLUGGED wipe out the cavity with a
dry cloth, never use water or solvents.
CHARGING THE BATTERY
Caution: Charge only 18 Volt battery packs with your charger
supplied in this HOME RIGHT® kit, other types may burst causing damage or personal injury.
• Plug the charger into a 120V AC power source and insert the battery pack into the charger receptacle pocket. Make sure that the
polarity rib in the battery pack is aligned with the polarity slot in
the charger. There are plus and minus symbols on either side of
the battery pack that designate the polarity of the terminals. These
symbols are on the same sides as their respective symbols on your
charger. In order for the charger to work properly the pack must
be fully inserted into the charger receptacle pocket. When fully
inserted into the pocket a light will come on.
• Charge your batteries only with the HOME RIGHT supplied battery
charger.
• Use only (120 volts, 60 HZ AC only) regular household voltage.
• Don’t charge battery pack when temperature is below 10°C (50°F)
or above 40°C (104°F).
• Don’t attempt to use a step-up transformer, an engine generator or
DC power receptacle.
• Don’t allow anything to cover or clog the charger vents.
• Before connecting the charger to a power source (receptacle
or outlet), be certain the voltage supplied is the same as power
requirements specified on the charger. Mismatched voltage source
can result in serious injury to the user. When in doubt, don’t plug in
the charger.
• Don’t operate charger if damaged in any way. Don’t operate charger
with damaged cord. Return product to factory. To prevent damage
to cord when disconnecting charger from power source, grip plug
body when removing it from a receptacle.
• Unplug charger from outlet before attempting maintenance or
cleaning.
• Don’t substitute charger of any other type. Doing so may result in
risk of electrical shock, fire or injury to persons.
• Keep charger free of foreign matter.
• Your new battery pack is not fully charged when received; therefore,
charging is necessary prior to use.
• When not in use the battery pack can be left on charger (indicated
by the red light) without any adverse effect; the batteries cannot be “over-charged”. However, if the battery pack is not going
to be used for an extended period of time the charger should be
unplugged from its power source.
• If you need to charge more than one battery pack, allow 15
minutes between charges.
SPECIFICATIONS OF THE AC/DC CHARGER ADAPTER
Output voltage:
Charging time:
21V DC 400mA
5 to 7 hours
3
SPECIFICATIONS FOR THE VELOCITY WAXER™
VELOCITY WAXER KIT CONTENTS
18-Volt Battery
18-Volt Battery Charger
1-Terry Cloth Bonnet
(to be used for applying or removing polish)
2-Microfiber Bonnets
(to be used for removing polish only)
SPECIFICATIONS
Model Number........................................................ C800669
Orbital Diameter..............................................................10”
Rated Voltage............................................................18V DC
Speed Without Load..............................................2800 rpm
Rated Current............................................................. 3.35 A
Battery (Part Number C816858)..................................... 18V
Battery Type............Nickel Cadmium (Ni CAD) Rechargable
Charging Time...................................................5 to 7 hours
Charger Input Current.....................................120V AC 60Hz
Charger Output............................................. 21V DC 400mA
Adapter..........................................................LK-DC-210040
Optional: Second Terry Cloth Bonnet
Optional: Lambswool Bonnet
(to be used for buffing and/or polishing surfaces only)
Optional: Second 18-Volt Battery
Optional: Liquid Wax
NOTE: Some liquid waxes will not pump through the
Velocity Waxer. Please contact HOME RIGHT’S customer
service department at 763-780-5115 or 1-800-264-5442
8:00 am to 5:00 pm CST for wax recommendations.
10
4
3
1
13
18V
12
5
6
2
11
9
7
8
14
15
16
VELOCITY WAXER™ P/N C800669
PARTS LIST
1. Housing
2. Pad Motor Switch
3. Wax Feeding Cover
4. Wax Feeding Funnel
5. Wax Feeding Motor Switch
6. Wax Reservoir, Maximum Capacity 150 mL (5 oz)
7. Nozzle with Plug
8. Brass Storage Plug, Nozzle (Not Shown)
9. Pad
10. 18-Volt Battery Pack
11. Battery Pack Charging Stand
12. AC/DC Charging Adapter
13. Optional Second Battery Pack
14. Optional Terry Cloth Bonnet (100% Cotton)
15. Optional Microfiber Bonnet (80% Polyester, 20% Polyamide)
16. Optional Lambswool Bonnet (80% Polyester, 20% Acrylic)
17. Optional Liquid Wax (Not Shown)
4
OPERATING INSTRUCTIONS
OPERATION WARNINGS/INSTRUCTIONS
There must be a bonnet on the polishing pad before using the polisher.
Do not press down on the polisher, the machine’s actions, not pressure does the best job.
The polisher cannot be upside down or at a serious incline for the wax to be sprayed.
Polish from the front to back of the car.
The wax in the reservoir shall not be less than 50 mL (1.5 oz) or the wax cannot be sprayed.
Do not make adjustments to the polisher while it is in operation.
When the polisher is not in use for a short duration, rest the polisher in the position shown
in Figure A.
• Before you begin, make sure the work surface is clean and dry. If the work surface is a car,
remove road tar with a general cleaner and remove excess grease spots, bugs, stains, and
other surface problems before waxing or polishing.
• Make sure the work surface is free of objects that could tear the bonnet or damage the pad.
• Make sure a clean bonnet is used at the start of each project.
• Always start and stop polisher on or against the surface of the car.
• The most common error is applying too much wax.
• If the bonnet should come off the pad, you may be using too much wax.
• Do not wax a surface in direct sunlight.
• Do not leave wax on a car or work surface for an extended time period.
• Follow the recommendations provided with the wax to avoid wax removal problems and/or paint damage.
APPLICATION OF WAX
1. Insert the BATTERY PACK into the polisher. Align the polarity rib on the BATTERY PACK with the polarity slot in the
polisher handle and slide the pack into the polisher. Make
sure the latches on the BATTERY PACK have snapped into
place.
Figure A
Wax 1
Wax 2
Wax 3
Wax 3
Wax 4
Wax 4
2. Check the BATTERY PACK alignment by lightly pulling on
the end of battery pack.
3. Press the WAX FEEDING COVER to open and remove the
plug in the WAX-FEEDING FUNNEL.
4. Add liquid wax up to 150 mL (5 oz) scale in the WAX
RESERVOIR (no more than 150 mL), attach the plug and
close the WAX FEEDING COVER.
Note: Check the sealing of the plug to avoid the spillage
of the wax. Be careful not to spill the wax on the housing
when adding the wax.
VELOCITY WAXER™ P/N C800669
5
OPERATING INSTRUCTIONS
APPLICATION OF WAX CONTINUED
5. Open the plug on the NOZZLE WITH PLUG before using.
Wax 5
Wax 6
Wax 8
Wax 9
6. Place an application bonnet on the PAD.
7. Place one hand on the HOUSING and the other hand on the
WAX-FEEDING MOTOR SWITCH.
8. Start the WAX FEEDING MOTOR SWITCH to apply the appropriate amount of wax on the car.
Note: Use a conservative amount of wax.
9. Start the PAD MOTOR SWITCH. The rotating pad will spread
the liquid wax evenly on the car body. Repeat until all the
surface of the car is covered with a thin layer of wax. The
WAX-FEEDING MOTOR SWITCH and PAD MOTOR SWITCH
are controlled by independent switches; the WAX-FEEDING
MOTOR SWITCH and PAD MOTOR SWITCH can be executed
at the same time.
Note: The polisher should always be started on or against
the surface of the car.
10. Apply wax by hand to all hard-to reach surfaces,
for example, under the bumpers, around the door
handles, etc.
POLISHING
Polish 3
1. Cover the NOZZLE WITH PLUG after waxing to prevent the
spillage of wax.
2. Remove applicator bonnet from the PAD. Replace with wax
removal bonnet.
3. Start the PAD MOTOR SWITCH; polish the wax from front to
back using long strokes.
4. Remove the wax in the same order as it was applied.
5. DO NOT press down. Let the polisher do the work. If the
wax seems difficult to polish, you may have applied too
much wax.
CLEAN UP
Clean Up 1
1. Open the WAX FEEDING COVER and remove the plug and
empty the remaining wax into a bucket.
2. Add water to WAX FEEDING FUNNEL, press the WAX
FEEDING MOTOR SWITCH to spray the water until the WAX
RESERVOIR and NOZZLE WITH PLUG until clean. Insert the
plug and close the WAX FEEDING COVER until next use.
Note: For best results us a light detergent soap, flush until
clean.
3. Squeeze the latch button on each side of the battery pack
and pull the battery out of the polisher and store battery.
VELOCITY WAXER™ P/N C800669
Clean Up 2
Clean Up 2
6
OPERATING INSTRUCTIONS
CARE OF BONNET AND PAD
CAR CARE TIPS
Bonnet
The application and polishing bonnets are washable and reusable. Hand washing and air-drying is recommended for longer
bonnet life. However, the bonnets may be machine-washed
in cold water with a small amount of detergent and machine
dried at medium heat.
Pad
• Always remove the bonnet from the pad when the polisher
is not in use. This will allow the pad to dry out and retain its
original shape.
• To prolong pad life and shape, store polisher with pad
face up.
• Do not use abrasive compounds on the pad.
• Do not apply too much wax to the bonnet. If the pad
becomes saturated, the polisher will not work as well and
the pad will not last as long. If polishing seems difficult too
much wax may have been applied.
• Wax and polish the car three to four times per year to ensure
paint protection.
• Wash the car at least every two weeks, preferably with a car
wash solution that will not harm the finish or strip the wax.
Avoid washing with household detergents.
• Wash with a clean sponge and dry with a soft, clean terry
cloth towel to prevent dirt from scratching the paint. Start on
the top of the car and work down.
• Remove bugs, bird droppings, tree sap, and tar daily from
the car’s surface.
• Make sure the surface of the car is cool before waxing.
• Avoid parking near sprinklers. Water spots are difficult to
remove.
• Spray glass cleaner chemicals onto a towel, not directly on
the window. This will keep the chemicals away from painted
surfaces.
• Badly oxidized paint may require several applications. Do not
use abrasive compounds.
POLISHER MAINTENANCE/STORAGE
1. The wax remaining in the reservoir shall be emptied and
the bottle shall be cleaned if the polisher is not going to be
used for an extended period of time to prevent the clot of
the wax.
2. Use mild soap and damp sponge to clean the polisher.
3. Cover the nozzle each time after the polisher is used.
4. The battery pack of the polisher shall be charged frequently
to extend the life of the battery.
5. When storing the polisher, do not store with bonnet on pad.
Store with battery pack not attached. Insert brass storage
plug into nozzle, remove prior to use.
Warning:
• Never allow brake fluids, gasoline, petroleum-based products, penetrating oils or other such products to come into
contact with plastic parts. They contain chemicals that can
damage, weaken or destroy plastic.
• Don’t immerse in water, remove the bonnet and clean each
bonnet separately.
Brass Storage Plug
TROUBLESHOOTING
Wax will not spray
Make sure there is more than 50 mL (1.5 oz) of wax in the reservoir.
If the polisher has not been used for a while, there might be a wax clog. To dissolve
the wax clog, flush reservoir with water then add wax again after clean. Use a mild
detergent to dissolve wax clot. Use brass storage plug to help clear nozzle.
Battery pack charging stand
light does not come on
Battery pack is dead. Replace it with a new battery. After charging the battery, unplug
the charger from the power source.
The pad does not rotate
Check if the battery is not charged or the battery pack is worn out.
There are times where a battery pack will not accept a full charge: when it is a new
battery pack and when the pack has not been used for an extended period of time.
These are normal conditions and do not indicate a problem. However, after
approximately a few charge and discharge cycles, the batteries will be able to accept
a full charge.
VELOCITY WAXER™ P/N C800669
7
WARRANTY
One Year Limited Warranty
HOME RIGHT® warrants this product for one year following date of purchase against any defects in material or workmanship. Any
product believed defective within the warranty period should be returned postage-paid with proof of purchase to HOME RIGHT®,
1661 94th Lane N.E., Minneapolis, MN 55449-4324, (763-780-5115), Attention: Service Department. HOME RIGHT® will repair or
replace defective product at no charge, and return postage-paid to you. Your name, address, and a description of problem should
be included in the box. This warranty does not cover accessories or damage resulting from improper use, negligence, accidents or
normal wear and tear.
1661 94th Lane N.E., Minneapolis, Minnesota 55449-4324
Phone 763-780-5115, Customer Service Line 1-800-264-5442, 8:00 a.m. to 5:00 p.m. CST
www.homeright.com
Patents Pending
Printed in China
HOME RIGHT®
LITERATURE PN C820368
COPYRIGHT 2006
REV C 6/06
ANY IMPLIED WARRANTY OF MERCHANTABILITY OR FITNESS FOR A PARTICULAR PURPOSE IS LIMITED TO ONE YEARS
FOLLOWING DATE OF PURCHASE. RESPONSIBILITY IS LIMITED TO THE REPAIR OR REPLACEMENT FOR DEFECTS IN
MATERIAL OR WORKMANSHIP. HOME RIGHT® SHALL NOT IN ANY EVENT BE LIABLE FOR ANY INCIDENTAL OR CONSEQUENTIAL DAMAGES
OF ANY KIND, WHETHER FOR BREACH OF THE WARRANTY OR ANY OTHER REASON. Some states do not allow a limitation on how
long implied warranties last or the exclusion of incidental or consequential damages, so the above limitation and exclusion may not
apply to you. This warranty gives you specific legal rights, and you may also have other rights, which vary from state to state. If you
cannot obtain parts and accessories at your local retail dealer, then call or write: HOME RIGHT®, 1661 94th Lane N.E., Minneapolis,
Minnesota 55449-4324, Phone (763) 780-5115 or 1-800-264-5442, 8:00 a.m. to 5:00 p.m. CST.