1
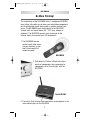
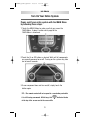
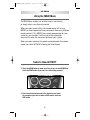
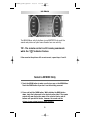
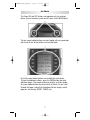
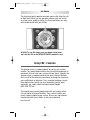
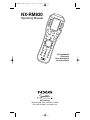
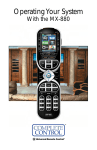
NX-RM820_Remote_Manual
10/6/08
2:09 PM
Page 1
NX-RM820
Operating Manual
PC Programmable
Professional
Home Entertainment
and System Control
NX-RM820_Remote_Manual
10/6/08
2:09 PM
Page 2
NX-RM820
This remote control was Custom Programmed for you by:
__________________________________________________
For questions about your Custom Programming call:
__________________________________________________
Custom Programming of a complex home theater and/or a multiroom system is one of the most challenging tasks within an
audio/video installation. It involves an intimate knowledge of how
the components interact and exact details on the proper sequences
of control.
Only a professional custom installation company has the requisite
experience and training to quickly and effectively customize a
remote control for true automated operation.
Congratulations on your choice!
OPERATING YOUR SYSTEM WITH THE NX-RM820
© 2008 NXG Technology All rights reserved.
The information in this manual is copyright protected. No part of
this manual may be copied or reproduced in any form without prior
written consent from NXG Technology. NXG Technology SHALL
NOT BE LIABLE FOR OPERATIONAL, TECHNICAL OR EDITORIAL
ERRORS/OMISSIONS MADE IN THIS MANUAL.
The information in this manual may be subject to change without
prior notice. All other brand or product names are trademarks or
registered trademarks of their respective companies or
organizations.
NXG Technology
16648 North 94th Street, Scottsdale, AZ 85260
Phone: 800-733-0008 | www.nxgtech.com
NX-RM820_Remote_Manual
10/6/08
2:09 PM
Page 3
NX-RM820
Table of Contents
No More Pointing
1
Finding the MAIN Menu
2
Turn On the System
3
Using the MAIN Menu
4
Select a New ACTIVITY
4
Select a DEVICE Only
5
Controlling the Volume
6
Operating Any Device
6
Using FAV - Favorites
8
Backlighting
10
Changing CONTRAST
10
Batteries
11
Cleaning the Screen
11
Warranty
12
Specifications
12
NX-RM820_Remote_Manual
10/6/08
2:09 PM
Page 4
NX-RM820
No More Pointing!
The combination of the NX-RM820 with it’s companion NX-RF200
base station will enable you to place your audio/video components
out of sight behind closed doors and/or in another room of your
house. The NX-RM820 sends radio signals to the NX-RF200
through walls and closed doors (50 – 100' away, indoors or
outdoors). The NX-RF200 converts your commands to the
infrared signals that control your A/V components.
1. The NX-RM820 remote
control sends radio waves
in every direction, so you
don’t have to point the
remote anymore!
NX-RM820
2. Self-adhesive ‘Flashers’ affixed to the front
panels of components relay commands to
components out of ‘line-of-sight’ with the
NX-RF200.
The NX-RF200
3. The built-in Front Blaster sends commands to components in the
same cabinet space as the NX-RF200.
1
NX-RM820_Remote_Manual
10/6/08
2:09 PM
Page 5
NX-RM820
Finding the MAIN Menu
The MAIN Button always takes you to the MAIN Menu which may
be named for the room the NX-RM820 controls.
The PAGE button switches between two MAIN Menu pages IF you
have more than ten remote controls. When the top title bar says
MAIN or the name of a Room, you are on the MAIN Menu.
The lower title bar displays PAGE 1 or PAGE 2 as you switch. Each
of the remote controls the NX-RM820 replaces are represented by a
button next to the corresponding screen label.
2
NX-RM820_Remote_Manual
10/6/08
2:09 PM
Page 6
NX-RM820
Turn On Your Entire System
Power on/off your entire system with the MAIN Menu
by following these steps:
1. Touch the MAIN Button to make sure that you are on the
MAIN Menu. It doesn’t matter which page of the
MAIN Menu is displayed.
2.Touch the On or Off button as desired. Wait until all components
are correctly powered on or off. Turning on the system may take
ten to twenty seconds.
3.If one component does not turn on/off, simply touch the
button again.
TIP – The remote control will not respond to a new button push while
it is still issuing commands. While busy, this
at the top of the screen next to the screen title.
3
indicator flashes
NX-RM820_Remote_Manual
10/6/08
2:09 PM
Page 7
NX-RM820
Using the MAIN Menu
The MAIN Menu enables you to either select a new Activity
or simply select a new Device to control.
When you select a new activity, the remote control will issue a
MACRO (a timed sequence of many commands from many different
remote controls). This MACRO was custom programmed for your
system by your installer. It will issue all of the commands
necessary to switch the sound and picture of your system.
When you select a device, the remote control becomes the remote
control you select WITHOUT affecting the home theater.
Select a New ACTIVITY
1. Touch the MAIN Button to make sure that you are on the MAIN Menu.
Touch the PAGE button if you don't see the activity you want.
2. Touch the activity button next to the desired screen label.
For example if you wish to watch a DVD movie, touch the
DVD button.
4
NX-RM820_Remote_Manual
10/6/08
2:09 PM
Page 8
NX-RM820
The MAIN Menu activity buttons issue MACROS that reset the
sound and picture of your home theater to a new activity.
TIP– The remote control is still issuing commands
while the
indicator flashes.
If the sound or the picture still are not correct, repeat steps 1 and 2.
Select a DEVICE Only
1. Touch the MAIN button to make sure that you are on the MAIN Menu.
Touch the PAGE button if you don’t see the activity you want.
2. Press and hold the MAIN button. While holding the MAIN button
down, touch the button next to the desired screen label. The remote
control will now display the name of the selected device and all
buttons will operate the device, however, the sound and the
picture of your system have not been changed.
5
NX-RM820_Remote_Manual
10/6/08
2:09 PM
Page 9
NX-RM820
Controlling the Volume
For your convenience, the VOLUME UP, VOLUME DOWN and the
MUTE buttons will always control the surround sound system,
regardless of what activity or device you are controlling.
Operating any Device
You can see the name of the device at the top of the screen. If it is
not the one you want, return to the MAIN Menu and select a new
device or activity.
All of the printed label buttons on
the remote operate just like the
original remote control (with the
exception of Volume Up, Volume
Down and Mute which operate your
surround sound system).
6
NX-RM820_Remote_Manual
10/6/08
2:09 PM
Page 10
NX-RM820
The Power ON and OFF buttons now operates only the selected
device (to turn the entire system on/off, return to the MAIN Menu).
The ten screen-labeled buttons are now labeled with any commands
that do not fit one of the buttons with printed labels.
Up to 40 screen labeled buttons are available for each device.
To view the additional buttons, press the PAGE button to display
additional pages. The remote control can display up to four pages
of screen labeled buttons for each activity or device. As you scroll
through the pages, notice that the bottom title bar displays which
page you are viewing. (PAGE1, PAGE2, etc.)
7
NX-RM820_Remote_Manual
10/6/08
2:09 PM
Page 11
NX-RM820
The thumb pad easily operates onscreen menus with either the Left
or Right hand. When you are operating a device with any kind of
on-screen menu, guide or display, the thumb pad offers you easy
one-handed control with your thumb.
To SELECT or say OK, simply press your thumb straight down.
You’ll feel the click as the OK/SELECT/ENTER command is sent.
Using FAV - Favorites
The favorites menu is created uniquely for you by your custom
installer. The screen labeled buttons now issue timed sequences of
commands that will reset your system with one touch. Typically, the
favorites menu is programmed with one touch ‘shortcut’ buttons
that issue all of the necessary commands to change the channel of
your satellite dish or television. Thus, instead of entering a two or
three digit number (which you must remember) and the enter
command, you simply select the favorite button labeled
HBO, CNN, TNT etc.
The Favorite menu can be programmed with any favorite activity.
It is not limited to channel favorites. Your custom installer may
invent a feature unique to your system. Discuss any non-channel
favorite label with your installer, so that you understand
how to use it.
8
NX-RM820_Remote_Manual
10/6/08
2:09 PM
Page 12
NX-RM820
To use the FAVORITE Menu:
1. Press the FAV button. The top title bar will now display FAV.
Use the FAV button and the PAGE button to navigate through your
various pages of FAVORITES. The FAV button scrolls up from Page 1
to Page 5, using the PAGE button scrolls down from Page 5 to Page 1.
As you select a new page, the bottom title bar will display the page
number (page 1, page 2, etc.)
To EXIT Fav and return to the last activity/device selected, press the
MAIN button ONCE. To EXIT Fav and go to the MAIN Menu, press the
MAIN button twice.
9
NX-RM820_Remote_Manual
10/6/08
2:09 PM
Page 13
NX-RM820
Backlighting
Turn on the backlighting by pressing the
LIGHT button on the right side of the
remote control. The backlighting will stay
on briefly, then turn off automatically. If you
wish to turn it off without waiting, simply
tap the LIGHT button again.
* Note that your battery life is reduced by
frequent backlighting use.
Changing Contrast
Press and Hold BOTH the MAIN and the UP thumb pad button at
the same time to make the screen DARKER.
Press and Hold BOTH the MAIN and the DOWN thumb pad button
at the same time to make it LIGHTER.
10
NX-RM820_Remote_Manual
10/6/08
2:09 PM
Page 14
NX-RM820
Batteries
If the batteries are running low, the screen will display a warning
at the bottom of the screen whenever you press the Power ON
button. You may also experience a slight drop in the operating
distance of either the NX-RM820 remote control when the batteries
are running low.
Please replace all of the batteries with fresh, new AAA batteries.
Do not mix old and new batteries.
The NX-RM820 will retain all programming even if the batteries are
removed for an extended period.
Cleaning The Screen
Do not use abrasives or liquid cleaning solutions!
Use a dry soft lint-free cloth to clean the screen. Be careful not to
use excessive force. The screen is glass and is easily breakable.
11
NX-RM820_Remote_Manual
10/6/08
2:09 PM
Page 15
NX-RM820
Warranty
The NX-RM820 is covered against any manufacturer’s defects or
workmanship defects for a period of one year from the date of
purchase if purchased from an authorized Home Theater Master
dealer. Units purchased from online auction sites or other
unauthorized resellers are not warranteed. This warranty does not
cover the following:
- Batteries, or damage to the remote from faulty batteries.
- Damage from misuse, neglect, or acts of nature.
- Products that have been modified or incorporated
into other products.
- Products purchased more than 12 months ago.
- Units purchased from unauthorized dealers or companies.
Specifications
Range: 50 to 100 feet, depending upon the structure of your
house and the amount of interference present
Weight: 8 oz. (with batteries)
Size: 9.0" x 3.0" x 1.3"
Batteries: Four AAA Alkaline batteries included
LCD Size: 1.4" x 2.1"
RF Frequency: 418MHz
NXG Technology
16648 North 94th Street, Scottsdale, AZ 85260
Phone: 800-733-0008 | www.nxgtech.com
12
NX-RM820_Remote_Manual
10/6/08
2:09 PM
Page 16
NX-RM820
16
NX-RM820_Remote_Manual
10/6/08
2:09 PM
Page 17
NX-RM820
17
NX-RM820_Remote_Manual
10/6/08
2:09 PM
Page 18
NX-RM820
Operating Manual
PC Programmable
Professional
Home Entertainment
and System Control
NXG Technology
16648 North 94th Street, Scottsdale, AZ 85260
Phone: 800-733-0008 | www.nxgtech.com